连接器
最后更新时间:2021-07-09 11:08:46
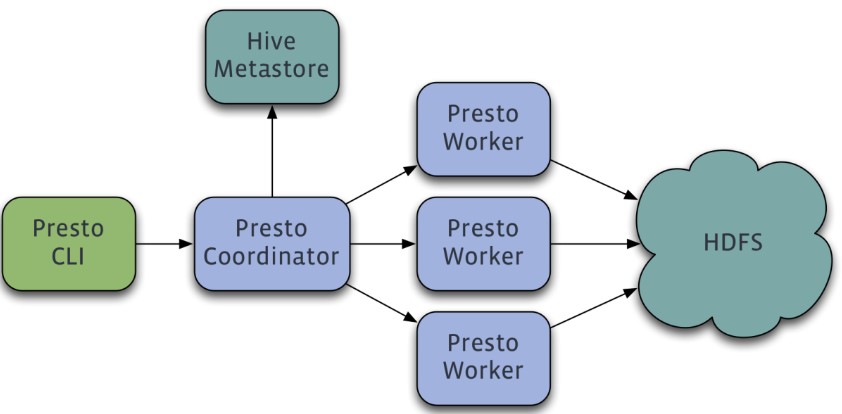
Presto 是由Facebook 开发的一个分布式 SQL 查询引擎,被设计为用来专门进行高速、实时的数据分析,适用于交互式分析查询,数据量支持 GB 到 PB 字节。支持标准的 ANSI SQL,包括复杂查询、聚合(aggregation)、连接(join)和窗口函数(window functions)。采用 Java 实现。Presto 的数据源包括 Hive、HBase、关系数据库,甚至专有数据存储。其架构图如下所示:


Presto 是一个运行在多台服务器上的分布式系统,采用了主从(Master-Slave)架构,包括一个主节点 Coordinator 和多个从节点 Worker。客户端 Presto CLI 负责提交查询到 Coordinator 节点;Coordinator 节点负责解析 SQL 语句、生成查询执行计划、管理 Worker 节点等;Worker 节点负责实际执行查询任务。
EMR 中 Presto 组件预置了 Hive、Mysql 和 Kafka 等连接器,本节将以 Hive 连接器为例说明 Presto 读取 Hive 的表信息进行查询的使用,EMR 集群机器配置了 presto-client 的相关环境变量,可直接切换 Hadoop 用户并使用 Presto 客户端工具。
1. 开发准备
确认您已开通腾讯云,并且创建了一个 EMR 集群。在创建 EMR 集群的时候需要在软件配置界面选择 Presto 组件。
Presto 等相关软件安装在路径 EMR 云服务器的
/usr/local/service/路径下。2. 使用连接器操作 Hive
首先需要登录 EMR 集群中的任意机器,最好是登录到 Master 节点。登录 EMR 的方式请参考 登录 Linux 实例。这里我们可以选择使用 WebShell 登录。单击对应云服务器右侧的登录,进入登录界面,用户名默认为 root,密码为创建 EMR 时用户自己输入的密码。输入正确后,即可进入命令行界面。
在 EMR 命令行先使用以下指令切换到 Hadoop 用户,并进入 Presto 文件夹:
[root@172 ~]# su hadoop[hadoop@172 ~]# cd /usr/local/service/presto
在
etc/config.properties配置文件中查看 uri 的值:[hadoop@172 presto]$ vim etc/config.propertieshttp-server.http.port=$portdiscovery.uri=http://$host:$port
其中 $host 为您的 host 地址;$port 为您的端口号。然后切换到 presto-client 文件夹中,并且使用 Presto 连接 Hive:
[hadoop@172 presto]# cd /usr/local/service/presto-client[hadoop@172 presto-client]$ ./presto --server $host:$port --catalog hive --schema default
其中 --catalog 参数表示要操纵的数据库类型,--schema 表示数据库名,这里进入的是默认的 default 数据库。更多的参数信息,可以通过命令
presto –h来查看,或者查看 官方文档。执行成功后即可进入 Presto 的界面,并且直接进入指定的数据库。可以使用 Hive-SQL 来查看 Hive 数据库中的表
presto:default> show tables;Table---------------hive_from_costest(2 rows)Query 20180702_140619_00006_c4qzg, FINISHED, 2 nodesSplits: 2 total, 2 done (100.00%)0:00 [3 rows, 86B] [17 rows/s, 508B/s]
文档反馈

