You can connect to a TDSQL for MySQL instance in the following ways:
Private network connection: A CVM instance can be used to connect to the private network address of a TDSQL for MySQL instance. This method utilizes the high-speed private network of Tencent Cloud and features low delay.
The CVM and TencentDB instances must be under the same account and in the same VPC in the same region, or both in the classic network.
The private network address is provided by TencentDB by default and can be viewed in the instance list or on the instance details page in the TDSQL for MySQL console.
Note:
CVM and TencentDB instances in different VPCs (under the same or different accounts in the same or different regions) can be interconnected over the private network through Cloud Connect Network.
Public network connection: If you fail to access the private network, you can connect to your TDSQL for MySQL instance at its public network address. The public network address needs to be manually enabled. It can be viewed on the instance details page in the TDSQL for MySQL console and can be disabled if no longer needed.
Enabling the public network address will expose your database services to the public network, which may lead to database intrusions or attacks. We recommend that you use the private network to connect to the database.
Public network connection to TencentDB is suitable for development or auxiliary management of databases but not for business access in the production environment, as potentially uncontrollable factors may lead to unavailability of the public network connection, such as DDoS attacks and bursts of high-traffic access.
Currently, public network access can be enabled in Guangzhou, Shanghai, Beijing, Chengdu and Nanjing.
To enable public network access, associate the instance with a security group. For more information, see Security Group Configuration.
Preparations
Creating an account
1. Log in to the TDSQL for MySQL console. In the instance list, click an instance ID or Manage in the Operation column to enter the instance management page.
2. On the instance management page, select Account Management and click Create Account.
3. In the pop-up dialog box, enter the account name, host, and password. After confirming that everything is correct, click Next.
The host name is actually the network egress address. If needed, you can enter % to indicate that this instance is accessible to every IP.
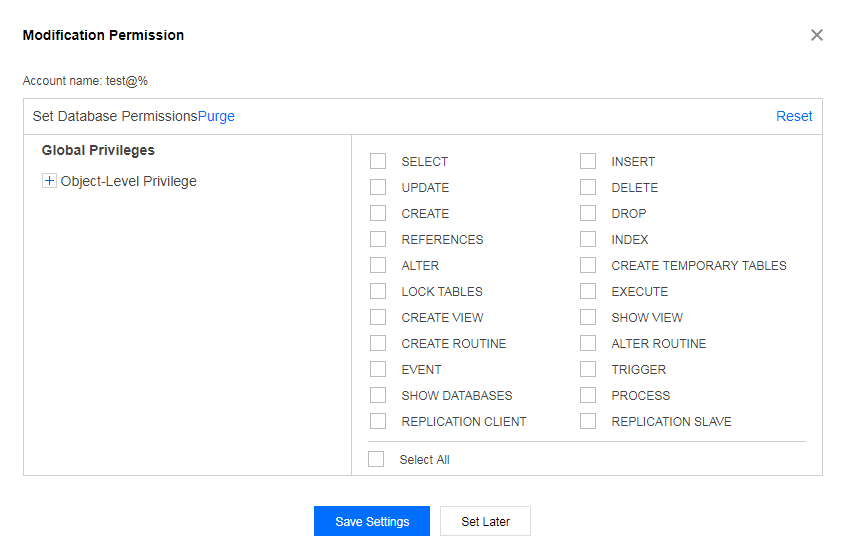
4. In the Modify Permissions pop-up window, grant permissions as needed and click Modify. To discard the changes, click Cancel Modification.
The navigation bar on the left provides a graphical interface fully compatible with MySQL management. Permissions can be managed at the column level.
5. Return to the account list, click Modify Permissions to modify user permission, click Clone Account to completely copy the current account permissions to create a new account. Click More to reset the password and delete the account.
Enabling the public network address (optional)
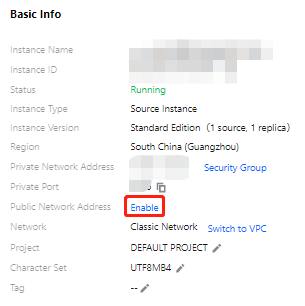
1. Log in to the TDSQL for MySQL console, click an instance ID in the instance list to enter the instance details page, and click Enable next to Public IP in the Basic Info section.
2. After this, the public network address and port number can be obtained. TDSQL for MySQL provides a unique IP and port for access and use.
After creating an account and obtaining the public/private network address, you can connect to TDSQL for MySQL through third-party tools and program drivers.
On Windows, connection methods of command line, client, and JDBC driver are taken as examples.
On Linux, connection method of command line is taken as an example.
Connecting from a Windows Device
Connecting with Windows command lines
1. Open the Windows command line tool, and enter the following commands under the correct path of mysql.
mysql -h public/private IP -P port number -u username -p
Enter password: **********
2. If the following information is displayed, the database is connected successfully, and you can operate it.
Welcome to the MySQL monitor. Commands end with ; or \\g.
Connecting with the Windows client
1. Download a standard SQL client such as MySQL Workbench and SQLyog. Here we take SQLyog as an example.
2. Open SQLyog, select File > New Connection, enter the host address, port, username, and password, and click Connect.
MySQL host address: Enter the public/private IP of the instance obtained earlier.
Username: Enter the account name created earlier.
Password: Enter the password of the account. If you forgot the password, reset it in the console.
Port: Enter the port number of the instance obtained earlier.
3. If the connection is successful, you will be prompted and can use the database from the page that appears.
Connecting with the Windows JDBC driver
TDSQL for MySQL supports connecting with program drivers. This document uses Java JDBC Driver for MySQL (Connector/J) as an example.
1. Download a JDBC jar package from the MySQL official website, and import it to the library referenced in Java.
2. Run the following code to call JDBC:
public static final String url ="public/private network address";
public static final String name ="com.mysql.jdbc.Driver"; // Call JDBC
3. After the connection is successful, you can perform other operations on the database.
Connecting from a Linux Device
Connecting with Linux command lines
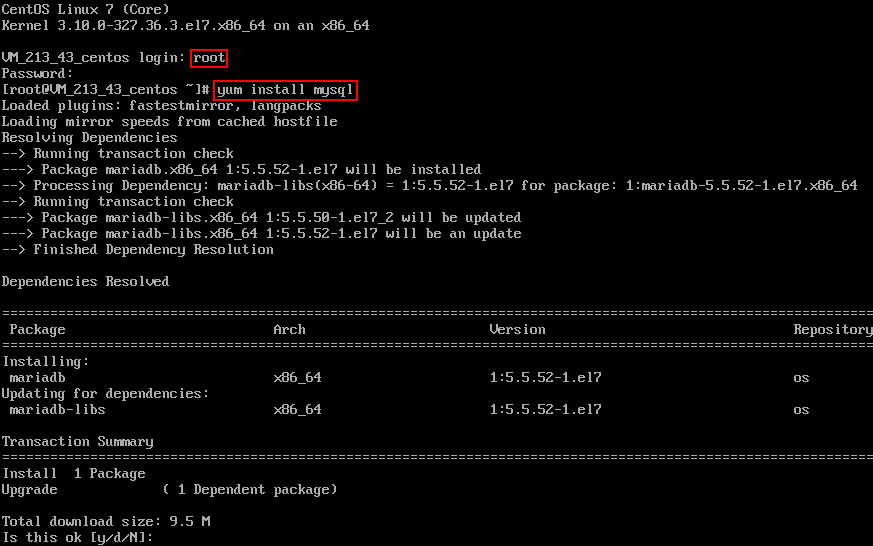
This document takes CentOS 7.2 64-bit on a CVM instance as an example. For more information on CVM instance purchase, see Purchasing Channels.
1. Log in to the Linux CVM, enter yum install mysql, and download and install the MySQL client from Tencent Cloud image source with CentOS's package management software Yum.
2. When complete is displayed on the command line, the MySQL client is successfully installed.
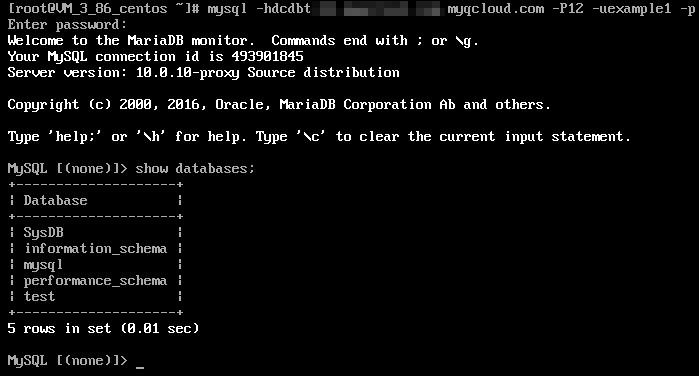
3. Enter mysql -h public/private IP -P port -u username -p to connect to TDSQL for MySQL. Then, you can perform sharding.
Below uses show databases; as an example: