- News and Announcements
- Release Notes
- Announcements
- Announcement: Chat Push Service Adaptation for Honor Push Standards
- Announcement: Renaming of Chat Premium to Pro Edition
- Announcement on New Billing for Delivered Messages in the IM Community Feature
- Announcement on Chat's Adaptation to MiPush's Discontinuation of Custom Notification Message
- Termination of Earlier Server Key Method for Chat FCM Push
- TRTC Call Official Editions Launched
- Tencent Cloud IM renamed
- Adjustment of Subscription Plans for Chat
- Product Introduction
- Purchase Guide
- Development Guidelines
- Demo Zone
- Download
- Chat Interaction (UI Included)
- TUIKit Library
- Getting Started
- Integrating TUIKit
- Only integrate chat
- Build Basic Interfaces
- Modifying UI Themes
- Setting UI Styles
- Implementing Local Search
- Integrating Offline Push
- User Online Status
- Typing Status
- Message Read Receipt
- Message Reactions
- Message Quotation
- Internationalization
- Adding Custom Messages
- Emoji & Stickers
- Custom UI components
- Video Call (UI Included)
- Overview (TUICallKit)
- Activate Service(TUICallKit)
- Integration(TUICallKit)
- UI Customization (TUICallKit)
- Additional Features(TUICallKit)
- API Documentation(TUICallKit)
- Release Notes (TUICallKit)
- Push Service
- Desk
- More Practices
- No UI Integration
- Quick Start
- SDK Integration
- Initialization
- Login and Logout
- Message
- Message Overview
- Sending Message
- Receiving Message
- Historical Message
- Forwarding Message
- Modifying Message
- Message Inserting
- Deleting Message
- Clearing Messages
- Recalling Message
- Online Message
- Read Receipt
- Querying Message
- Group @ Message
- Targeted Group Message
- Notification Muting
- Message Extension
- Message Reaction
- Message Translation
- Voice-to-Text
- Message Pinning
- Conversation
- Group
- Community Topic
- User Profile and Relationship Chain
- Offline Push
- Cloud Search
- Local Search
- Signaling
- Client APIs
- Server APIs
- Generating UserSig
- RESTful APIs
- RESTful API Overview
- RESTful API List
- Message Related
- Session Related
- Group Related
- Group Management
- Group Information
- Group Member Management
- Group Member Information
- Group Custom Attributes
- Live Group Management
- Setting Live Streaming Group Robots
- Deleting Live Streaming Group Robots
- Setting/Deleting Live Streaming Group Administrators
- Obtaining the List of Live Streaming Group Administrators
- Checking Whether Users Are in a Live Streaming Group
- Getting the Number of Online Users in an Audio-Video Group
- Getting the List of Online Members in Audio-Video Group
- Setting Audio-Video Group Member Marks
- Getting the List of Banned Group Members
- Community Management
- Creating Topic
- Deleting Topic
- Getting Topic Profile
- Modifying Topic Profile
- Importing Topic Profiles
- Permission Group Management
- Creating Permission Groups
- Terminating Permission Groups
- Modifying Permission Group Information
- Obtaining Permission Group Information
- Adding Topic Permissions
- Modifying Topic Permissions
- Deleting Topic Permissions
- Obtaining Topic Permissions
- Adding Members to a Permission Group
- Deleting Permission Group Members
- Obtaining Permission Group Member List
- Getting the List of Online Members in Community Group
- Group Counter
- User Management
- Global Mute Management
- Operations Management
- Chatbots
- Official Account Management
- All/Tagged Push
- Webhooks
- Webhook Overview
- Webhook Command List
- Operations Management Callbacks
- Online Status Webhooks
- Relationship Chain Webhooks
- One-to-One Message Webhooks
- Group Webhooks
- Group Creation Daily Net Increase Threshold Alarm Callback
- Before a Group Is Created
- After a Group Is Created
- Before Applying to Join a Group
- Before Inviting a User to a Group
- After a User Joins a Group
- After a User Leaves a Group
- Before Group Message Is Sent
- After a Group Message Is Sent
- After a Group Is Full
- After a Group Is Disbanded
- After Group Profile Is Modified
- Callback After Recalling Group Messages
- Webhook for Online and Offline Status of Audio-Video Group Members
- Webhook for Exceptions When Group Messages Are Sent
- Before a Topic Is Created
- After a Topic Is Created
- After a Topic Is Deleted
- Topic Profile Change Webhook
- Callback After Group Member Profile Changed
- Callback After Group Attribute Changed
- Callback After Read Receipt
- Callback After the Group Owner Changed
- Webhooks related to the Official Account
- Before a Official Account Is Created
- After a Official Account Is Created
- After Official Account Profile Is Modified
- After Official Account Is Destroyed
- Before Official Account Is Subscribed
- After Official Account Is Subscribed
- After a Official Account Is Full
- After Official Account Is Unsubscribed
- Before Official Account Message Is Sent
- Callback After Sending an Official Account Message
- Webhook After Recalling Official Account Messages
- Console Guide
- New Console Introduction
- Creating and Upgrading an Application
- Basic Configuration
- Feature Configuration
- Account Management
- Group Management
- Webhook Configuration
- Statistics
- Auxiliary Development Tools
- Access Management
- Advanced Features
- FAQs
- Security Compliance Certification
- Chat Policies
- Migration
- Error Codes
- Contact Us
This document describes how to integrate the SDK for Flutter.
Try Out the Demo
Before getting started, you can try out the Flutter Chat Demo with the embedded UIKit here.
Mobile App Android & iOS | Web The QR Code & 'Visit' button direct to the same page | Windows | macOS | |
 |  | | Windows 10+ | |
Environment Requirements
Environment | Version |
Flutter | Flutter 3.0.0 or later for the Chat SDK; Flutter 3.24.0 or later for the TUIKit component library. |
Android | Android Studio Dolphin | 2021.3.1 or later; and devices with Android 7.0 or later for apps. |
iOS | Xcode 12.0 or later. Ensure that your project has a valid developer signature. |
Supported Platforms
We offer a set of Chat SDK and UIKit for all Flutter platforms, allowing you to run one set of code on all platforms.
Platform | UIKit | |
iOS | Supported | Supported |
Android | Supported | Supported |
Web | Supported from v4.1.1+2 | Supported |
macOS | Supported from v4.1.9 | Supported |
Windows | Supported from v4.1.9 | Supported |
Directions
1. Create an App
1. Log in to the Chat Console. If you already have an app, record its SDKAppID and SDKSecretKey.
Note:
1. A Chat account can create a maximum of 300 Chat apps. If you want to create a new app, you can disable and delete an unwanted app first.
2. Once an app (along with its SDKAppID) is deleted, the service it provides and all its data are lost. Please operate with caution.
2. Click 
Create Application, enter your Application name, product, Region, and click Create.
2. Obtain SDKAppID, SDKSecretKey and Login User
After creation, you can view the newly created app's Status, SDKAppID, Expiration time, etc., on the Applications page:
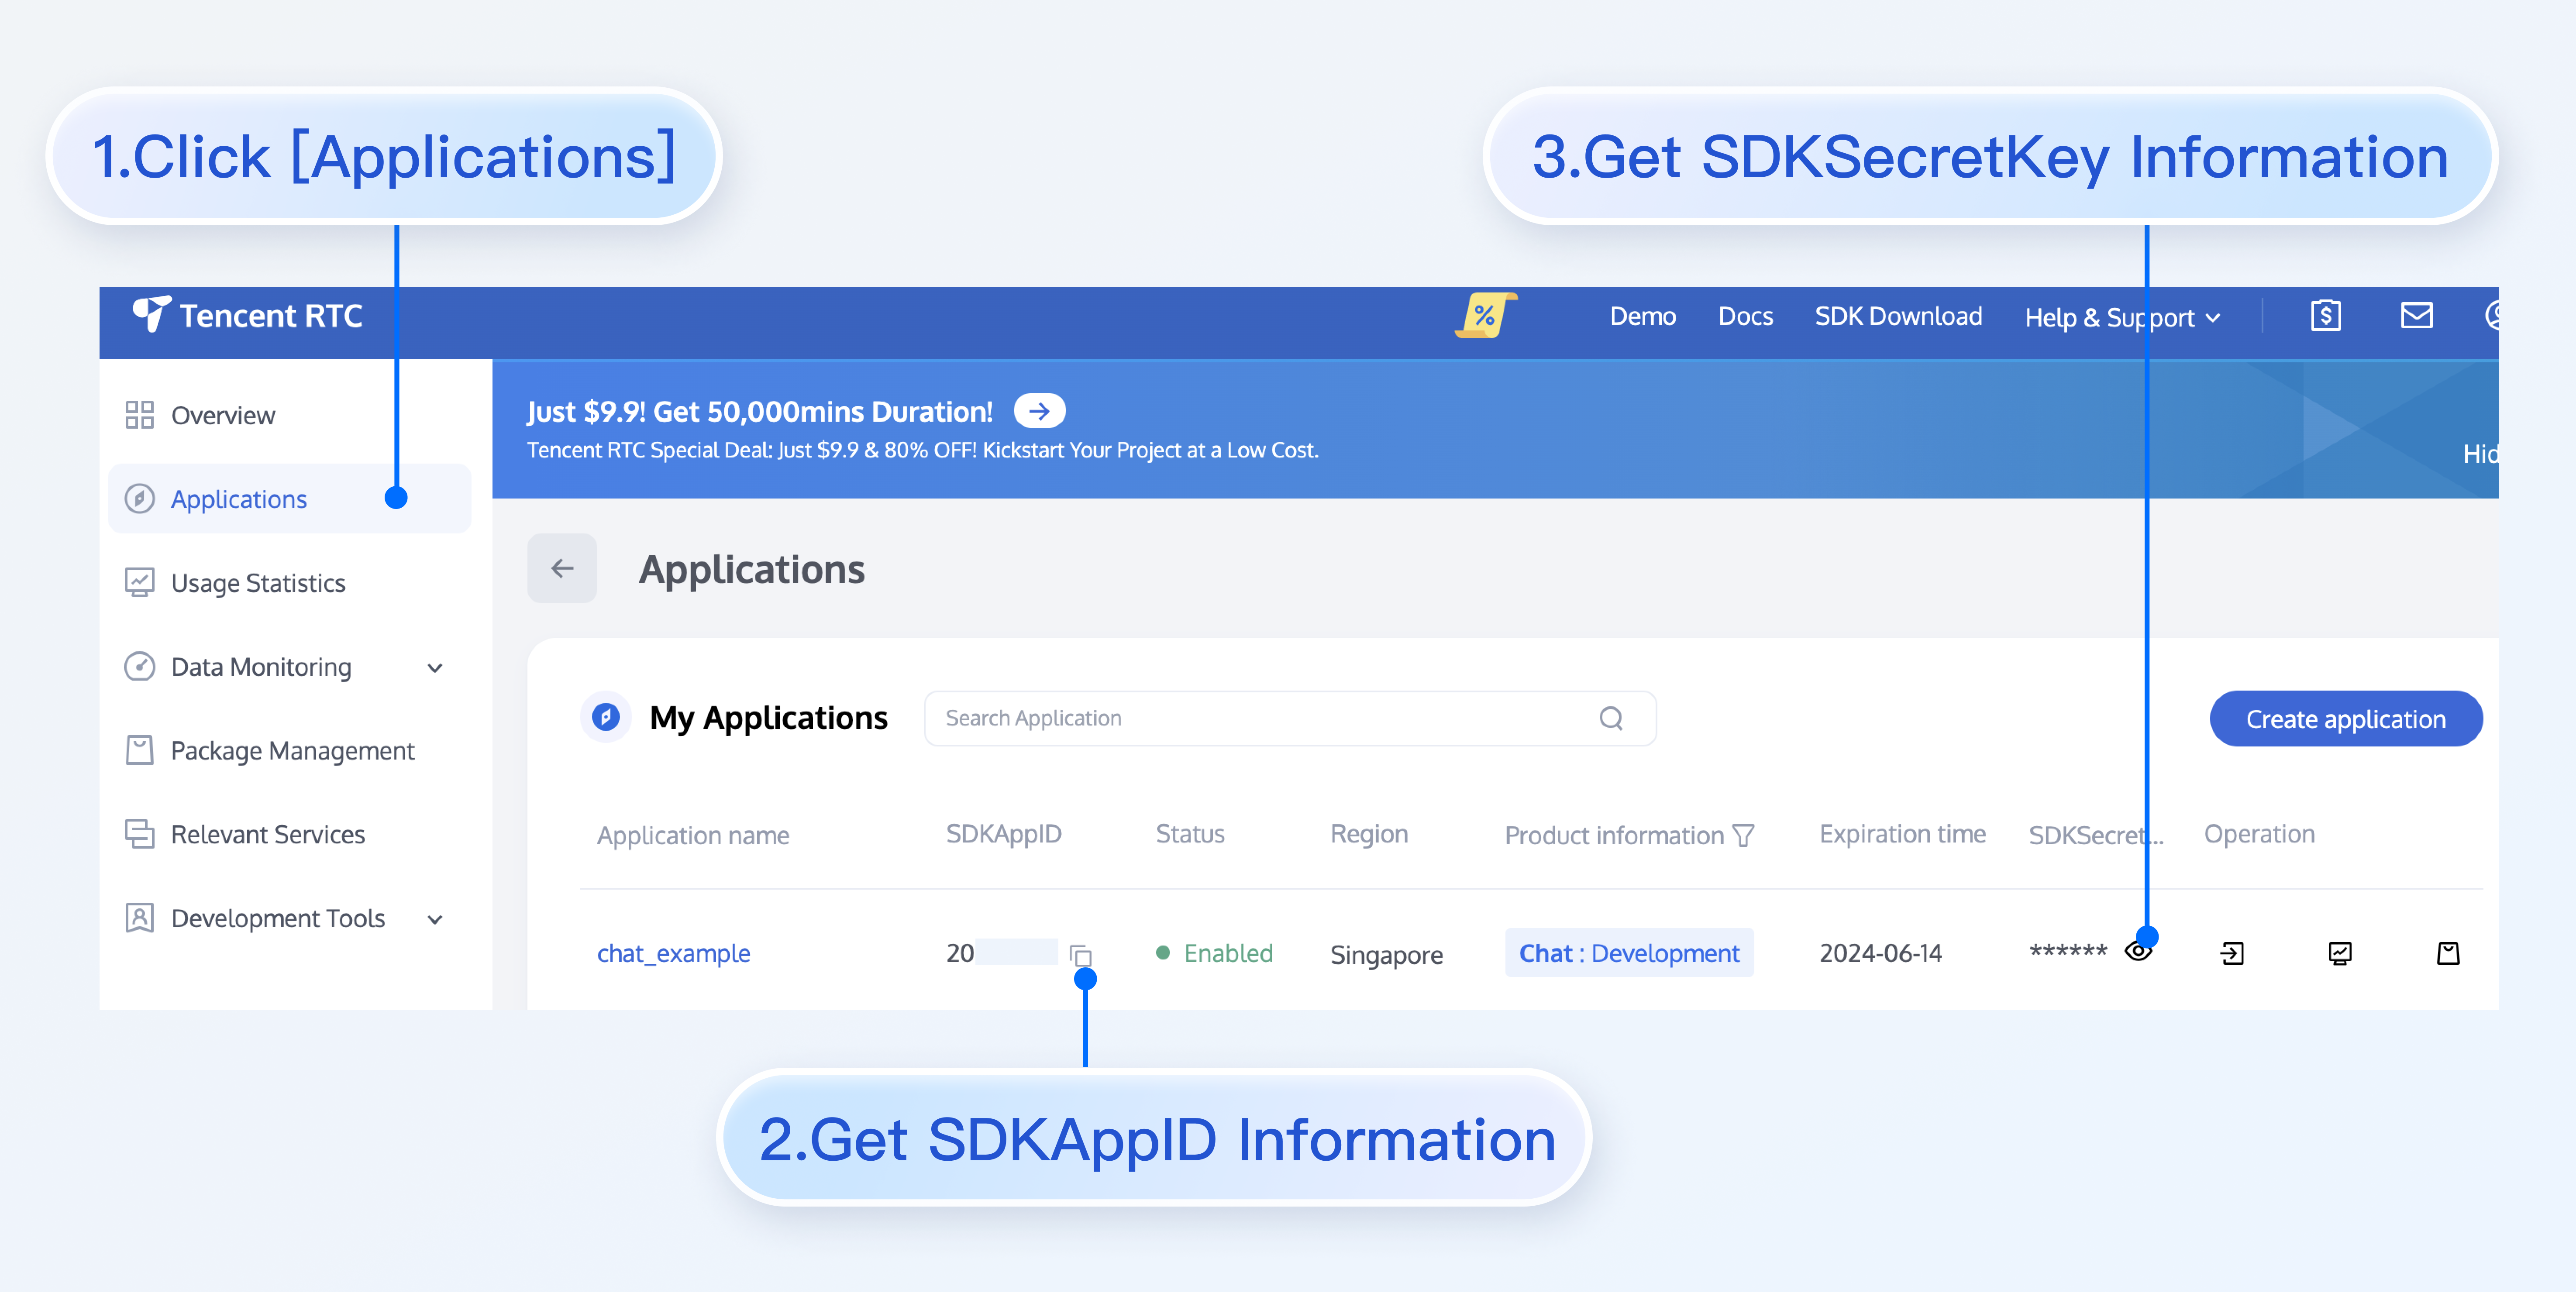
Record the SDKAppID and SDKSecretKey from the Application Information.
Danger:
Keep the SDKSecretKey properly to prevent disclosure.
3. Download and Configure the Demo
1. Download the source code and install dependencies:
# Clone the codegit clone https://github.com/TencentCloud/chat-demo-flutter.git# Checkout the 'v2' branchgit checkout v2# Clean the project. Importantflutter clean# Install dependenciesflutter pub get
2. Configure the user info for login.
Open
lib/config.dart, and specify the sdkappid and key obtained in the previous step.sdkAppID:set it to the SDKAppID obtained above.
key:set it to the SDKSecretKey obtained above.
Warning:
In this document, the method to obtain UserSig is to configure a SECRETKEY in the client code. In this method, the SECRETKEY is vulnerable to decompilation and reverse engineering. Once your SECRETKEY is disclosed, attackers can steal your Tencent Cloud traffic. Therefore, this method is only suitable for locally running a demo project and feature debugging.
The correct
UserSig distribution method is to integrate the calculation code of UserSig into your server and provide an app-oriented API. When UserSig is needed, your app can send a request to the business server to obtain a dynamic UserSig. For more information, see How to Generate UserSig on the Server.4. Compile and Run the Demo
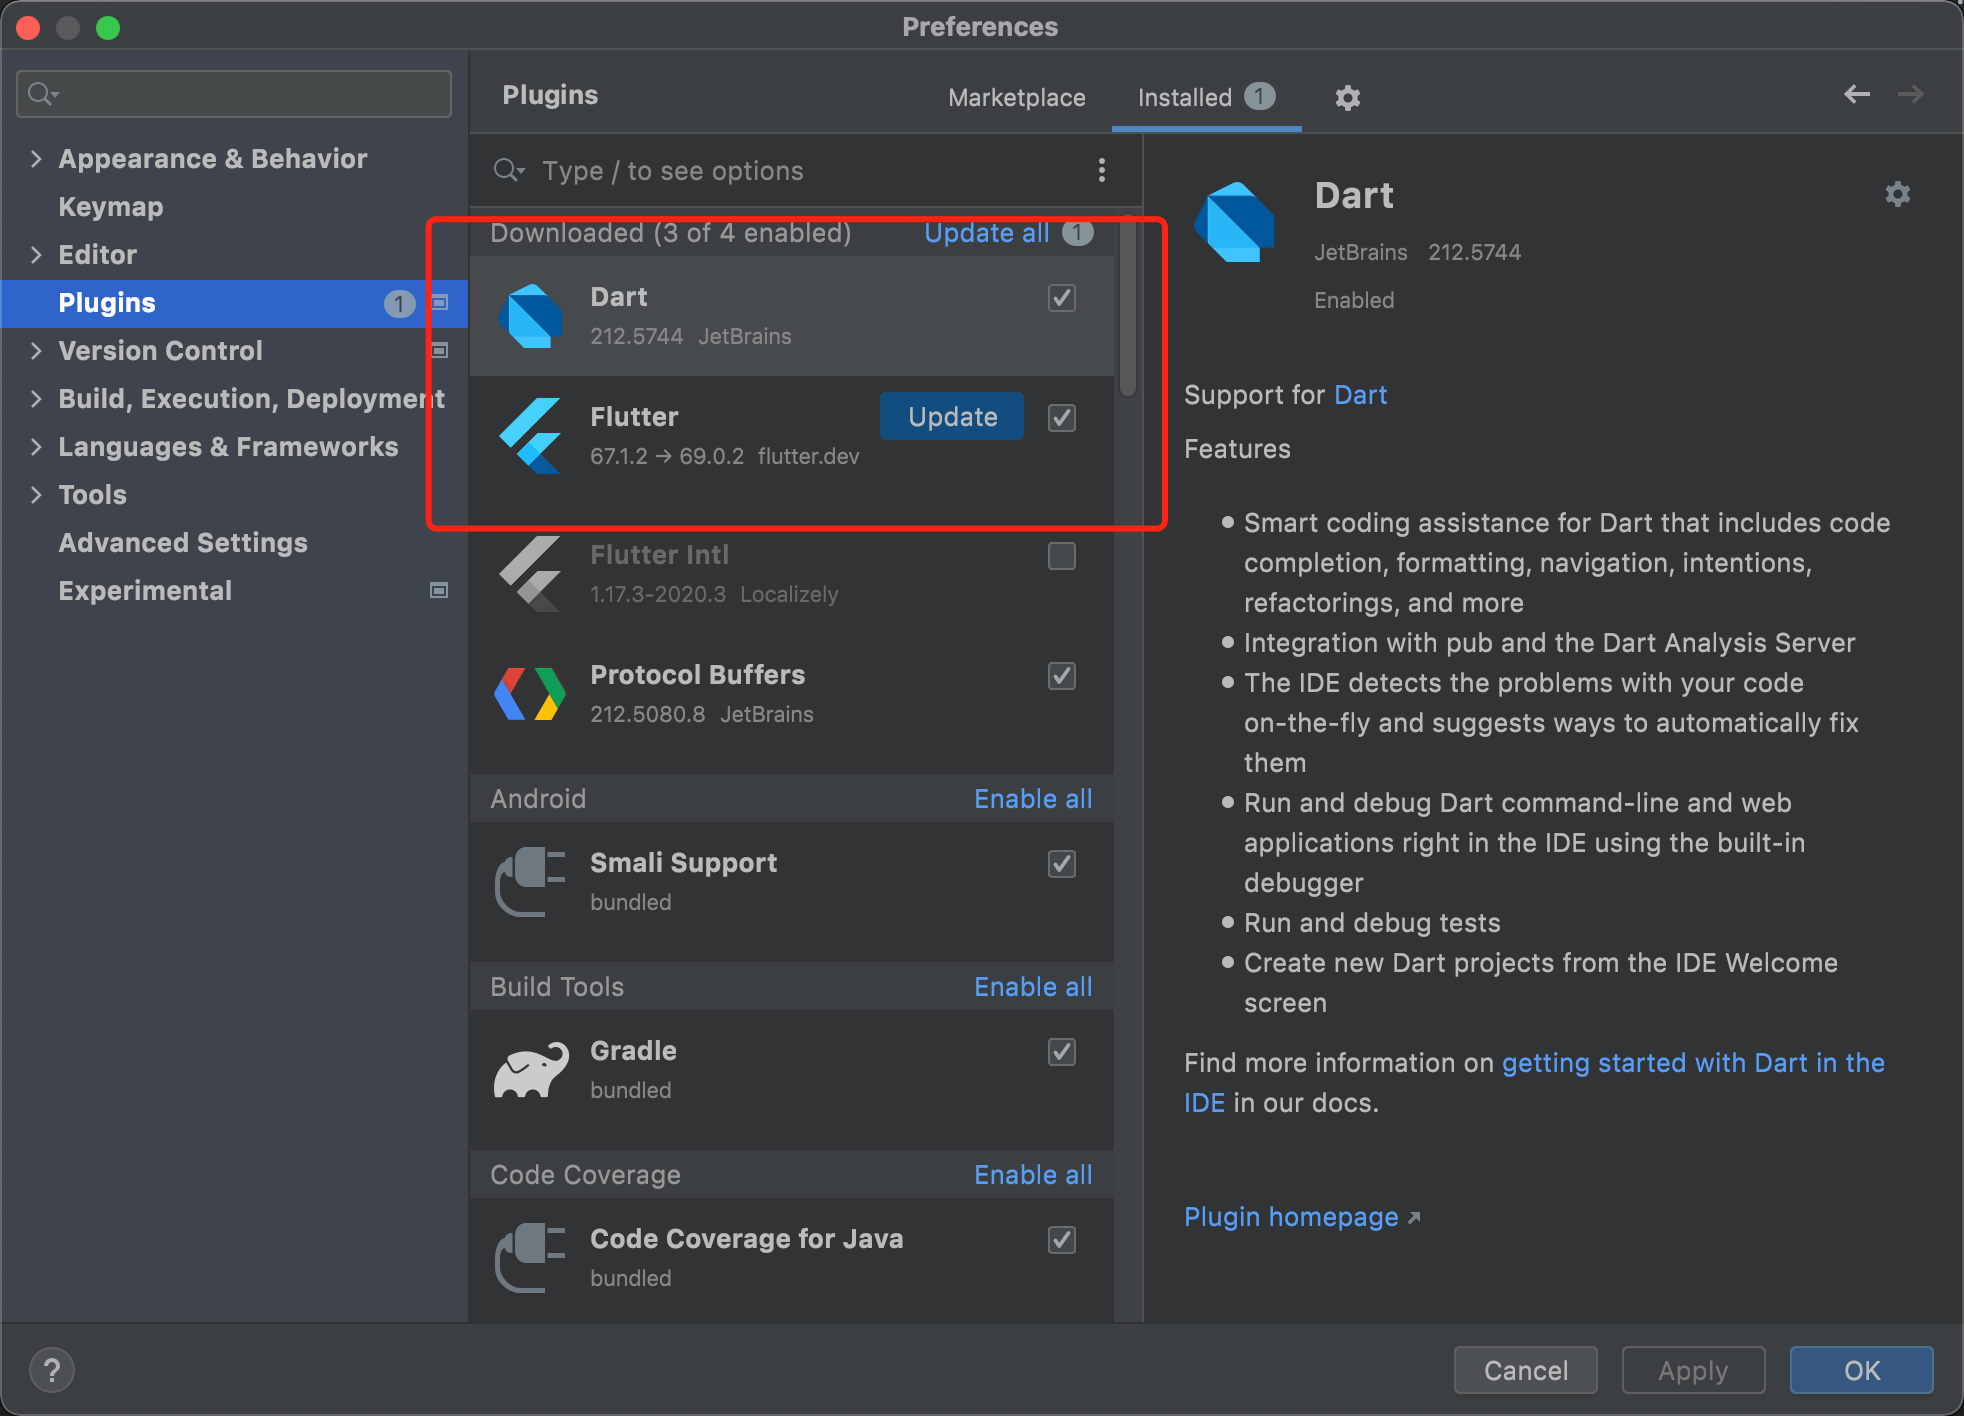
Import the demo project with Android Studio, and install the Flutter and Dart plugins.
Execute the following command in the project root directory to install dependencies, then compile and run.
flutter pub get
Platform Configuration
Web
To enable support for web, you need to perform the following extra steps in addition to those for enabling support for Android and iOS:
Upgrading to Flutter 3.x
Flutter 3.x has been dramatically optimized for web performance and is highly recommended for Flutter web project development.
Importing JS
Note:
If your existing Flutter project does not support web, run
flutter create . in the root directory of the project to add web support.Go to the
web/ directory of your project and run npm or yarn to install relevant JS dependencies. Initialize the project as instructed.cd webnpm initnpm i @tencentcloud/chatnpm i tim-upload-plugin
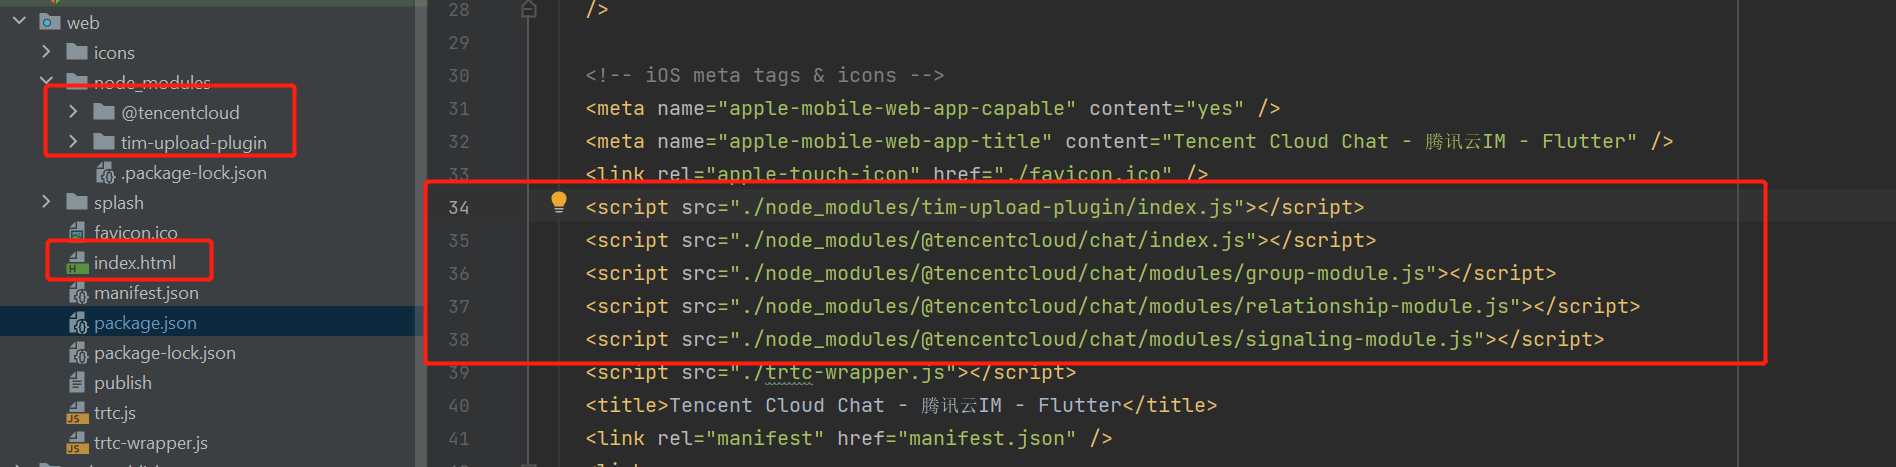
Open
web/index.html and import the JS files in <head> </head>. See below:<script src="./node_modules/tim-upload-plugin/index.js"></script><script src="./node_modules/@tencentcloud/chat/index.js"></script> <script src="./node_modules/@tencentcloud/chat/modules/group-module.js"></script> <script src="./node_modules/@tencentcloud/chat/modules/relationship-module.js"></script> <script src="./node_modules/@tencentcloud/chat/modules/signaling-module.js"></script>
macOS
Additional configurations are required for the macOS platform. Follow the steps below to configure the macOS platform:
1. Open the
macos/Runner/DebugProfile.entitlements and macos/Runner/Release.entitlements files in your project.2. Add the following lines to each file:
<key>com.apple.security.network.client</key><true/>
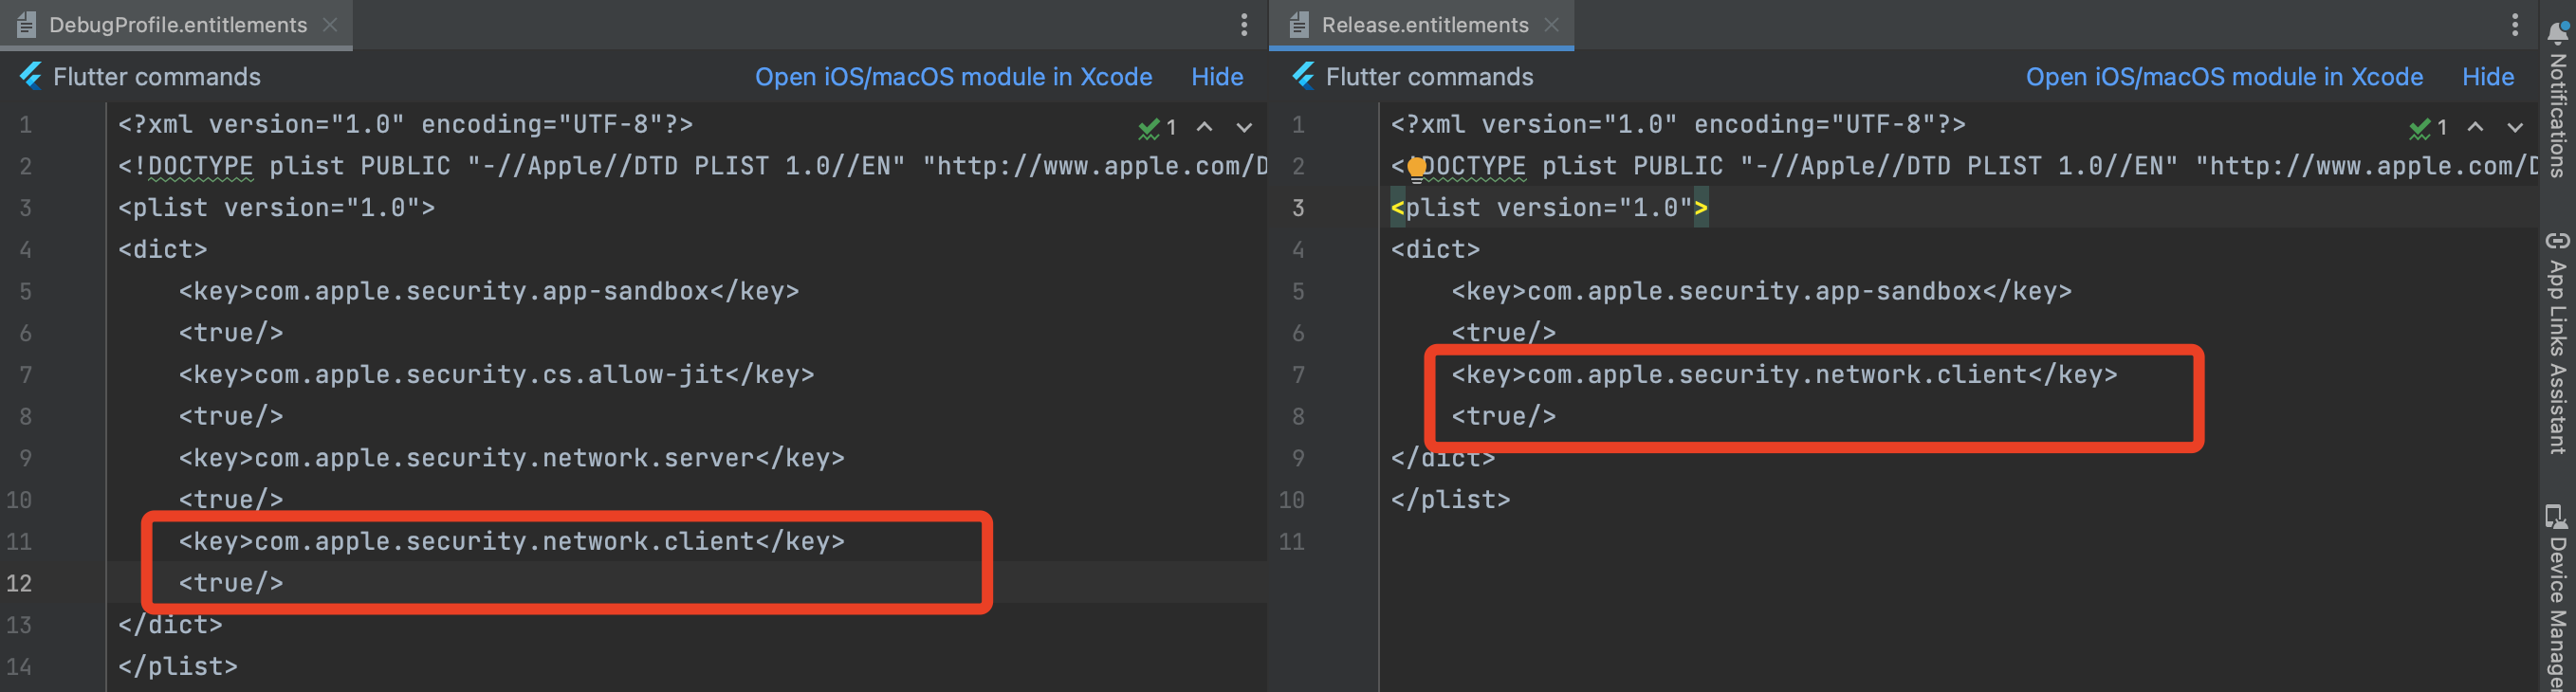
These lines grant your app the necessary permissions to access the network as a client.
This configuration is essential for ensuring proper communication between your app and the backend services on the macOS platform.

 Yes
Yes
 No
No
Was this page helpful?