- News and Announcements
- Release Notes
- Announcements
- Announcement: Chat Push Service Adaptation for Honor Push Standards
- Announcement: Renaming of Chat Premium to Pro Edition
- Announcement on New Billing for Delivered Messages in the IM Community Feature
- Announcement on Chat's Adaptation to MiPush's Discontinuation of Custom Notification Message
- Termination of Earlier Server Key Method for Chat FCM Push
- TRTC Call Official Editions Launched
- Tencent Cloud IM renamed
- Adjustment of Subscription Plans for Chat
- Product Introduction
- Purchase Guide
- Development Guidelines
- Demo Zone
- Download
- Chat Interaction (UI Included)
- TUIKit Library
- Getting Started
- Integrating TUIKit
- Only integrate chat
- Build Basic Interfaces
- Modifying UI Themes
- Setting UI Styles
- Implementing Local Search
- Integrating Offline Push
- User Online Status
- Typing Status
- Message Read Receipt
- Message Reactions
- Message Quotation
- Internationalization
- Adding Custom Messages
- Emoji & Stickers
- Custom UI components
- Video Call (UI Included)
- Overview (TUICallKit)
- Activate Service(TUICallKit)
- Integration(TUICallKit)
- UI Customization (TUICallKit)
- Additional Features(TUICallKit)
- API Documentation(TUICallKit)
- Release Notes (TUICallKit)
- Push Service
- Desk
- More Practices
- No UI Integration
- Quick Start
- SDK Integration
- Initialization
- Login and Logout
- Message
- Message Overview
- Sending Message
- Receiving Message
- Historical Message
- Forwarding Message
- Modifying Message
- Message Inserting
- Deleting Message
- Clearing Messages
- Recalling Message
- Online Message
- Read Receipt
- Querying Message
- Group @ Message
- Targeted Group Message
- Notification Muting
- Message Extension
- Message Reaction
- Message Translation
- Voice-to-Text
- Message Pinning
- Conversation
- Group
- Community Topic
- User Profile and Relationship Chain
- Offline Push
- Cloud Search
- Local Search
- Signaling
- Client APIs
- Server APIs
- Generating UserSig
- RESTful APIs
- RESTful API Overview
- RESTful API List
- Message Related
- Session Related
- Group Related
- Group Management
- Group Information
- Group Member Management
- Group Member Information
- Group Custom Attributes
- Live Group Management
- Setting Live Streaming Group Robots
- Deleting Live Streaming Group Robots
- Setting/Deleting Live Streaming Group Administrators
- Obtaining the List of Live Streaming Group Administrators
- Checking Whether Users Are in a Live Streaming Group
- Getting the Number of Online Users in an Audio-Video Group
- Getting the List of Online Members in Audio-Video Group
- Setting Audio-Video Group Member Marks
- Getting the List of Banned Group Members
- Community Management
- Creating Topic
- Deleting Topic
- Getting Topic Profile
- Modifying Topic Profile
- Importing Topic Profiles
- Permission Group Management
- Creating Permission Groups
- Terminating Permission Groups
- Modifying Permission Group Information
- Obtaining Permission Group Information
- Adding Topic Permissions
- Modifying Topic Permissions
- Deleting Topic Permissions
- Obtaining Topic Permissions
- Adding Members to a Permission Group
- Deleting Permission Group Members
- Obtaining Permission Group Member List
- Getting the List of Online Members in Community Group
- Group Counter
- User Management
- Global Mute Management
- Operations Management
- Chatbots
- Official Account Management
- All/Tagged Push
- Webhooks
- Webhook Overview
- Webhook Command List
- Operations Management Callbacks
- Online Status Webhooks
- Relationship Chain Webhooks
- One-to-One Message Webhooks
- Group Webhooks
- Group Creation Daily Net Increase Threshold Alarm Callback
- Before a Group Is Created
- After a Group Is Created
- Before Applying to Join a Group
- Before Inviting a User to a Group
- After a User Joins a Group
- After a User Leaves a Group
- Before Group Message Is Sent
- After a Group Message Is Sent
- After a Group Is Full
- After a Group Is Disbanded
- After Group Profile Is Modified
- Callback After Recalling Group Messages
- Webhook for Online and Offline Status of Audio-Video Group Members
- Webhook for Exceptions When Group Messages Are Sent
- Before a Topic Is Created
- After a Topic Is Created
- After a Topic Is Deleted
- Topic Profile Change Webhook
- Callback After Group Member Profile Changed
- Callback After Group Attribute Changed
- Callback After Read Receipt
- Callback After the Group Owner Changed
- Webhooks related to the Official Account
- Before a Official Account Is Created
- After a Official Account Is Created
- After Official Account Profile Is Modified
- After Official Account Is Destroyed
- Before Official Account Is Subscribed
- After Official Account Is Subscribed
- After a Official Account Is Full
- After Official Account Is Unsubscribed
- Before Official Account Message Is Sent
- Callback After Sending an Official Account Message
- Webhook After Recalling Official Account Messages
- Console Guide
- New Console Introduction
- Creating and Upgrading an Application
- Basic Configuration
- Feature Configuration
- Account Management
- Group Management
- Webhook Configuration
- Statistics
- Auxiliary Development Tools
- Access Management
- Advanced Features
- FAQs
- Security Compliance Certification
- Chat Policies
- Migration
- Error Codes
- Contact Us
Introduction to chat-uikit-react-native
chat-uikit-react-native is a React Native UI component library based on Tencent Cloud Chat SDK, providing common UI components such as session, chat, and group features. With these well-designed UI components, you can quickly build elegant, reliable, and scalable chat applications. The UI style developed based on React Native is more in line with the habits of overseas users and supports internationalization. You are welcome to integrate it.
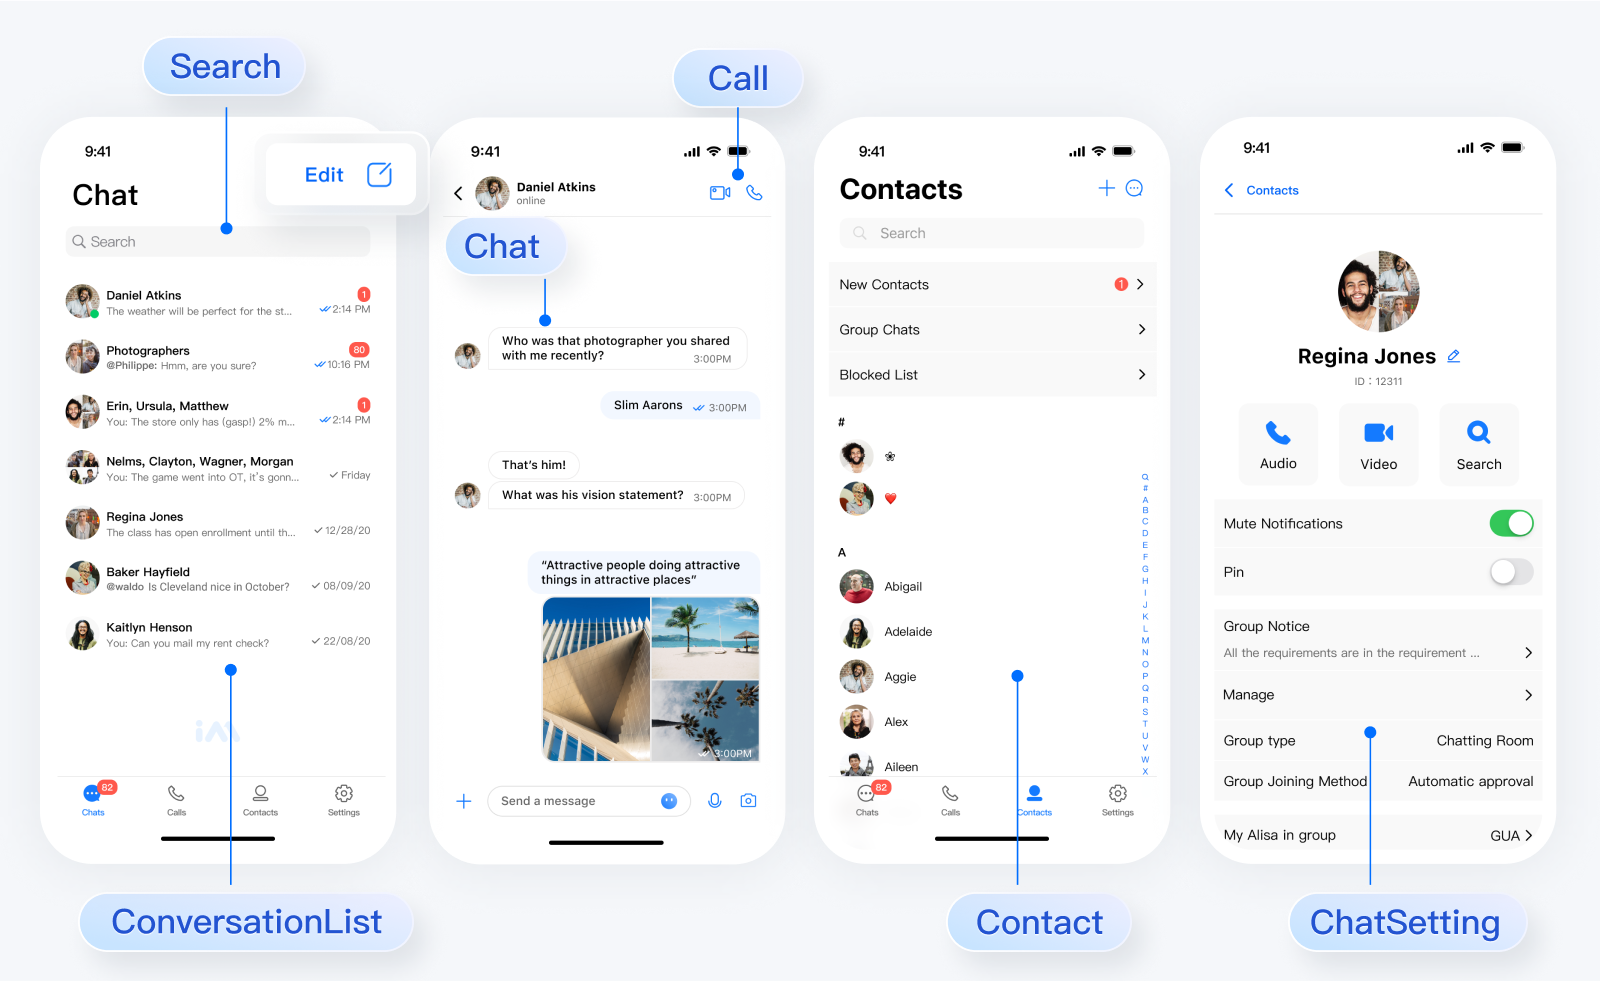
The interface effect of chat-uikit-react-native is shown below:
Environment Requirements
React Native 0.75.0
Node.js version 18+
JDK 17
Xcode version 14.0 or above
Android Studio
Configuring the development environment
If you are developing a React Native project for the first time, please refer to the steps on the React Native official website set-up-your-environment to configure your development environment.
If you encounter any environment issues during project creation or compilation, you can run
npx react-native doctor for an environmental diagnosis.Integrate chat-uikit-react-native
Step 1: Create a project (this step can be skipped if you already have a project)
1. Create a new React Native project.
npx @react-native-community/cli@latest init MyChatApp --version 0.75.0
2. After the project is created, go to the project directory.
cd MyChatApp
Step 2. Integrate chat-uikit-react-native
Download chat-uikit-react-native via npm/yarn and use it in the project. You can also use it for secondary development.
npm install @tencentcloud/chat-uikit-react-native react-native-image-picker react-native-document-picker react-native-video
yarn add @tencentcloud/chat-uikit-react-native react-native-image-picker react-native-document-picker react-native-video
Add device permissions
Add the following permissions to the android/app/src/main/AndroidManifest.xml file.
<uses-permission android:name="android.permission.READ_MEDIA_IMAGES" /><uses-permission android:name="android.permission.READ_MEDIA_AUDIO" /><uses-permission android:name="android.permission.READ_MEDIA_VIDEO" /><uses-permission android:name="android.permission.READ_EXTERNAL_STORAGE" /><uses-permission android:name="android.permission.WRITE_EXTERNAL_STORAGE" />
Add the following permission usage description to the info.plist file.
<key>NSCameraUsageDescription</key><string> we would like to use your camera</string><key>NSPhotoLibraryUsageDescription</key><string> we would like to use your photo library</string><key>NSMicrophoneUsageDescription</key><string>we would like to use your microphone</string>
Step 3: Set up navigation
npm install @react-navigation/native react-native-screens react-native-safe-area-context @react-navigation/native-stack
yarn add @react-navigation/native react-native-screens react-native-safe-area-context @react-navigation/native-stack
Step 4. Import chat-uikit-react-native
Note:
The following code does not contain SDKAppID, userID, and userSig, which should be replaced after obtaining the relevant information in Step 5.
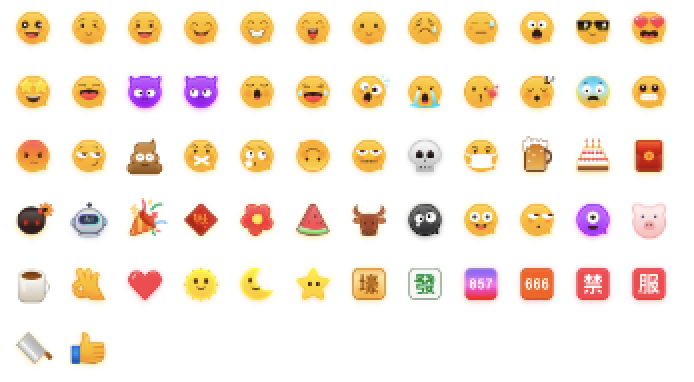
To respect the emoji design copyright, the IM Demo/TUIKit project does not include large emoji elements. Before going live and for commercial use, please replace them with other emoji packs that you have designed or have the copyright for. The default yellow face emoji pack shown below is copyrighted by Tencent Cloud and can be licensed for a fee. To obtain authorization, you can Submit a ticket to contact us.

Note:
The code below does not contain
SDKAppID, userID, and userSig, which should be replaced after obtaining the relevant information in Step 5.Replace the content in App.tsx, or you can create a new component to introduce.
import React from 'react';import {View,TouchableOpacity,Text,Image,StyleSheet,} from 'react-native';import { NavigationContainer, useNavigation } from '@react-navigation/native';import { createNativeStackNavigator } from '@react-navigation/native-stack';import { UIKitProvider } from '@tencentcloud/chat-uikit-react-native';import resources from '@tencentcloud/chat-uikit-react-native/i18n';import { TUITranslateService } from '@tencentcloud/chat-uikit-engine';import { TUILogin } from '@tencentcloud/tui-core';import { ConversationListScreen, ChatScreen, ChatSettingScreen } from './Screens';const LoginScreen = () => {const navigation = useNavigation<any>();// Init localizationTUITranslateService.provideLanguages(resources);TUITranslateService.useI18n('en-US');// Loginconst Login = () => {TUILogin.login({SDKAppID: 0, // Your SDKAppIDuserID: 'test_1', // Login UserIDuserSig: '', // Login userSiguseUploadPlugin: true,framework: 'rn',}).then(() => {navigation.navigate('ConversationList');});}return (<View style={styles.container}><Imagestyle={styles.logo}source={{uri:'https://web.sdk.qcloud.com/im/assets/images/tencent_rtc_logo.png'}}/><TouchableOpacity style={styles.buttonContainer} onPress={Login}><Text style={styles.buttonText}>Log in</Text></TouchableOpacity></View>);};const Navigation = () => {const Stack = createNativeStackNavigator();return (<NavigationContainer><Stack.NavigatorscreenOptions={{ headerShown: false }}initialRouteName="Login"><Stack.Screenname="Login"component={LoginScreen} /><Stack.Screenname="ConversationList"component={ConversationListScreen} /><Stack.Screenname="Chat"component={ChatScreen} /><Stack.Screenname="ChatSetting"component={ChatSettingScreen}/></Stack.Navigator></NavigationContainer>);};const App = () => {return (<UIKitProvider><Navigation /></UIKitProvider>);};const styles = StyleSheet.create({container: {flex: 1,justifyContent: 'center',alignItems: 'center',backgroundColor: '#FFFFFF',},logo: {width: 232,height: 80,},buttonContainer: {width: '80%',justifyContent: 'center',alignItems: 'center',paddingVertical: 11,borderRadius: 5,backgroundColor: '#2F80ED',},buttonText: {fontSize: 18,lineHeight: 24,color: '#FFFFFF',},});export default App;
Create a new Screens.tsx file in the same directory as the App.tsx file.
import React from 'react';import { useNavigation } from '@react-navigation/native';import { ConversationList, Chat, ChatSetting } from '@tencentcloud/chat-uikit-react-native';export const ConversationListScreen = () => {const navigation = useNavigation<any>();const onPressConversation = () => {navigation.navigate('Chat');};return (<ConversationList onPressConversation={onPressConversation} />);};export const ChatScreen = () => {const navigation = useNavigation<any>();const navigateBack = () => {navigation.goBack();};const navigateToChatSetting = () => {navigation.navigate('ChatSetting');};return (<ChatnavigateBack={navigateBack}navigateToChatSetting={navigateToChatSetting}/>);};export const ChatSettingScreen = () => {const navigation = useNavigation<any>();// Navigate to Chat when you click header back button.const navigateBack = () => {navigation.goBack();};// Navigate to Chat when you click the send message button.const navigateToChat = () => {navigation.goBack();};// Navigate to ConversationList when you disband group or leave group.const navigateToConversationList = () => {navigation.navigate('ConversationList');};return (<ChatSettingnavigateBack={navigateBack}navigateToChat={navigateToChat}navigateToConversationList={navigateToConversationList}/>);};
Step 5: Obtain SDKAppID, userID, and userSig
Obtain the relevant parameters SDKAppID, userID, and the corresponding userSig from
Login:SDKAppID, can be obtained through Chat Console in Applications: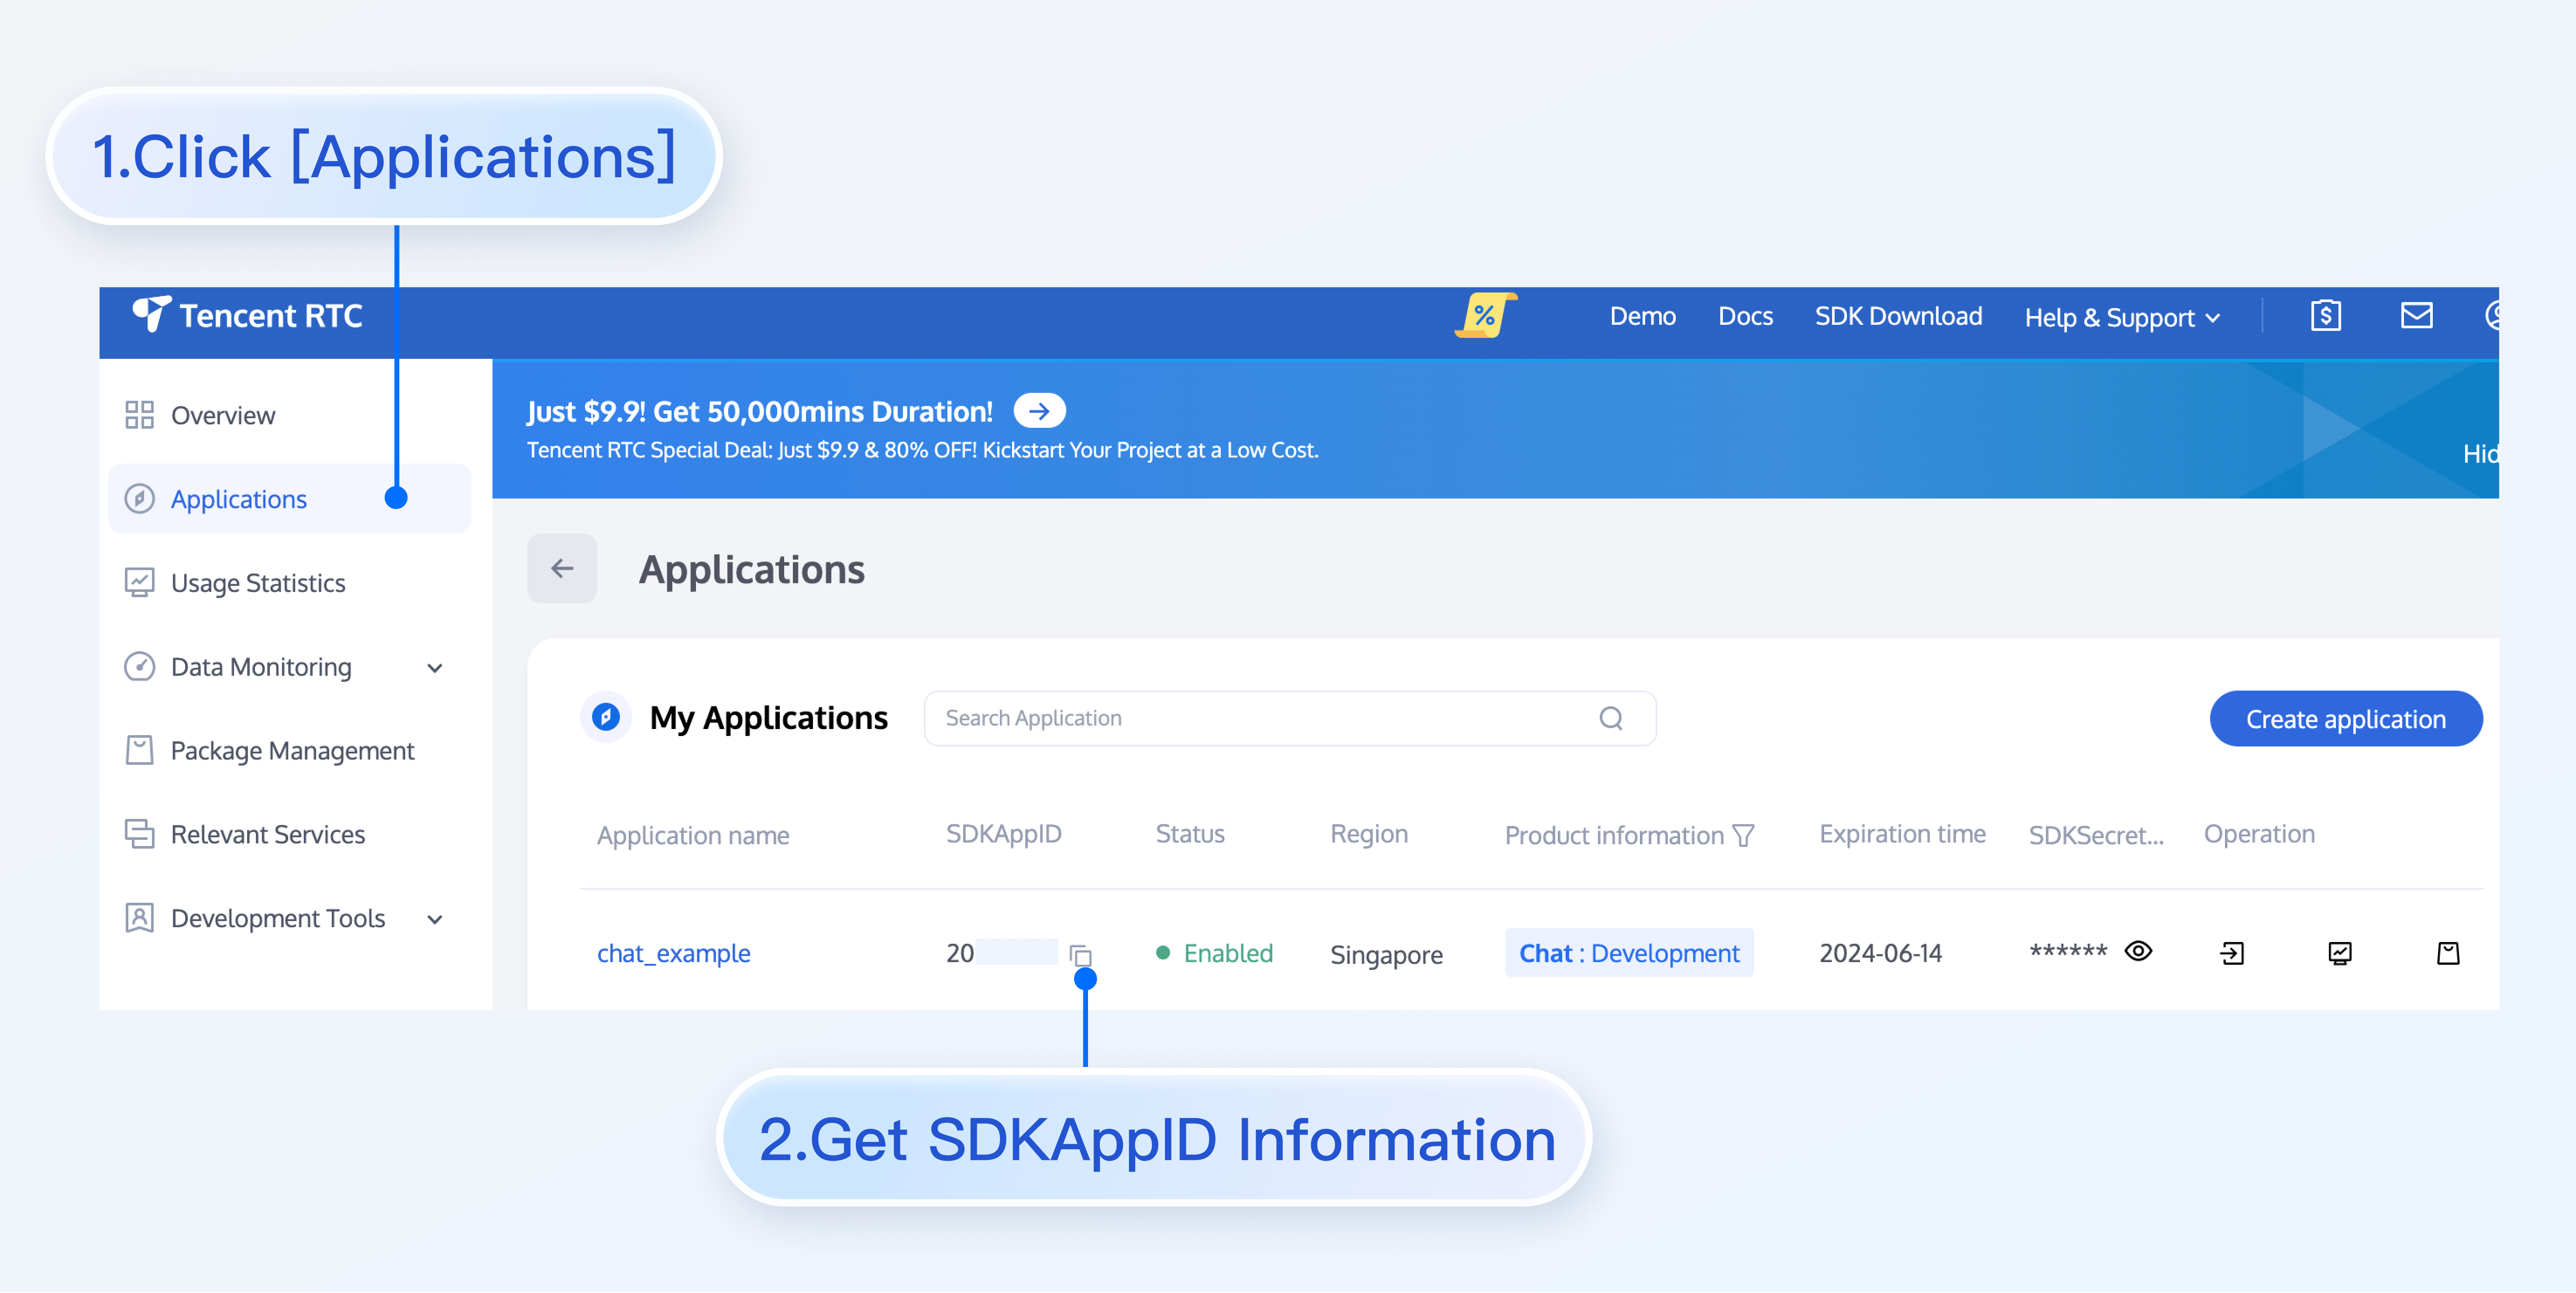
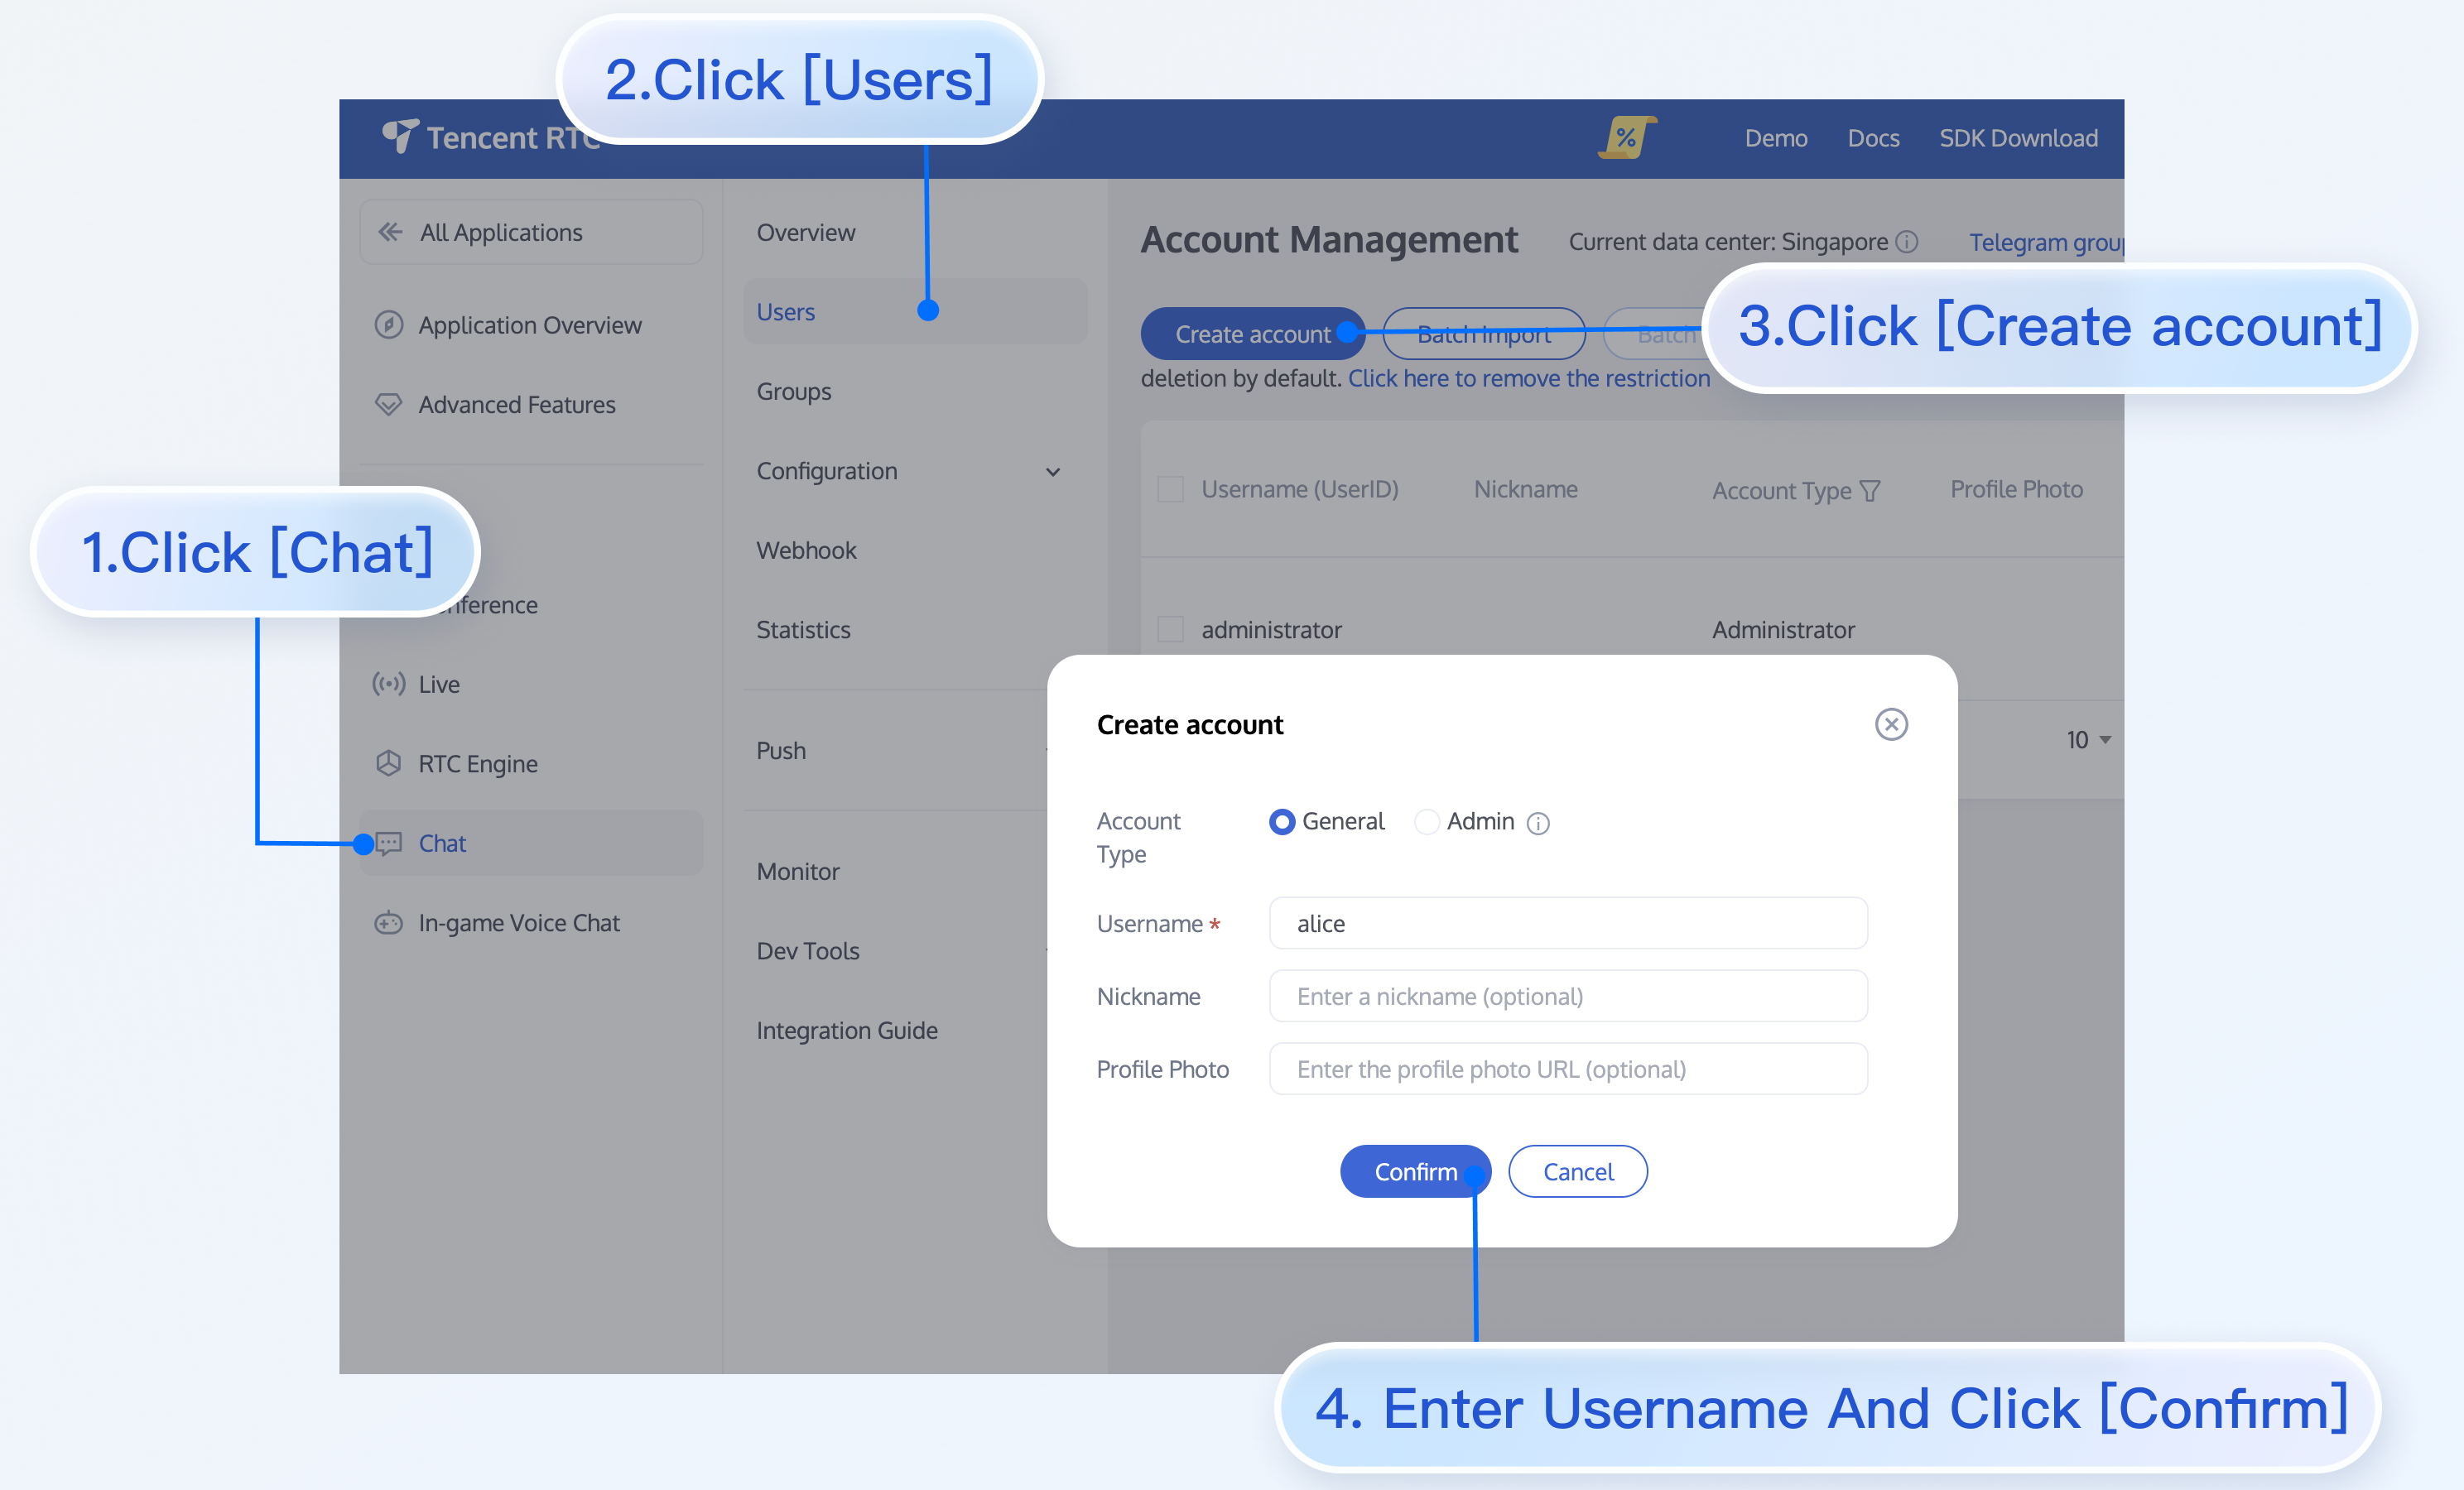
userID Click to enter the Application you created above, you will see the
Chat product entry in the left sidebar, click to enter.After entering the Chat product sub-page, click
Users to enter the User Management page.Click
Create account to pop up the account creation information filling box. If it is just a regular member, we recommend selecting the General type.For a better experience with messaging and other features, it is recommended that you create two user IDs (test_1, test_2).
userSig can be generated in real-time using the development tools provided by the console. For development tools, click Chat Console > Development Tools > UserSig Tools > Signature (UserSig) Generator.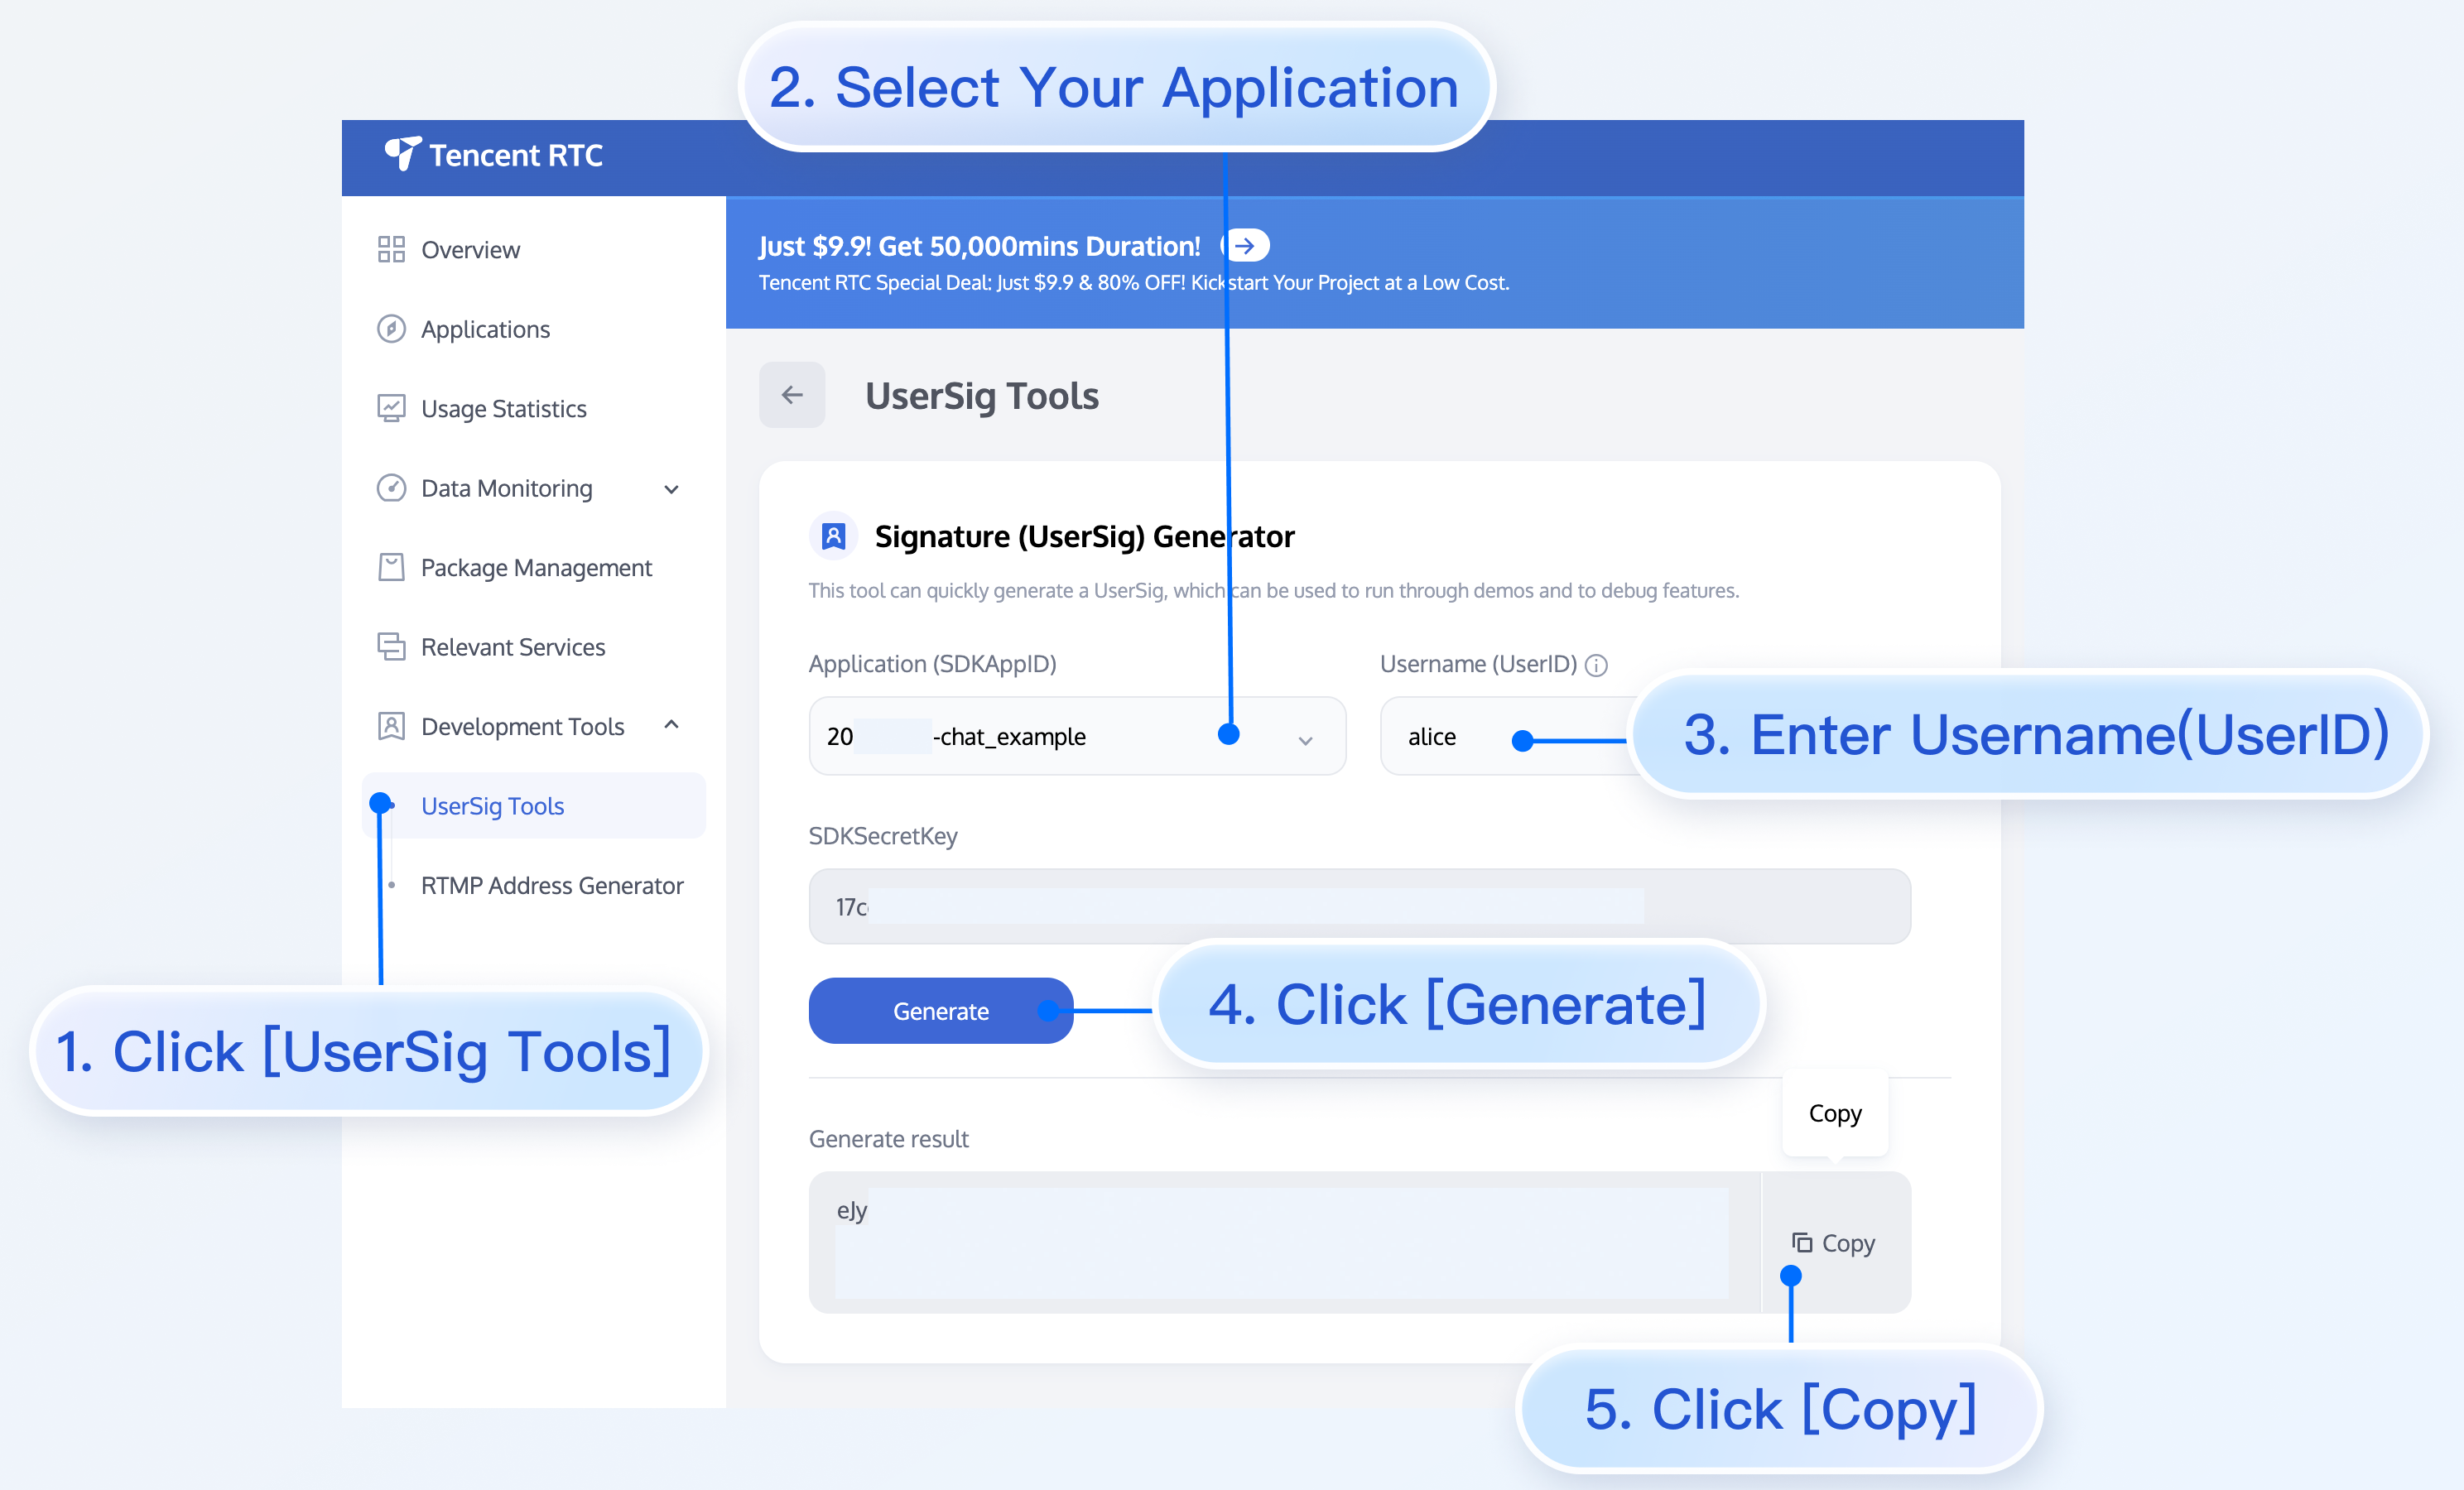
Step 6: Compile and run the project
To compile and run the project, you need to use a real device or an emulator. It is recommended to use a real device. You can refer to the React Native official website running-on-device for connecting a real device for debugging.
Replace SDKAppID, userID, userSig in App.tsx, then run the following command:
1. Enable Developer Mode on the phone and turn on the USB Debugging switch.
2. Connect the phone with a USB cable, it is recommended to choose the Transfering File option, do not choose the Charge Only option.
3. After confirming the phone is successfully connected, execute
npm run android to compile and run the project.npm run android
1. Connect the phone with a USB cable and open the project ios directory with Xcode.
2. Configure the signing information according to the running-on-device section on the React Native official website.
3. Go to the ios directory and install dependencies.
cd iospod install
4. Go back to the root directory and execute npm run ios to compile and run the project.
cd ../npm run ios
Step 7: Send your first message
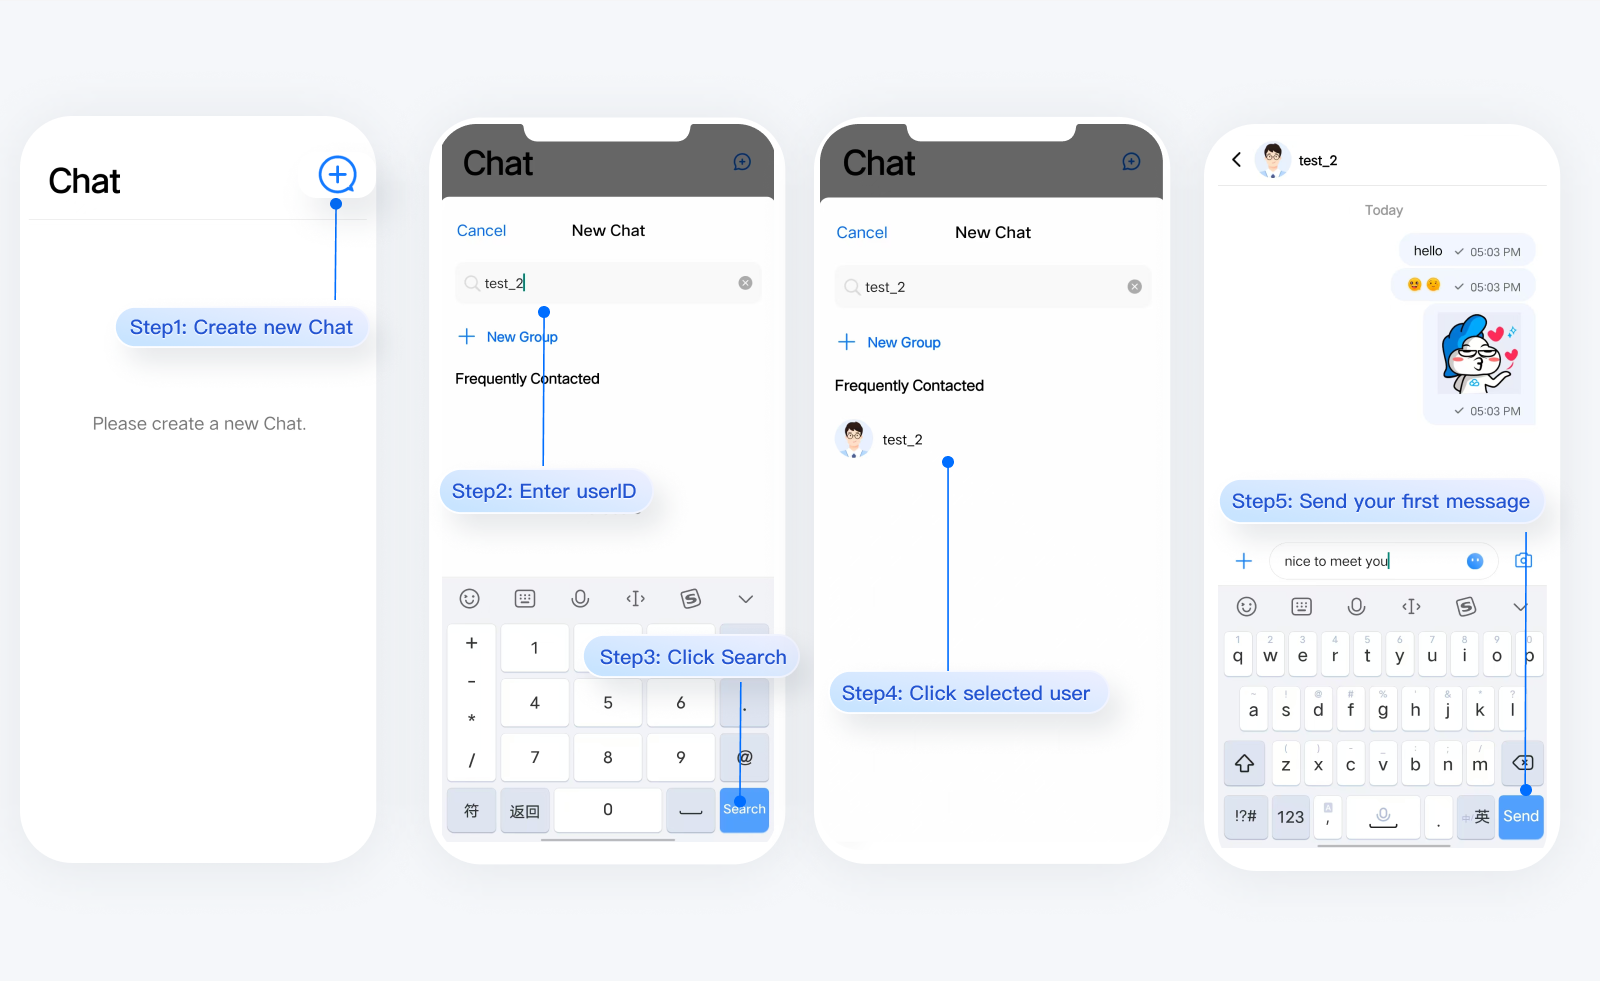
1. After the project starts, click Initiate Session in the top left corner.
2. Enter the Initiate Session window. In the search bar, enter the user ID created in Step 5 (test_2), select it and open the session.
3. Enter the message in the input box and click send.
Exchange and Feedback
Join Telegram Technical Support Group or WhatsApp Communication Group for professional engineer support to solve your problems.
FAQs
What to do when there is a runtime environment error?
You can run the following command for environmental diagnosis.
npx react-native doctor
Documentation
Related to UIKit:

 Yes
Yes
 No
No
Was this page helpful?