1. If you have already integrated Chat TUIKit, you can ignore this step.
2. If you are integrating Chat without UI, you can ignore this step.
2. Upgrade @tencentcloud/chat to the latest version.
Note:
@tencentcloud/chat is backward compatible, feel free to upgrade. If you are currently using tim-js-sdk or tim-wx-sdk, please refer to our Upgrade Guide.
npminstall @tencentcloud/chat@latest
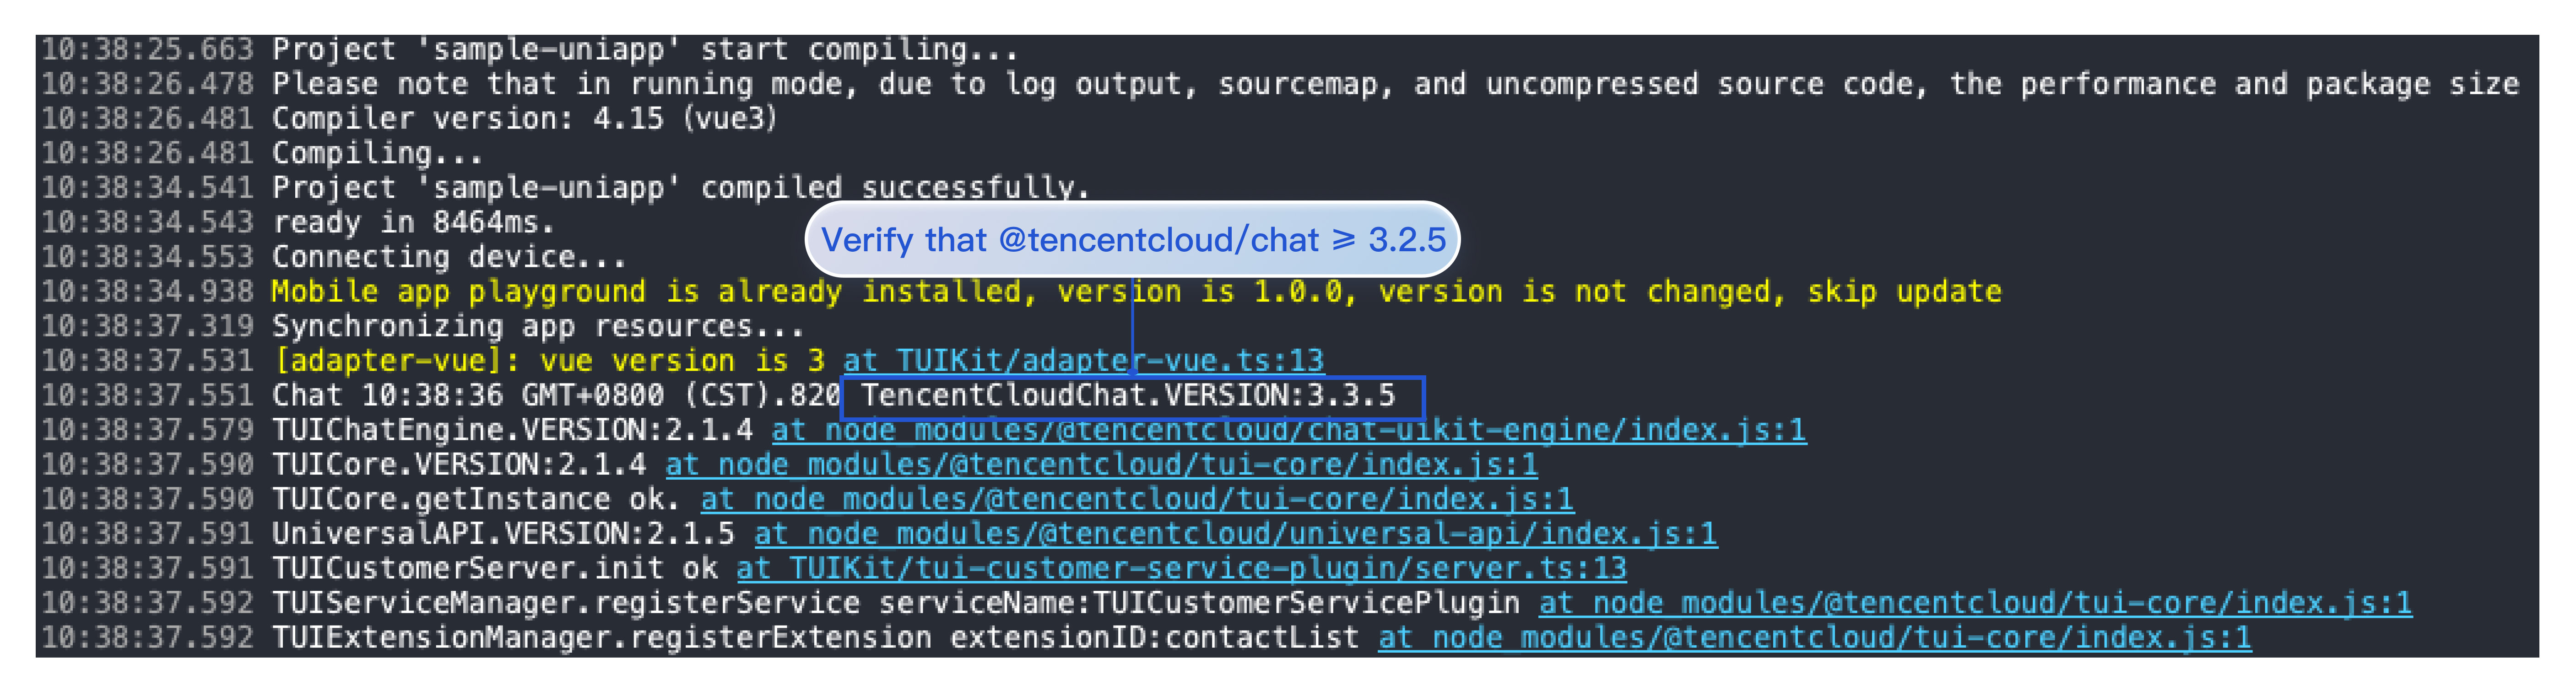
Check the version number of TencentCloudChat.VERSION in the HBuilder log to confirm @tencentcloud/chat ≥ 3.2.5 as shown:
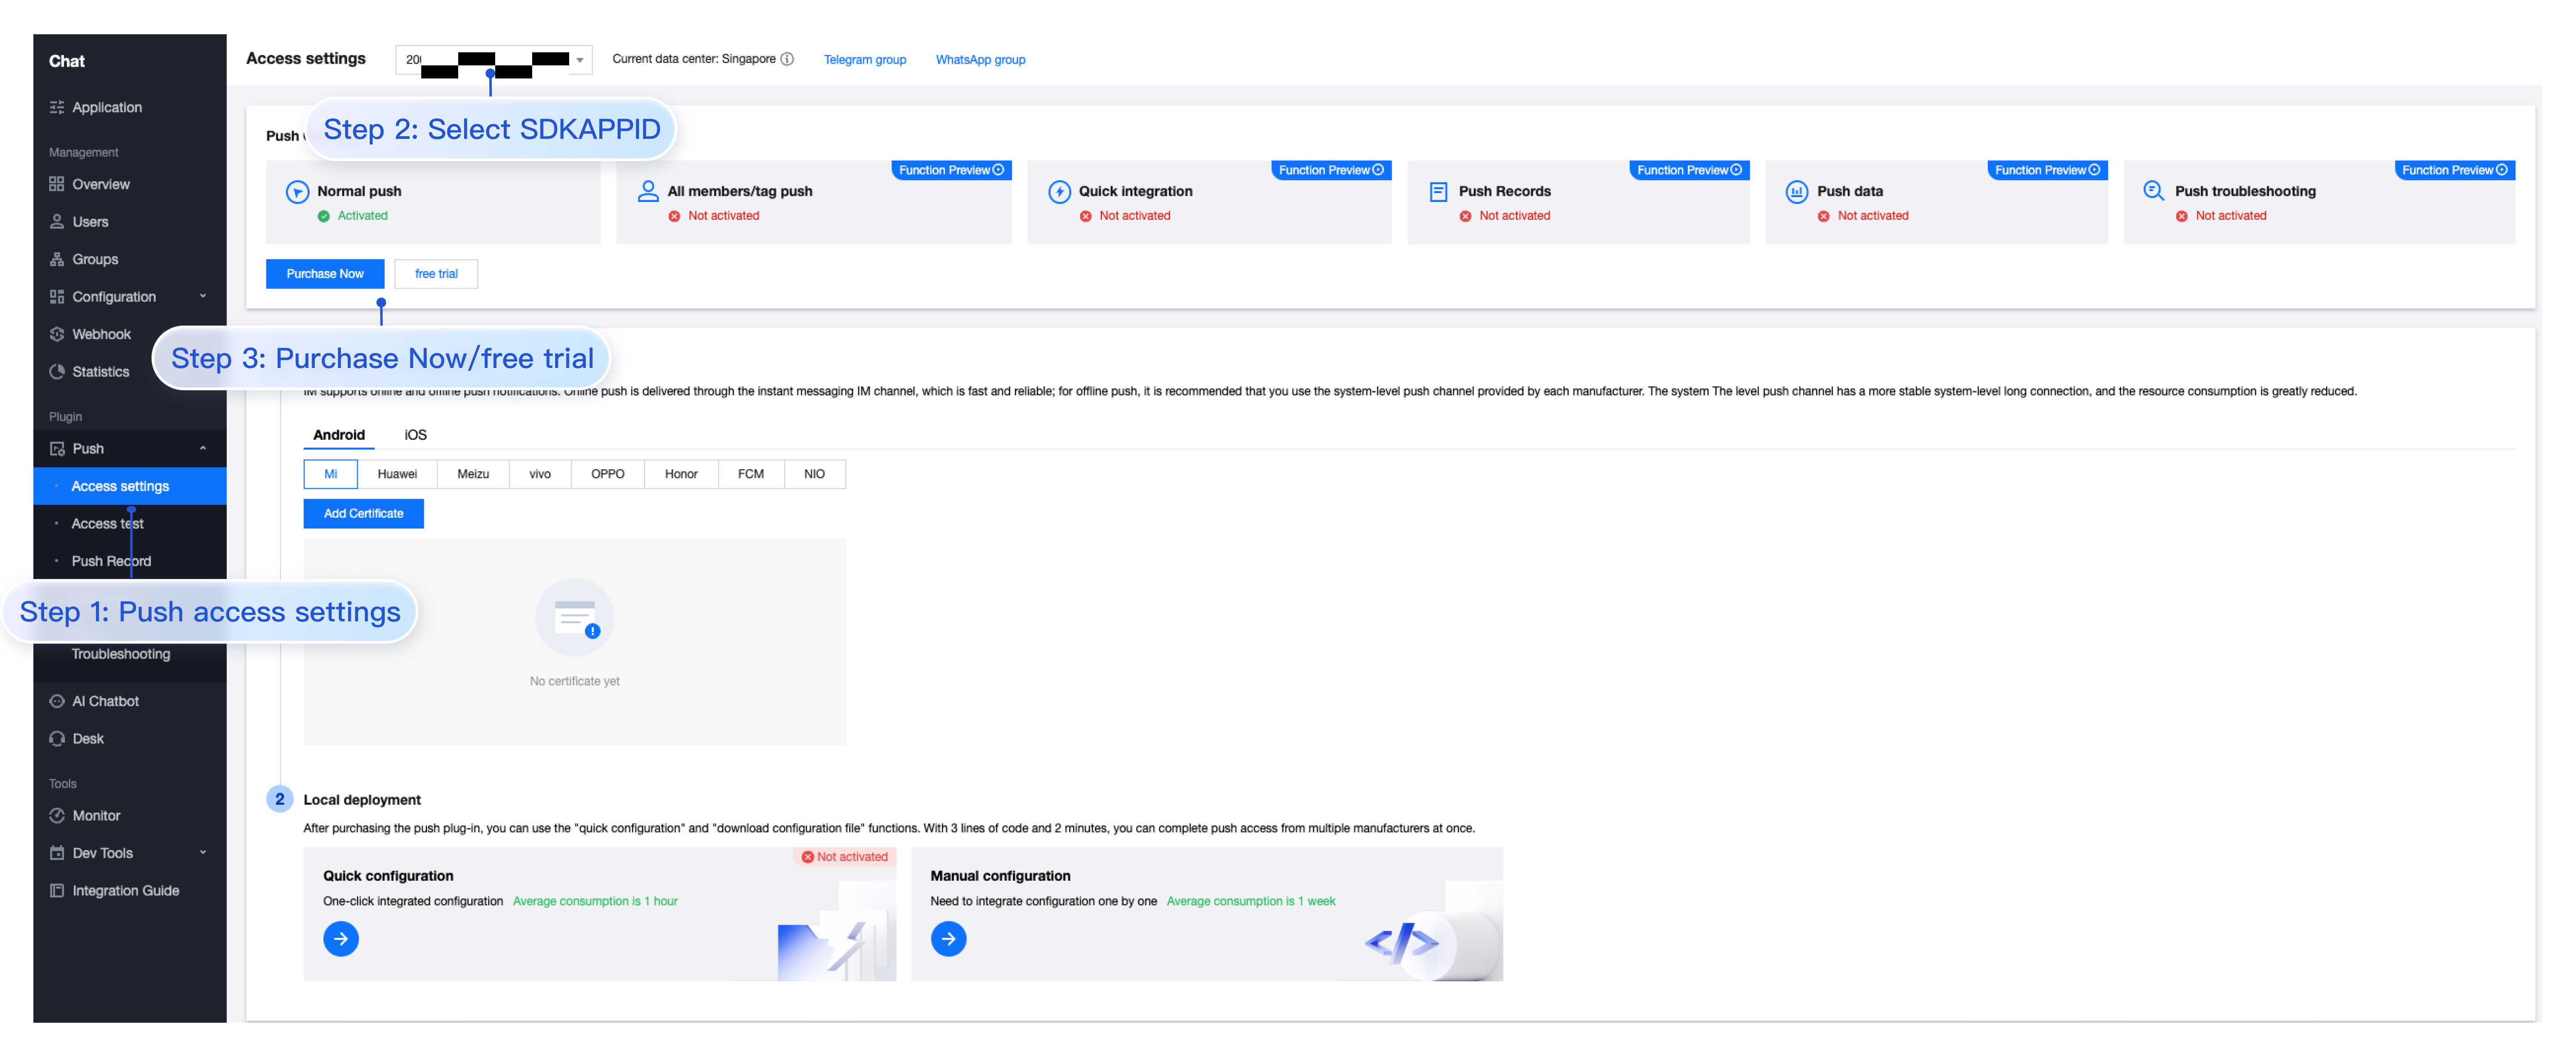
3. Activate the Push Plugin
Go to IM Console > Push, click Purchase Now or Free Trial. (Each application can try it for free once, valid for 7 days.)
Note:
After the trial or purchase of the Push Plugin expires, the push service (including normal message offline push, all member/Tag push, etc.) will automatically stop. To avoid affecting the normal use of your business, please purchase/renew in advance.
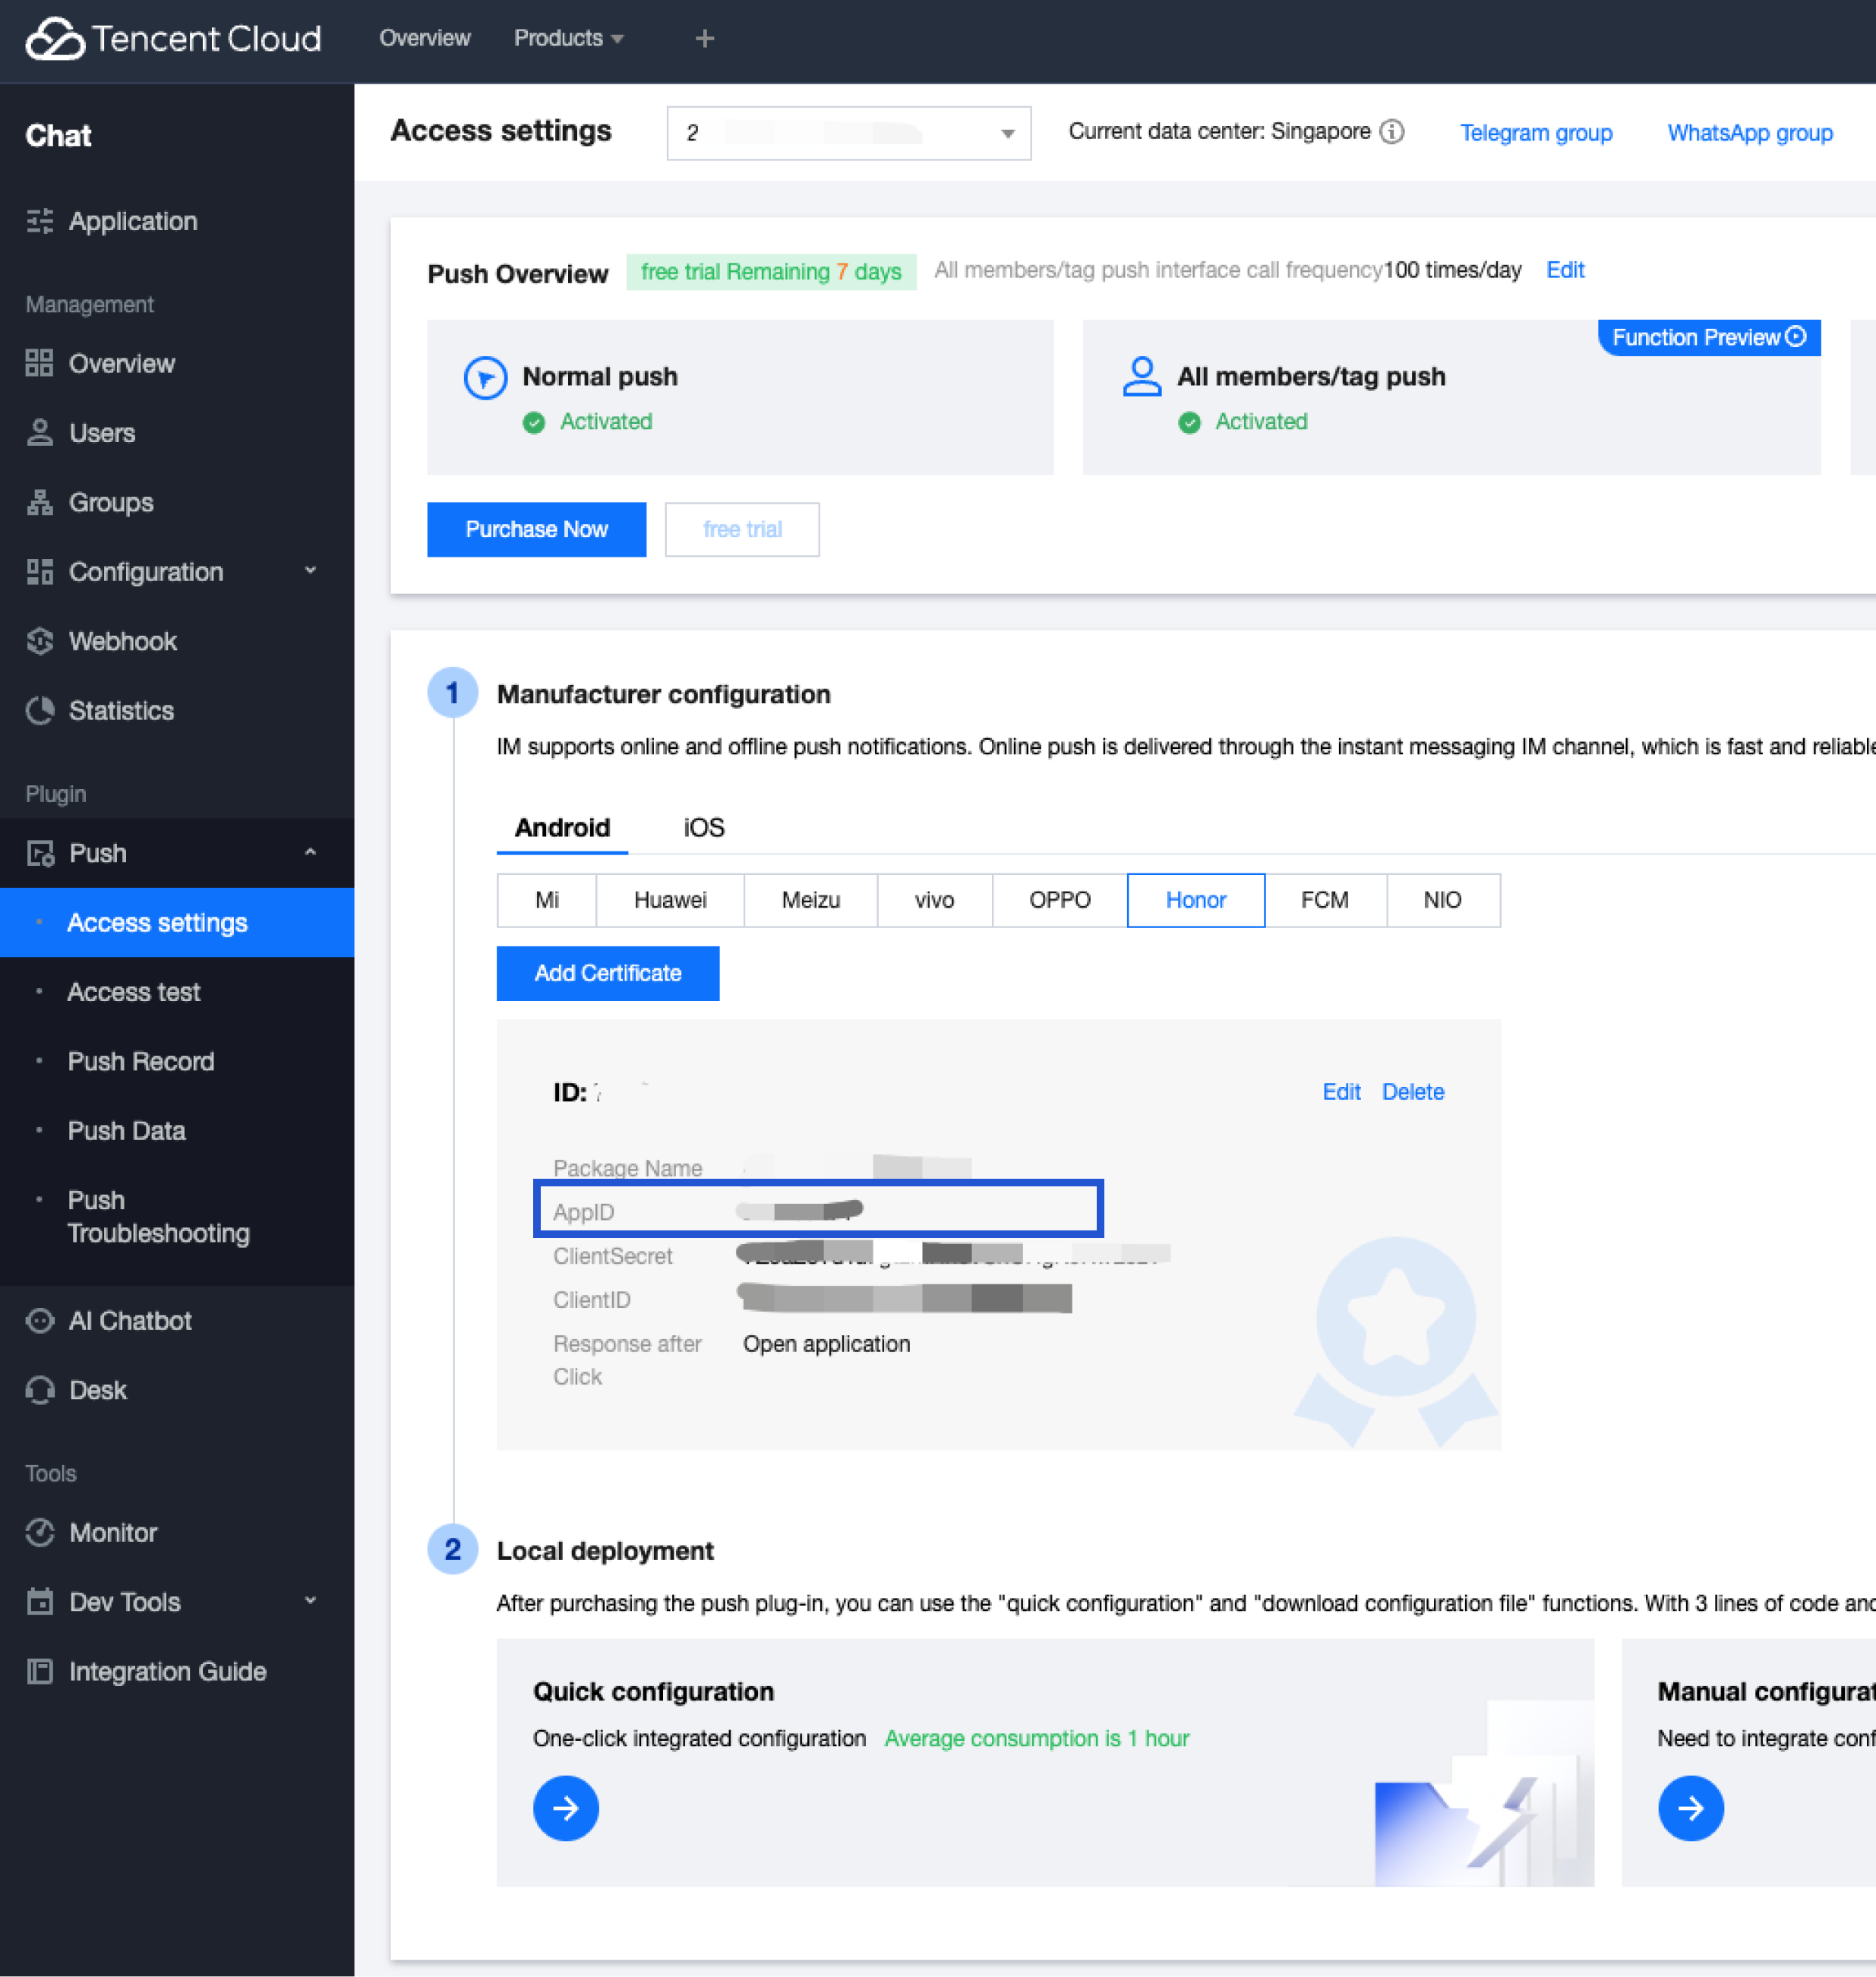
4. Manufacturer Configuration
Note:
The uniapp Manufacturer Configuration includes Android Manufacturer Configuration and iOS Manufacturer Configuration, see uniapp.
Integrating TencentCloud-TIMPush
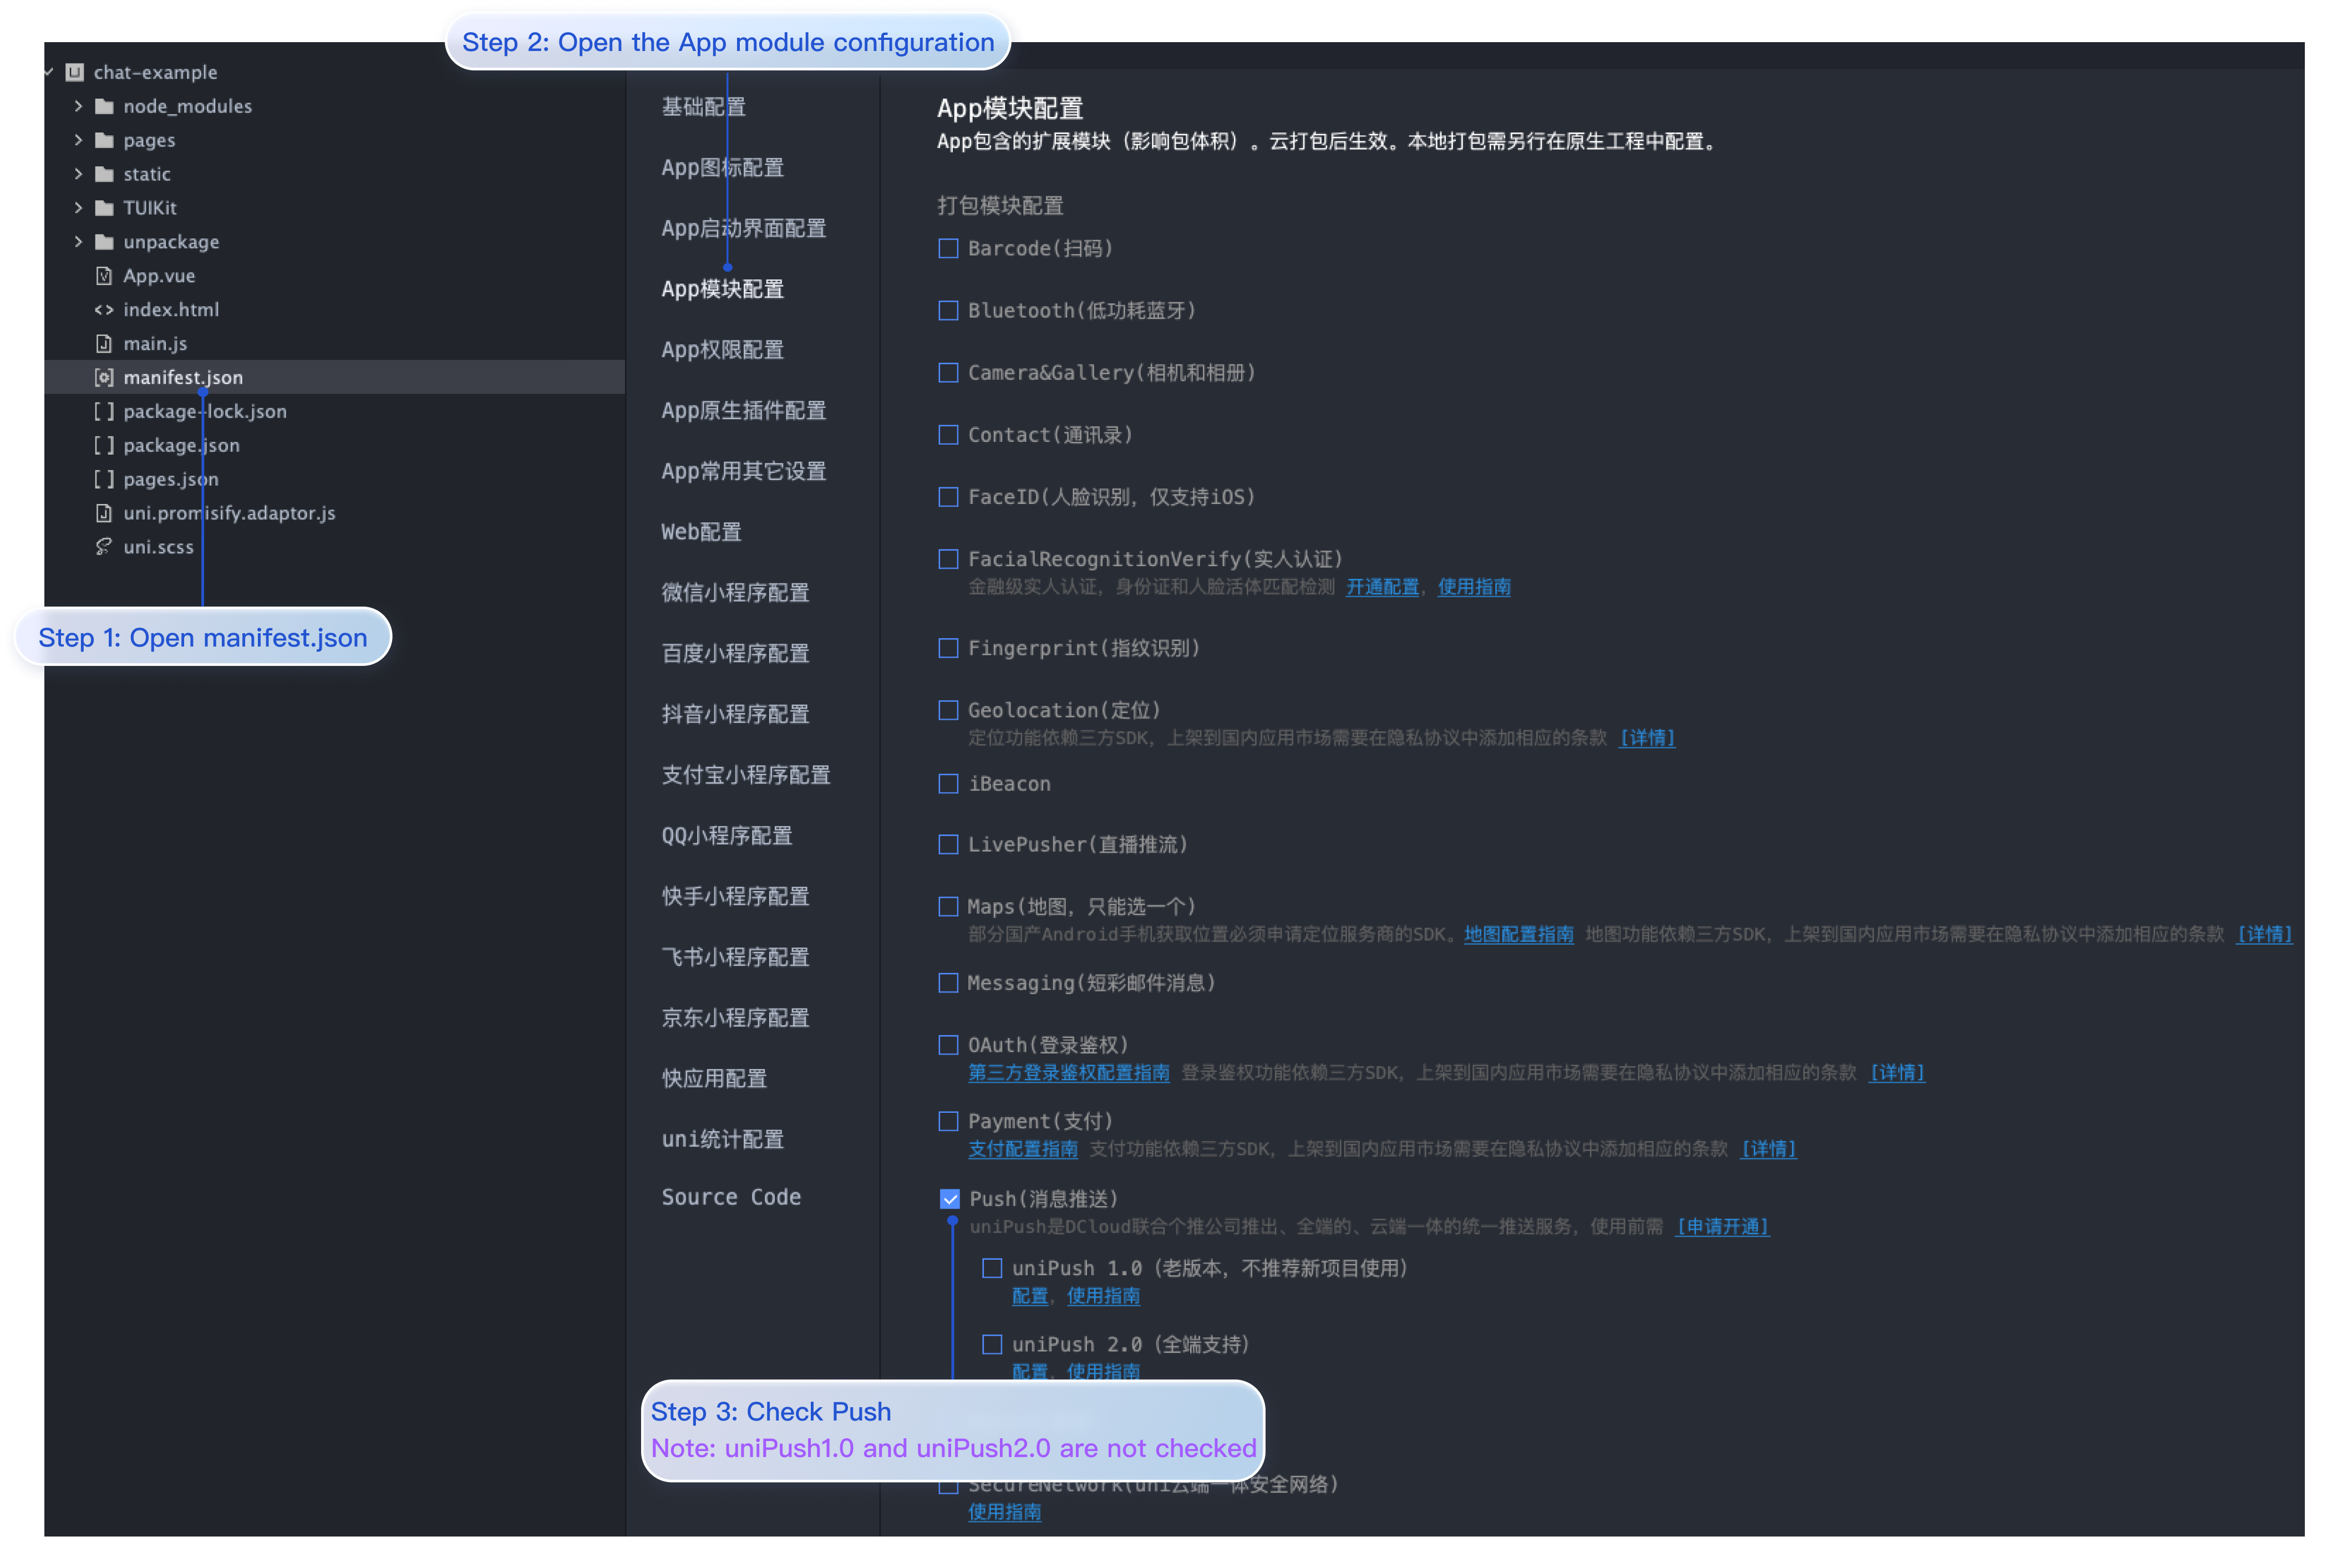
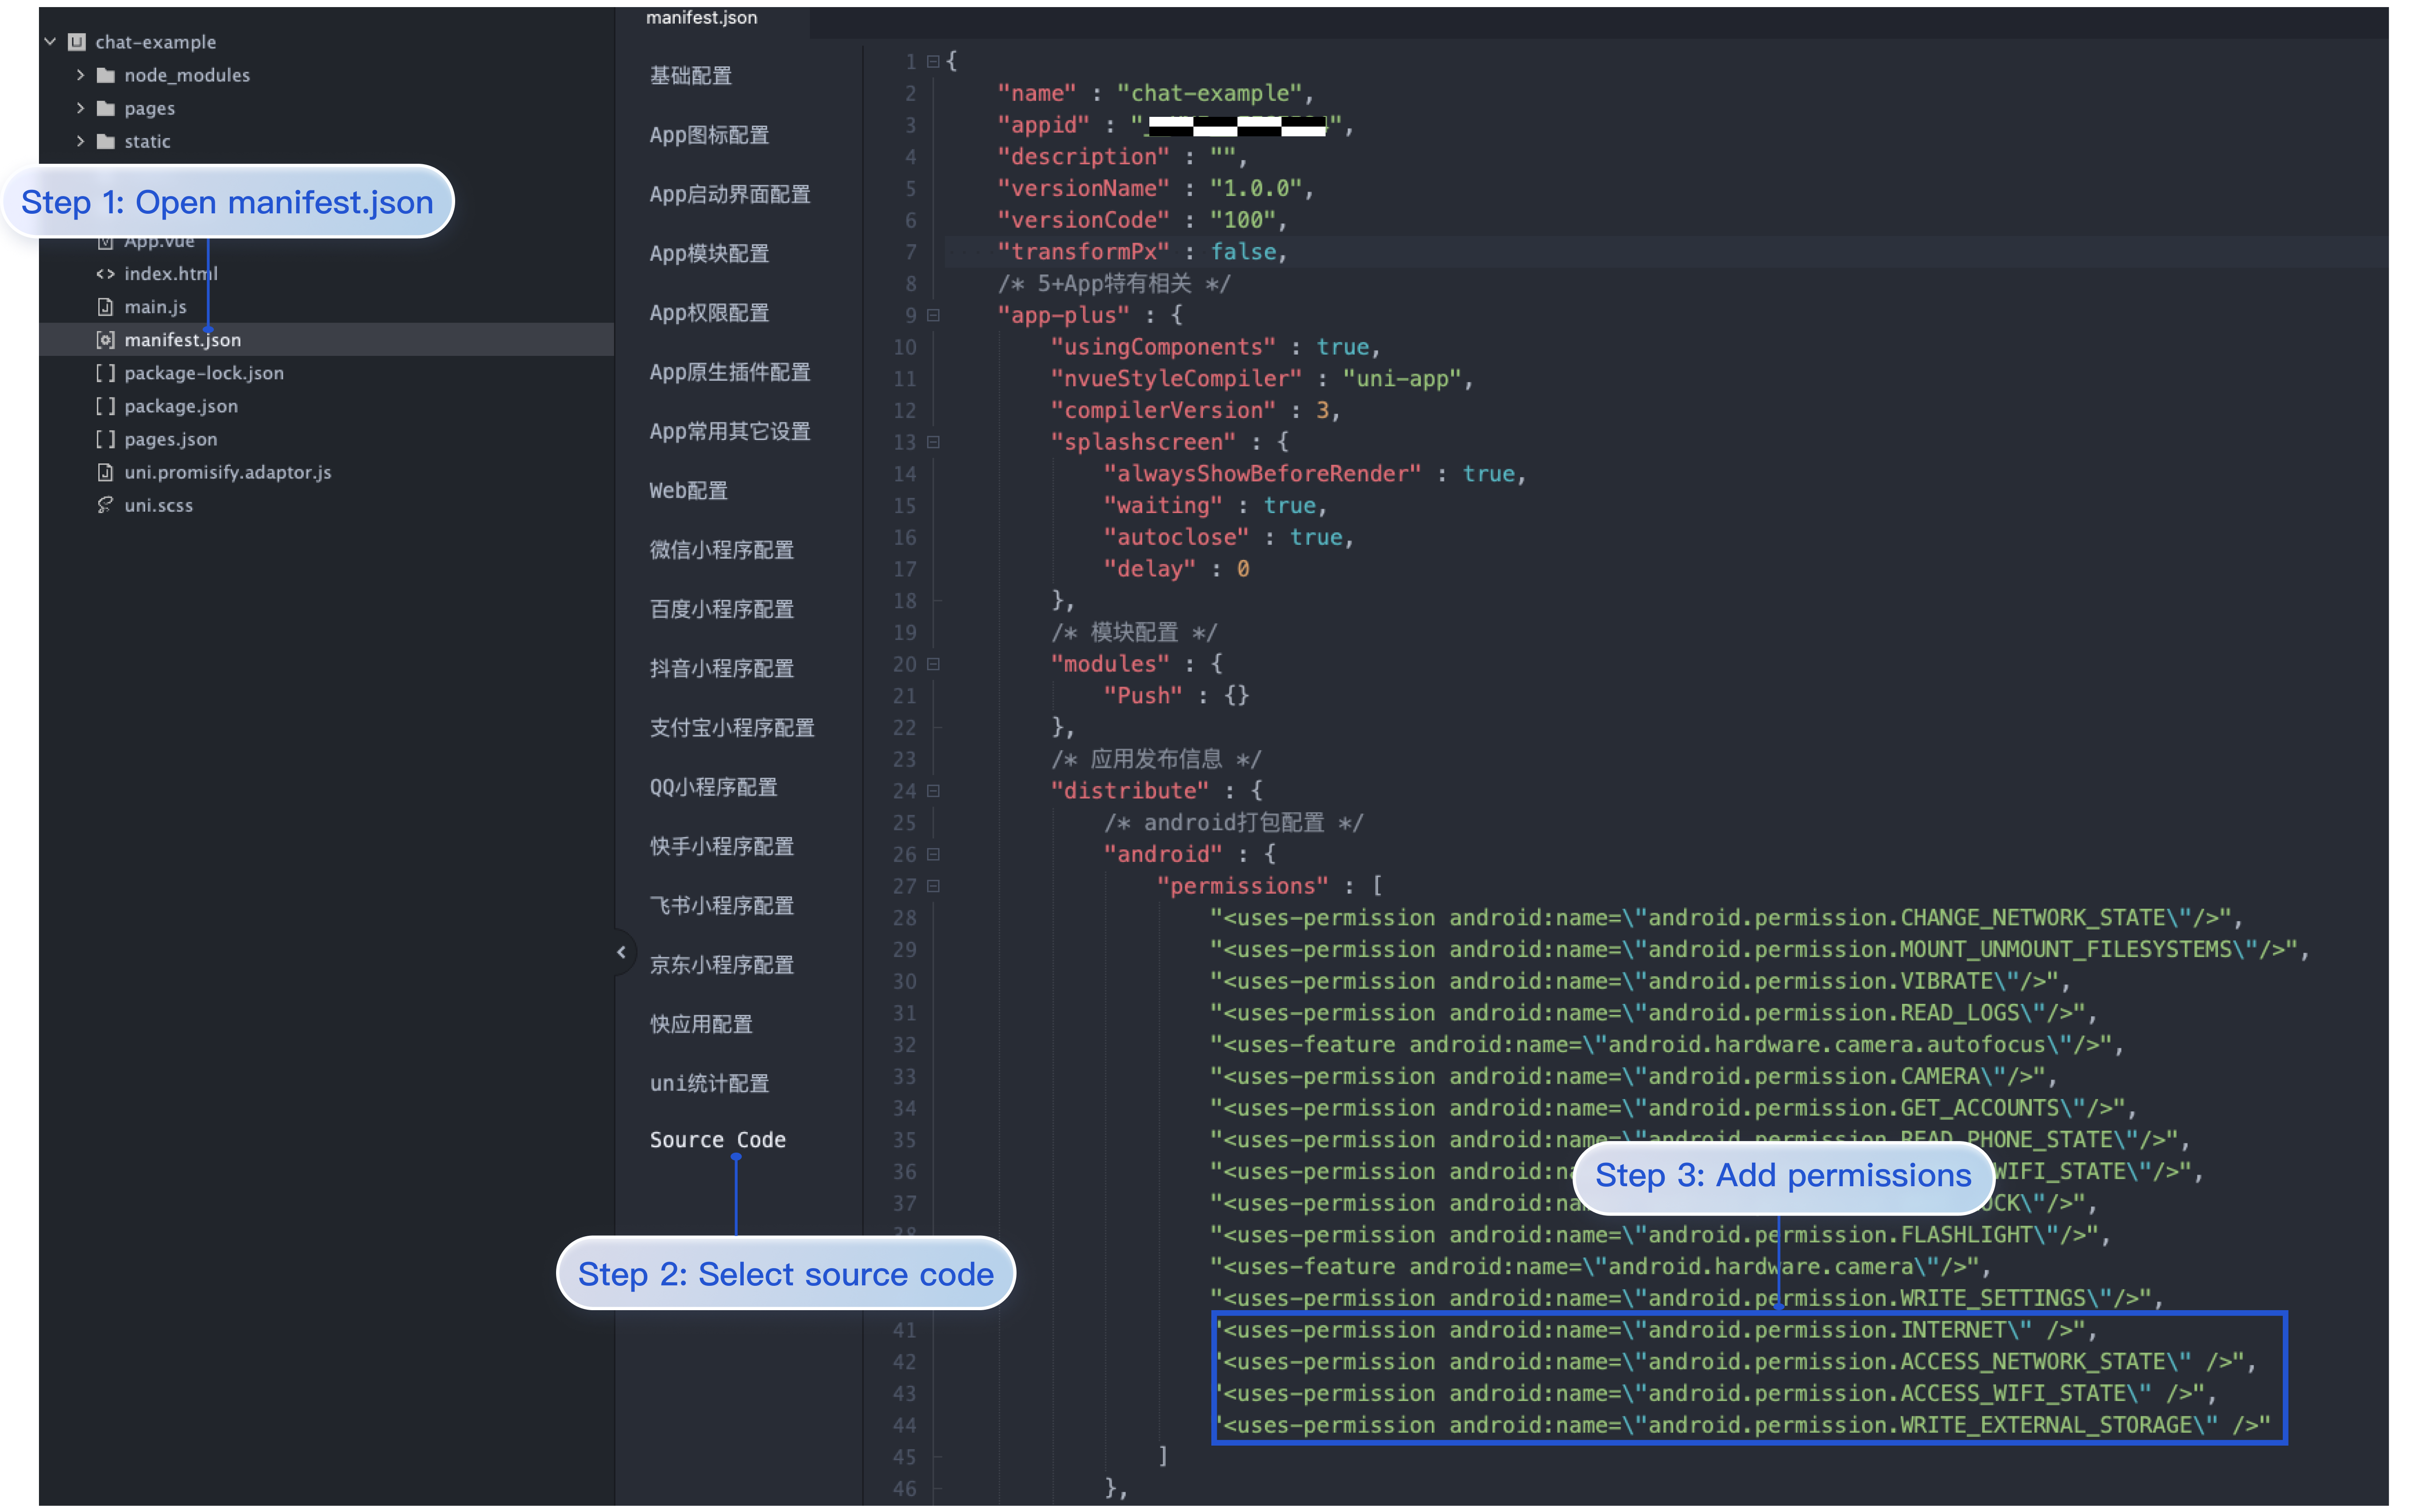
Step 1: manifest.json App Module Configuration
In the project [manifest.json] > [App Module Configuration], configure the Message Push Module as shown:
Step 2: Activate the TencentCloud-TIMPush cloud packaging service and fill in the relevant parameters.
1. Go to the plugin marketplace and activate the TencentCloud-TIMPush cloud packaging service. As shown in the image:
Note:
1. In the plugin marketplace, the appId for the cloud packaging service project must match the appid in the project's manifest.json.
2. Activation of the TencentCloud-TIMPush cloud packaging service is for a single project only. It only concerns the project.
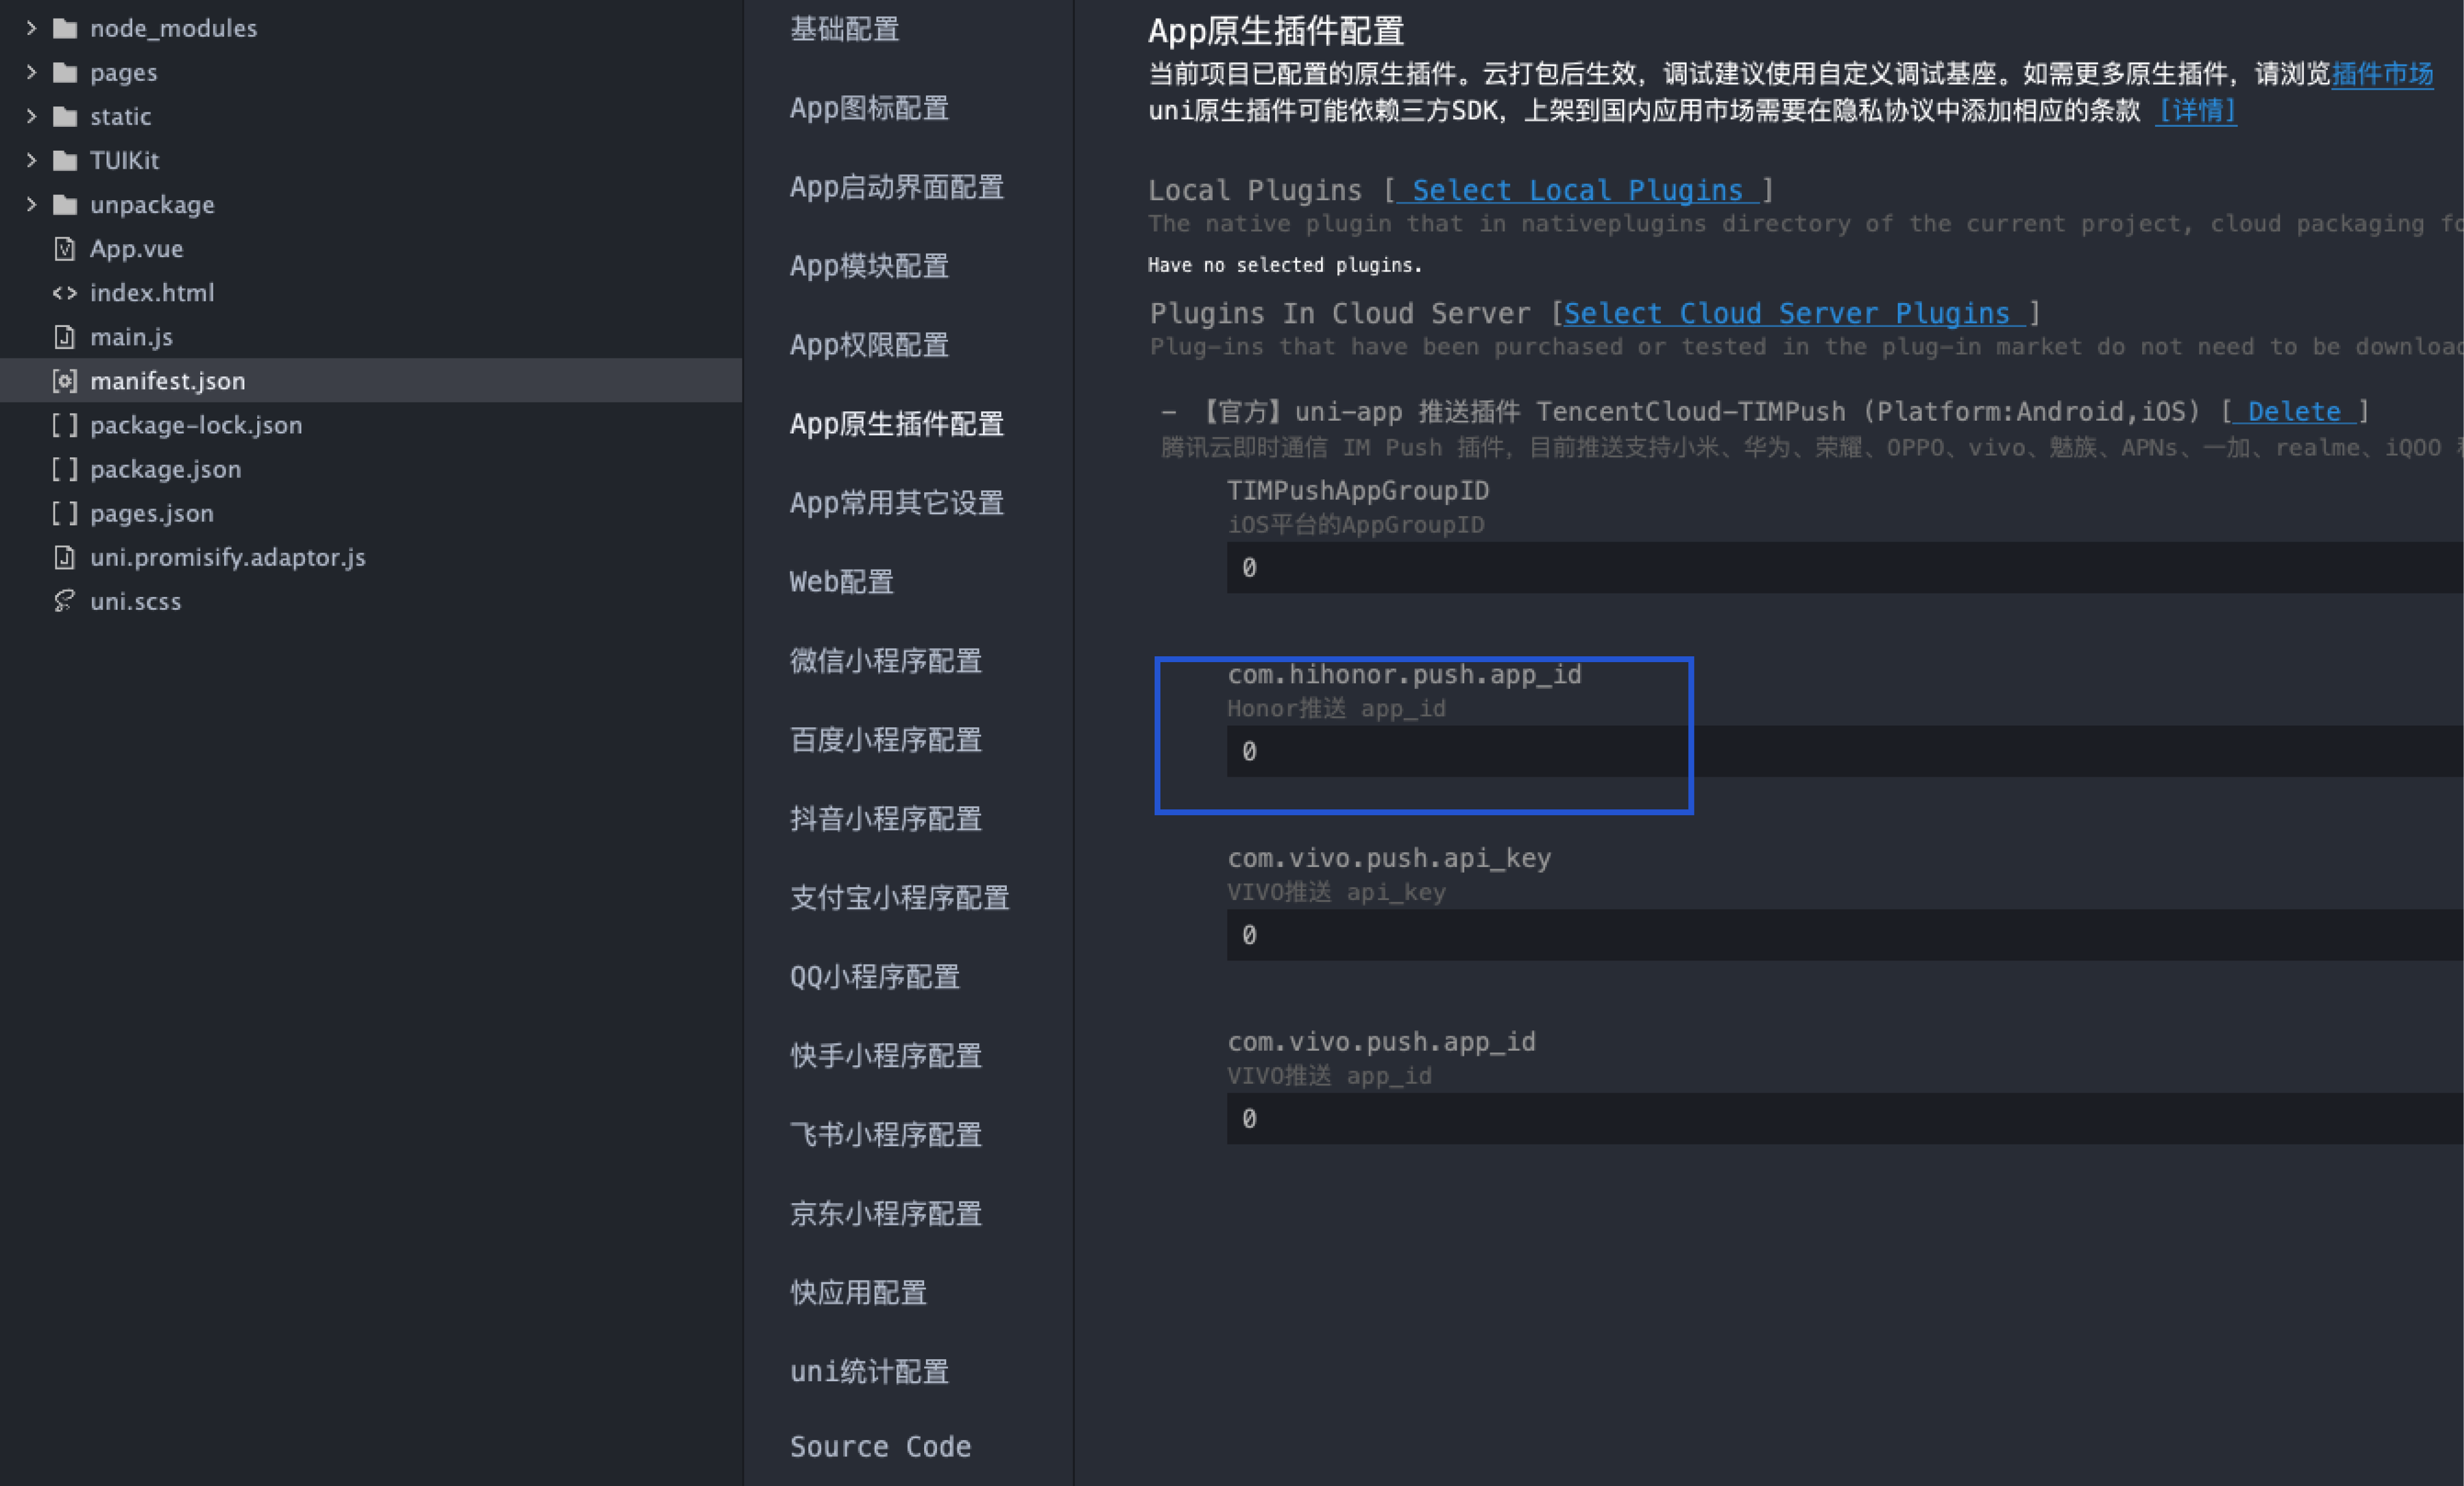
2. In the project's [manifest.json] > [App Native Plugin Configuration] > [Cloud Plugins], select TencentCloud-TIMPush and set the relevant parameters.
Note:
1. Note that parameters might appear out of order in HBuilderX. Please fill them out carefully and accurately.
2. Each parameter is required; otherwise, a compilation error will occur. The default is 0.
com.hihonor.push.app_id
com.vivo.push.app_id && com.vivo.push.api_key
TIMPushAppGroupID
Note:
com.hihonor.push.app_id corresponds to the appID of hihonor.
When not enabling hihonor push, com.hihonor.push.app_id can be set to 0 by default.
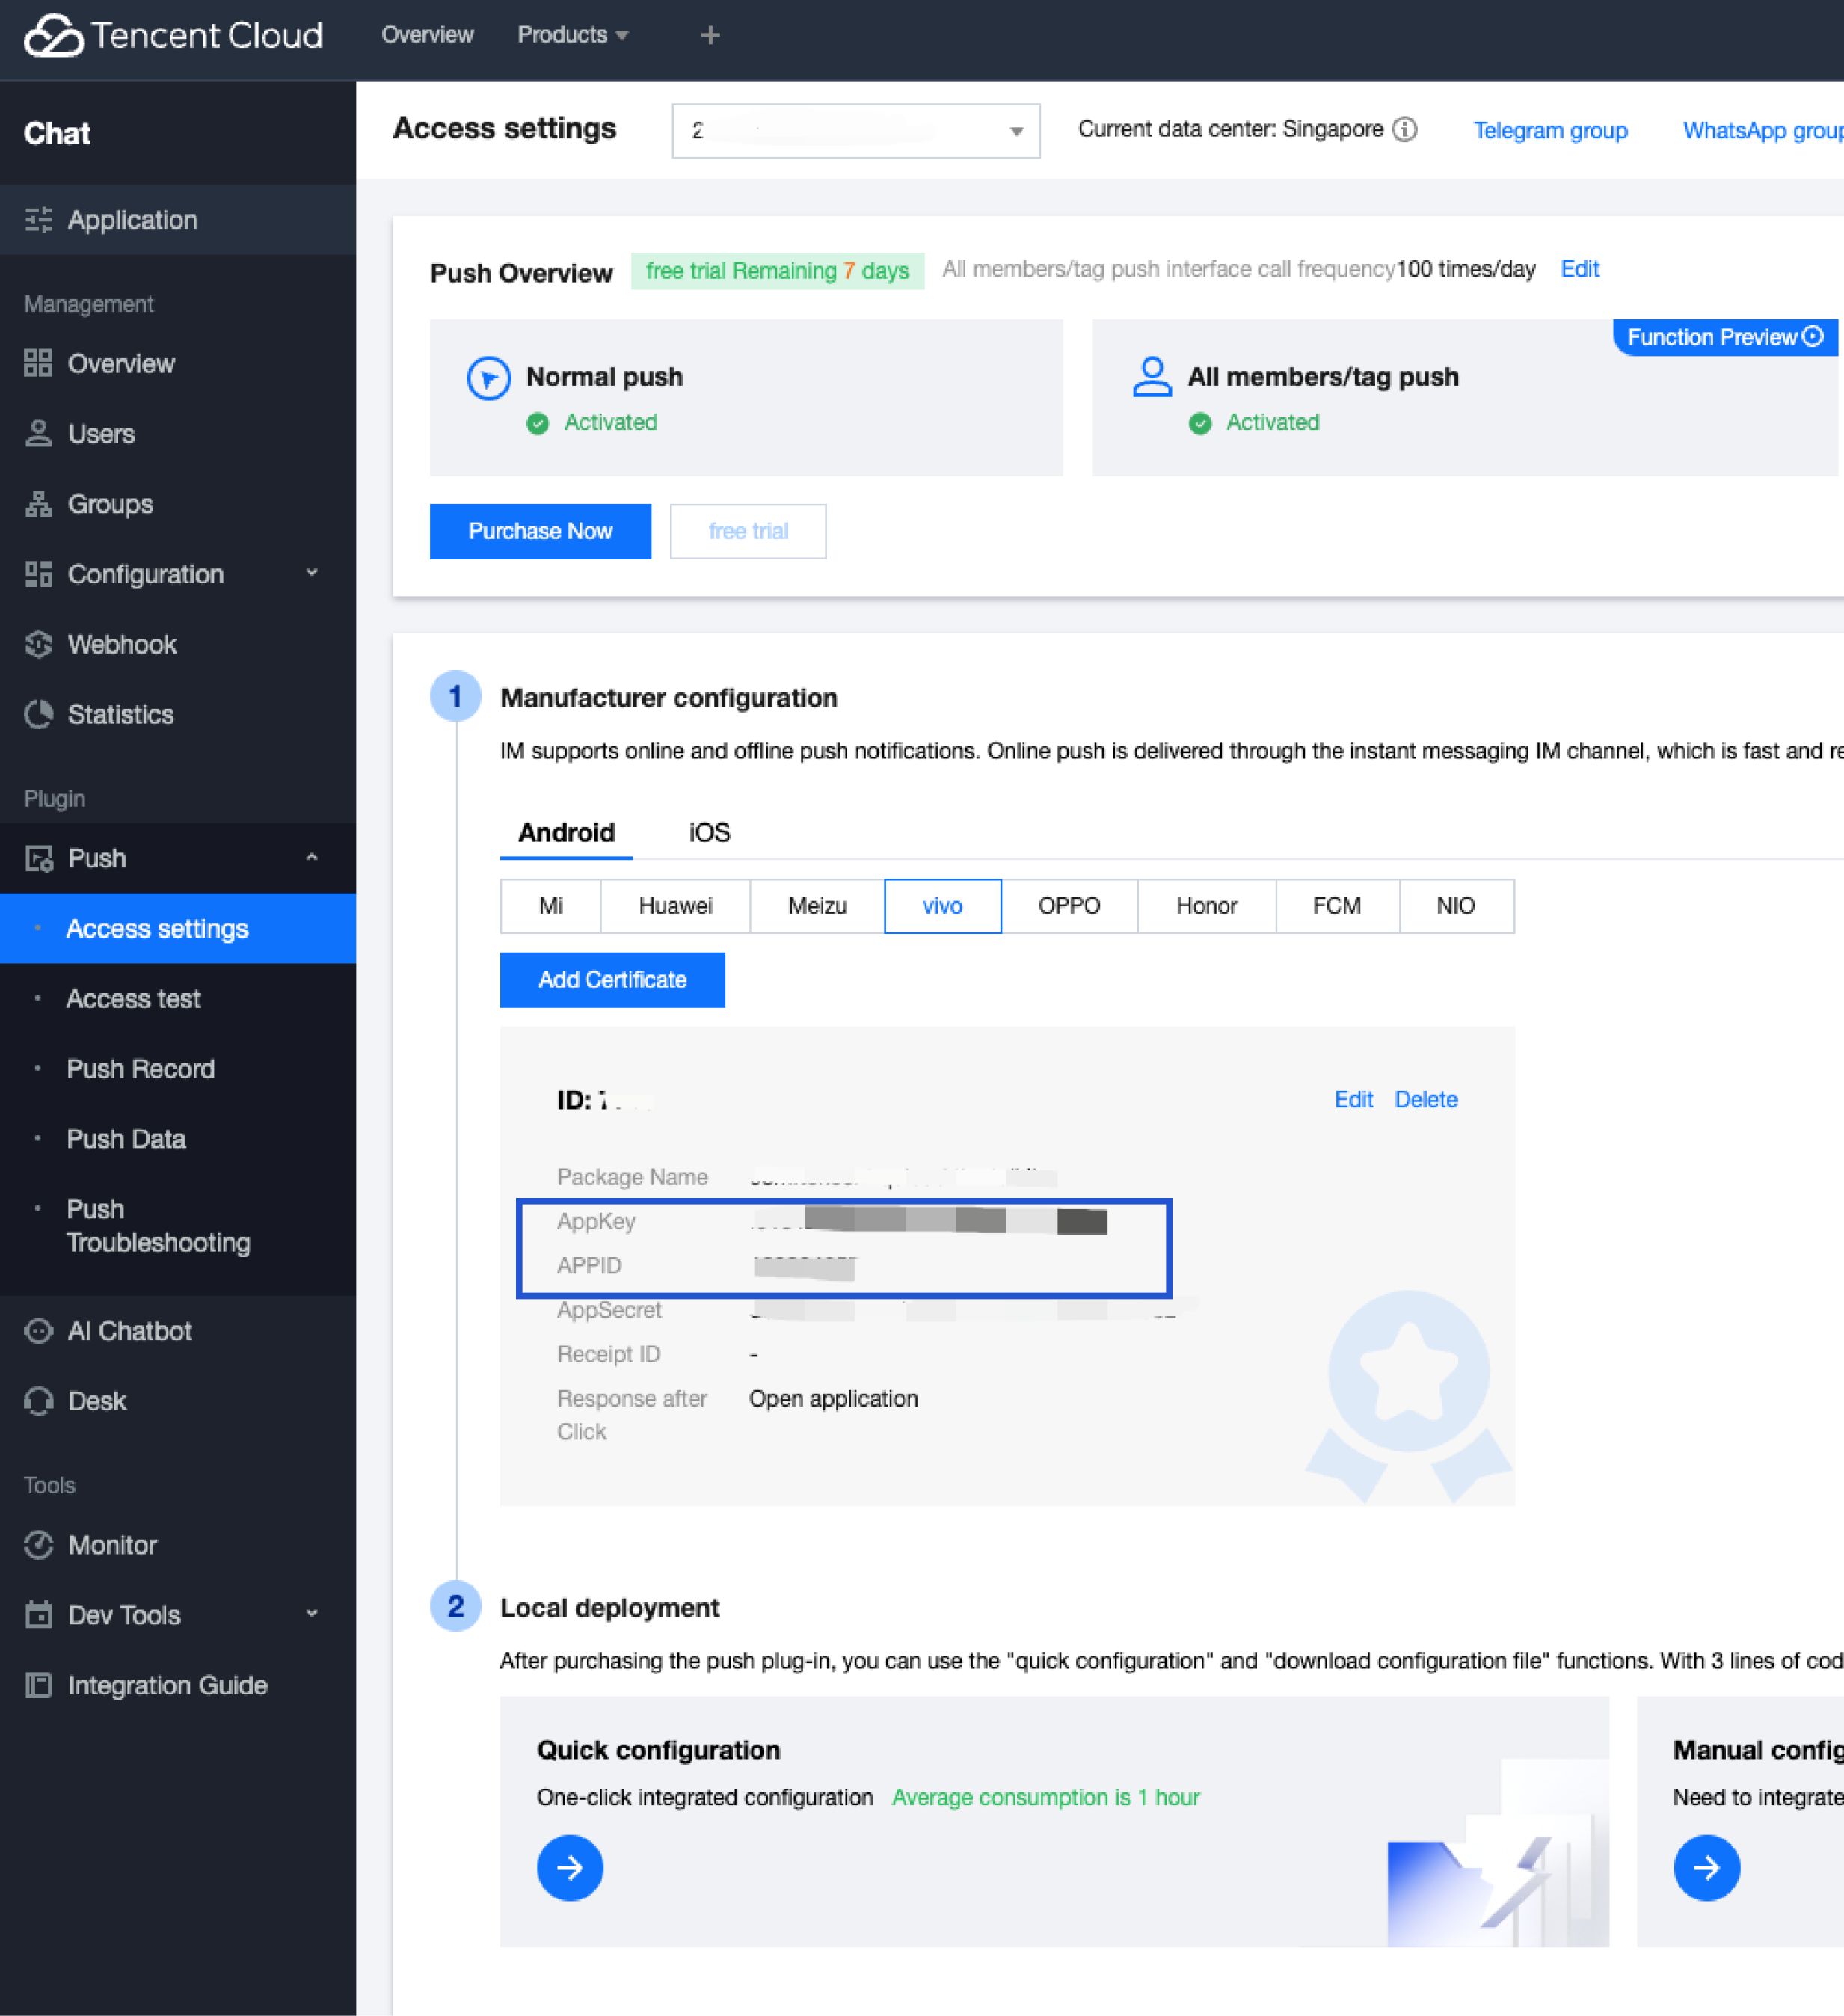
Console configuration
manifest.json Honor Configuration
Note:
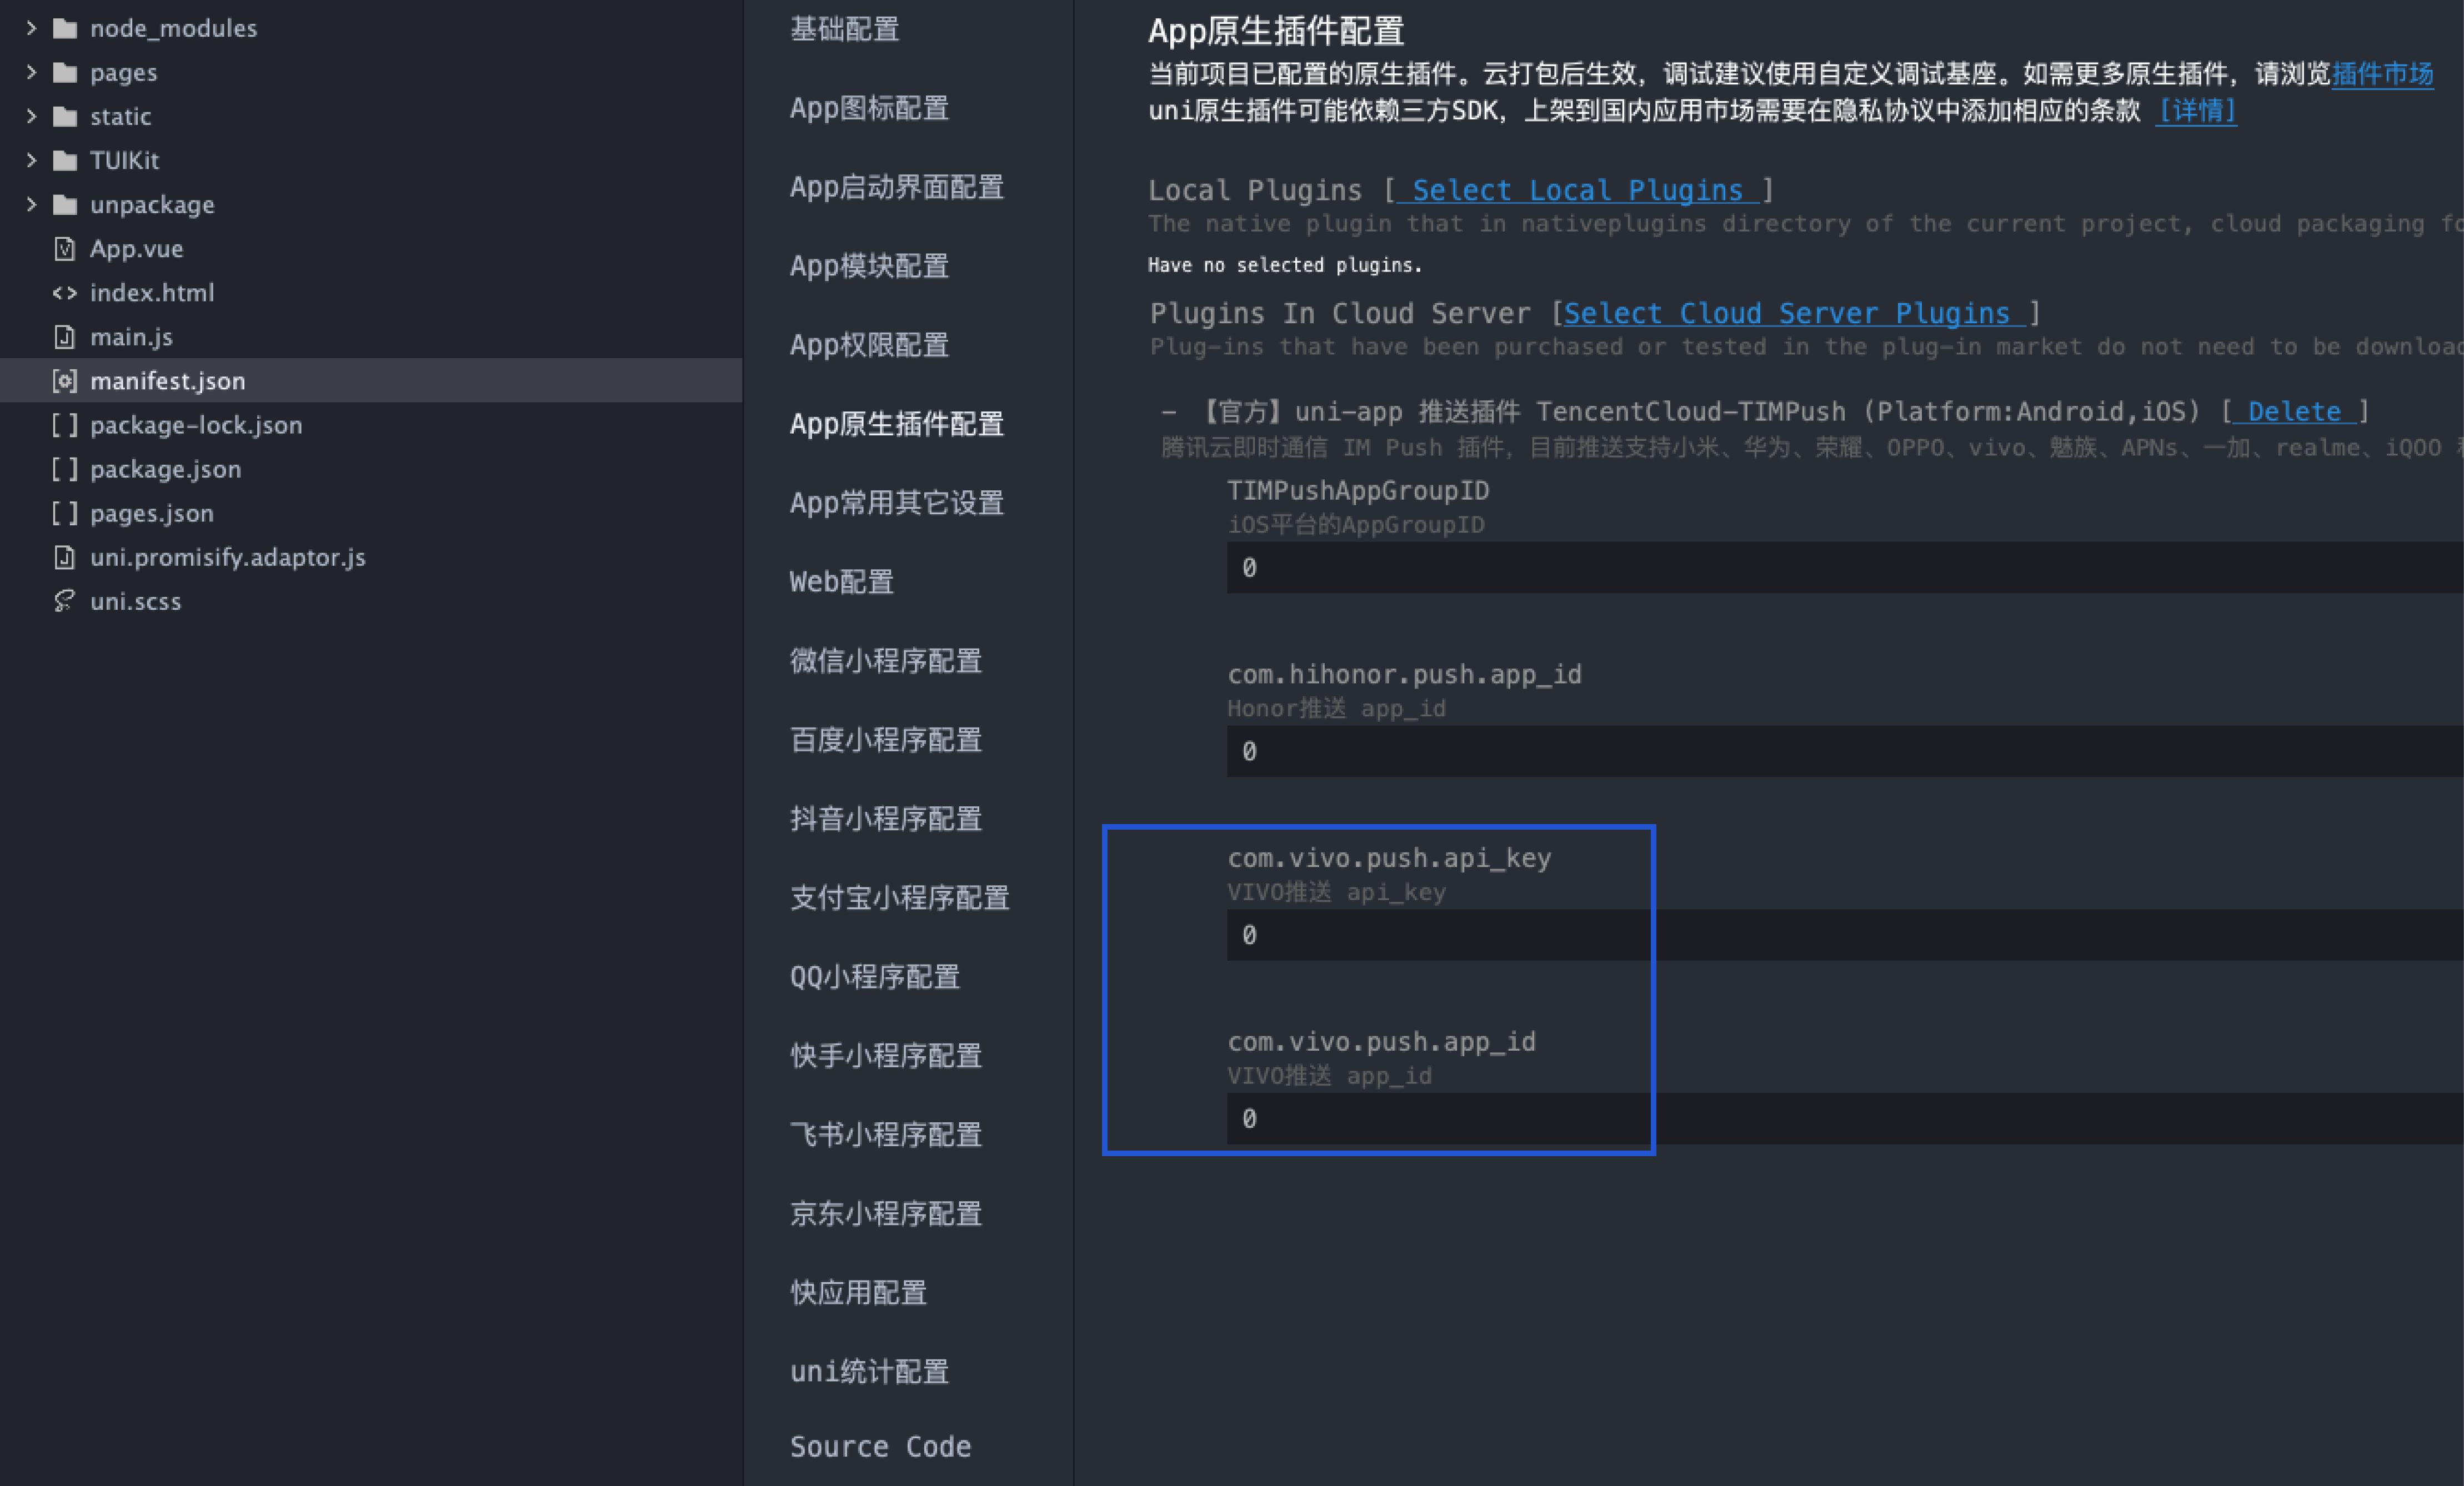
com.vivo.push.api_id corresponds to vivo's appID.
com.vivo.push.api_key corresponds to vivo's appKey.
When not enabling vivo push, com.vivo.push.api_id and com.vivo.push.api_key can be set to 0 by default.
Console configuration
manifest.json vivo Configuration
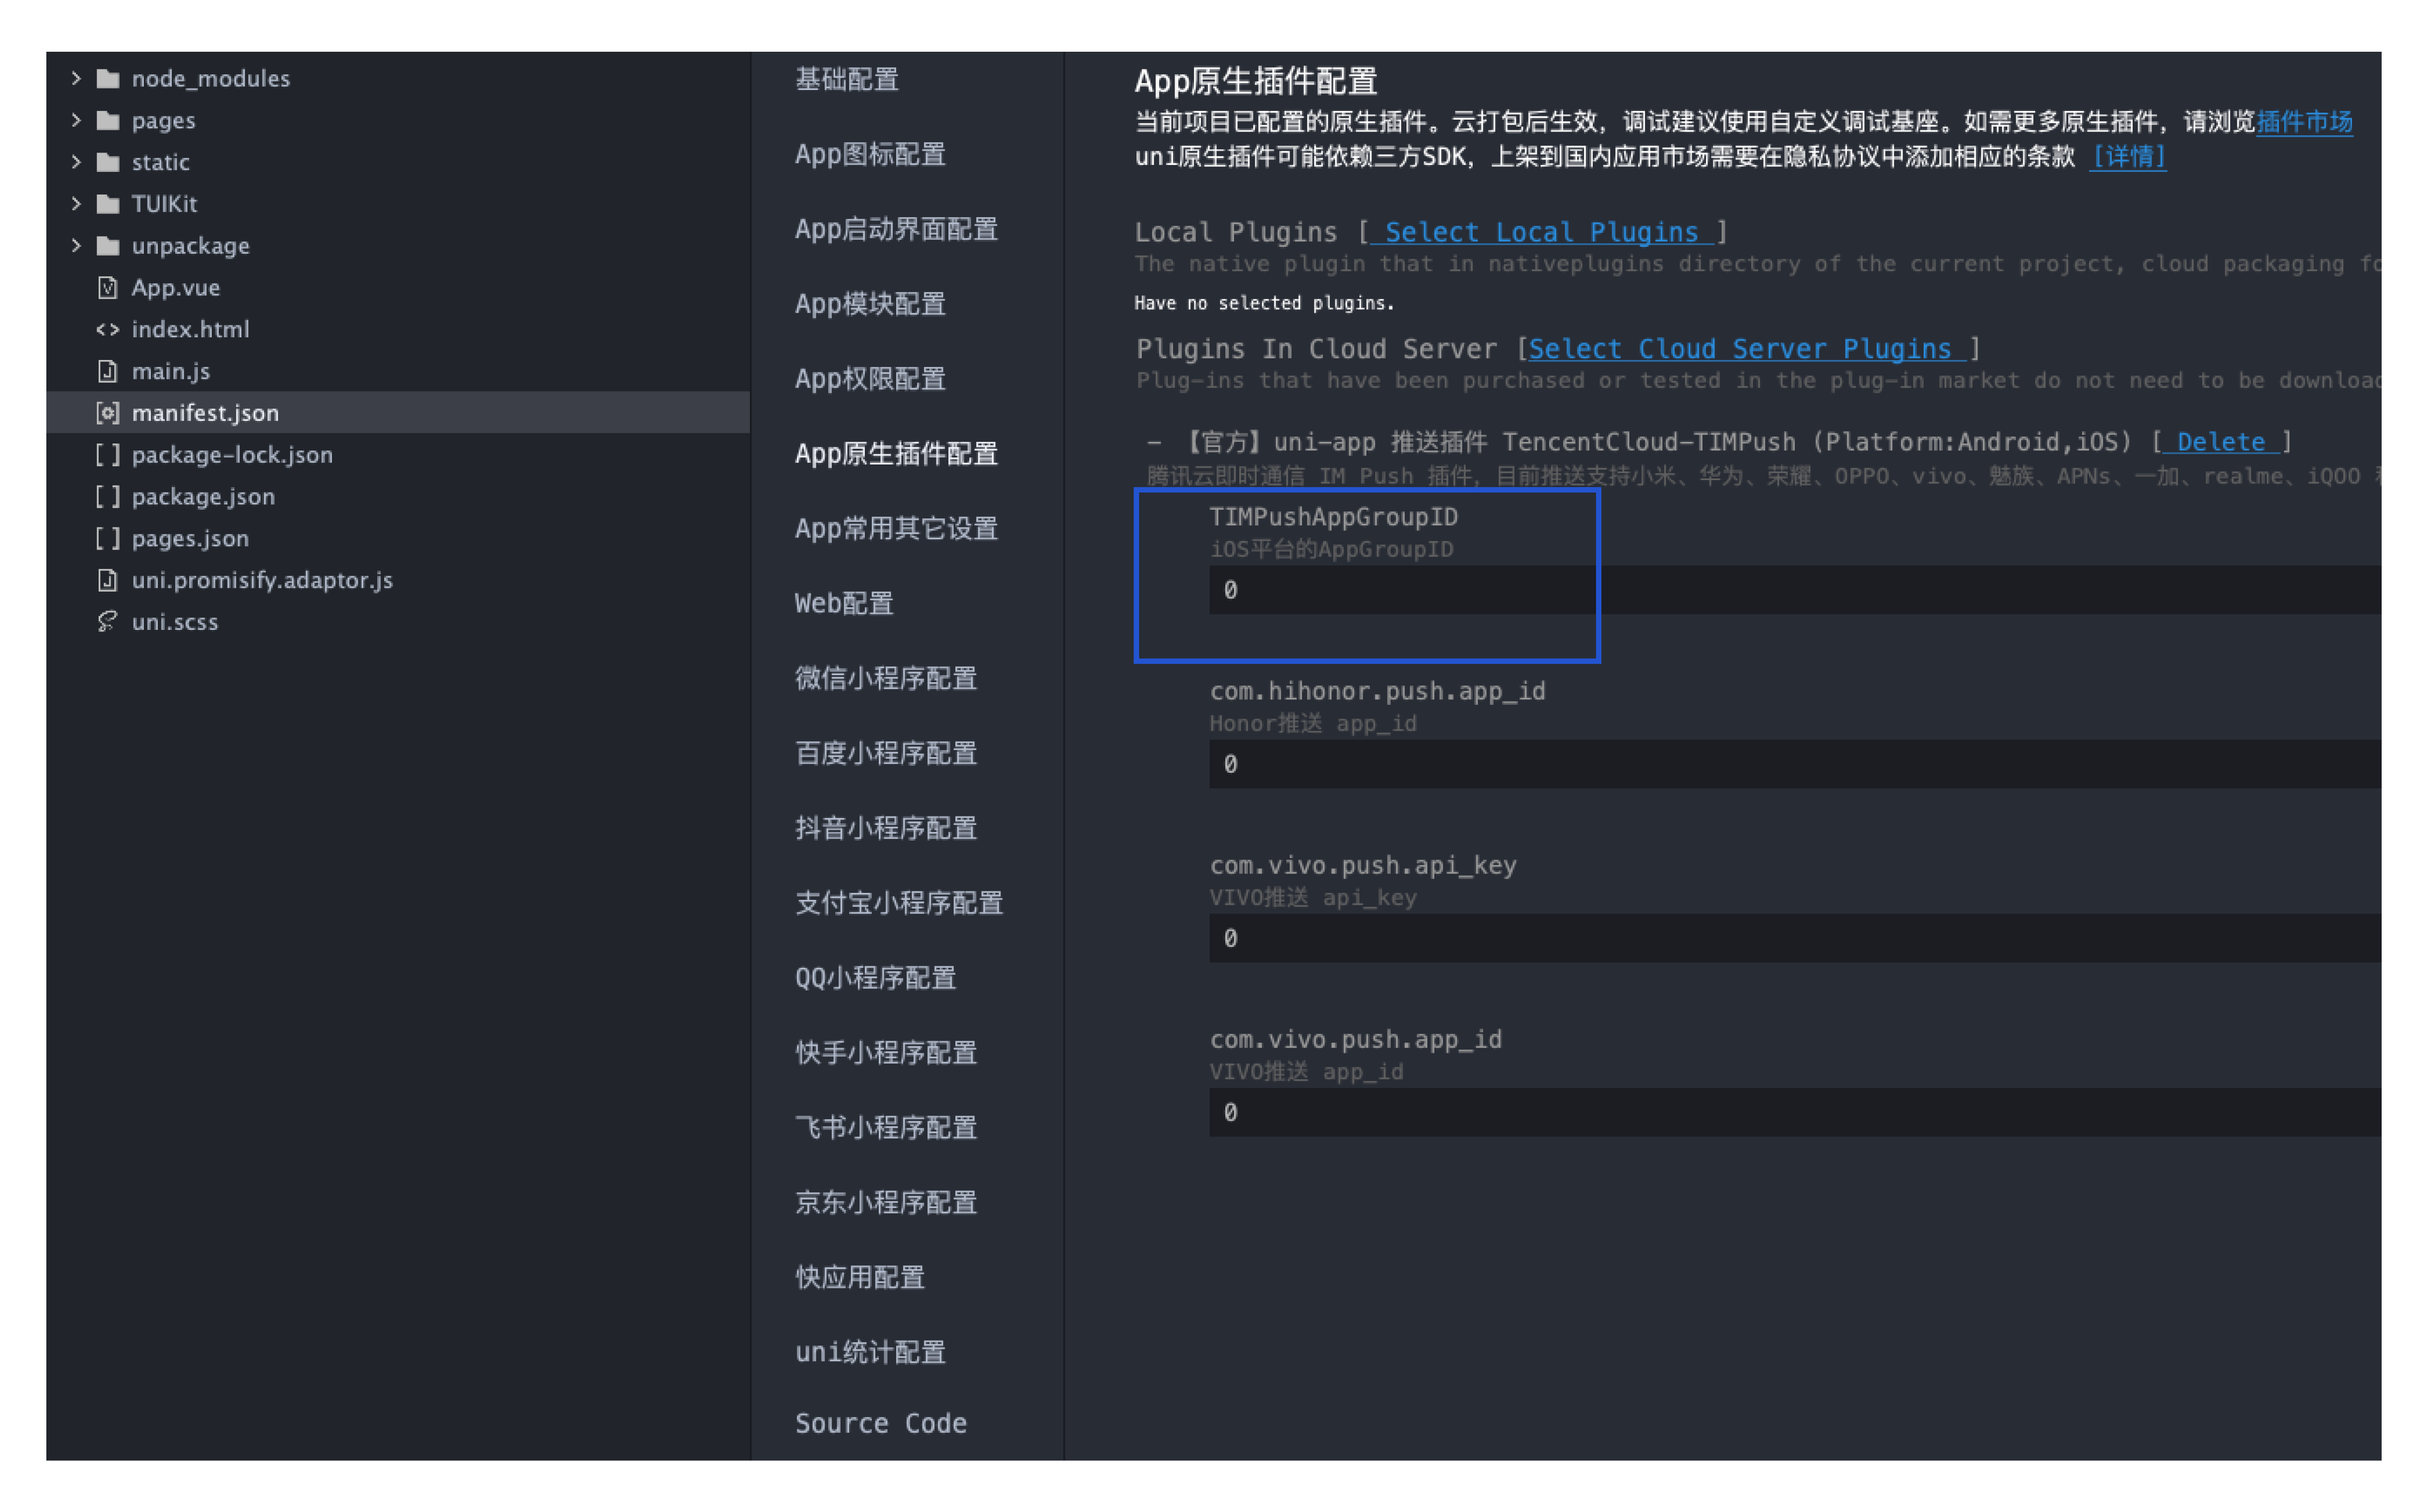
TIMPushAppGroupID corresponds to iOS's appGroupID. It is a configuration item for iOS reach reporting, refer to configuring-app-groups to generate appGroupID.
Note:
Not configuring TIMPushAppGroupID will not affect the normal push feature.
When iOS reach reporting is not enabled, TIMPushAppGroupID can be set to `0` by default;
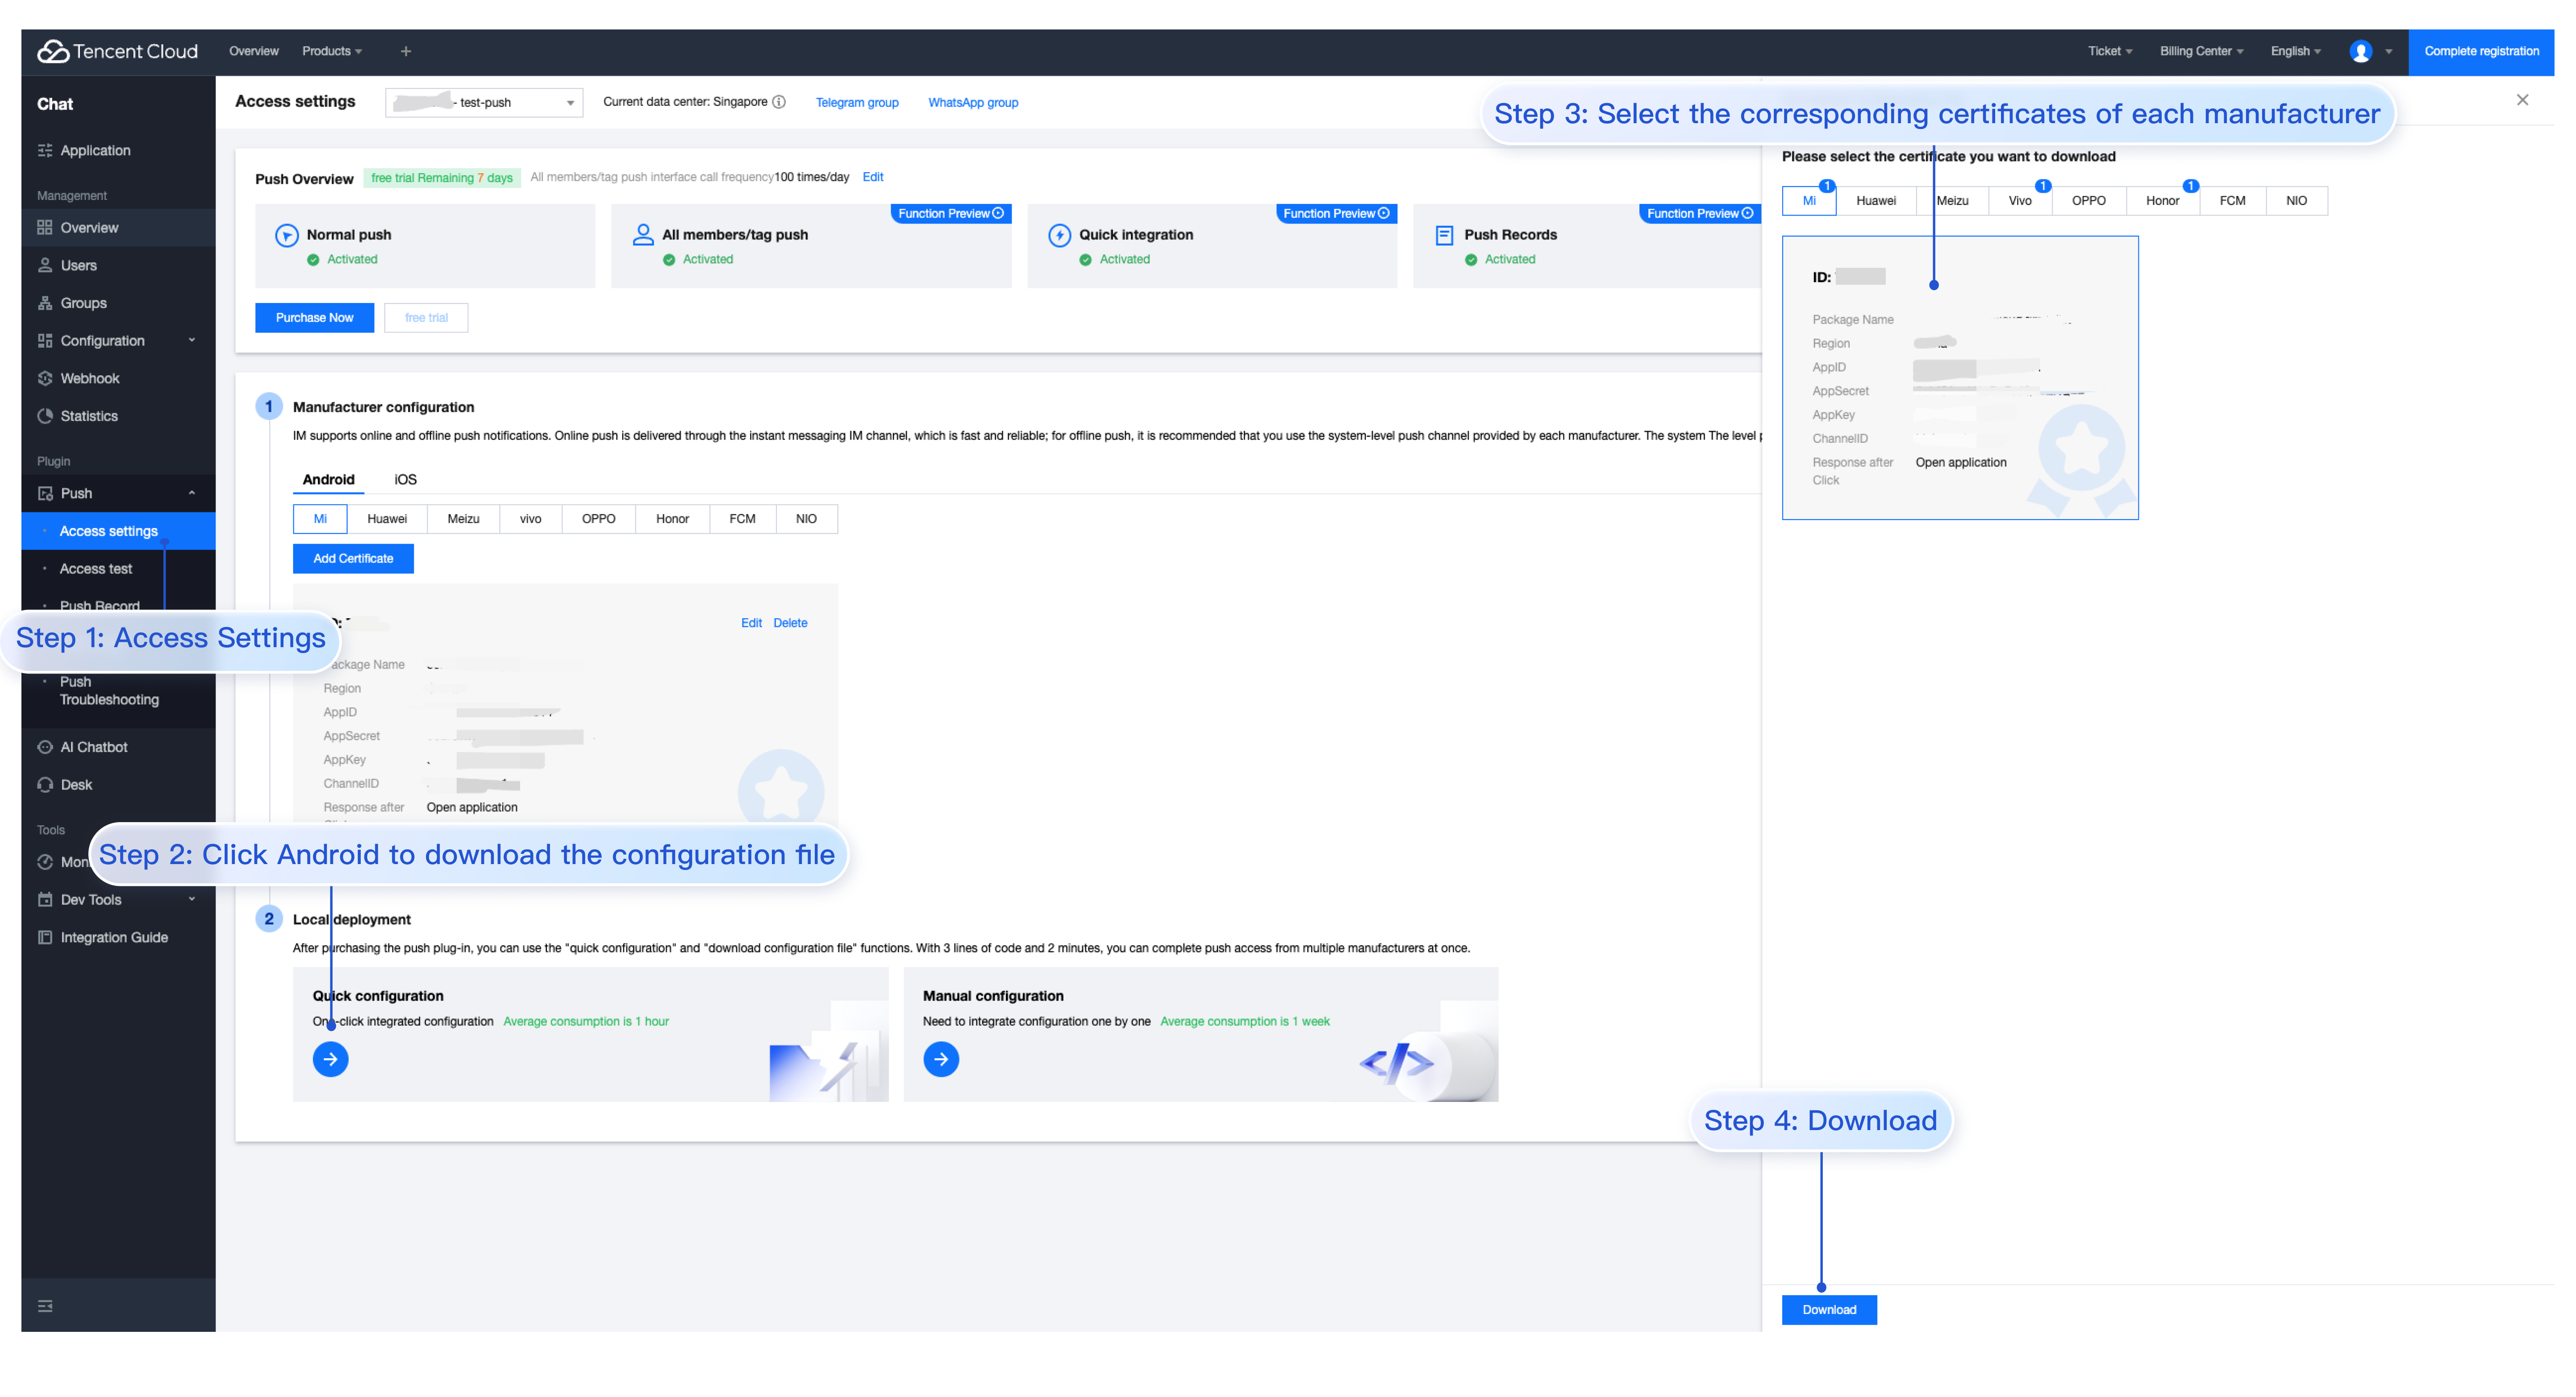
Ensure uni.requireNativePlugin successfully imports TencentCloud-TIMPush, as shown in the figure:
When logging into uikit, register TencentCloud-TIMPush into uikit.
import{ TUILogin }from"@tencentcloud/tui-core";
TUILogin.login({
SDKAppID:0,// Replace 0 with the SDKAppID of your IM app during integration.
userID:'',
// UserSig is the cipher for users to sign in to Instant Messaging, essentially being the ciphertext obtained from encrypting information such as UserID.
// This method is only suitable for running Demo locally and debugging functions. For details, please refer to https://www.tencentcloud.com/document/product/269/32688?from_cn_redirect=1
userSig:'',
// Should you require to send image, voice, video, file and other rich media messages, please set `Setting` to `true`
useUploadPlugin:true,
framework:`vue${vueVersion}`// Current development uses framework vue2 / vue3
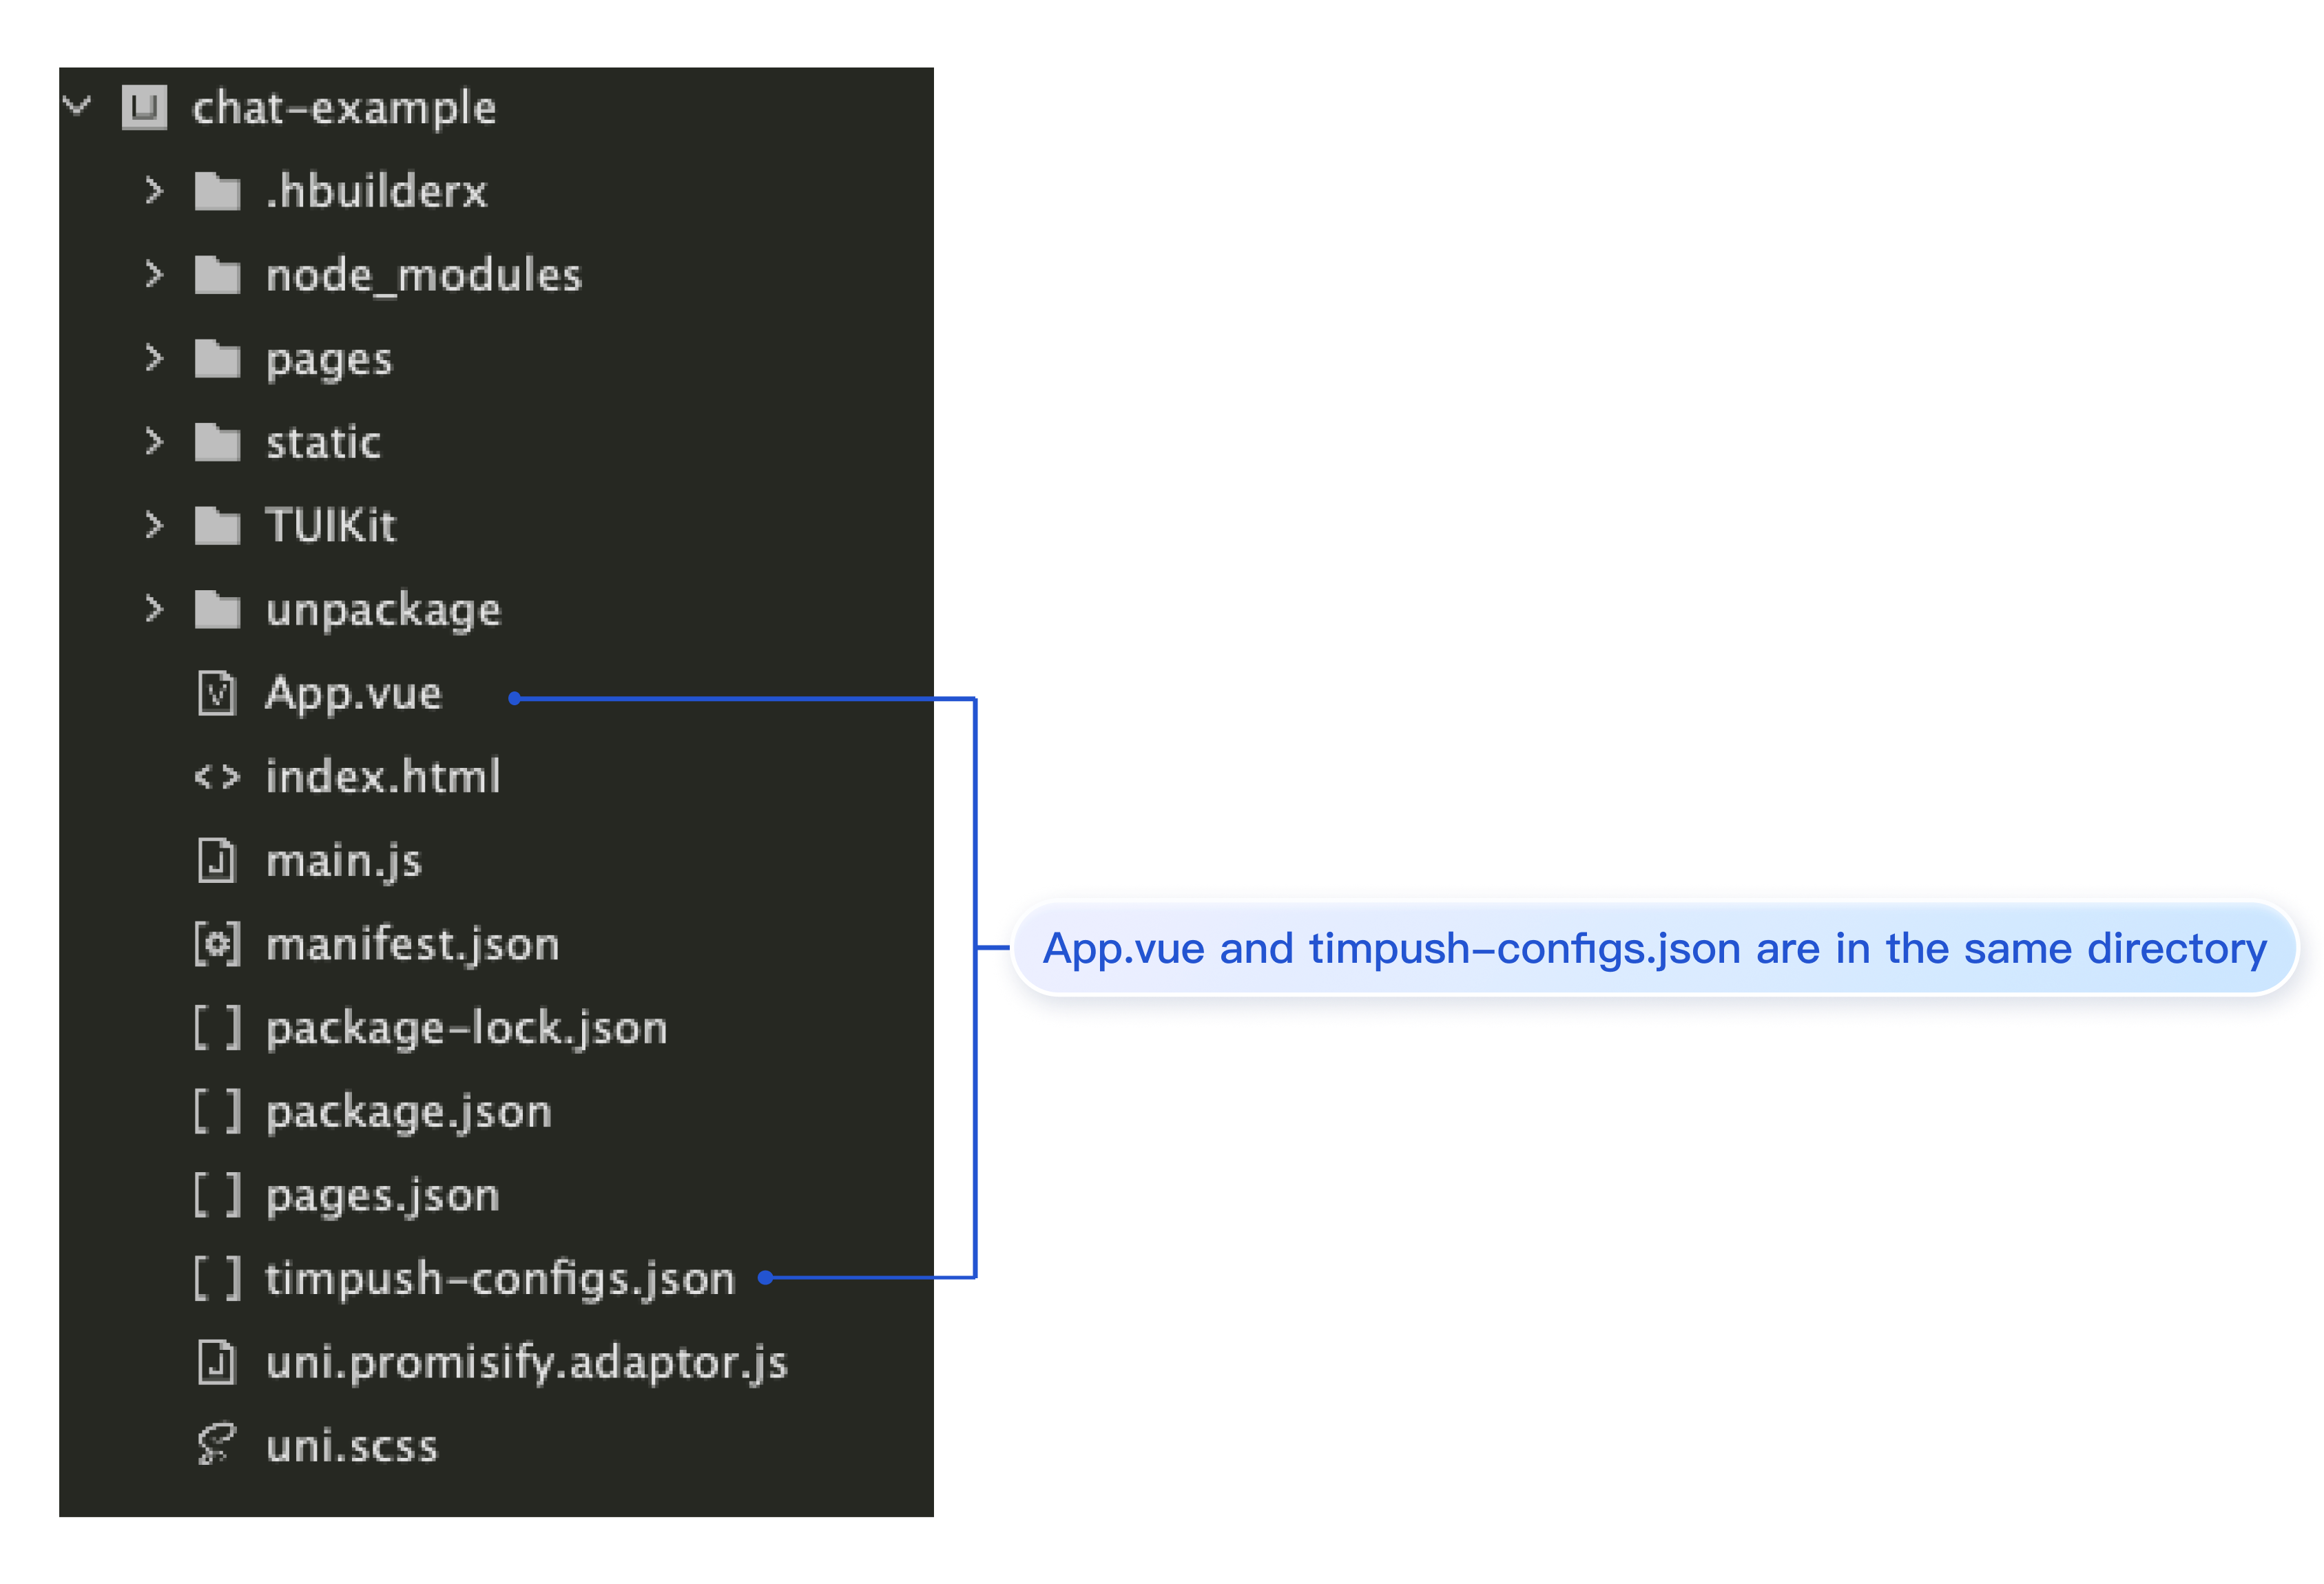
androidConfig: uni.$TIMPushConfigs,// Android push configuration, pass null if not needed.
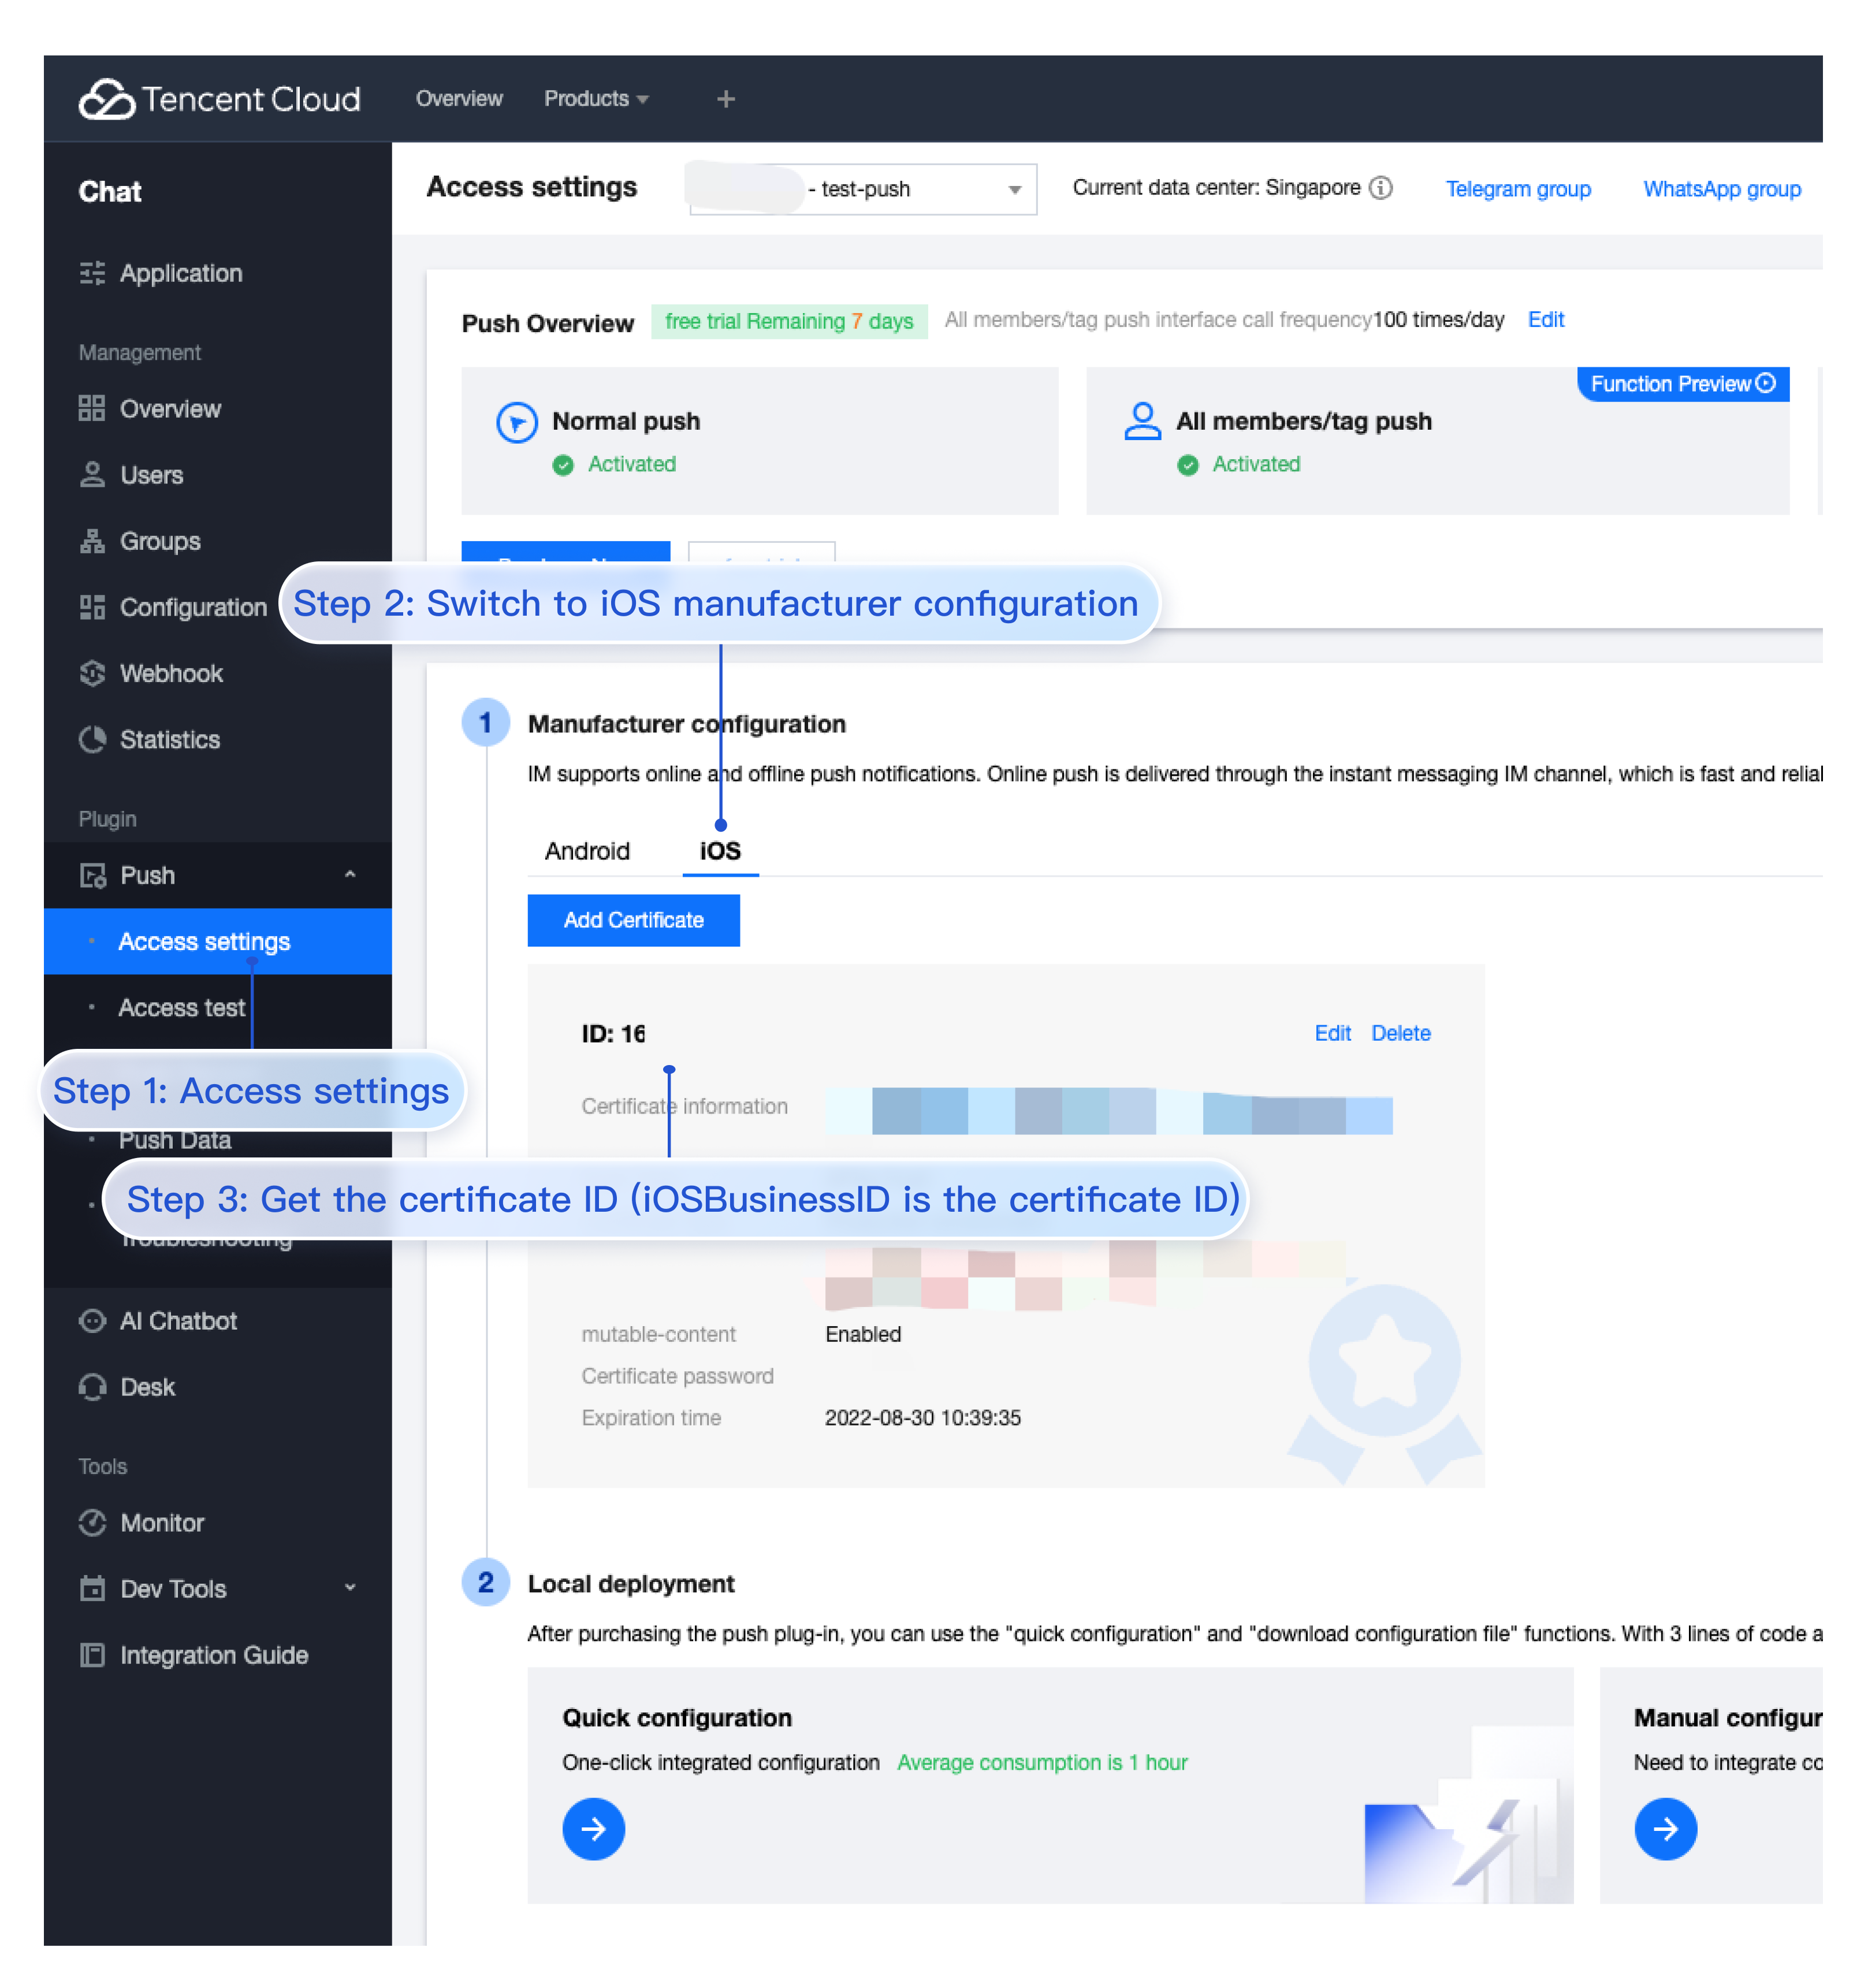
iOSConfig:{
"iOSBusinessID":""// iOS push configuration, pass null if not needed.
}
}
})
Before logging into chat, register TencentCloud-TIMPush in the chat.
import TencentCloudChat from'@tencentcloud/chat';
const chat = TencentCloudChat.create({SDKAppID:0})// Replace 0 with the SDKAppID of your IM app during integration
chat.registerPlugin({
'tim-push': uni.$TIMPush,
pushConfig:{
androidConfig: uni.$TIMPushConfigs,// Android push configuration, pass null if not needed.
iOSConfig:{
"iOSBusinessID":"xxx"// iOS push configuration, pass null if not needed.
}
}
})
chat.login({
userID:'',// User ID.
userSig:''// The password for logging into Chat, which is essentially the ciphertext obtained by encrypting information such as UserID. For the detailed generation method, please refer to https://www.tencentcloud.com/document/product/269/32688?from_cn_redirect=1
})
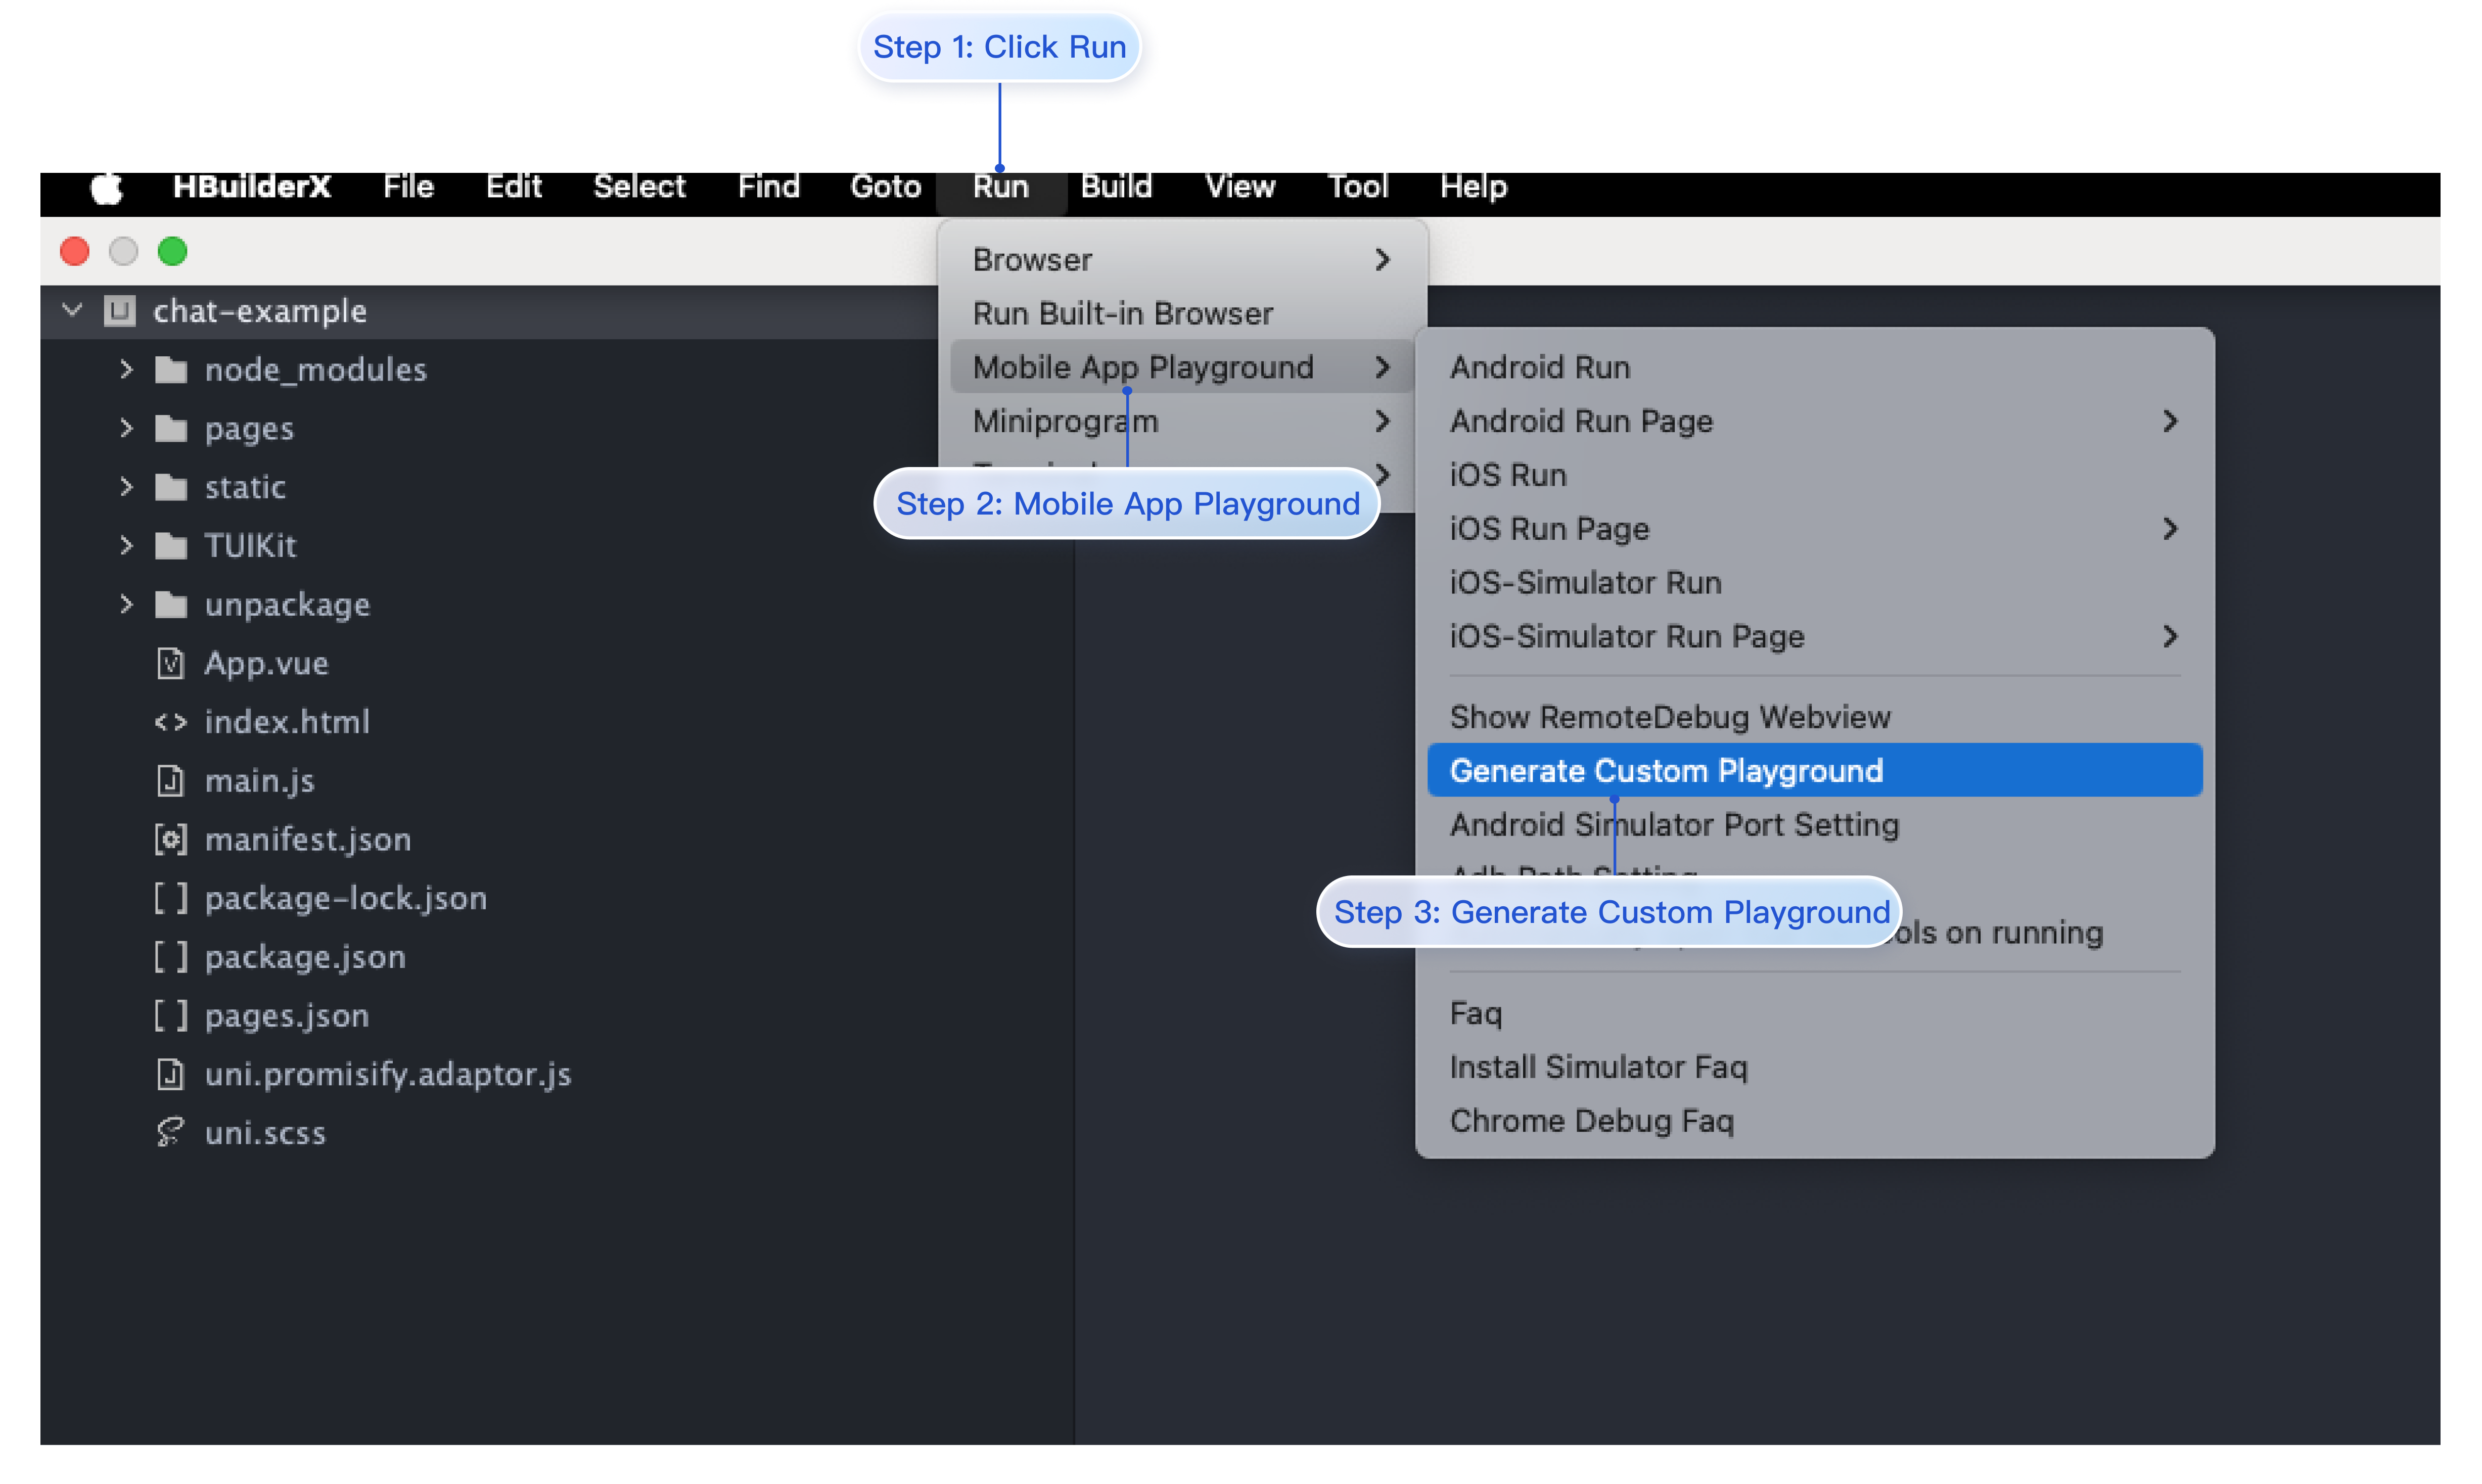
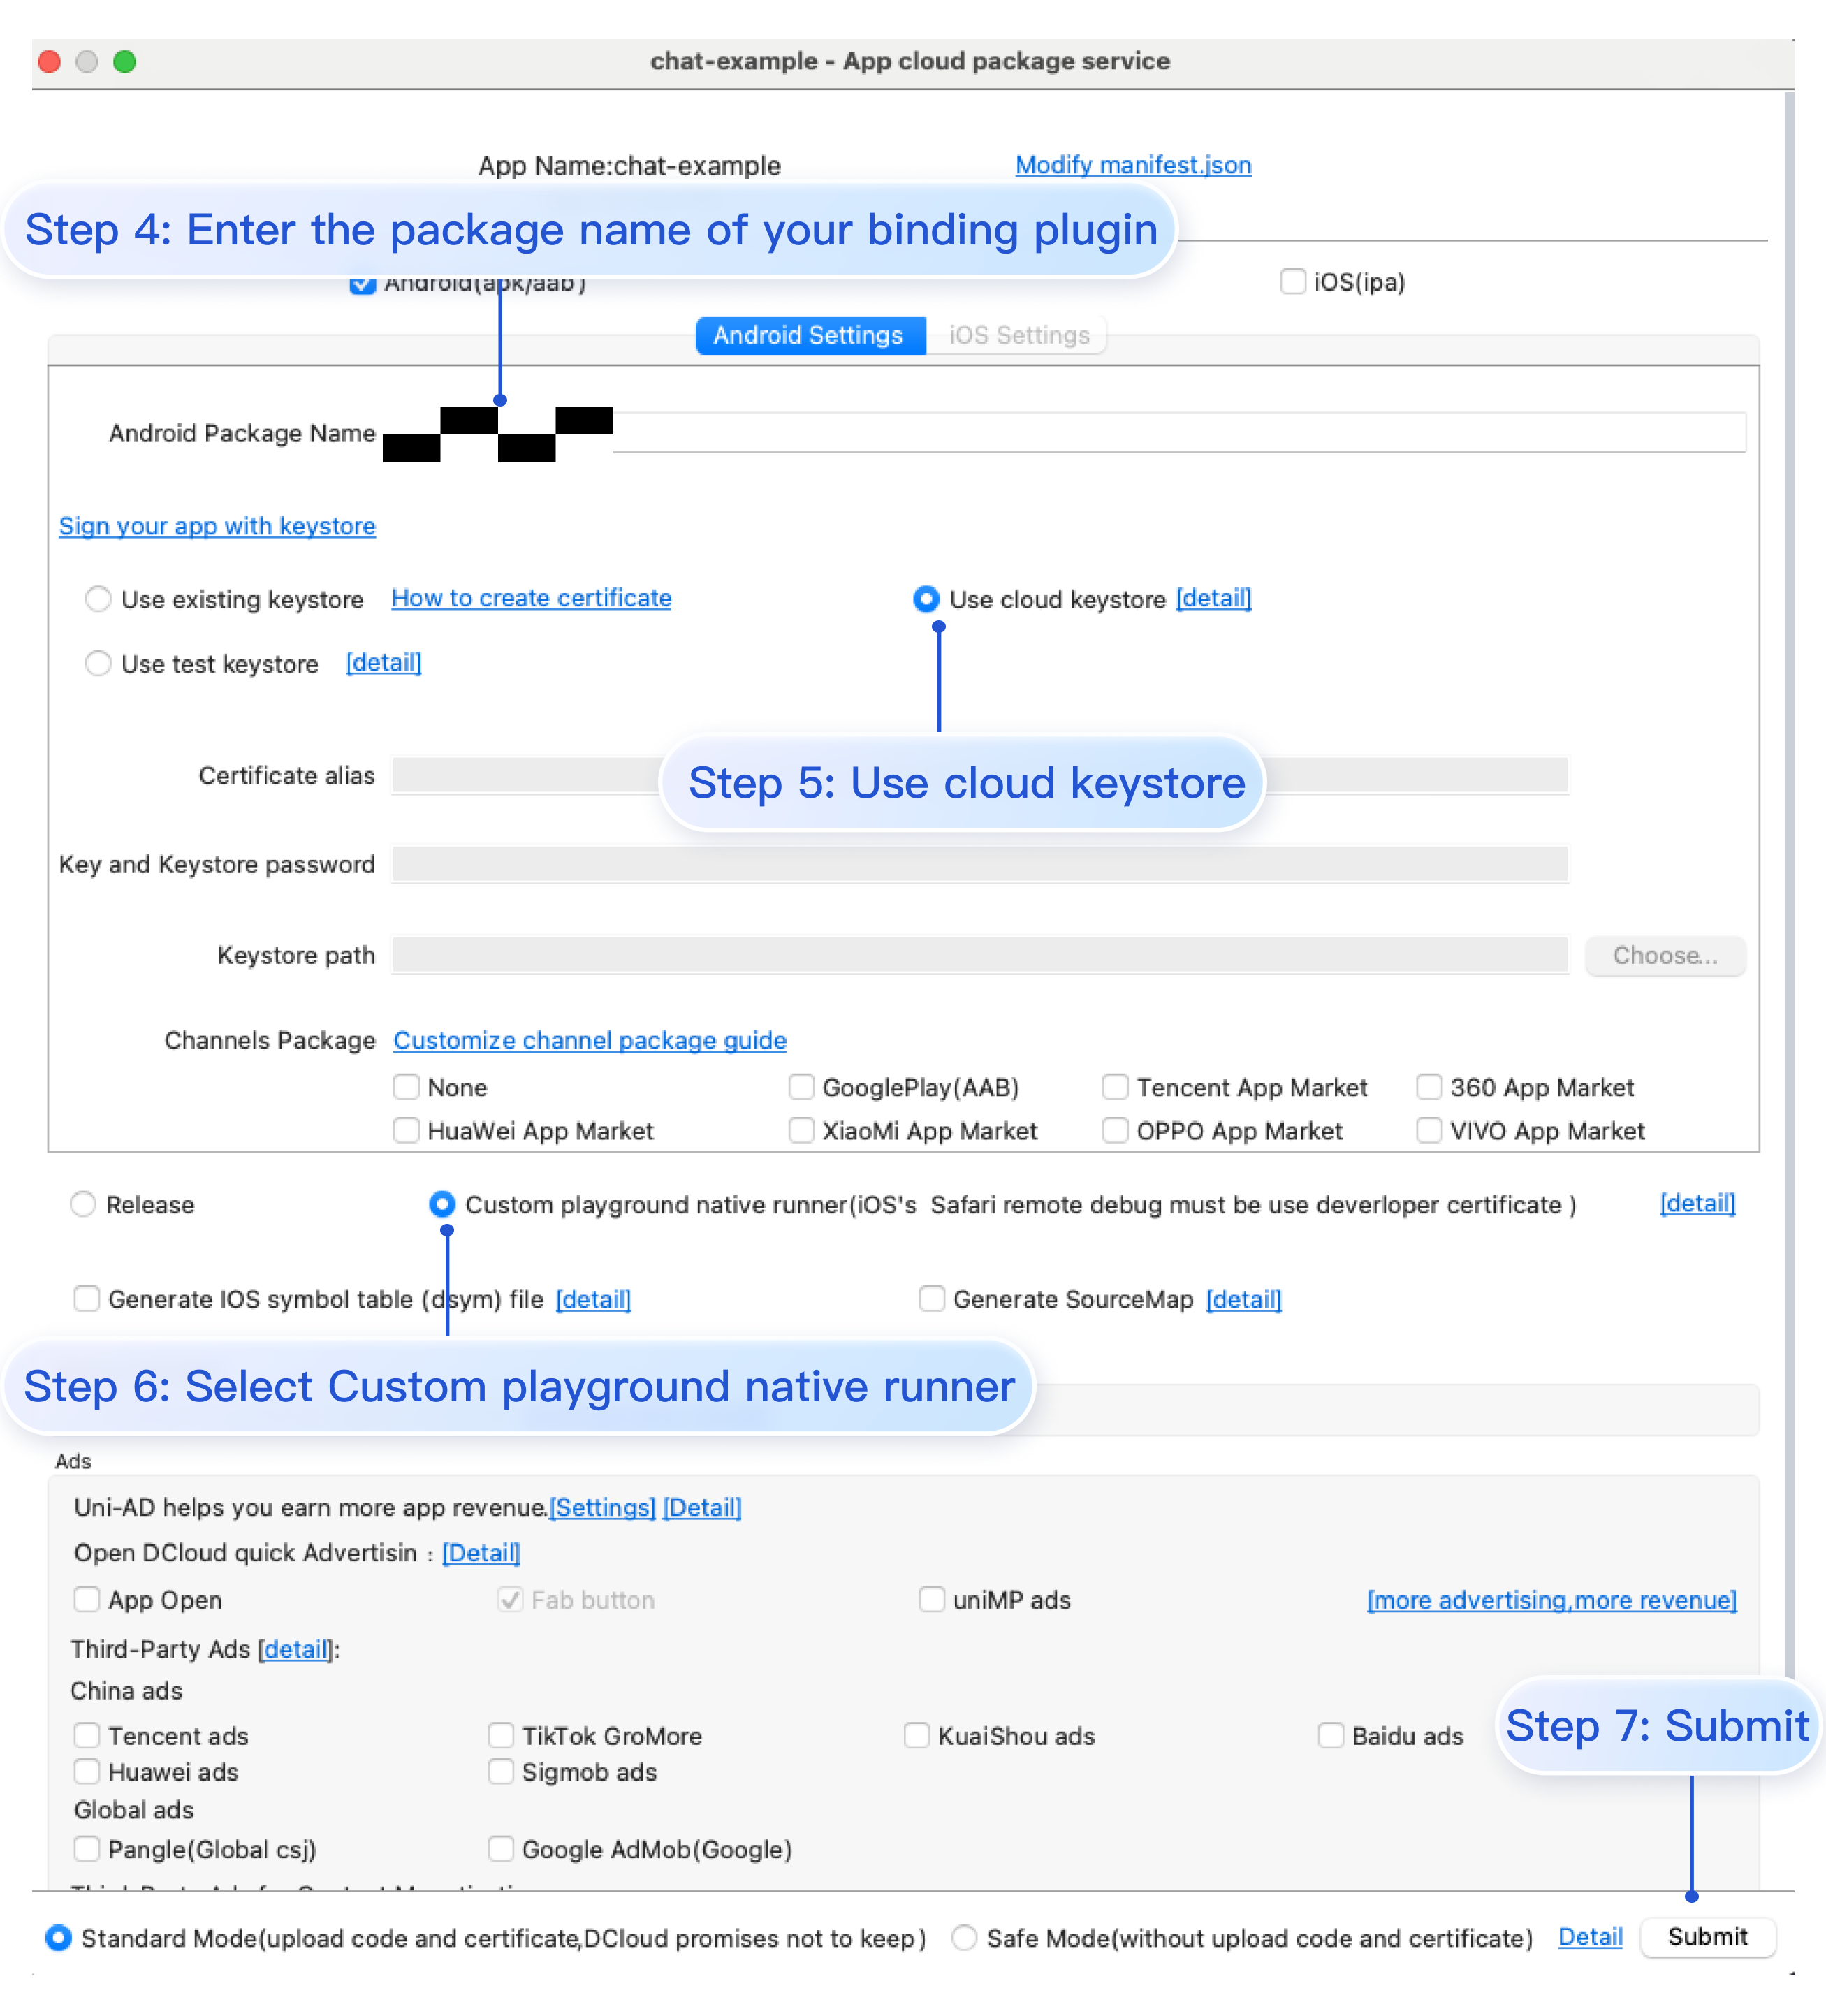
Step 5. Create a Custom Base
click HBuilderX's Run> Run on Mobile or Emulator> Make a Custom Debugging BaseCreate a Custom Base.
Note:
Configure Native Plugins, it is necessary to package a Custom Base for testing.
When creating a base, the Android package name is the application package name bound during the activation of cloud packaging for plugins.
Use cloud certificates.
Step 6. Run and log in to the project, confirm the integration of TencentCloud-TIMPush is successful.
During runtime, choose to run with a Custom Base. In HBuilder's log, confirm the printing of TIMPushModule._setToken ok, indicating successful integration of TencentCloud-TIMPush, as shown in the picture:
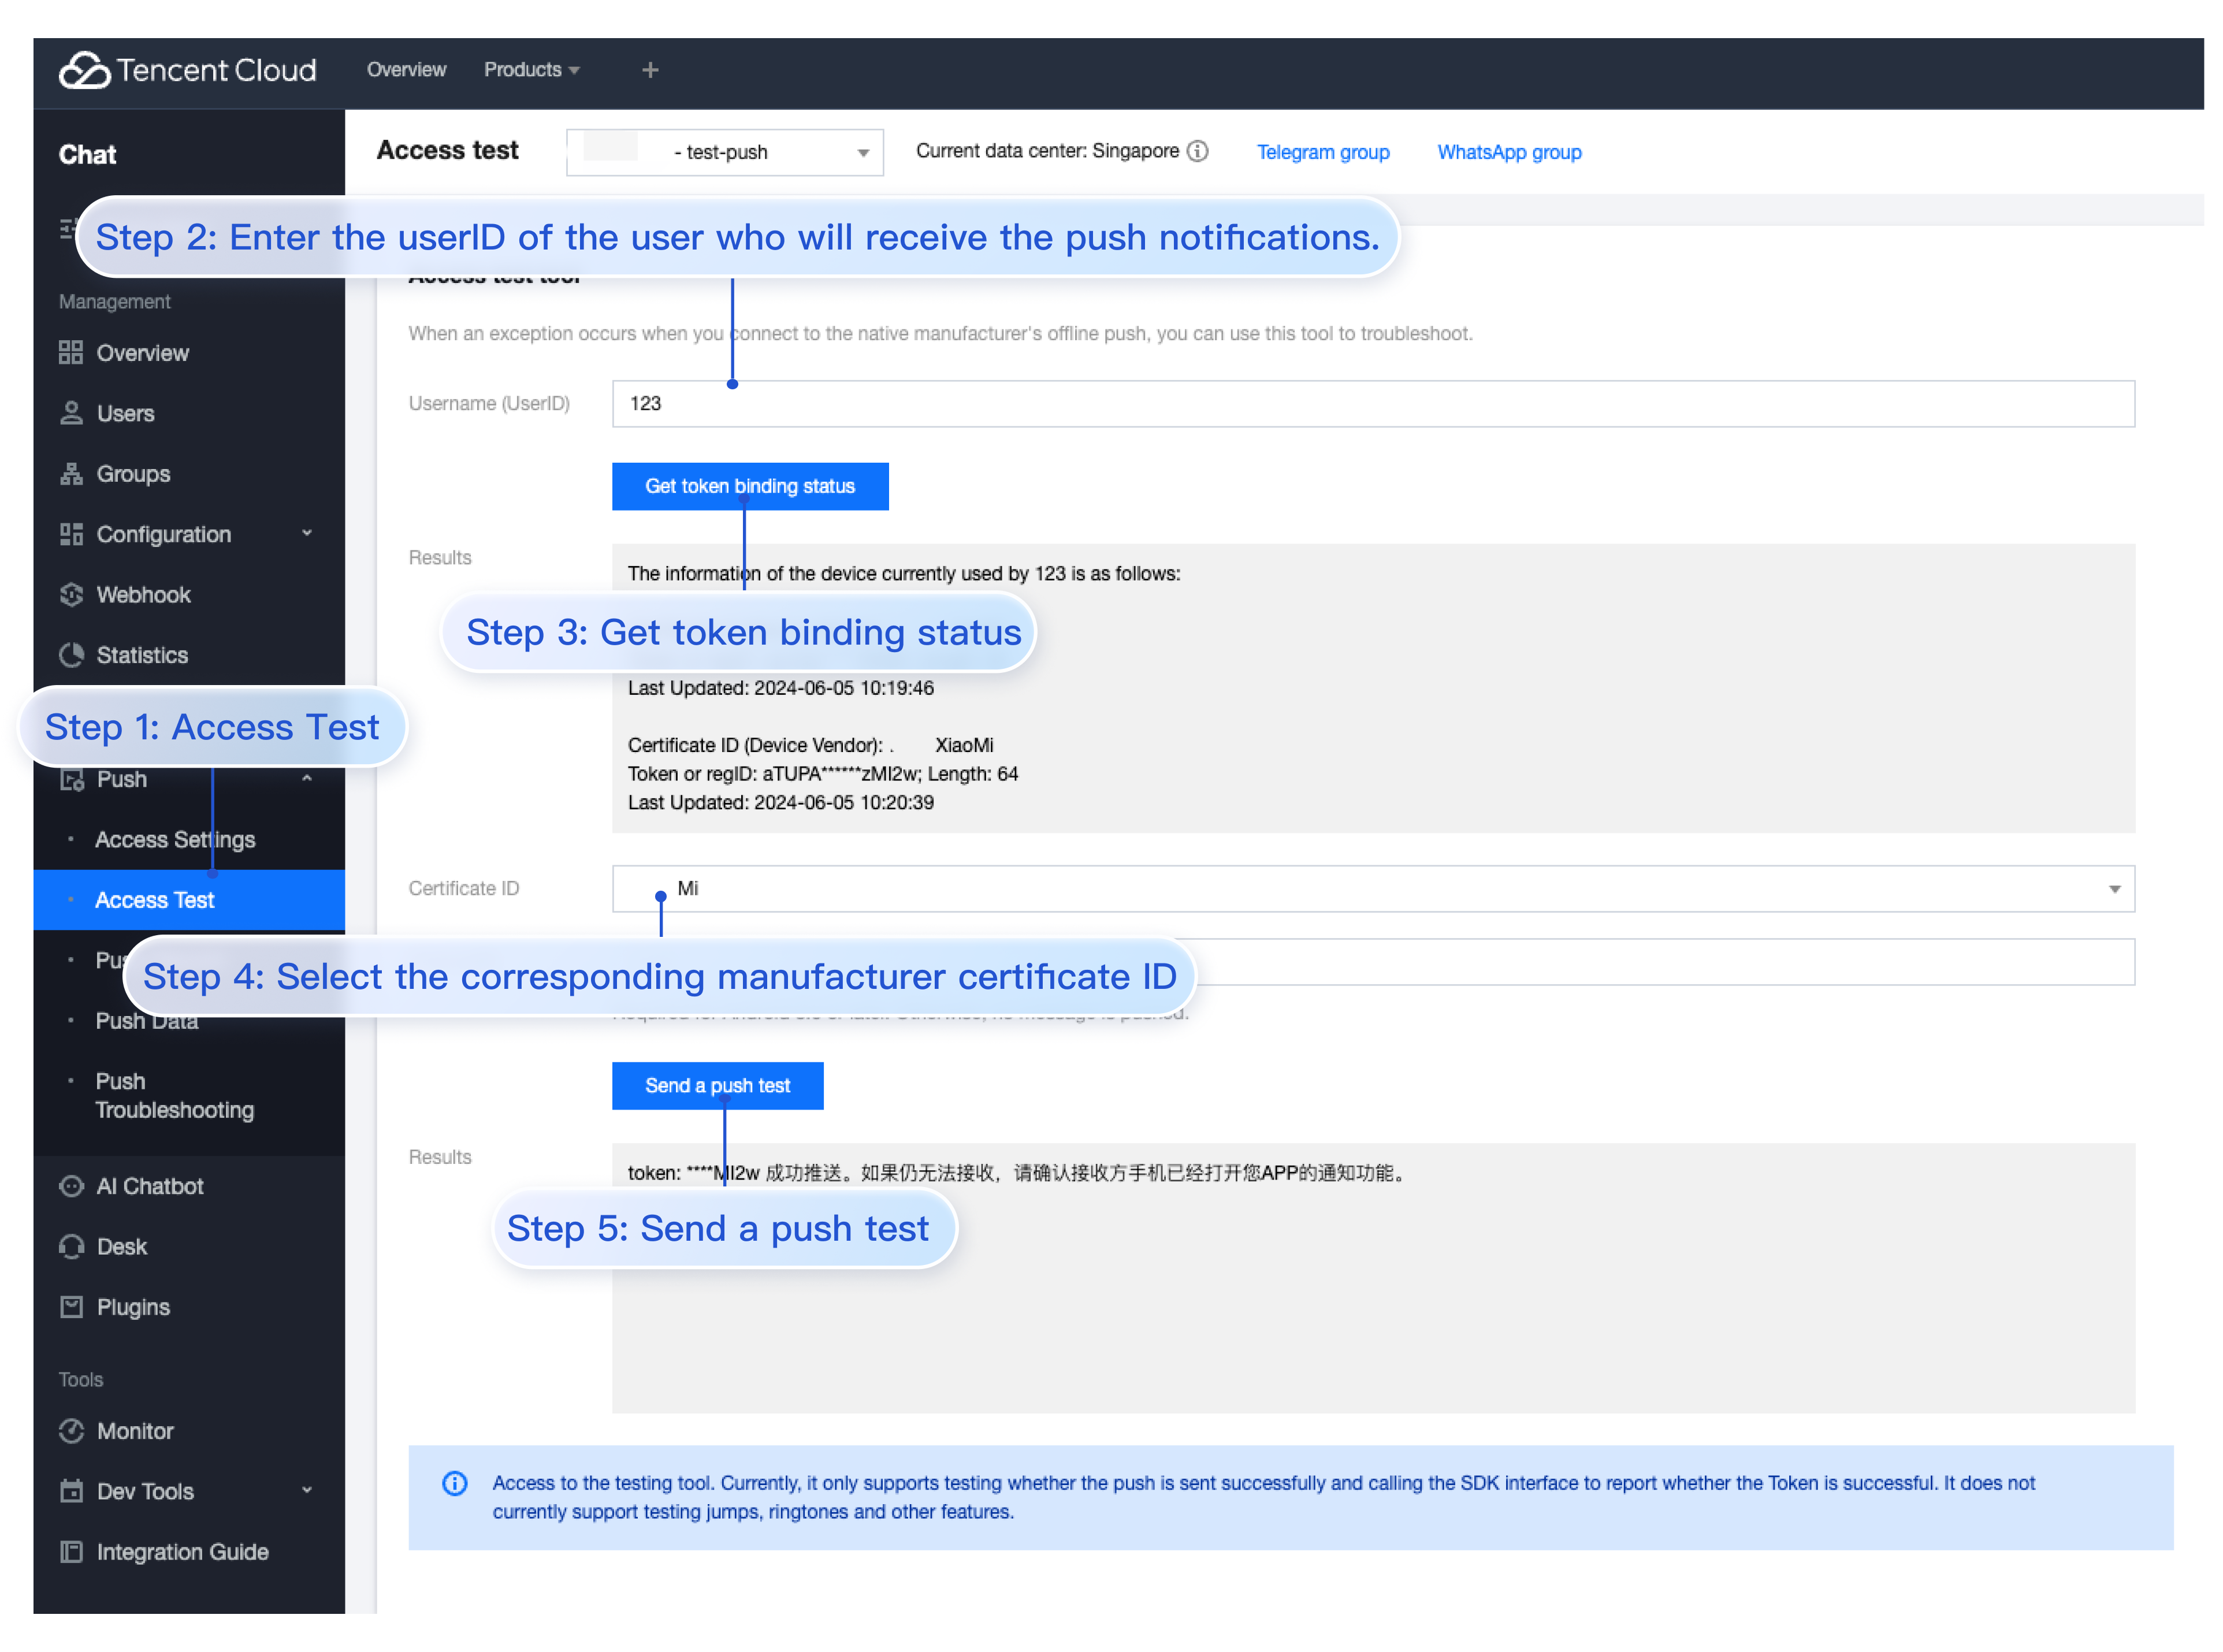
Step 7. Receive your first push notification.
Go to the IM Console Push > Push Test to send your first push notification. As shown in the figure:
Note:
1. The receiver's application must be in the background or the process terminated.
2. Live broadcast groups do not support offline message push.
More Advanced Features (Highly Recommended)
1. Set Push Content
Integration (UI Included)
Integration Without UI
When using TUIChatService to send messages in uikit, set the related parameters for offlinePushInfo. For example, when sending a standard text message, the code is as follows:
// Send Plain Text Message
let promise = TUIChatService.sendTextMessage(
{
payload:{text:'Hello world!'}
},
{
// If the recipient is offline, the message will be stored for roaming and an offline push will be executed (when the recipient's App is in the background or the process has been killed). The integrator can define the title and content of the offline push
offlinePushInfo:{
title:'',// Offline Push Title.
description:'',// Offline Push Content.
extension:'',// Offline Push Transparent Content
}
}
);
promise.catch((error)=>{
// Business side can handle errors by catching exceptions through promise.catch when an invocation exception occurs
When sending a message in chat, set the related fields for offlinePushInfo as follows:
// Message Sending Options
chat.sendMessage(message,{
// If the recipient is offline, the message will be stored for roaming and an offline push will be executed (when the recipient's App is in the background or the process has been killed). The integrator can define the title and content of the offline push
Retrieve the transmission content in the App.vue file, and configure the specified jump page.
onLaunch:function(){
// #ifdef APP-PLUS
// In App.vue, listen in the lifecycle hook onLaunch
if(uni.$TIMPush){
uni.$TIMPush.setOfflinePushListener((data)=>{
// The content within the pass-through entity, excluding the pushed Message
console.log('setOfflinePushListener', data);
// Redirect to a specified interface within the application
uni.navigateTo({
url:"/pages/xxx/xxx",
});
});
}
// #endif
}
Note:
Here you can retrieve the pass-through content configured during the push notification.
Here you can configure the application redirect interface.
During cross-platform interoperability, ensure that extension remains consistent, extension must include the entity field.
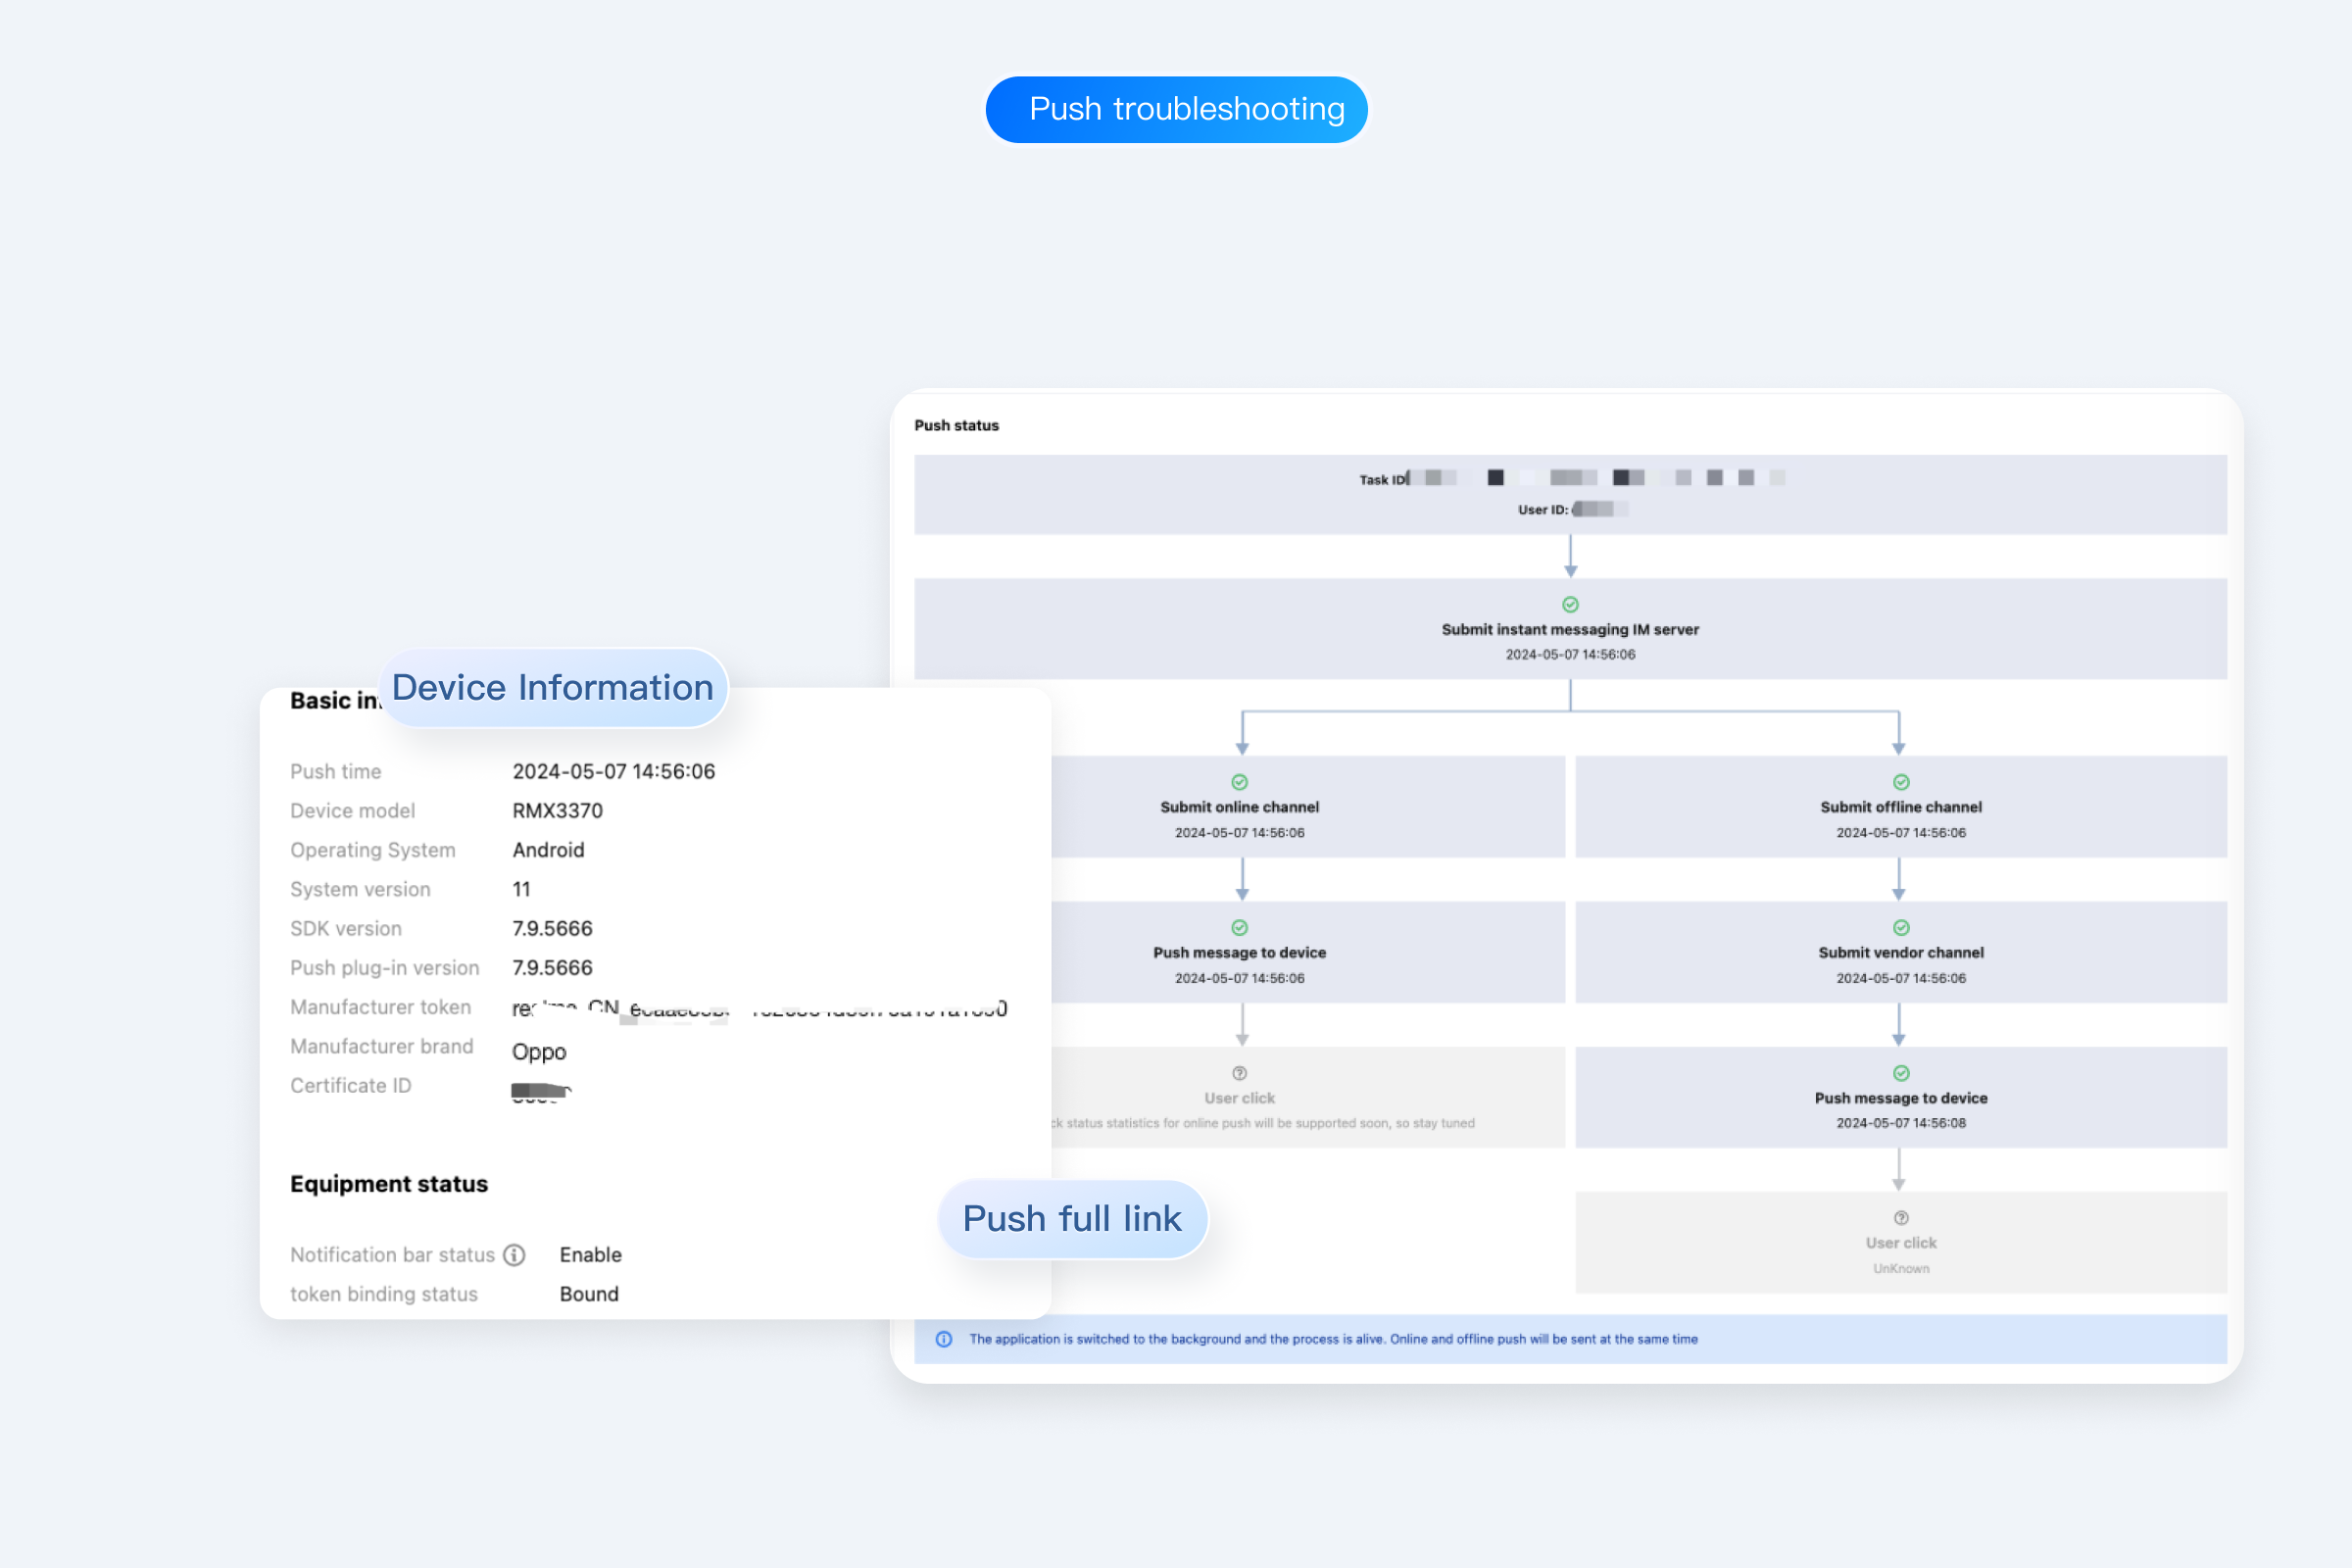
Anomaly Troubleshooting
If users do not receive offline push notifications when the App is offline, they can use the Troubleshooting Tools for end-to-end troubleshooting of push details.
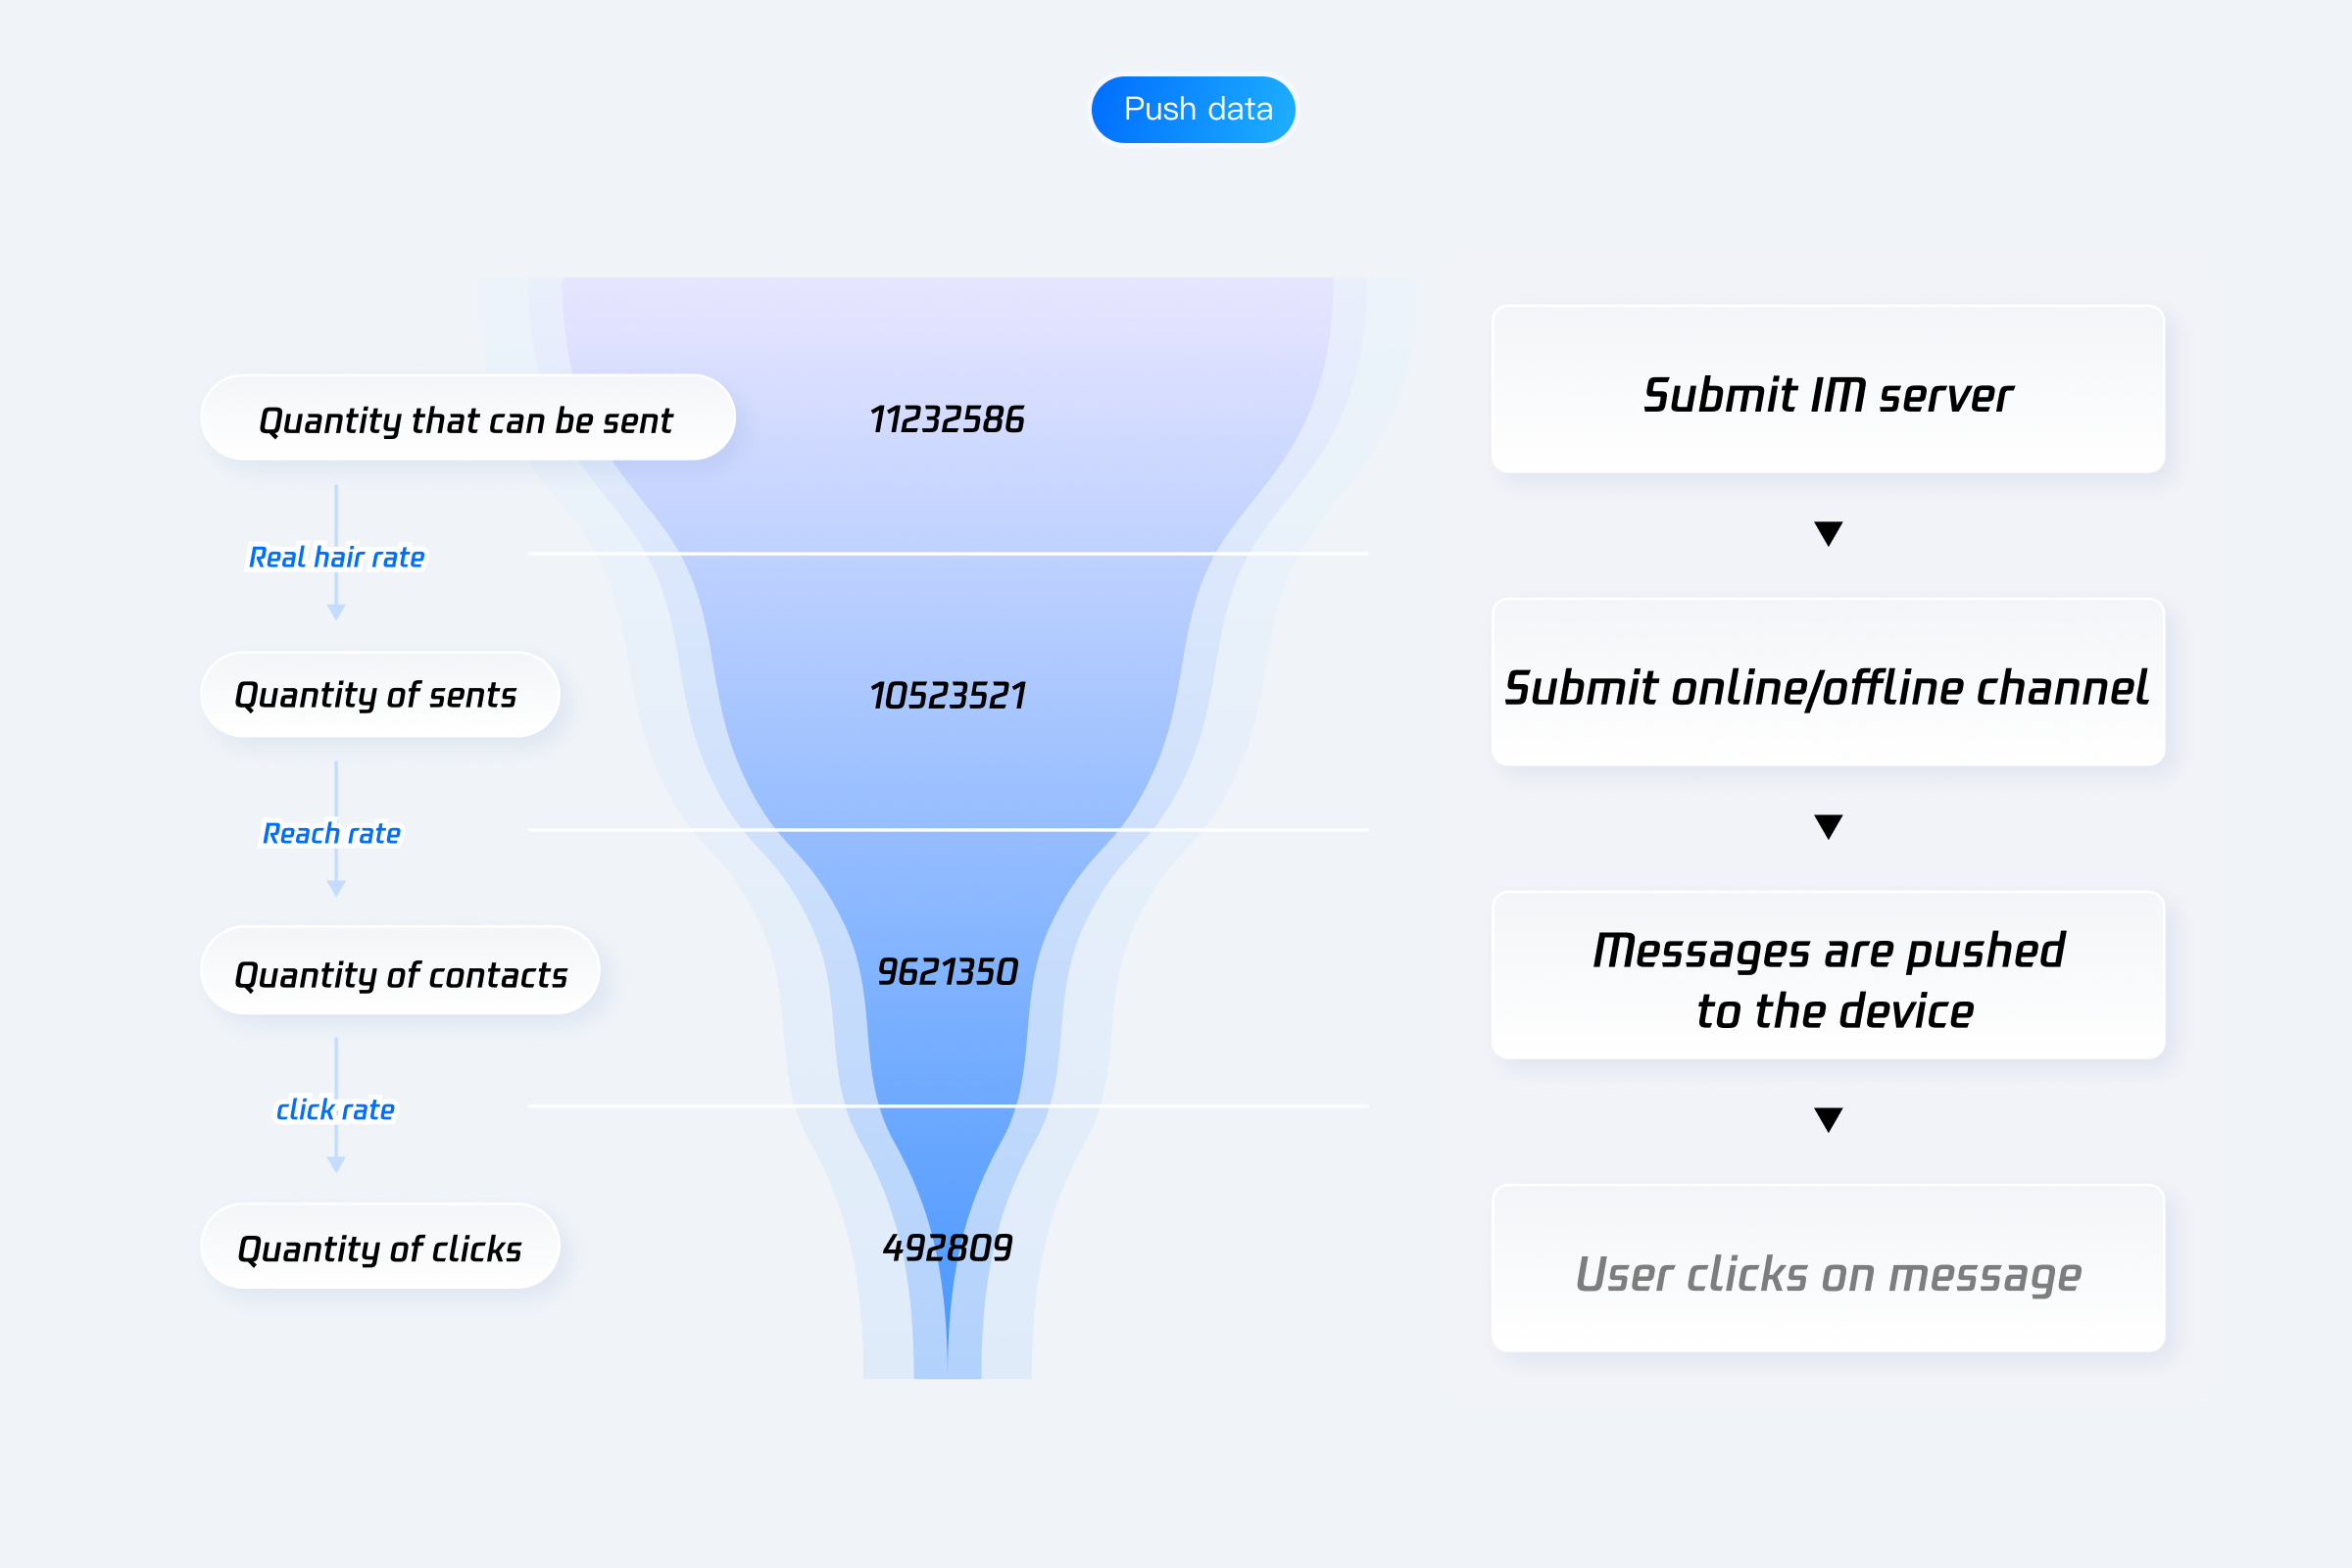
Statistics Collection
Query all Statistics for a user, organize and analyze daily push metric data of various types, and generate recent Sent > Reached > Clicked funnel conversion charts, with support for viewing by manufacturer channel.
Device Notification Bar Settings
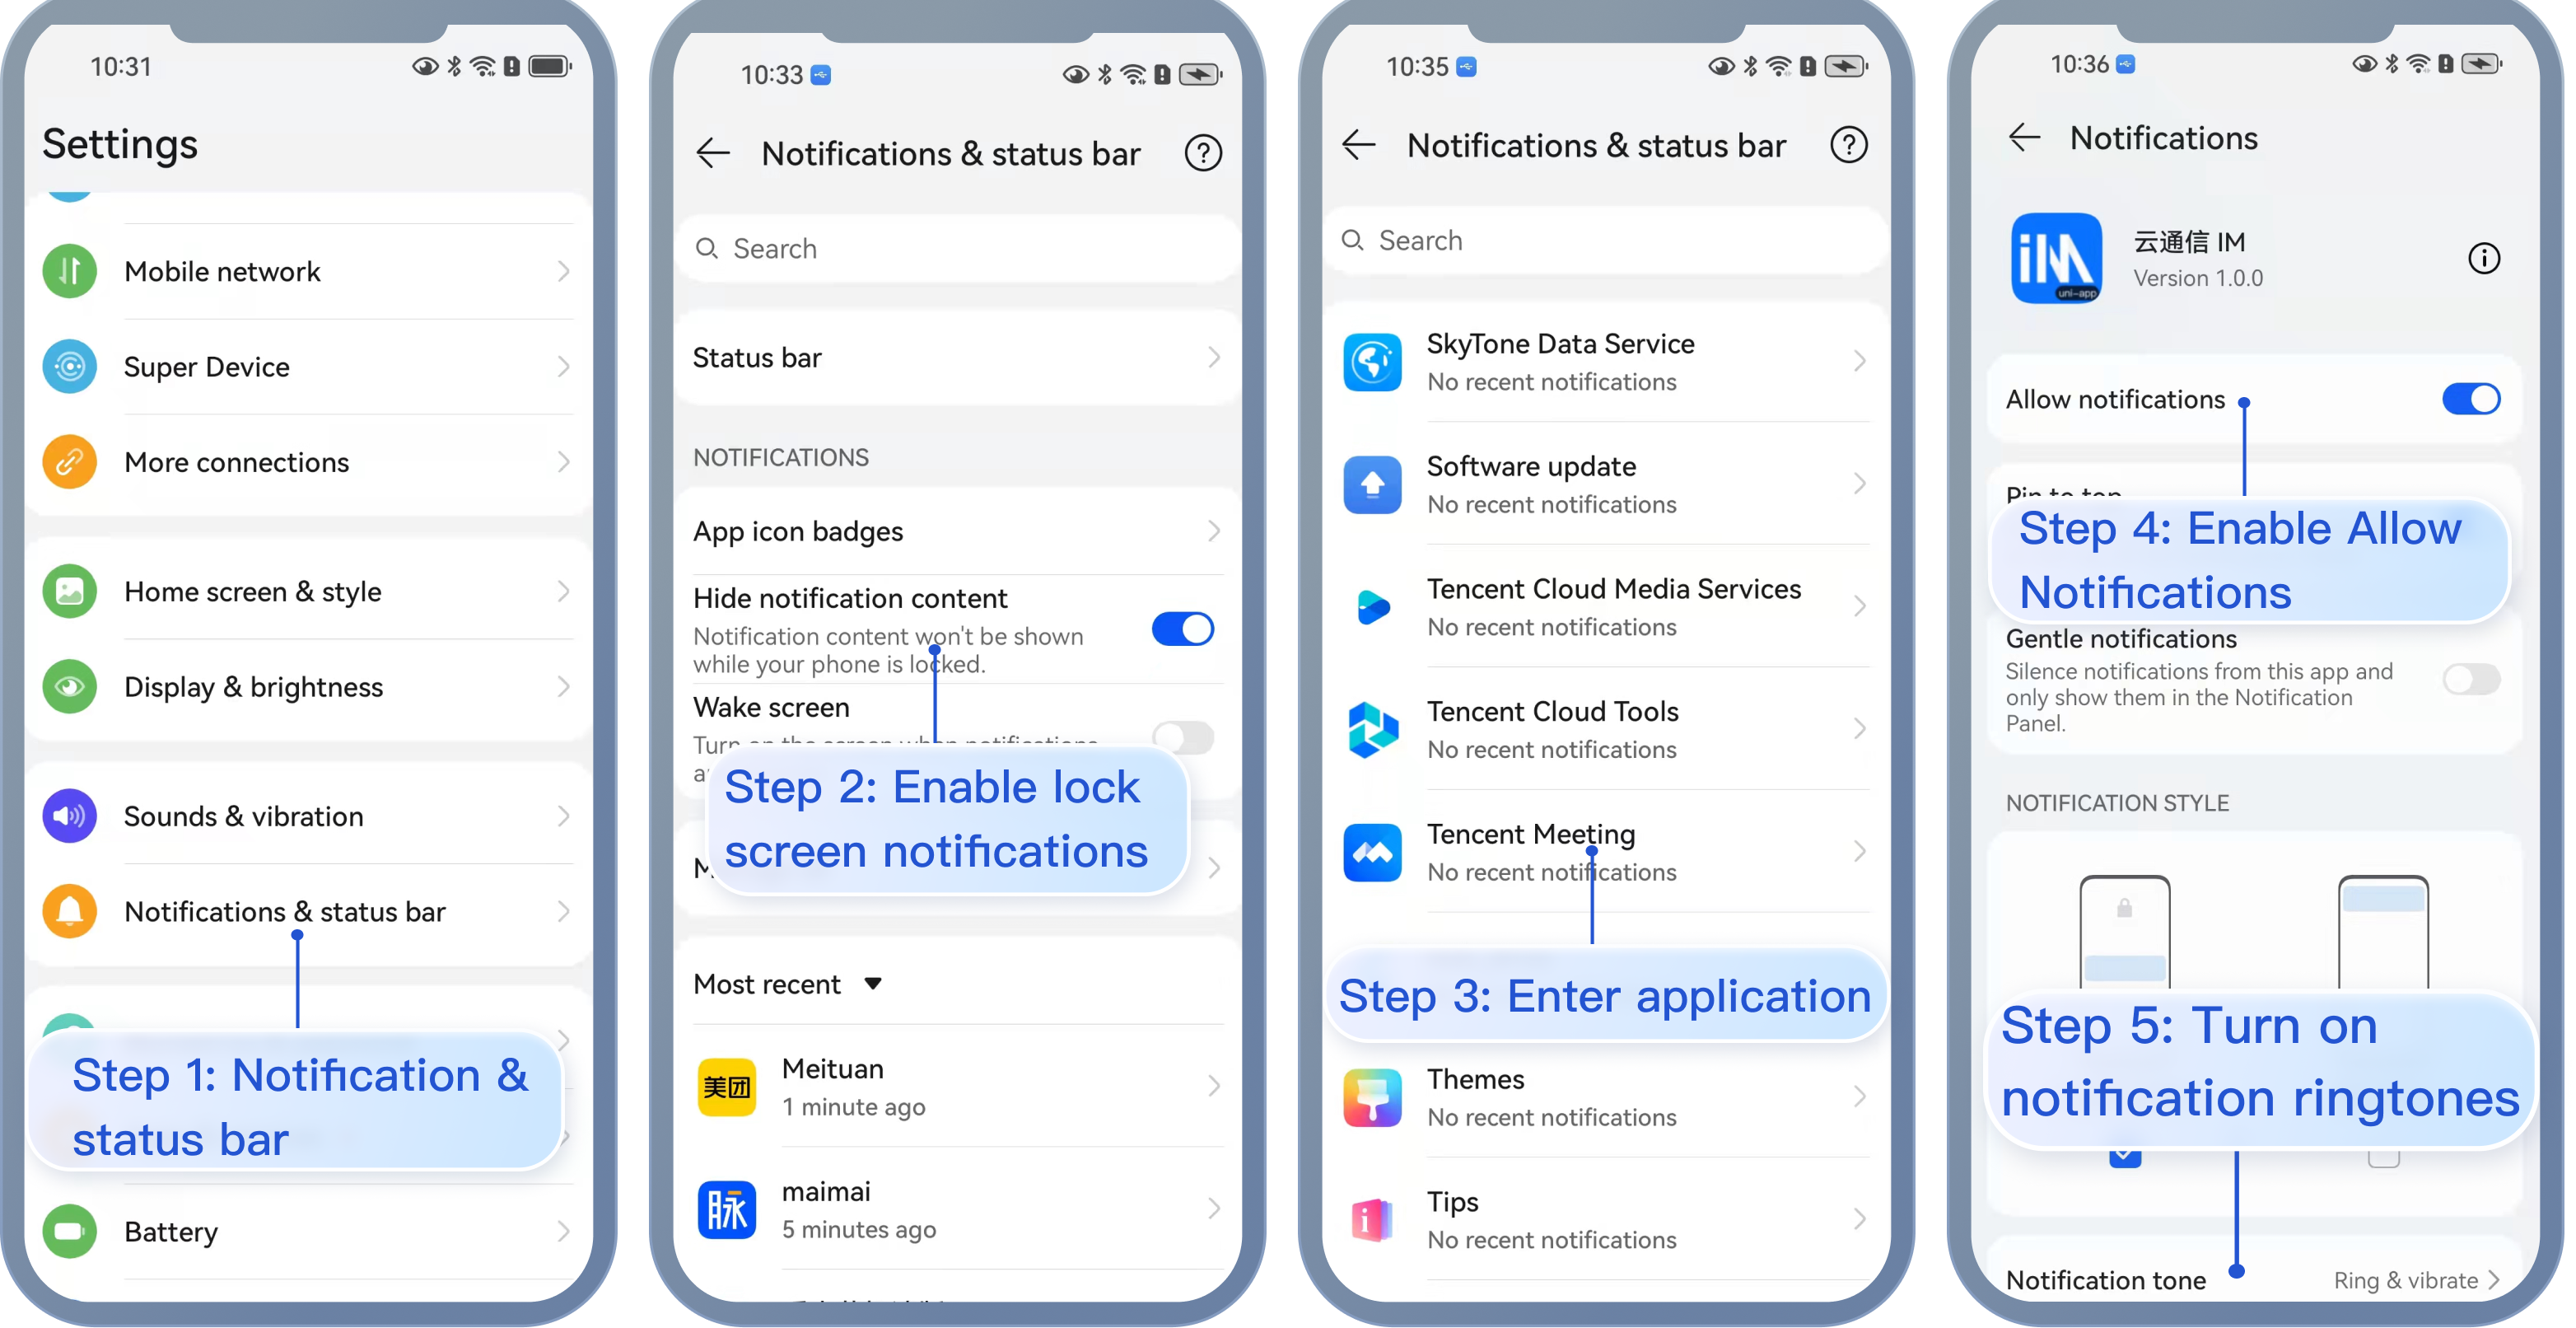
The direct manifestation of a push is a notification bar prompt, which, like other notifications, is affected by device notification-related settings, taking Huawei as an example:
"Settings - Notifications - Notifications (Lock Screen) - Hide or Do not Disturb" will affect the display of offline push notifications when the screen is locked.
"Settings - Notifications - Advanced Settings - Show Notification Icons (Status Bar)" will affect the showing of the offline push notification icon in the status bar.
"Settings - Notifications - Application Notifications - Allow Notifications" will directly affect the display of offline push notifications.
"Settings - Notifications - Application Notifications - Notification Sound" and "Settings - Notifications - Application Notifications - Notification Mute" will affect the offline push notification sound.
Vendor's push restrictions
1. All vendors in China have adopted message classification mechanisms, and different push policies are assigned for different types of messages. To make the push timely and reliable, you need to set the push message type of your app as the system message or important message with a high priority based on the vendor's rules. Otherwise, offline push messages are affected by the vendor's push message classification and may vary from your expectations.
2. Additionally, some manufacturers impose limits on the daily number of pushes for an application. You can check the daily push quantity limits in the Manufacturer Console. If offline push messaging is not timely or is occasionally not received, consider the following:
Huawei
viv
OPPO
Mi
Meizu
FCM
Push messages are divided into Service and Communication Category and Information Marketing Category, with different push effectiveness and policies. Additionally, message classification is also related to self-categorization benefits:
If there is no self-help message classification permission, the vendor will perform secondary intelligent message classification on push messages.
If you have applied for self-categorization benefits, push messages will be classified according to your own defined categories for pushing. For more details, please see Manufacturer Description.
Push messages are divided into system messages and operational messages, with different push effectiveness and policies. System messages will also undergo a secondary correction by the vendor's intelligent classification. If a message is identified not as a system message, it will automatically be corrected to an operational message. If there is a misjudgment, you can provide feedback via email. Additionally, the number of push messages is restricted by a daily limit, which is determined by the app's subscription statistics with the vendor. For more details, please see Manufacturer Description 1 or Manufacturer Description 2.
Push messages are divided into private messages and public trust messages, with different push effectiveness and policies. Private messages are for users who are significantly attentive to and wish to receive information promptly. Privileges for the private message channel need to be applied for via email. The number of pushes through the public trust channel is limited. For more details, please see Manufacturer Description 1 or Manufacturer Description 2.
Push messages are divided into important messages and general messages, with different push effectiveness and policies. The important message type is reserved exclusively for instant messaging, personal follow-up dynamic alerts, personal matters reminders, personal order status changes, personal financial reminders, personal status changes, personal resource changes, and personal device alerts. These eight types of messages can be activated through an application in the manufacturer's console. The number of general message type pushes is limited. For more details, please see Manufacturer Description 1 or Manufacturer Description 2.
Reason: The Huawei agconnect-services.json file has not been imported.
Solution: Check if the Huawei agconnect-services.json file has been imported.
Note:
Huawei Push requires the agconnect-services.json file downloaded from the official website to be placed in the nativeResources/android/assets directory. For details, see uniapp.
3. Error in push: "TIMPushModule._getDeviceToken failed. error:{"code":-1, "msg": "callback is not String"}".
Reason: Huawei version is too low, EMUI version needs to be greater than 10.
Solution: Upgrade or switch to a Huawei with EMUI version > 10 for push.
Reason: The inconsistency between the app's running environment and the certificate environment.
Solution:
Check if the app's running environment matches the certificate environment. If they do not match, offline push notifications will not be received.
Check whether the app and certificate environment is set to production. If it's in the development environment, requesting a deviceToken from Apple might fail, but this issue hasn't been observed in the production environment, please switch to the production environment for testing.
8. In the iOS development environment, registration occasionally does not return a deviceToken or indicates an APNs request token failure?
Cause: This issue arises due to instability in the APNs service.
Solution:
Insert a SIM card into the phone and use the 4G network.
Uninstall and reinstall the application, restart the application, or shut down and restart the phone.
Use a package for the production environment.
Use another iPhone.
9. Why is there no token in iOS?
Cause:
Emulators do not generate tokens.
Real Device, you need to enable push permissions on the phone.
Real Device, you need to add push notification's entitlement.
Solution: Use a real device to enable push permissions, and add push notification's entitlement.


 Yes
Yes
 No
No
Was this page helpful?