- Release Notes
- Product Introduction
- Purchase Guide
- Getting Started
- Operation Guide
- Troubleshooting
- API Documentation
- History
- Introduction
- API Category
- Making API Requests
- Network Security APIs
- AddAndPublishNetworkFirewallPolicyDetail
- AddAndPublishNetworkFirewallPolicyYamlDetail
- AddNetworkFirewallPolicyDetail
- AddNetworkFirewallPolicyYamlDetail
- CheckNetworkFirewallPolicyYaml
- ConfirmNetworkFirewallPolicy
- CreateNetworkFirewallClusterRefresh
- CreateNetworkFirewallPolicyDiscover
- CreateNetworkFirewallPublish
- CreateNetworkFirewallUndoPublish
- DeleteNetworkFirewallPolicyDetail
- DescribeNetworkFirewallAuditRecord
- DescribeNetworkFirewallClusterList
- DescribeNetworkFirewallClusterRefreshStatus
- DescribeNetworkFirewallNamespaceLabelList
- DescribeNetworkFirewallPodLabelsList
- DescribeNetworkFirewallPolicyDetail
- DescribeNetworkFirewallPolicyDiscover
- DescribeNetworkFirewallPolicyList
- DescribeNetworkFirewallPolicyStatus
- DescribeNetworkFirewallPolicyYamlDetail
- UpdateAndPublishNetworkFirewallPolicyDetail
- UpdateAndPublishNetworkFirewallPolicyYamlDetail
- UpdateNetworkFirewallPolicyDetail
- UpdateNetworkFirewallPolicyYamlDetail
- Cluster Security APIs
- CreateCheckComponent
- CreateClusterCheckTask
- CreateRefreshTask
- DescribeAffectedClusterCount
- DescribeAffectedNodeList
- DescribeAffectedWorkloadList
- DescribeCheckItemList
- DescribeRefreshTask
- DescribeRiskList
- DescribeTaskResultSummary
- DescribeUnfinishRefreshTask
- DescribeUserCluster
- SetCheckMode
- DescribeClusterDetail
- DescribeClusterSummary
- Security Compliance APIs
- AddComplianceAssetPolicySetToWhitelist
- AddCompliancePolicyAssetSetToWhitelist
- AddCompliancePolicyItemToWhitelist
- CreateComplianceTask
- CreateExportComplianceStatusListJob
- DeleteComplianceAssetPolicySetFromWhitelist
- DeleteCompliancePolicyAssetSetFromWhitelist
- DeleteCompliancePolicyItemFromWhitelist
- DescribeComplianceAssetDetailInfo
- DescribeComplianceAssetList
- DescribeComplianceAssetPolicyItemList
- DescribeCompliancePeriodTaskList
- DescribeCompliancePolicyItemAffectedAssetList
- DescribeCompliancePolicyItemAffectedSummary
- DescribeComplianceScanFailedAssetList
- DescribeComplianceTaskAssetSummary
- DescribeComplianceTaskPolicyItemSummaryList
- DescribeComplianceWhitelistItemList
- InitializeUserComplianceEnvironment
- ModifyCompliancePeriodTask
- ScanComplianceAssets
- ScanComplianceAssetsByPolicyItem
- ScanCompliancePolicyItems
- ScanComplianceScanFailedAssets
- Runtime security - High-risk syscalls
- Runtime Security - Reverse Shell APIs
- Runtime Security APIs
- AddEditAbnormalProcessRule
- DescribeAssetImageBindRuleInfo
- AddEditAccessControlRule
- AddEditRiskSyscallWhiteList
- CreateDefenceVulExportJob
- CreateEmergencyVulExportJob
- CreateProcessEventsExportJob
- CreateRiskDnsEventExportJob
- CreateSystemVulExportJob
- CreateVulContainerExportJob
- CreateVulImageExportJob
- CreateVulScanTask
- CreateWebVulExportJob
- DeleteAbnormalProcessRules
- DeleteAccessControlRules
- DescribeAbnormalProcessEventTendency
- DescribeAbnormalProcessEventsExport
- DescribeAbnormalProcessLevelSummary
- DescribeAbnormalProcessRuleDetail
- DescribeAbnormalProcessRules
- DescribeAbnormalProcessRulesExport
- DescribeAccessControlRuleDetail
- DescribeAccessControlRules
- DescribeAccessControlRulesExport
- DescribeEmergencyVulList
- DescribeSupportDefenceVul
- DescribeVulContainerList
- DescribeVulDetail
- DescribeVulImageList
- DescribeVulScanInfo
- DescribeVulScanLocalImageList
- DescribeWebVulList
- ModifyAbnormalProcessRuleStatus
- ModifyAbnormalProcessStatus
- ModifyAccessControlRuleStatus
- ModifyAccessControlStatus
- OpenTcssTrial
- StopVulScanTask
- DescribeAccessControlEventsExport
- DescribeAbnormalProcessDetail
- DescribeAbnormalProcessEvents
- DescribeAccessControlDetail
- DescribeAccessControlEvents
- DescribeRiskSyscallDetail
- Alert Settings APIs
- Advanced prevention - K8s API abnormal requests
- CreateAccessControlsRuleExportJob
- CreateK8sApiAbnormalEventExportJob
- CreateK8sApiAbnormalRuleExportJob
- CreateK8sApiAbnormalRuleInfo
- DeleteK8sApiAbnormalRule
- DescribeAssetClusterList
- DescribeK8sApiAbnormalEventInfo
- DescribeK8sApiAbnormalEventList
- DescribeK8sApiAbnormalRuleInfo
- DescribeK8sApiAbnormalRuleList
- DescribeK8sApiAbnormalRuleScopeList
- DescribeK8sApiAbnormalSummary
- DescribeK8sApiAbnormalTendency
- ModifyK8sApiAbnormalEventStatus
- ModifyK8sApiAbnormalRuleInfo
- ModifyK8sApiAbnormalRuleStatus
- Asset Management APIs
- CreateAssetImageScanSetting
- CreateAssetImageVirusExportJob
- CreateHostExportJob
- DeleteMachine
- DescribeABTestConfig
- DescribeAgentDaemonSetCmd
- DescribeAgentInstallCommand
- DescribeAssetSyncLastTime
- DescribeExportJobDownloadURL
- DescribeExportJobManageList
- DescribeInspectionReport
- DescribePromotionActivity
- DescribeTcssSummary
- DescribeUnauthorizedCoresTendency
- ModifyContainerNetStatus
- Security Operations - Log Analysis APIs
- CreateSearchTemplate
- DeleteSearchTemplate
- DescribeESAggregations
- DescribeESHits
- DescribeIndexList
- DescribeLogStorageStatistic
- DescribePublicKey
- DescribeSearchExportList
- DescribeSearchLogs
- DescribeSearchTemplates
- DescribeSecLogAlertMsg
- DescribeSecLogCleanSettingInfo
- DescribeSecLogDeliveryClsOptions
- DescribeSecLogDeliveryClsSetting
- DescribeSecLogDeliveryKafkaOptions
- DescribeSecLogDeliveryKafkaSetting
- DescribeSecLogJoinTypeList
- DescribeSecLogKafkaUIN
- ModifySecLogCleanSettingInfo
- ModifySecLogDeliveryClsSetting
- ModifySecLogDeliveryKafkaSetting
- ModifySecLogJoinState
- ModifySecLogKafkaUIN
- ResetSecLogTopicConfig
- DescribeSecLogJoinObjectList
- ModifySecLogJoinObjects
- Runtime Security - Trojan Call APIs
- CreateVirusScanAgain
- DescribeExportJobResult
- DescribeVirusAutoIsolateSampleDetail
- DescribeVirusAutoIsolateSampleDownloadURL
- DescribeVirusAutoIsolateSampleList
- DescribeVirusAutoIsolateSetting
- DescribeVirusEventTendency
- DescribeVirusManualScanEstimateTimeout
- DescribeVirusSampleDownloadUrl
- DescribeVirusScanTaskStatus
- DescribeVirusScanTimeoutSetting
- DescribeVirusSummary
- ExportVirusList
- ModifyVirusAutoIsolateExampleSwitch
- ModifyVirusAutoIsolateSetting
- ModifyVirusFileStatus
- ModifyVirusScanTimeoutSetting
- StopVirusScanTask
- DescribeVirusMonitorSetting
- DescribeVirusScanSetting
- ModifyVirusMonitorSetting
- ModifyVirusScanSetting
- DescribeVirusList
- DescribeVirusTaskList
- CreateVirusScanTask
- DescribeVirusDetail
- Runtime Security - Container Escape APIs
- DeleteEscapeWhiteList
- CreateEscapeWhiteListExportJob
- CreateEscapeEventsExportJob
- AddEscapeWhiteList
- DescribeEscapeEventTendency
- DescribeEscapeEventsExport
- DescribeEscapeRuleInfo
- DescribeEscapeSafeState
- DescribeEscapeWhiteList
- DescribeEscapeEventTypeSummary
- ModifyEscapeEventStatus
- ModifyEscapeRule
- ModifyEscapeWhiteList
- DescribeEscapeEventDetail
- DescribeEscapeEventInfo
- Image Security APIs
- AddAssetImageRegistryRegistryDetail
- AddEditImageAutoAuthorizedRule
- AddIgnoreVul
- CheckRepeatAssetImageRegistry
- CreateAssetImageRegistryScanTask
- CreateAssetImageRegistryScanTaskOneKey
- CreateAssetImageScanTask
- CreateComponentExportJob
- CreateImageExportJob
- CreateOrModifyPostPayCores
- CreateVulDefenceEventExportJob
- CreateVulDefenceHostExportJob
- CreateVulExportJob
- DeleteIgnoreVul
- DescribeAssetAppServiceList
- DescribeAssetComponentList
- DescribeAssetDBServiceList
- DescribeAssetHostList
- DescribeAssetImageDetail
- DescribeAssetImageHostList
- DescribeAssetImageList
- DescribeAssetImageListExport
- DescribeAssetImageRegistryAssetStatus
- DescribeAssetImageRegistryDetail
- DescribeAssetImageRegistryList
- DescribeAssetImageRegistryListExport
- DescribeAssetImageRegistryRegistryDetail
- DescribeAssetImageRegistryRegistryList
- DescribeAssetImageRegistryRiskInfoList
- DescribeAssetImageRegistryRiskListExport
- DescribeAssetImageRegistryScanStatusOneKey
- DescribeAssetImageRegistrySummary
- DescribeAssetImageRegistryVirusList
- DescribeAssetImageRegistryVirusListExport
- DescribeAssetImageRegistryVulList
- DescribeAssetImageRegistryVulListExport
- DescribeAssetImageRiskList
- DescribeAssetImageRiskListExport
- DescribeAssetImageScanSetting
- DescribeAssetImageScanStatus
- DescribeAssetImageScanTask
- DescribeAssetImageSimpleList
- DescribeAssetImageVirusList
- DescribeAssetImageVirusListExport
- DescribeAssetImageVulList
- DescribeAssetImageVulListExport
- DescribeAssetPortList
- DescribeAssetProcessList
- DescribeAssetWebServiceList
- DescribeAutoAuthorizedRuleHost
- DescribeContainerSecEventSummary
- DescribeImageAutoAuthorizedLogList
- DescribeImageAutoAuthorizedRule
- DescribeImageAutoAuthorizedTaskList
- DescribeImageComponentList
- DescribeImageRegistryNamespaceList
- DescribeImageRegistryTimingScanTask
- DescribeImageRiskSummary
- DescribeImageRiskTendency
- DescribeImageSimpleList
- DescribeNewestVul
- DescribePostPayDetail
- DescribeScanIgnoreVulList
- DescribeSecEventsTendency
- DescribeSystemVulList
- DescribeValueAddedSrvInfo
- DescribeVulDefenceEventTendency
- DescribeVulIgnoreLocalImageList
- DescribeVulIgnoreRegistryImageList
- DescribeVulImageSummary
- DescribeVulLevelImageSummary
- DescribeVulLevelSummary
- DescribeVulRegistryImageList
- DescribeVulScanAuthorizedImageSummary
- DescribeVulTendency
- DescribeVulTopRanking
- ModifyAsset
- ModifyAssetImageRegistryScanStop
- ModifyAssetImageRegistryScanStopOneKey
- ModifyAssetImageScanStop
- ModifyImageAuthorized
- ModifyVulDefenceEventStatus
- RemoveAssetImageRegistryRegistryDetail
- RenewImageAuthorizeState
- SwitchImageAutoAuthorizedRule
- SyncAssetImageRegistryAsset
- UpdateAssetImageRegistryRegistryDetail
- UpdateImageRegistryTimingScanTask
- DescribeAssetHostDetail
- DescribeAssetSummary
- DescribeContainerAssetSummary
- DescribeVulDefenceEventDetail
- DescribeVulSummary
- ModifyVulDefenceSetting
- DescribeAssetContainerDetail
- DescribeAssetContainerList
- DescribeVulDefenceEvent
- DescribeVulDefenceHost
- DescribeVulDefencePlugin
- DescribeVulDefenceSetting
- Billing APIs
- Data Types
- Error Codes
- FAQs
- TCSS Policy
- Contact Us
- Glossary
When you need to access repository images from your AWS account to the TCSS console for security scanning, you can see this document to access the AWS image repository.
Accessing Repository
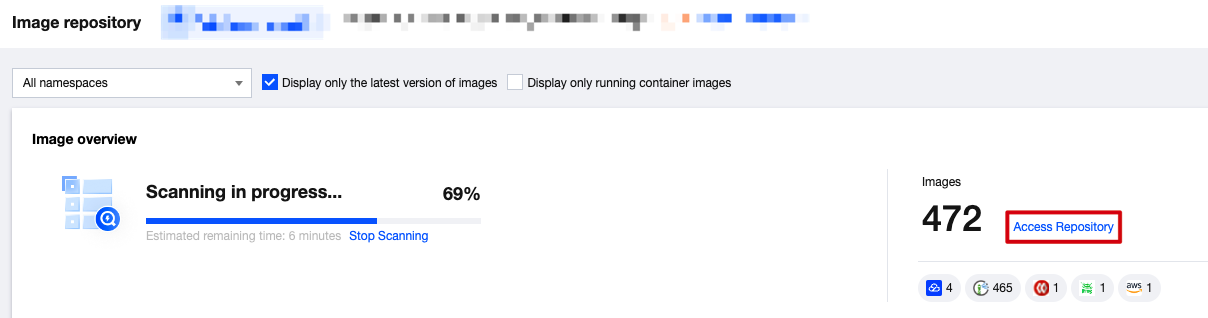
1. Log in to the TCSS console. In the left sidebar, click Image Risk Control > Repository Images.
2. On the image repository page, click Access Repository.
3. In the add image repository popup, configure the relevant parameters, and click Next .
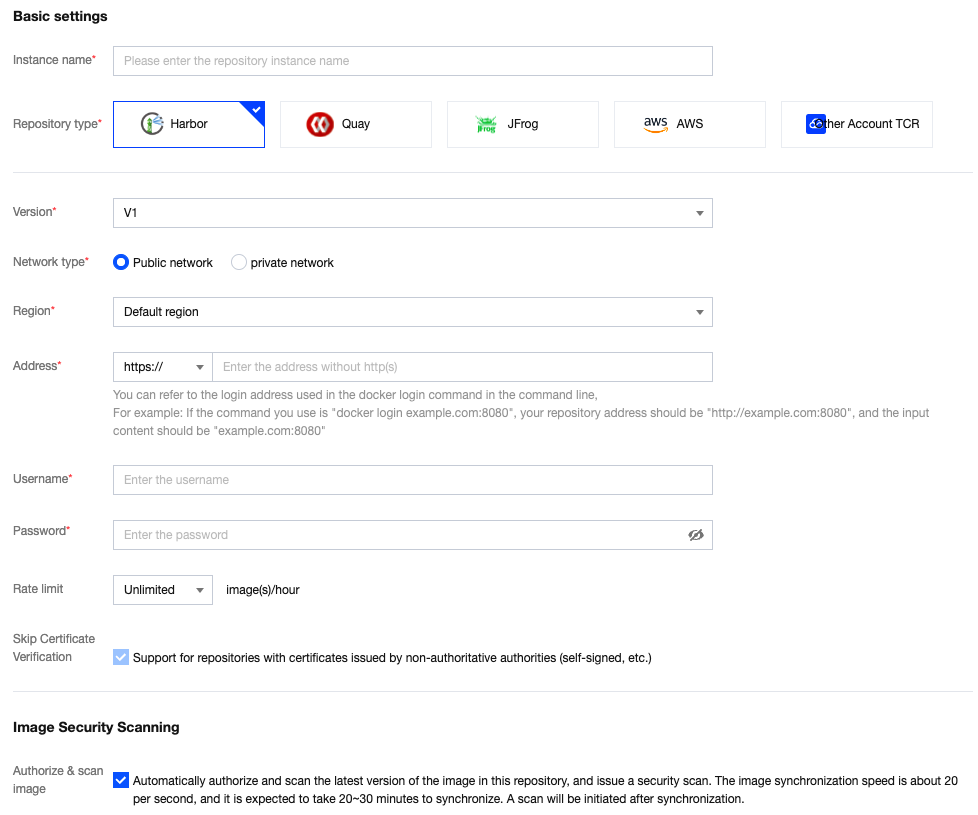
Parameter Name | Description |
Instance Name | Fill in the image repository instance name. The instance name must be unique and not empty. |
Repository Type | Select the third-party image repository type. Currently supported options include Harbor, Quay, JFrog, and AWS. When users access AWS repositories, select AWS. |
Network Type | Select the network access type for the third-party image repository. AWS repositories only support the public network. |
Region | Select the region where the third-party image repository is located. The AWS type defaults to Default Region. |
Address | Enter the access address of the third-party image repository. You can see the log-in address used in the docker log-in command on the command line. For example: If your command is docker log-in example.com:8080, your repository address should be http://example.com:8080 and the input content should be example.com:8080. |
Username | Enter the username to access the third-party image repository. For details, see how to create an AWS account. |
Password | Enter the password to access the third-party image repository. For details, see how to create an AWS account. |
Rate Limit | Select the number of images that can be synchronously pulled per hour. The default is unlimited. Optional values are 5, 10, 20, 50, 100, 500, 1,000, and unlimited. |
Certificate Verification Skipping | Confirm whether to verify the certificate of the remote image repository instance for image synchronization. If the remote instance uses a self-signed or untrusted certificate, do not check this option. It is checked by default. |
Image Authorizing & Scanning | Automatically authorize and scan the latest version of the image in this repository, and issue a security scan. The image synchronization speed is about 20 per second, and it is expected to take 20-30 minutes to synchronize. A scan will be initiated after synchronization. |
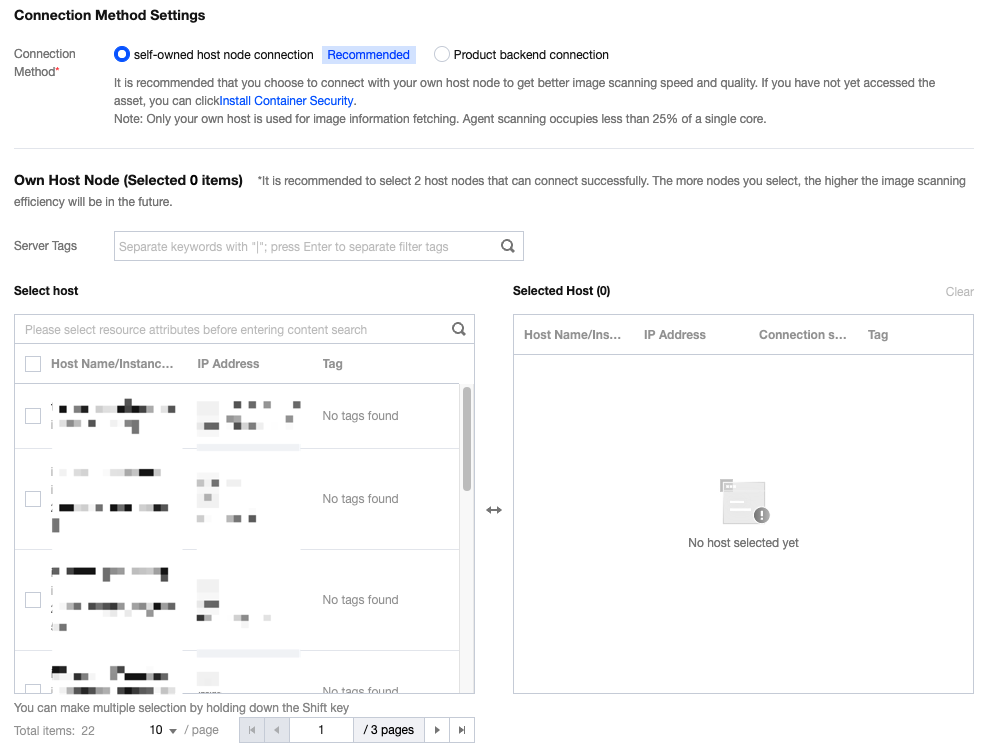
4. Under the Verify Connection Status, select Connection method, and click Confirm to add.
Note:
Verify connection status: You can select Self-owned Host Node Connection or Product Backend Connection.
Self-owned host node connection: Select your own host node for repository image pulling and scanning. It is recommended to select self-owned host node connection for better image scanning rate.
Product backend connection: Use TCSS product-side backend services for repository image pulling and scanning. The scanning rate is slower and it takes longer time.
Creating an AWS Account
Step 1: Creating an IAM User
1. Log in to the AWS console, and select IAM service.
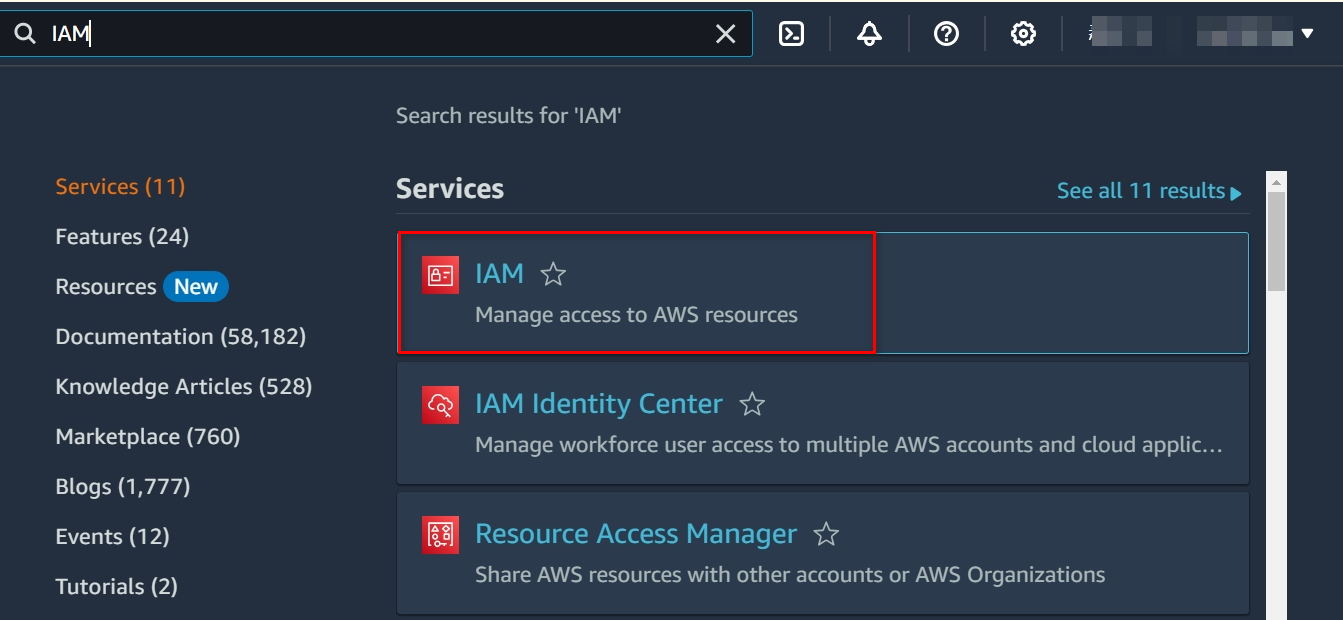
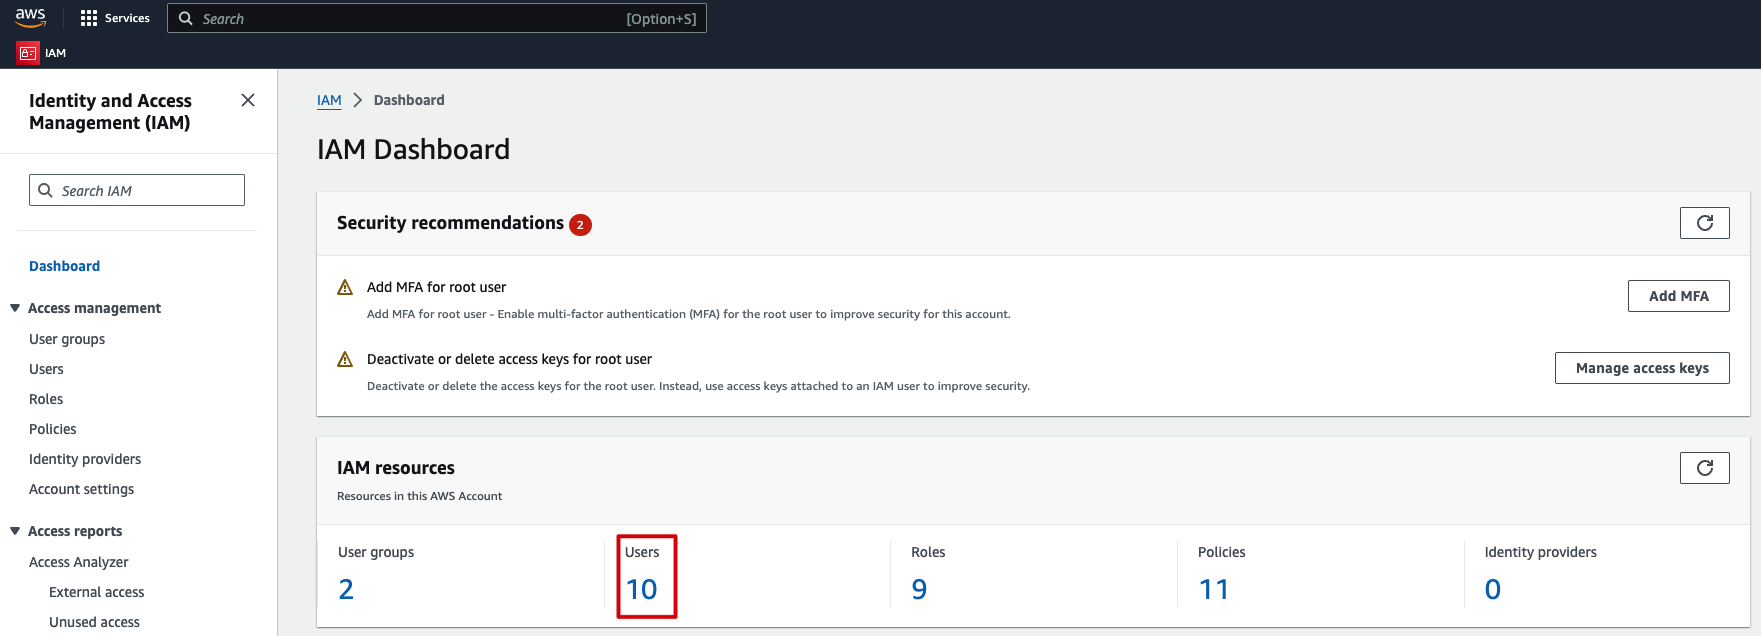
2. In the IAM dashboard, click Number of Users to enter the user list.
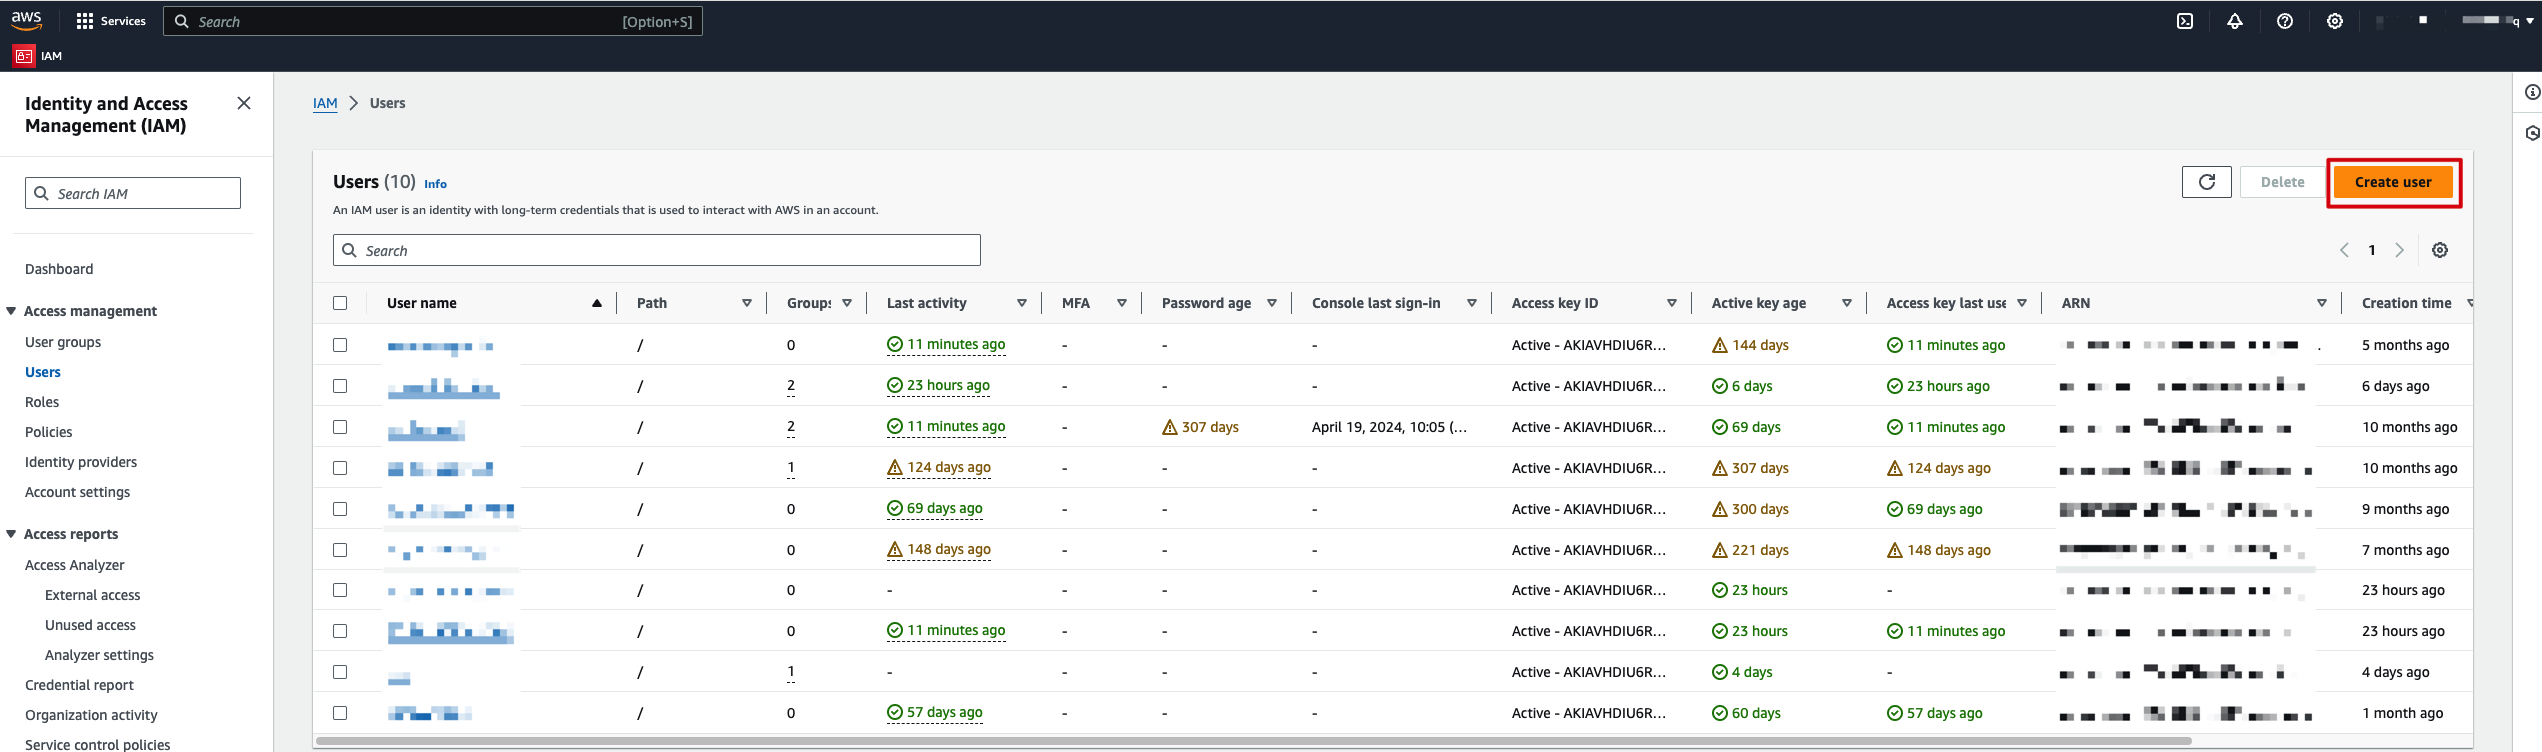
3. In the user list, click Create user.
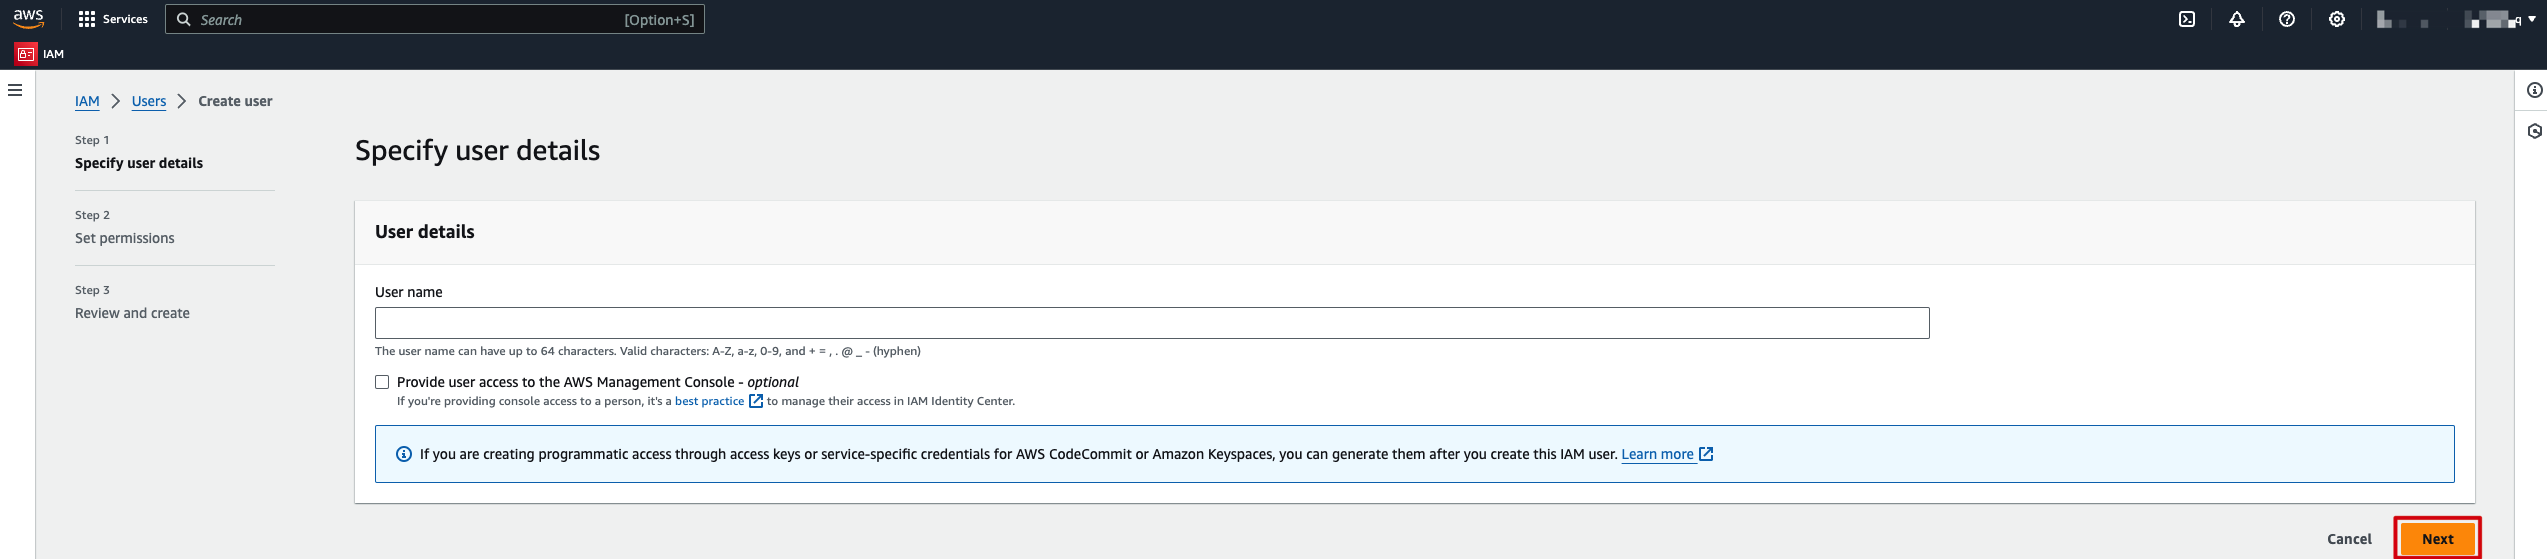
4. On the create user page, enter the user name as prompted, and click Next.
Note:
The optional enabling console access can be configured as needed. This guide does not require checking.
5. On the permissions setting page, select Attach policies directly.

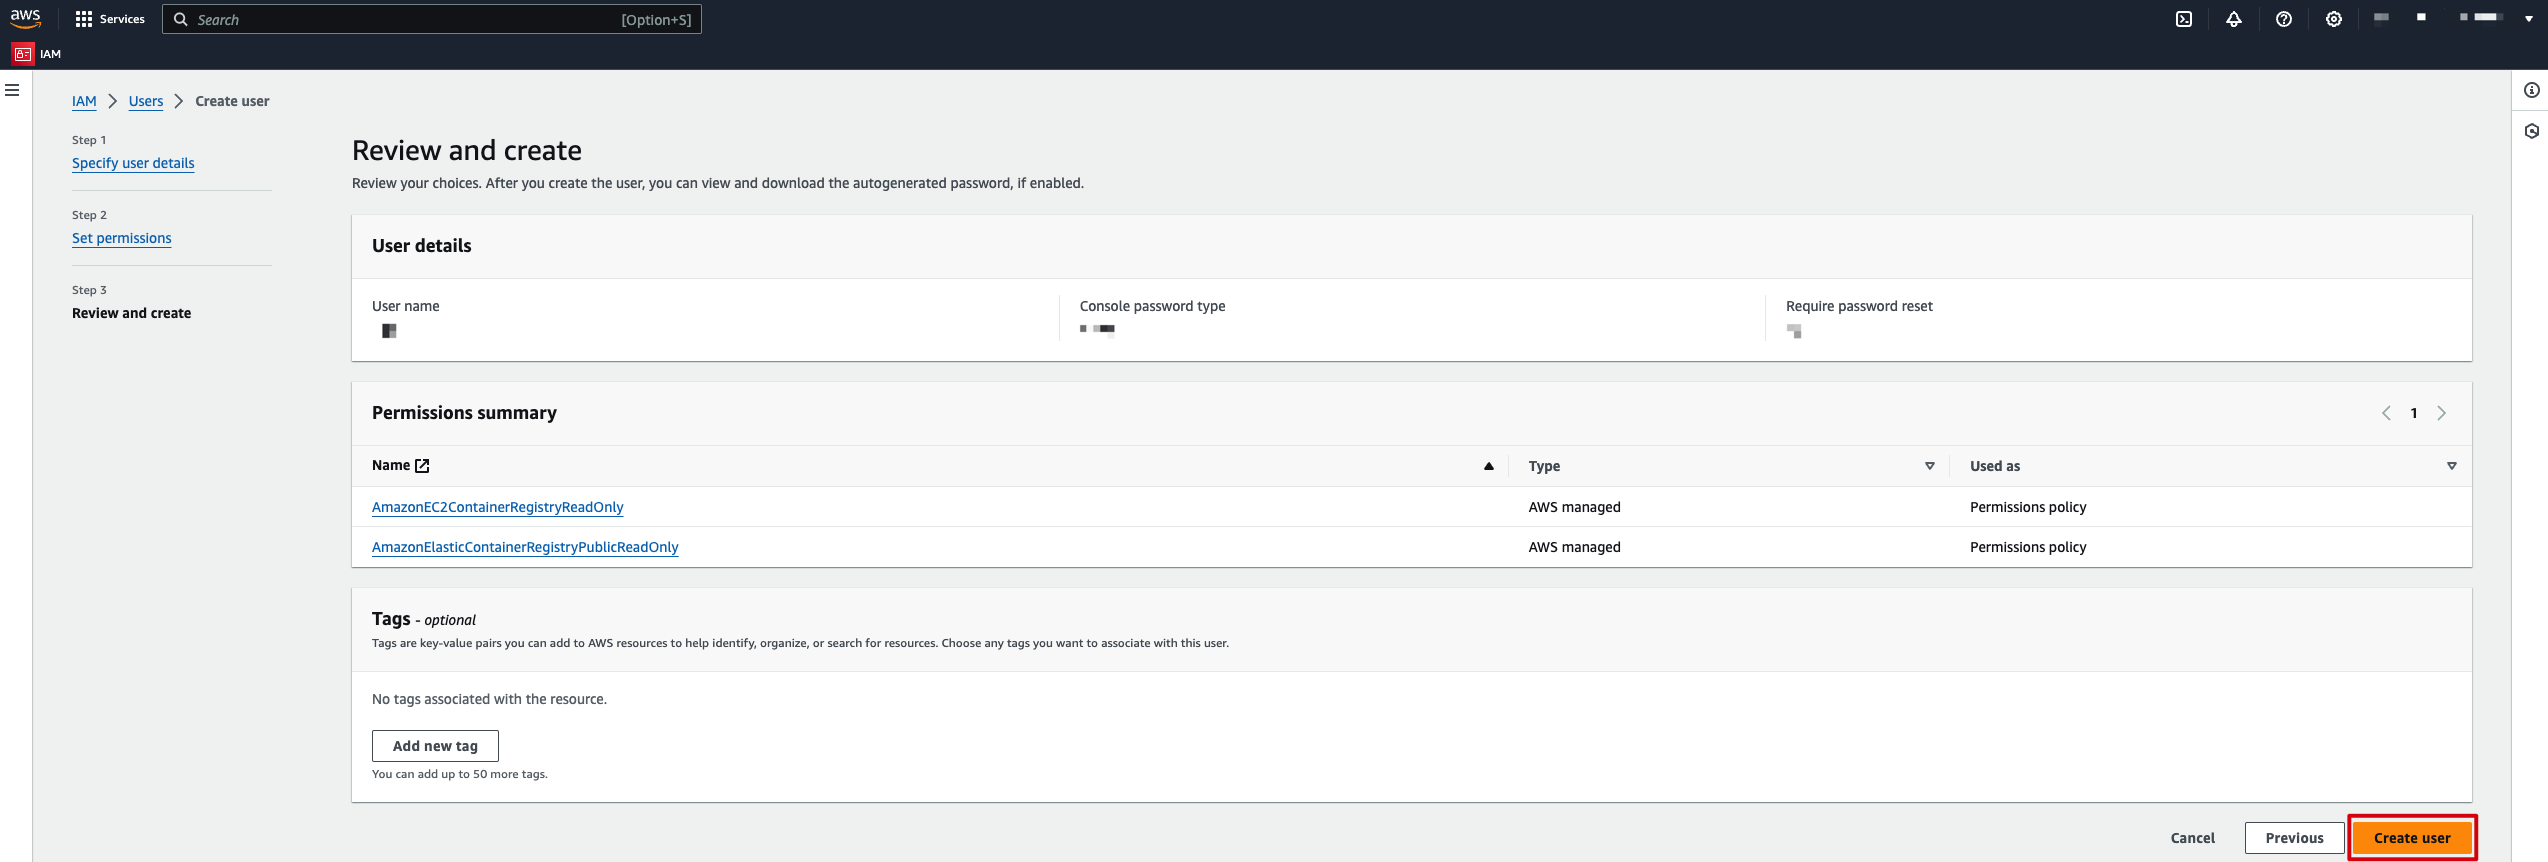
6. When users select permission policies, select the following two policies: AmazonEC2ContainerRegistryReadOnly, and AmazonElasticContainerRegistryPublicReadOnly.

7. After the above configuration is completed, click Next to enter the view and create page, and click Create user to finish creating an IAM user.
Step 2: Creating AK/SK
1. In the user list, click User name to enter the user summary page.

2. On the user summary page, click Create access key under access keys.

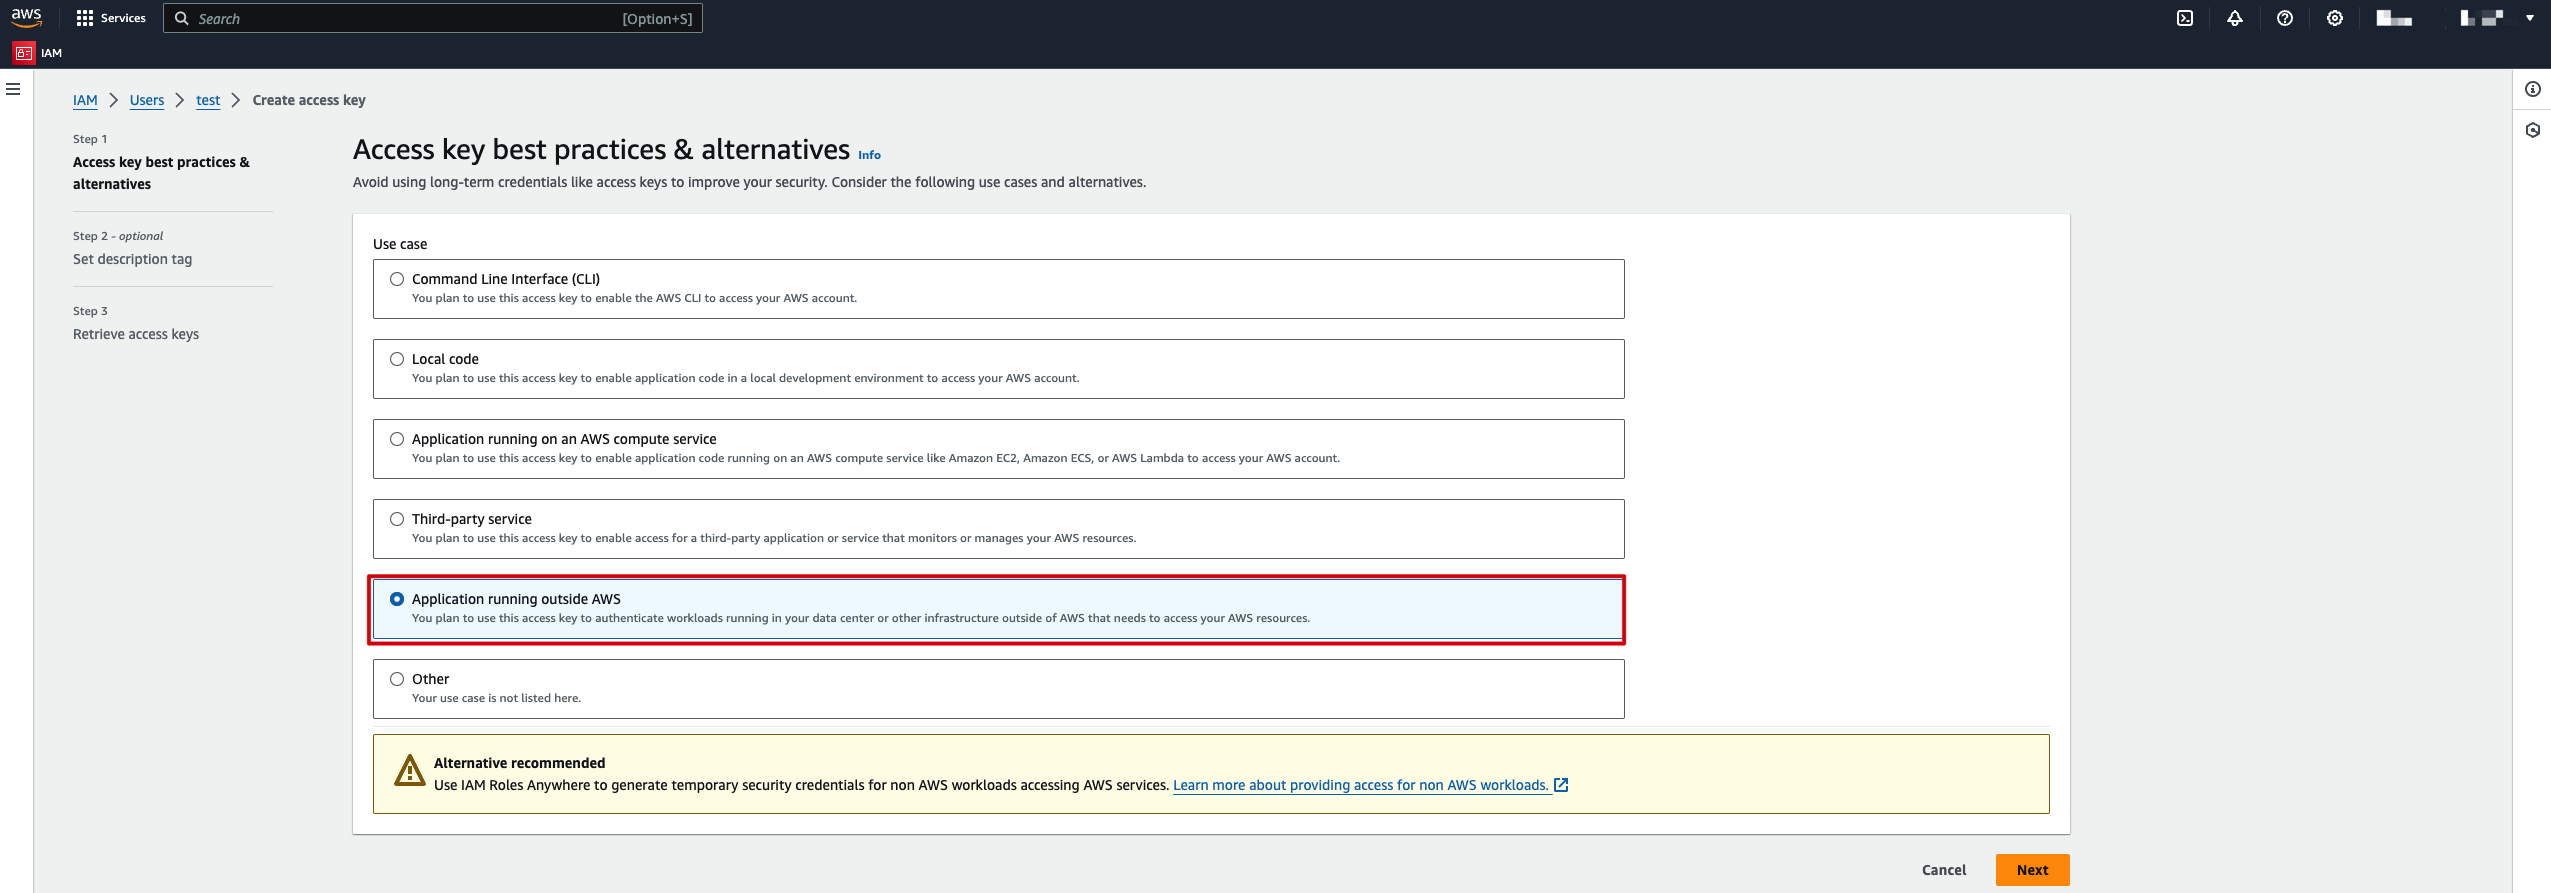
3. In the best practices and alternatives of the access key, select Application Running Outside AWS.
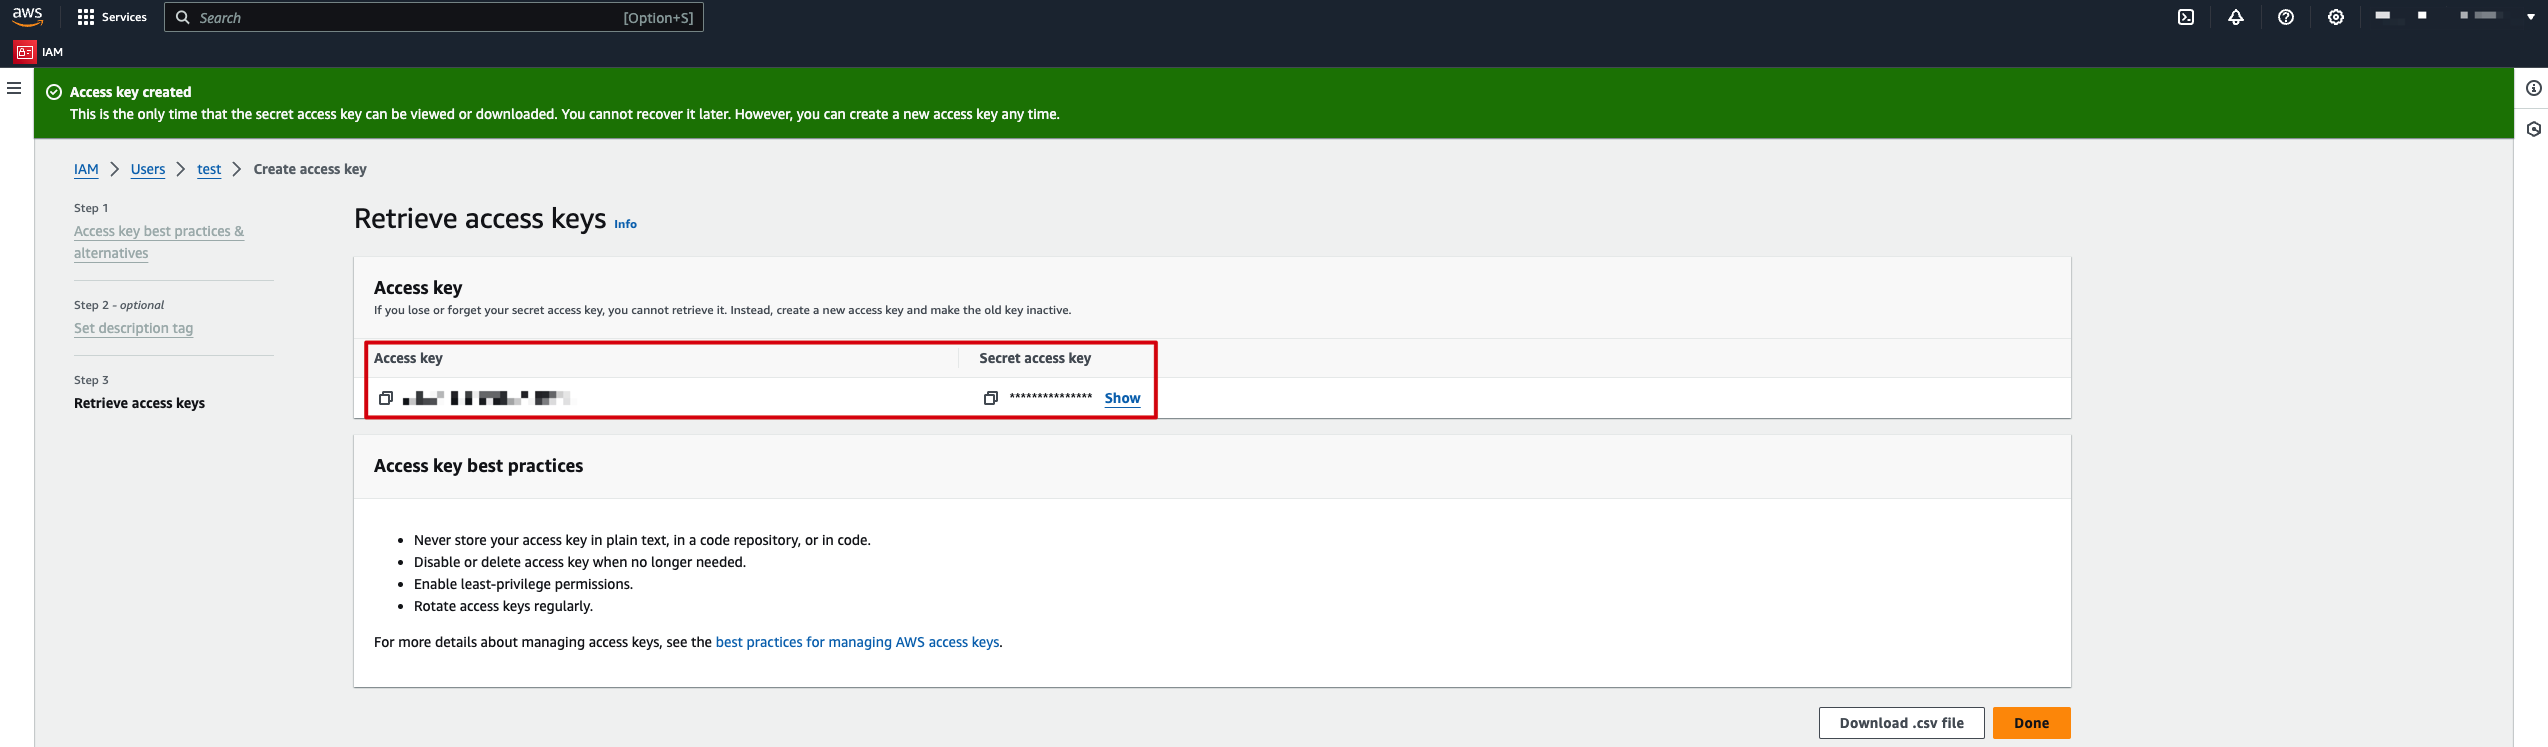
4. In the set description tag, enter the tag value, and click Create access key to complete the creation of the AK/SK access key.

5. On the retrieve and access keys page, the access key is the username required to access the AWS repository, and the secret access key is the password required to access the AWS repository.

 Yes
Yes
 No
No
Was this page helpful?