Publishing IDC IP Ranges to CCN
Last updated: 2024-11-05 09:46:38
After associating a CCN instance with the direct connect gateway, you need to configure a routing policy for the CCN instance, with the direct connect gateway as the next hop and IDC IP range as the destination to implement communication. The routing policy can be either manually entered (Static) or automatically synced (BGP). For more information, see Route Overview. This document describes how to publish IP ranges on the direct connect gateway to CCN.
Note:
Up to 20 routes can be published to CCN through a direct connect gateway. To publish more routes, submit a ticket.
Background
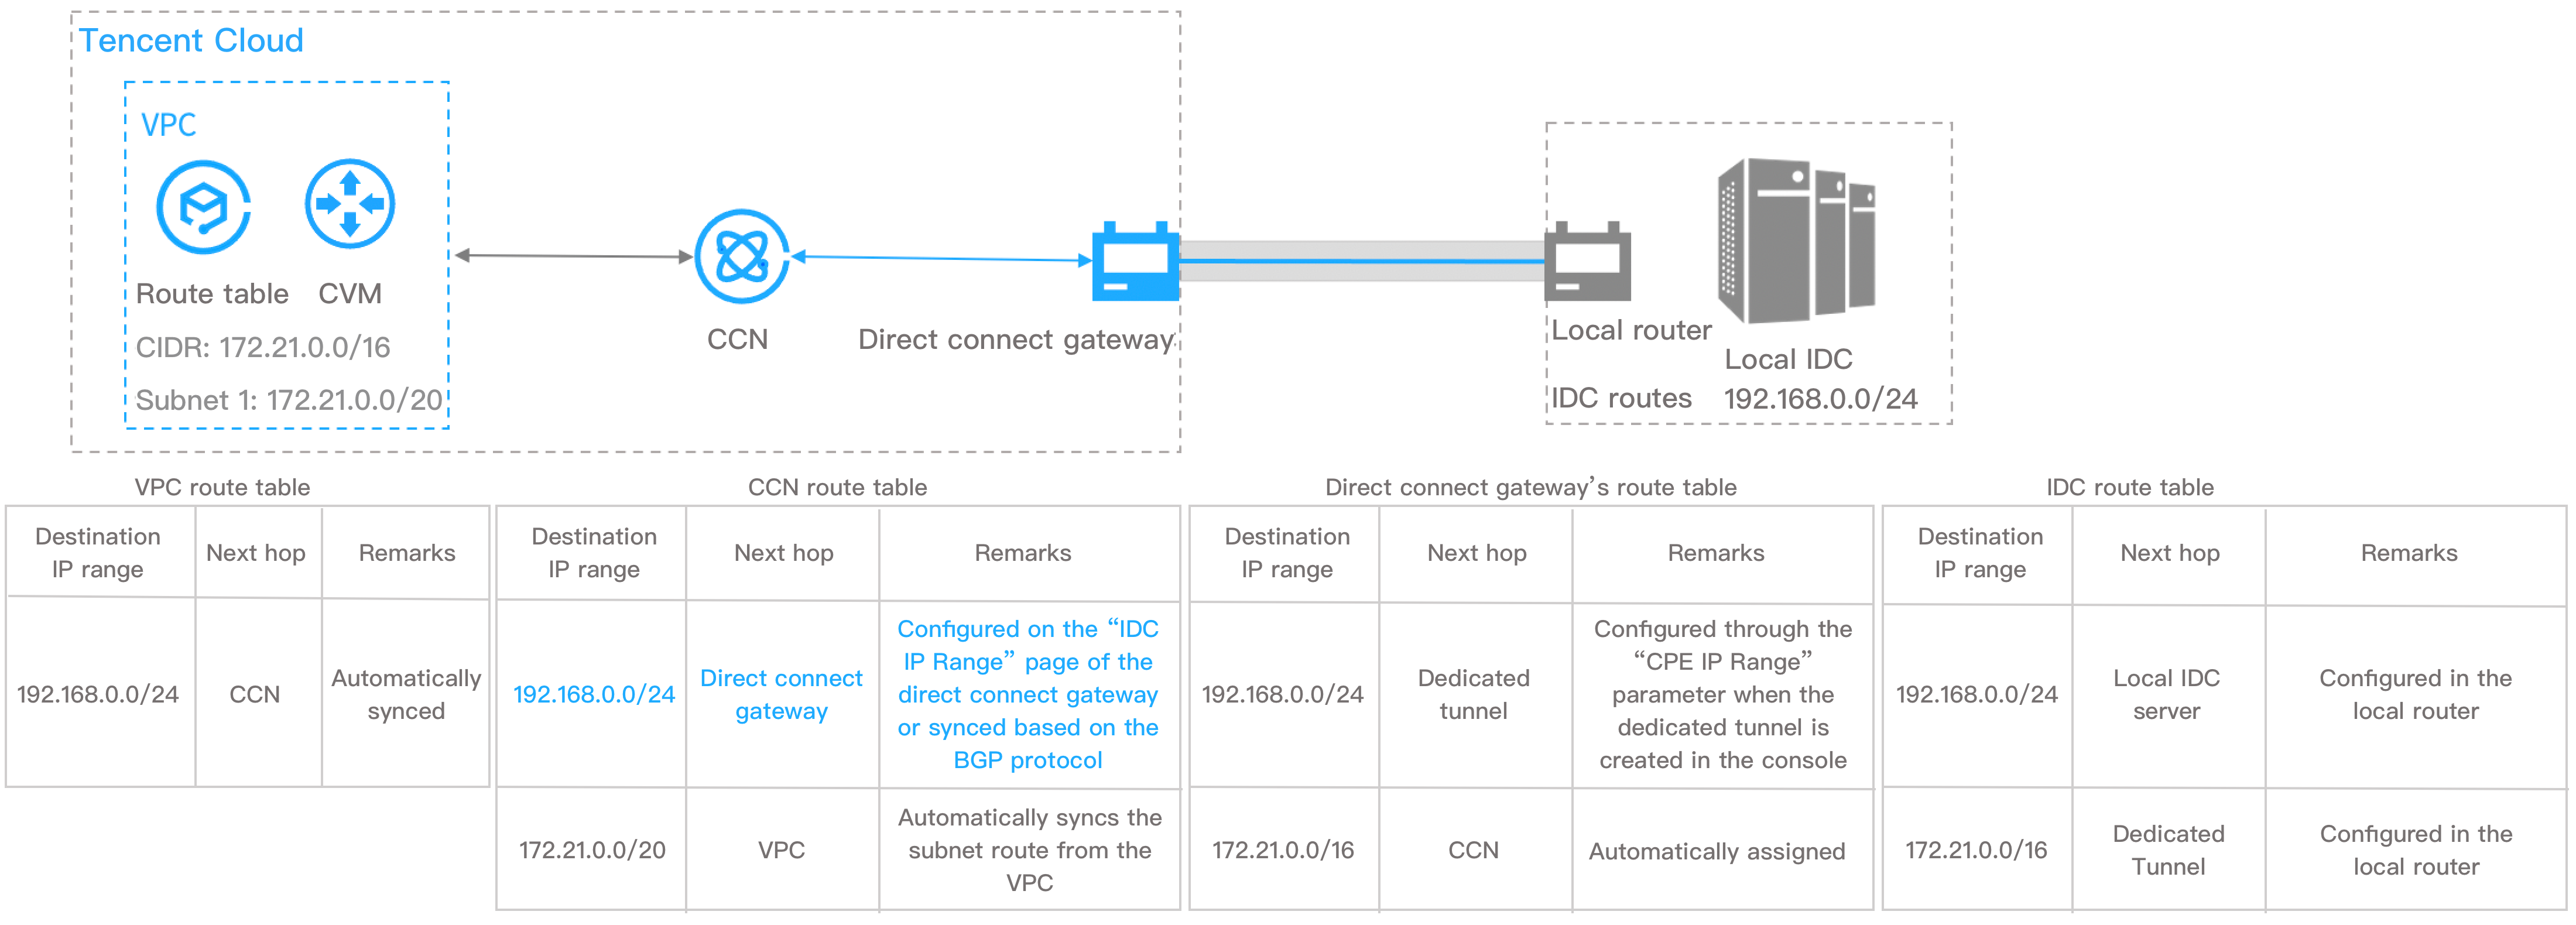
As shown in the following Direct Connect network architecture, your IDC associated with the CCN-based direct connect gateway and CCN can communicate with a Tencent Cloud VPC. The destination IP range of VPC routes to IDC is
192.168.0.0/24. After the IDC IP range is configured on the direct connect gateway, the CCN route table will add a routing policy with the direct connect gateway as the next hop and 192.168.0.0/24 as the destination to realize the route propagation.Note:
If you configure multiple IDC IP ranges on the direct connect gateway, CCN will forward the route with the longest mask. For more information, see Route Overview.

Prerequisite
You have created a CCN-based direct connect gateway as instructed in Creating Direct Connect Gateway.
How It Works
1. Log in to the Direct Connect console, and click Direct Connect Gateway in the left sidebar.
2. Select a region and a VPC at the top. Click the ID/Name of the target instance to enter its details page.
3. Click the Publish IP range tab on the details page.
The IP range published is an IDC IP range that specifies the direct connect gateway route to CCN. When receiving the route, CCN automatically adds a route with the direct connect gateway as the next hop and IDC IP range as the destination.
4. (Optional) Associate with CCN.
If you did not specify a CCN instance when creating the direct connect gateway, click Associate with CCN, select a CCN instance to be associated in the pop-up window, and click OK.

Then the CCN instance will be associated and the CCN icon becomes green. The dotted line between the direct connect gateway and CCN changes to solid, indicating that the interconnection between them is established.
5. Create a dedicated tunnel.
A dedicated tunnel is the network segmentation of a connection. It provides a linkage of IDC to Tencent Cloud.
Under the Dedicated tunnels icon connected with the direct connect gateway, click Create dedicated tunnel to redirect to the Create dedicated tunnels page, where you can configure a dedicated tunnel.

For more information on the parameter configurations, see Applying for a Dedicated Tunnel.
Then the dedicated tunnel is created and the Dedicated tunnels icon becomes green. The dotted line between direct connect gateway and dedicated tunnel changes to solid, indicating the direct connect gateway is configured with a dedicated tunnel.
6. Publish IDC IP ranges to CCN.
After an IDC IP range is published to CCN, the CCN route is synced to the direct connect gateway, while whether the direct connect gateway route is synced to CCN depends on the publishing method of the IDC IP range.
Custom: the manual configuration mode. CCN obtains the specified direct connect gateway route.
Auto-propagation: the BGP mode. CCN automatically obtains the direct connect gateway route published from the dedicated tunnel. But it depends on the publishing time.
Formerly named Static or manual configuration.
1. (Optional) Select a CCN instance in the Publish rules section.
Perform this step if you want to associate one CCN instance with the direct connect gateway or change the associated CCN instance.
Note:
2. Click the Custom tab on the IP range details page. Click Create and enter the information of the IP range that is published to CCN. Click Save.
Then the direct connect gateway will publish the IDC IP range you entered to CCN.
Note:
1. (Optional) Select a CCN instance in the Publish rules section.
Perform this step if you want to associate one CCN instance with the direct connect gateway or change the associated CCN instance.
Note:
Auto-propagation is selected after this feature is enabled. If needed, you can select Custom and complete the relevant configurations.
Either Custom or Auto-propagation can be checked.
2. Configure IDC IP ranges.
When Auto-propagation is selected, the direct connect gateway automatically obtains the IDC IP range without needing configuration.
Note:
Publishing IDC IP ranges may be delayed for one minute. If there are any updates on the IDC IP range, please refresh the current page.
You can switch between the two methods for publishing the IDC IP ranges through the direct connect gateway to CCN.
Switching to auto-propagation
Submit a ticket to enable the auto-propagation feature.
The custom IP ranges published to CCN will be withdrawn after the switching. The information of IDC IP ranges will be automatically synced to the direct connect gateway and published to CCN.
Switching to custom
Configure IP ranges to be published to CCN on the Custom tab on the IP range details page after the switching.
7. View the published IDC IP ranges.
The published IDC IP ranges are shown in the IP range details segment.
Was this page helpful?
You can also Contact Sales or Submit a Ticket for help.
Yes
No
Feedback

