Simple upload refers to users uploading objects using the PUT Object interface. This method is suitable for uploading individual objects not exceeding 5GB in a single request.
To upload individual objects larger than 5GB, you can use the following methods:
Using the console upload: The console supports uploading individual objects up to 512GB in size. For more information, please refer to the Upload Object Console Operation Guide.
Using API/SDK for multipart upload: This method supports uploading individual objects up to 48.82TB (i.e., 50,000GB). Please refer to Multipart Upload.
Using the COSCMD tool, you can upload individual objects up to 40TB in size. For more information, please refer to COSCMD Tool.
Note
When initiating an upload request, if you need to upload to a specific folder or path, you can use / to achieve this. For example, to upload picture.png to the doc folder, set the object key as doc/picture.png.
Scenarios
The simple upload method is suitable for scenarios where the object to be uploaded does not exceed 5GB.
In a high bandwidth or weak network environment, if your object is relatively large, for example, over 100 MB, we recommend you use Multipart Upload, even if the object is smaller than 5 GB. This is because multipart upload supports uploading multiple parts concurrently, which gives full play to resources in high bandwidth environments. On the other hand, in weak network environments, the uploaded parts will not be affected by the failed ones. Therefore, failed parts can be re-uploaded with a simple retry, improving the overall upload success rate. For more information about uploading objects with a client in a weak network environment, see Multipart Upload Resumption in a Weak Network Environment.
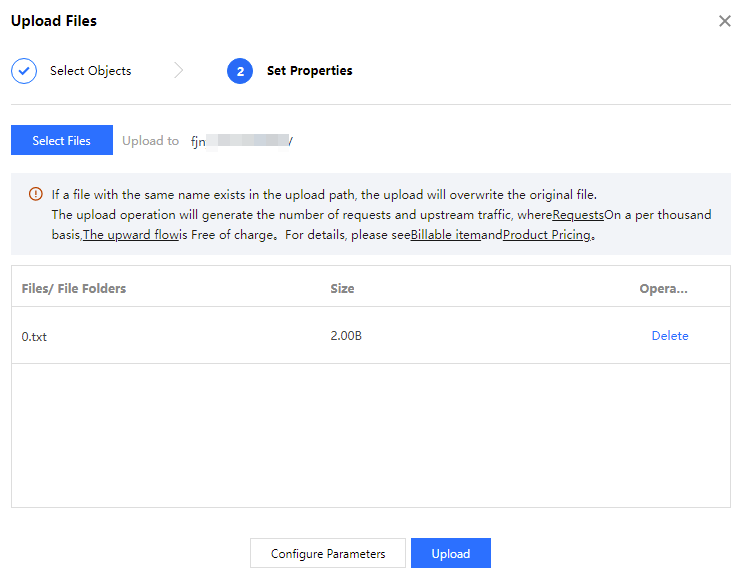
3. Click the target bucket to enter the File List page.
4. In File List, click Upload Files.
5. In the pop-up window, click Select Files or Select Folders and select one or multiple local files (or folders) as needed.
Note:
Since some browsers do not support uploading multiple files, we recommend you use popular browsers such as Internet Explorer 10 or later, Firefox, or Chrome.
6. (Optional) Click Configure Parameters.
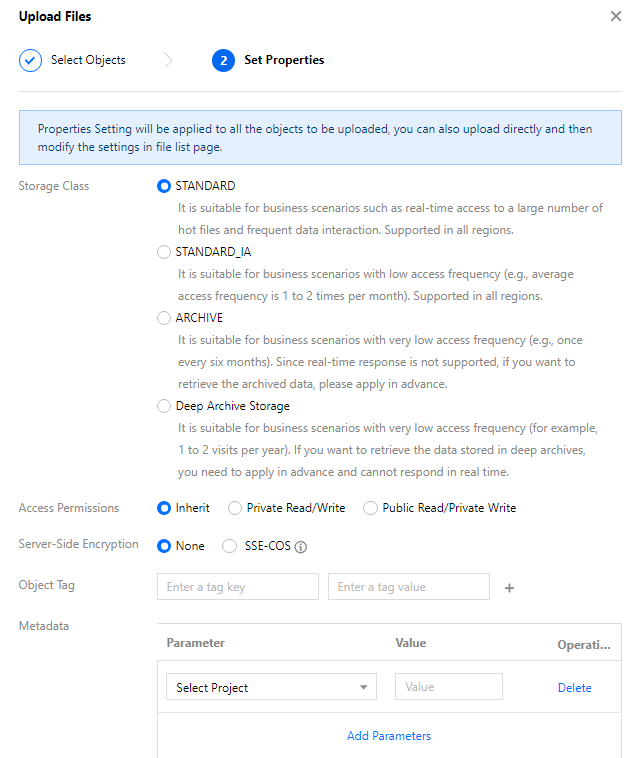
7. (Optional) set the object attributes in the Upload Files window.
The configuration instructions are as follows:
Storage Class: Select the storage class for your object as needed. This field is set to STANDARD by default. For more information, see Overview.
Note:
If your bucket has MAZ configuration enabled, you can only select an MAZ storage class, such as MAZ_STANDARD. If it also has INTELLIGENT TIERING configuration enabled, you can also select MAZ_INTELLIGENT TIERING.
Access Permissions: Select the access permission for your object as needed. This field is set to Inherit by default (inheriting permissions of the bucket). For more information, please see Basic Concepts of Access Control.
Server-side encryption: When you upload objects, configure the server encryption attribute for the objects. Tencent Cloud COS will add a data encryption protection policy for the uploaded objects, helping you automatically encrypt before data is written and automatically decrypt when you access the data. Currently, SSE-COS and SSE-KMS are supported. For an introduction to server-side encryption and applicable regions, see Server-side Encryption Overview.
Object tag: You can add tags to an object to be uploaded. The object tag is composed of a tag key, (=), and a tag value, such as group = IT. Each object tag is a key-value pair. For more information, see Object Tag Overview.
Metadata: Object metadata, or HTTP header, is a string sent by the server over HTTP before it sends HTML data to the browser. By modifying HTTP headers, you can modify how the webpage responds as well as certain configurations, such as caching time. Modifying an object's HTTP headers does not modify the object itself. For more information, please see Custom Headers.
8. Click Upload.
9. You can check the upload progress in Task Completed in the top-right corner of the page. Once the upload is complete, the uploaded object will appear in File List.
Note:
The task progress in the figure indicates the number of tasks established by the current operation. For example, if you have executed an upload task (this upload task is to upload 10 files) and all have been uploaded successfully, then the task progress will display "Task completed (10 successful)".
Using the REST API
Use REST APIs to initiate a simple upload request. For more information, see PUT Object.
Using SDKs
Directly call the simple upload method in the SDK. For more information, see the SDK documentation for the corresponding programming language below: