
Configure Topic Read-Write Permission

Last updated: 2025-09-19 17:33:13
Scenarios
After SASL authentication is enabled for a CKafka instance, only authenticated SASL users can access CKafka resources. ACL (Access Control List) policies support setting different Topic-level production/consumption permissions for different SASL users, implementing permission isolation between users and enhancing user access control for public network/private network transmission.
Restrictions and Limitations
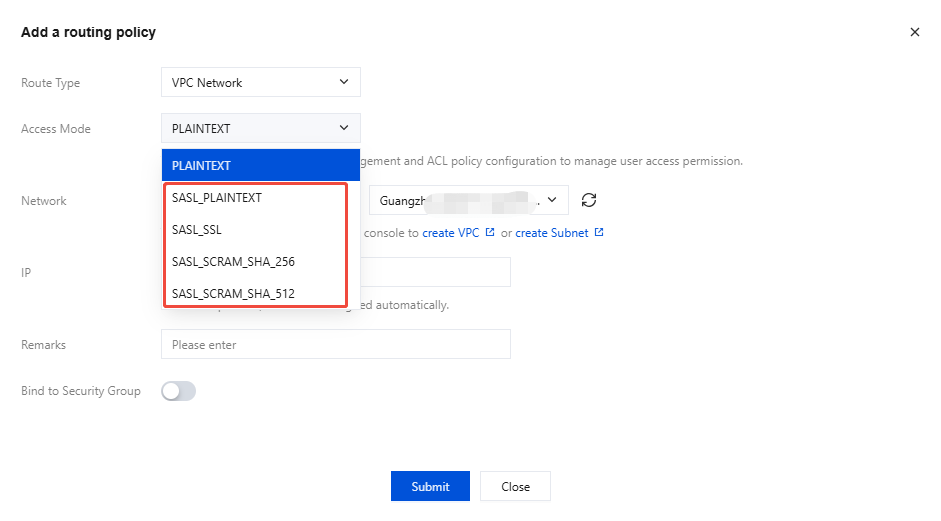
The access method set when adding a routing policy only affects the authentication method during connection. The set ACL policy is global. The two work together to guarantee the security of the cluster and access control.
If you are using SASL to connect CKafka and also using PLAINTEXT to connect CKafka, the ACL set for the Topic will still take effect. If you wish to ensure PLAINTEXT access is not affected, add read and write permissions for all users to the Topic that PLAINTEXT needs to access.
If a Topic is already being used by other cloud products (for example: log delivery by Cloud Log Service (CLS), message dump by Serverless Cloud Function (SCF), or consumption by EMR big data components), enabling an ACL policy is equivalent to imposing restrictions on the permissions of linked capabilities. These capabilities will directly become unavailable, so be sure to do so with caution. For such cases, we recommend producing the same data to another topic for separate processing. Do not configure a unified ACL policy on the same topic.
The maximum number of ACL policies per instance is 100.
Configuring ACL Policy
Step 1: Enable SASL Authentication
Before configuring ACL policy, you need to enable SASL authentication for the instance. For variations in different access methods and detailed directions, refer to Network Description.
Step 2: Create a User
Note:
Only users with SASL authentication can trigger subsequent ACL policy validation. If you already have a suitable user, you can skip this step.
- Please save your username and password properly to avoid leakage. You need to configure this parameter when using the client for message production and consumption subsequently.
1. Log in to the CKafka console.
2. Select in the left sidebar, go to instance list, after selecting a region, click the ID of the target instance to go to instance basic information page.
3. On the instance basic information page, select ACL Policy Management > User Management, click Create, and enter username and password.
username: comply with the naming rule, can only contain letters, digits, underscore, "-", ".".
password: comply with the password rule, must contain at least 2 of the following: lowercase letters, uppercase letters, digits, special characters [()`~!@#$^&*-_=|{}[]:;',.?/].
4. Click Submit, complete the creation, and copy the username on the user management list page.

Step 3: Set Topic Read/Write Permissions
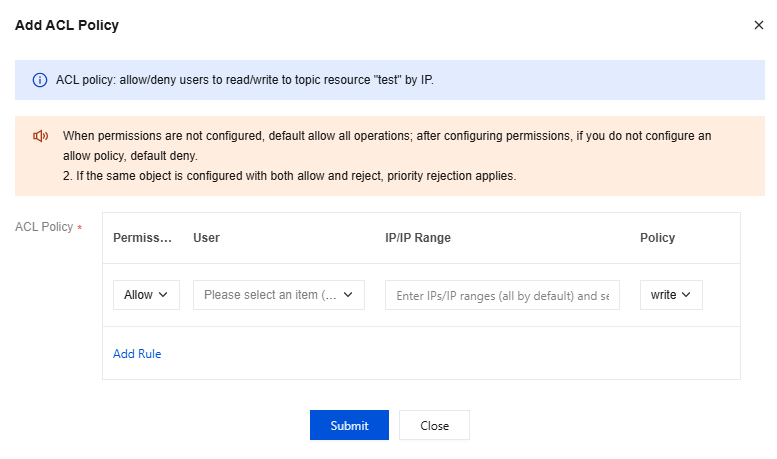
An ACL policy is a group of user-defined permission rules that allow/deny users to read/write Topic resources through IP.
1. Log in to the CKafka console.
2. Select in the left sidebar, go to instance list, after selecting a region, click the ID of the target instance to go to instance basic information page.
3. On the instance basic information page, select ACL Policy Management > Strategy List tab, click batch configure, and enter the configure ACL policy webpage.
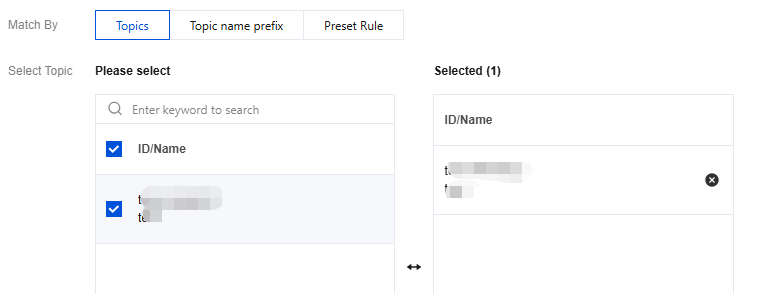
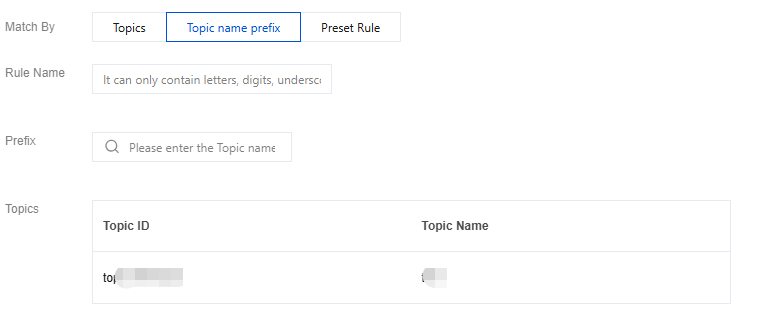
4. Set the Topic resource match rule in Match Mode.
Note:
Kafka version instances 2.4.1 and above support three ways to select effective Topics: batch selection, prefix fuzzy match, and preset rules. Kafka version instances below 2.4.1 only support two ways: batch selection and preset rules. You can view configuration instructions for different match modes through the following tabs:
To select multiple Topics that require the same ACL policy, you can directly batch select the Topics that need to be set under "Select Topic".
Match Topics by prefix fuzzy match that require the same ACL policy. After rule creation, when adding new Topics with a specified prefix, system automation configures the ACL policy for the Topic.
Rule name: Set the name of the fuzzy match rule, comply with naming convention, start with a letter, can only contain letters, digits, underscore, "-", ".".
Prefix match: input matching characters, and the matching Topic list will be displayed automatically below.
Set up an ACL policy. Once created, you can select and configure this ACL policy in advanced parameter settings when creating a new topic. For details, refer to Create Topic.
Rule name: Set the name of the preset rule, comply with naming convention, start with a letter, can only contain letters, digits, underscore, "-", "."
Automatically apply to all subsequent new topics: When enabled, subsequent newly created topics will automatically configure this rule.

5. Set user access rules in "ACL Policy".
Note:
Configure permissions. If not configured, default deny.
If the same object has both allow and deny permissions configured, deny takes precedence.
Parameter | Description |
Operation Permissions | The operation permissions of an ACL policy are divided into two categories: allow rule and deny rule. If only allow rules are set, other IPs cannot connect to the instance. If only deny rules are set, other IPs need to set allow rules only then can connect to the instance. If both allow rules and deny rules are set, only IPs in the allow rules can connect to the instance, and other IPs cannot connect to the instance. |
User | Select the user to grant permission. If no user is selected, it will default to all users. |
IP or ranges | Fill in the IPs to set permission, support multiple inputs of IPs or ranges, separated by ;. If no IP is specified, it will default to all IPs.Instances of version 3.2.x cannot be configured with IP ranges. |
Policies | Select the action for the policy to take effect, such as reading or writing messages to a Topic. Simultaneous selection of read and write is not supported. If needed, set up two separate ACL policies. |
6. Click Submit to complete ACL policy creation.
7. Validate whether the privilege takes effect. You can access TDMQ for CKafka through the SASL access point and use the PLAIN/SCRAM mechanism to consume messages (please refer to SDK documentation).
Managing ACL Policy
Matched ACL policies display under the Policy List Resources tab. Preset ACL policies created via Prefix Fuzzy Match and Preset Rules methods display under the Preset Rules tab.
Viewing and Modifying Topic Permissions
1. On the ACL policy list page, select the resource tab. The list will display created topics under the current instance.
2. Click Edit ACL Policy in the Operation column of the target Topic to view the policy details of the Topic Configuration. On this tab, you can perform the following operations:
Click Create in the top-left corner to directly create a new ACL policy under the current Topic.
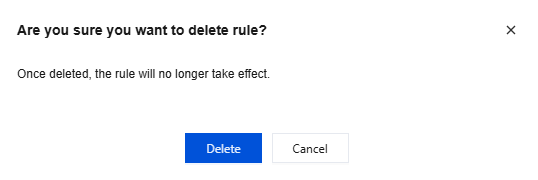
Click Delete in the operation bar to delete the ACL policy configured for the Topic. Once deleted, the rule will no longer take effect.
View and Modify Preset Rules
1. On the ACL policy list page, select the Preset Rules tab. The list will display preset rules created for the current instance.
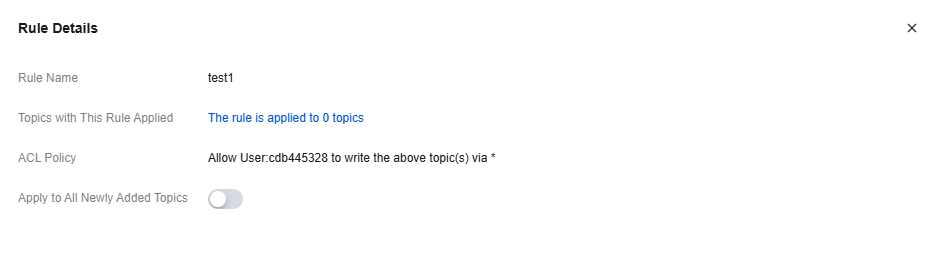
2. Click Details in the target rule operation bar to view the preset rule details and choose whether to enable automatic application to all subsequently added Topics.
3. Click Delete in the operation bar of the target rule to delete this preset rule.
For preset rules created by different methods, the processing method for historic Effective Rules varies after deletion, as follows:
Prefix fuzzy match: For topics that have historically matched this rule, the rule will become invalid directly.
Preset Rules: The rule remains in effect for topics that have matched it historically.
Was this page helpful?
You can also Contact Sales or Submit a Ticket for help.
Yes
No
Feedback