tencent cloud

HashiCorp Consul on the Tencent Cloud

February 2021

Overview

This guide provides step-by-step instructions for deploying HashiCorp Consul on the Tencent Cloud. It is for users who are finding a solution for service discovery, monitoring, or a key/value store. This guide is based on using the open-source version of Consul.
HashiCorp Consul uses a central registry for service-based networking and provides a foundation for cloud networking automation. Consul is ideal for the following use cases:
  • Service registry and health monitoring, to automatically add and remove services based on health checking across any cloud.
  • Network middleware automation, to easily deploy, manage and optimize network infrastructure.
  • Multi-platform service mesh, to create a platform for application networking and secure service-to-service traffic with identity-based security policies and automatic mTLS communication.
  • Consul is a service mesh solution offering service discovery, configuration, and segmentation functionality in your infrastructure. You can use these features individually or use together to create a full-service mesh. The key features of Consul are:
  • Service Discovery: Consul clients can easily register a service and to discover other services via a DNS or HTTP interface. External services providers can also be registered.
  • Health Checking: Consul clients can quickly check any issues in a cluster, either associated with a given service or with the local node. This information can be used by an operator to monitor cluster health, and the service discovery components route traffic away from unhealthy hosts based on the information.
  • Key/Value Store: Applications can store and use Consul's hierarchical key/value store for different purposes, including dynamic configuration, feature flagging, coordination, leader election. The simple HTTP API makes it easy to use anywhere.
  • Secure Service Communication: Consul enables generate and distribute TLS certificates for services to establish mutual TLS connections.
  • Multi Datacenter: Consul supports multiple datacenters out of the box. Consul users do not have to worry about building additional layers of abstraction to grow to multiple regions.
For more detailed instructions and screen illustrations of using HashiCorp Consul is available on the HashiCorp Consul and HCP Consul websites.

Costs and Licenses

You are responsible for the cost of the Tencent Cloud services used while running the reference deployment. You can customize the configuration parameters of the reference mentioned below, such as instance type, storage size, bandwidth, which will affect the cost of deployment. Add other Tencent Cloud services to your deployment will also affect the cost. Please see the pricing pages for each Tencent Cloud service you are going to use for cost estimates.
This guide uses the open-source version of HashiCorp Consul, which doesn’t require a license fee.

Prerequisites

Deployment Steps

Step 1. Prepare a Tencent Cloud Account
If you don’t already have a Tencent Cloud account, create one at our Sign Up page by following on-screen instructions.
Step 2. Create a CVM instance
After you log in your Tencent Cloud account, create a CVM instance on Cloud Virtual Machine page.
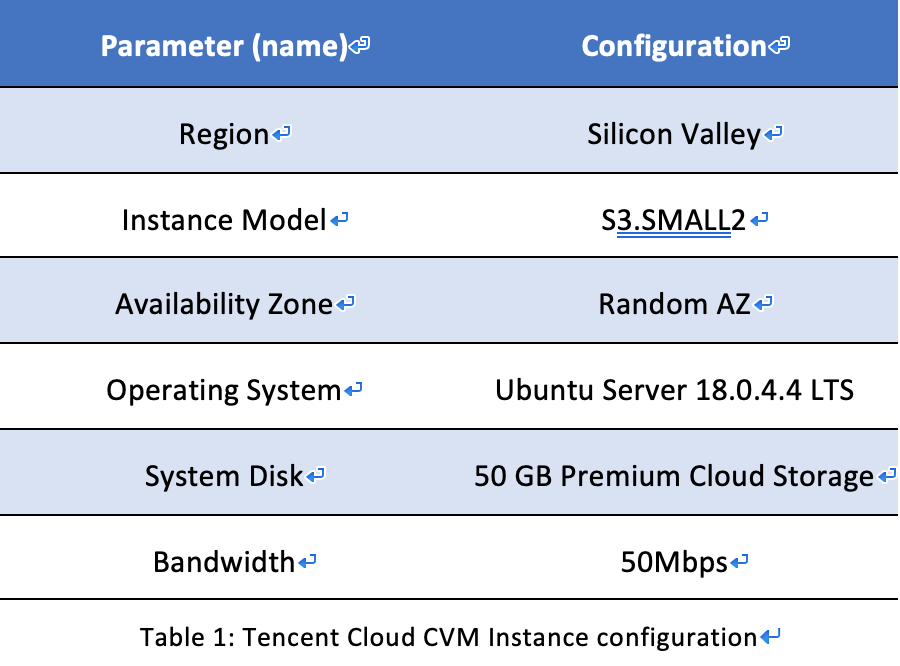
In the guide, we launched an instance using the configuration in Table 1. You can change the configuration based on your needs. Please note that you are responsible for the cost of using any Tencent Cloud CVM services. Changing the configuration will also influence the cost.
Step 3. Install HashiCorp Consul
1. Log into your Tencent CVM instance using the login method you selected.
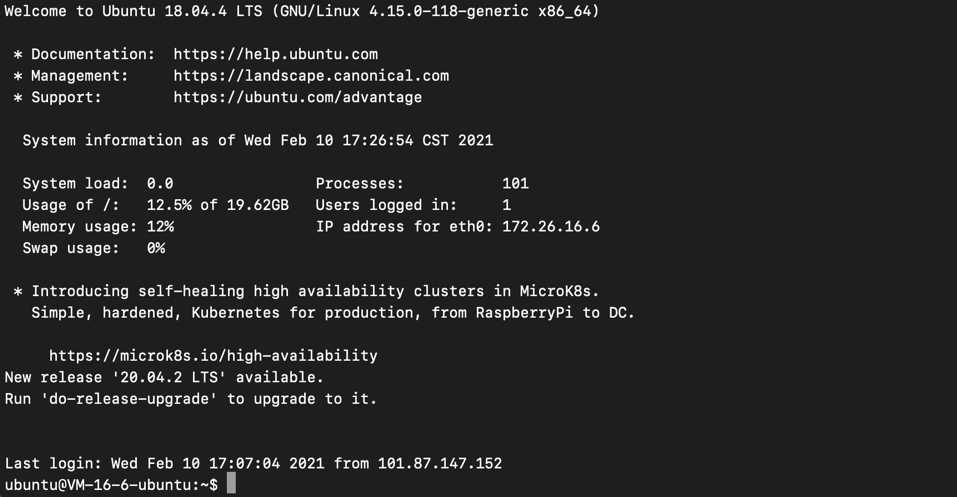
2. Download the appropriate package for your system from HashiCorp Consul website. Consul is currently packaged as a zip file. The reference instance uses a Ubuntu 18.04.4 LTS 64bit system, so here we download Linux 64-bit version of Consul.
wget https://releases.hashicorp.com/consul/1.9.3/consul_1.9.3_linux_amd64.zip
3. Unzip the file into any directory. The consul binary inside needs no additional files to run Consul.
unzip consul_1.9.3_linux_amd64.zip
4. To access consul the binary from the command-line, place it somewhere on your path. If you intend to permanently add a directory to your path, see solutions on Stack overflow.
sudo mv consul /usr/bin/
To verify Consul is properly installed, run consul -v on your system. You will be able to see the version of HashiCorp Consul illustrated in the figure above.
Step 4. Set up the Consul
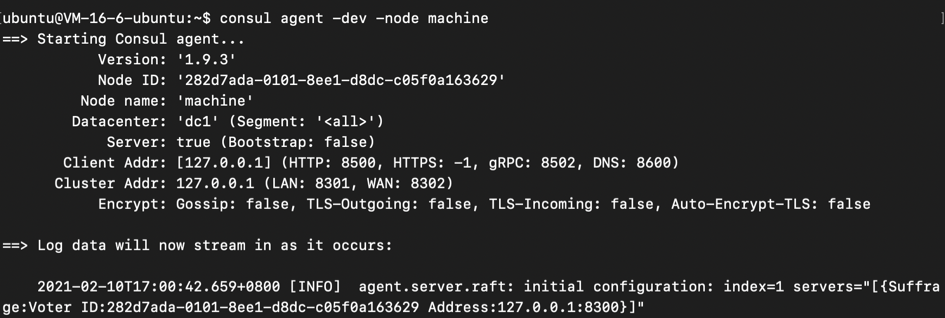
1. This guide starts the Consul agent in development mode for simplicity. This mode is useful for setting a single-node Consul environment efficiently. It is not intended to be used in production as it does not persist any state. Consul default uses your hostname as the node name. To avoid this, set your node name with the -node flag. Here we set the node name as machine.
consul agent -dev -node machine
2. Run consul members in another terminal to see the members and information of the Consul cluster. We created one node in the previous step, so we would only see one member named machine.
consul members
To integrate Consul with your specific environment, please see more detailed deployment guide on Getting Started section of the HashiCorp Consul official website.
Step 5. Access Consul via SSH
To access the Consul environment, use an SSH agent to forward our private key on connection. Visit GitHub documentation for more information on SSH agents.
1. Add your SSH private key to the ssh-agent. If you created your key with a different name, or if you are adding an existing key that has a different name, put the name of your private key file instead of id_ed25519 in the command.
2. In the Tencent Cloud CVM console, find the public IP address of the CVM you created for Consul.
In the example above, the public IP address is 170.106.101.25
3. Type the command ssh -A ubuntu@170.106.101.25 and remotely log in your instance. If it’s your first time remotely access this instance, type yes when prompted to continue connecting.
4. View Consul members you created.
Step 6. Access the Consul Web UI
1. Start your consul agent with option -client 0.0.0.0 or add “client_addr”: “0.0.0.0” to your consul configuration file.
consul agent -dev -node machine -client 0.0.0.0
2. Use command ssh -L 8500:170.106.101.25:8500 ubuntu@170.106.101.25 to open an SSH tunnel from your local workstation.
Step 7. Access the Nomad Web UI
To integrate Consul with your specific environment, please see more detailed deployment guide on Getting Started section of the HashiCorp Consul official website.

Additional Resources

Tencent Cloud ServicesHashiCorp Consul
Contact Us

Contact our sales team or business advisors to help your business.

Technical Support

Open a ticket if you're looking for further assistance. Our Ticket is 7x24 avaliable.

7x24 Phone Support
Hong Kong, China
+852 800 906 020 (Toll Free)
United States
+1 844 606 0804 (Toll Free)
United Kingdom
+44 808 196 4551 (Toll Free)
Canada
+1 888 605 7930 (Toll Free)
Australia
+61 1300 986 386 (Toll Free)
EdgeOne hotline
+852 300 80699
More local hotlines coming soon