Copyright in this document is exclusively owned by Tencent Cloud. You must not reproduce, modify, copy or distribute in any way, in whole or in part, the contents of this document without Tencent Cloud's the prior written consent.
Trademark Notice
All trademarks associated with Tencent Cloud and its services are owned by the Tencent corporate group, including its parent, subsidiaries and affiliated companies, as the case may be. Trademarks of third parties referred to in this document are owned by their respective proprietors.
Service Statement
This document is intended to provide users with general information about Tencent Cloud's products and services only and does not form part of Tencent Cloud's terms and conditions. Tencent Cloud's products or services are subject to change. Specific products and services and the standards applicable to them are exclusively provided for in Tencent Cloud's applicable terms and conditions.
The SQL editor provided by Data Lake Compute (DLC) supports data querying using unified SQL statements, compatible with SparkSQL. You can complete data query tasks using standard SQL.
You can access the SQL editor through data exploration, where you can perform simple data management, multi-session data queries, query record management, and download record management.
Data Management
Data management supports adding data sources, managing databases, and managing data tables.
Creating a data catalog
Currently, Data Lake Compute supports the management of COS and EMR Hive data catalogs. The directions are as follows:
1. Log in to the Data Lake Compute console and select the service region. You need to have the admin permission.
2. Select Data Explore on the left sidebar, hover over
on the Database & table tab, and click Create catalog.
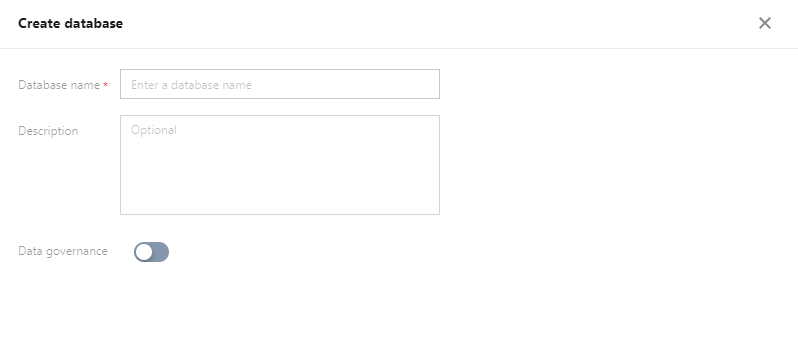
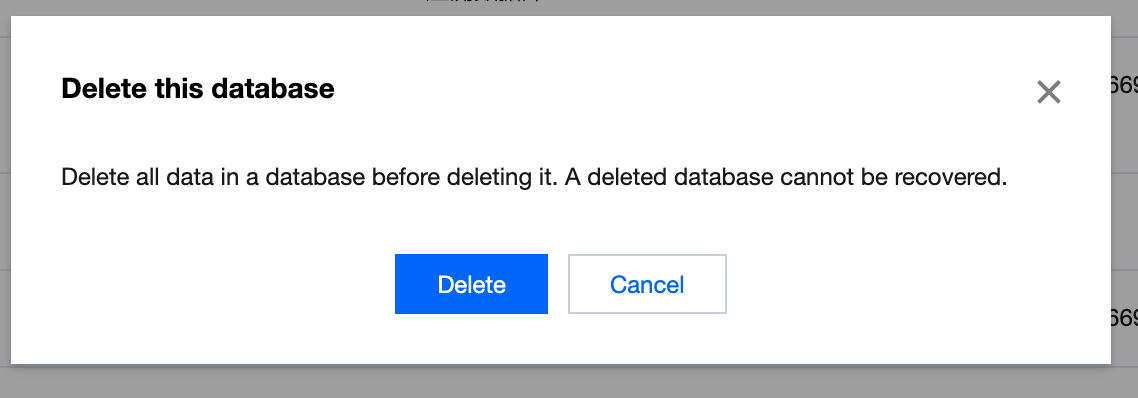
You can create, delete, and view the details of a database in the SQL editor.
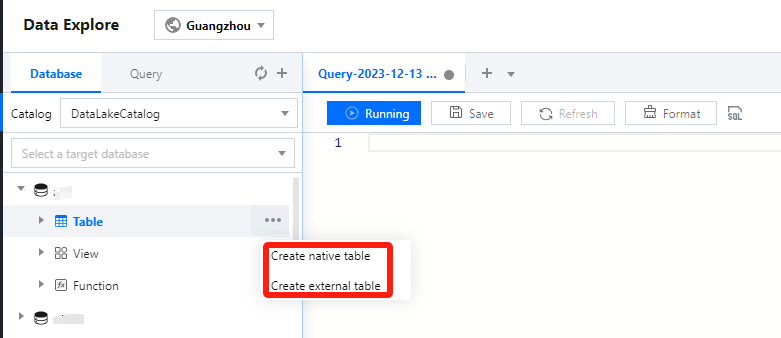
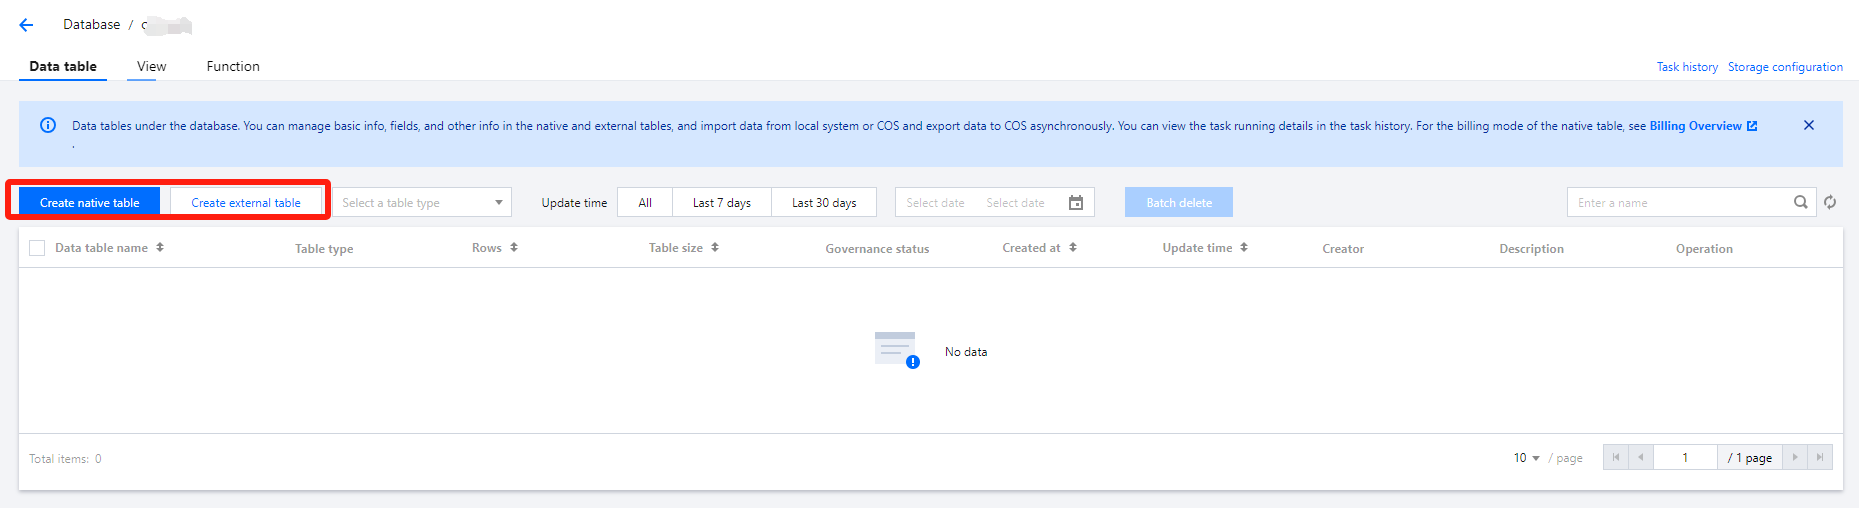
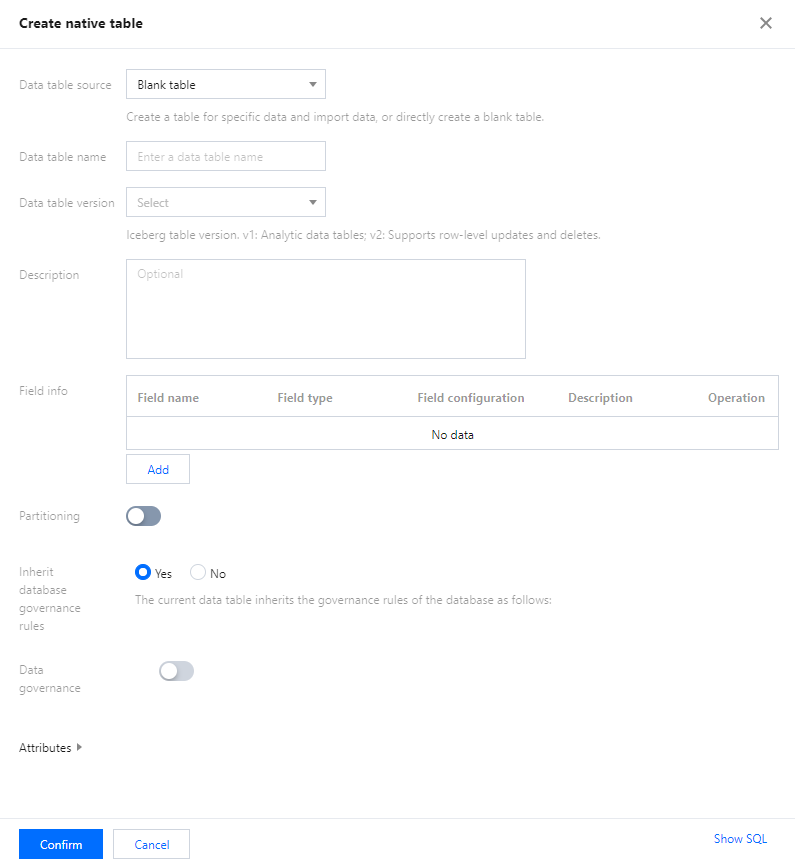
Managing a data table
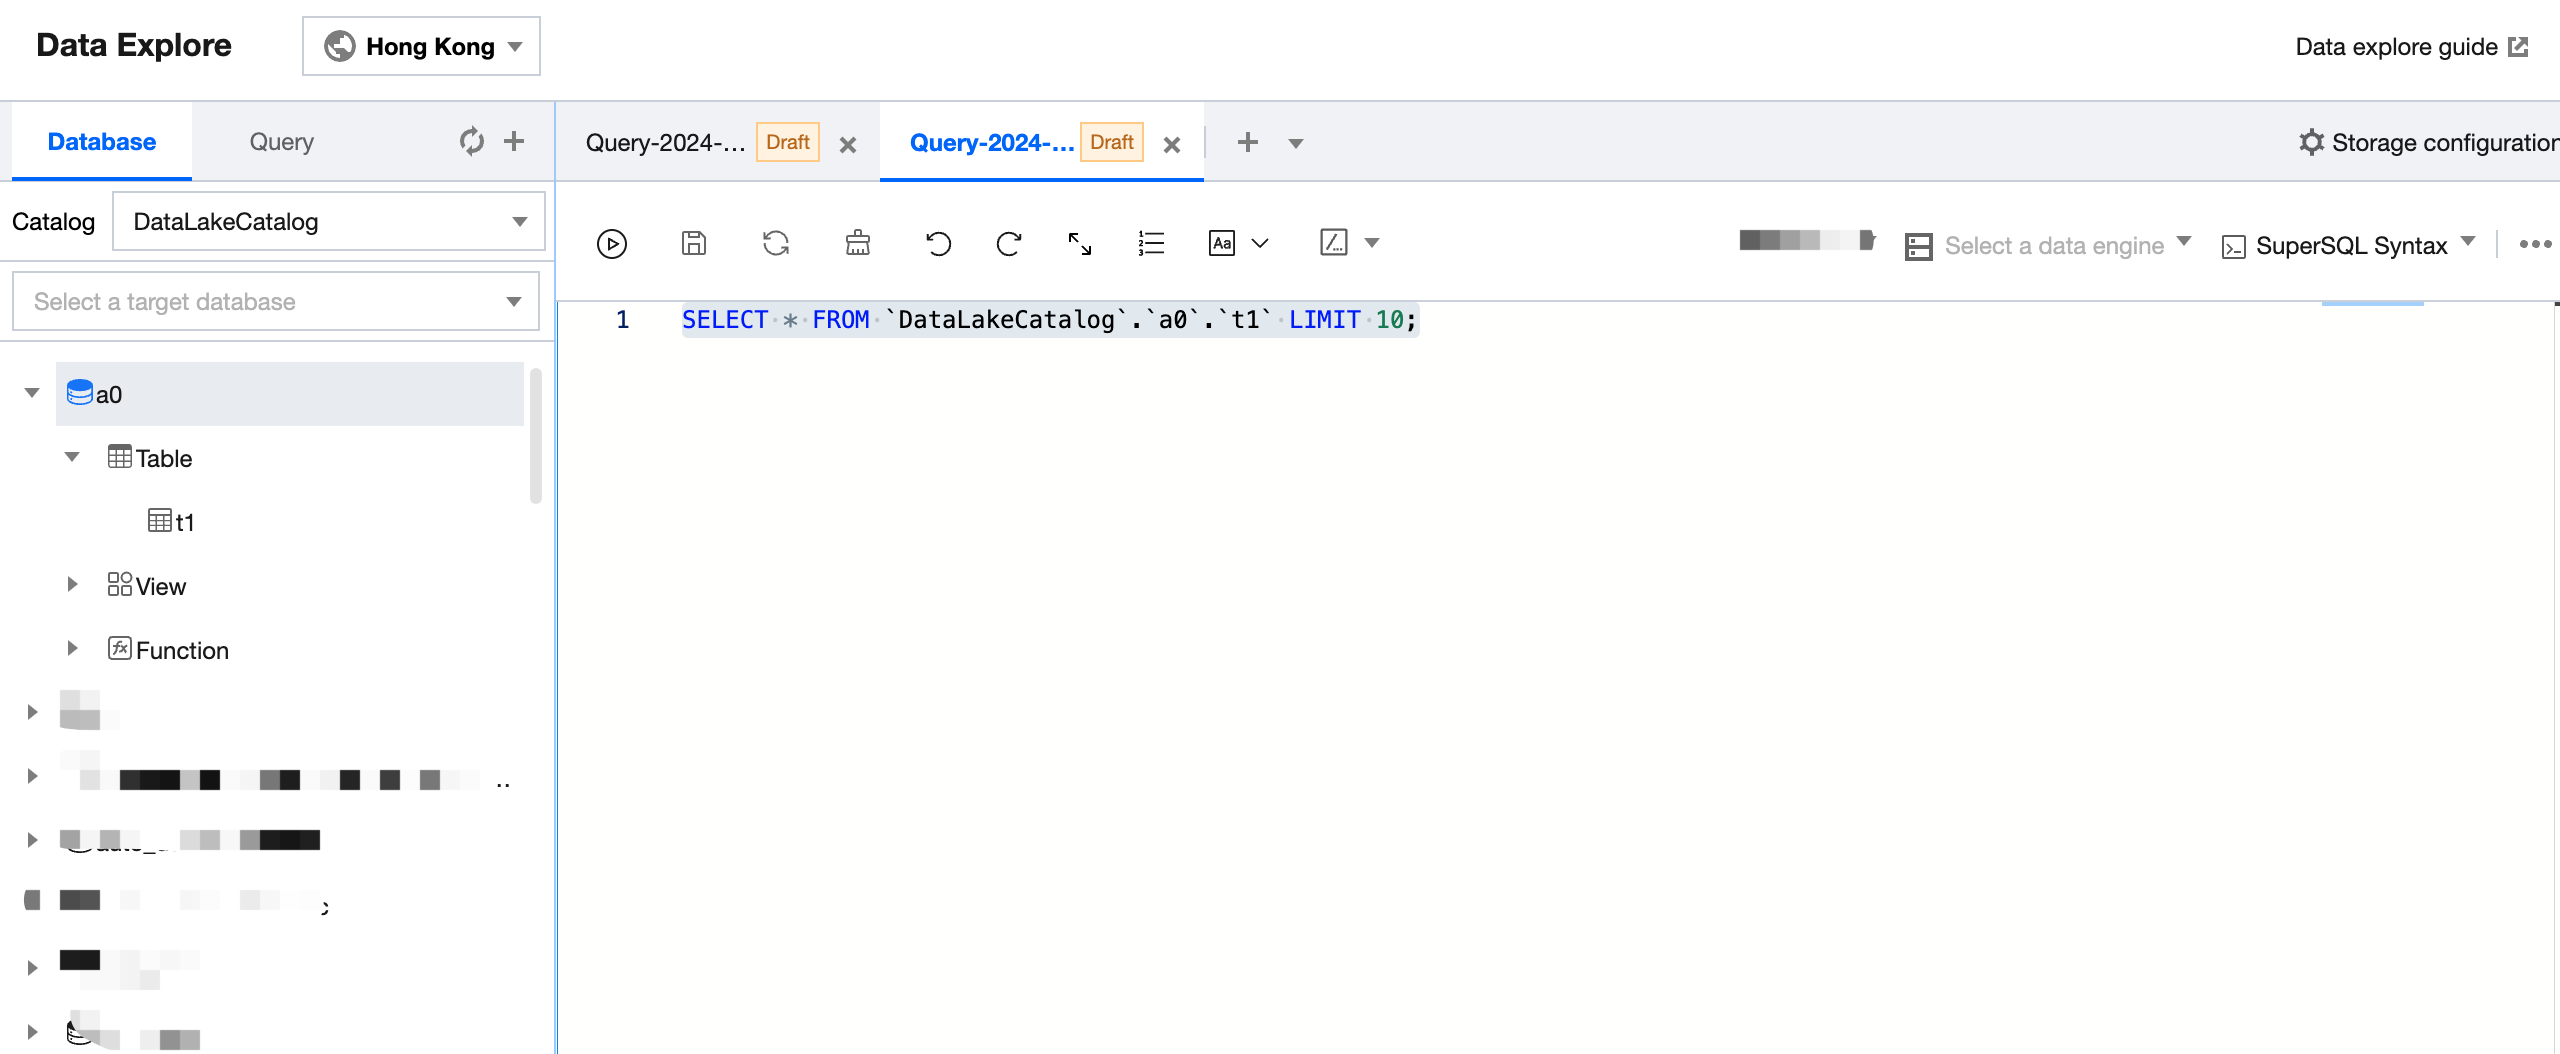
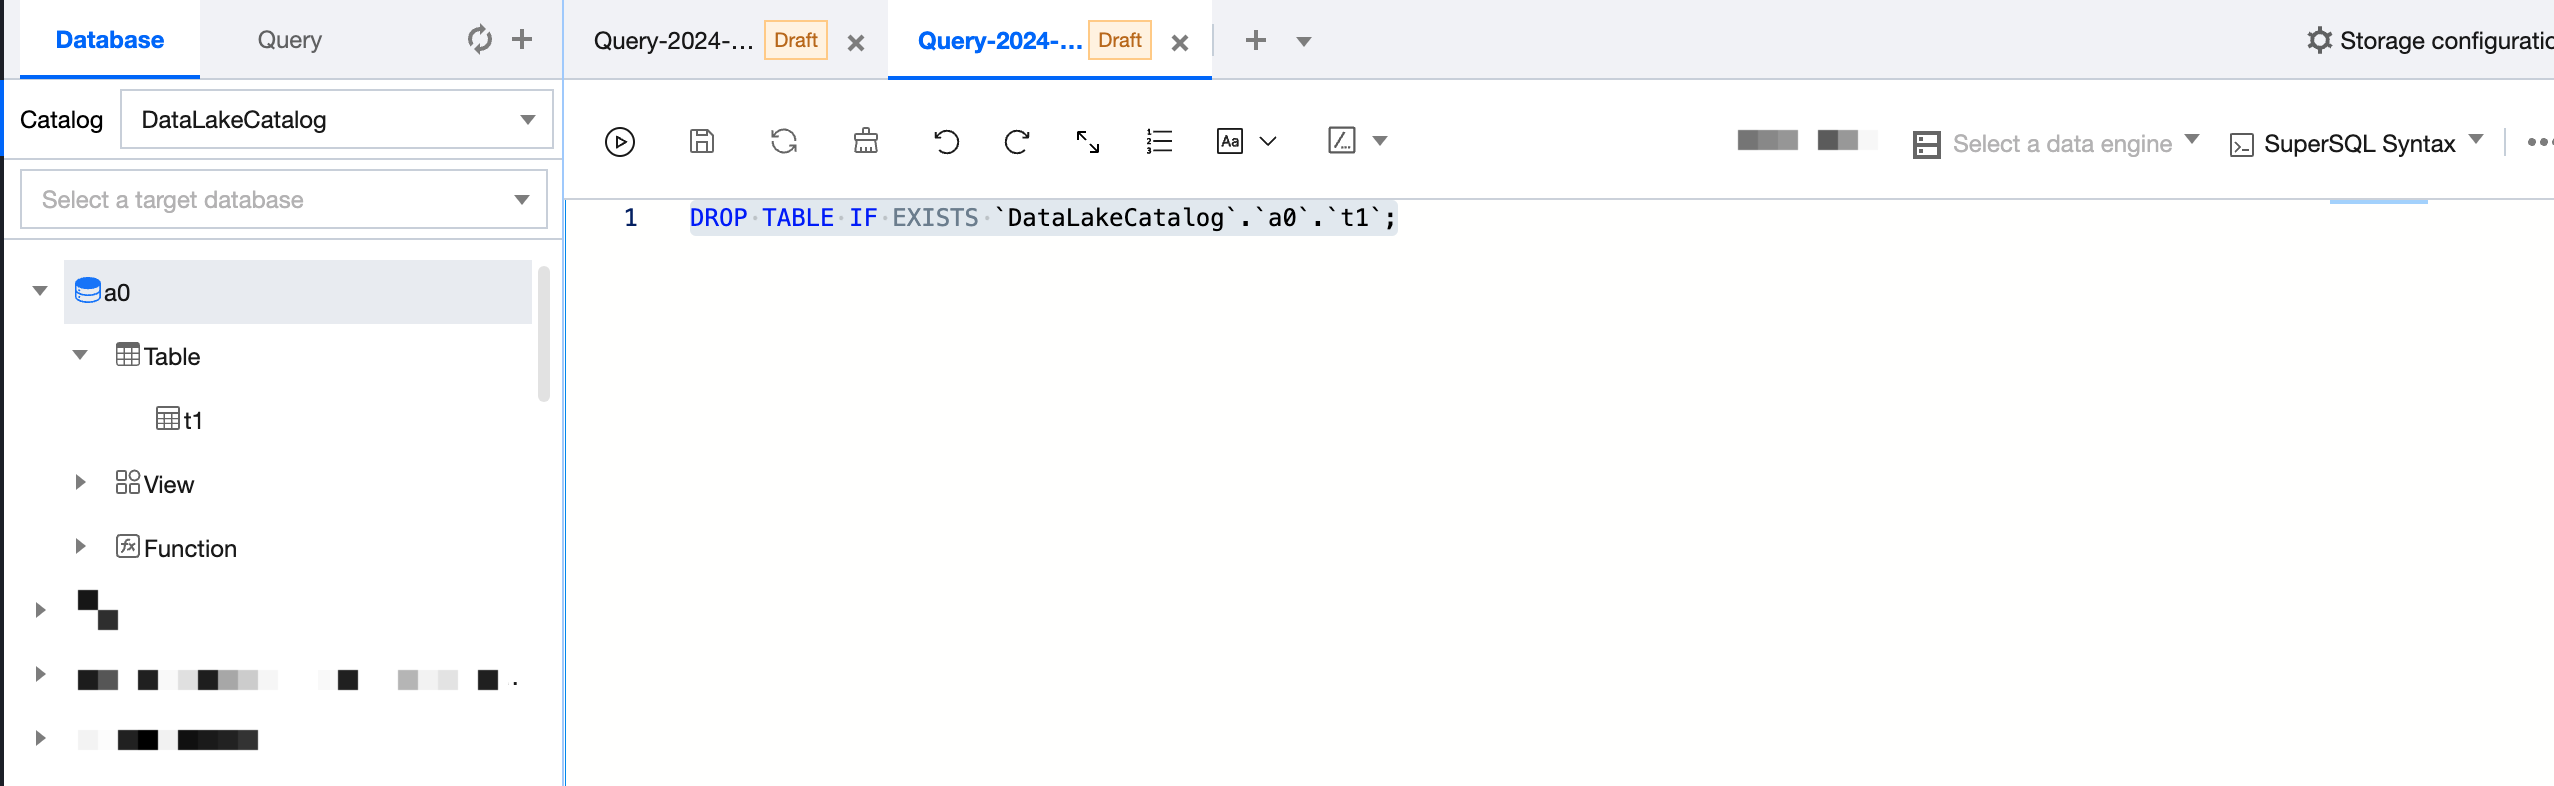
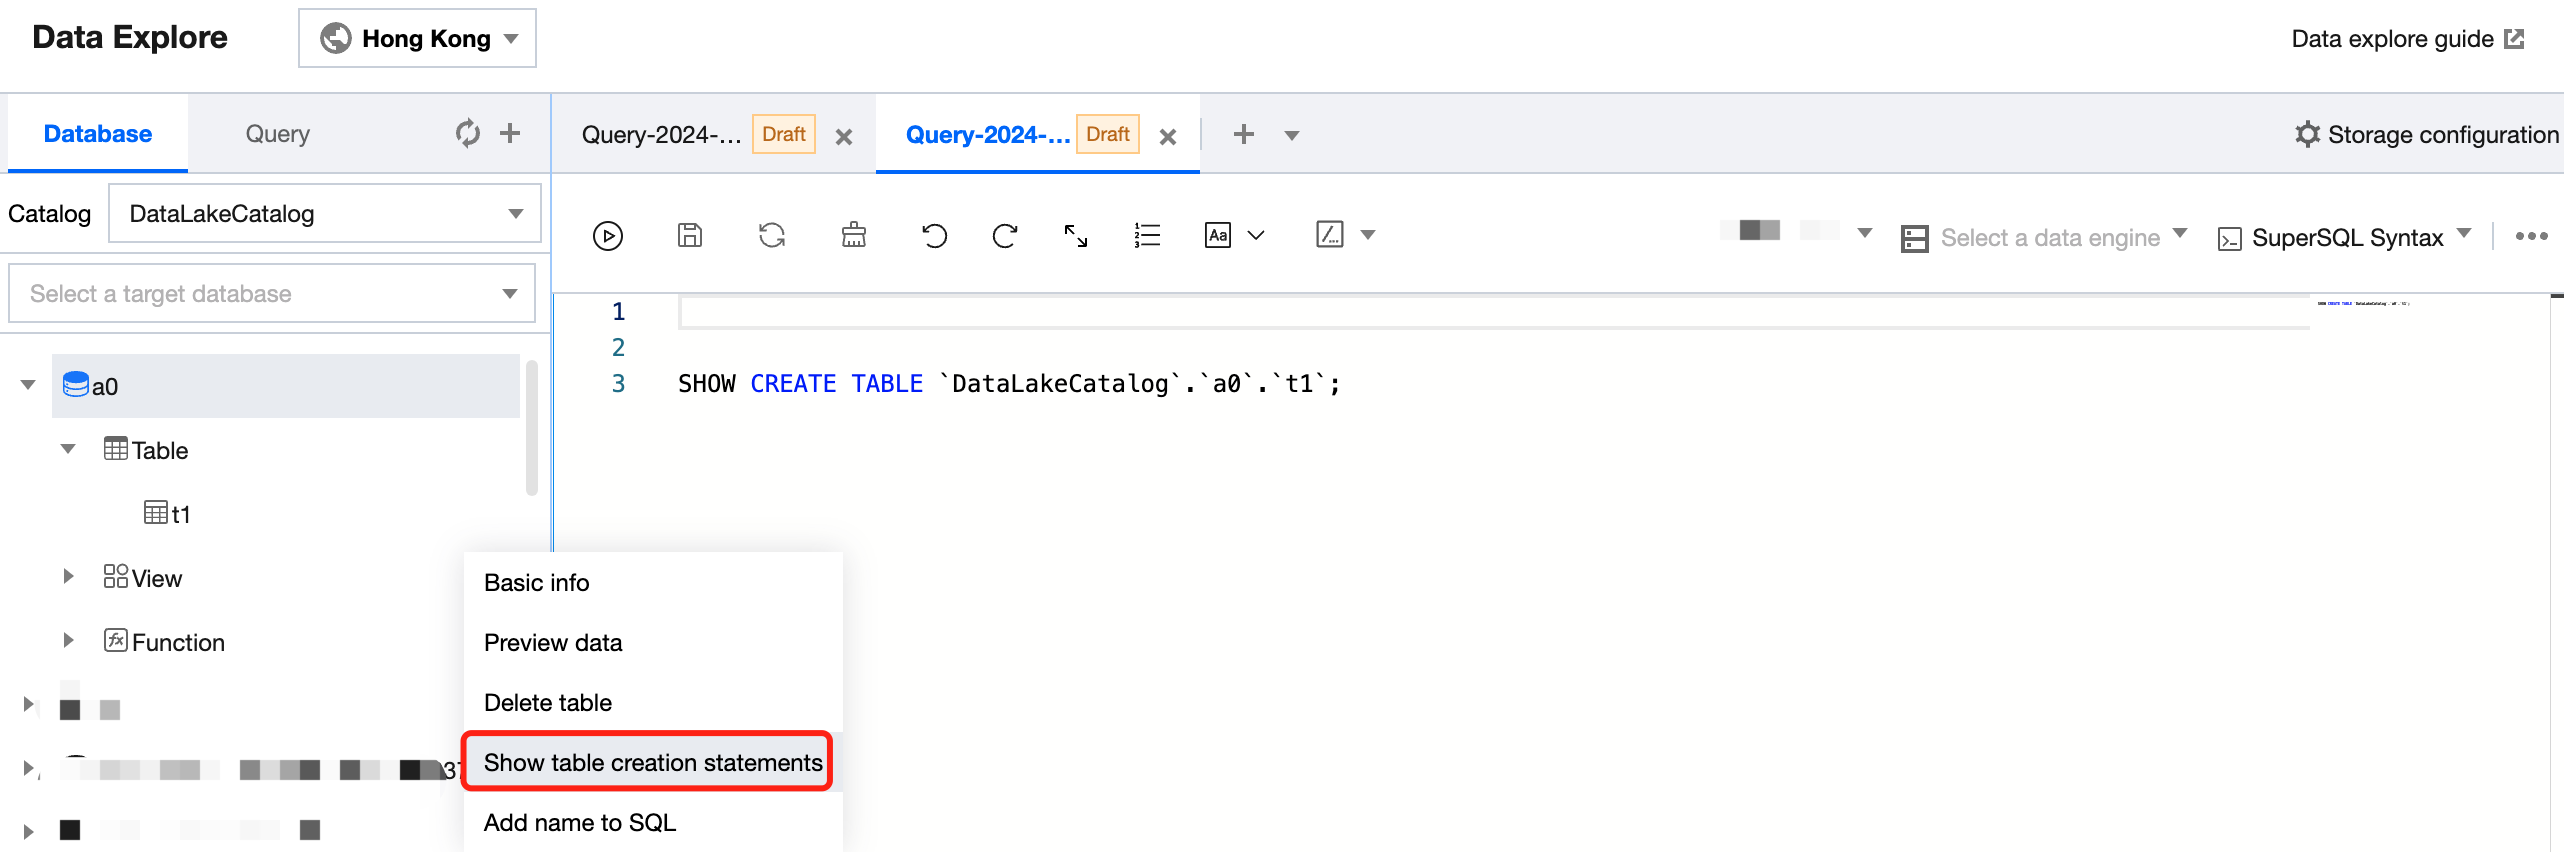
You can create, query, and view the details of a data table in the SQL editor.
Changing the default database
You can use the SQL editor to specify the default database for query tasks. If no database is specified in a query statement, the query will be executed in the default database.
2. Select Data Explore on the left sidebar, hover over the target database name, click
, and click Set as default database to set the database as the default database.
3. You can also change the default database in the Default database selection box.
Data Query
Add Query Page
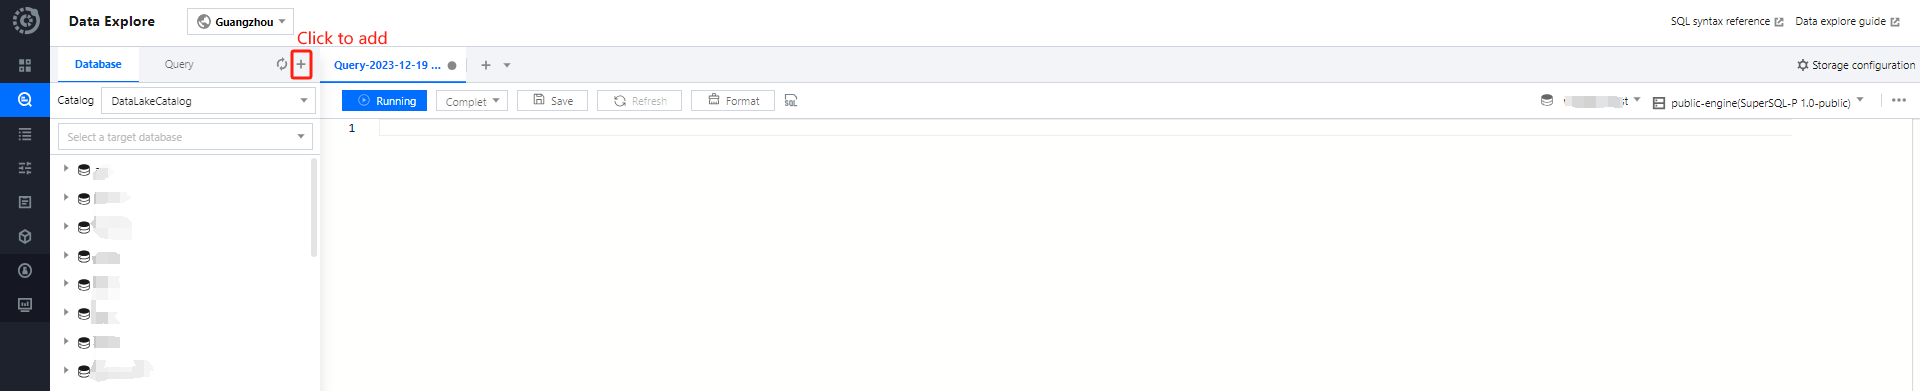
The SQL editor supports adding multiple pages for data querying, with each query page having independent configurations (default database, computation engine used, query records, etc.). This facilitates users in running and managing multiple tasks.
You can create a new query page by clicking on the
icon, and switch the editor interface by clicking on the tab bar.
For your convenience, you can save frequently used query pages by clicking the Save button. You can also quickly open your saved pages by clicking the
icon.
For saved query page information, you can click the Refresh button to update and synchronize the saved information, ensuring the accuracy of the query statement.
The editor supports running multiple different SQL statements simultaneously. Clicking the Run button will execute all SQL statements within the editor, simultaneously dividing them into multiple SQL tasks.
If you need to run a portion of the statement, select the required statement and click Partial run.
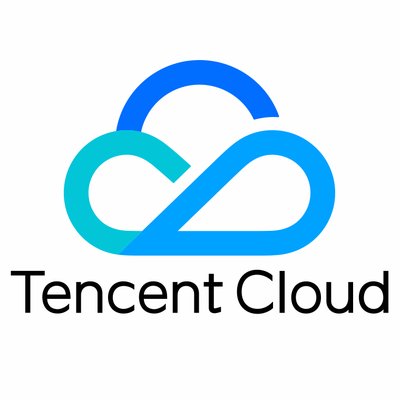
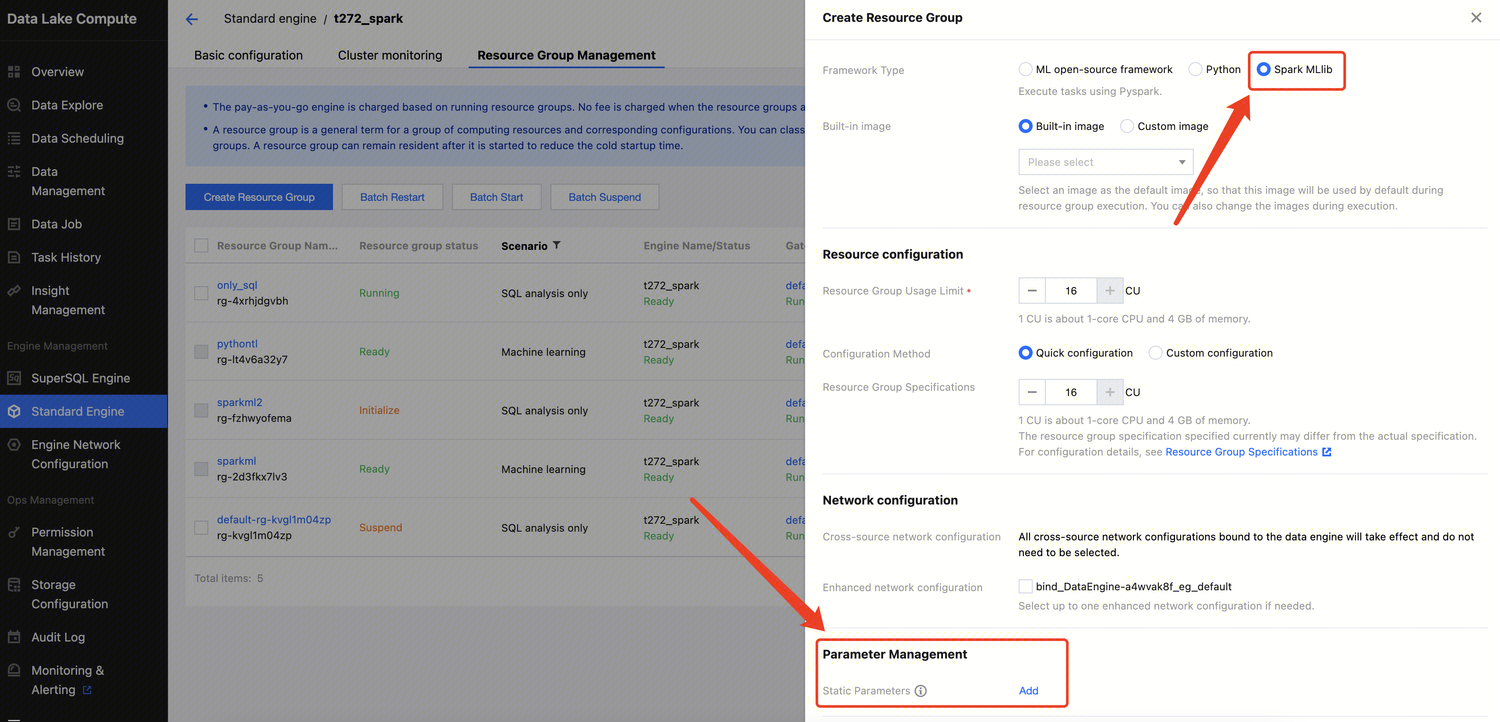
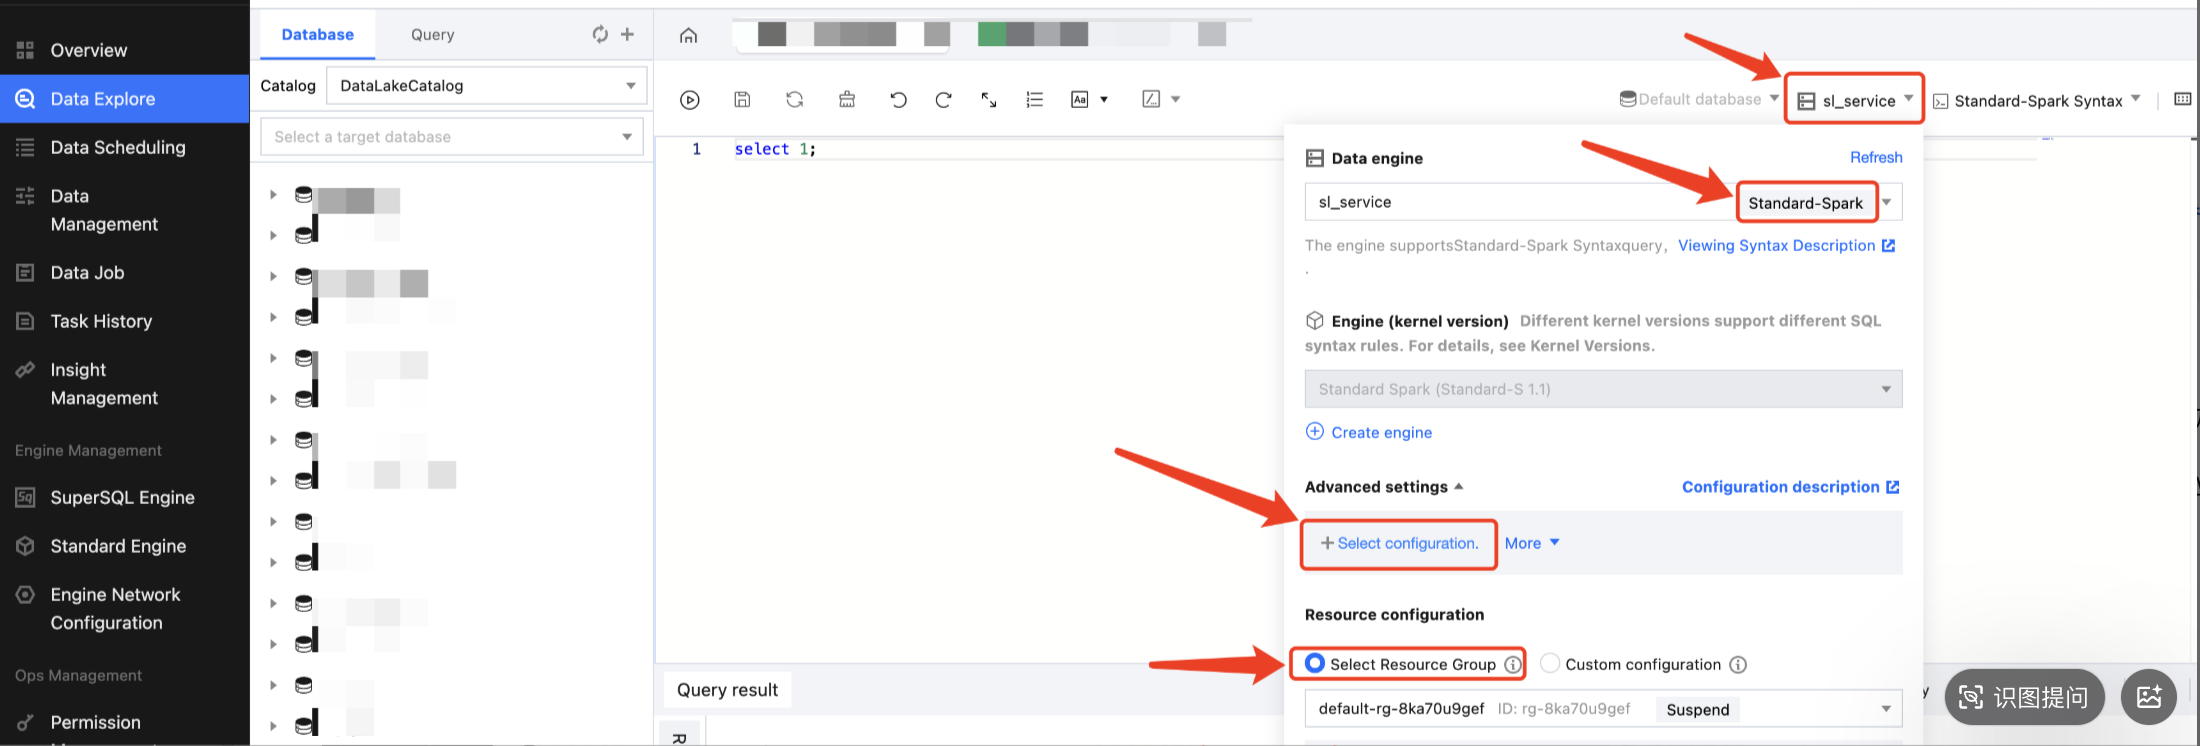
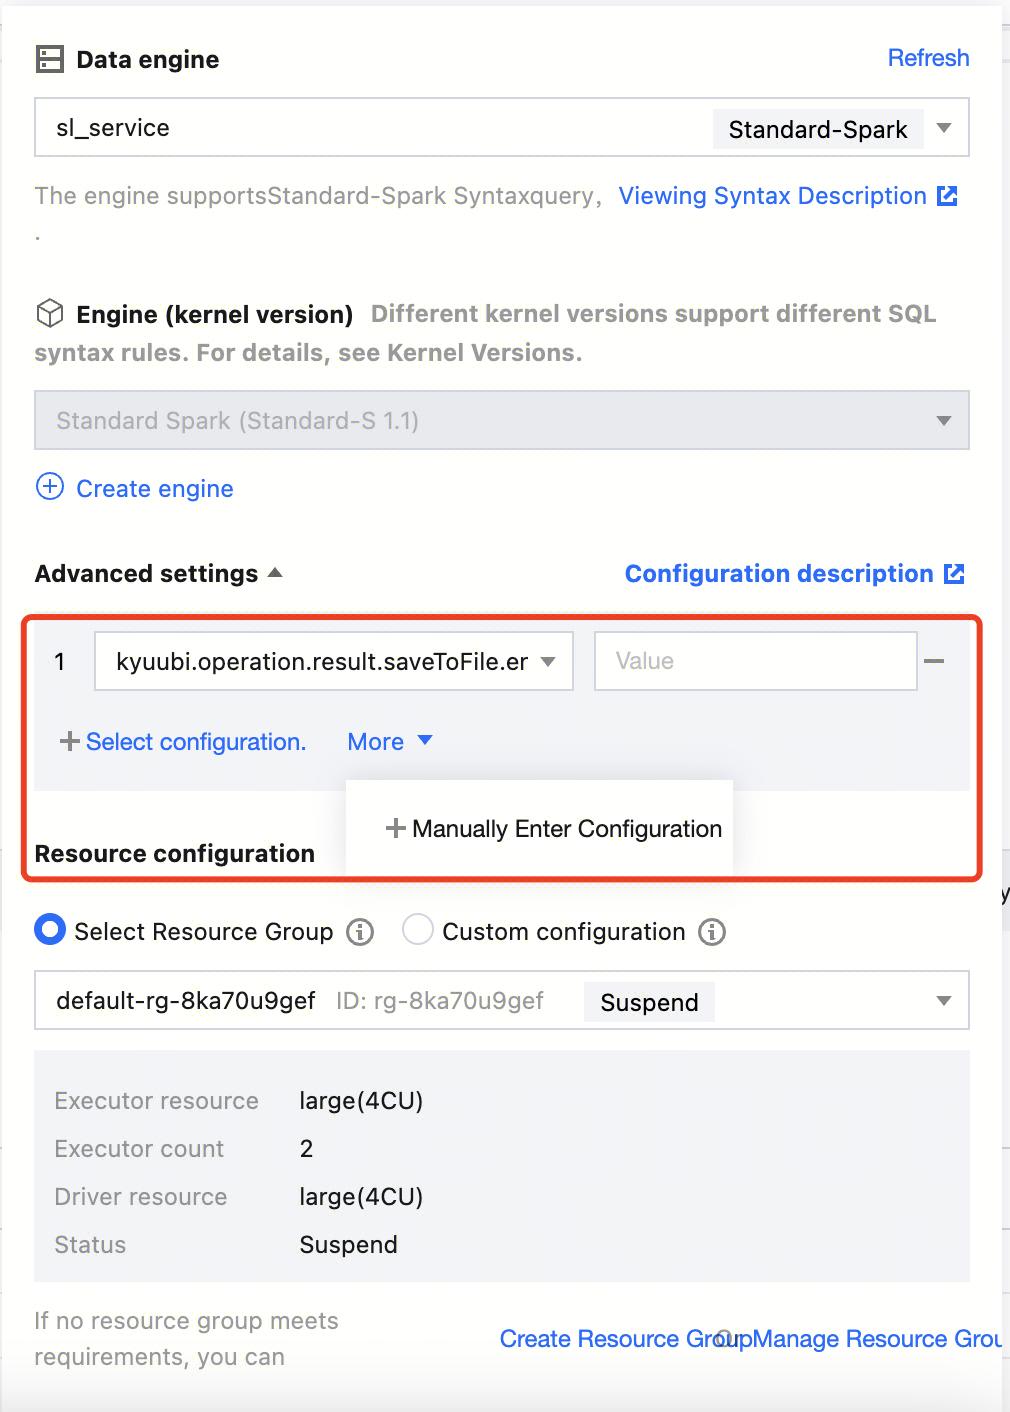
Engine Parameter Configuration
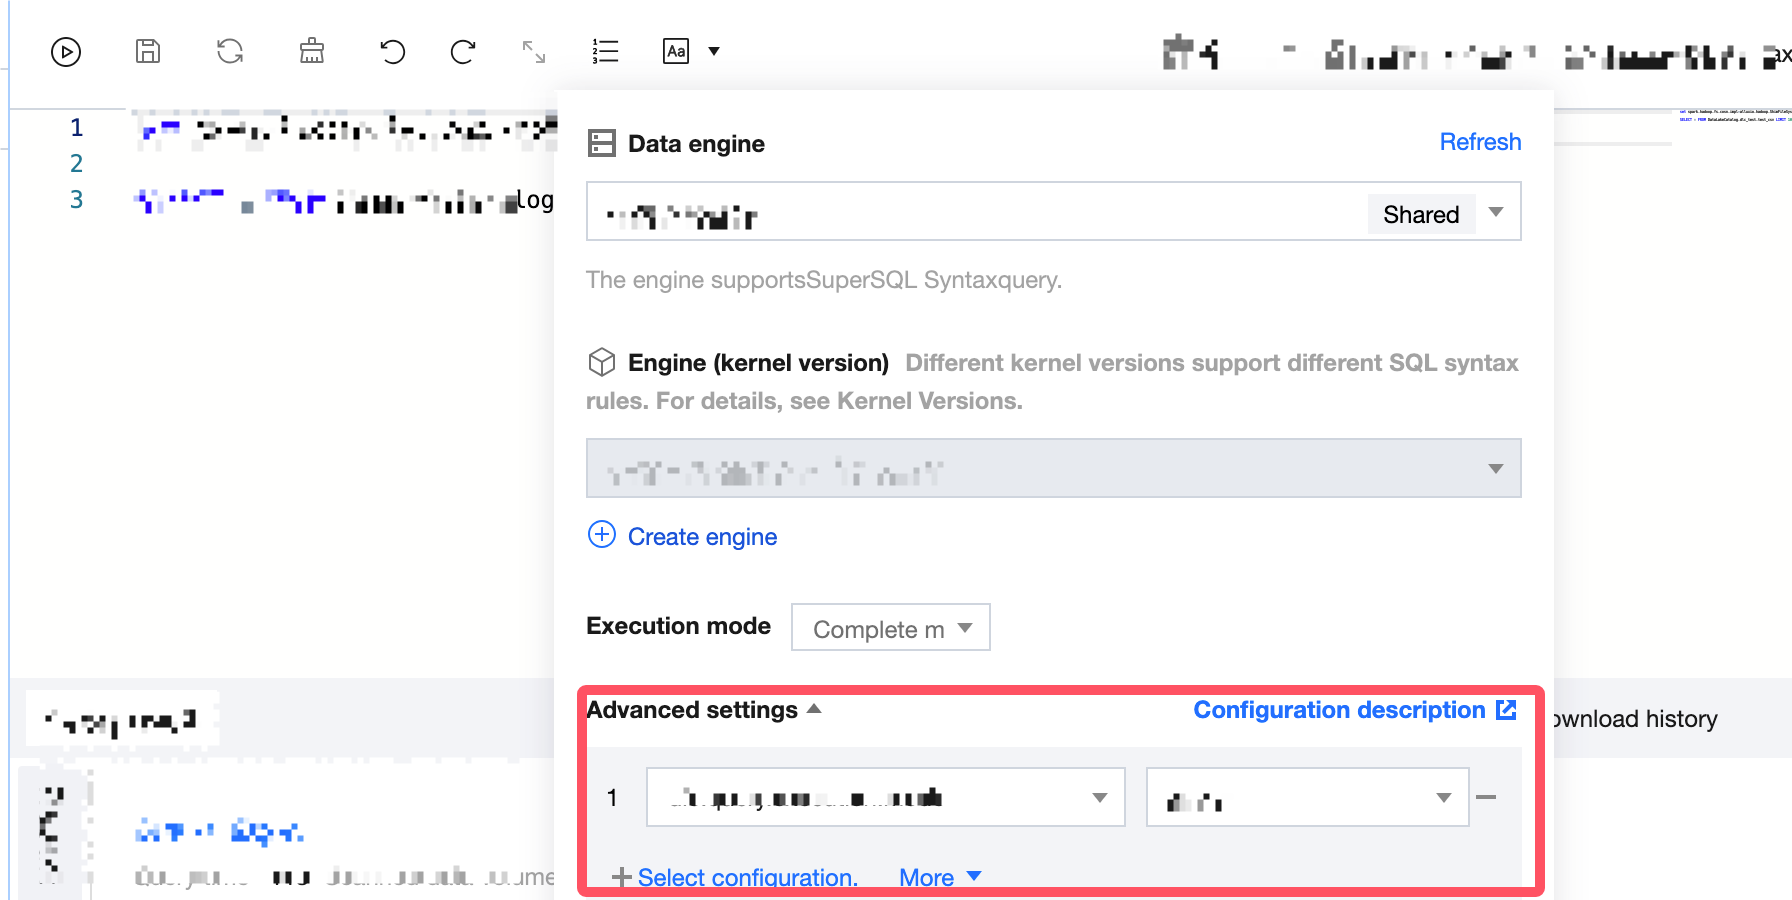
After selecting the data engine, you can configure parameters for the data engine. After selecting the data engine, click Add in Advanced Settings to configure.
The currently supported configuration parameters are as follows:
Engine
Configuration name
Start Value
Configuration Notes
SparkSQL
spark.sql.files.maxRecordsPerFile
0
The maximum number of records that can be written to a single file.
If this value is zero or negative, there are no restrictions.
spark.sql.autoBroadcastJoinThreshold
10MB
Configure the maximum byte size of the table of all working nodes displayed when executing a connection.
By setting this value to "-1", the display can be disabled.
spark.sql.shuffle.partitions
200
Default Partition Count.
spark.sql.sources.partitionOverwriteMode
static
When the value is set to static, all qualifying partitions will be deleted prior to executing the overwrite operation.
For instance, in a partitioned table, there is a partition "2022-01". When using the INSERT OVERWRITE statement to write data to the "2022-02" partition, the data in the "2021-01" partition will also be overwritten.
When the value is set to 'dynamic', partitions will not be deleted in advance, but will be overwritten during runtime for those partitions where data is written.
spark.sql.files.maxPartitionBytes
128MB
The maximum number of bytes to be packaged into a single partition when reading a file.
Presto
use_mark_distinct
true
Determines whether the engine redistributes data when executing the distinct function.
If the distinct function is called multiple times in a query, it is recommended to set this parameter to false.
USEHIVEFUNCTION
true
Determines whether to use Hive functions when executing a query; if you need to use Presto native functions, please set the parameter to false.
query_max_execution_time
-
This setting is used to establish a query timeout. If the execution time of a query exceeds the set time, the query will be terminated. The units supported are d-day, h-hour, m-minute, s-second, ms-millisecond (for example, 1d represents 1 day, 3m represents 3 minutes).
dlc.query.execution.mode
async
The engine query execution mode is set to async mode by default. In this mode, the task will perform a complete query calculation, save the results to COS, and then return them to the user, allowing the user to download the query results after the query is completed.
Users can also change this value to sync. In sync mode, queries may not necessarily perform full calculations. Once partial results are available, they will be directly returned to the user by the engine, without being saved to COS. Therefore, users can achieve lower query latency and duration, but the results are only saved in the system for 30 seconds. This mode is recommended for users who do not need to download the complete query results from COS, but expect lower query latency and duration, such as during the query exploration phase or BI result display.
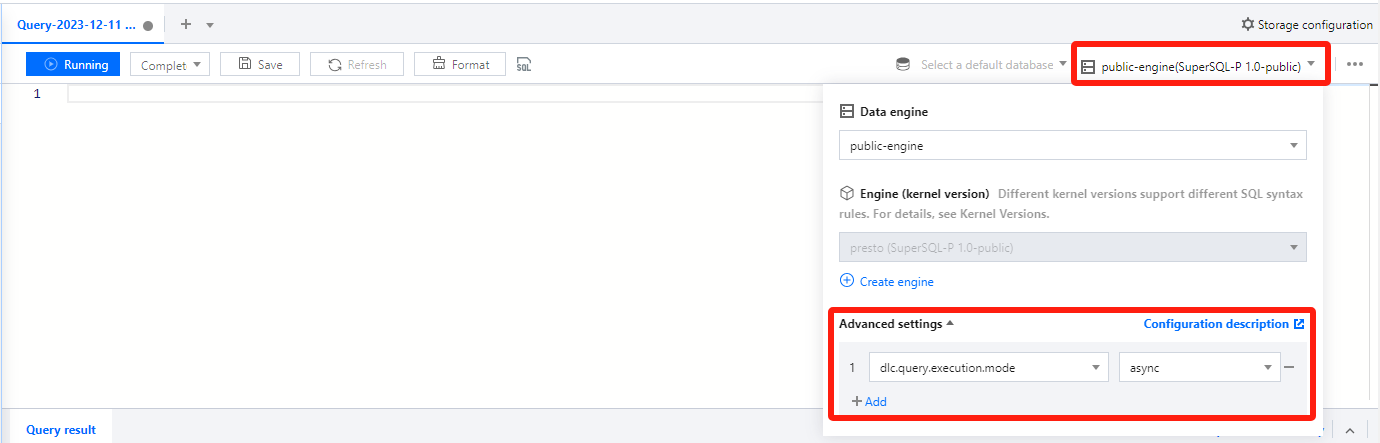
Presto Execution Mode
When the user selects the Presto engine, Data Exploration supports the user to choose to run in "Fast Mode" or "Full Mode".
Quick Query: This offers faster speed, but the query results cannot be persistently saved. It is suitable for the exploration phase.
Full Mode: Execute a full query and save the data to object storage.
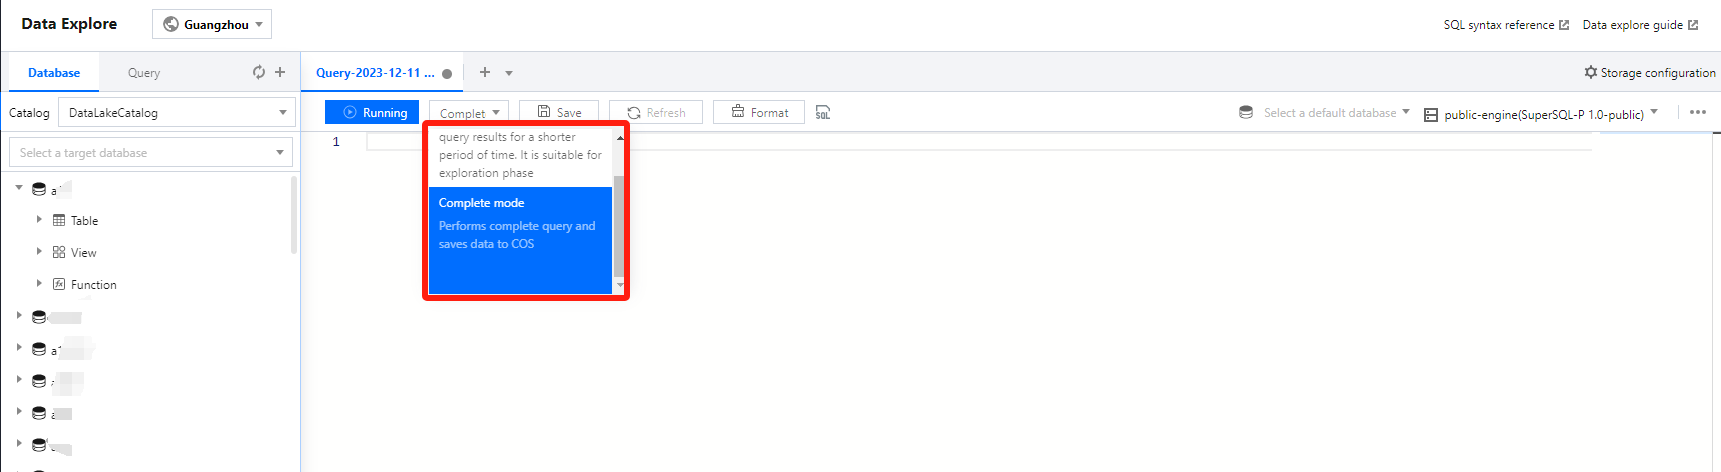
Search results
Through the SQL editor, you can directly view the query results. You can expand or collapse the display height of the query results by clicking the
chart.
You can configure the query result storage directory through the configuration button in the upper right corner, supporting configuration to the COS path or built-in storage.
The console will return a maximum of 1000 results for a single task. If more results are needed, the API can be used. For instructions on API-related operations, refer to the API Documentation.
Query results can be downloaded locally when no COS storage path is specified. For detailed instructions, refer to Obtaining Task Results.
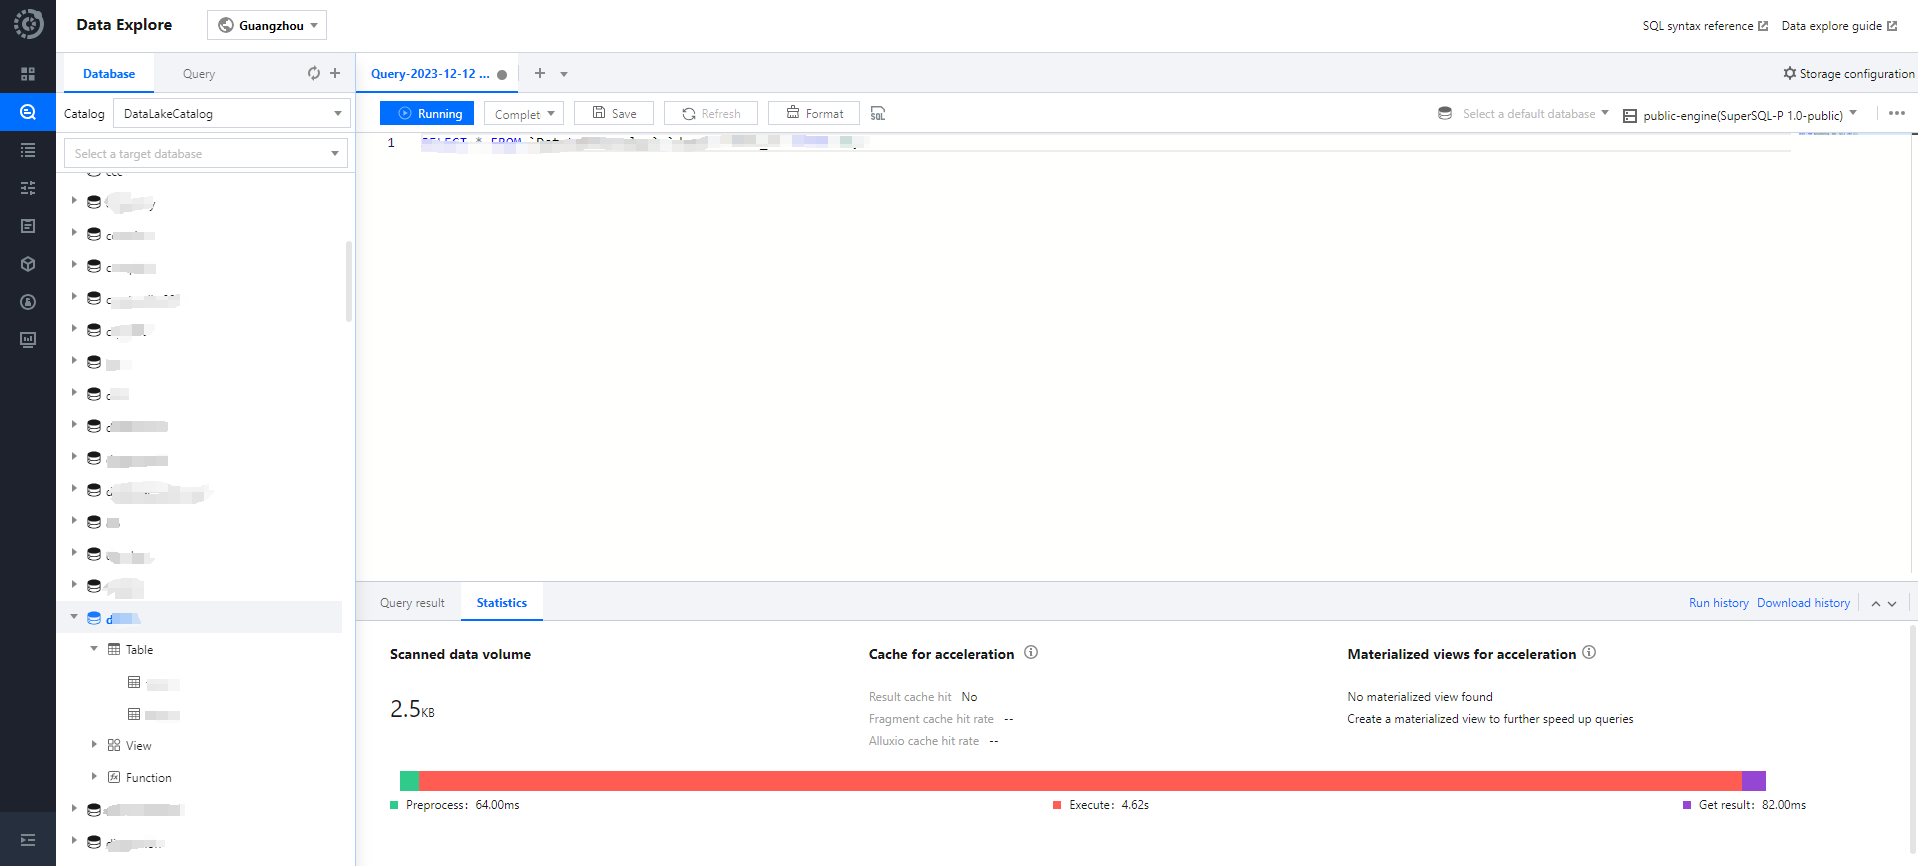
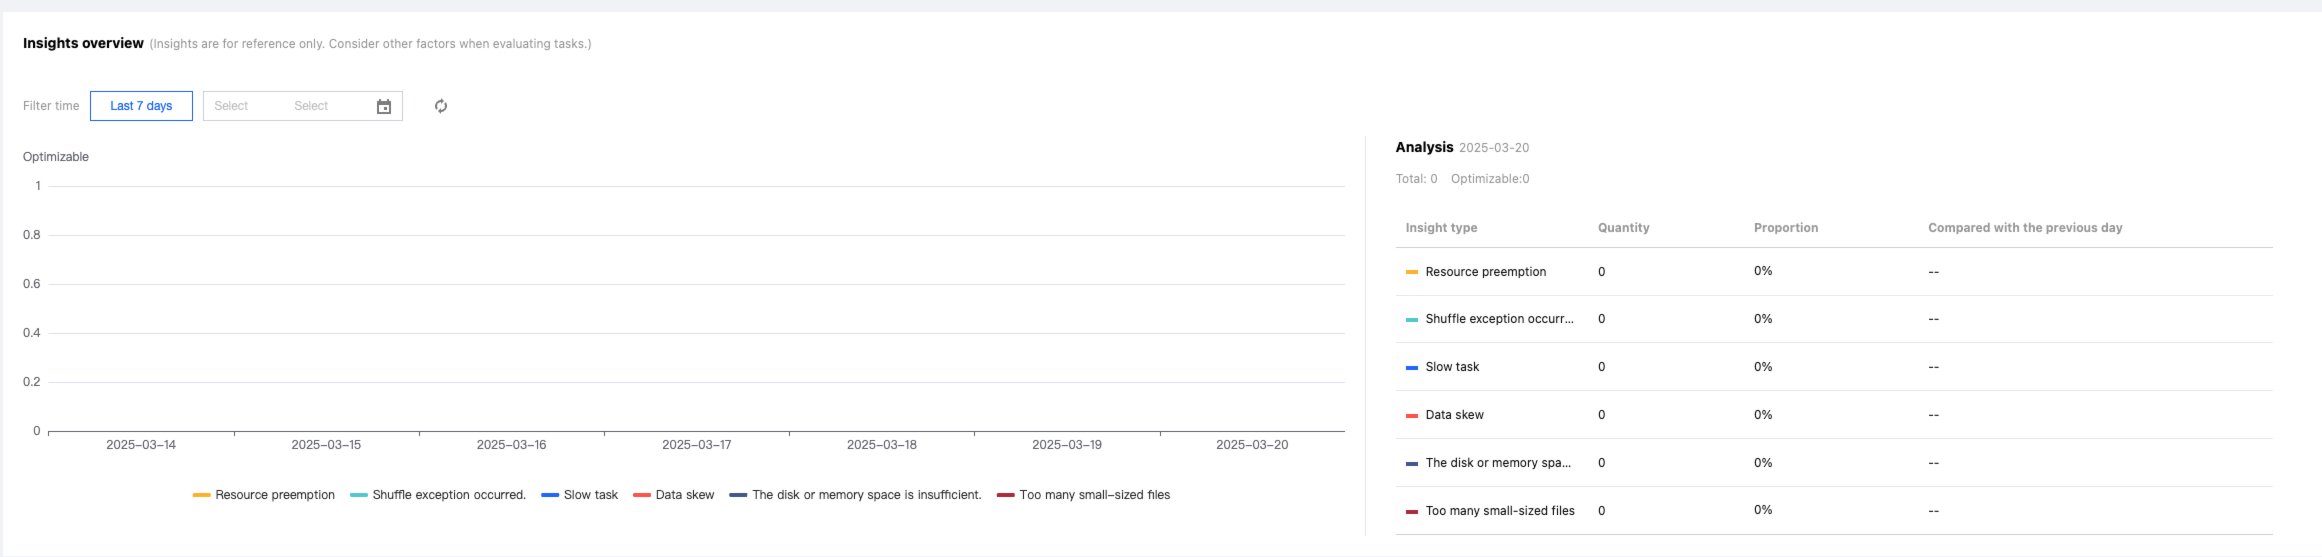
Querying statistical data
The query results under the Presto engine and SparkSQL engine support the display of optimized quantification with different characteristics.
The SparkSQL engine supports viewing:
1. Data Scanning Volume
2. Cache Acceleration
3. Adaptive Shuffle
4. Materialized View Acceleration
The Presto engine supports viewing:
1. Data Scanning Volume
2. Cache Acceleration
3. Materialized View Acceleration
Click on the Statistics column to review the statistical data and optimization suggestions for the query results.
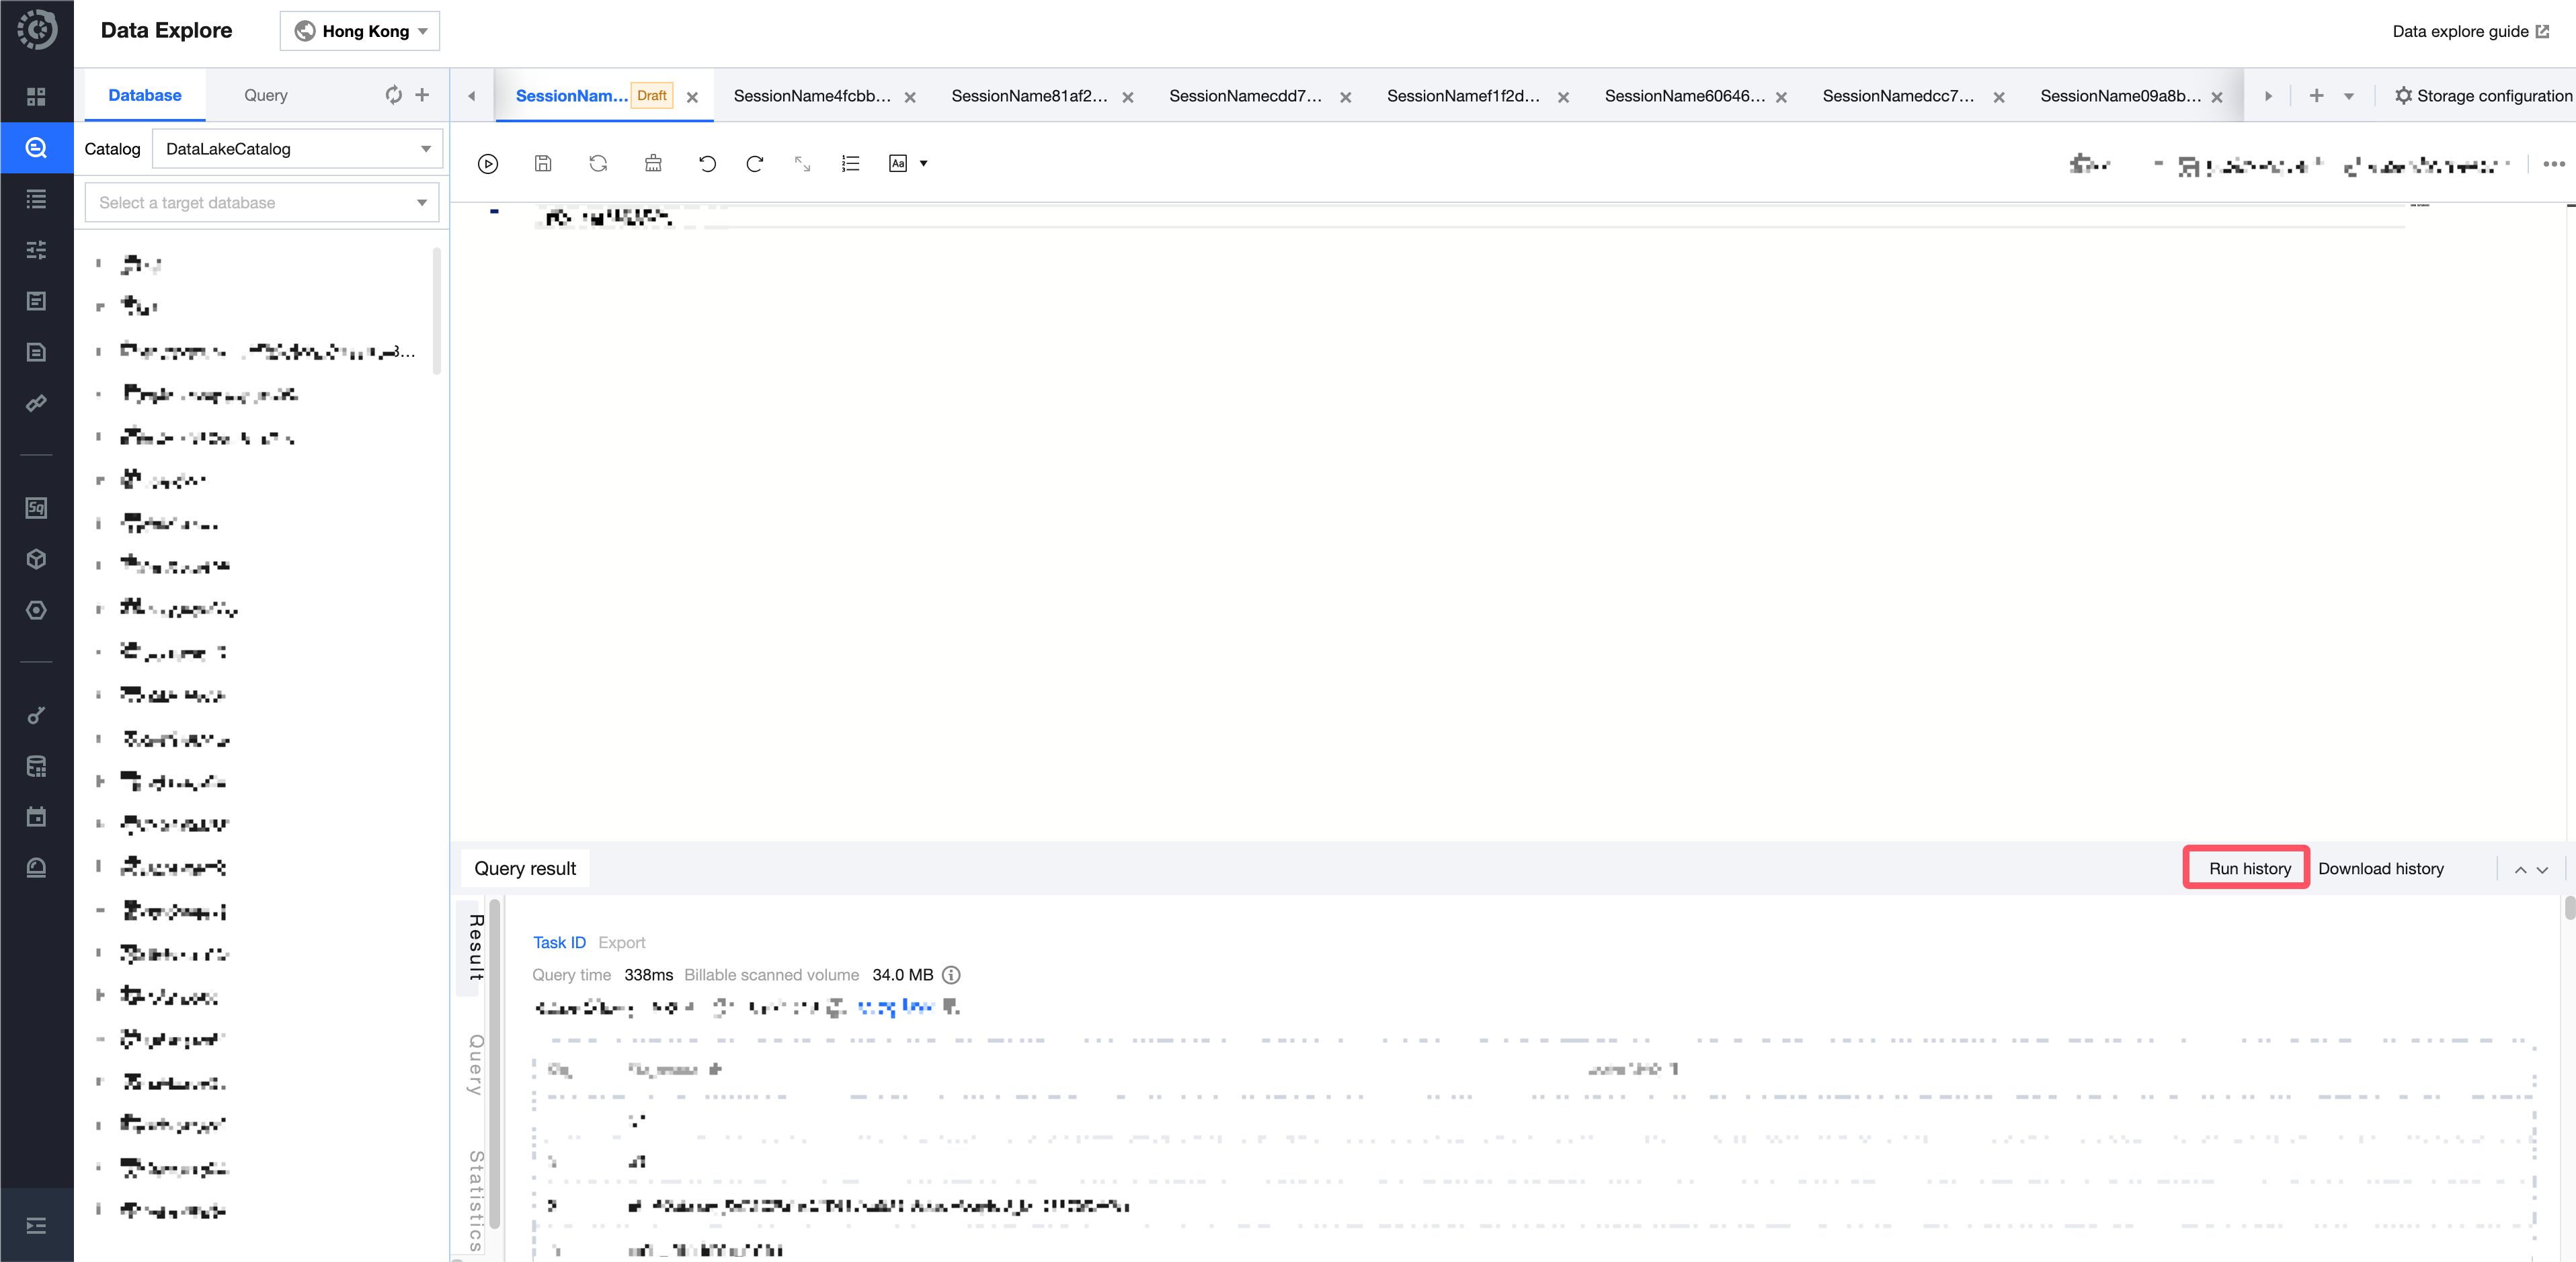
Historical Queries
Each query page can save the running history of the past three months and supports viewing the query results of the past 24 hours. You can quickly find past task information through the running history. For detailed operations, refer to Task History Records.
Download History Management
Each query result's download task can be viewed in the Download history, where you can check the status of the download task and related parameter information.
Data Query Task
SELECT Task
Last updated:2024-07-17 16:04:41
You can query, analyze, and compute the data in a created database or data table with SQL statements.
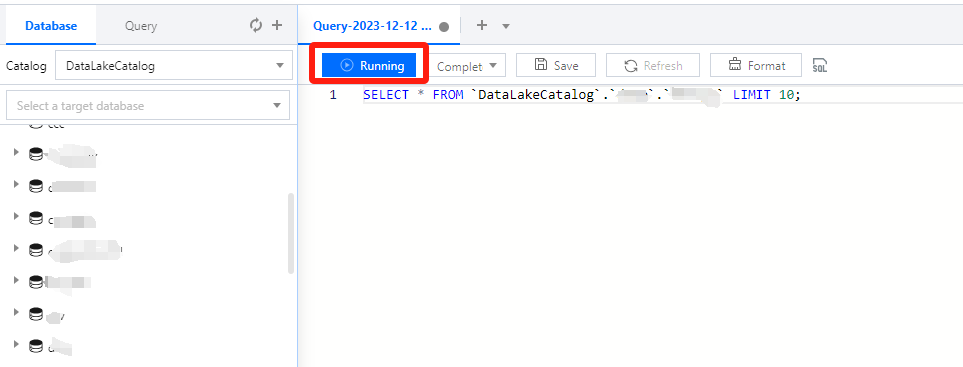
Running a SELECT query task
1. Select the default database and compute resource.
You can select a default database. Then, when there is no database specified in a SQL statement, the statement will be executed in the default database.
You can select a public or private cluster as the compute resource.
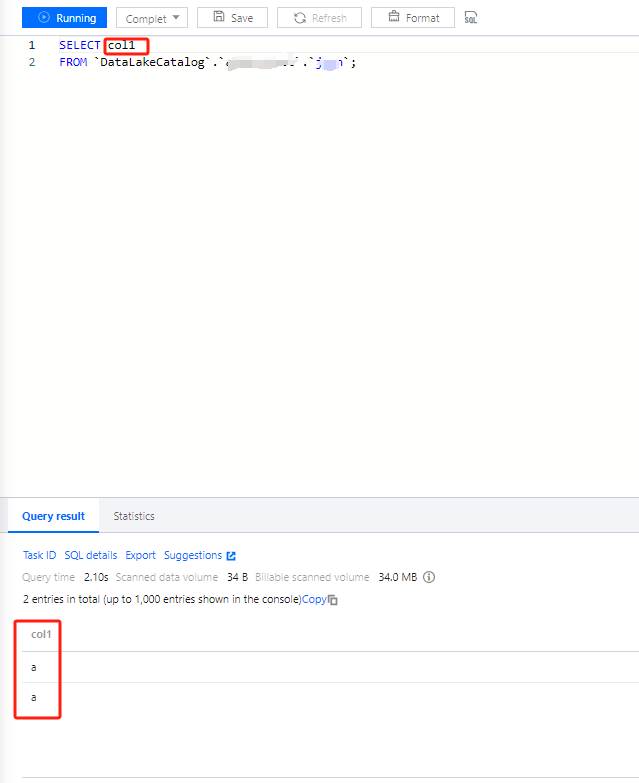
2. Write a standard SQL statement and click Running.
In Data Lake Compute, a task can run for up to 30 minutes.
Data Lake Compute is serverless, so compute resources will be scheduled temporarily. It may take longer than usual to return the result of the first DML task.
3. The query result will be displayed in the console after the task is completed.
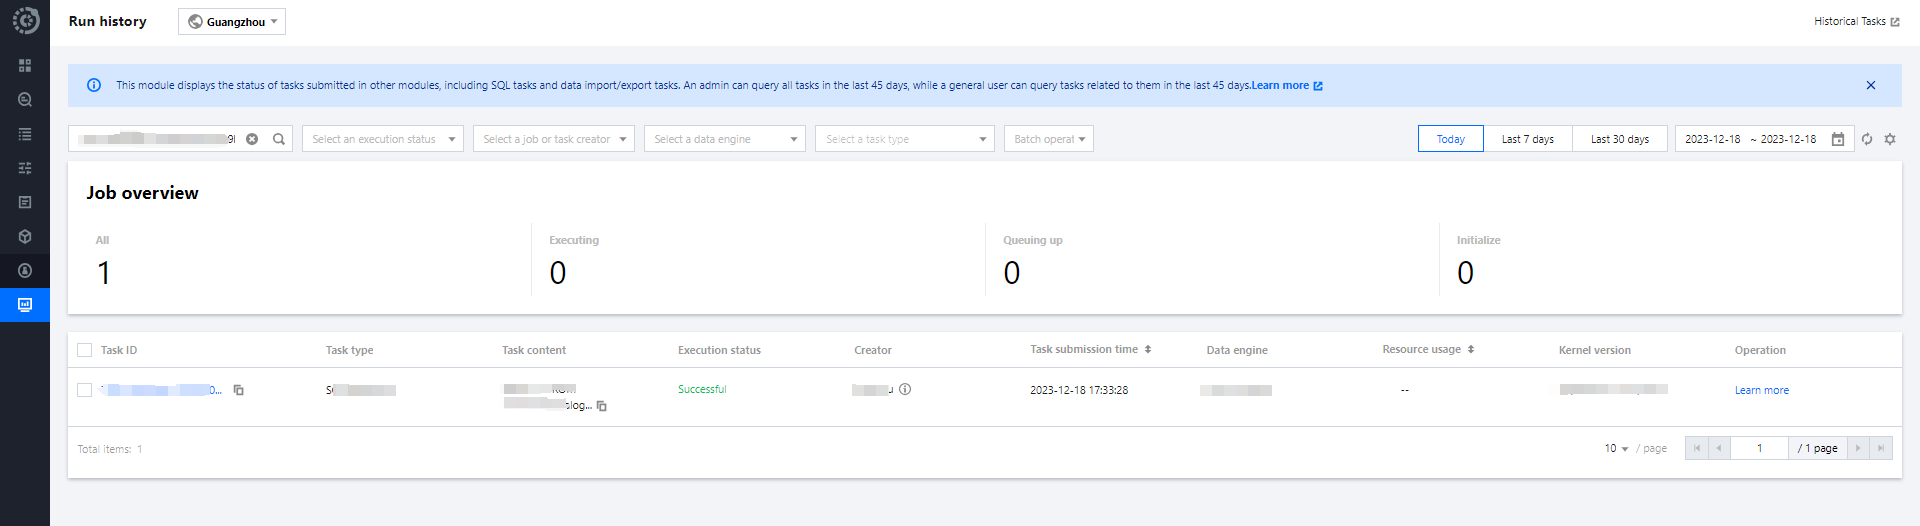
If you exit the console page, you cannot view the query result of a historical task there again. In this case, you can view the task result file in Run history or the query result COS bucket you configured.
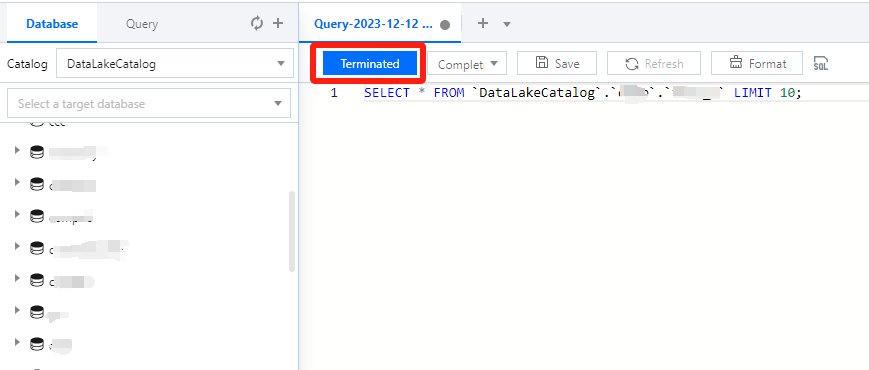
Canceling a running query task
During task running, the Run button becomes Terminated, which you can click to cancel the task. Then, Data Lake Compute will not return the query result but will calculate the scanned data volume. If you use the public engine, the scanned data volume will incur fees. For billing details, see Billing Overview.
Querying Partition Table
Last updated:2025-03-07 15:27:25
Storing data in partition catalogs can greatly reduce the scanned data volume of a computing task in Data Lake Compute and thereby significantly enhance the computing performance. The general practice of data partitioning is to store data in different catalogs by time. For example, data generated on the same day can be stored in the same catalog, and catalogs can be organized in a "year-month-day" structure. In Data Lake Compute, a table and its partitions must adopt the same data format.
Creating a Partition Table
To create a partition table, you need to specify the partition field in the table creation statement.
Adding Partitioned Data
Specifying a partition during data table creation is only to configure the partition field and doesn't allow running a query statement immediately to get data. You need to add partitioned data to a data table. If new partitioned data is added to the data catalog, you also need to add the partition information to the data table.
Manually adding a partition
Use the ALTER TABLE ADD PARTITION statement to add a specified partition catalog to a data table. If the partition catalog is compatible with the Hive partitioning rule (partition column name=partition column value), you don't need to specify the data path; otherwise, you need to refer SQL Syntax.
Use the MSCK REPAIR TABLE statement to scan the data catalog specified during table creation. If there is a new partition catalog, the system will automatically add the partitions to the metadata of the data table. Details can be found in the SQL Syntax.Below is a sample:
MSCK REPAIR TABLE table_demo
System Restraints
MSCK REPAIR TABLE only adds partitions to the metadata of the data table but does not delete them. To delete an added partition, run the ALTER TABLE table-name DROP PARTITION statement.Details can be found in the SQL Syntax.
MSCK REPAIR TABLE is not recommended if the data volume is large, as the system will scan all the data, which may take a long time, cause the task to time out, and make the partition information of the data table incomplete.
A partition catalog must be compatible with the Hive partitioning rule of partition column name=partition column value; otherwise, use ALTER TABLE ADD PARTITION to load a partition.Details can be found in the SQL Syntax.
Make sure that data of a table is stored in a separate folder. For example, if the cosn://tablea_a data in table A and the s3://table_a/table_b data in table B are stored in COS and both tables are partitioned by string, then MSCK REPAIR TABLE will add partitions of table B to table A. To avoid this, use separate folder structures, such as cosn://tablea_aand cosn://tablea_b.
The statement may incur data read/write fees charged by COS. For more information, see Billing Overview.
Querying JSON Data
Last updated:2024-07-17 16:18:53
Query steps
1. Create a data table and specify the JSON format for parsing.
CREATE EXTERNAL TABLE `order_demo`(
`docid` string COMMENT 'from deserializer',
`user` struct <id :int,
username :string,
name :string,
shippingaddress :struct < address1 :string,
address2 :string,
city :string,
state :string >> COMMENT 'from deserializer',
`children` array < string >
) ROW FORMAT SERDE 'org.apache.hive.hcatalog.data.JsonSerDe' LOCATION 'cosn://dlc-bucket/order'
2. Run a query statement to query the JSON data. Data Lake Compute supports json_parse(), json_extract_scalar(), and json_extract() parsing functions.
The data must be in complete JSON format; otherwise, Data Lake Compute cannot parse it.
A data row cannot contain a line break, and the JSON format cannot be optimized visually; for example:
{"name":"Michael"}
{"name":"Andy","age":30}
{"name":"Justin","age":19}
Data Lake Compute will automatically recognize the first JSON level as the attribute column of a data table and recognize other nested structures as corresponding attribute values.
Querying Data from Other Sources
Last updated:2025-01-03 15:40:27
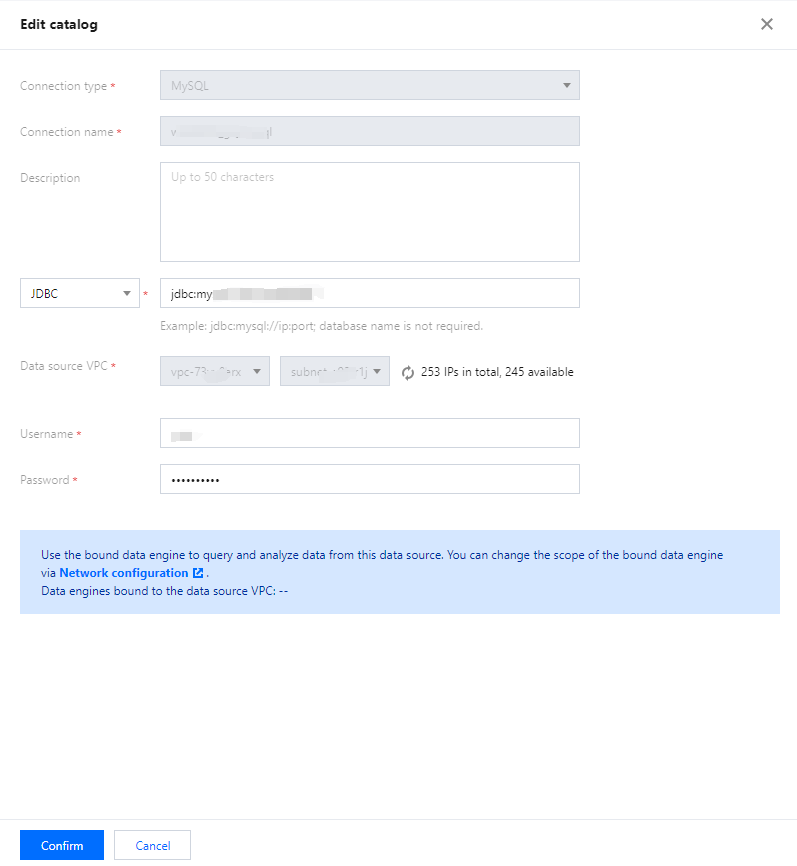
Data Lake Compute allows you to query and analyze data in an external table. Currently, data from MySQL and EMR Hive can be connected to it. You can add and manage other data sources in the Data Lake Compute console.
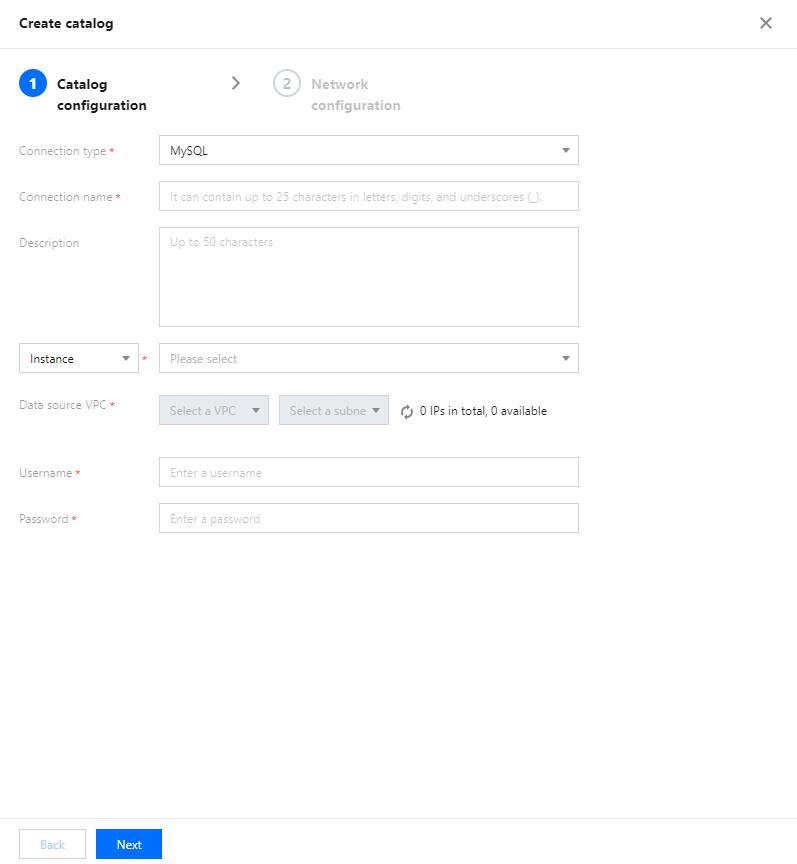
Adding a data source
1. Log in to the Data Lake Compute console and select the service region. You need to have the permission to create data catalogs.
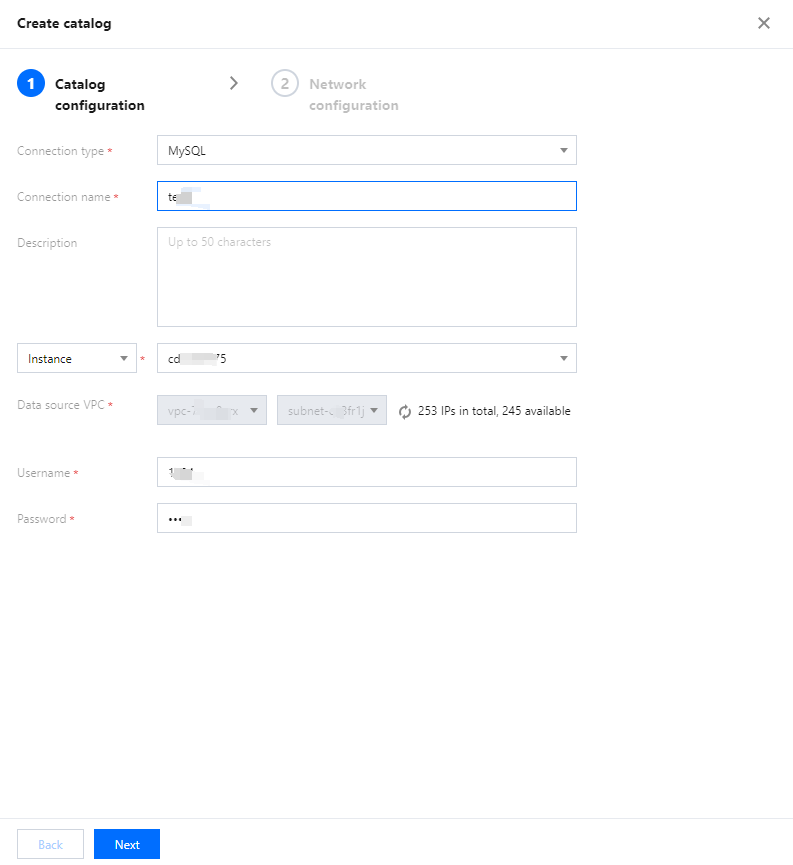
2. Select Data Explore on the left sidebar, hover over +, and click Create data catalog.
3. Select the data source type. Currently, MySQL and EMR Hive are supported. Before configuring MySQL, you need to add the Data Lake Compute subnet to the database's allowlist. Two configuration methods are supported: database instance and JDBC connection.
Supported EMR Hive versions are 2.0.1, 2.1.0, 2.2.0, 2.2.1, 2.3.0, 2.4.0, 2.5.0, 2.5.1, and 2.6.0. The configuration is performed through the EMR access address.
4. Enter the data source information and click Create connection.
Note:
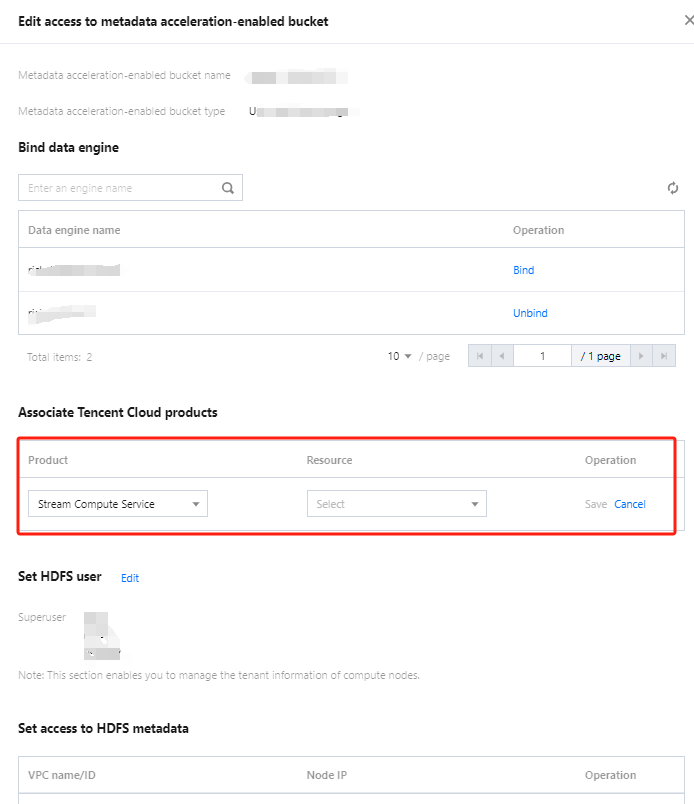
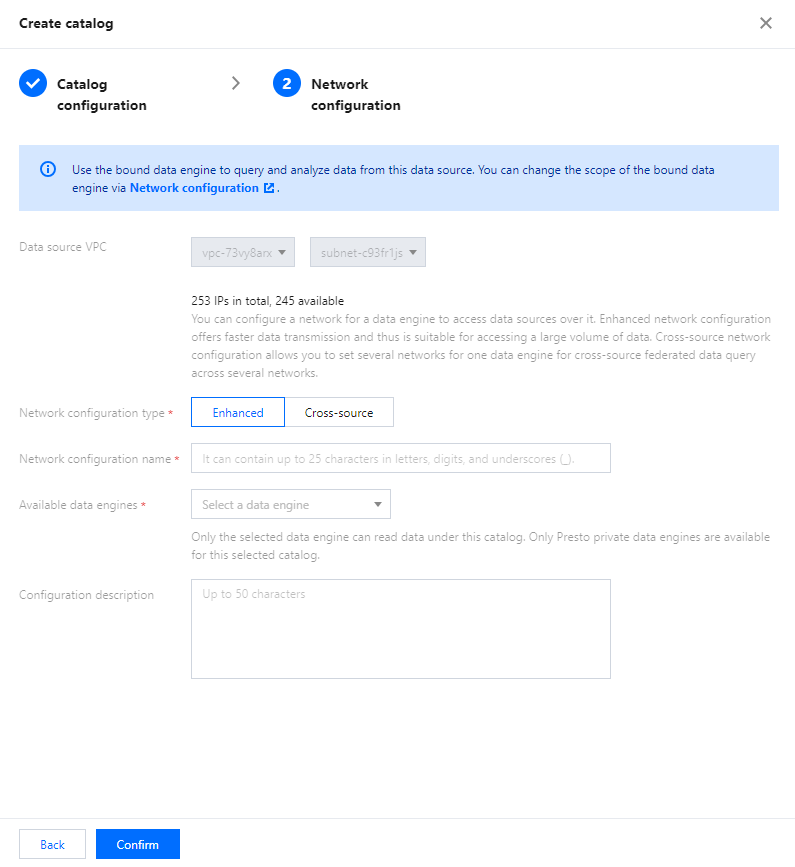
A data engine must be bound to the network configuration of the VPC where the data source resides. You can view the bound data engine during creation or create a network configuration and bind the data engine. For more information about network configuration, see Engine Network Configuration.
Managing Data
Currently, Data Lake Compute allows you to view the database information of and preview data in external tables.
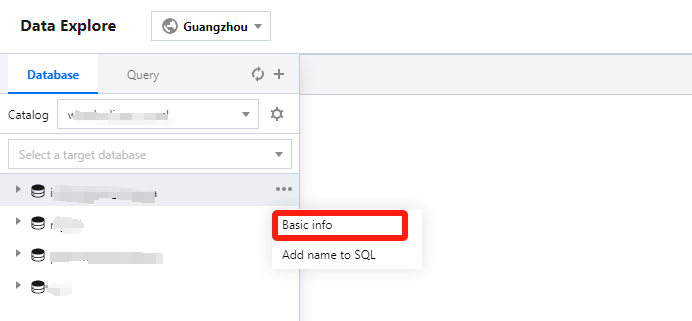
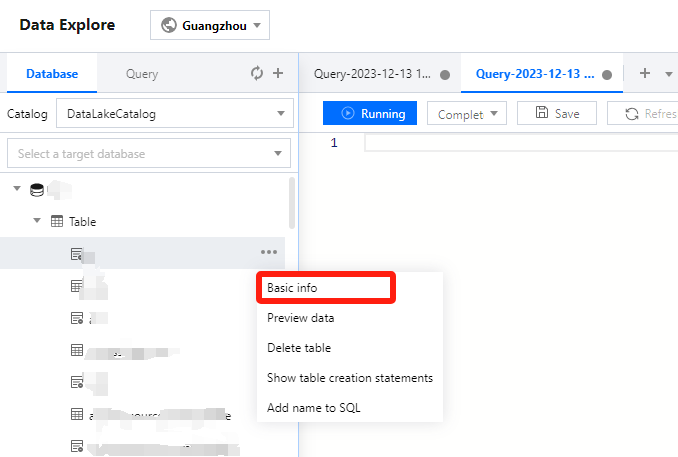
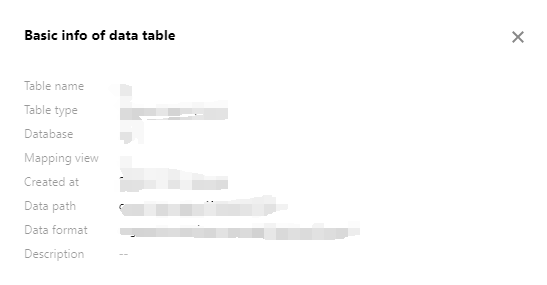
Viewing database information
1. Log in to the Data Lake Compute console and select the service region. You need to have the permission to view data tables.
2. Select Data Explore on the left sidebar, hover over +, and click Basic info. You can view the basic information of a data table in the pop-up window.
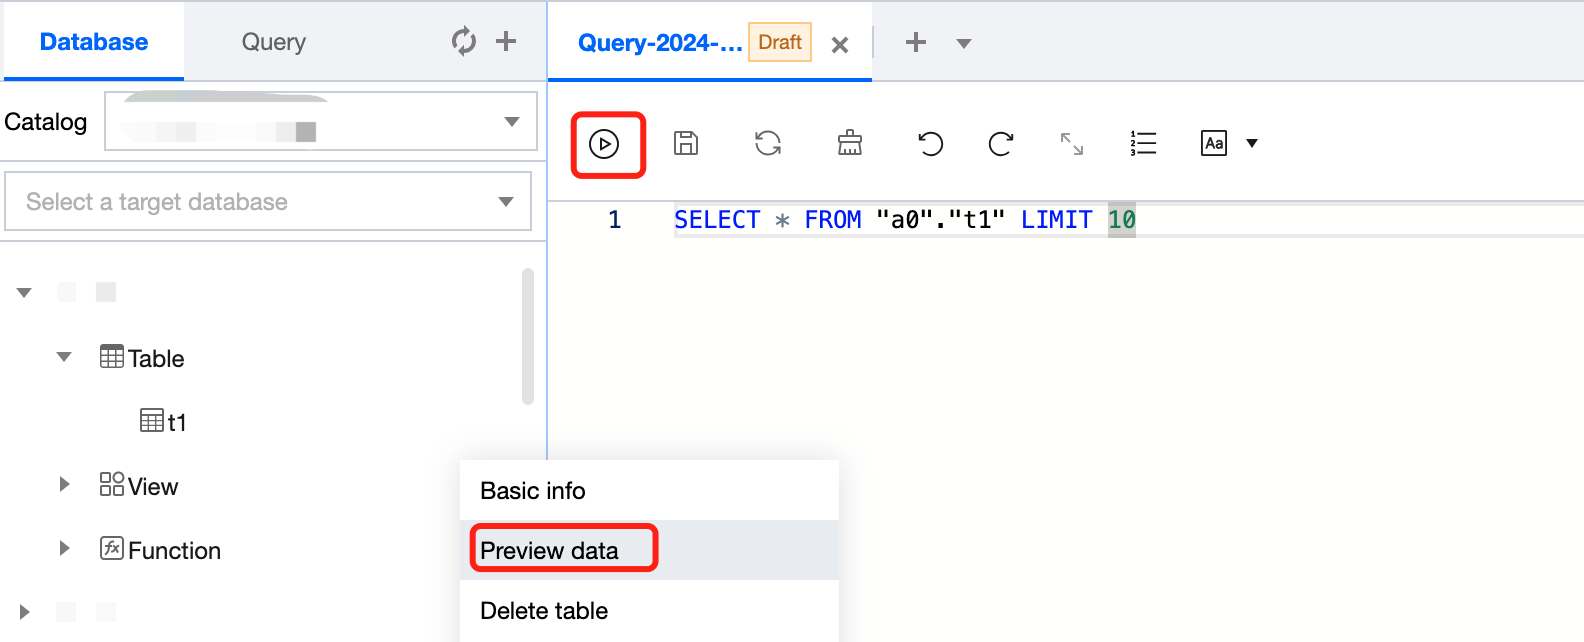
Previewing data in a data table
1. Log in to the Data Lake Compute console and select the service region. You need to have the permission to view data tables.
2. Select Data Explore > Data table, hover over ..., and click Preview data. Then, you can run a SQL statement to query and display data in the data table.
Note:
Select the data engine bound to the network configuration of the VPC of the data source.
Using View
Last updated:2025-01-03 15:27:27
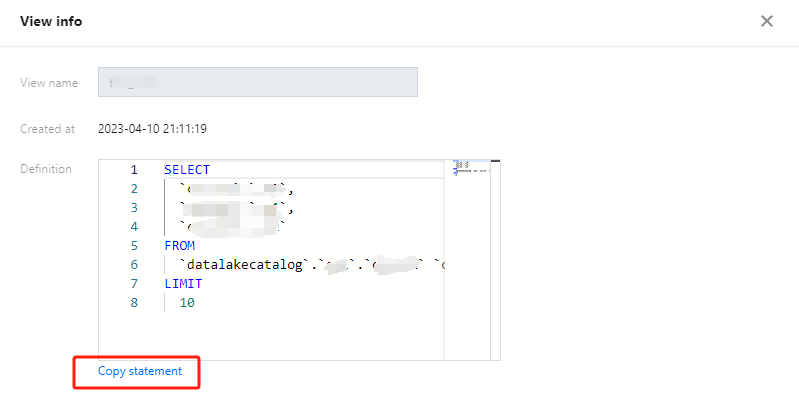
In Data Lake Compute, a view is a logical table rather than a physical table. Whenever a view is referenced during a query, the query that defines the view will be executed. You can create a view through SELECT and reference it in future queries.Details can be found in the SQL Syntax.
System restraints
A view name is case-insensitive and can contain up to 128 letters and underscores.
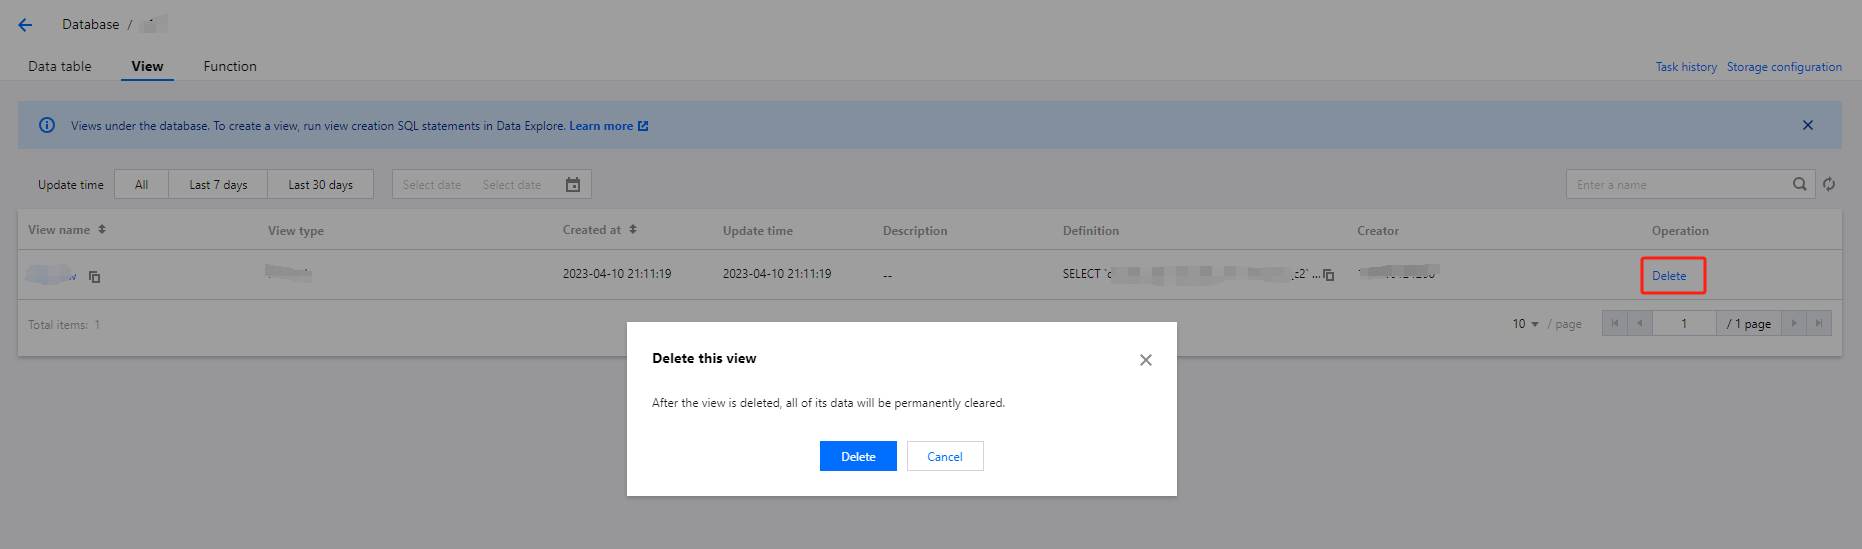
Data Lake Compute doesn't support managing data access permissions through views.
INSERT INTO
Last updated:2024-07-17 16:23:11
The INSERT INTO statement can insert a SELECT query result in the source table to the target table as a new row.
Querying Script Parameters
Last updated:2024-07-17 16:23:47
Data Lake Compute allows you to configure date parameters to facilitate queries with scripts.
Data Lake Compute adopts the standard date format of yyyymmddhh24miss and uses the ${} command to set a date as a variable consisting of the date and time.
Date: It can be in any date format or a predefined system variable, such as yyyymmdd, yyyymm, yyyy-mm-dd, yy, and dataDate.
Time: It can be +/-N cycles and supports N/Nd, Nm, Nw, Nh, and Nmi. It is compatible with various calculation formulas, such as 7*N and N/24.
Examples
+/- N Cycle
Method
Compatible Format
Example
N years later
${yyyymmdd+Ny}
-
-
N years ago
${yyyymmdd-Ny}
-
One year ago: ${yyyymmdd-12m}: 20190920
N months later
-
${yyyymmdd+Nm}
-
N months ago
${yyyymmdd-Nm}
$[add_months(yyyymmdd,-N)]
${yyyymmdd-1m}: 20200820
${yyyymm}: 202009
${dataDate-1m}: 20200820
N weeks later
${yyyymmdd+Nw}
${yyyymmdd+7*N}
-
N weeks ago
${yyyymmdd-Nw}
${yyyymmdd-7*N}
-
N days later
${yyyymmdd+N/Nd}
-
-
N days ago
${yyyymmdd-N/Nd}
-
${yyyymmdd-1}, ${dataDate-1}
N hours later
${yyyymmddhh24+Nh}
$[yyyymmddhh24+N/24]
-
N hours ago
${yyyymmddhh24-Nh}
$[yyyymmddhh24-N/24]
${yyyymmddhh24-1h}: 2020092014
${dataDate-1h}: 2020092014
N minutes later
${yyyymmddhh24mi+Nmi}
$[yyyymmddhh24+N/24/60]
-
N minutes ago
${yyyymmddhh24mi-Nmi}
$[yyyymmddhh24-N/24/60]
${yyyymmddhh24mi-10mi}, ${dataDate-10mi}
Note:
Make sure that the variable or the part before +/- in the variable is in line with the standard date format; otherwise, the system cannot recognize and use it.
Obtaining Task Results
Last updated:2024-09-18 17:59:35
Using the Query Editor to Obtain Task Results
When you use the DLC console for task queries, the query results will be displayed in real-time below the editor.
A single SQL task in the console can display up to 1,000 rows of data. SQL tasks submitted via API and JDBC are not subject to this limitation.
You can view the query history for a single Session for up to 3 months by checking the running history. For more methods to query historical records, see History.
Output Format Configuration for Task Results
The results of data exploration are saved in CSV format by calling Spark's DataFrame.write. If the engine version is released later than April 2023, you can configure the output format of the exploration results.
1. Configure the format of the results output to CSV. The following parameters are supported:
Parameter
Default Value
Remark
livy.sql.result.format.option.sep
livy.sql.result.format.option.delimiter
,
The separator between columns when the result is stored in CSV, which is a comma by default.
livy.sql.result.format.option.encoding
livy.sql.result.format.option.charset
UTF-8
String encoding format.
For example: UTF-8, US-ASCII, ISO-8859-1, UTF-16BE, UTF-16LE, and UTF-16.
livy.sql.result.format.option.quote
\"
Specifies whether to use single or double quotation marks, with attention to the use of escape characters.
livy.sql.result.format.option.escape
\\
Escape character. Ensure the proper use of escape characters.
The name for the column that cannot be converted. This parameter is influenced by spark.sql.columnNameOfCorruptRecord, with table configuration taking precedence.
livy.sql.result.format.option.nullValue
Specifies the storage format for null values. The default is an empty string, in which case it can specify other emptyValue types.
livy.sql.result.format.option.nanValue
NaN
The storage format for non-numeric values.
livy.sql.result.format.option.positiveInf
Inf
The storage format for positive infinity.
livy.sql.result.format.option.negativeInf
-Inf
The storage format for negative infinity.
livy.sql.result.format.option.compression or codec
The class name of the compression algorithm. By default, no compression is applied. Short names like bzip2, deflate, gzip, lz4, and snappy can be used.
livy.sql.result.format.option.timeZone
System default time zone
The default time zone, influenced by spark.sql.session.timeZone. For example, Asia/Shanghai. Table configuration takes precedence.
livy.sql.result.format.option.locale
en-US
Specifies the language type.
livy.sql.result.format.option.dateFormat
yyyy-MM-dd
The default format for dates.
livy.sql.result.format.option.timestampFormat
yyyy-MM-dd'T'HH:mm:ss.SSSXXX
The default format for time. In non-LEGACY mode, it follows the format of yyyy-MM-dd'T'HH:mm:ss[.SSS][XXX].
The maximum number of characters per column. -1 means no limit.
livy.sql.result.format.option.escapeQuotes
true
Escapes quotation marks.
livy.sql.result.format.option.quoteAll
quoteAll
Encloses the entire content in quotation marks when writing.
livy.sql.result.format.option.emptyValue
\"\"
The format used for reading and writing empty values.
livy.sql.result.format.option.lineSep
The newline character used for line separation.
2. Configure the output format to a non-CSV format. Note that in this case, the console will not be able to display the results. However, you can read the result path using other methods. For details on where the result path is saved, see the next section.
The configuration option livy.sql.result.format supports saving in formats such as text, ORC, JSON, and Parquet.
Task Result Storage Location Configuration
Note: The Standard Engine - Presto is not supported. Full results can be obtained via JDBC.
DLC supports automatically saving query results to a COS path or DLC's managed storage through configuration. The configuration steps are as follows:
1. Log in to the DLC console, select the service region, and ensure that the login account has necessary COS-related permissions.
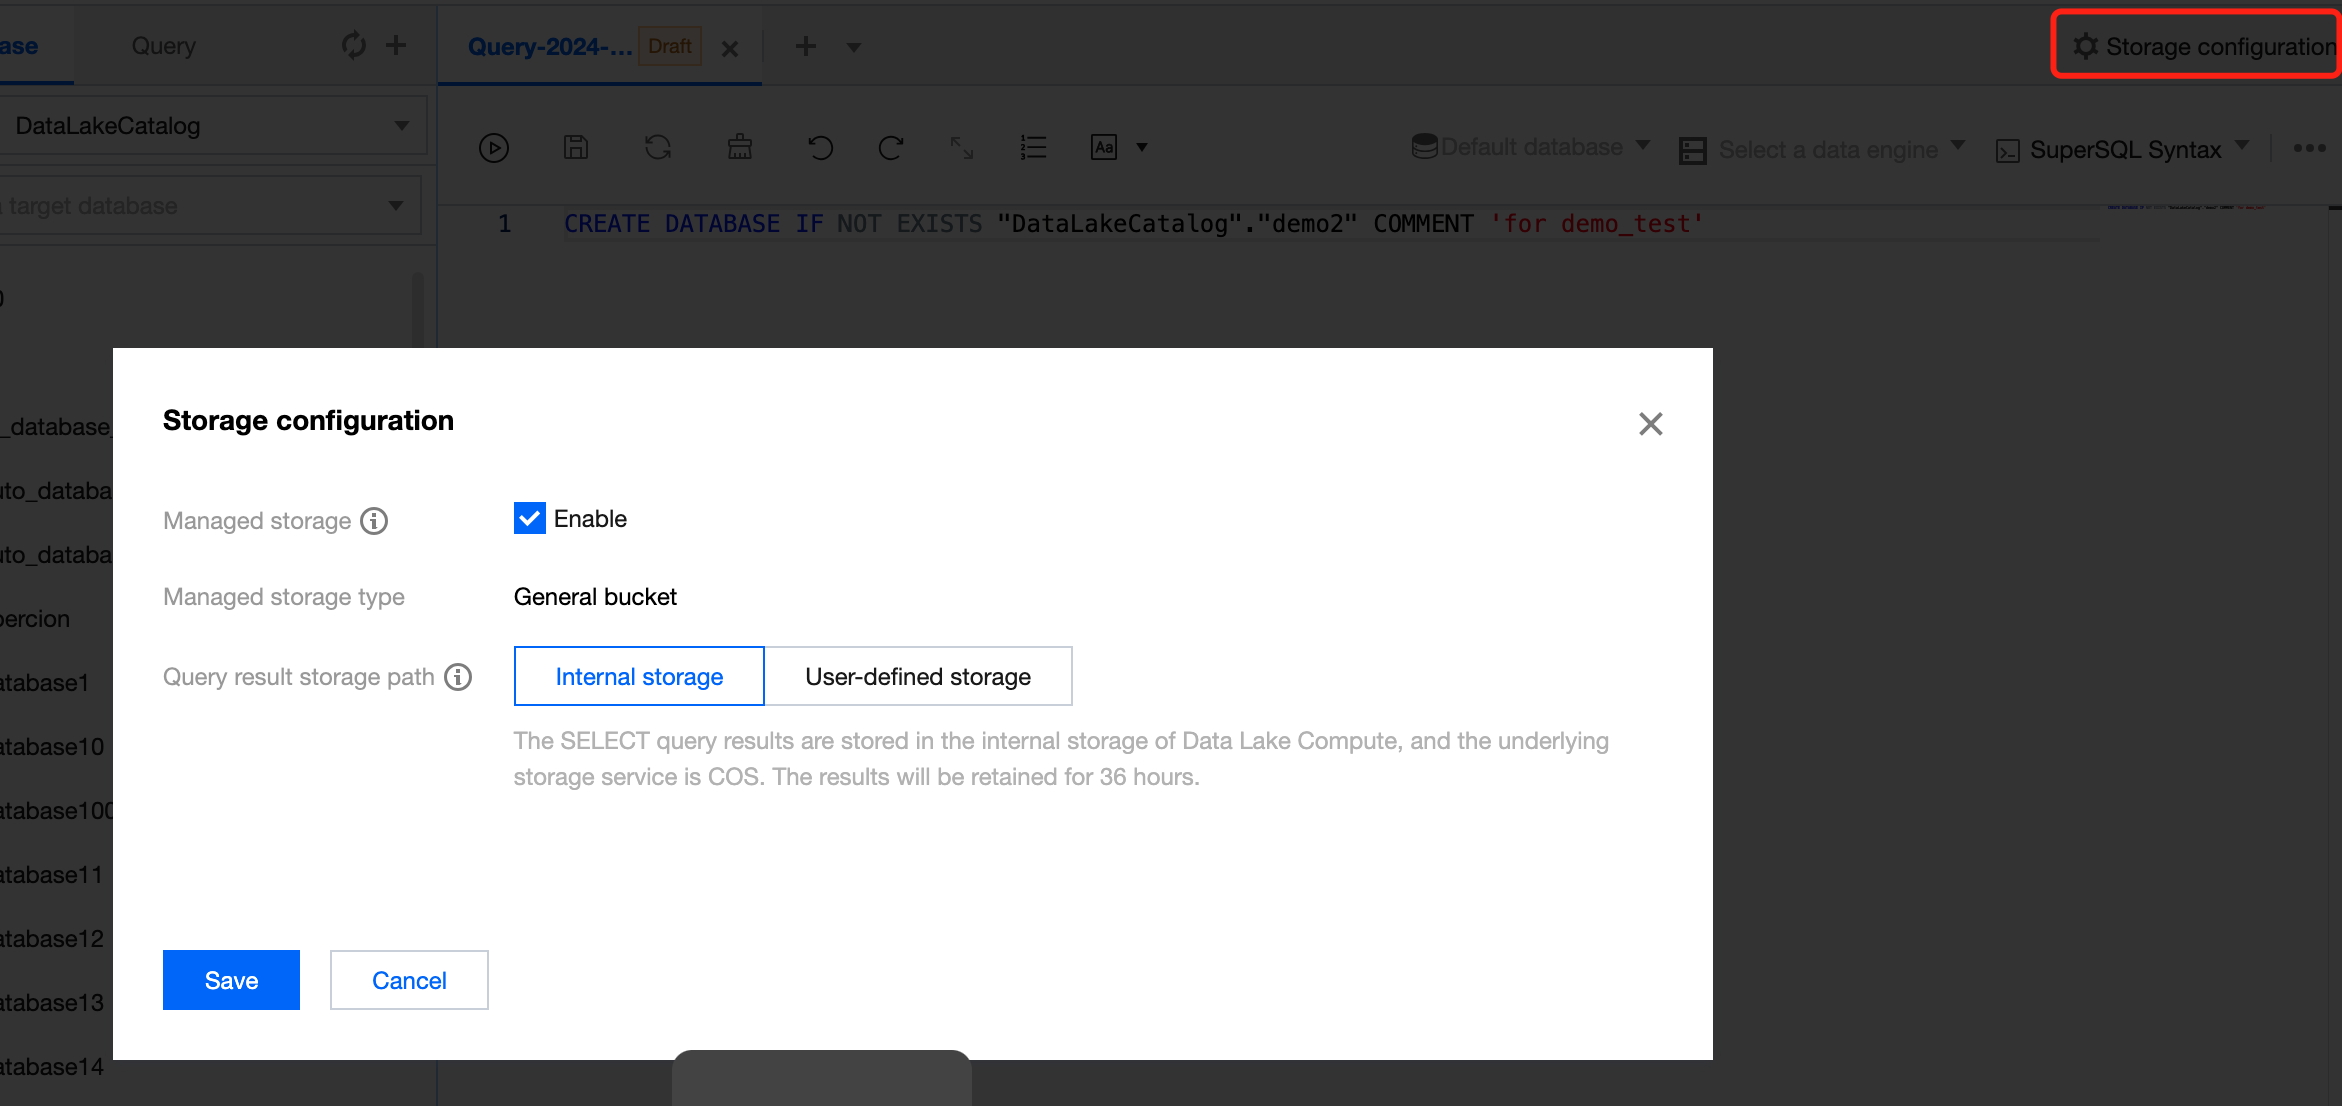
2. Go to the Data Exploration Page, click Storage Configuration in the upper right corner, and configure the settings for saving query results.
3. You can save the results to DLC's managed storage or COS. If you want to configure the path to COS, the operating account should have necessary COS-related permissions. Data storage fees will be based on COS pricing.
The task results are stored in subfolders under the following COS path:
Data path for task results: COS directory path/DLCQueryResults/yyyy/mm/dd/[QueryID]/data/XXXX.csv
Metadata path for task results: COS directory path/DLCQueryResults/yyyy/mm/dd/[QueryID]/meta/result.meta.json
COS directory path: This is the COS directory path configured in the system settings.
/yyyy/mm/dd: The directory is organized based on the task execution date.
/data: This directory stores the query result data, with files in CSV format. DLC may generate multiple data files.
/meta: This directory stores the metadata for the queried data tables, with files in JSON format.
Note:
Storing SELECT query results in DLC's internal storage, with Cloud Object Storage as the underlying storage, and the results are retained for 36 hours.
When SELECT query results are stored in your COS bucket path, ensure that you have necessary COS-related permissions.
Downloading Task Results
Note: The Standard Engine - Presto is not supported. Full results can be obtained via JDBC.
DLC allows users to manually download query results to their local devices. If full result mode is not enabled, users can download the results of tasks with available query results to their local devices or manually save them to COS (COS permissions are required).
The data downloaded or saved to COS correspond to the query results of the current SQL task, with a maximum of 500 results.
The maximum size for the local download is 50 MB.
If the results are configured to be saved to COS, they will be automatically stored in the COS path without the need for manual downloads.
Query Script Analysis
Last updated:2024-08-07 17:08:48
To facilitate users in quickly handling repetitive query tasks, DLC provides script file analysis.
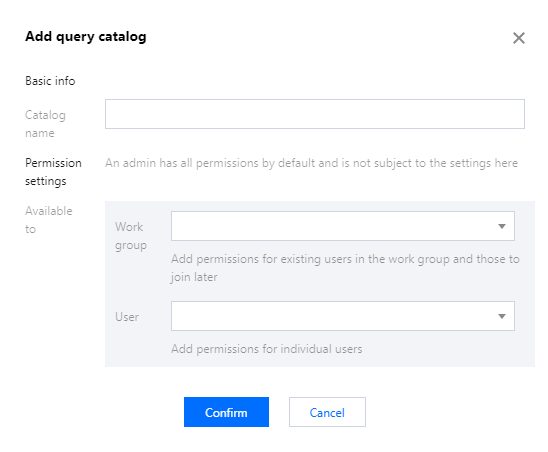
3. After filling in the directory configuration, you can save and complete the creation.
Directory name: Supports Chinese characters, letters, and underscores (_), up to 25 characters.
Permission settings: You can set the visibility permissions for the script directory and the scripts within it based on the perspective of the workgroup or user.
2. After the computation engine is selected, click Run to execute the script.
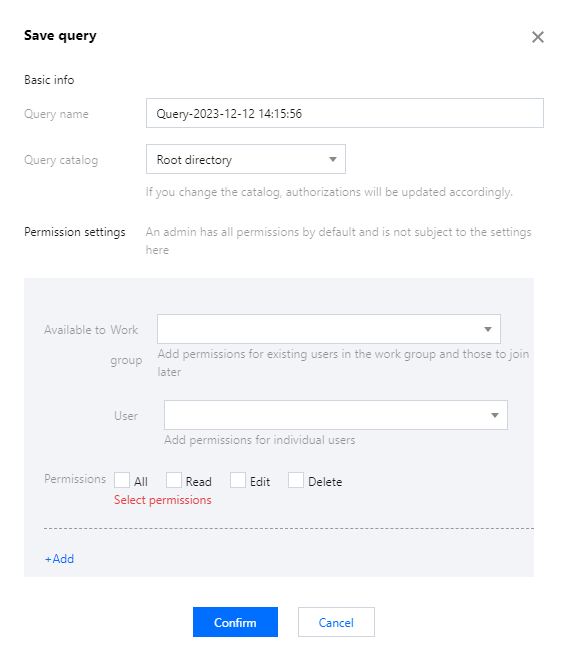
Saving a Query Script
1. After the query is completed, click the Save button.
2. Queries created through the library will be saved under the directory of that library. Queries added through the tab bar can be saved directly in the root directory or an authorized library.
3. Query table permissions can be customized according to the public scope of the library, and table usage permissions can be specified for the public scope.
Viewing script information
1. Hover the mouse pointer over the script name to view the script details.
2. Click the
icon next to the table you want to view, and select to open or query it.
Deleting a Query Script
Click the
icon next to the table you want to delete, and select to delete the script.
Note:
Deleted scripts cannot be restored. Operate with caution.
Data Job
Overview
Last updated:2024-07-17 16:36:54
Data Lake Compute provides Spark-based batch and flow computing capabilities for you to perform complex data processing and ETL operations through data jobs.
Currently, data jobs support the following versions:
Scala 2.12
Spark 3.1.2
Preparations
Before starting a data job, you need to create a data access policy to ensure data security as instructed in Configuring Data Access Policy.
Currently, only CKafka data source is supported for data job configuration, with more data sources to come in the future.
Billing mode
A data job is billed by the data engine usage. Currently, pay-as-you-go and monthly subscription billing modes are supported. For more information, see Data Engine Overview.
Pay-as-you-go: It is applicable to scenarios with a small number of data jobs or periodic usage. A data job is started after creation and automatically suspended after successful execution, after which no fees will be incurred.
Monthly subscription: It is applicable to scenarios where a large number of data jobs are regularly executed. Resources are reserved in this mode, so you don't need to wait for data engine start.
Note:
As a data job differs from a SQL job in terms of the compute engine type, you need to purchase a separate data engine for Spark jobs; otherwise, you can’t run data jobs on a SparkSQL data engine.
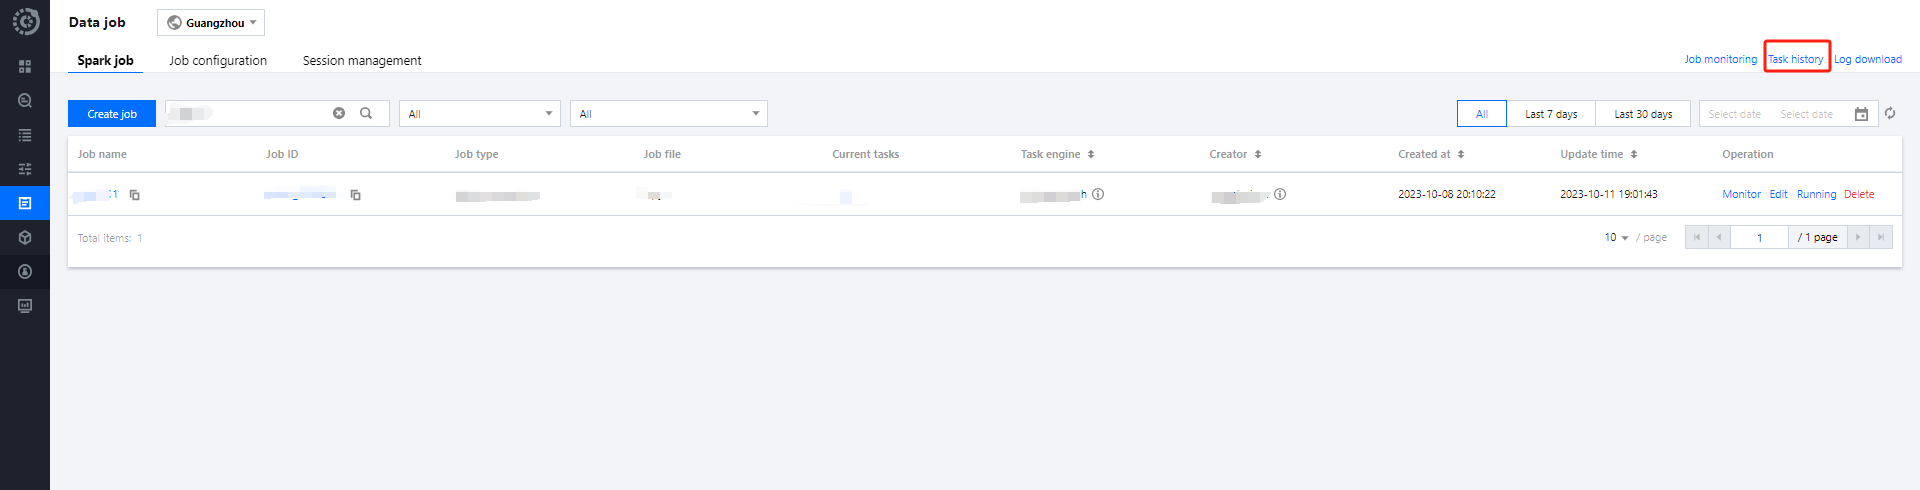
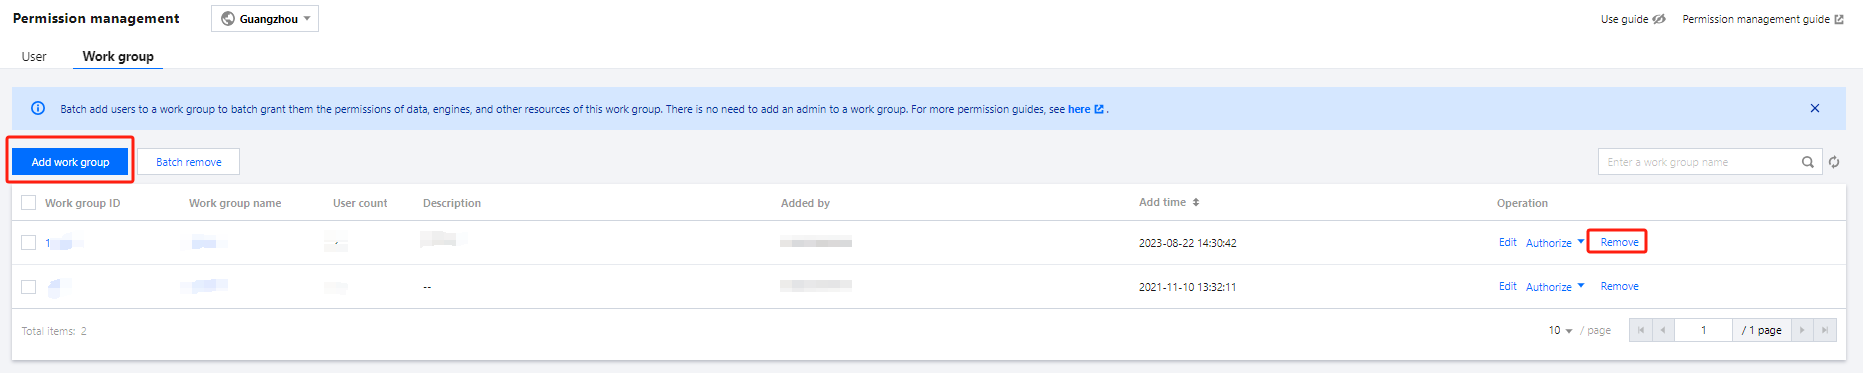
Job management
On the Data job management page, you can create, start, modify, and delete a data job.
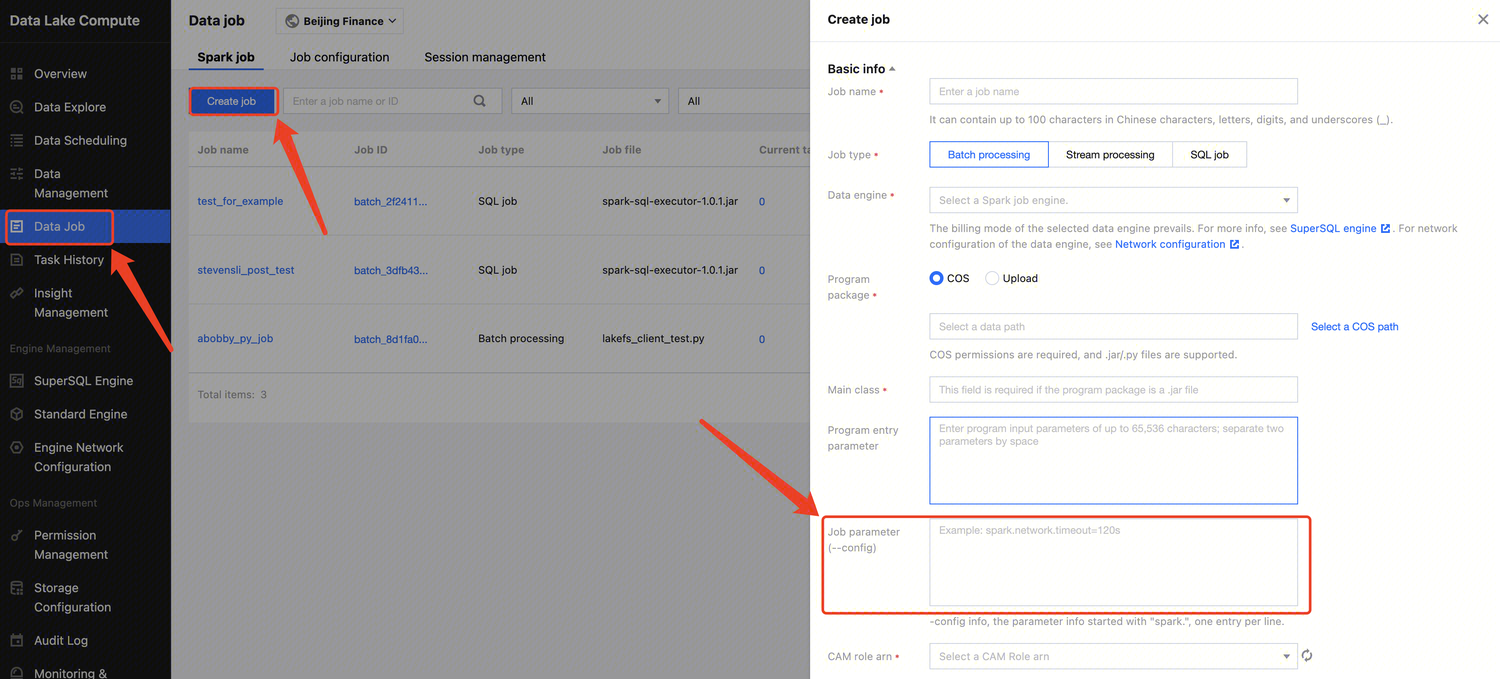
2. Click Create job. For detailed directions, see Creating Data Job.
3. In the list, you can view the current task status of the data job. You can also manage the job as instructed in Managing Data Job.
Configuring Data Access Policy
Last updated:2024-07-17 17:44:52
Data Access Policy (CAM role arn) Overview
A data access policy (CAM role arn) allows you to configure permissions in CAM for accessing data in data sources and COS during data job execution.
When configuring a data job in Data Lake Compute, you need to specify the data access policy to protect data security.
Directions
Step 1. Create a policy in CAM
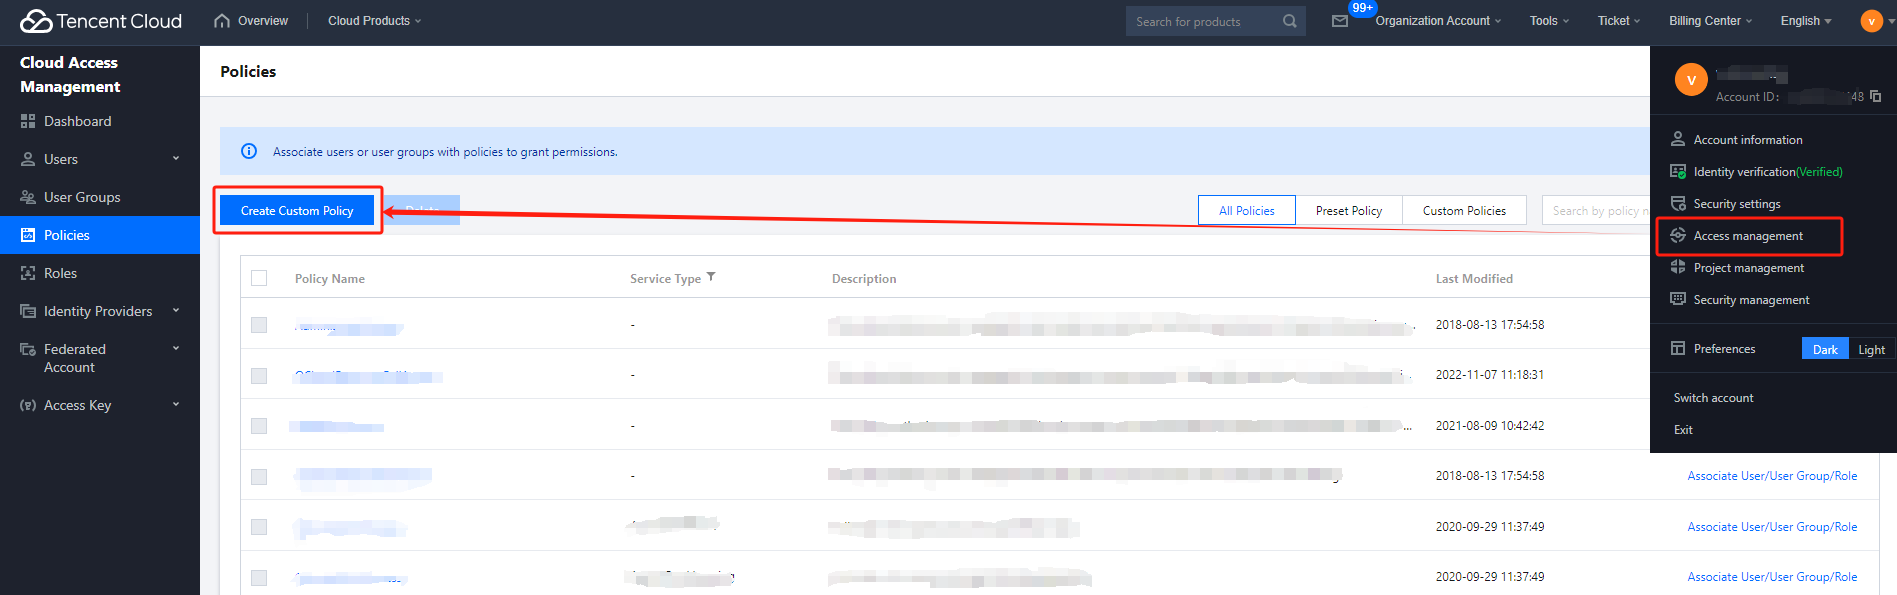
1. Log in to the Tencent Cloud console and select Cloud Access Management. The logged-in account needs to have permissions to configure CAM; therefore, we recommend you use a root account or admin account.
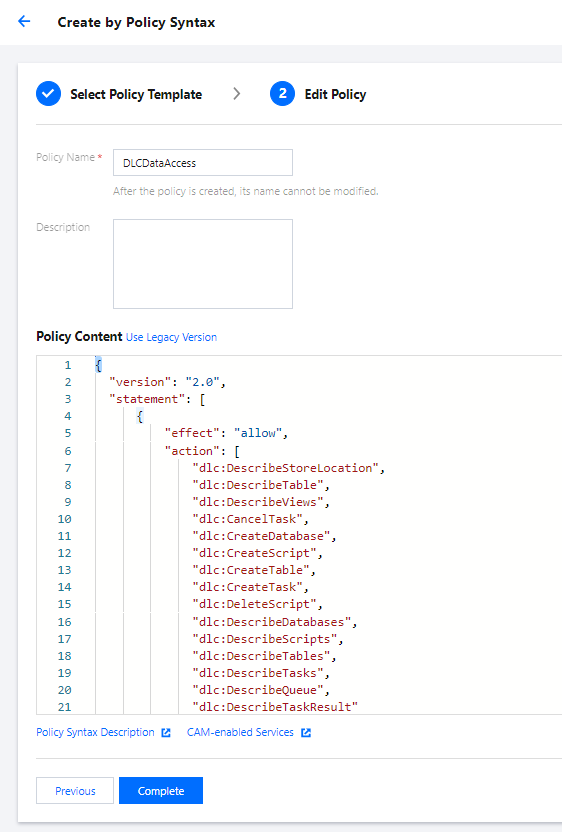
2. Select Policies on the left sidebar to enter the policy management page. Click Create Custom Policy and select Create by Policy Syntax.
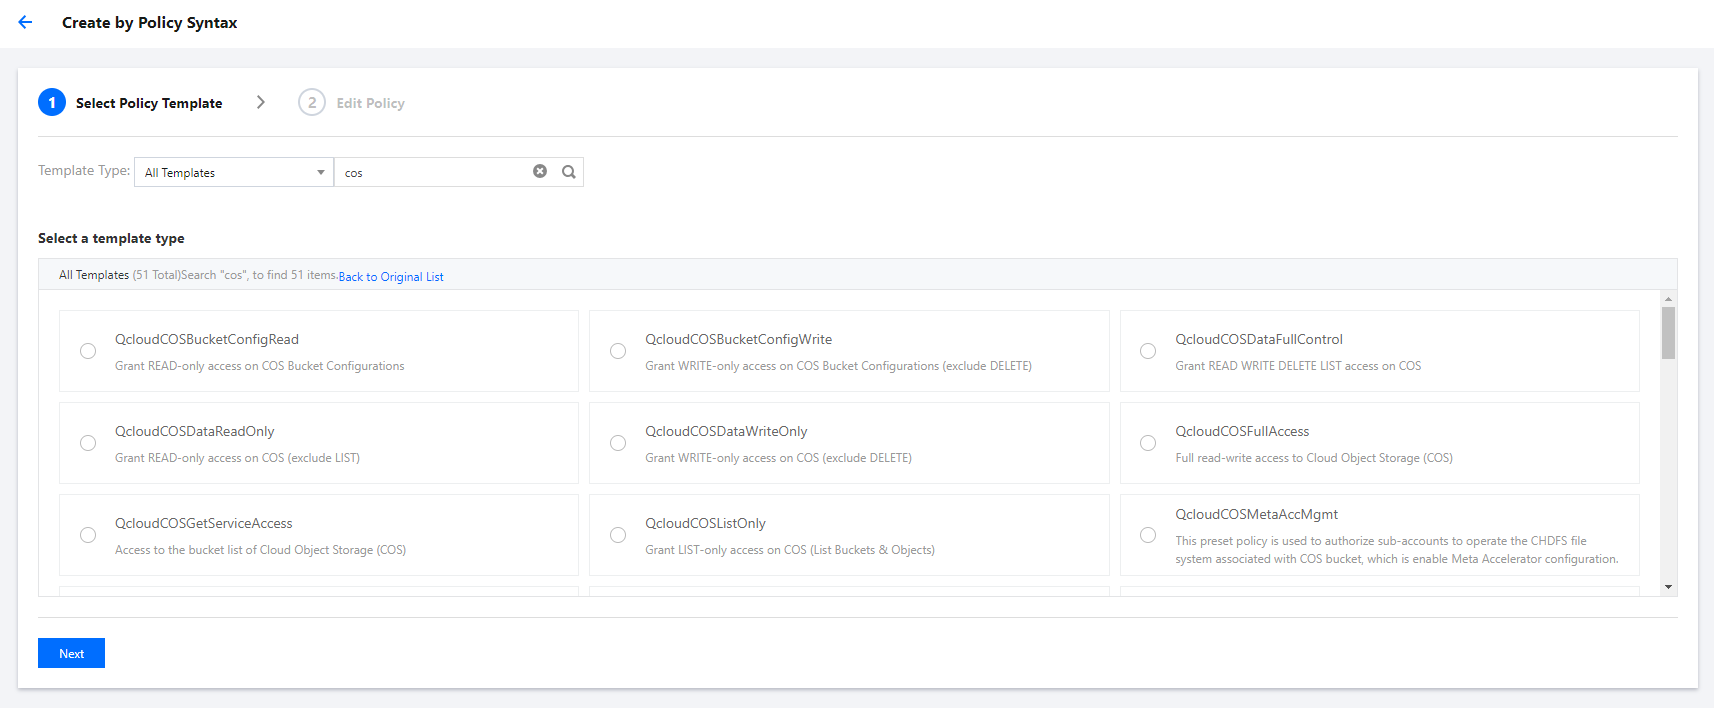
3. Search for COS in the policy template and select COS permission templates.
The preset templates define read-only and read/write permission policies. If they don't meet your needs, create a custom policy template as instructed in Appendix.
4. Select the template, set a name for the policy, and click Save.
Step 2. Create a service role
1. Log in to the Tencent Cloud console and select Cloud Access Management. The logged-in account needs to have permissions to configure CAM; therefore, we recommend you use a root account or admin account.
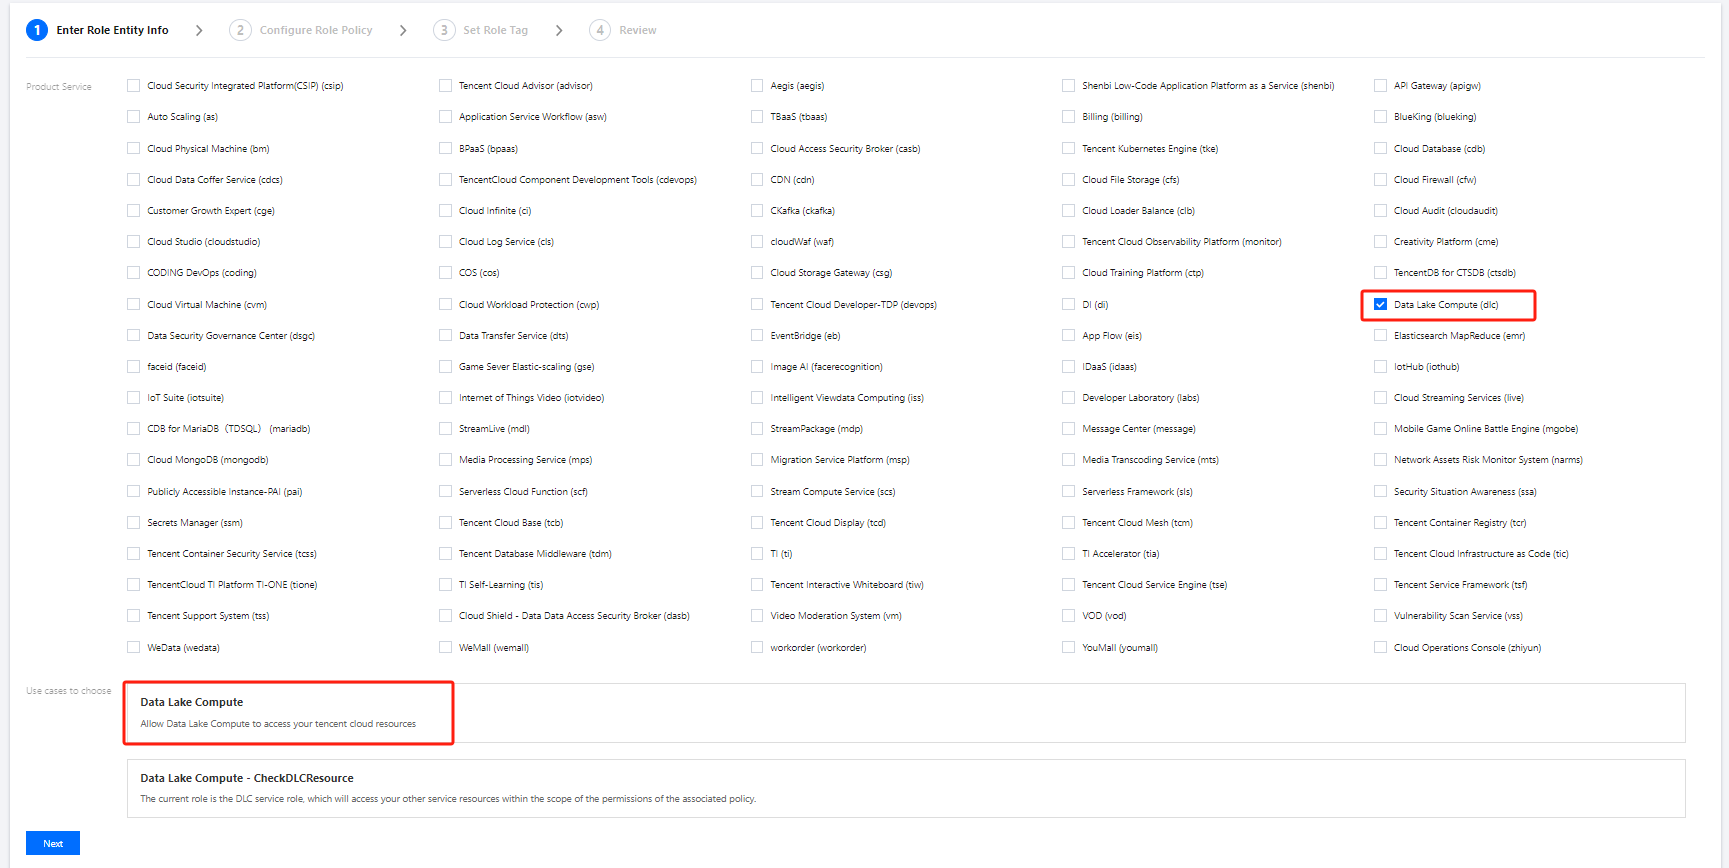
2. Select Role on the left sidebar to enter the role management page. Click Create Role and select Tencent Cloud Product Service.
3. In the Role Entity service list, find and select Data Lake Compete and click Next.
4. In the policy configuration, find and select the policy created in Step 1 and click Next.
5. Set a name for the role and click Save.
Step 3. Get the role arn information
1. After creating the role in Step 2, return to the role list and find the created role.
2. Click Role Name to enter the role details page.
3. Find and copy the role arn information.
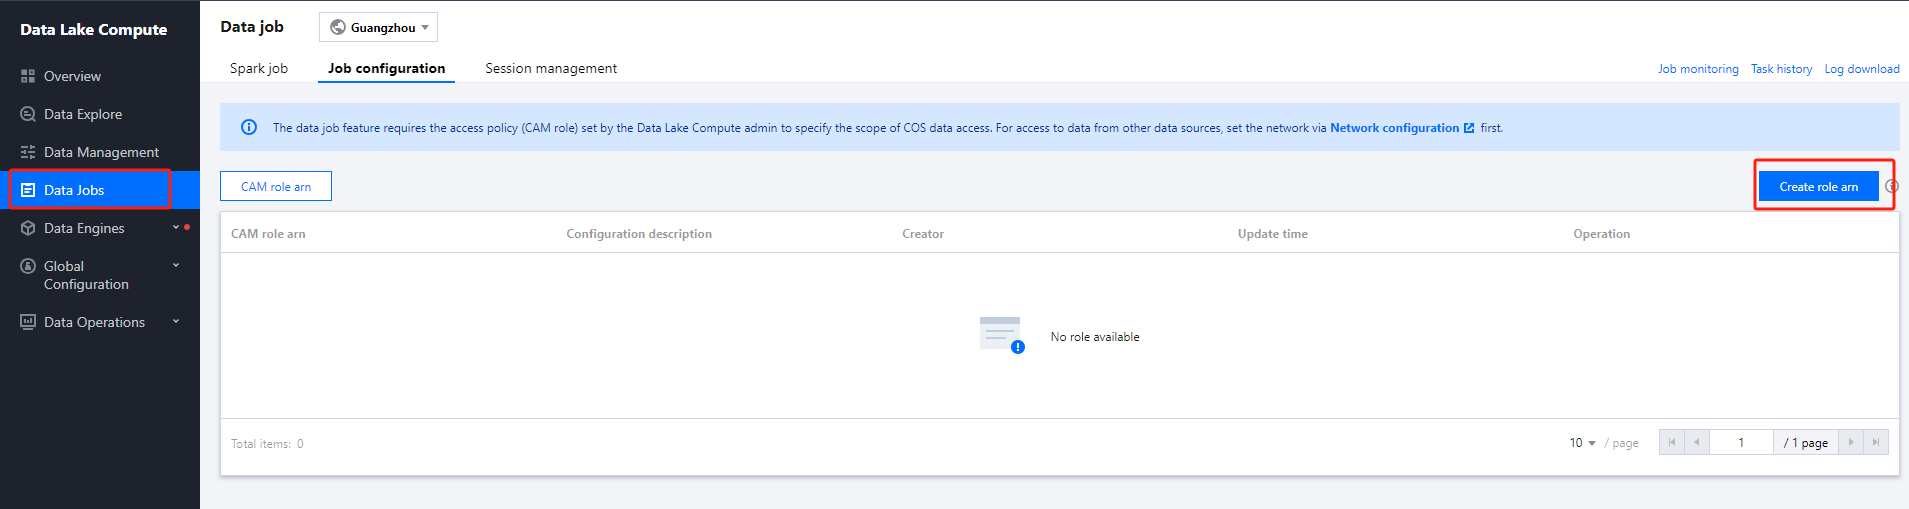
Step 4. Configure the role arn in Data Lake Compute
2. Select Data job on the left sidebar to enter the data job management page. Click Job configuration and select CAM role arn.
3. Click Create role arn.
4. Paste the role arn information obtained in Step 3 in the input box and click Save.
Appendix: Custom Policy Template
If the preset templates cannot meet your data management needs, you can configure a custom template in the following steps.
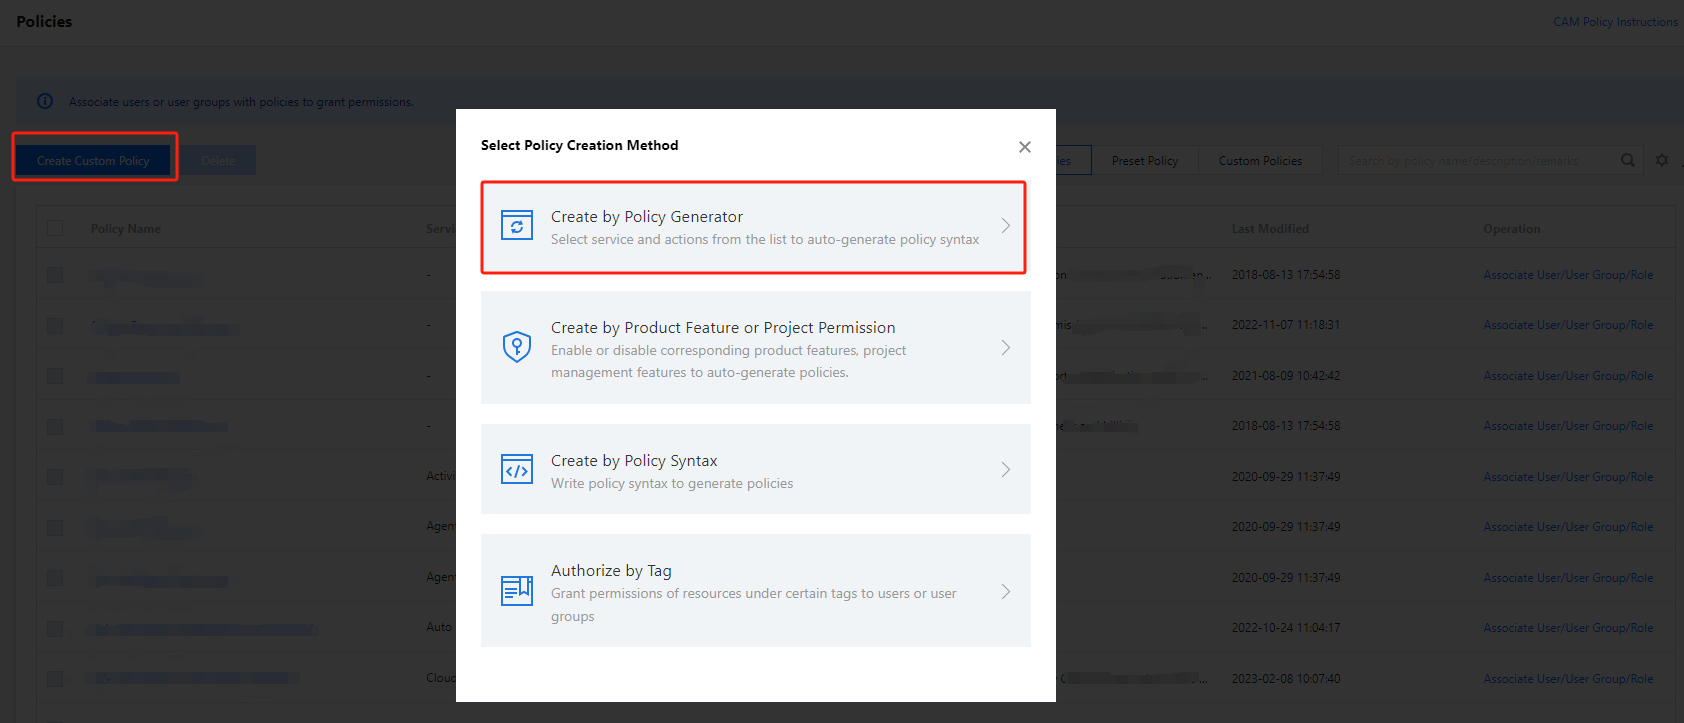
1. Log in to the Tencent Cloud console and select Cloud Access Management. The logged-in account needs to have permissions to configure CAM; therefore, we recommend you use a root account or admin account.
2. Select Policies on the left sidebar to enter the policy management page. Click Create Custom Policy and select Create by Policy Generator.
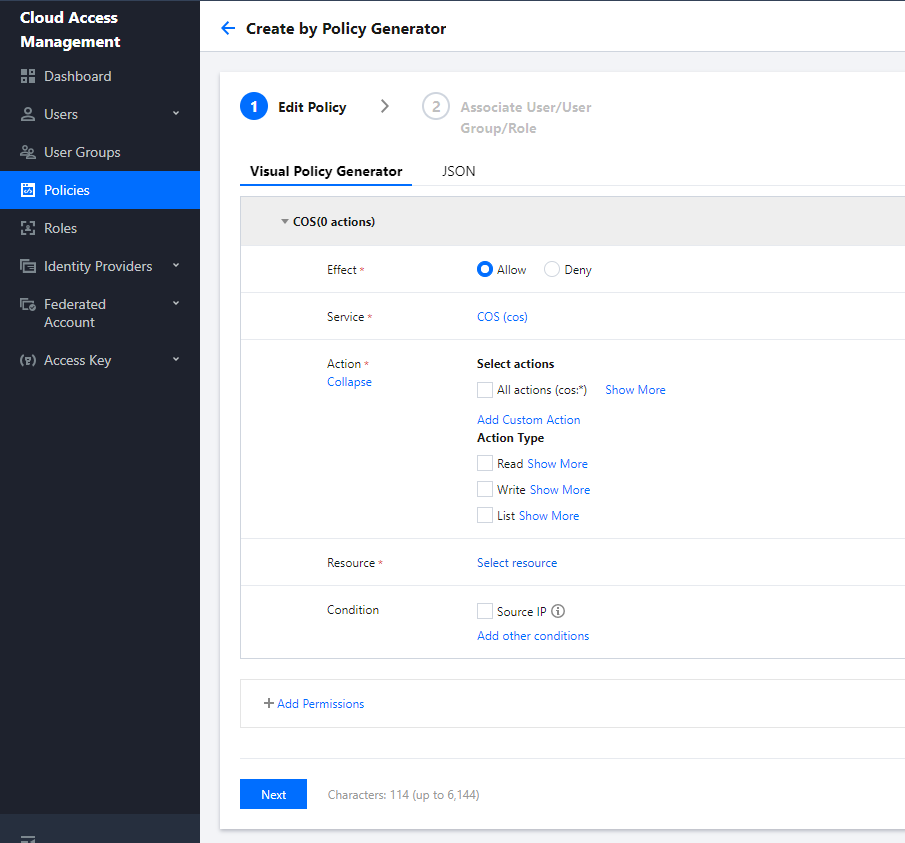
3. Select Allow as Effect and COS as Service. Select the resource scope as needed.
If you need to manage specific resources, click Add a six-segment resource description to add resources. You can use * to indicate all the resources. For more information, see Resource Description Method.
4. After completing the configuration, set a name for the policy and click Save. You can also select Authorized Users to authorize the policy to existing users.
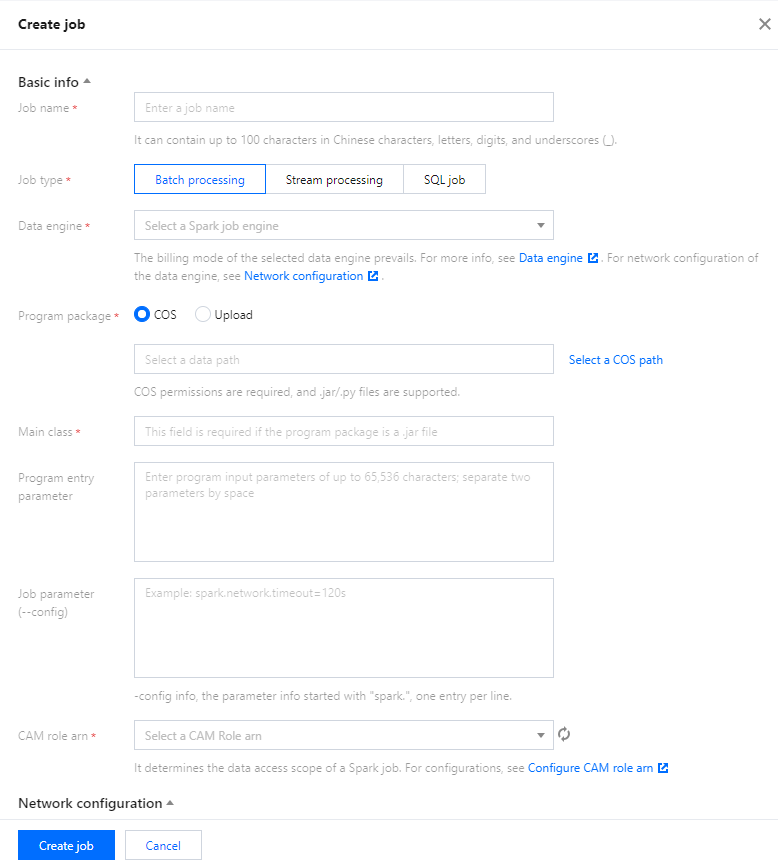
Creating Data Job
Last updated:2024-07-17 17:45:32
Preparations
Before creating a data job, you need to configure the CAM role arn to secure the data access from the data job. For detailed directions, see Configuring Data Access Policy.
It can contain up to 40 letters, digits, and underscores.
Job type
In batch: Batch data jobs based on Spark JAR
In flow: Flow data jobs based on Spark Streaming
Data source connection
Data source for In batch data jobs. Currently, it can only be CKafka, which needs to be configured in advanced in Job configuration.
Data engine
It can be a Spark job data engine for which you have the permission.
If you select Data source, you can only select a data engine connected to the data source.
Program package
The JAR format is supported.
You can select a local file of up to 5 MB in size or a file in COS. If the local file exceeds 5 MB, upload it to COS for use. You can directly enter a COS path.
Dependency JAR resource
The JAR format is supported. You can select multiple resources.
You can select a local file of up to 5 MB in size or a file in COS. If the local file exceeds 5 MB, upload it to COS for use. You can directly enter multiple COS paths and separate them by semicolon.
Dependency file resource
You can select a local file of up to 5 MB in size or a file in COS. If the local file exceeds 5 MB, upload it to COS for use. You can directly enter multiple COS paths and separate them by semicolon.
CAM role arn
The data access policy configured in Job configuration, which specifies the scope of data accessible to a data job. For more information, see Configuring Data Access Policy.
Main class
JAR package parameter in the main class. Separate multiple parameters by space.
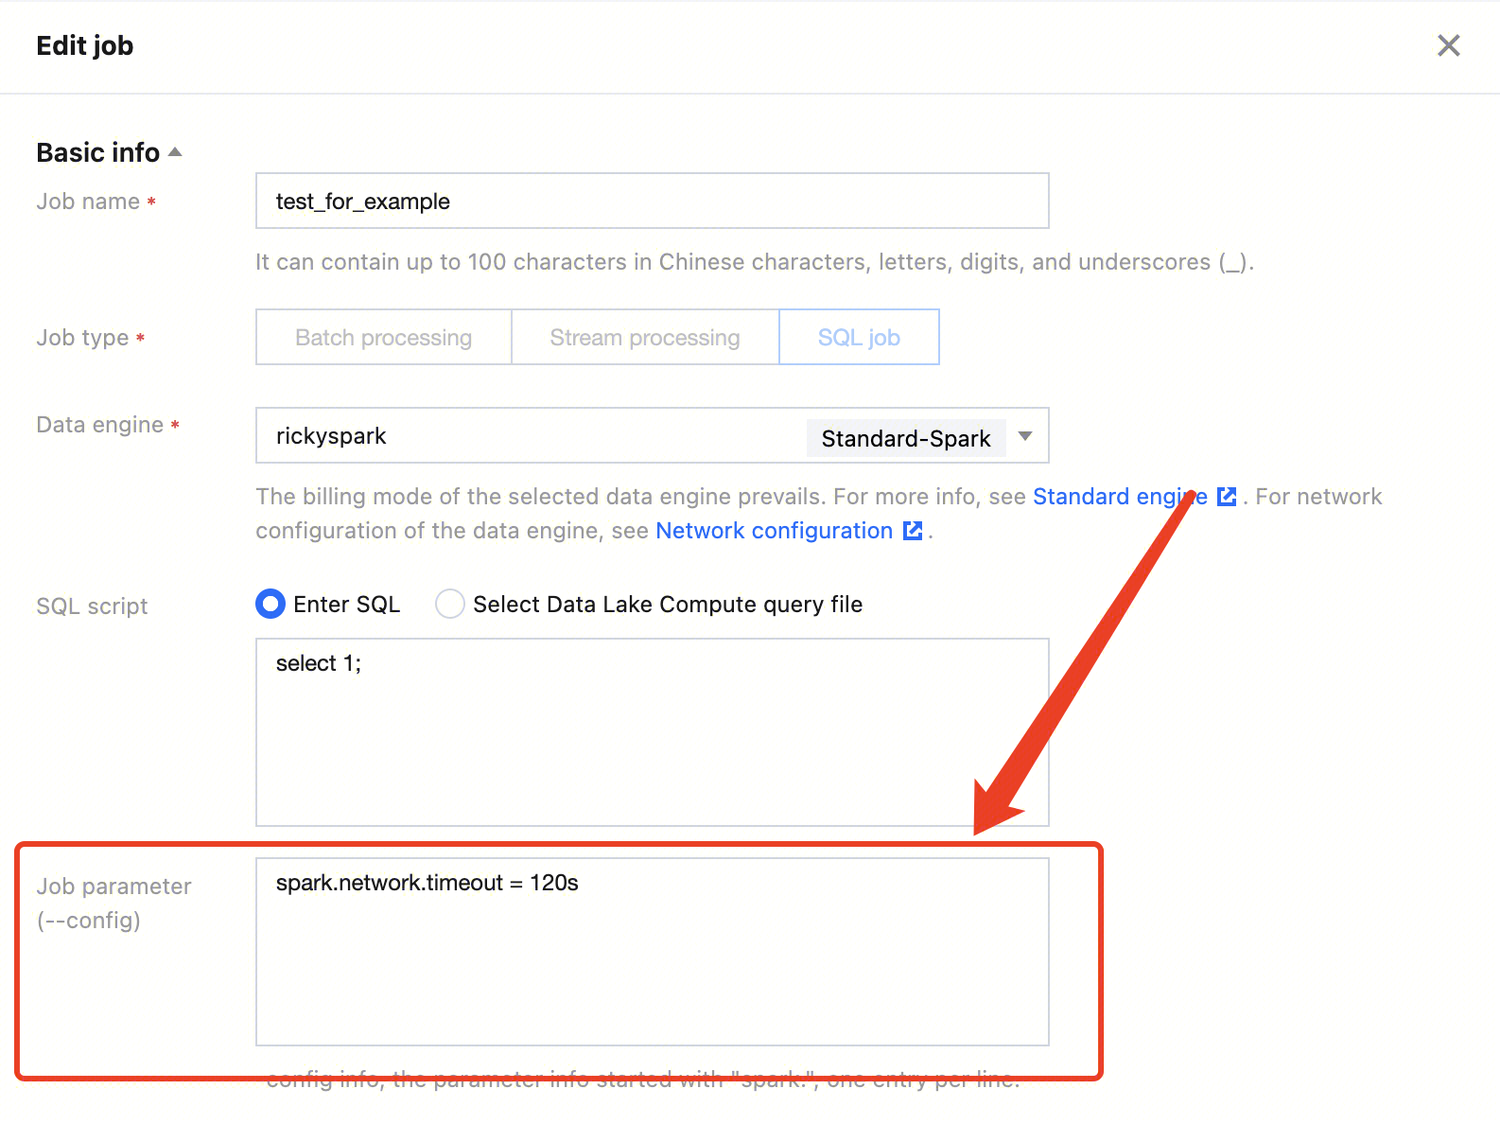
Job parameter
-config information of the job, which starts with spark. in the format of k=v. Separate multiple parameters by line break.
Example: spark.network.timeout=120s
Resource configuration
The engine resources that can be configured with the data job, the number of which cannot exceed the specifications of the selected data engine. Resource description: 1 CU ≈ 1-core 4 GB MEM
Pay-as-you-go data engines are billed by the billable CUs.
3. After configuring the parameters, click Save.
Managing Data Job
Last updated:2025-03-07 15:27:25
This document describes how to manage a data job.
Edit a data job.
Start and stop a data job task.
View the data job and task details.
Delete a data job.
Editing a data job
Note:
A running data job cannot be edited.
The type of a data job cannot be changed. To change it, create a new data job as instructed in Creating Data Job.
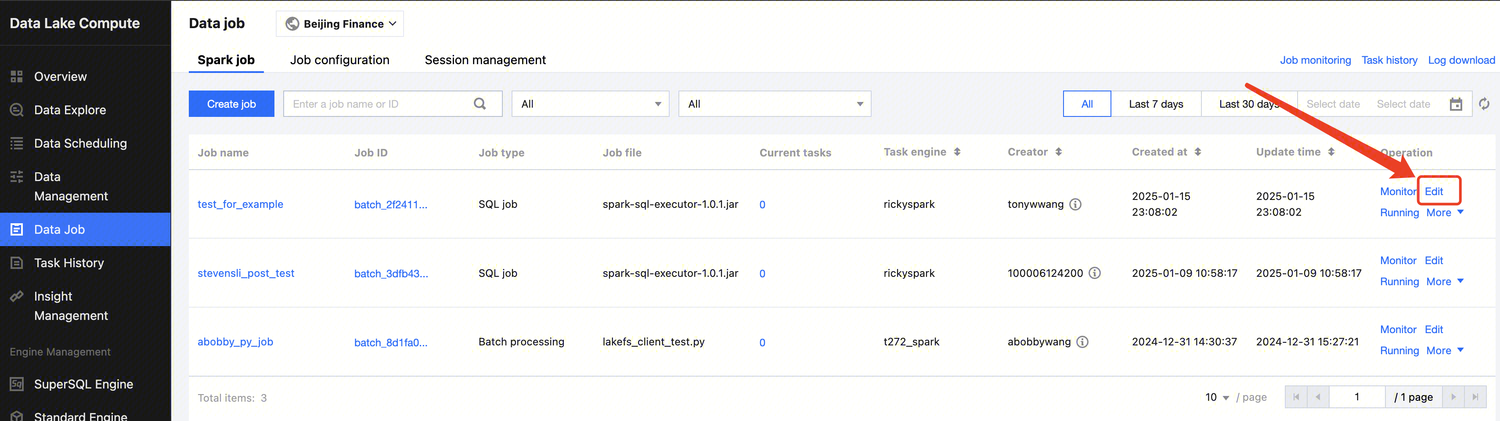
1. Log in to the Data Lake Compute console, select the service region, and select Data job on the left sidebar.
2. Find the target data job and click Edit.
3. Edit the content and click Save.
Starting and stopping a data job task
You can start and stop a created data job to generate corresponding tasks. A data job can generate multiple task instances and be executed multiple times.
Data task statuses are as follows:
Status
Description
Not started
Initial status after creation.
Running
The data task is running, during which the data job cannot be edited or deleted.
Successful
The task is executed successfully.
Failed
Failed to run the task. You can query the error message through the log or SparkUI.
Canceled
The task is manually canceled.
You can start and stop a data job task in the following steps:
1. Log in to the Data Lake Compute console, select the service region, and select Data job on the left sidebar.
2. Find the target data job and click Start or Stop to change the task status.
Note:
Starting a task instance will use compute engine resources. If the usage exceeds the configured upper limit, the task will be put into a queue.
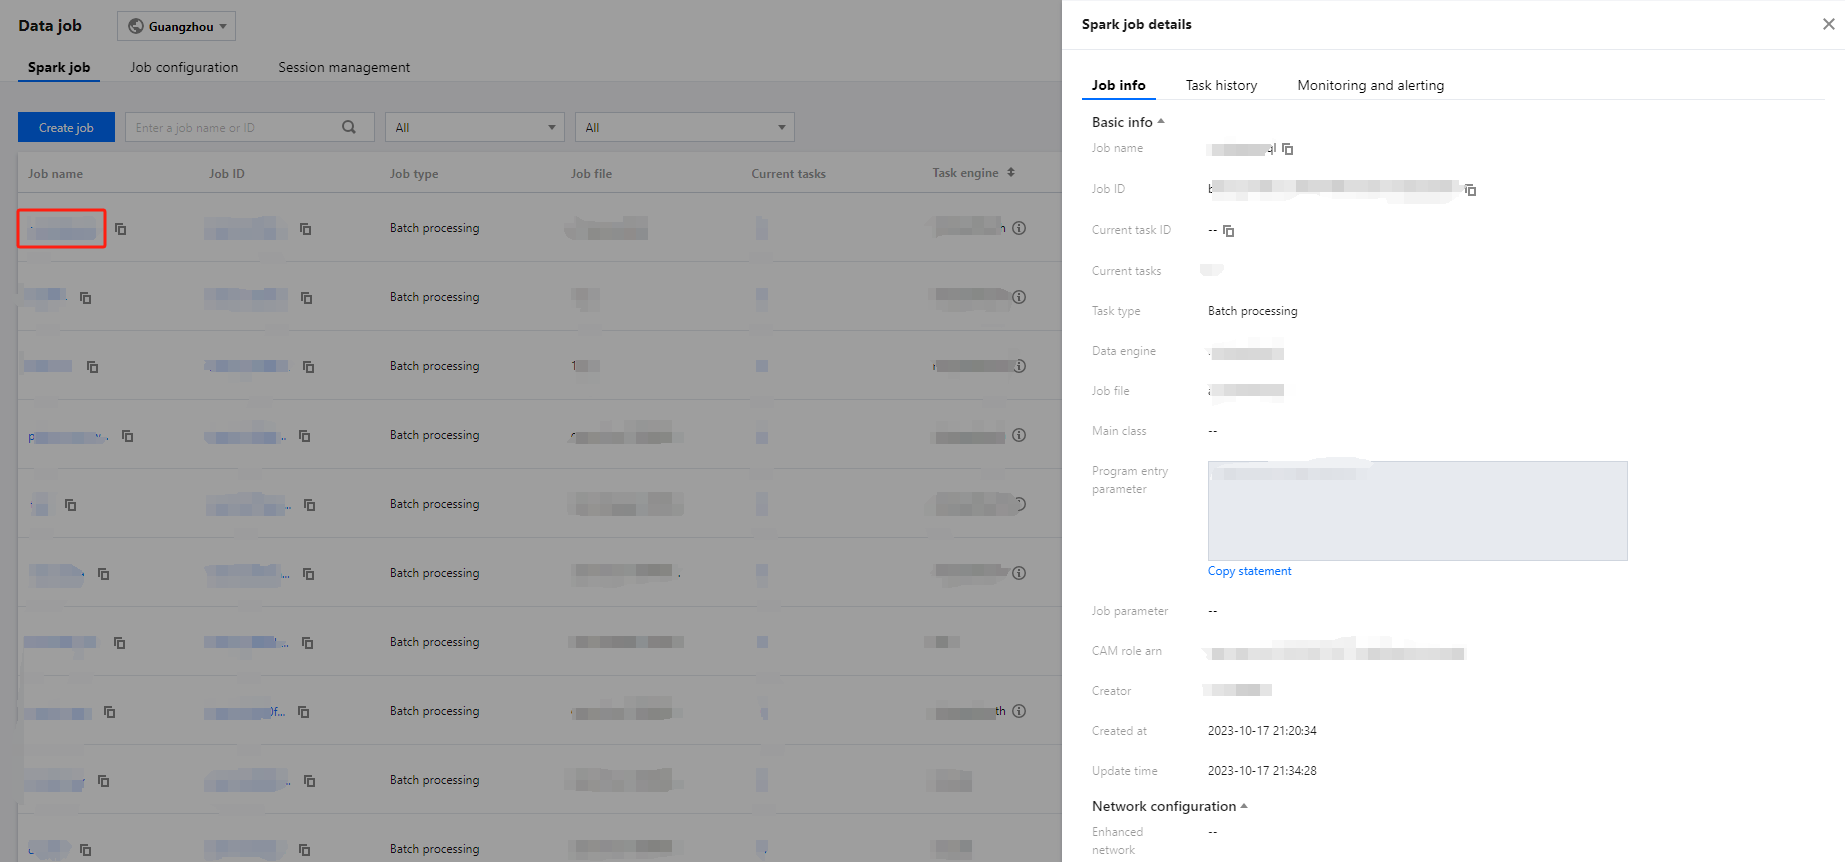
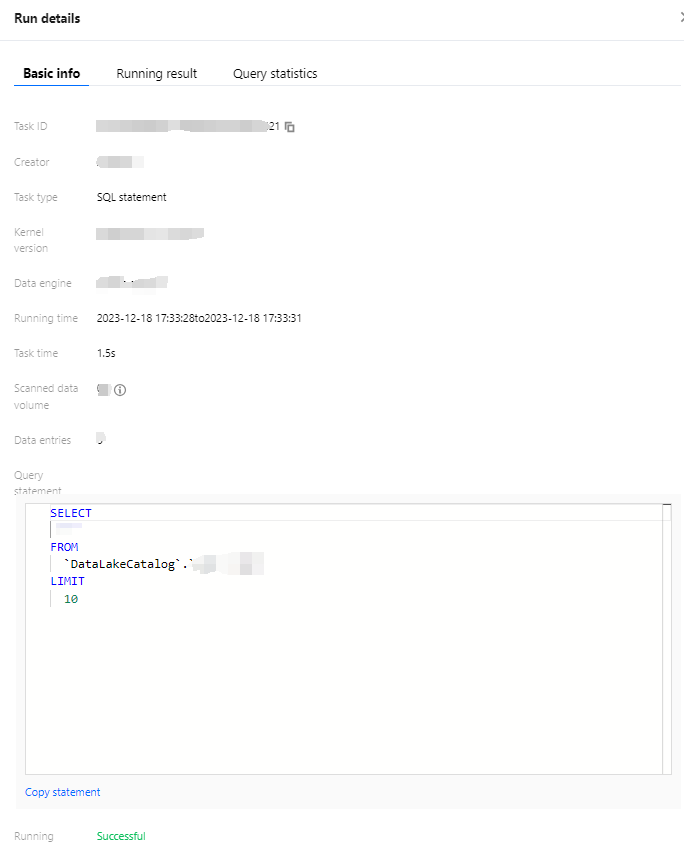
Viewing the Data Job and Task Details
1. Log in to the Data Lake Compute console, select the service region, and select Data job on the left sidebar.
2. Click Job name to enter the data job details page.
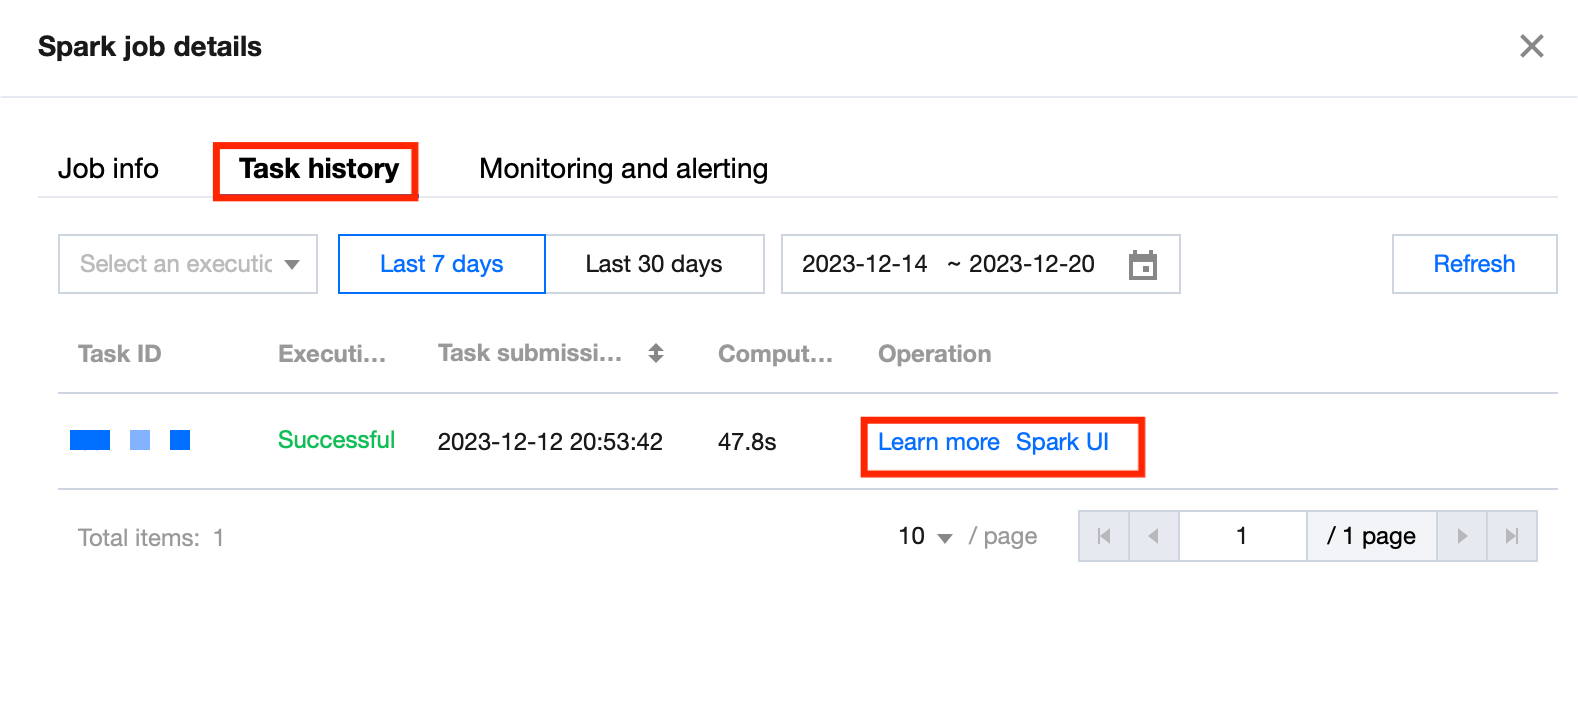
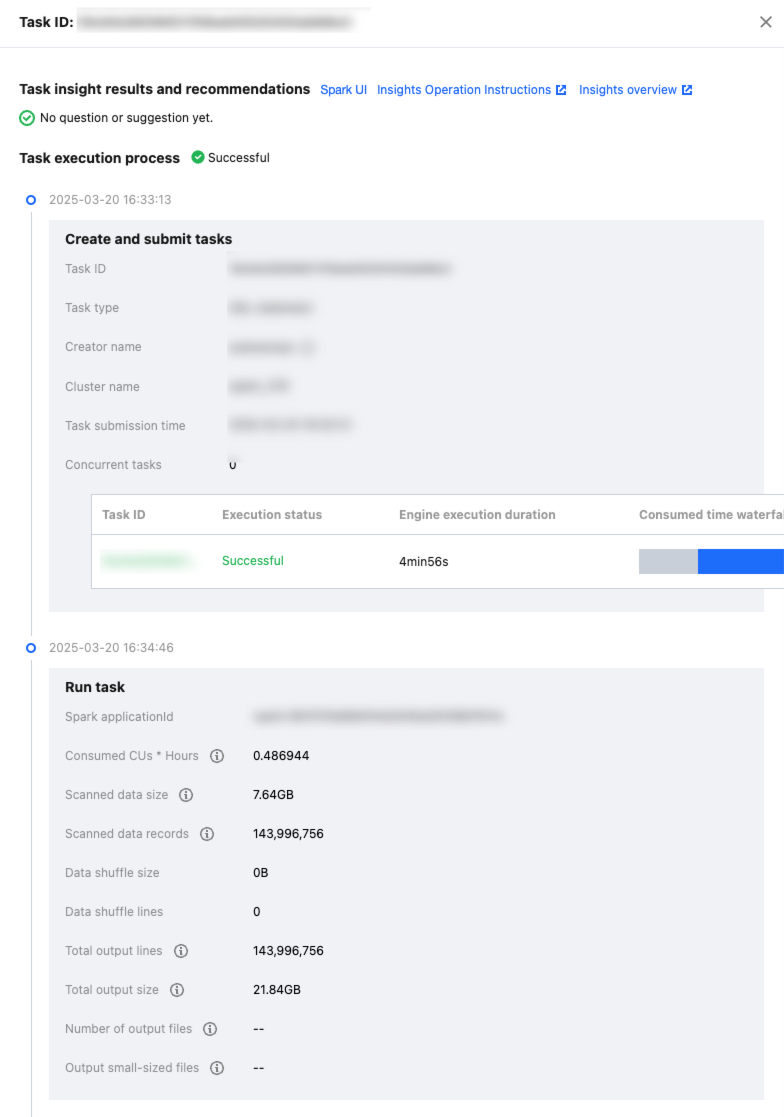
On the details page, you can view the basic information and task list of the data job. The task list contains the data task information of the data job. You can view the task run log and SparkUI.
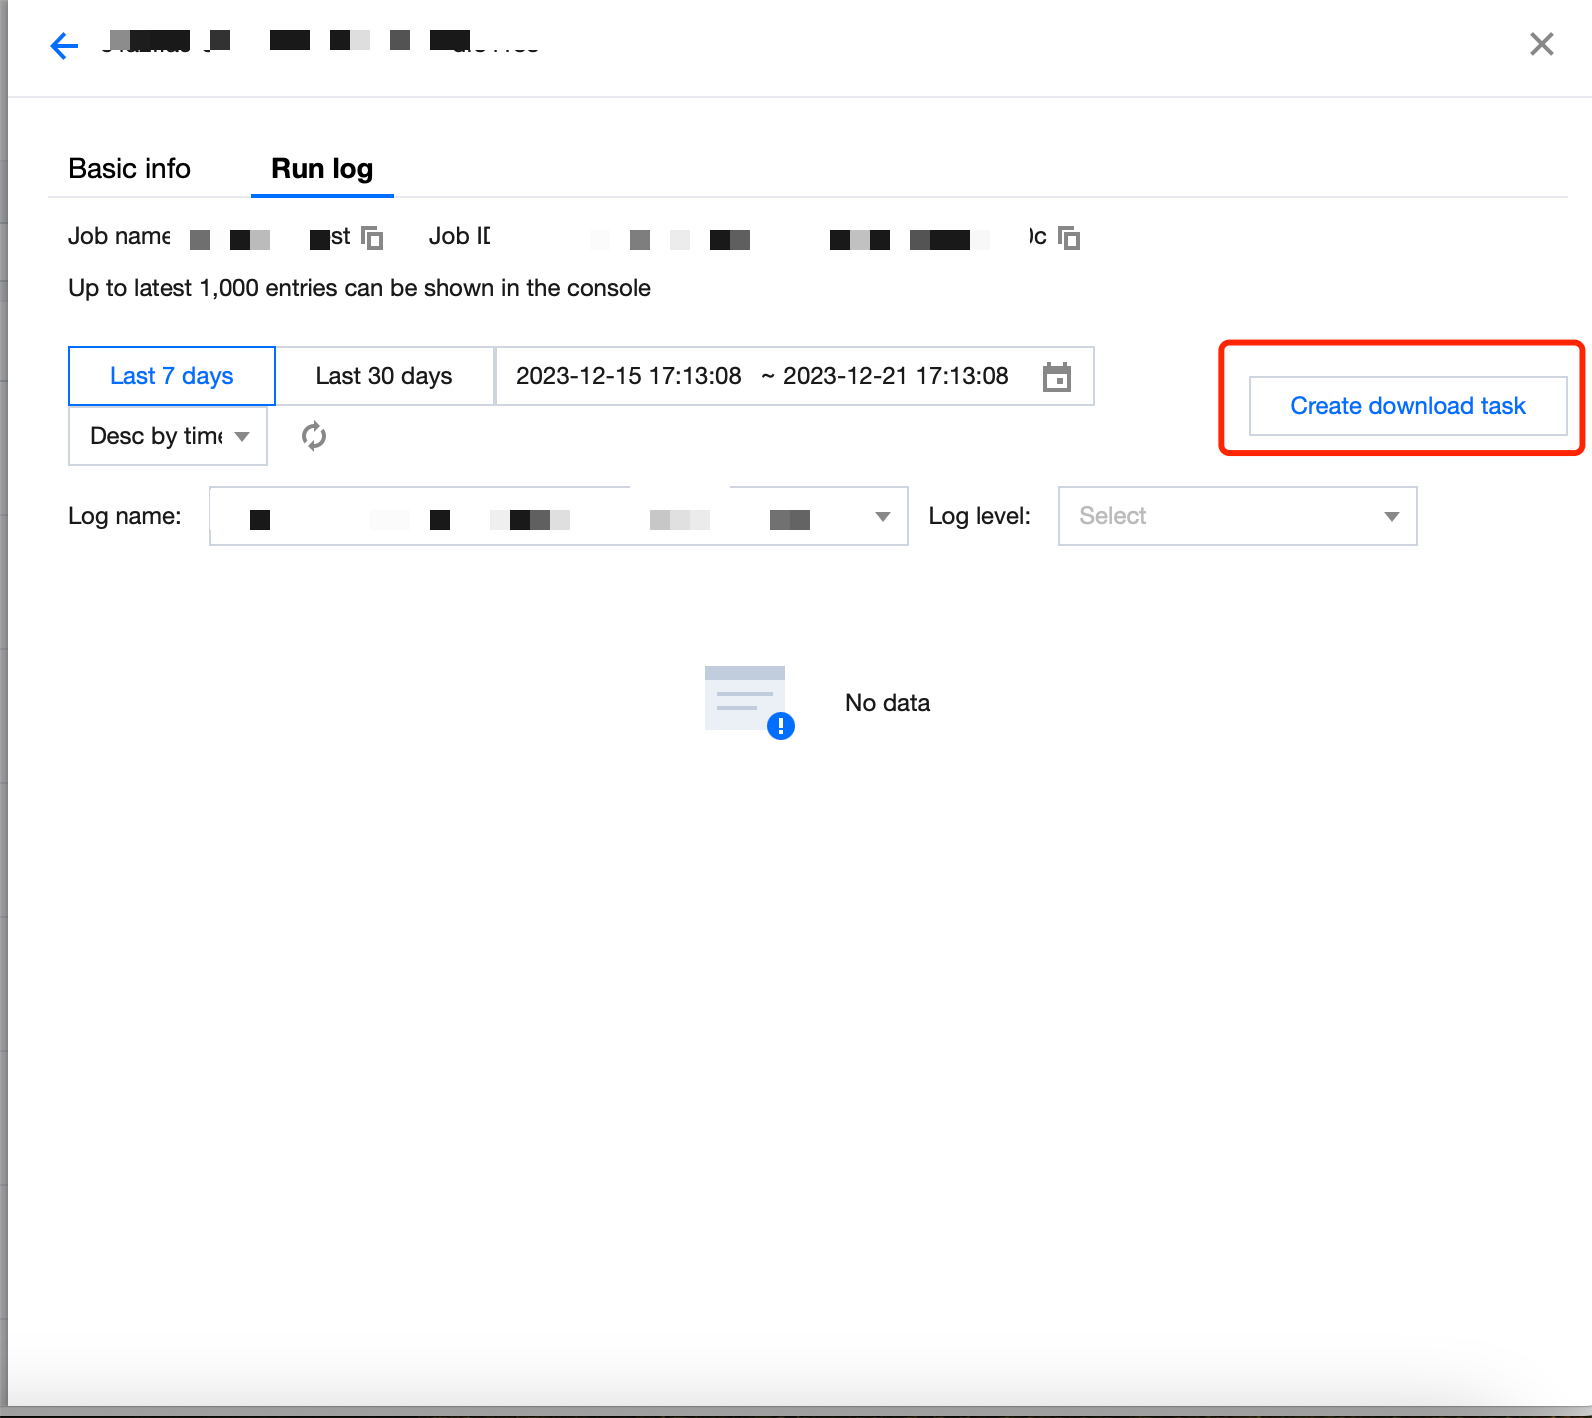
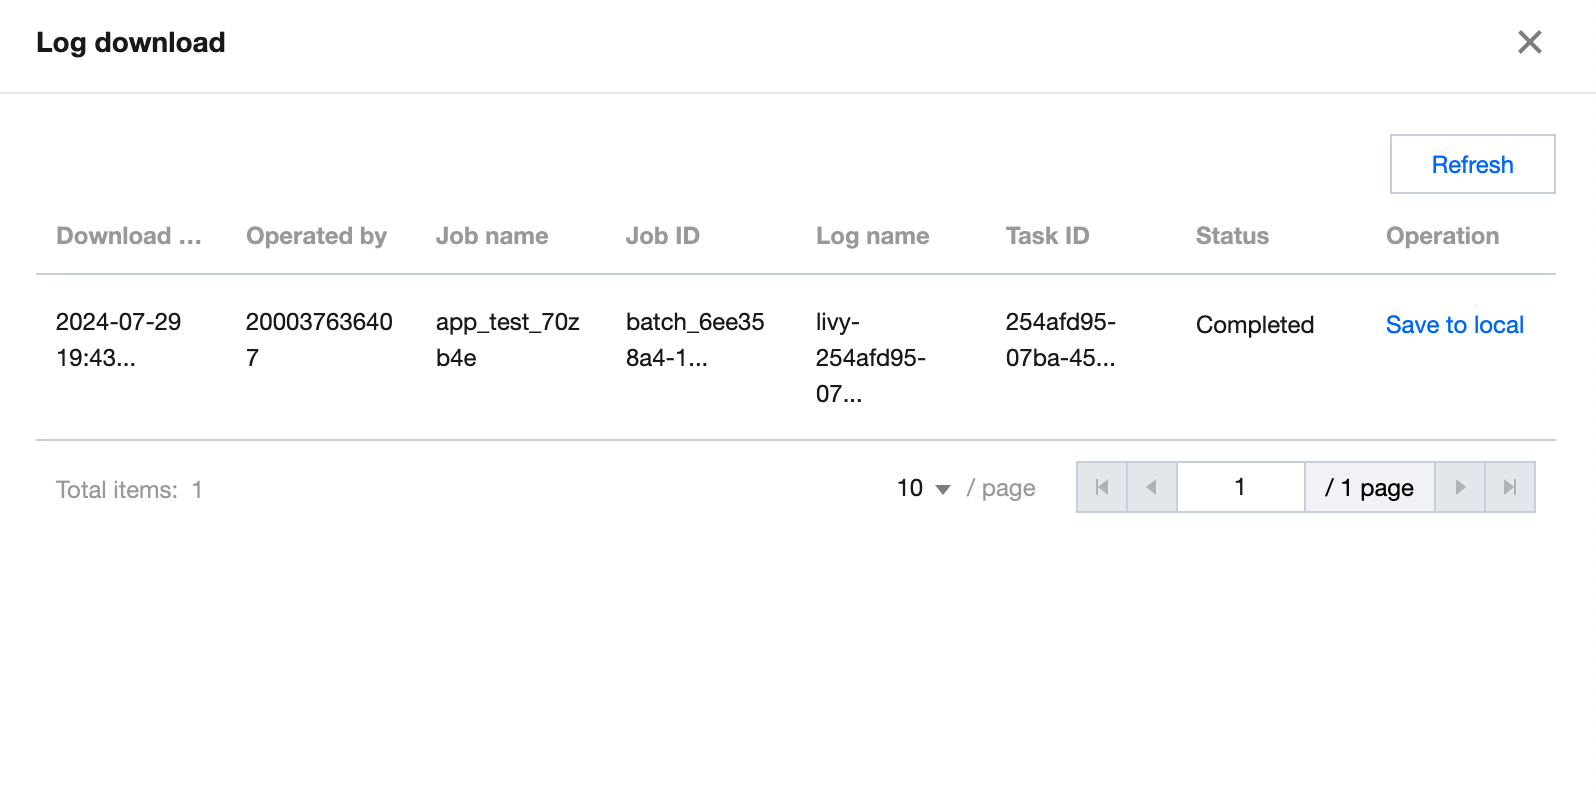
Click Learn more or Task ID to view the task details, which include the basic information and run log of the task. Currently, the run log allows you to view the last 1,000 data entries.
You can click Create download task to download the full log and click Log download to save the log locally.
Note:
The download record will be saved for three days, after which you cannot save the log locally and need to create a new download task.
Deleting a data job
Note:
A data job with a running data task cannot be deleted.
1. Log in to the Data Lake Compute console, select the service region, and select Data job on the left sidebar.
2. Find the target data job, click Delete > OK.
Note:
Note that deleting a data job will delete its data task information. Proceed with caution.
PySpark Dependency Package Management
Last updated:2024-09-18 17:59:53
Currently, the basic running environment for DLC's PySpark uses Python 3.9.2.
Python dependencies for Spark jobs can be specified in the following two methods:
1. Use --py-files to specify dependency modules and files.
2. Use --archives to specify a virtual environment.
If your module or file is compiled by using pure Python to implement customized function, it is recommended to specify Python dependencies using the --py-files.
The --archives option allows you to package and use the entire development and test environment. This method supports compiled installations of C-related dependencies and is recommended when the environment is more complex.
Note:
The two methods mentioned above can be used simultaneously based on your needs.
Using --py-files to Specify Dependency Packages
This method is suitable for modules or files implemented in pure Python, without any C dependencies.
Step 1: Packaging Modules/Files
For external PyPI packages, use the pip command to install and package common dependencies in the local environment. The dependencies should be implemented in pure Python and should not be dependent on any C-related databases.
pip install -i https://mirrors.tencent.com/pypi/simple/ <packages...> -t dep
cd dep
zip -r ../dep.zip .
The single-file module (e.g., functions.py) and custom Python modules can be packaged by using the method mentioned above. It is important to ensure that custom Python modules are standardized according to Python's official requirements. For more details, see the official Python Packaging User Guide.
Step 2: Importing the Packaged Module
In the Data Lake DLC Console, create a job in the Data Job module. Use the --py-files parameter to import the packaged dep.zip file, which can be uploaded either through COS or directly from your local device.
Using a Virtual Environment
A virtual environment can resolve issues with some Python dependency packages that are dependent on C databases. Users can compile and install dependency packages into the virtual environment as needed, and then upload the entire environment.
Since C-related dependencies involve compilation and installation, it is recommended to use an x86 architecture machine, Debian 11 (Bullseye) system, and Python 3.9.2 environment for packaging.
Step 1: Packaging the Virtual Environment
There are two methods to package a virtual environment: using Venv or Conda.
After the script running is completed, you can obtain py3env.tar.gz in the current directory and then upload this file to COS.
Step 2: Specifying the Virtual Environment
In the Data Lake DLC console, create a job in the Data Operation Module following the instructions as shown in the screenshot below.
1. For the --archives parameter, enter the full path to the virtual environment. The name of the decompressed folder is After the #.
Note:
The # symbol is used to specify the decompression directory. The decompression directory will affect the configuration of the subsequent running environment parameters.
2. In the --config parameter, specify the running environment settings.
For the Venv packaging method, configure: spark.pyspark.python = venv/pyspark_venv/bin/python3
For the Conda packaging method, configure: spark.pyspark.python = venv/bin/python3
For the script packaging method, configure: spark.pyspark.python = venv/bin/python3
Note:
Due to the differences in packaging methods between Venv and Conda, the directory structure will vary. You can decompress the .tar.gz file to check the relative path of the Python file.
Resource Management
Engine Management
Data Engine Introduction
Last updated:2025-04-15 16:25:35
The DLC data engine is the foundation of DLC's data analysis and computation services. All calculations performed by users within DLC require the use of this data engine. Depending on the specific use case, users can select the appropriate engine type.
Engine Types
DLC offers two types of data engines for users to choose from: Standard Engine and SuperSQL Engine. The primary difference between these two engines lies in the SQL syntax they support. The Standard Engine uses native Spark and Presto syntax from the community, while the SuperSQL Engine supports DLC's independently developed unified syntax. This unified SuperSQL syntax can run on both Spark and Presto engines, effectively masking the syntax differences between them. This feature can significantly reduce usage costs in scenes where different analytics engines need to be used together. Below are the main characteristics of each engine and recommendations for selection:
Engine Types
Available Types
Main Features
Usage Requirements
Purchase Recommendations
Standard Engine
Spark
Presto
Native syntax: Uses the native syntax from the Spark/Presto community, ensuring low learning and migration costs.
Flexible usage: Supports both Hive JDBC and Presto JDBC.
Integrated Spark: The standard Spark engine can execute SQL and Spark batch tasks.
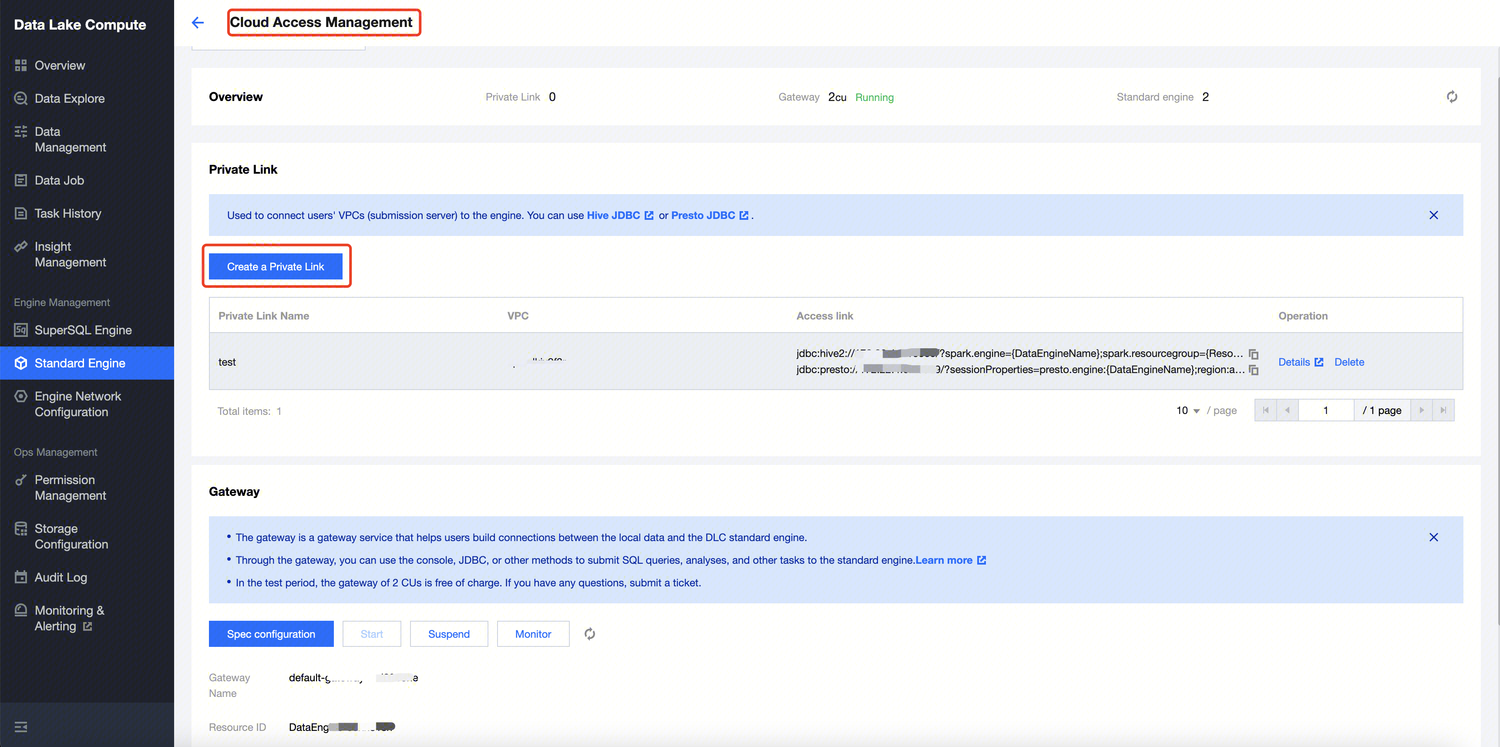
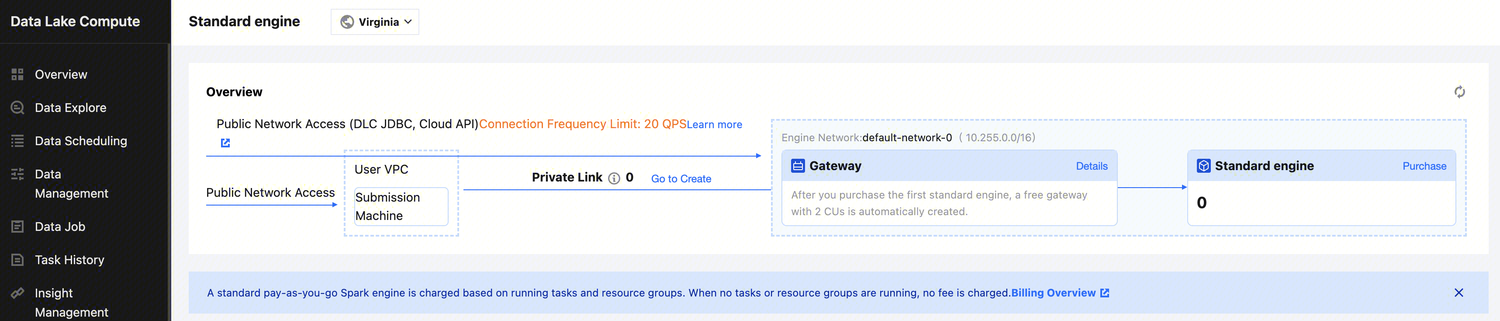
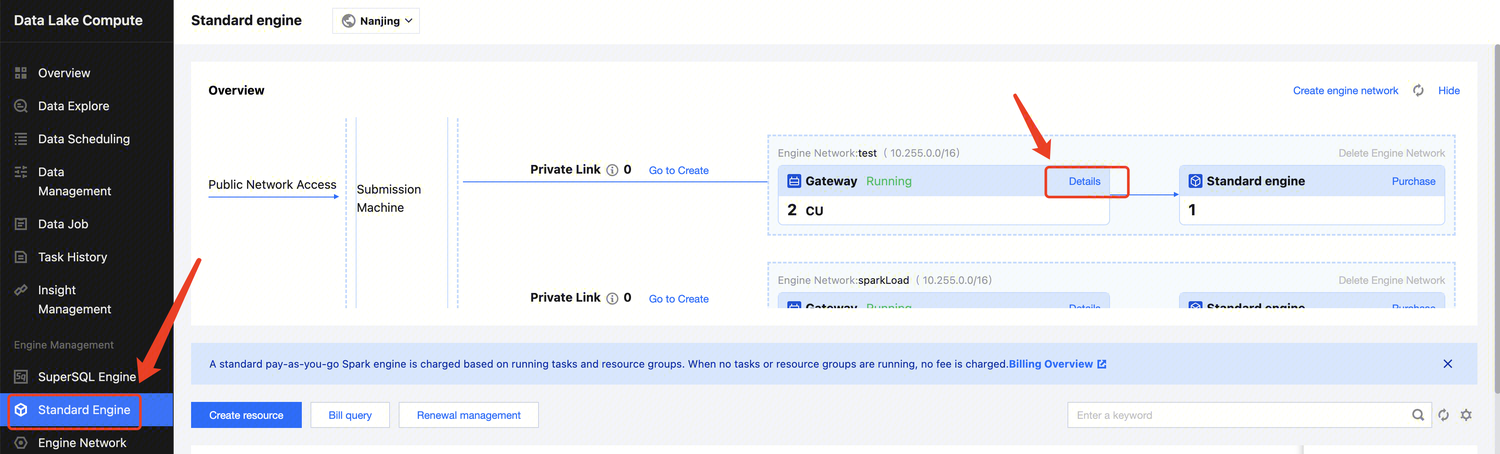
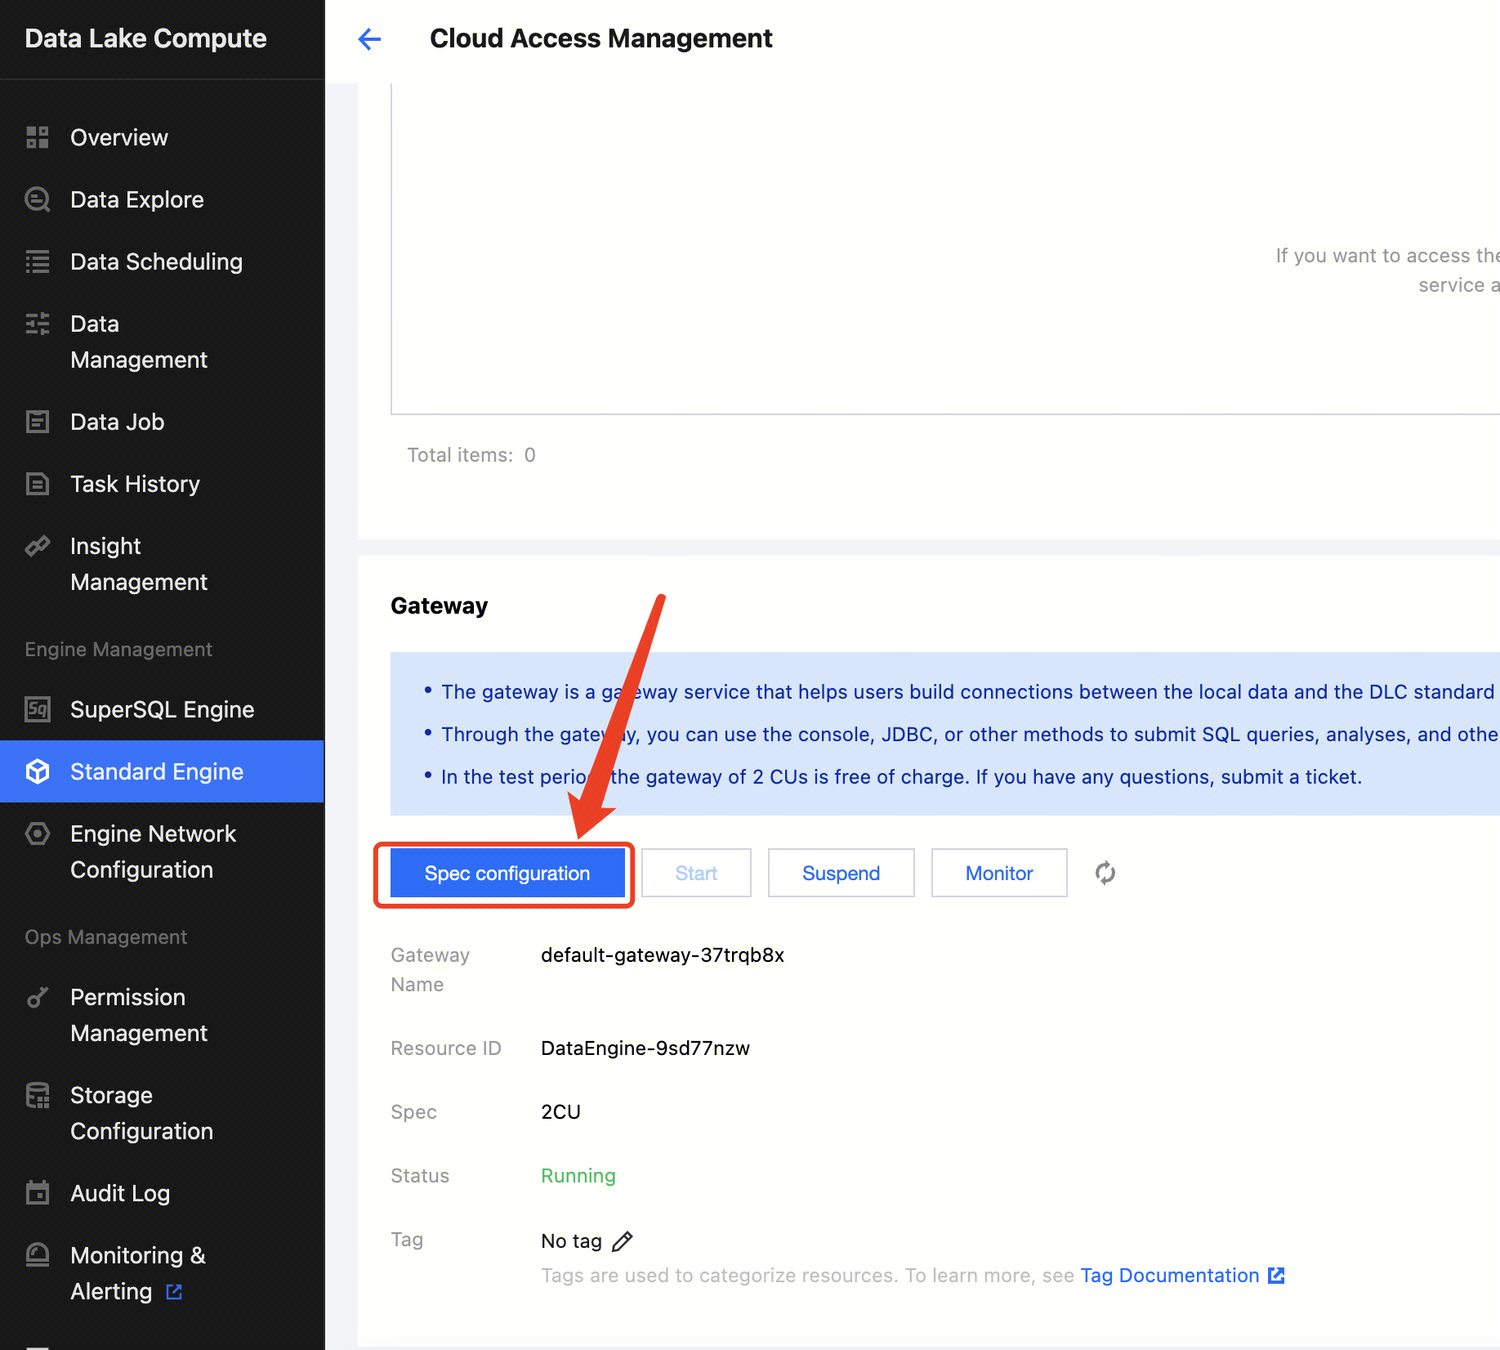
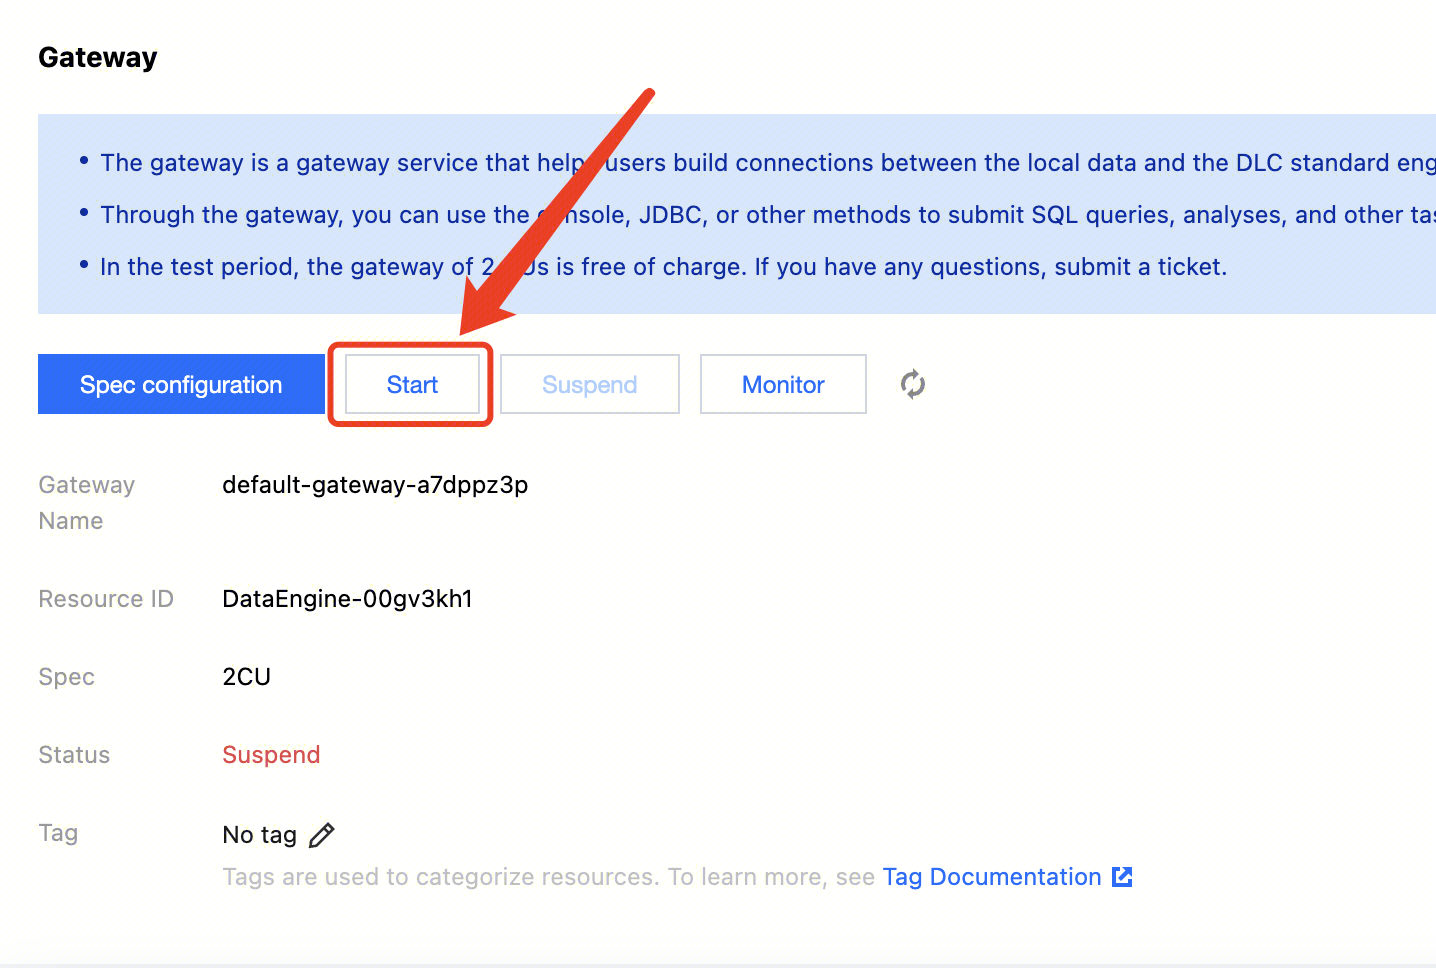
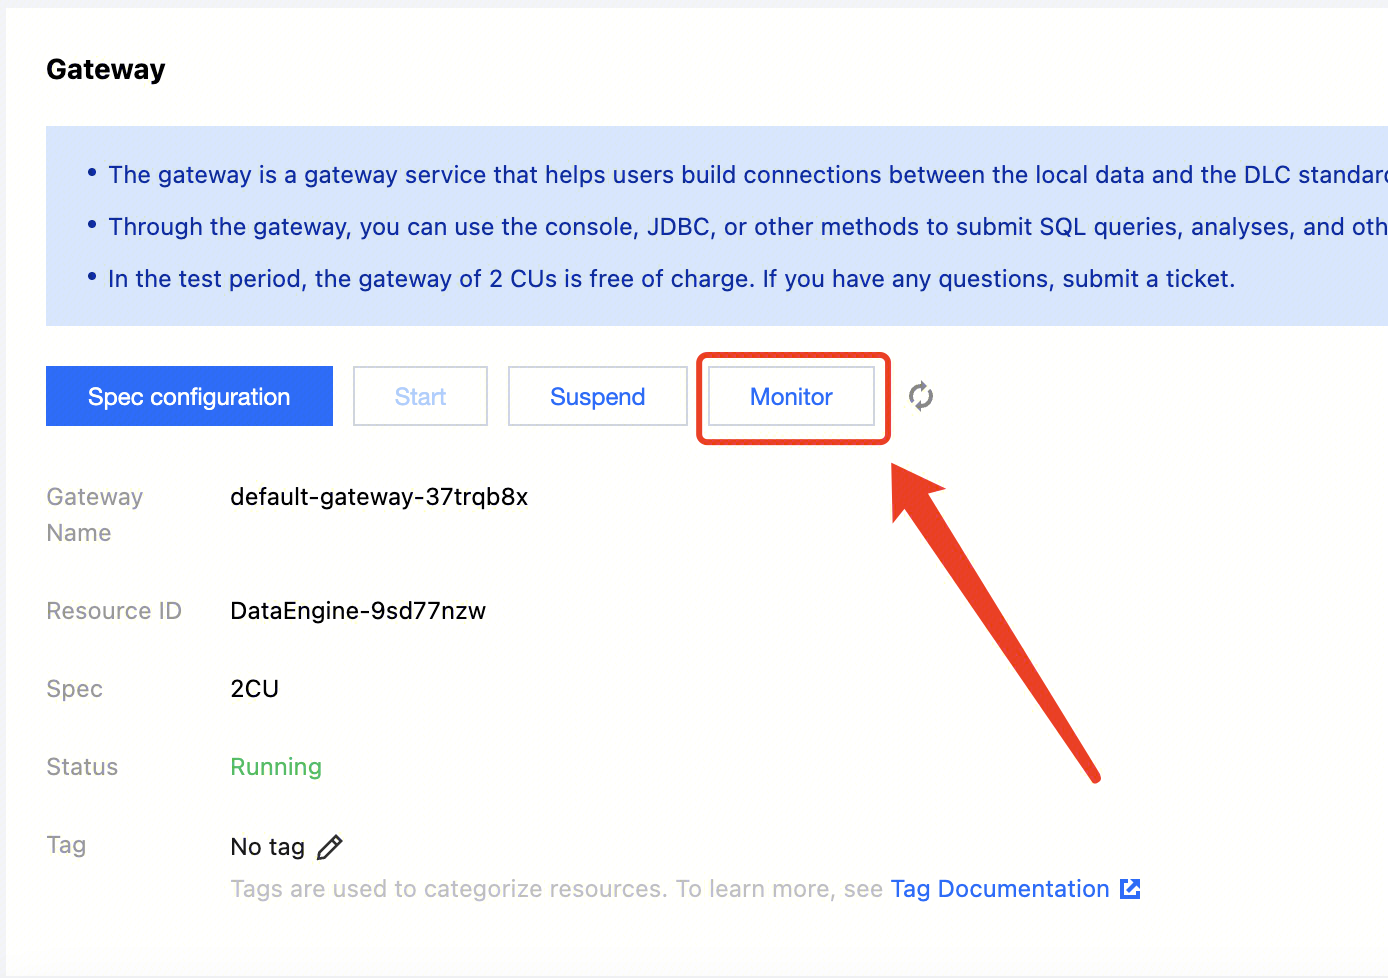
Currently, a 2 CU specification free gateway is provided. If you need to upgrade the specification, upgrade the Gateway
1. Require the use of native Spark/Presto syntax.
2. Need to purchase a Spark engine for batch processing and offline SQL tasks.
3. Prefer to use Hive JDBC and Presto JDBC.
SuperSQL Engine
SparkSQL
Spark jobs\nPresto
Unified syntax: A set of syntax applies to both Spark and Presto engines.
Supports federated queries.
You need to learn the SuperSQL unified syntax.\nFor SQL/batch task scenes, it is recommended to purchase the corresponding engine type.
1. Prefer to use a unified syntax for both Spark and Presto.
Detailed Comparison of Standard Engine and SuperSQL Engine
Feature
Standard Engine
SuperSQL Engine
Description
Presto
✓
✓
Both engines support the Presto engine.
Spark
✓
✓
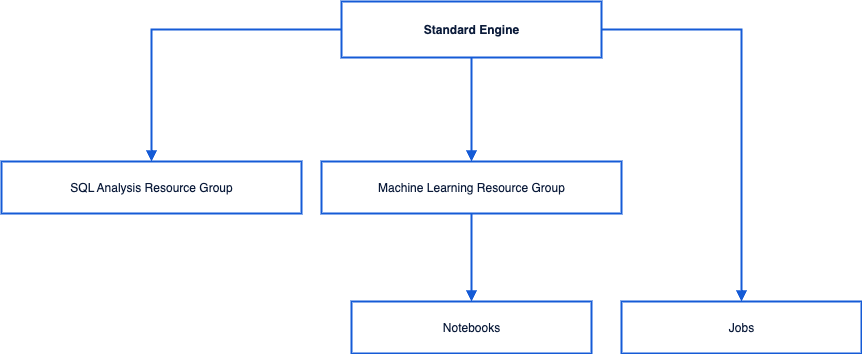
The SuperSQL Engine is divided into SparkSQL and Spark job. The SparkSQL engine supports SQL jobs, while the Spark job engine supports Spark batch and streaming jobs as well as SQL jobs. The Standard Engine is an integrated Spark engine.
DLC, based on Apache Kyuubi, has developed its own Serverless gateway service, providing a more stable, secure, and high-performance task submission experience.
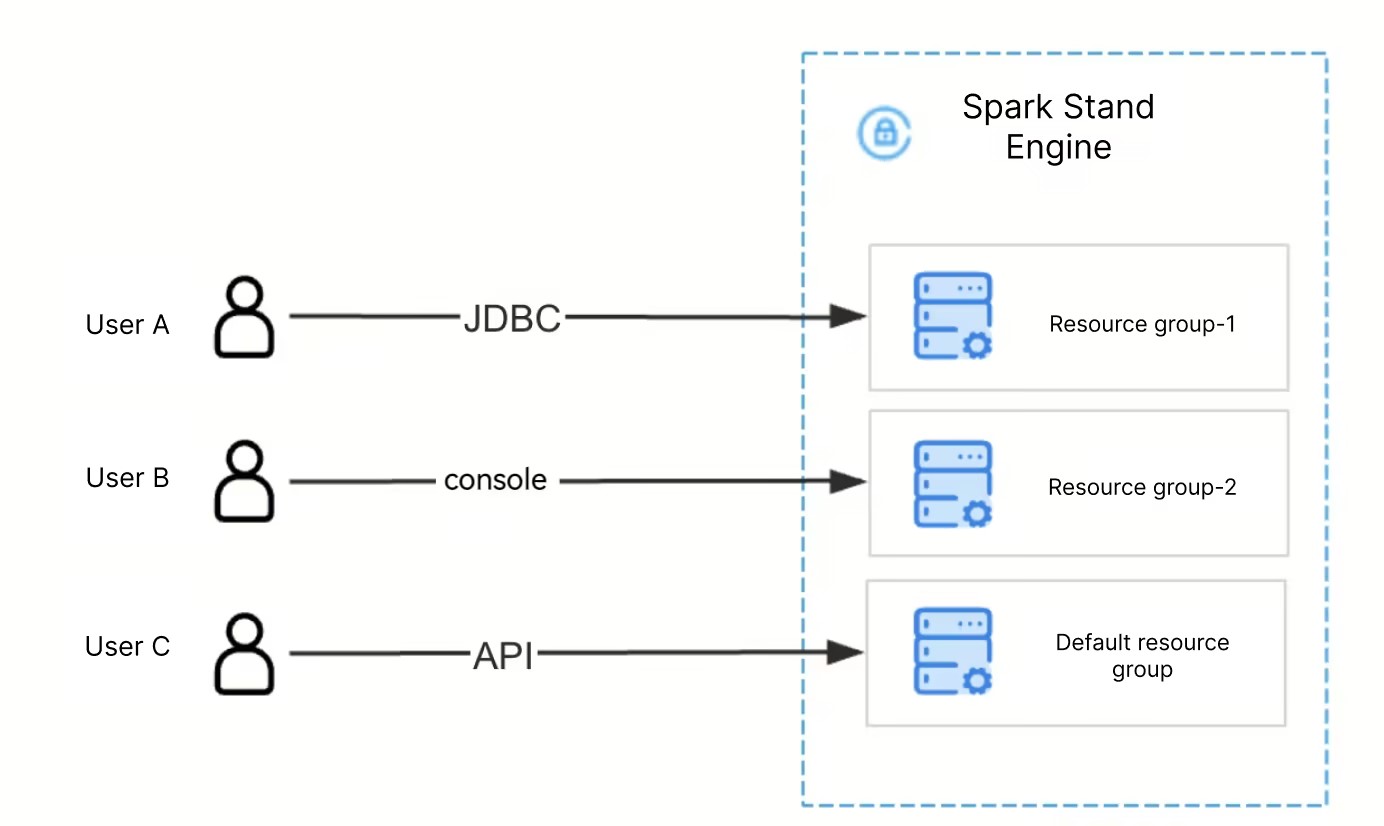
Resource groups are a unique feature of the Standard Spark Engine, allowing resources to be allocated as needed. SQL tasks can be submitted to a designated resource group for execution.
Shared Engine
✓
The SuperSQL Engine supports a shared mode, which is suitable for scenes with low analysis frequency and smaller data volumes.
Both types of engines support submitting tasks using DLC JDBC.
TencentCloud API Task Submission
✓
✓
Both types of engines support submitting tasks using TencentCloud API or through the data exploration page in the console.
Federated Query
✓
The SuperSQL Engine provides federated query analysis capabilities. For instructions on adding a federated query data catalog, see Data Directory and DMC. The Standard Engine currently does not support federated queries.
If you have any questions about choosing between the Standard Engine or SuperSQL Engine, you can Submit a Ticket to contact us.
Engine Pricing
Data engines support both monthly subscription and pay-as-you-go subscription. For more information, see Billing Overview.
Limitations
The name of the data engine should be globally unique and cannot be changed.
The billing mode of the data engine cannot be switched.
The data engine does not support changing regions.
SuperSQL Engine
SuperSQL Engine Overview
Last updated:2025-03-07 15:27:25
Data engines empower the data analysis and computing service in Data Lake Compute. They are used in all computing operations and can be public or private based on your needs.
Public engine
The Data Lake Compute service comes with the shared public engine, which is applicable to low-frequency analysis use cases with small data volumes. With this highly flexible and available engine, you don't need to configure or manage resources. Fees are charged by the scanned data volume of running tasks. For billing details, see Billing Overview.
Since Data Lake Compute adopts serverless architecture, it needs to schedule the data engine for task execution for the first time over a period of time, which may take a longer time.
Private engine
A private engine is a dedicated data engine that you purchase on a pay-as-you-go basis. For billing details, see Billing Overview.
Pay-as-you-go: This billing mode is highly flexible and stable, where fees are charged by the CU usage. It is applicable to use cases where data is analyzed regularly, with compute resources elastically scaled based on the business load.
Monthly subscription: This billing mode is applicable to use cases where large amounts of data require long-term and stable analysis, with compute resources elastically scaled based on the business load. It guarantees always available resources with no need to wait for resource startup. Fees are charged by month based on the cluster specification (elastic clusters are billed by CU usage though).
Compute engine types
A private engine can work with different compute engines in different use cases.
SparkSQL: It is suitable for stable and efficient offline SQL tasks.
Spark job: It is suitable for native Spark stream/batch data job processing.
Presto: It is suitable for agile and fast interactive query and analysis.
Note:
The compute engine type does not affect the unit price of a private engine.
Engine scaling rules
The elastic scaling rules for the engine can be configured either in Create Engine or in the SuperSQL Engine.within the Console Data Engine.
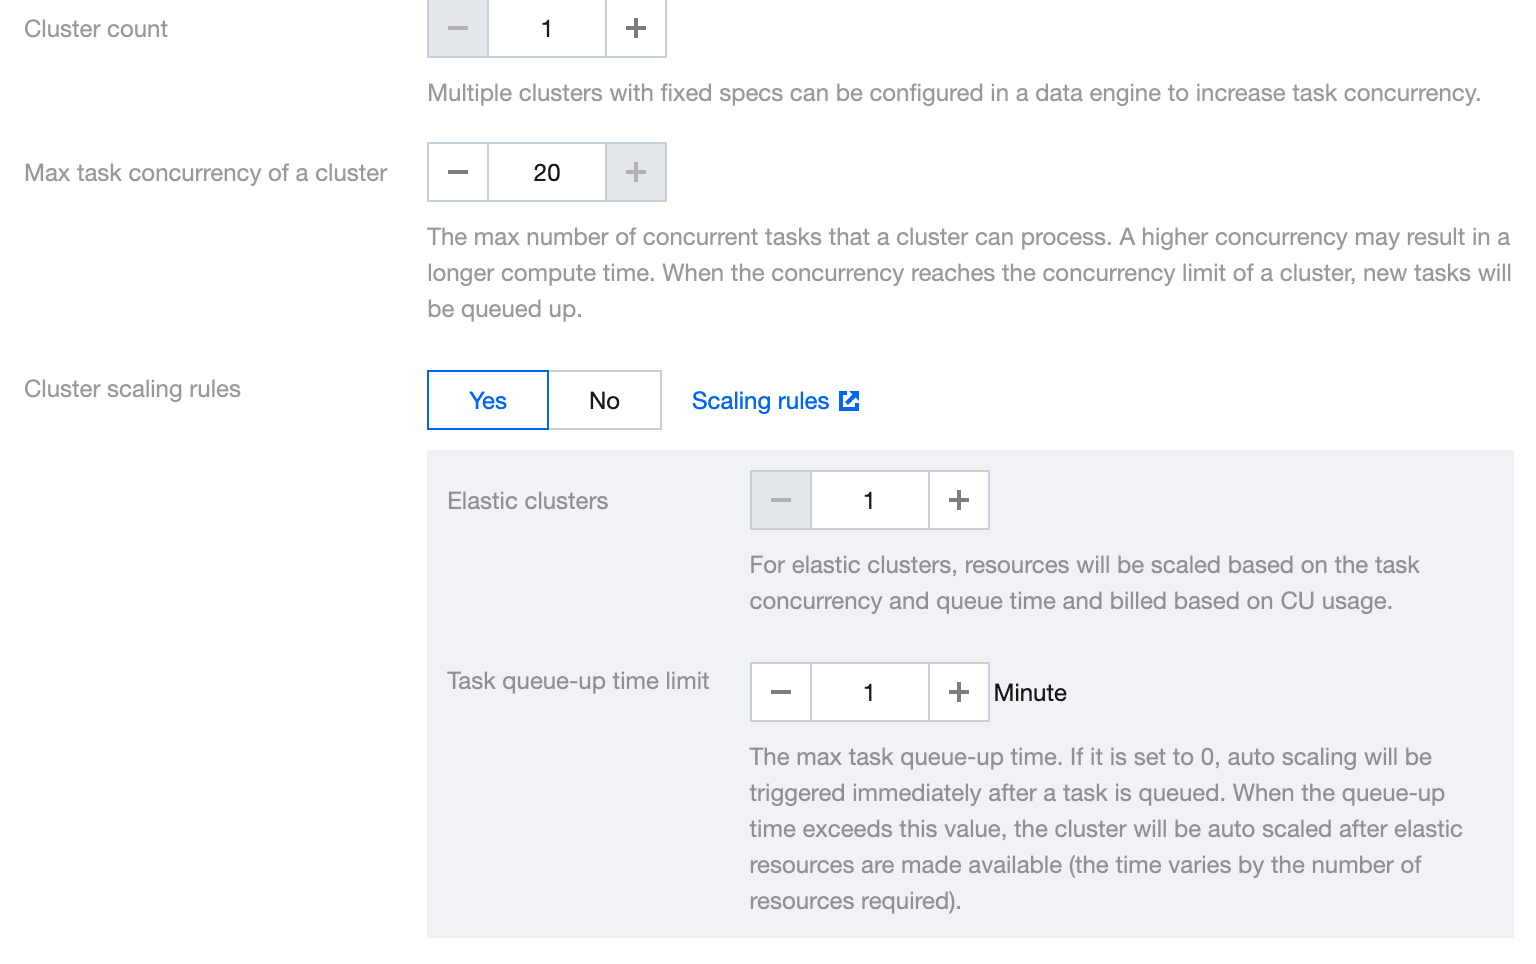
The number of clusters refers to the number of resident clusters in the engine. The sum of the total number of clusters and elastic clusters represents the maximum number of clusters the engine can scale to during elastic scaling.
Basic rule: Engine scaling will only occur when the number of elastic clusters is greater than zero.
Scale-out rule: The system will scale out the data engine based on the configured rules when the number of queued tasks exceeds the available concurrent capacity, the task queue time surpasses the queue time limit, and no clusters are being initialized.
Scale-in rule: The system will scale in the data engine when the current number of clusters exceeds the number of resident clusters, the overall average load of the clusters is below 20%, and there are idle clusters.
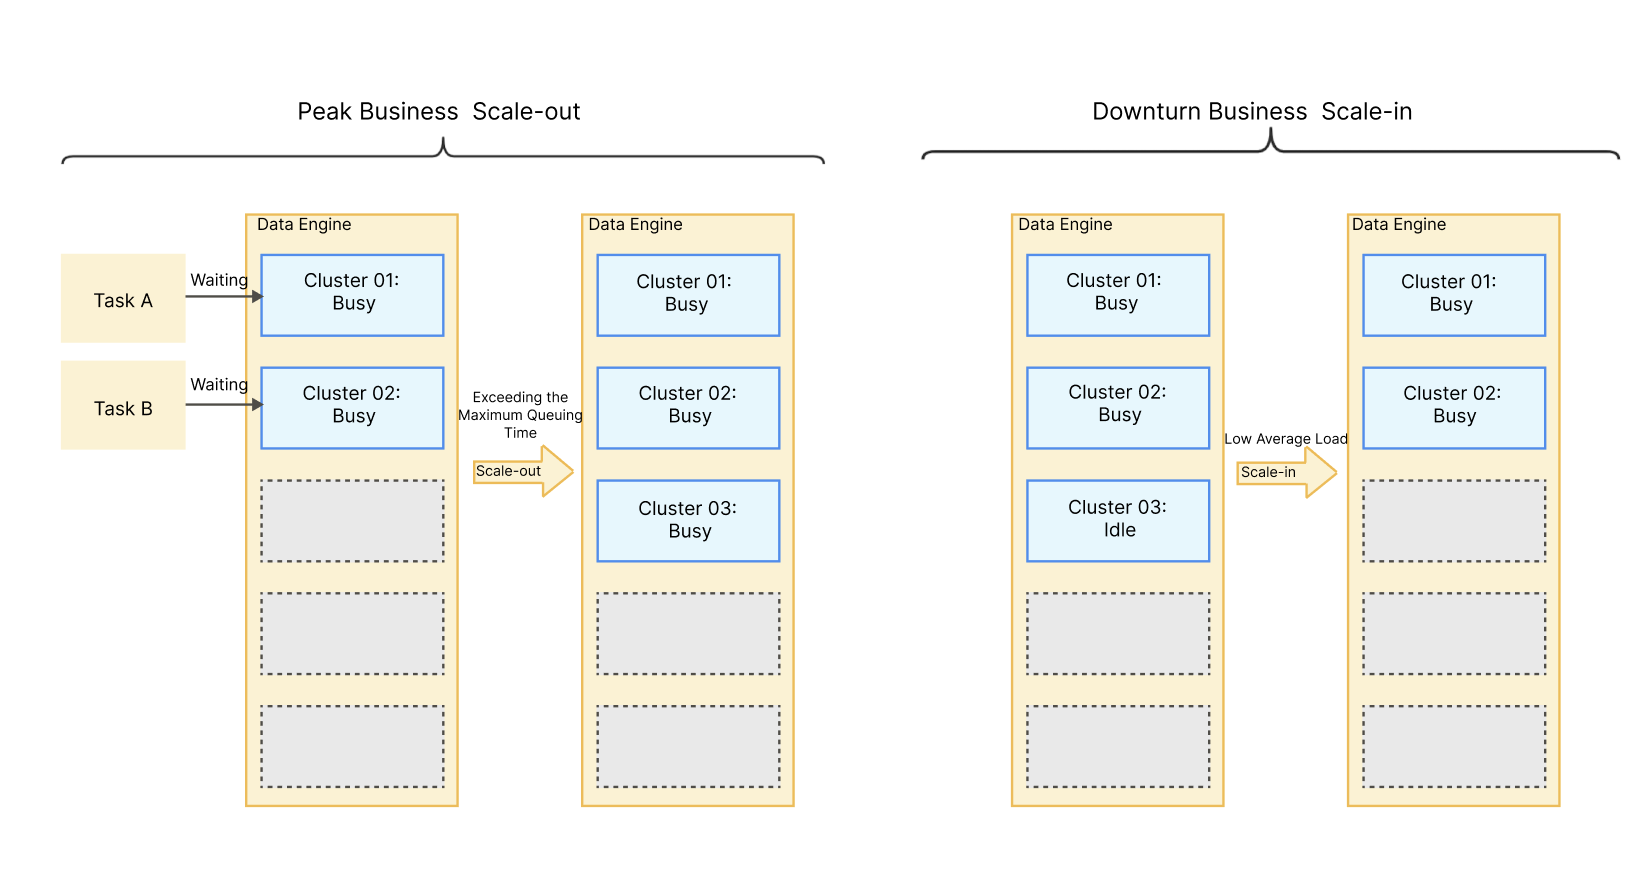
As shown in the figure below: During the purchase, the number of clusters is set to 2, the number of elastic clusters to 3, and the task queue time limit to 5 minutes. During high concurrency of cluster tasks, if the number of queued tasks exceeds 2 and the queue time exceeds 5 minutes, the system will scale out the data engine to alleviate the task queuing situation. After successful scale-out, if the task queuing situation is alleviated, clusters become idle, and the load is low, the system will scale in the data engine.
In the case of elastic scaling, the number of clusters in the data engine will not be less than the configured cluster count and will not exceed the sum of the configured cluster count and the elastic clusters.
For example, if the configured number of clusters is 2 and the number of elastic clusters is 3, after scaling out, the number of clusters will not exceed 5, and after scaling in, the number of clusters will not be fewer than 2.
Note:
The cluster count of a data engine cannot be smaller than the minimum cluster count. A pay-as-you-go cluster can be suspended if it is not needed.
Engine running status
A cluster may be in one of the following eight statuses: Starting, Running, Suspended, Suspending, Changing configuration, Isolated, Isolating, Recovering.
Starting: The cluster is being started. In this case, a pay-as-you-go private engine is not billed. A starting cluster cannot be selected for data computing.
Running: The cluster is running and can be selected for data computing.
Suspended: The cluster is suspended and cannot be selected for data computing.
Suspending: The cluster is being suspended and cannot be selected for data computing. This will affect running tasks.
Changing configuration: The cluster is undergoing a configuration change and cannot be selected for data computing.
Isolated: The cluster is isolated due to overdue payments and cannot be selected for data computing.
Isolating: The cluster is being isolated due to overdue payments and cannot be selected for data computing. This will affect running tasks.
Recovering: The cluster is being recovered from the Isolated status to the Running status after the account is topped up. It cannot be selected for data computing.
Purchasing Private Data Engine
Last updated:2024-07-17 17:55:49
A private data engine in Data Lake Compute supports pay-as-you-go and monthly subscription billing modes. For billing details, see Billing Overview.
Private engine purchase
You can purchase on the Data Lake Compute purchase page or in the console as instructed below:
1. Log in to the Data Lake Compute console and select the service region. You need to have the Tencent Cloud admin or financial collaborator permission.
2. Click Data engine on the left sidebar to enter the data engine management page.
3. Click Create resource in the top-left corner to enter the Resource configuration page. Configure the resource as needed and view the estimated price.
4. Confirm the price and make the purchase.
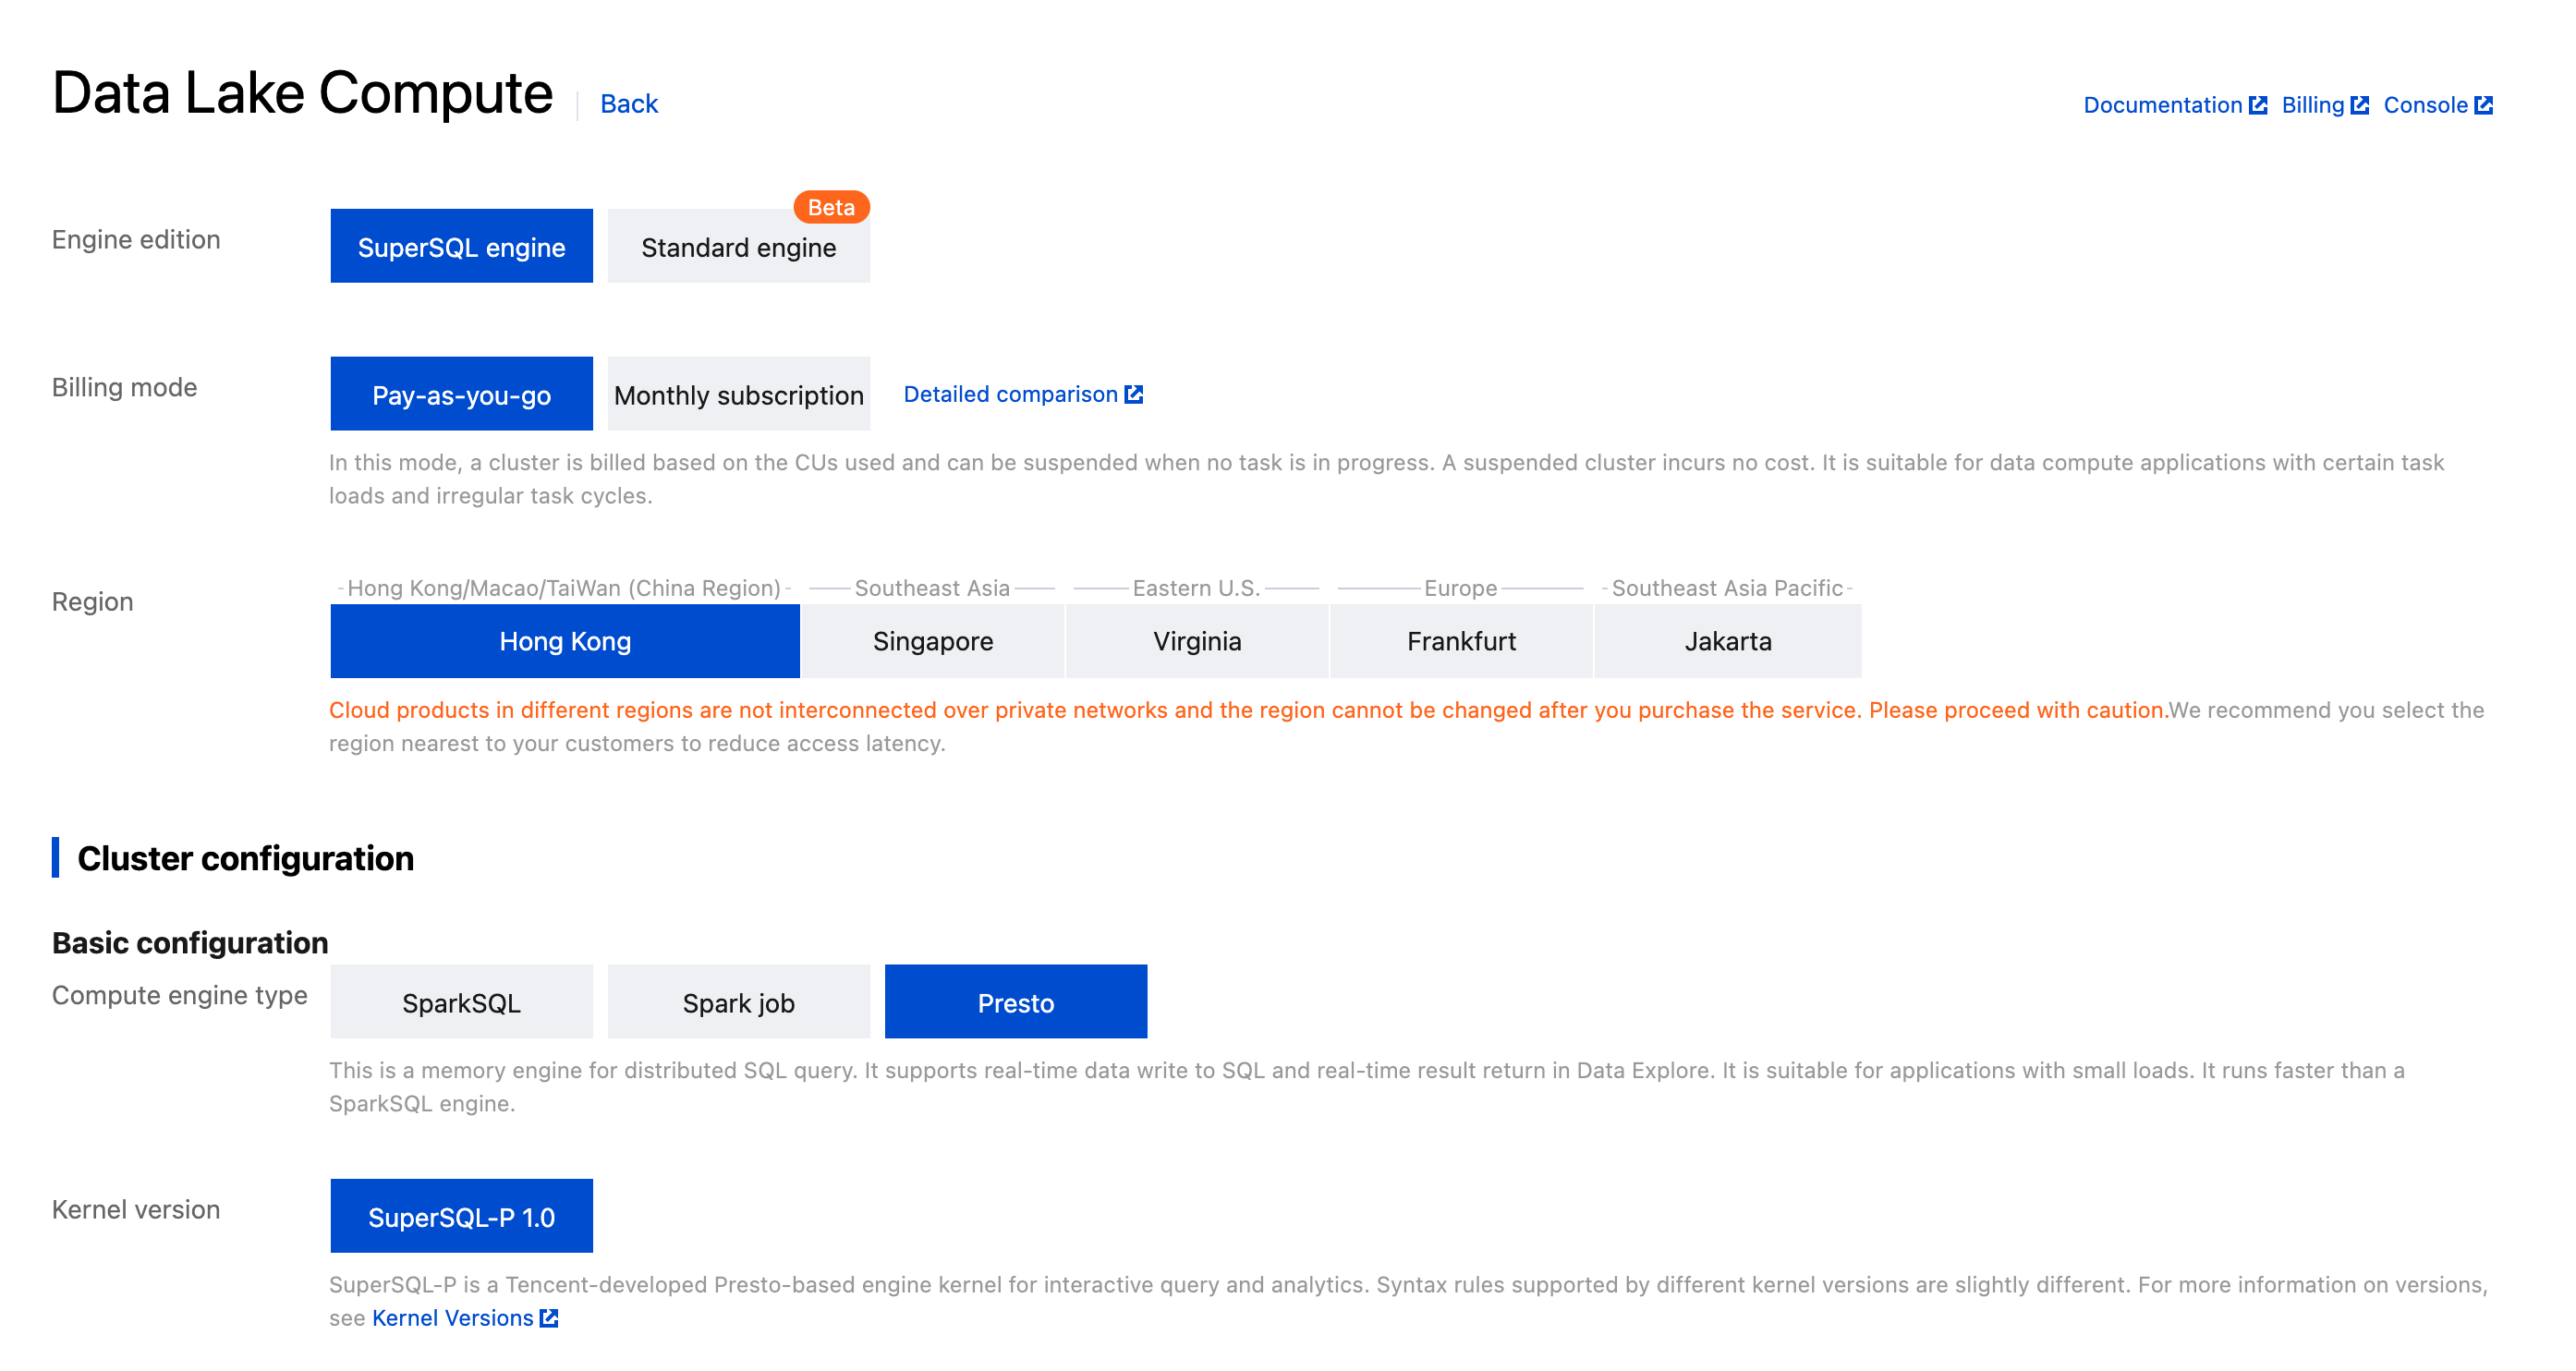
Configuration parameter description:
Region: Cloud products in different regions are not interconnected over private networks and the region cannot be changed after you purchase the service. Proceed with caution.
Compute engine: Presto and Spark engines are supported. Note that the engine cannot be changed once purchased. Presto is suitable for faster interactive query and analysis and multi-source federated query, while Spark is suitable for more stable offline tasks with large data volumes.
Cluster spec: Cluster specification is measured in CU. 1 CU equals to 1 CPU core and 4 GB memory of compute resources. The specification determines the amount of compute resources during task execution and can be purchased as needed.
Note:
If you need more than 152 CUs, submit a ticket for assistance.
Min cluster count: Set the minimum number of clusters during cluster start or resident resources in a monthly subscribed cluster. Multiple clusters can deliver a higher concurrency.
Max cluster count: Set the maximum number of clusters for elastic scaling. If it is the same as the minimum cluster count, elastic scaling is not enabled for the cluster.
Auto-start: If it is enabled, a suspended data engine will be automatically started after receiving a task request.
Note:
As pay-as-you-go resources are not reserved, it is possible that they cannot be started right away. If you need resident and stable compute resources, purchase a monthly subscribed data engine instead.
Suspension policy: Configure the suspension method of a pay-as-you-go data engine. Automatic suspension and scheduled suspension are supported. A suspended pay-as-you-go data engine will not incur fees.
Auto-suspension: The data engine will be automatically switched to the Suspended status after it has been idle for a certain period of time.
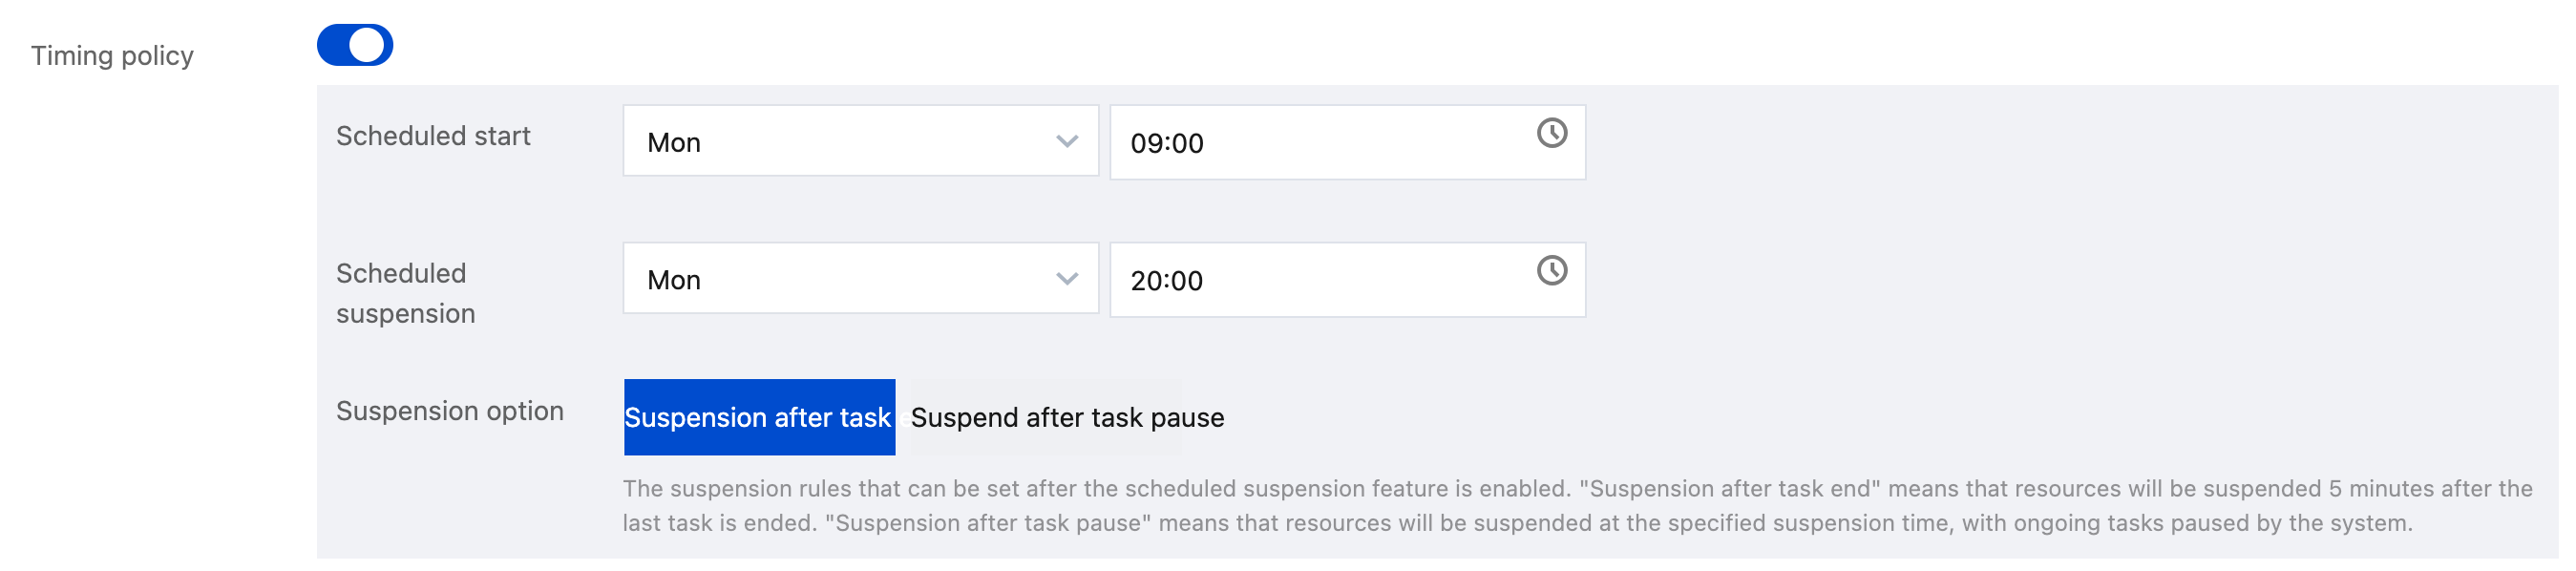
Timing policy: You can configure scheduled start and suspension policies by week. The system will start or suspend clusters regularly as configured.
Suspension after task end: After the specified time elapses, if a task is running, the system will automatically suspend the data engine within five minutes after the task ends.
Suspension after task pause: After the specified time elapses, if a task is running, the system will pause the task and suspend the data engine immediately.
Advanced configuration: If you need to use federated query, configure the IP range in the advanced configuration.
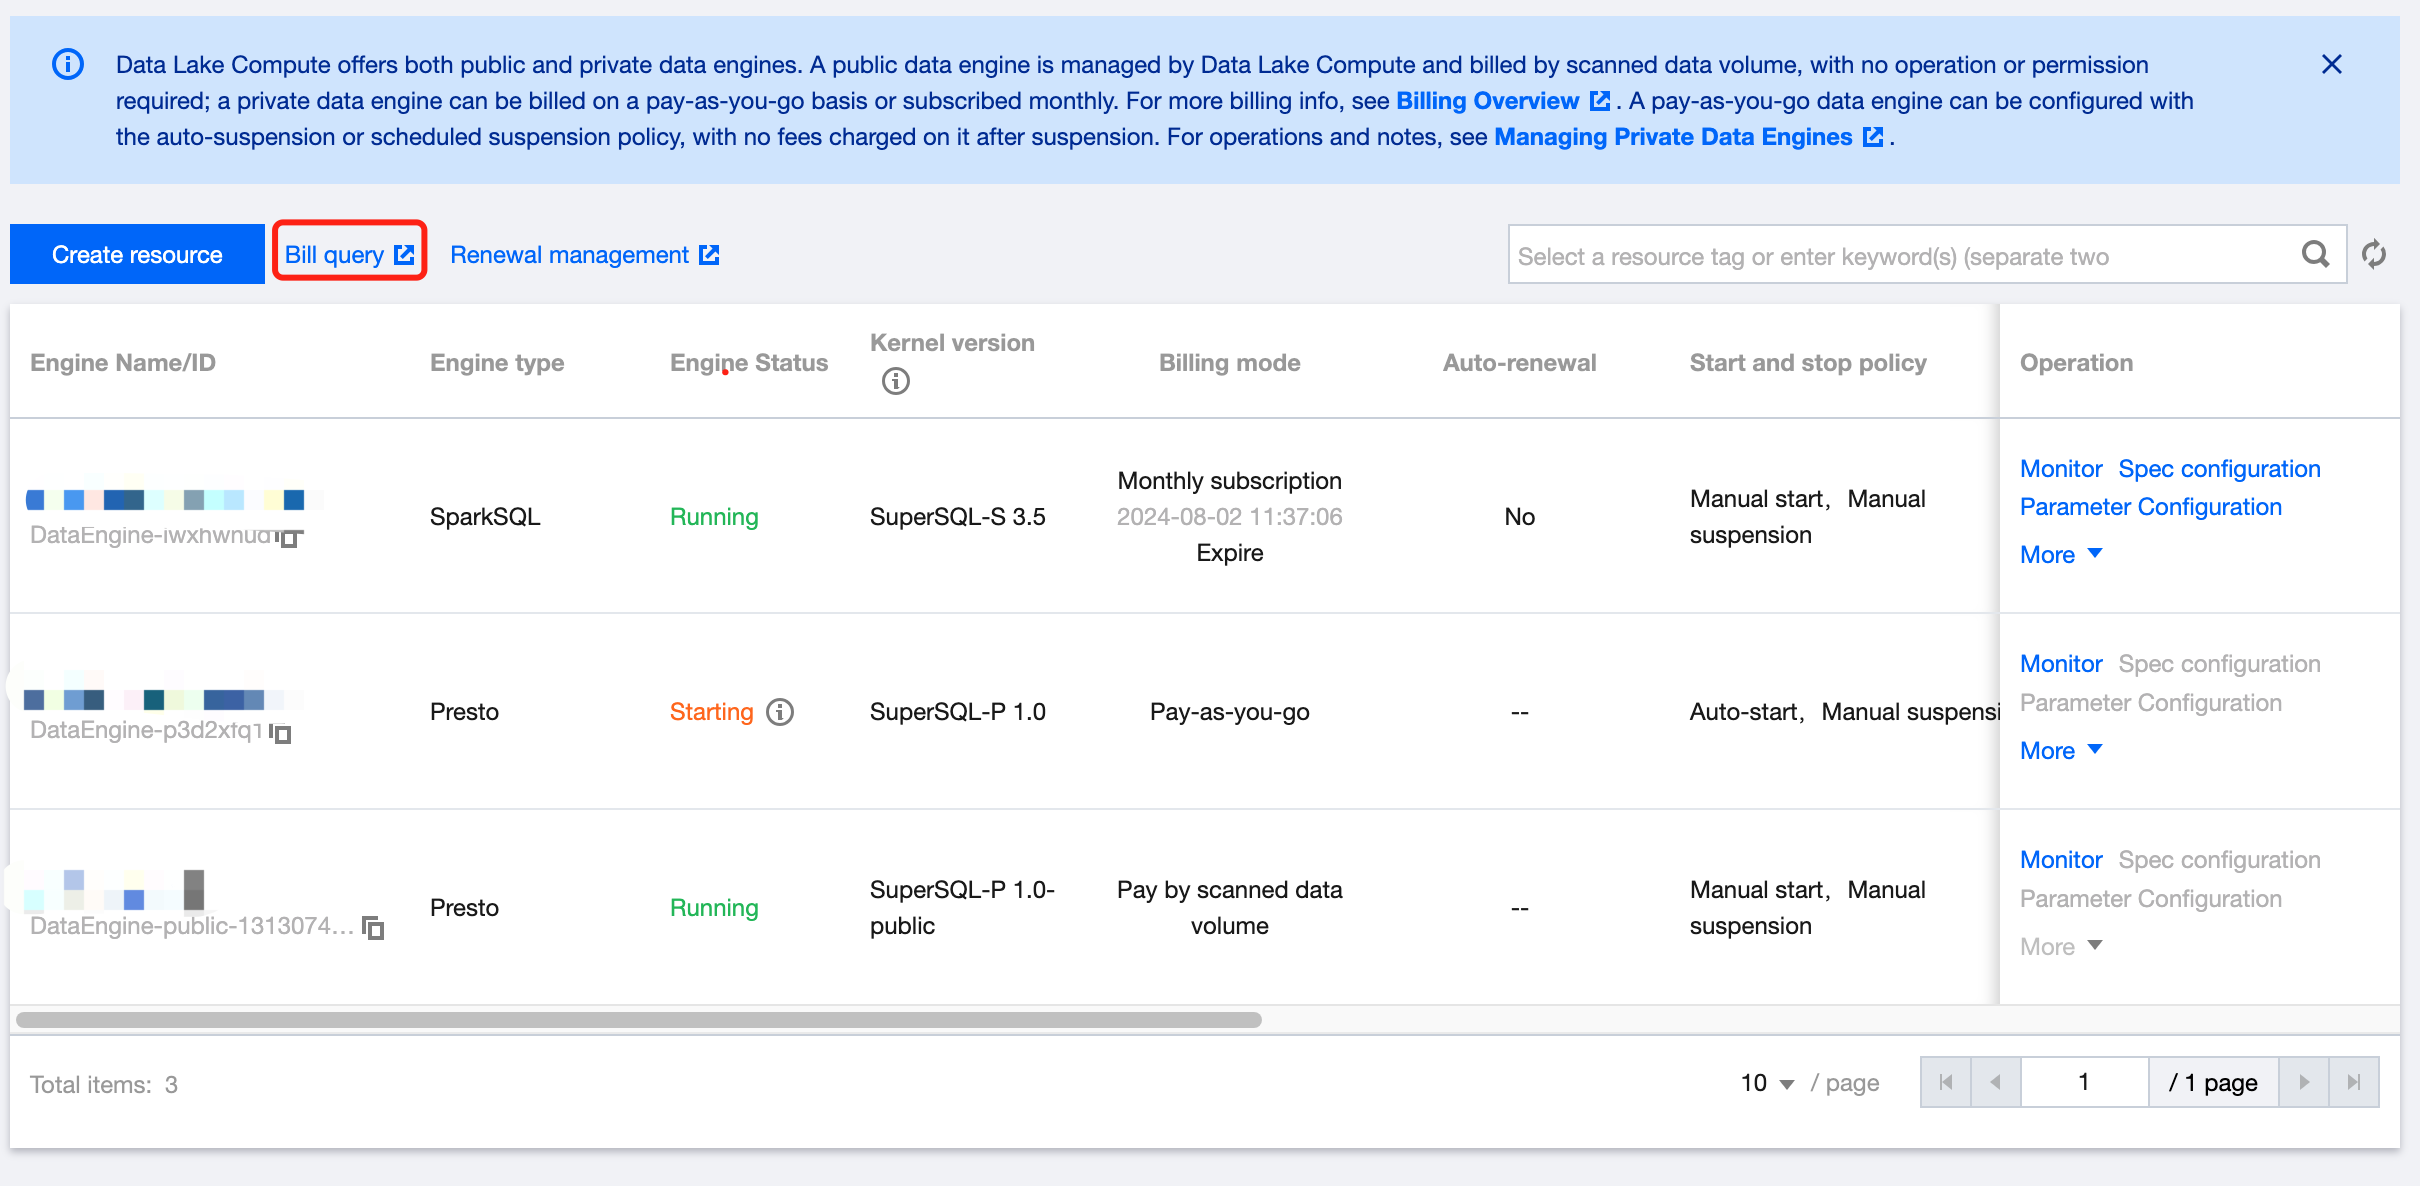
You can query bills in the Data Lake Compute console in the following steps:
1. Log in to the Data Lake Compute console and select the service region. You need to have the Tencent Cloud admin or financial collaborator permission.
2. Click Data engine on the left sidebar to enter the data engine management page.
3. Click Bill query to view the detailed bill and settlement information (the financial collaborator permission is required).
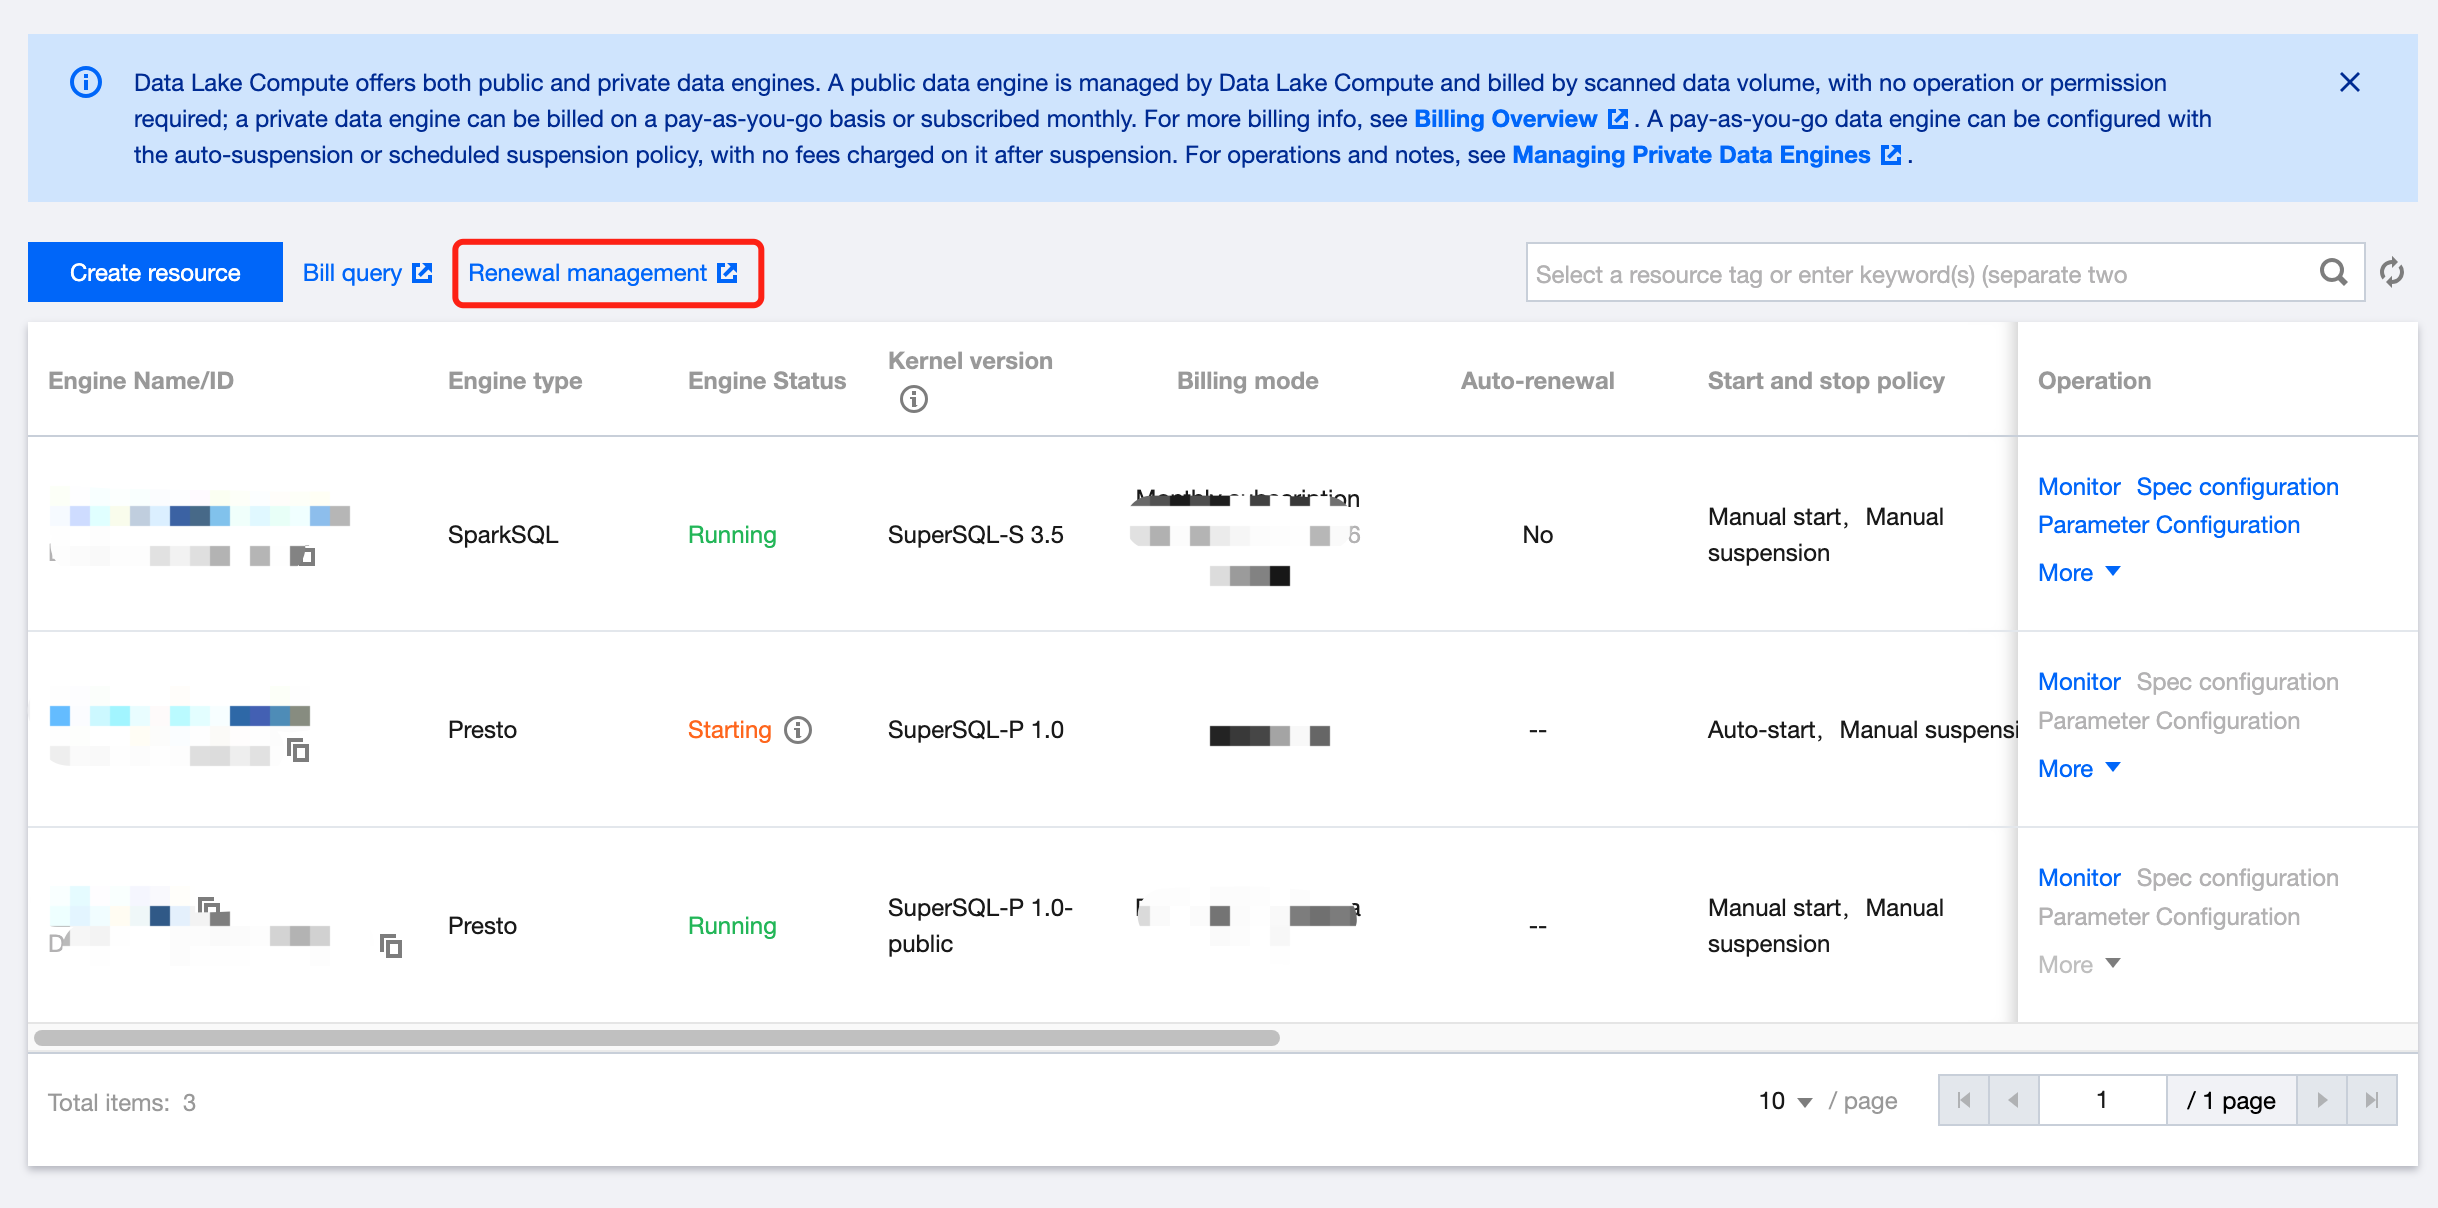
Renewal management
For a monthly subscribed private data engine, you can perform renewal and other operations in the Data Lake Compute console > Renewal management > Resource management in the following steps:
1. Log in to the Data Lake Compute console and select the service region. You need to have the Tencent Cloud admin or financial collaborator permission.
2. Click Data engine on the left sidebar to enter the data engine management page.
3. Click Renewal management to enter the resource list and renew resources (the financial collaborator permission is required).
Renewing SuperSQL Engine
Last updated:2024-07-31 17:55:25
You can renew a monthly subscribed data engine that has not expired or is isolated in the Data Lake Compute console.
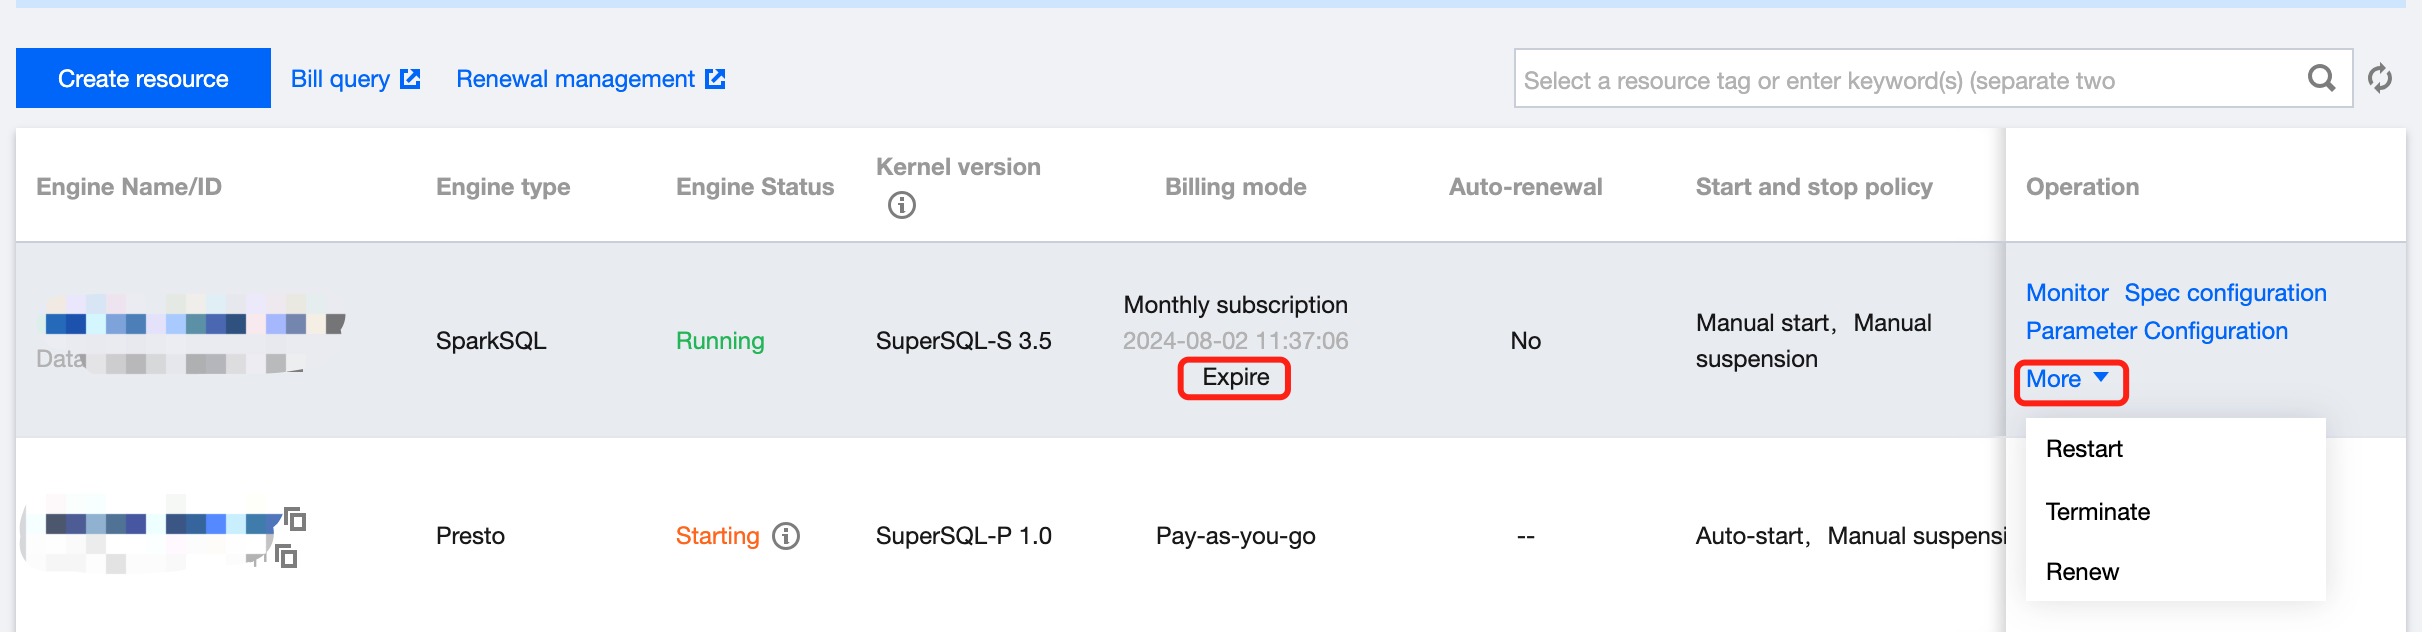
1. Log in to the Data Lake Compute console and select the service region. You need to have the Tencent Cloud admin or financial collaborator permission.
2. Click Data engine on the left sidebar to enter the data engine management page.
3. Find the target data engine and click More > Renew. You can also renew resources that will expire soon (in seven days) by clicking Renew next to the expiration time.
4. Check the renewal term and price and click Confirm. The renewal will be completed after the order is confirmed and paid.
Note:
The billing cycle of a data engine that is renewed from the isolated status will start from the expiration date of the previous cycle.
Managing Private Data Engine
Last updated:2025-12-02 16:27:57
Note:
You don't need to manage the public engine, as it is managed by Data Lake Compute in a unified manner.
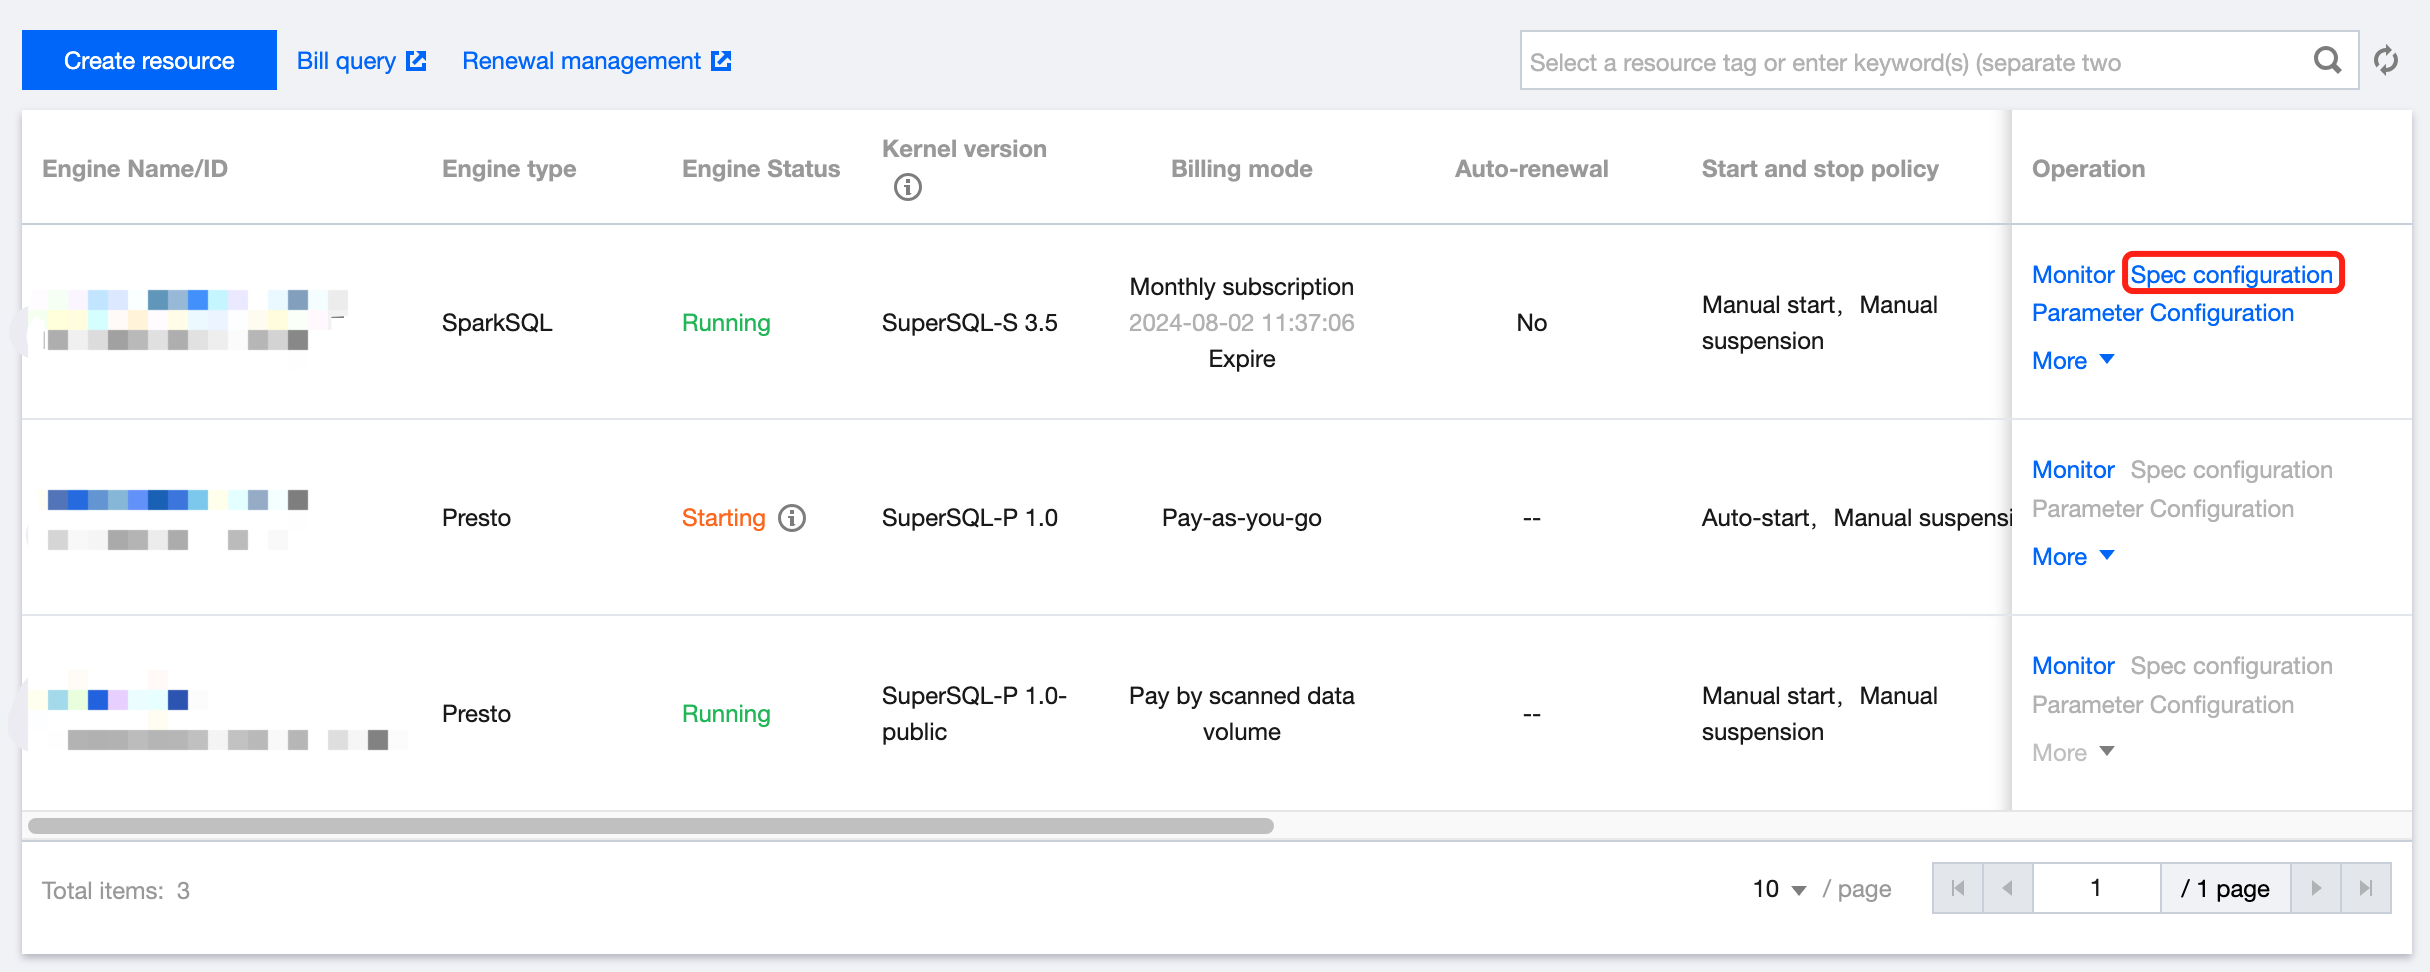
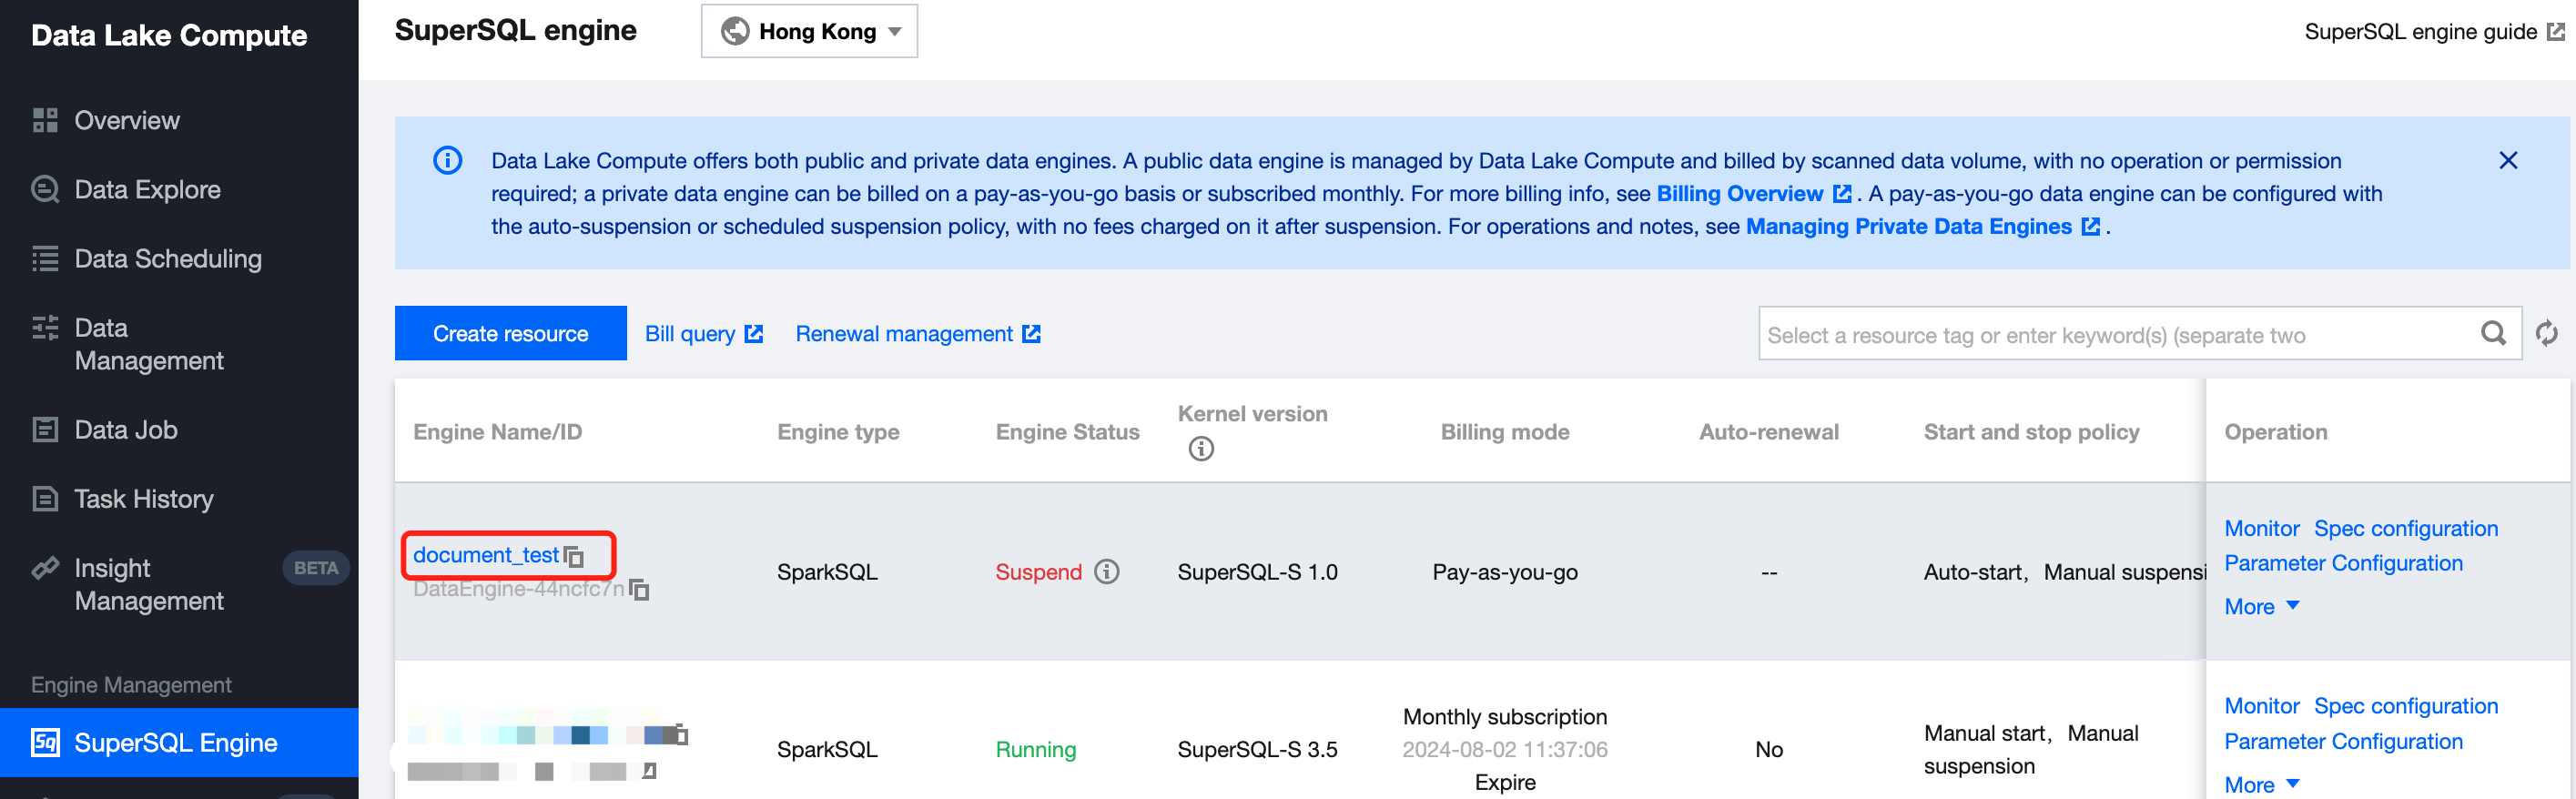
1. Log in to the Data Lake Compute console and select the service region. You need to have the Tencent Cloud admin or financial collaborator permission.
2. Click SuperSQL Engine on the left sidebar to enter the data engine management page.
3. Find the target private engine and click Specconfiguration on the right to enter the configuration modification page, where you can modify the cluster specification and elastic scaling policy.
4. After making changes, click Save to submit the order and make the payment.
Option 2. Data engine details
1. Log in to the Data Lake Compute console and select the service region. You need to have the Tencent Cloud admin or financial collaborator permission.
2. Click SuperSQL Engine on the left sidebar to enter the data engine management page.
3. Locate the private engine that needs to be modified in the SuperSQL Engine, and click the engine name to go to the engine details page. Hover the mouse over the More option in the upper-right corner of the configuration information, and click Scale Configuration Change from the dropdown menu to modify the cluster specifications and scaling policies.
4. Adjust the parameters as needed and click Save.
Modifying the private engine information
1. Log in to the Data Lake Compute console and select the service region. You need to have the Tencent Cloud admin permission.
2. Click SuperSQL Engine on the left sidebar to enter the data engine management page.
3. Locate the private engine that needs to be modified in the data engine, and click the engine name to go to the engine details page. In basic information, the DescriptionInformation is editable. Hover the mouse over the More option in the top-right corner of the configuration information, and click Startup/SuspensionPolicyConfigurations from the dropdown menu to modify the automatic startup and suspension policies.
Note:
Suspension policy: It supports configurations of suspension methods for the pay-as-you-go SuperSQL Engine, including automatic and scheduled suspension policies. No fees will be incurred after suspending a pay-as-you-go engine.
Automatic suspension: The SuperSQL engine will automatically switch to the paused state after 15 minutes of no tasks.
Scheduled policy: You can configure weekly scheduled startup and suspension policies. The system will periodically start and suspend clusters according to the configuration rules.
Suspend after task ends: If the SuperSQL Engine has tasks in progress at the specified time, the system will automatically suspend the engine within 5 minutes after the tasks are completed.
Suspend after automatic pause: If the SuperSQL Engine has tasks in progress at the specified time, the system will pause the tasks and immediately suspend the engine.
4. Adjust the parameters as needed and click Save.
Managing the Startup and Suspension Policies
This feature supports configurations of startup and suspension policies for pay-as-you-go exclusive data engines to facilitate management and cost control.
Note:
Pay-as-you-go data engines will generate fees if not suspended. Suspend unused data engines promptly.
Startup policy: It supports configurations of startup methods for a pay-as-you-go SuperSQL Engine, including automatic startup, manual startup, and scheduled startup.
Automatic startup: After the configuration, if the data engine is in a suspended state, it will automatically start when a task is submitted to it.
Manual startup: After the configuration, if the data engine is in a suspended state, you need to manually start the data engine before processing data tasks.
Scheduled startup: You can configure weekly scheduled startup policies. The system will periodically start clusters according to the configuration rules.
Suspension policy: It supports configurations of suspension methods for pay-as-you-go data engines, including automatic and scheduled suspension policies. No fees will be incurred after suspending a pay-as-you-go SuperSQL engine.
Automatic suspension: After the configuration, the SuperSQL engine defaults to switching to a suspended state 10 minutes after task completion. The trigger time can also be configured.
Periodic policy - You can configure weekly periodic start and suspension policies. The system starts and suspends the cluster periodically based on the configuration rules.
Suspend after Completion: If a task is being executed by the data engine within the specified time, the data engine automatically suspends the task within 5 minutes after the task is completed.
Suspend after Automatic pause: If a task is being executed on the data engine within the specified time, the system suspends the task and immediately suspends the data engine.
Manually suspending/starting a private engine
Note:
Monthly subscribed resources are resident and cannot be suspended.
1. Log in to the Data Lake Compute console and select the service region. You need to have the Tencent Cloud admin permission.
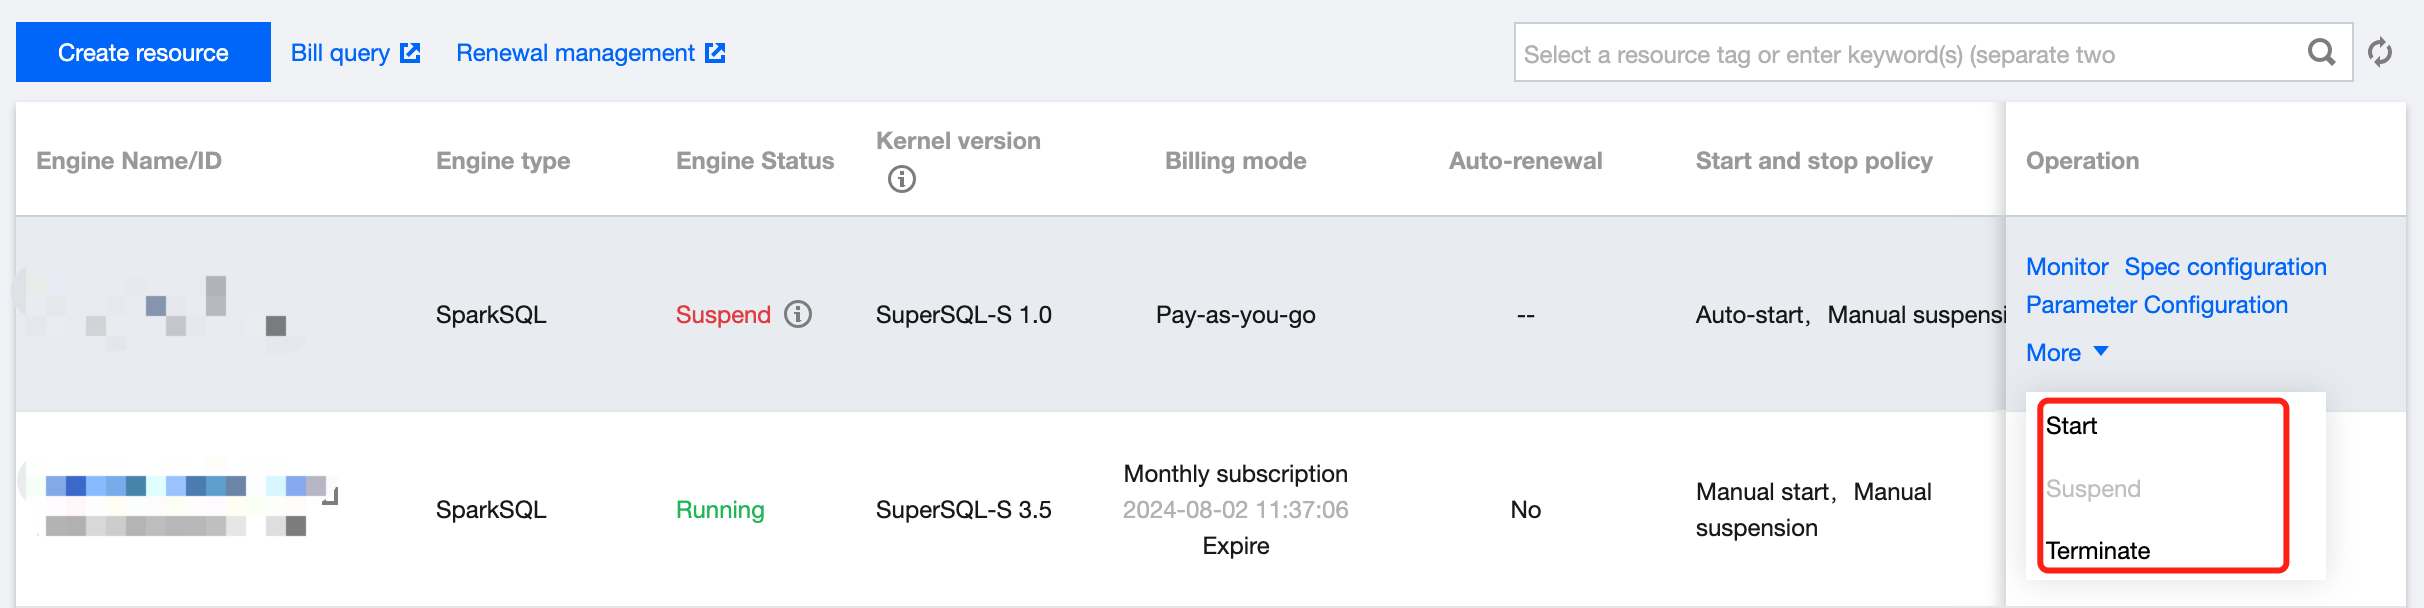
2. Click SuperSQL Engine on the left sidebar to enter the data engine management page.
3. Find the target private engine, click More, and select Start or Suspend in the drop-down list.
Terminating a private engine
You can terminate a data engine that is no longer needed. A monthly subscribed data engine will be returned automatically after termination. For more information, see Refund.
Note:
Note that a pay-as-you-go data engine cannot be recovered once terminated. Proceed with caution.
1. Log in to the Data Lake Compute console and select the service region. You need to have the Tencent Cloud admin permission.
2. Click SuperSQL Engine on the left sidebar to enter the data engine management page.
3. Find the target private engine (only suspended clusters can be terminated), click More, and select Terminate in the drop-down list.
4. Confirm the termination.
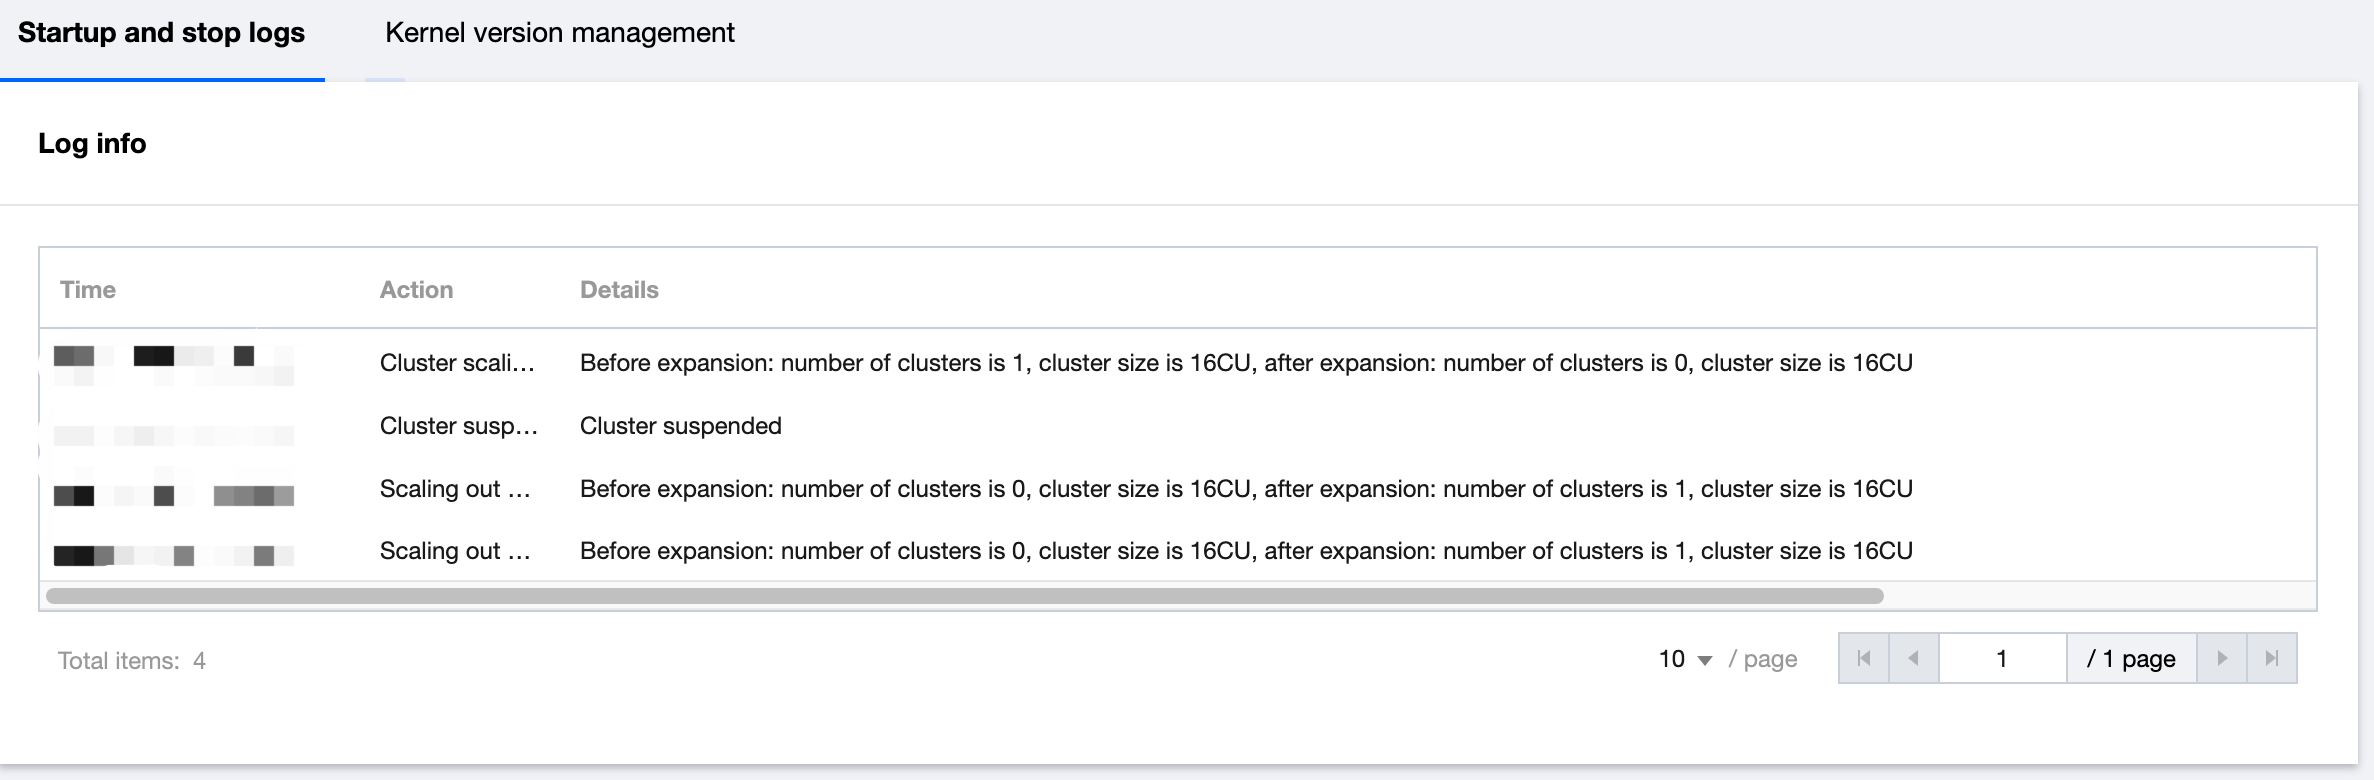
Cluster running logs
Data Lake Compute provides running logs within 14 days for private engines to help you stay informed of the start, suspension, and scaling of clusters. Cluster logs mainly include the following content:
Start time: The time when the cluster starts working.
Suspension time: The time when the cluster stops working.
Scale-out record: The time of the cluster scale-out and the number of added clusters.
Scale-in record: The time of the cluster scale-in and the number of removed clusters.
Engine-Level Parameter Settings
Last updated:2024-09-04 11:22:53
Note:
Currently, only the SparkSQL Engine and Spark Job Engine are supported for engine configuration.
Spark parameters are used to configure and optimize the settings of Apache Spark applications. In a self-built Spark environment, these parameters can be set via command-line options, configuration files, or programmatically. In DLC, you can specify Spark parameters within the SQL and code of the SparkSQL Engine and Spark Job Engine, or you can directly set engine-level parameters. The engine-level Spark parameter configuration is as follows.
Setting Engine-Level Parameters
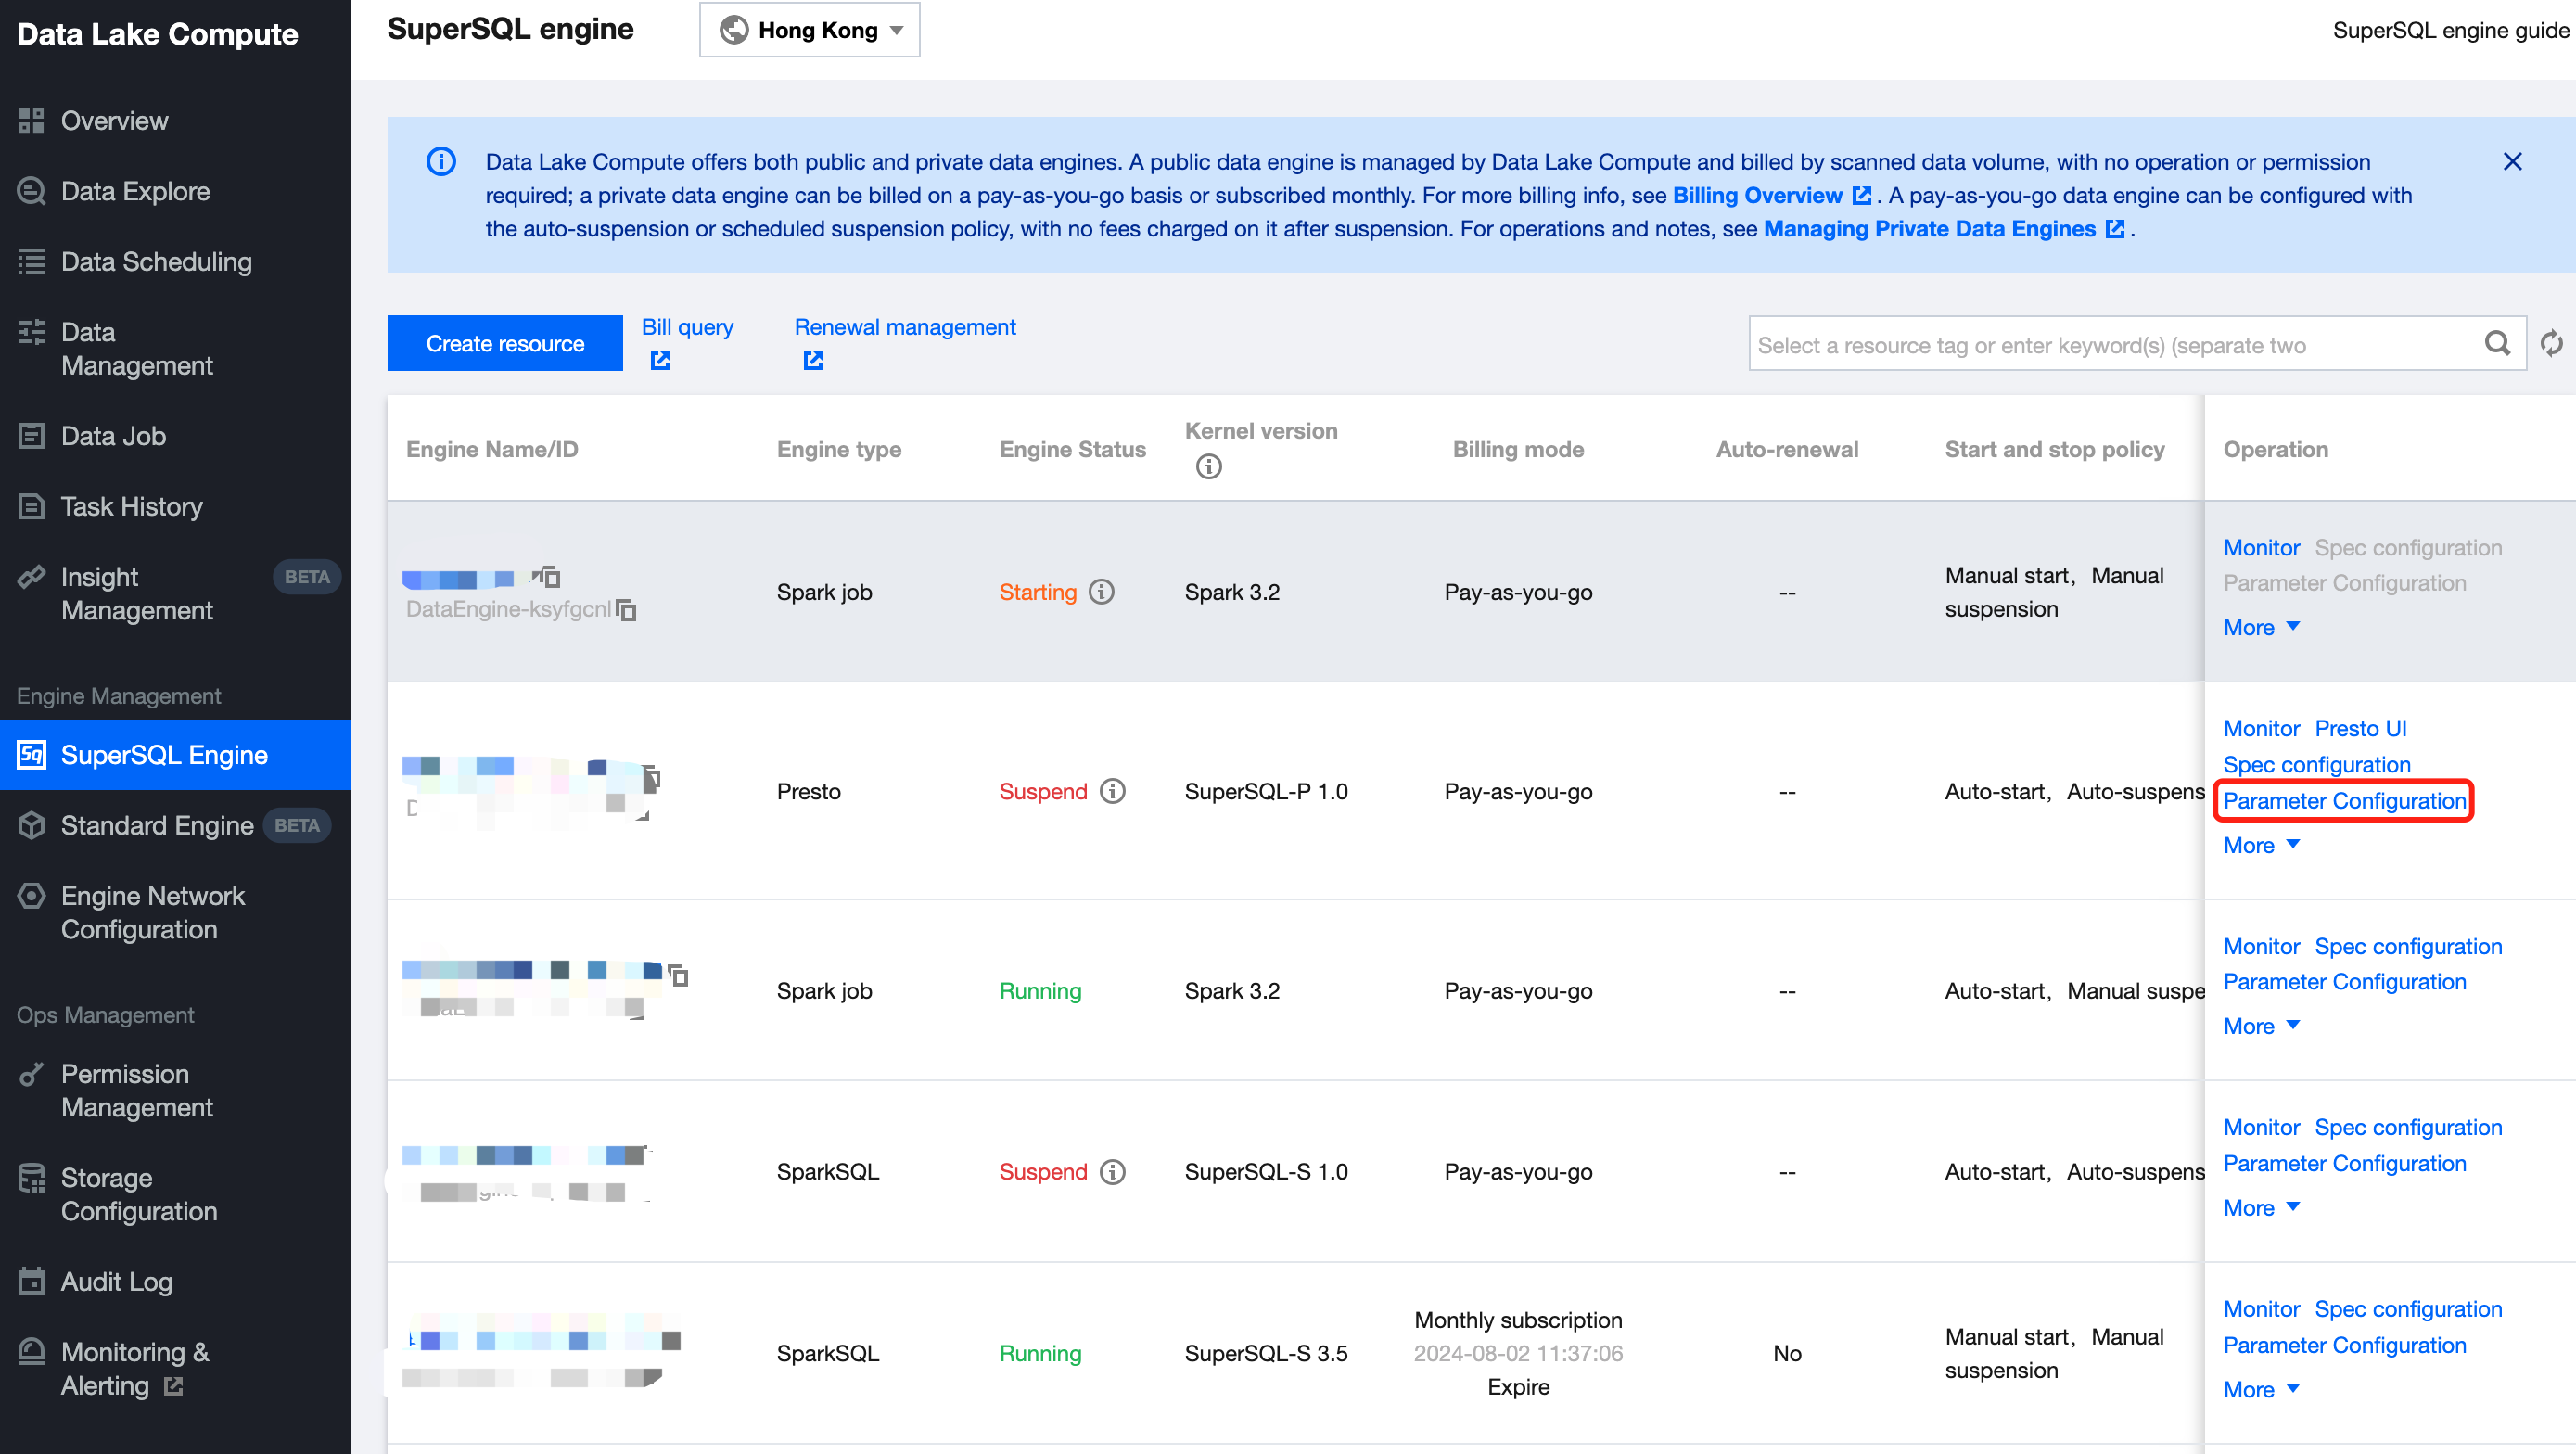
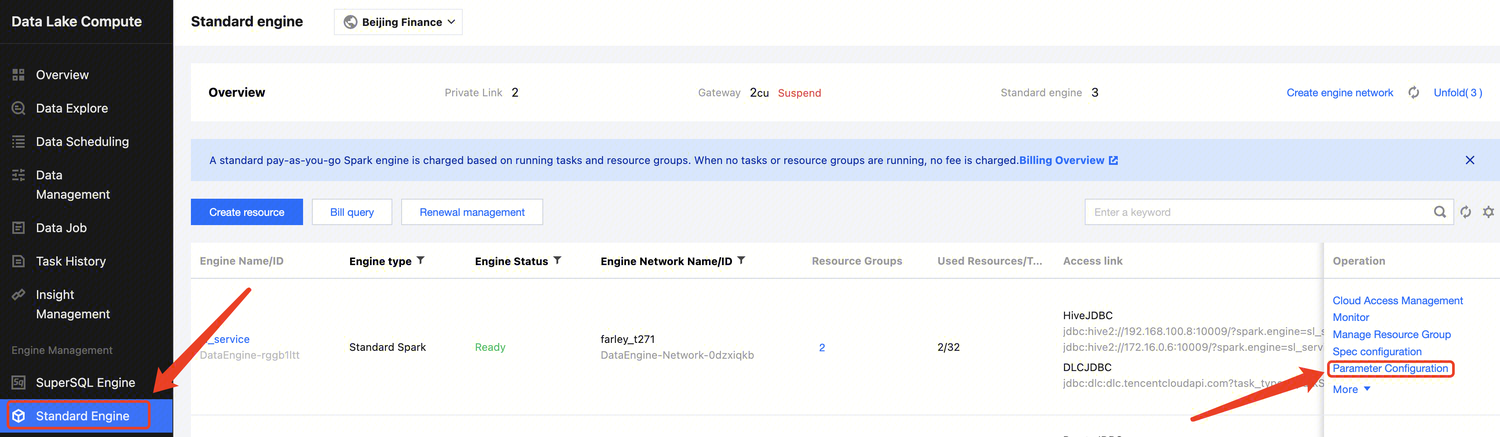
1. Enter the SupersSQL Engine module, click Parameter Configuration, and the engine parameter side window will appear.
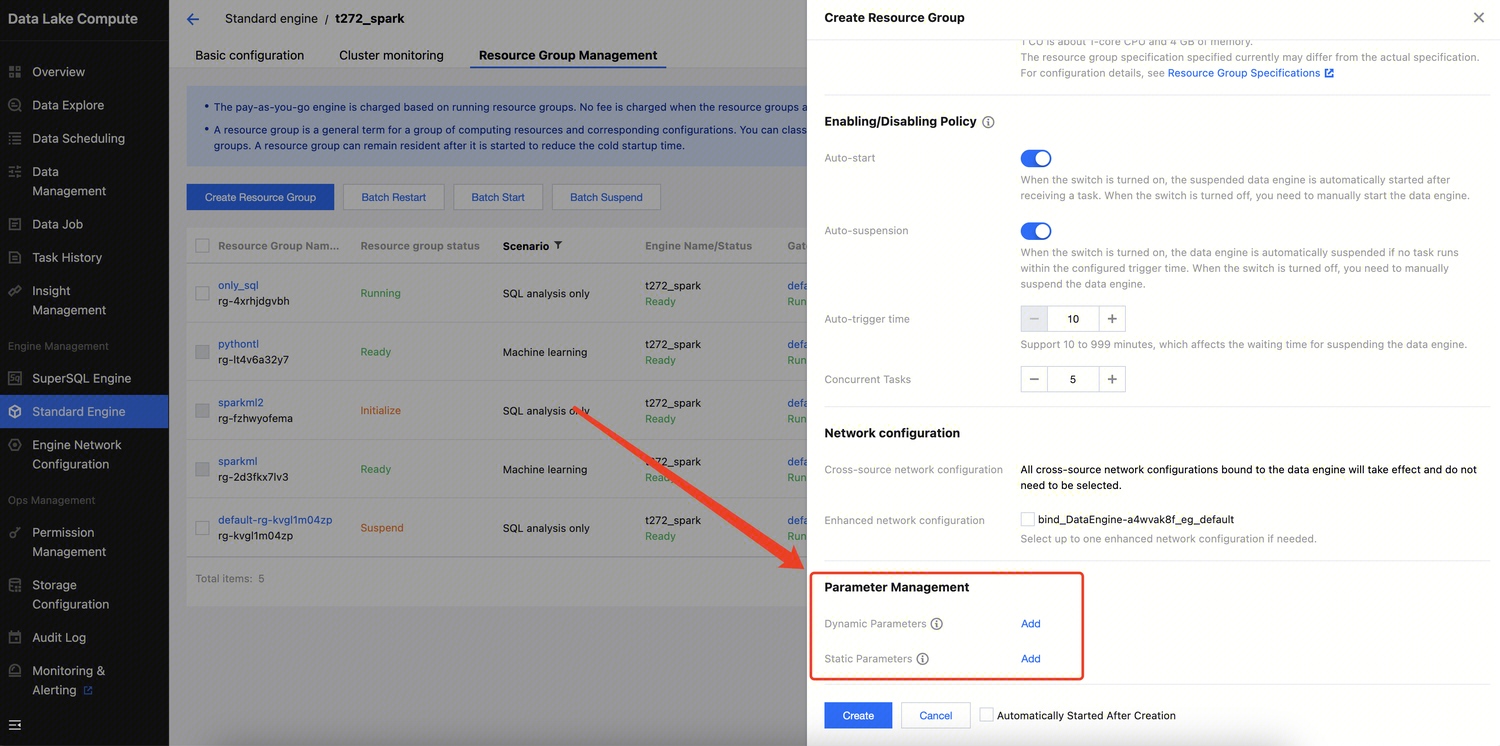
2. Under the Spark Job Engine, you can configure the default resource specifications and parameters for jobs. In the SparkSQL Engine, there's no need to adjust the default resource specifications for jobs.
Using Engine-Level Parameters
Spark Job Engine Using Engine-Level Parameters
There are two entry points for submitting jobs in the Spark Job Engine: Data Job and Data Exploration. Both support the use of engine-level parameters.
When you create a data job, the engine-level parameters and resource configurations are inherited by default. You can override the engine-level parameters using job parameters (--config) and choose whether to inherit the engine-level resource configurations. If the default configuration is selected, the engine-level resource configuration will be used.
When you use the Spark Job Engine to run SQL in Data Exploration, the engine-level parameters and resource configurations are inherited by default. You can override the engine-level parameters using the set command within the SQL, and choose whether to inherit the engine-level resource configurations.
SparkSQL Engine Using Engine-Level Parameters
The SparkSQL Engine does not have engine-level resource parameters, so tasks will use as much of the cluster's resources as possible. Currently, SQL needs to be submitted using the SparkSQL Engine within Data Exploration. When you run SQL in Data Exploration with the SparkSQL Engine, engine-level parameters are inherited by default. You can override these parameters using the set command within the SQL.
Disaster Recovery Cluster
Last updated:2024-07-31 17:47:09
To ensure the stable operation of the compute engine under extreme scenarios, DLC provides an efficient and agile disaster recovery cluster capability. When you need a disaster recovery cluster, you can quickly switch to it to ensure normal service operation. The disaster recovery cluster is only charged during operation, for more details, please see Cost Description.
Operation step
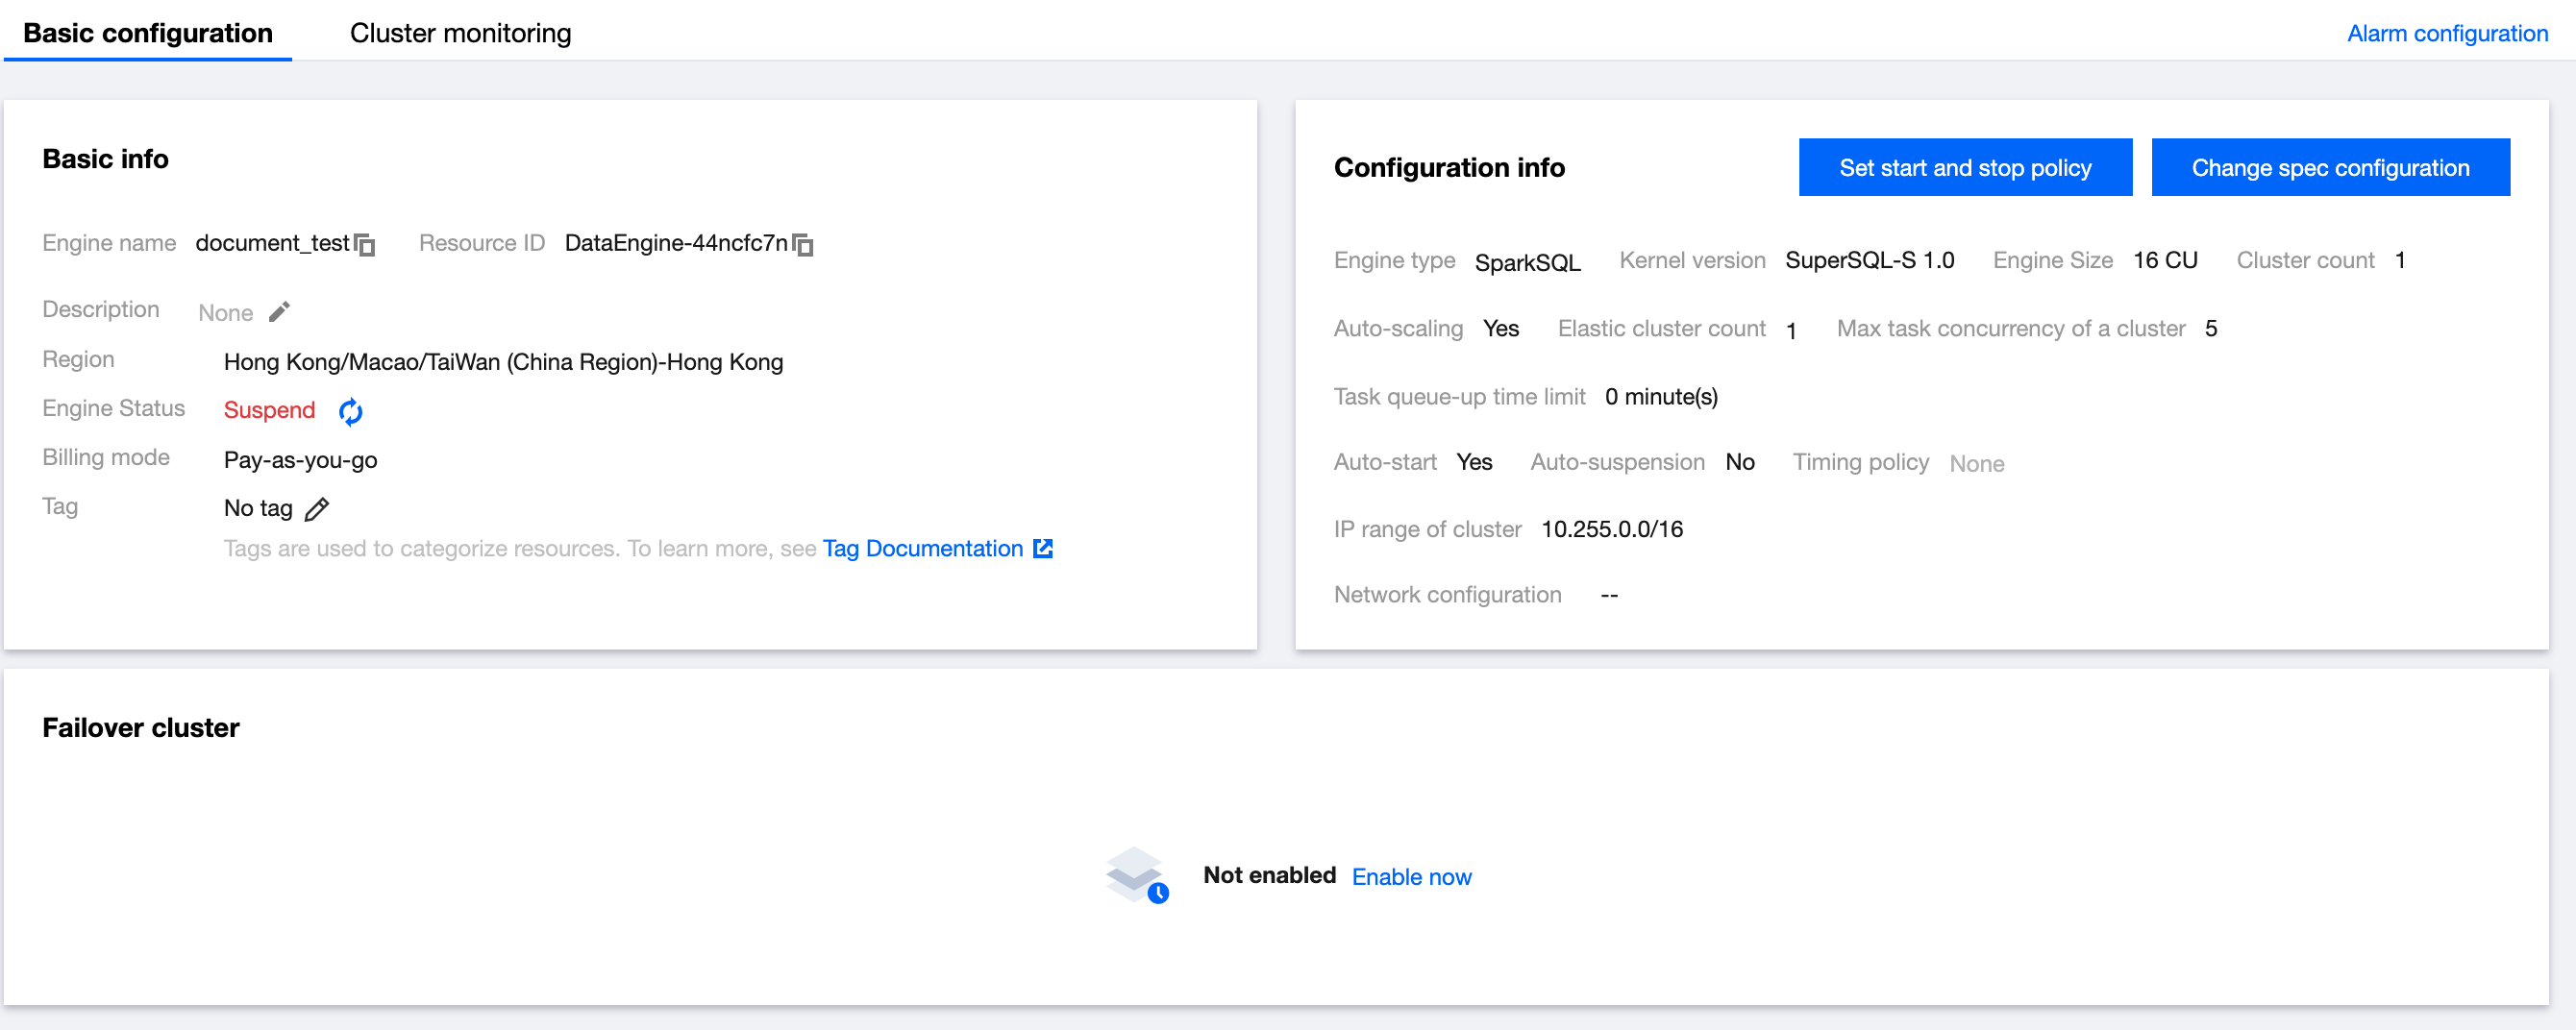
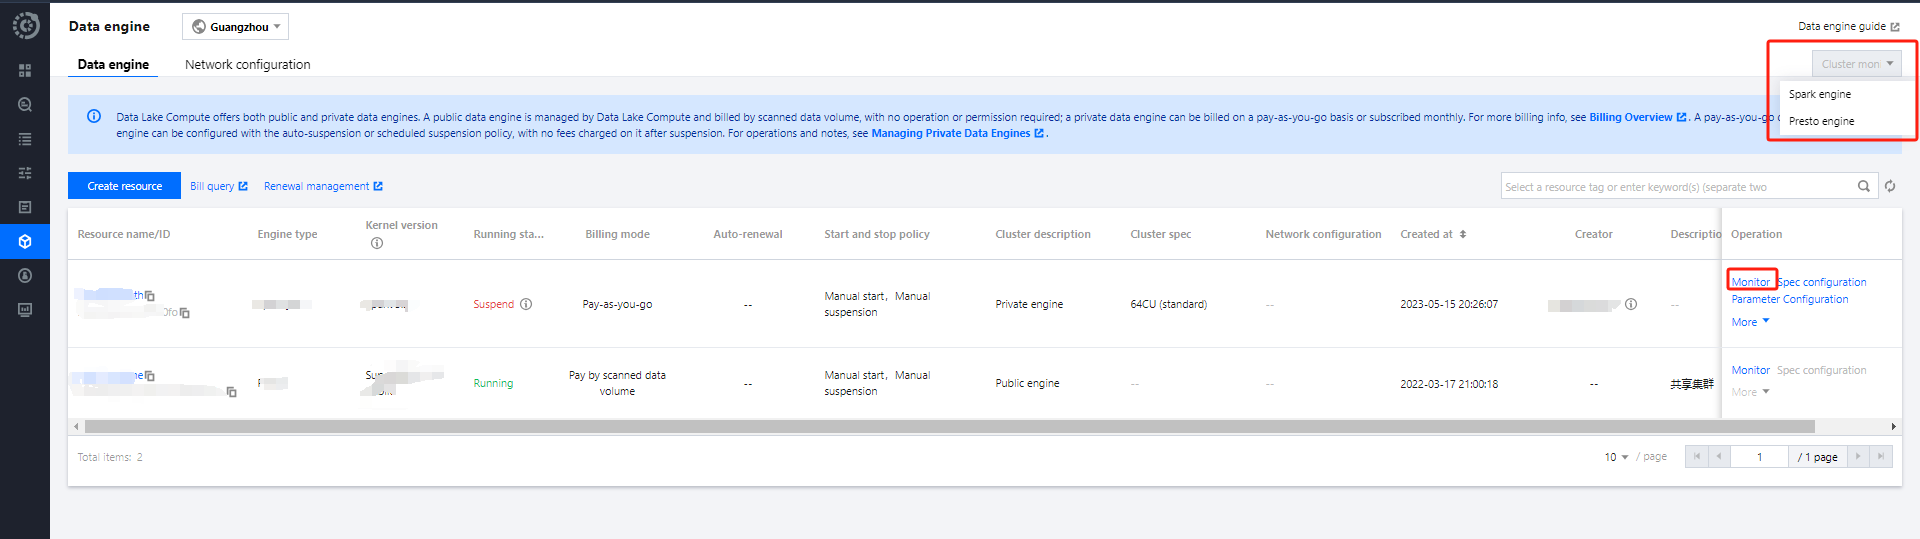
1. Enter the DLC Console, click Data Engine to access the Data Engine Page.
2. Click on the Data Engine Resource Name to enter the Data Engine Detail Page.
3. Click Enable Disaster Recovery Cluster and wait for the disaster recovery cluster to initialize.
4. After the disaster recovery cluster is enabled, in the disaster recovery cluster information, click Switch to Disaster Recovery Cluster to adjust the running cluster to the disaster recovery cluster. Subsequently, jobs directed to this data engine will be submitted to the disaster recovery cluster. The disaster recovery cluster serves as a transition during extreme failures of the data engine.
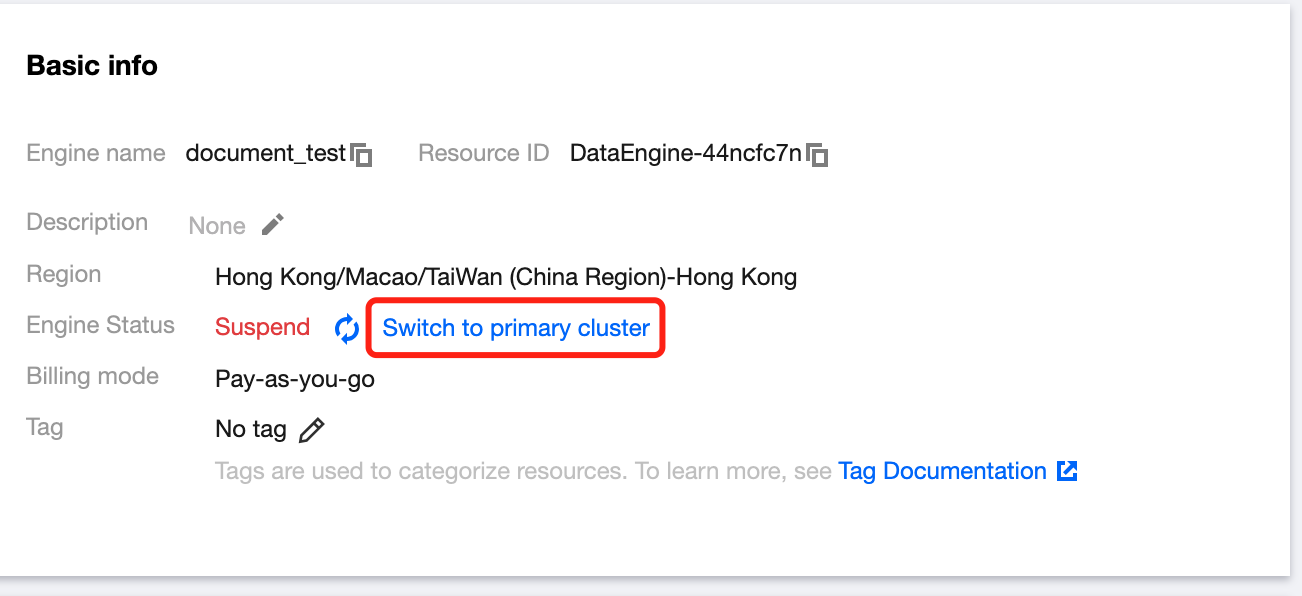
5. Once the extreme failure is resolved, in the basic information of the data engine, click Switch to Primary Cluster, and the disaster recovery cluster will be suspended. Subsequently, jobs directed to this data engine will be submitted to the primary cluster.
Disaster Recovery Cluster Specifications
The disaster recovery cluster always tries to match the specifications of the data engine itself to ensure that the original tasks can transition and run normally. When AS is enabled on the data engine itself, the AS rules of the disaster recovery cluster will be consistent with the data engine. At the same time, to save costs, the disaster recovery cluster always operates on a pay-as-you-go basis.
Note on Fees
There is no charge for enabling the disaster recovery cluster. When switching to the disaster recovery cluster and it is running, charges will be applied according to the pay-as-you-go rates for the same specifications as the data engine.
Example:
1. When the data engine itself is a 16 CU SparkSQL engine with an annual and monthly subscription. After enabling the disaster recovery cluster, it becomes a 16 CU SparkSQL engine on a pay-as-you-go basis, and there is no charge while the disaster recovery cluster is suspended. When users switch to the disaster recovery cluster and it is running, additional charges for the disaster recovery cluster's use of CU duration will apply. For specific fees, please refer to Billing Overview.
2. When the data engine itself is a 16 CU SparkSQL engine on a pay-as-you-go basis. After enabling the disaster recovery cluster, it remains a 16 CU SparkSQL engine on a pay-as-you-go basis, and there is no charge while the disaster recovery cluster is suspended. When users switch to the disaster recovery cluster and it is running, with the primary cluster suspended, only the fees for the disaster recovery cluster's use of CU duration will be charged.
Engine Kernel Version
Last updated:2024-07-31 17:47:29
DLC provides different kernel versions optimized for various use cases, with numerous features and performance enhancements. The available kernel versions are listed below.
If your scenario primarily involves interactive queries, it is recommended to use the Presto engine and SparkSQL engine with the latest kernel versions.
If your scenario primarily involves batch jobs, it is recommended to use the Spark job engine with the Spark 3.2 kernel version.
Engine Type
Kernel Version
Description
Presto
SuperSQL-P 1.0
Based on the native Presto 0.242 version, this implementation supports dynamic data source loading, enhanced Dynamic Filter, Iceberg V2 tables, INSERT OVERWRITE for non-partitioned tables, and execution of Hive UDFs.
SparkSQL
SuperSQL-S 1.0
Based on the native Spark 3.2 version, this implementation supports Iceberg 1.1.0, Hudi 0.12.0, and Adaptive Shuffle Manager.
SuperSQL-S 3.5
Based on the native Spark3.5 version, this implementation supports Iceberg 1.5.0 and Adaptive Shuffle Manager.
The current beta version is backward compatible with various SQL and data governance tasks of SuperSQL-S 1.0, providing a performance improvement of more than 33% over the S1.0 version.
SparkBatch
Spark 3.5
Based on the native Spark3.5 version, this implementation supports Iceberg 1.5.0, Python3 and Adaptive Shuffle Manager.
The current beta version is backward compatible with various SQL, jar, pyspark and data governance tasks of Spark 3.2, with a performance improvement of more than 33% over Spark 3.2.
Spark 3.2
Based on the original Spark3.2 version, this implementation supports Iceberg 1.1.0, Hudi 0.12.0, Python3, and Adaptive Shuffle Manager.
Spark 2.4
Based on the native Spark2.4 version, this implementation supports Iceberg 0.13.1, Python2, and Python3.
Engine Network Configuration
Last updated:2024-07-31 17:47:50
DLC supports configuring the network (VPC) for the data engine, facilitating the management of data engine access to different data source networks.
Network Configuration Type
Based on different business scenarios, Data Lake Computing offers two types of network configurations.
Enhanced Network Configuration: Suitable for situations requiring high-speed, stable access to data within a single VPC.
Caution
Data engines of non-Spark job types can only be bound to one Enhanced Network Configuration.
Cross-origin Network Configuration: Suitable for cross-origin federated data queries requiring access to multiple VPCs. A data engine can be bound to multiple Cross-origin Network Configurations.
Network Configuration Status
Initial: The network configuration is being initialized, and the network is not yet effective.
Success: The network configuration is effective for the bound engine.
Failure: Network configuration failed, it can be deleted and reconfigured.
Network Configuration Security Policies
If you have configured a Security Group Policy for the VPC, inbound rules need to be added for different types of network configurations.
Enhanced Network: In the Security Group, add inbound rules for the IP range of the VPC where the data source is located.
Cross-origin Network: In the Security Group, add inbound rules for the IP range where the network configuration's bound engine is located.
Create Network Configuration
1. log in to DLC console, select the service region.
2. Access Engine Management> Engine Network Configuration through the left navigation menu.
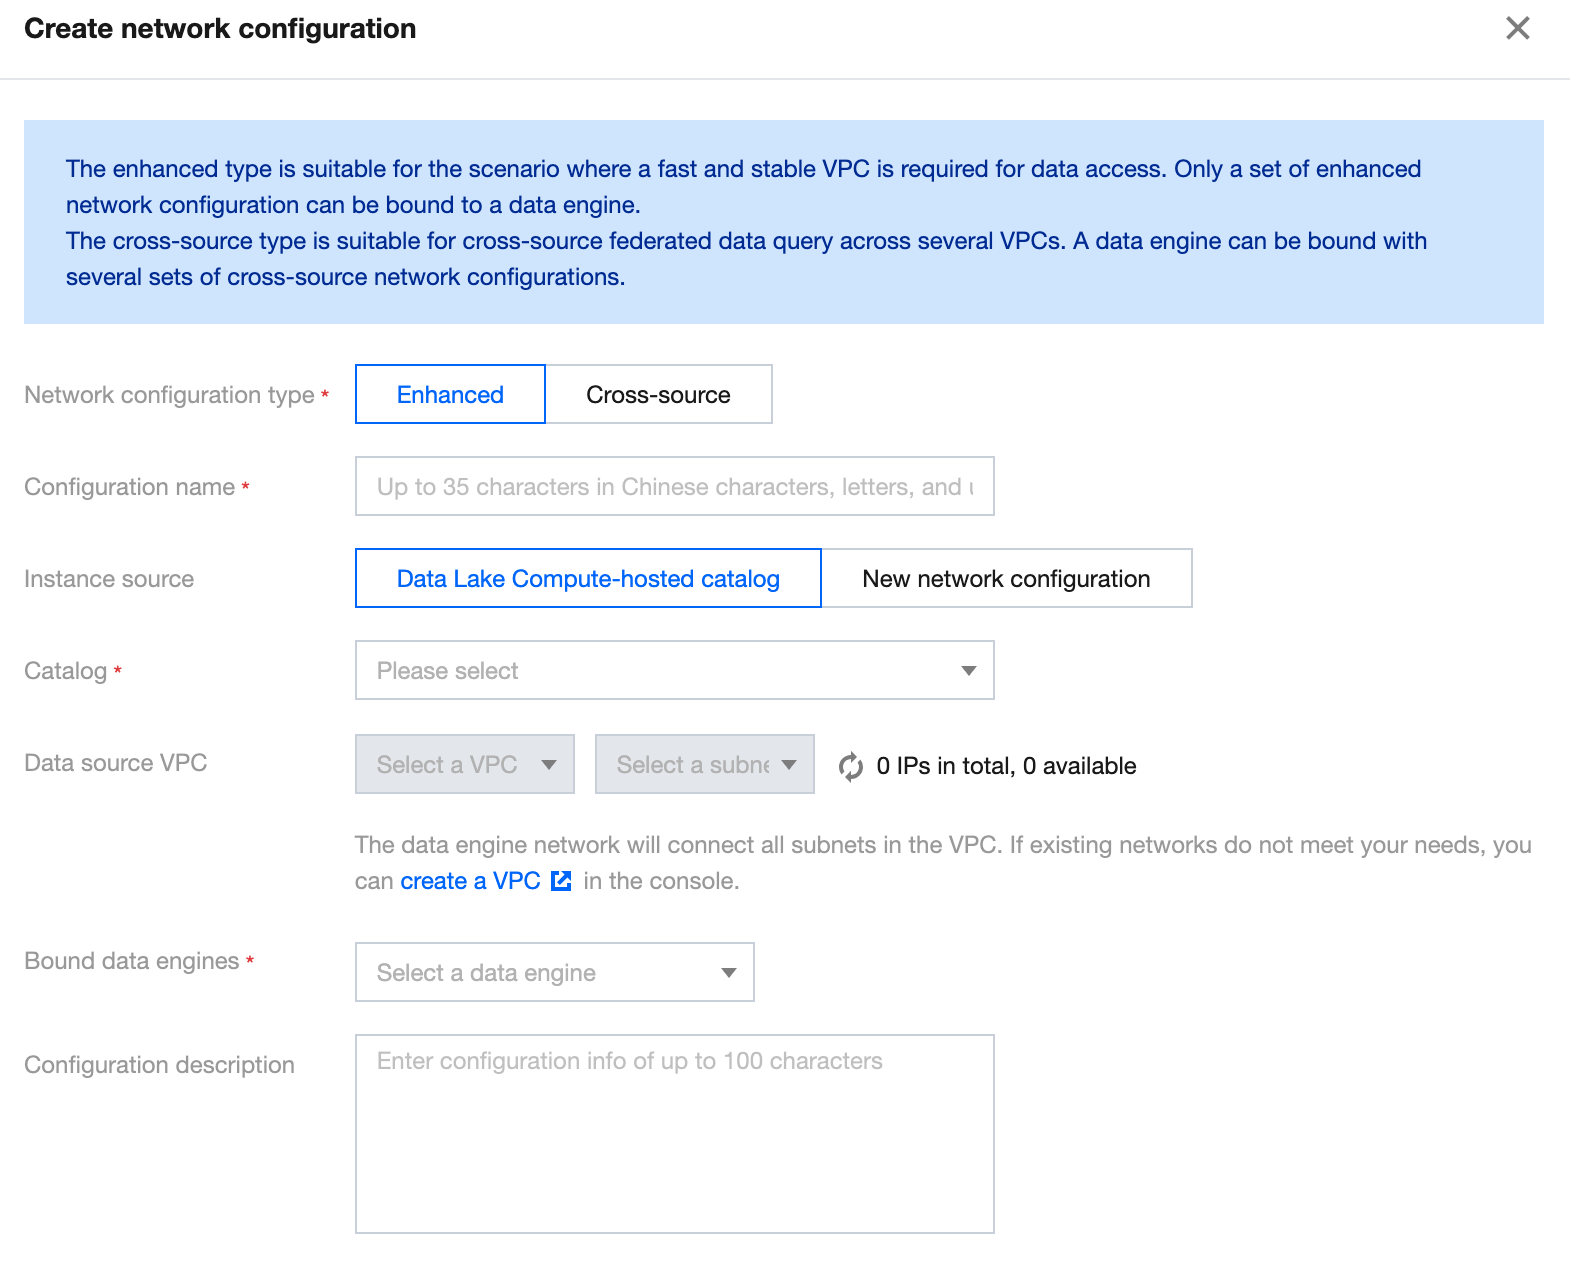
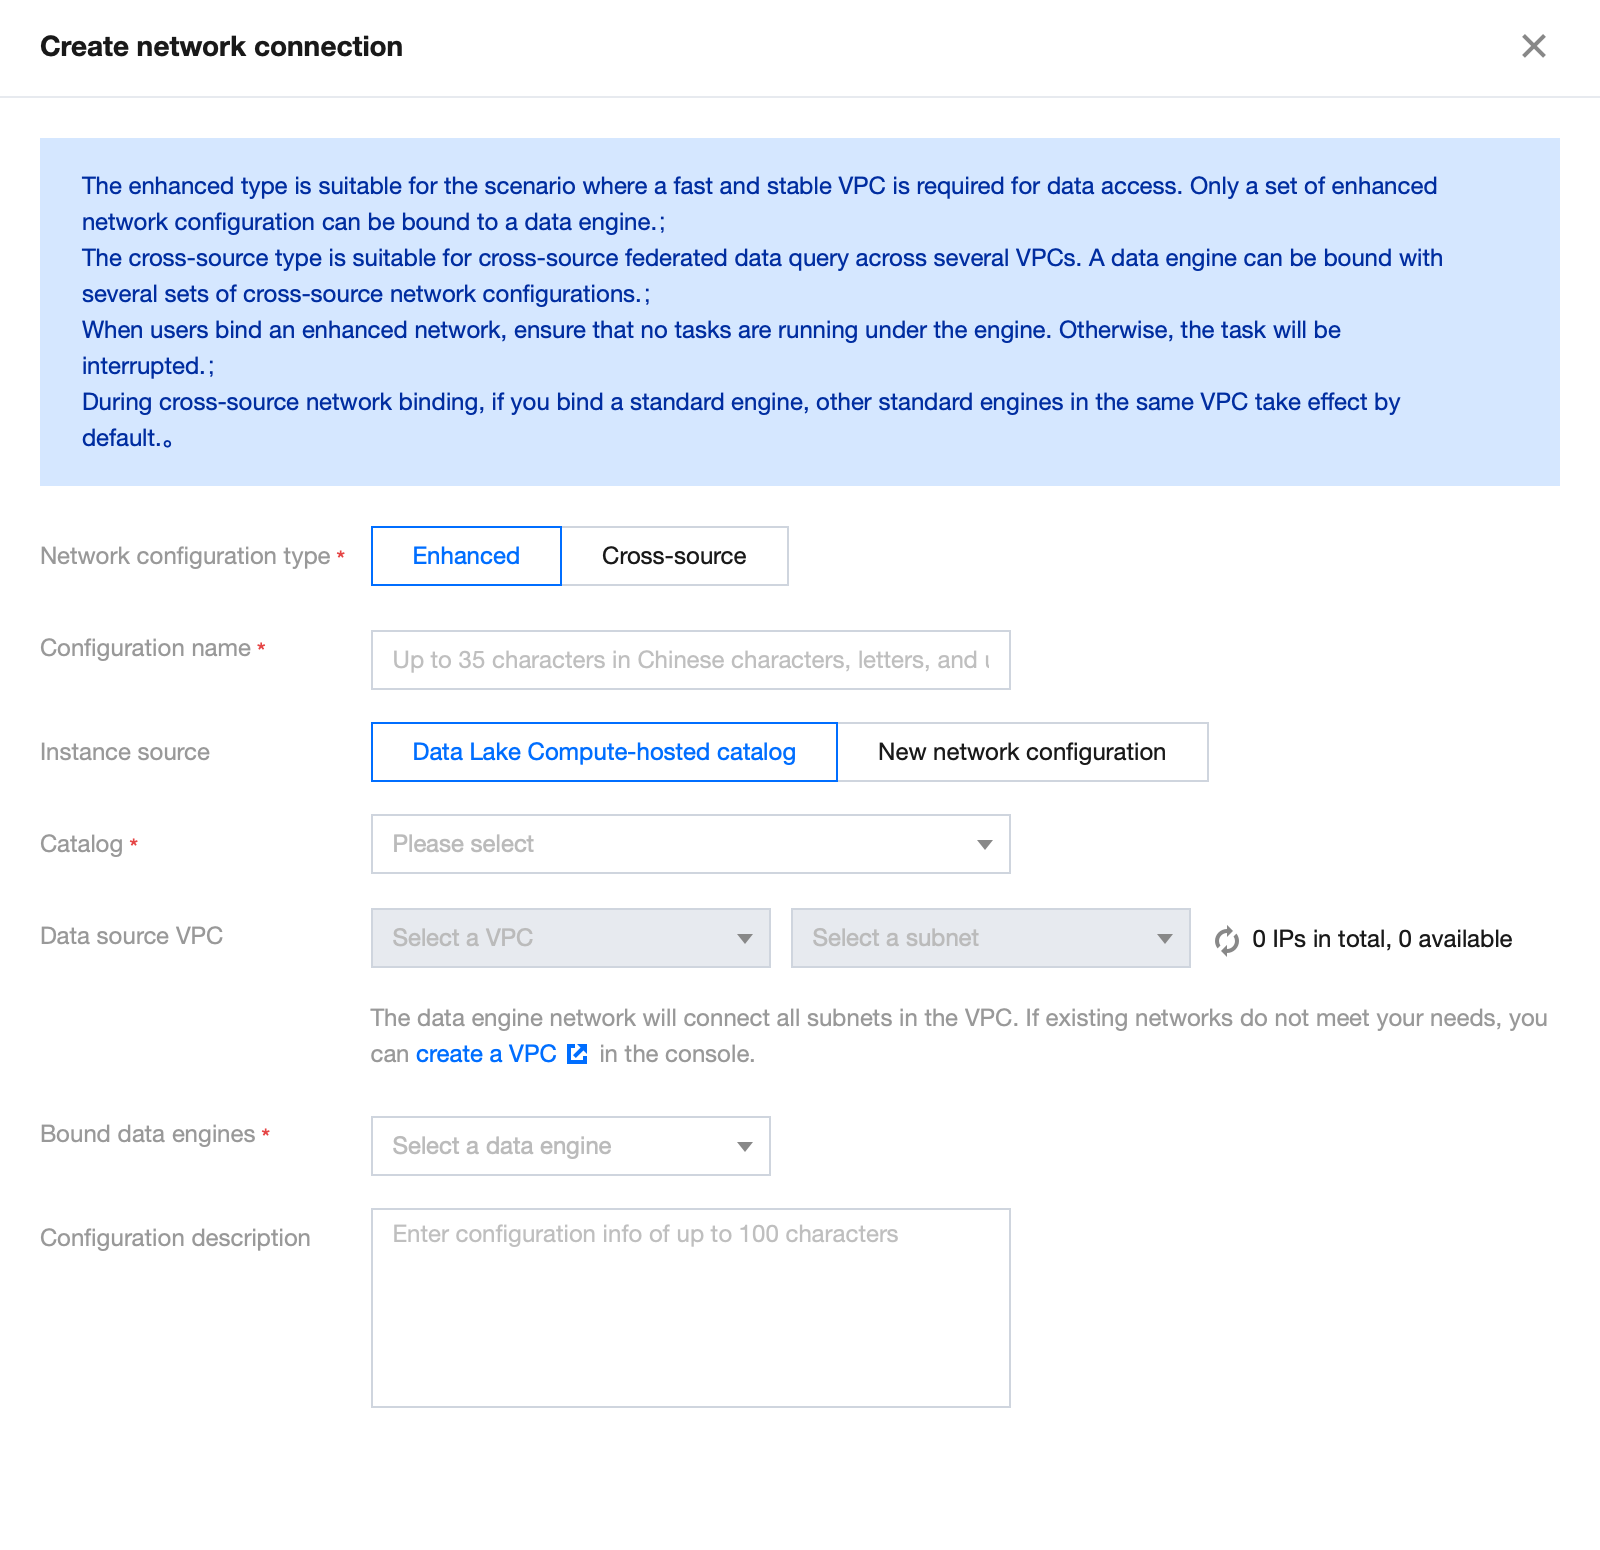
3. Click the Create Network Configuration button to enter the creation page.
Configure parameters as follows:
Configuration
Required
Filling Instructions
Network Configuration Type
Yes
Select based on use case:
Enhanced Network Configuration: Suitable for scenarios requiring high-speed, stable access to data within a single VPC
Cross-origin Network Configuration: Suitable for scenarios involving cross-origin federated query analysis requiring access to data across multiple VPCs
Configuration Name
Yes
Supports Chinese, English, and _, with a maximum of 35 characters
Instance Source
Yes
Supports two sources:
DLC data directory: You can select the data directory that has been created under DLC's Data Management
New Network Configuration: Choose a new data source to create a network connection. Currently, supported data sources include MySQL, Kafka, EMR HDFS (COS, HDFS, Chdfs), PostgreSQL, SQLServer, and ClickHouse. If the data source required for the network configuration is not yet supported, select Other and manually specify the VPC
Data directory
Yes
Based on the selected instance source, choose the corresponding data directory. The range of available data directories will be related to your account permissions
Bind data engine
Yes
Select the data engine associated with this network configuration. If the data engine is in an isolated or initializing status, it cannot be selected
Configuration description
No
No more than 100 characters
4. Fill out and save to create a network configuration.
Caution
After creation, the network will be in an initialization state, and its status can be viewed in the list afterward.
Delete network configuration
You can manage and delete network configurations that are no longer needed or have failed to configure by deleting them. The steps are as follows:
2. Access Engine Management> Engine Network Configuration through the left navigation menu.
3. Find the network configuration you wish to delete. You can filter search results, but be sure to select the correct Network Configuration Type.
4. Click the Delete button. After a secondary confirmation, the deletion will be complete.
Caution
After deletion, the data engine will not be able to use this network configuration. If access is required, it must be reconfigured. Please proceed with caution.
Modifying description information
You can modify the description of an existing network configuration by following these steps:
2. Access Engine Management> Engine Network Configuration through the left navigation menu.
3. Find the network configuration you wish to delete. You can filter search results, but be sure to select the correct Network Configuration Type.
4. Click the Modify description information button to edit and modify.
Associating Tag with Private Engine Resource
Last updated:2025-01-03 15:27:27
Overview
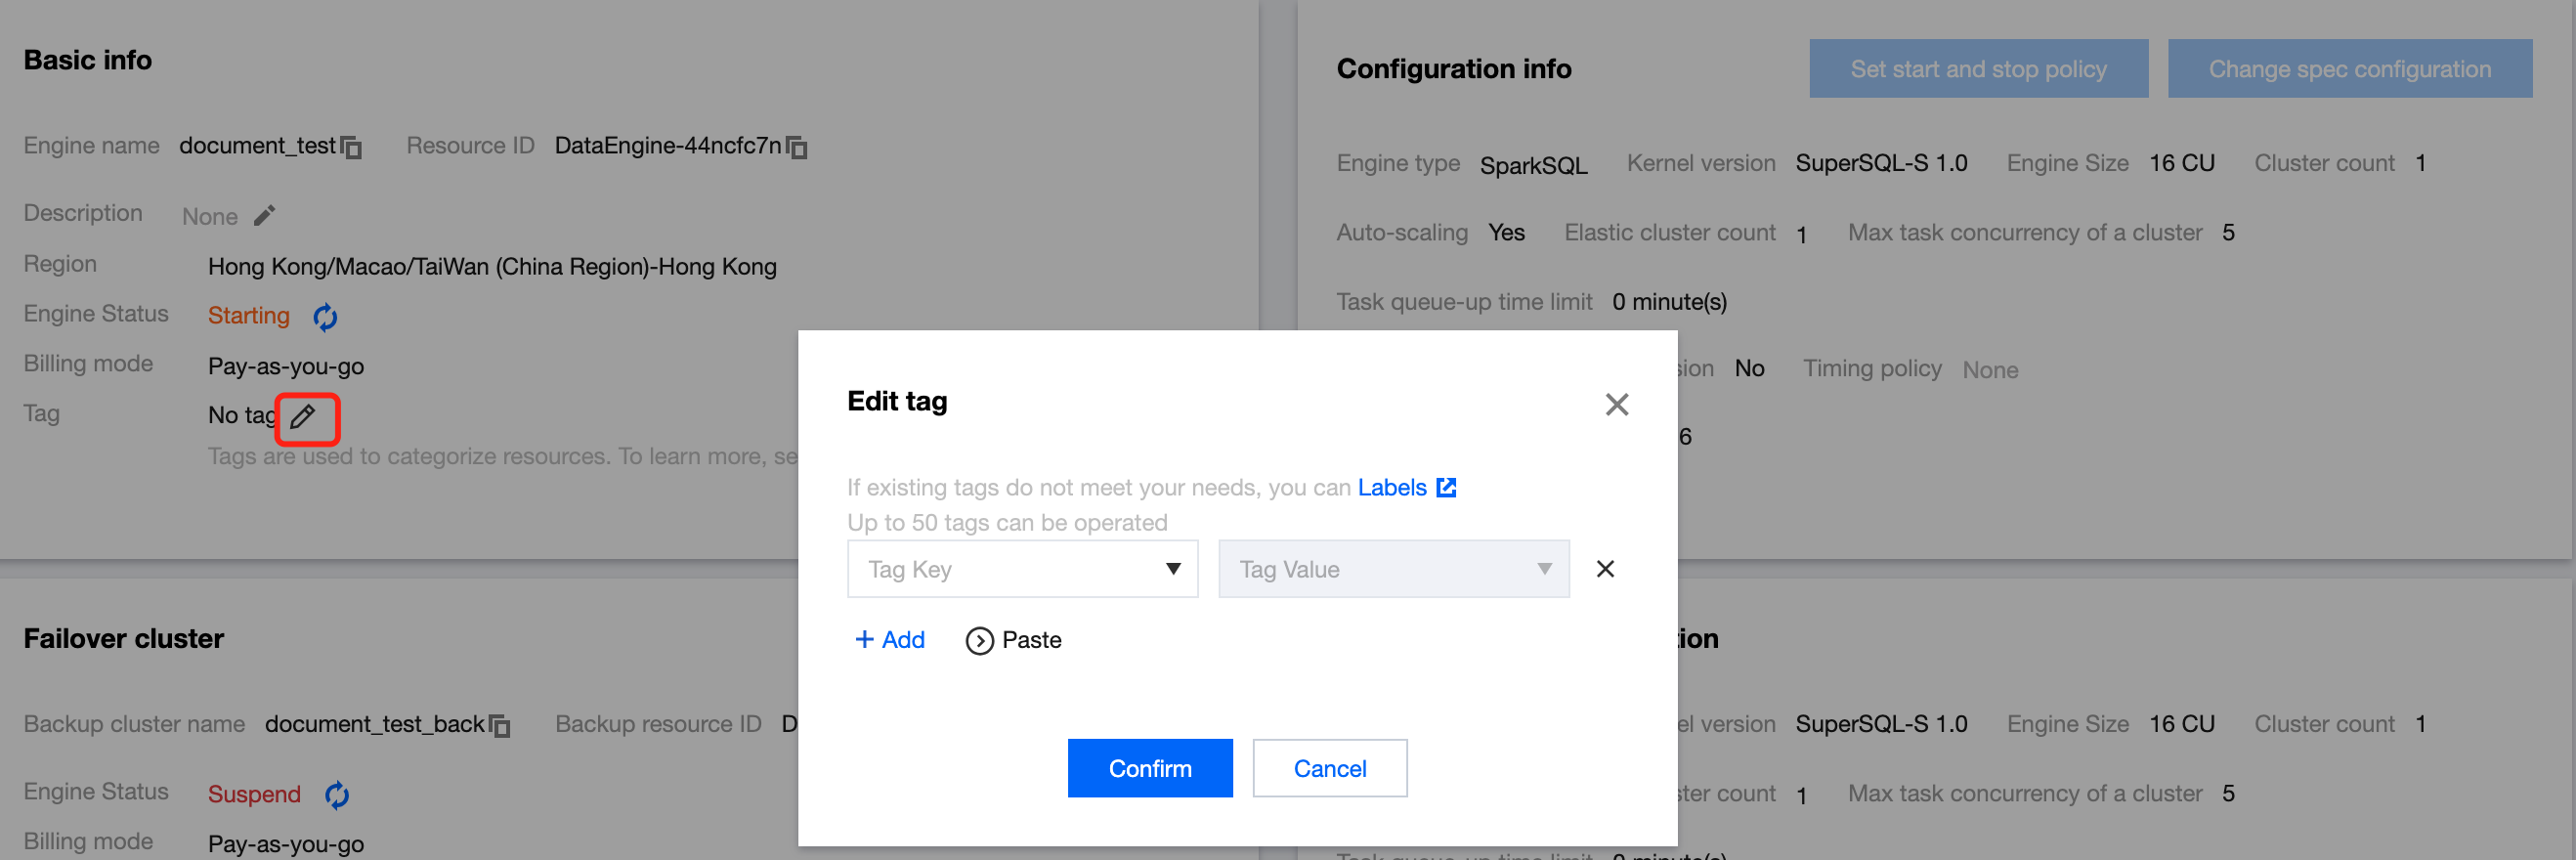
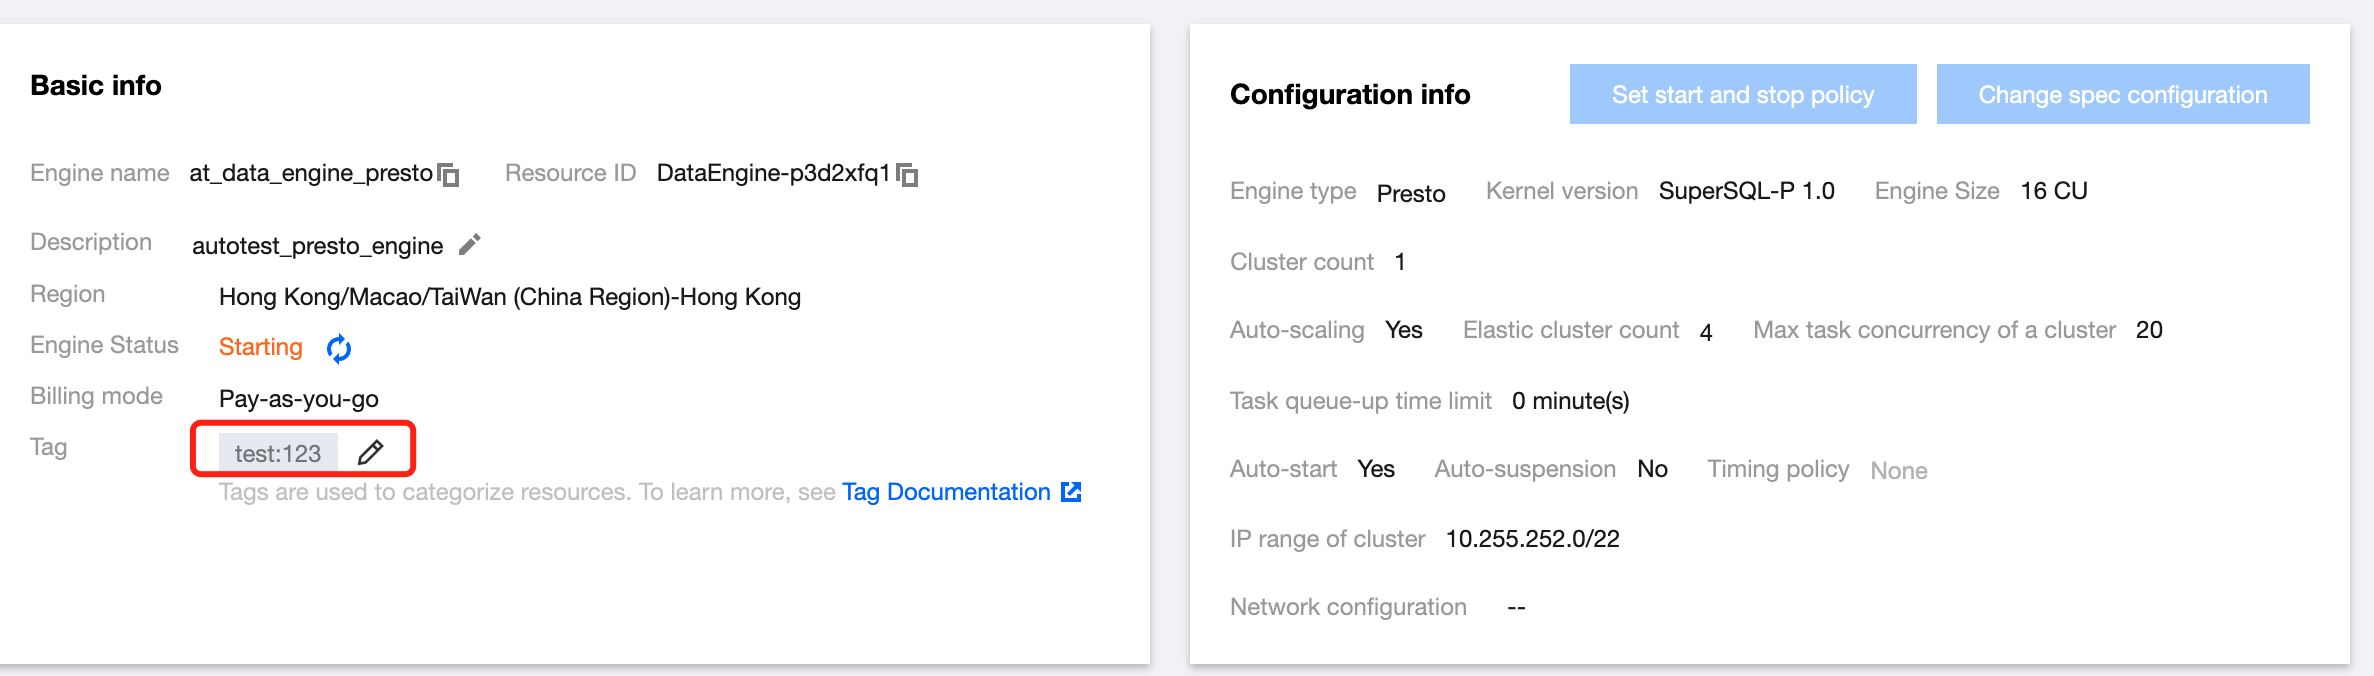
A tag is used to categorize and manage resources. It consists of a tag key and a tag value. A tag key can correspond to multiple values. You can create tags and bind them to cloud resources for easier management. Data Lake Compute supports binding tags to private engines in the console or on the purchase page, thereby enabling multidimensional category management and bill breakdown for private engine resources.
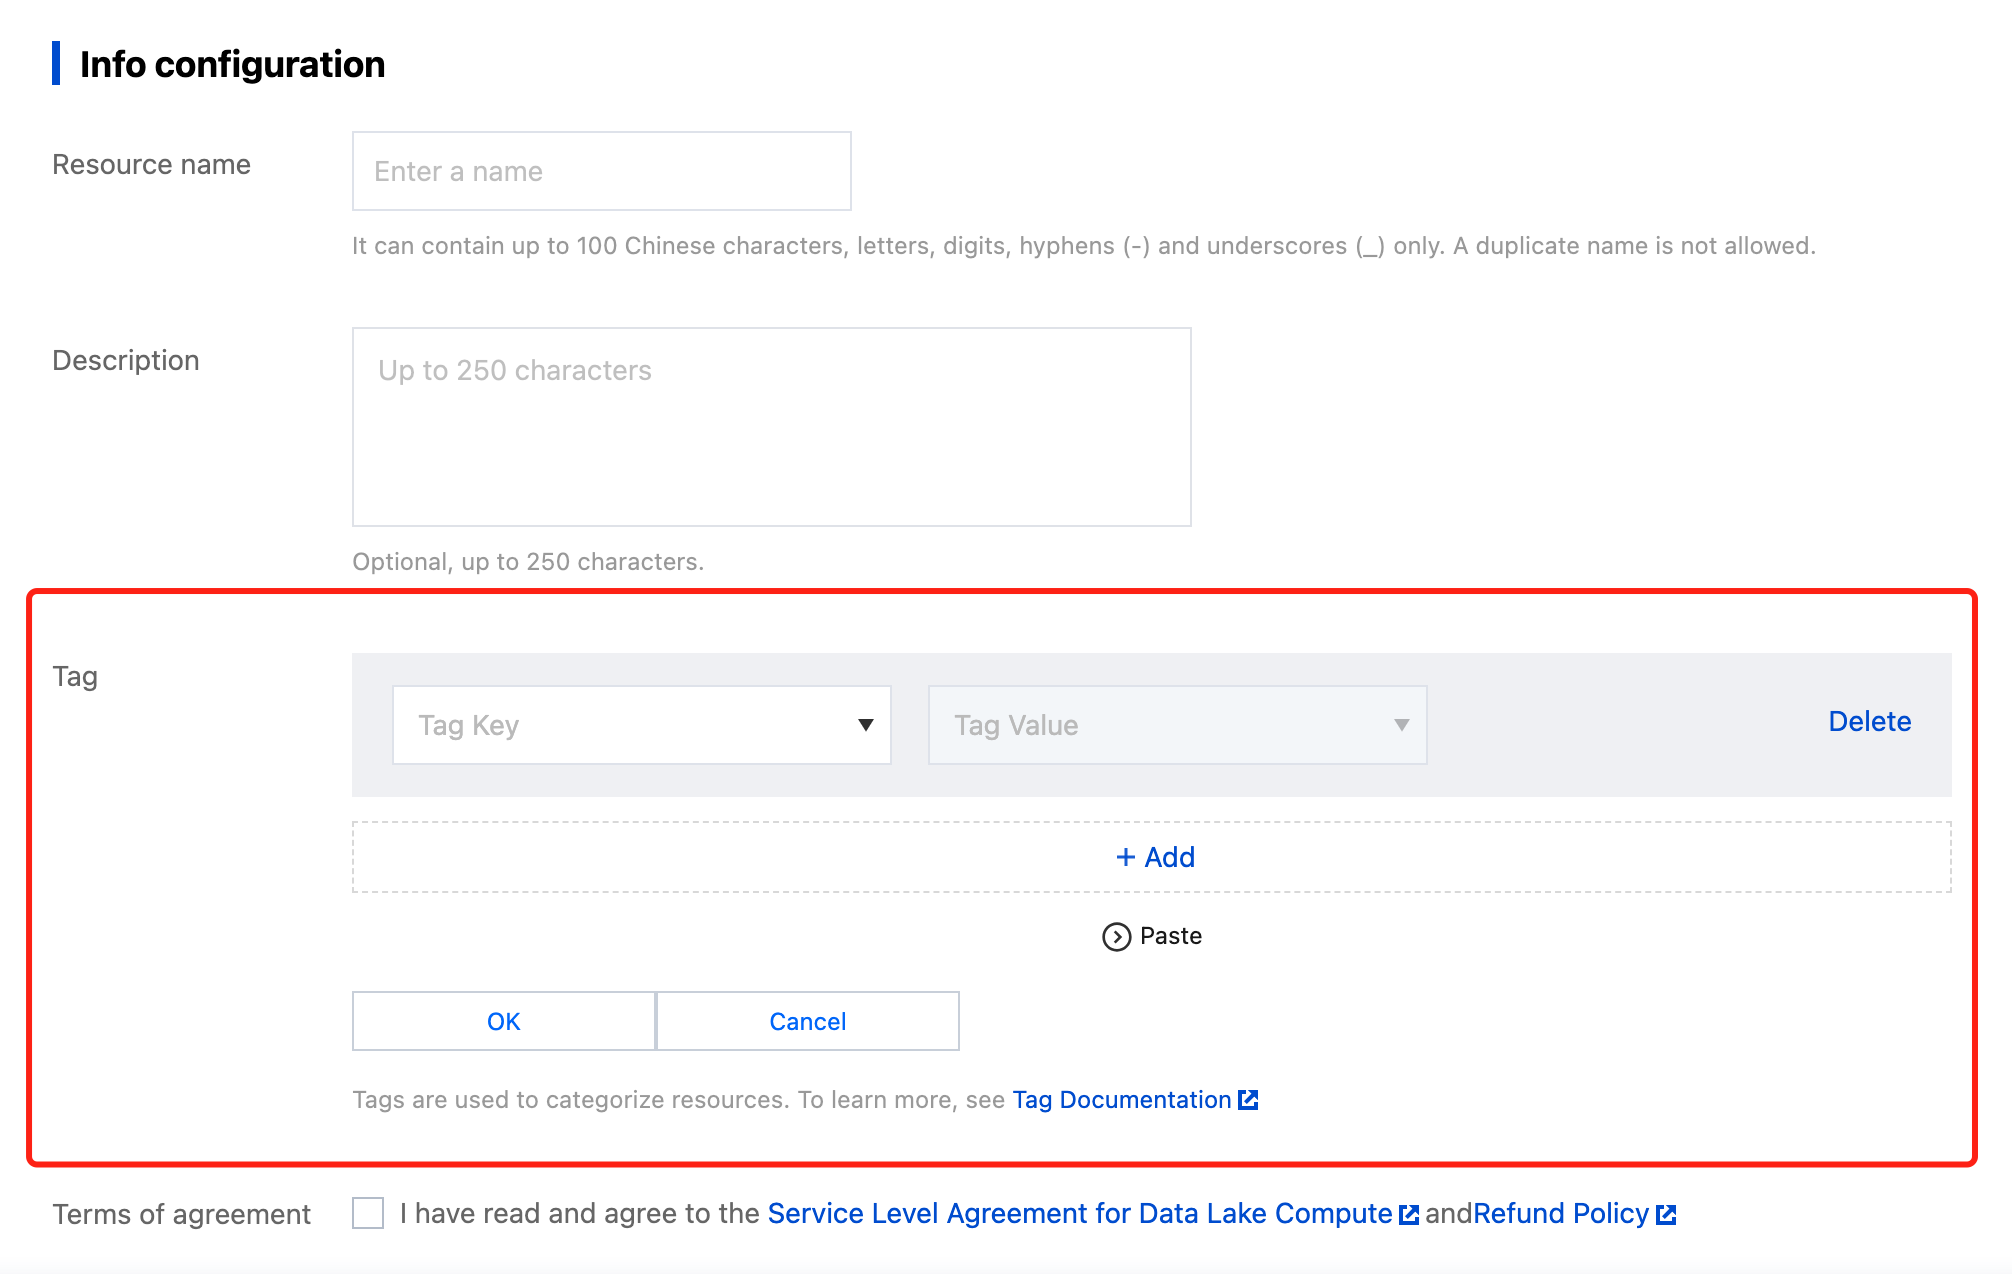
Creating a Tag and Binding a Resource
Create a tag and bind it to a private engine for resource categorization and unified management.
4. Go to the Bill Overview page, select the aggregation by tag tab, and view the column chart and list of resources aggregated by tag key.
Engine Local Cache
Last updated:2024-07-31 17:48:05
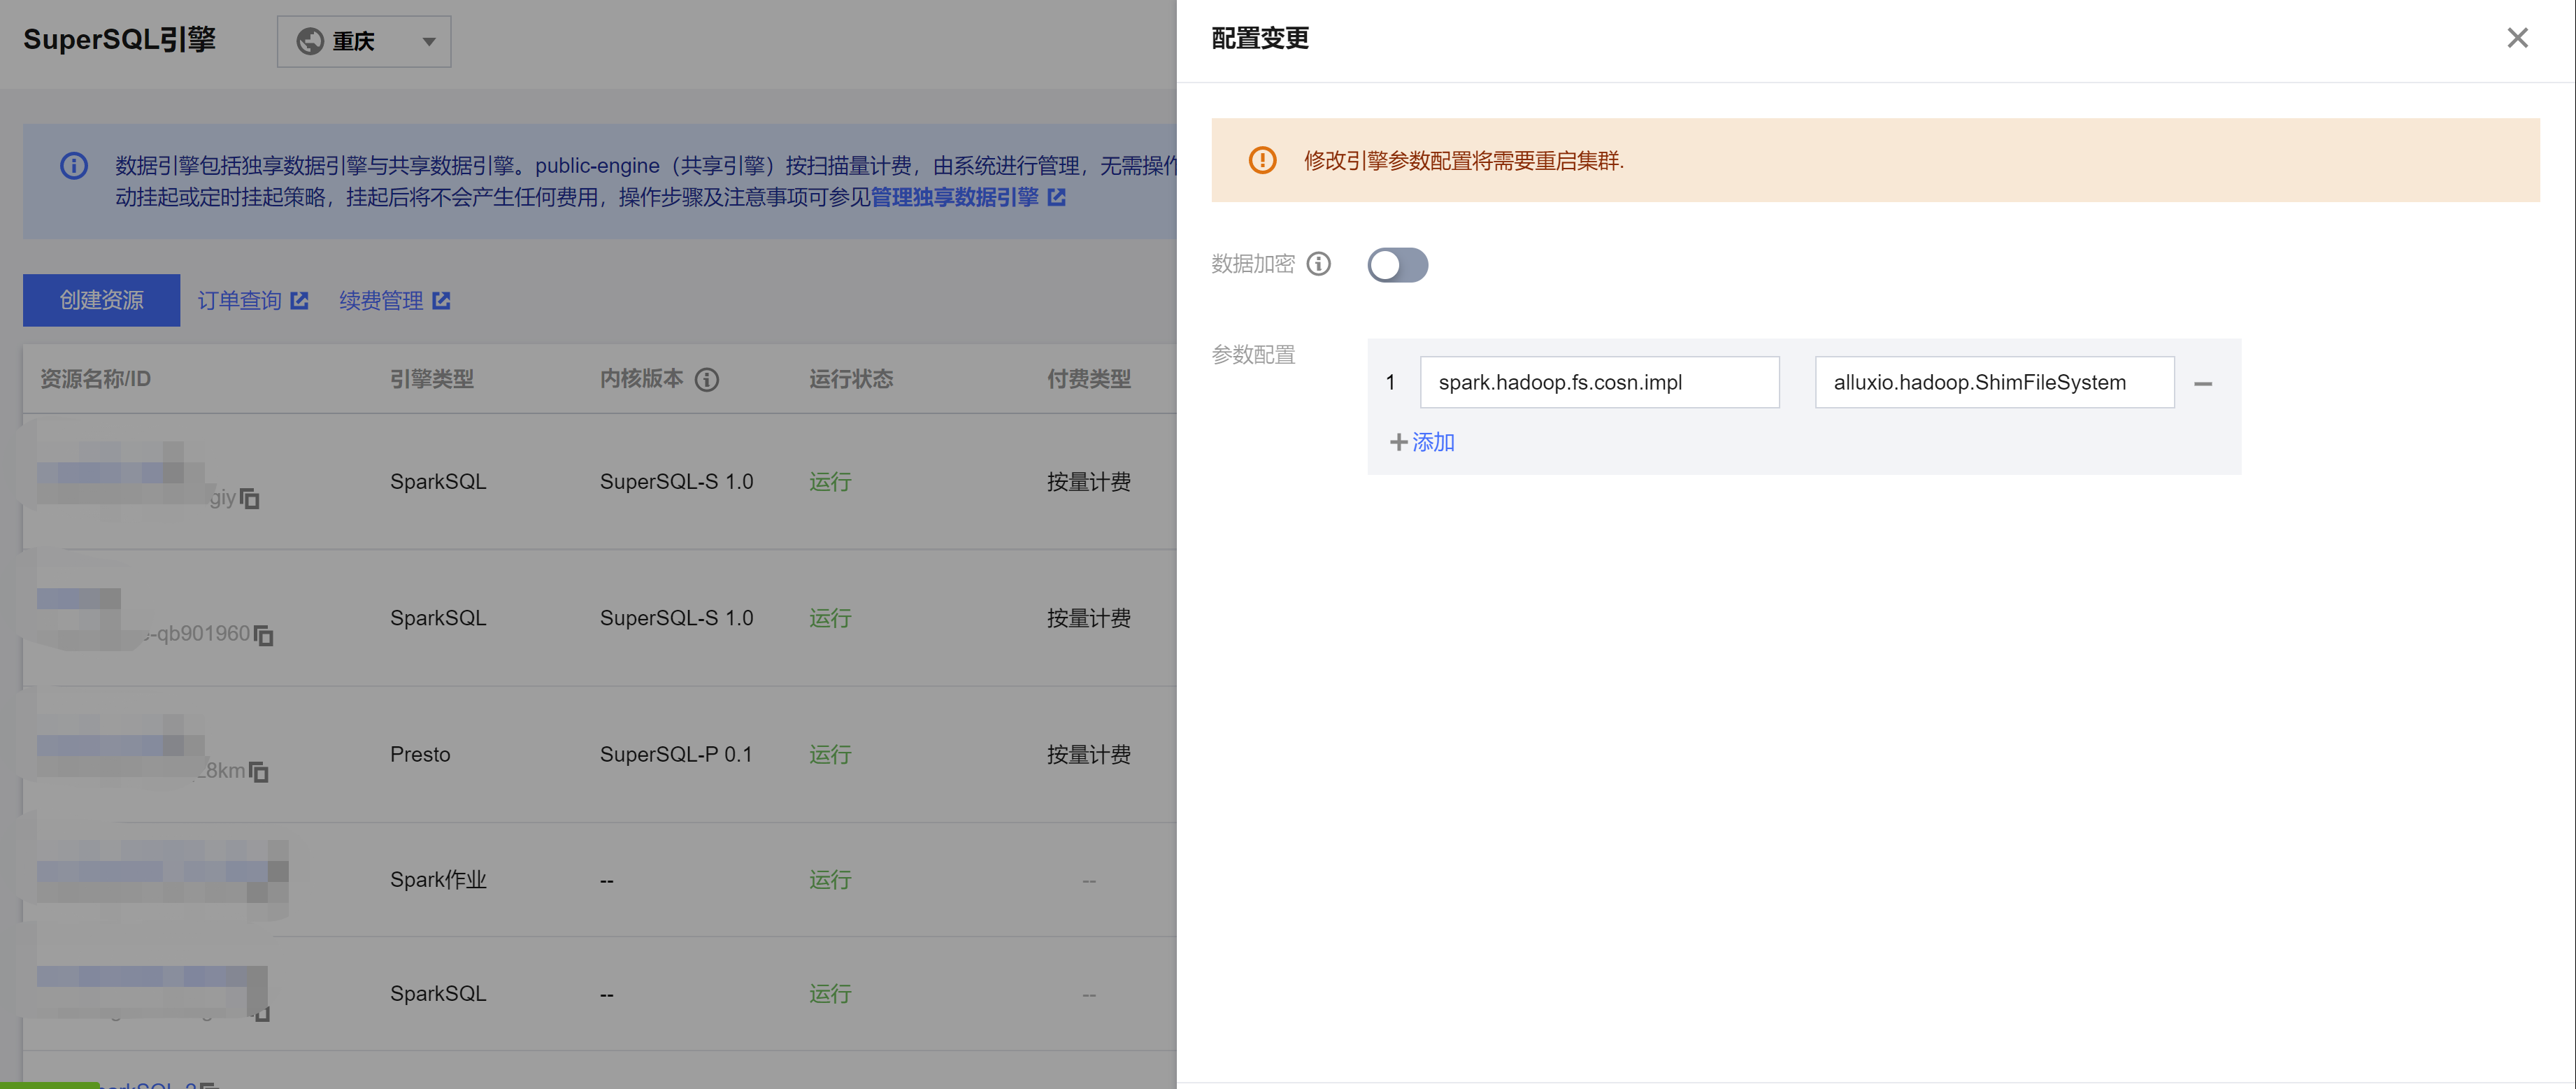
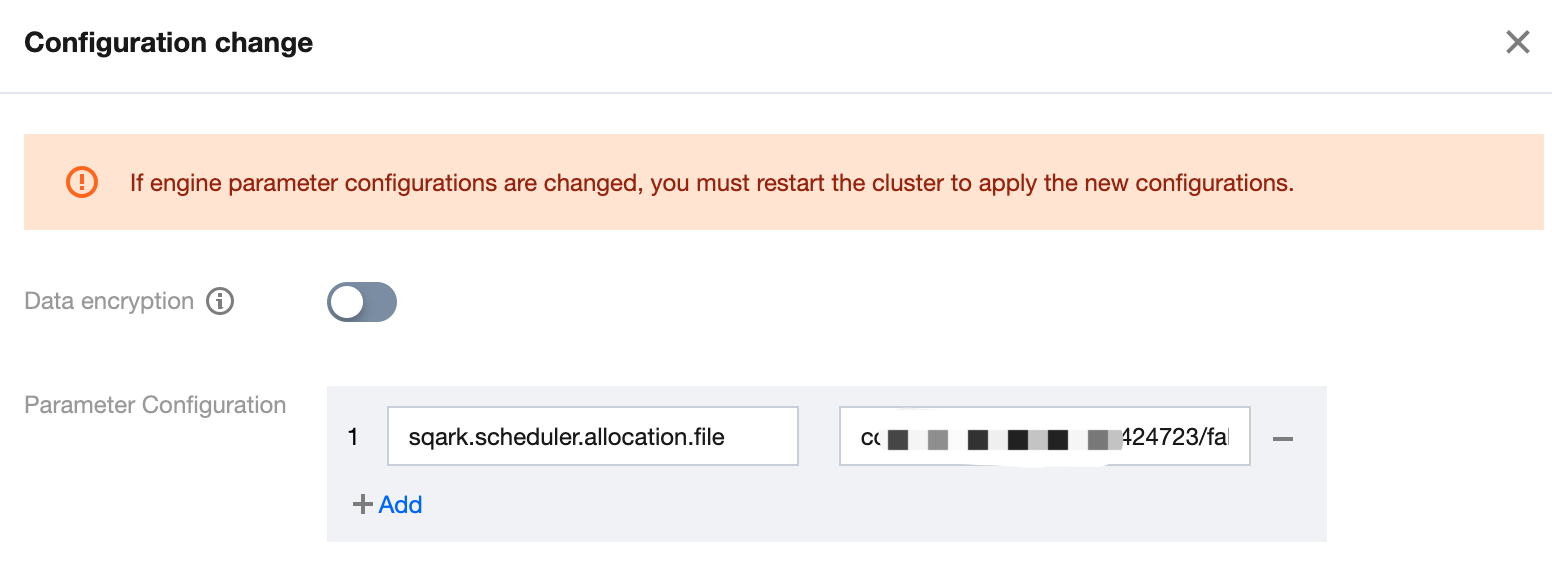
To ensure stable operation of Spark engine query analysis when network bandwidth is limited (e.g. during storage system throttling), the DLC Spark engine provides a local cache capability. When you need to cache table data, you can quickly enable caching by adding engine configuration.
After the configuration is added, the engine cluster will restart. It is recommended to enable the cache when no tasks are running to avoid affecting ongoing tasks.
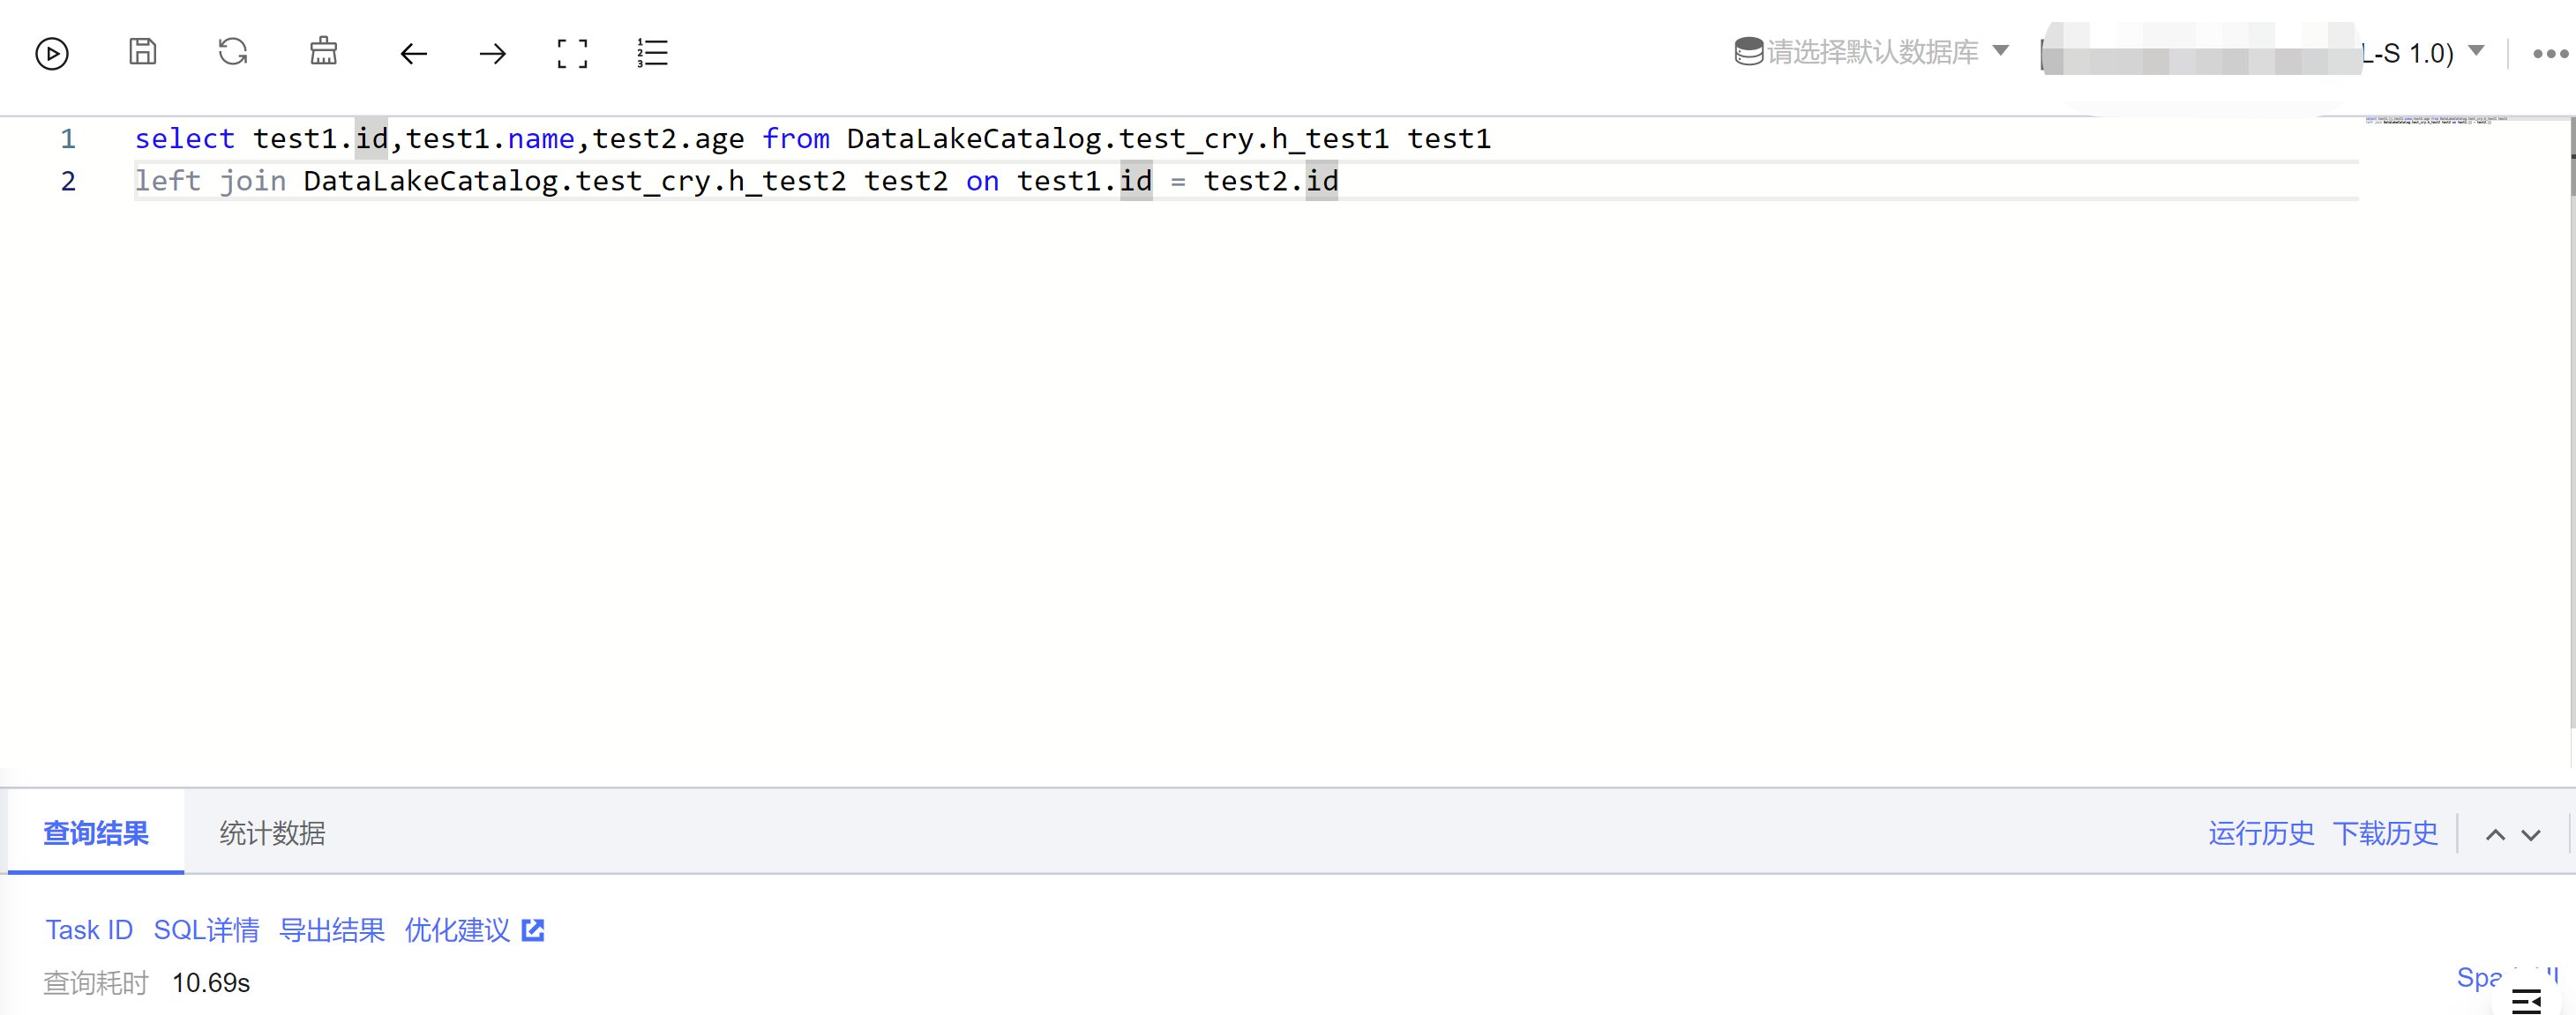
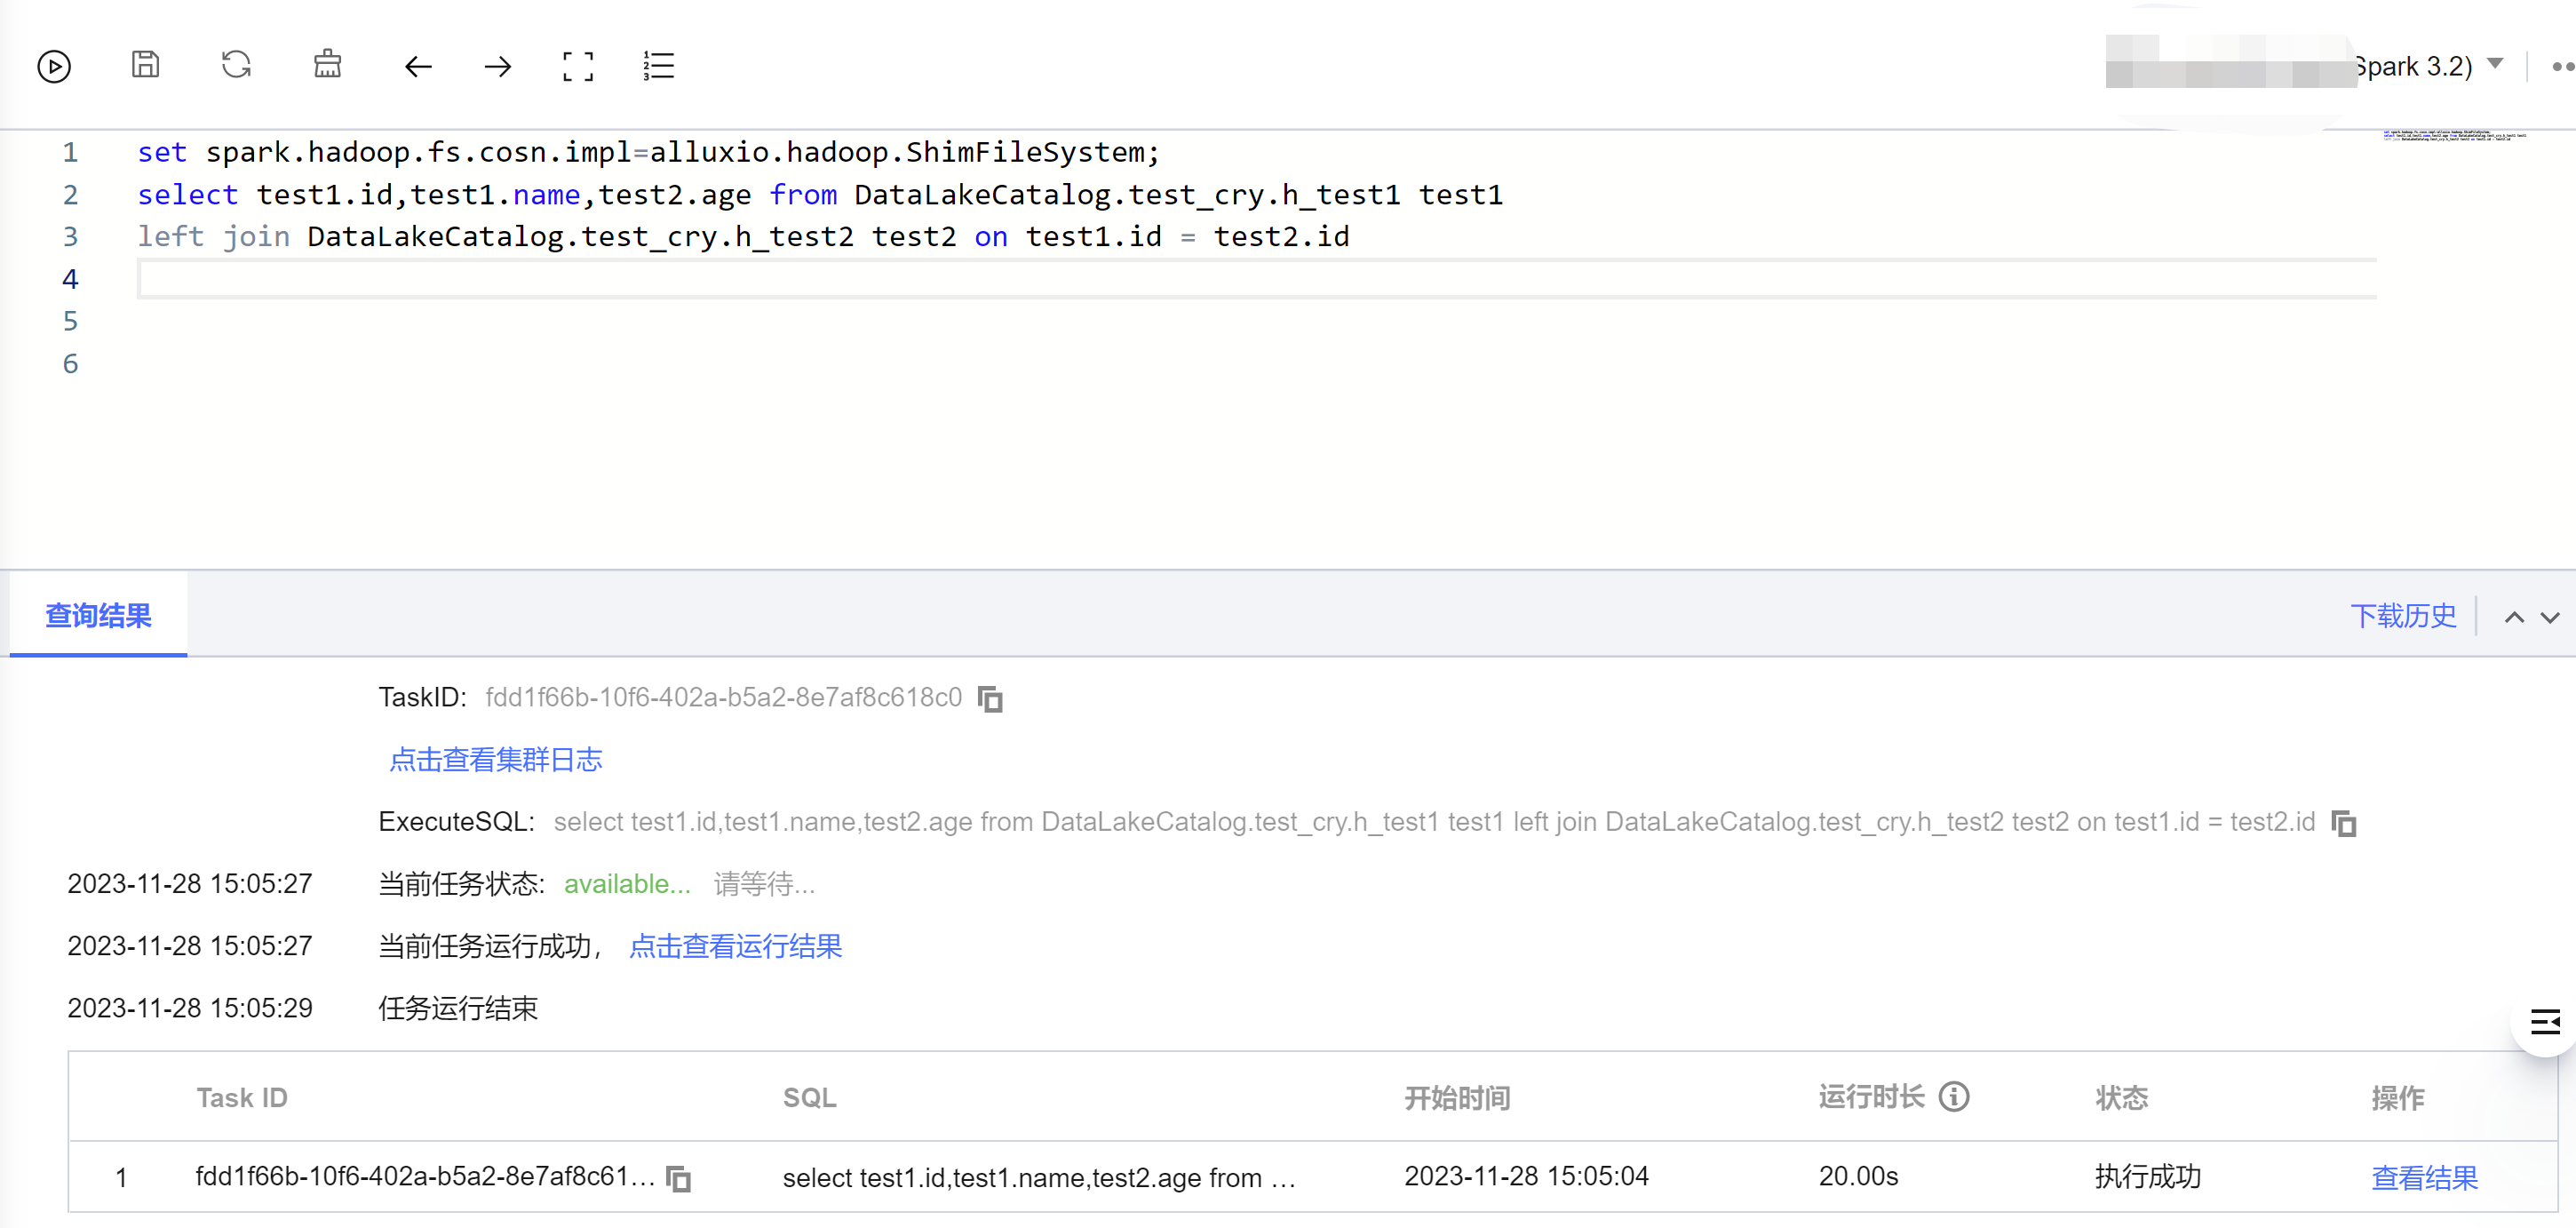
3. To use the engine cache, go to Data Exploration, write the query SQL in the SQL interface, select the engine with the cache enabled, and execute the SQL. Once executed, the engine will cache the DLC external table data locally. When the SQL is executed again, the data will be fetched from the local cache, improving query efficiency.
Spark SQL Engine Query:
Spark Batch Engine Query:
Cache Description
Cache Configuration Items Description
Configuration Items
Configuration Values
Configuration Items Description
spark.hadoop.fs.cosn.impl
alluxio.hadoop.ShimFileSystem
Fixed value; the configuration value is the cache implementation class. Configure this value to enable the cache feature. If the cache feature is enabled, configuring a value other than this will result in the engine not being able to access COS data. Please follow the instructions carefully.
If you need to disable the cache after enabling it, please delete this configuration item.
Cache Usage Instructions
1. Engine Type Description
SparkSQL Engine: When the engine restarts, the cached data becomes invalid because it is a local cache.
SparkBatch Engine: The SparkBatch engine runs tasks at the session level. Once the task execution is complete, the cached data becomes invalid.
2. Table Type Description
Currently, only DLC external tables are cached.
Custom Task Scheduling Pool
Last updated:2024-07-31 17:48:18
Application scenario
Applicable Engine: Spark SQL Engine.
When you submit multiple tasks to the engine, for example, submitting multiple SQL tasks to the Spark SQL cluster simultaneously, the tasks submitted by the business may have dependencies, so the engine will default to scheduling these tasks in a FIFO manner when scheduling and executing.
However, in some special cases, you may need to define the priorities of certain tasks yourself, for example in the following scenario:
The submitted task has a high priority and needs to be executed with the highest priority, not wanting it to queue for cluster resources.
The submitted task has a low priority, hoping that it will not preempt resources from other tasks as much as possible. It will be executed when resources are available, and it will queue when resources are not.
Customize Scheduling Rules
In the Spark SQL Engine, each executed SQL task Job is split into a collection of multiple tasks, TaskSet, and our scheduling is based on TaskSet. Whenever the cluster has idle resources, it takes a Task from all Job's TaskSet according to the scheduling algorithm for dispatch execution.
Our scheduling algorithm is to define multiple scheduling pools, placing Job/TaskSet in the corresponding scheduling pool, and obtaining the Task that needs to be dispatched for execution according to the scheduling pool.
Scheduling Pool and Its Attributes
You can define multiple scheduling pools, each with four attributes:
name: The name of the scheduling pool, which you can name yourself. It can be named default, indicating the default scheduling pool.
schedulingMode: The scheduling rule, supporting two modes: FIFO and FAIR. The scheduling algorithm when there are multiple TaskSets within a scheduling pool.
FIFO: Tasks are dispatched in the order that TaskSets are submitted.
FAIR: Tasks from multiple TaskSets are dispatched fairly. The specific dispatch rules are related to the minShare and weight attributes of the scheduling pool.
minShare: The minimum number of cores required, must be greater than 0, that is, the minimum number of Tasks that can run. During scheduling, priority is given to the number of Tasks running in the scheduling pool reaching minShare.
weight: The weight. Scheduling pools with a higher weight will have their Tasks prioritized. Weight comparison will only occur after minShare is met.
The scheduling configuration requires you to write an xml file, in the following formats:
<?xml version="1.0"?>
<allocations>
<pool name="production">
<schedulingMode>FAIR</schedulingMode>
<weight>1</weight>
<minShare>2</minShare>
</pool>
<pool name="test">
<schedulingMode>FIFO</schedulingMode>
<weight>2</weight>
<minShare>3</minShare>
</pool>
</allocations>
Scheduling Configuration Reference Example
You can refer to the settings for three scheduling pools:
Default Scheduling Pool default:schedulingMode = FIFO, weight = 1, minShare = (Cluster Cores - Driver Cores). This scheduling pool is the default submission pool for tasks, with ordinary priority. Execution is in sequential order, and it can utilize all of the cluster's computing resources.
Slow Task Scheduling Pool straggler:schedulingMode = FAIR, weight = 1, minShare = 1. This scheduling pool is dedicated to slow task submissions, with ordinary priority. Since minShare = 1, it does not preempt resources from tasks submitted to the default pool. Tasks in the straggler scheduling pool are executed when the cluster has more available resources.
High Priority Scheduling Pool special:schedulingMode = FIFO, weight = 1000, minShare = (Cluster Cores - Driver Cores). This scheduling pool is for tasks that need priority execution in special circumstances. However, due to the presence of minShare, this pool does not monopolize all cluster resources. Tasks in both the default and special pools continue to be executed, typically dispatching an equal number of Tasks from each pool.
Taking a 16CU cluster (with the driver being 4CU) as an example, the configuration for this reference example is as follows:
<?xml version="1.0"?>
<allocations>
<pool name="default">
<schedulingMode>FIFO</schedulingMode>
<weight>1</weight>
<minShare>12</minShare>
</pool>
<pool name="straggler">
<schedulingMode>FAIR</schedulingMode>
<weight>1</weight>
<minShare>1</minShare>
</pool>
<pool name="special">
<schedulingMode>FIFO</schedulingMode>
<weight>1000</weight>
<minShare>12</minShare>
</pool>
</allocations>
Operation method
1. After preparing the xml file for the scheduling pool, place it in a path on cos, for example cosn://bucket-appid/fairscheduler.xml.
2. Add the following configuration in the engine settings.
Parameter configuration spark.scheduler.allocation.file, set to the path of your scheduling pool xml file cosn://bucket-appid/fairscheduler.xml.
This operation requires restarting the cluster.
3. When submitting a task, specify the following parameters as task parameters: spark.scheduler.pool = the name of the scheduling pool to submit to. If it is the default scheduling pool, it does not need to be specified.
Notes
Scheduling occurs at the time node when: the cluster has idle resources and there is a task that needs scheduling. Therefore, if the cluster is already fully occupied by a task, for example, a slow task, it must wait for one Task of that task to be completed before beginning to schedule other tasks with higher priority. Therefore, it is important to note that the time consumption of a single Task of a slow task should be relatively reasonable; otherwise, it might still lead to long periods of occupying cluster resources.
Standard Engine
Introduction of the Standard Engine System
Last updated:2024-09-04 11:12:04
The Standard Engine system is composed of several key components: Engine Network, Gateway, Resource Group, Endpoint, and Executor. Before using the DLC Standard Engine, you should understand these concepts:
Concepts
The table below provides a brief introduction to several key concepts within the Standard Engine system. For more detailed information, you can click the relevant links.
The Engine Network is a managed private connection that deploys the gateway and the Standard Engine within a logically isolated network environment. Users can customize the IP address range and subnet of the Engine Network according to their business needs.
The gateway, implemented based on the Kyuubi big data component, serves as the access point for the Standard Engine services, providing users with a more efficient and stable task submission experience.
The Standard Engine is a type of computing resource provided by DLC that helps users quickly launch compute clusters of a certain scale. It offers comprehensive support for native syntax and behavior, allowing users familiar with the big data ecosystem to get started more quickly and use the system with ease.
The Standard Spark Engine supports further on-demand division of engine resources through the use of resource groups. A resource group is a collection of a portion of the Standard Spark Engine's computing resources and corresponding configurations. SQL tasks can be submitted to a designated resource group for execution.
Through a private connection, users can establish a link between their account's VPC and the Standard Engine's network, allowing tasks to be submitted via servers within that VPC.
Executor
After an endpoint is created, any server within the user account's VPC associated with that endpoint can serve as an executor for task submissions.
Task Submission Methods
Users can submit tasks in various ways:
1. Through JDBC on the executor, as shown in the diagram.
2. Submit SQL tasks via the Data Exploration page in the DLC console.
3. Submit Spark batch and streaming jobs via the Data Jobs page in the DLC console.
4. Submit tasks through the TencentCloud API.
Quick Purchase and Configuration of the Standard Engine
1. If you are purchasing the Standard Engine for the first time, DLC recommends following the Standard Engine Configuration Guide in the documentation to quickly set up the Standard Engine.
2. Once the purchase is completed, you can submit tasks via the Data Exploration page or the executor.
Standard Engine Introduction
Last updated:2024-09-04 11:13:49
The Standard Engine is a type of computing resource provided by DLC that helps users quickly launch compute clusters of a certain scale. It offers comprehensive support for native syntax and behavior, enabling users who are familiar with the big data ecosystem to get started quickly and use it with ease.
Types of Standard Engine
Users can choose different Standard Engine kernels based on their needs to address various use cases. The Standard Engine is divided into the following types:
Spark: Suitable for stable and efficient offline SQL tasks, as well as native Spark streaming/batch data processing jobs.
Presto: Suitable for agile and rapid interactive query analysis.
Gateway: The Gateway is a special type of Standard Engine implemented based on native Kyuubi. The Gateway is used to connect users to the Spark/Presto computing engines and submit tasks, serving as a prerequisite for using other computing engines.
Note:
Different types of engines do not affect the unit price of engine billing. For detailed pricing information, see the Billing Overview.
Engine Elasticity
Currently, only the annual subscription Spark Standard Engine supports the configuration of pay-as-you-go for resource elasticity.
As shown in the diagram, tasks and resource groups will prioritize using the resources from the monthly or annual subscription. If a user’s submitted task exhausts the resources from this subscription, any subsequent tasks will automatically use the configured pay-as-you-go elastic resources. In the diagram, after Task 03 depletes the subscription resources, it continues to use the pay-as-you-go resources.
Note:
1. Pay-as-you-go elastic resources are charged based on the actual computing resources used.
2. If a task or resource group is scheduled to use pay-as-you-go resources, it will continue to use those resources even if the monthly or annual subscription resources are later freed up. The resource group will only be rescheduled to use the subscription resources after it has been restarted.
3. A single Spark Standard Engine cannot set elastic resources exceeding the amount of resources in the annual or monthly subscription. For example, a 128 CU annual or monthly subscription engine can set up to 128 CU of elastic resources. If you need to configure more elastic resources, contact us through a ticket.
Standard Engine Terminology
Terminology
Description
Cluster Type
When purchasing a Standard Spark Engine, you can choose the cluster type. The standard type is 1 CU ≈ 1 core with 4 GB memory, and the memory type is 1 CU ≈ 1 core with 8 GB memory. Different types have different unit prices. For more details, see the Billing Overview.
Elastic Cluster Specifications
The monthly or annual subscription Spark Engine allows users to configure elastic specifications. Once the resources from the subscription package are exhausted, the system will automatically allocate pay-as-you-go resources based on user configuration.
Gateway Name
The name of the gateway must be globally unique. It cannot share the same name as any other gateway or compute engine.
Engine Name
The name of the engine must be globally unique. It cannot share the same name as any other gateway or compute engine.
Engine Type
The Standard Engine types are categorized into Presto Engine and Spark Engine. The gateway is also a special type of Standard Engine.
Engine Status
The status of the Standard Engine varies based on the current operation of the cluster. The statuses include: Starting, Running, Ready, Paused, Pausing, Modifying, Isolated, Isolating, and Recovering.
Starting: The cluster resources are being initiated. Pay-as-you-go for the engine does not occur during this time. Clusters in the starting status cannot be selected for data computation tasks.
Running: The cluster is running and can be selected for data computation tasks.
Ready: Similar to the running status, this status indicates that the engine is available for use.
Paused: The cluster is paused and cannot be selected for data computation tasks.
Pausing: The cluster is in the process of switching to the paused status. This transition may affect any running tasks, and the cluster cannot be selected for data computation during this time.
Modifying: The cluster is undergoing configuration changes. During this period, it cannot be selected for data computation tasks.
Isolated: The cluster has been isolated due to account arrears and cannot be selected for data computation tasks.
Isolating: The cluster is in the process of being isolated due to account arrears. This transition may affect any running tasks, and the cluster cannot be selected for data computation during this time.
Recovering: The process of restoring the cluster from an isolated status to a running status after the account has been recharged and is no longer in arrears. The cluster cannot be selected for data computation during this process.
Resource Group Count
The current number of resource groups under the Standard Spark Engine.
Used Resources / Total Resources
The quantity of resources currently used by the engine and the total available resources of the engine.
The total resource count includes both the persistent resources and the elastic resources.
Used resources include those occupied by the DLC deployment service system.
There may be some delay in the reported data.
Payment Type
Payment types include annual/monthly subscription and pay-as-you-go.
The gateway only supports the annual/monthly subscription model.
The Standard Spark and Presto engines support both annual/monthly subscription and pay-as-you-go.
Auto-Renewal
Indicates whether the monthly or annual subscription engine will automatically renew as it approaches expiration.
Engine Size
The total available resources of the engine, measured in CUs.
For monthly or annual subscription engines, the size includes both the engine's persistent capacity and the elastic capacity billed on a pay-as-you-go basis.
Note:
1. For monthly or annual subscription engines, a one-time payment is required at the time of purchase. The engine's status does not affect billing costs.
2. For pay-as-you-go engines, charges are based on the user's usage:
The Standard Presto Engine incurs charges while running, but not when suspended. Some costs may be incurred during the engine's startup phase.
The Standard Spark Engine does not incur charges while in a ready status. Costs are only incurred when tasks are submitted or when a resource group is started and running.
Standard Engine Kernel Versions
Last updated:2024-09-04 11:14:22
The kernel versions used by the DLC Standard Engine are described as follows:
Engine Type
Kernel Version
Description
Spark
Standard-S 1.0
Standard-S 1.0 is a self-developed engine kernel based on Spark 3.2, compatible with native Spark syntax and behavior, and suitable for offline SQL tasks. It also supports Iceberg 1.1.0, Hudi 0.12.0, and Python 3, and includes support for Adaptive Shuffle Manager.
Presto
Standard-P 1.0
Standard-P 1.0 is a self-developed engine kernel based on Presto 0.242, compatible with native Presto syntax and behavior, and suitable for interactive query analysis. It also supports dynamic data source loading, enhanced Dynamic Filtering, Iceberg V2 tables, INSERT OVERWRITE for non-partitioned tables, and the execution of Hive UDFs.
Standard Engine Parameter Configuration
Last updated:2025-03-12 18:03:39
Spark parameters are used to configure and optimize settings for Apache Spark applications.
In a self-built Spark, these parameters can be set through command line options, configuration files, or programmatically.
In the DLC standard engine, you can set Spark parameters on the engine, which will take effect when users submit Spark jobs or submit interactive SQL using custom configurations.
Note:
1. The standard engine dimension configuration only takes effect for Spark jobs and Batch SQL tasks.
2. Only after the engine dimension configuration is added will the new tasks take effect.
Setting Standard Spark Engine Parameters
1. Enter the standard engine feature.
2. Select the engine that needs to be configured on the list page.
3. Click Parameter Configuration , and the engine parameter side window pops up.
4. In "Parameter Configuration", click Add , add the target configuration and then click Confirm .
Resource Group Dimension Parameters
Parameters of Resource Group for SQL Analysis Only Scenario
Adding Parameters When a Resource Group Is Created
When a resource group is created, select SQL analysis only and add parameters in the Parameter Management at the bottom.
Note:
1. Static parameters can only take effect after the resource group restarts, while dynamic parameters do not require a restart of the resource group to take effect.
2. For details on dynamic parameters and static parameters, see the official website of Spark.
3. The configuration of resource group for SQL analysis only scenario takes effect only when SQL tasks are run using that resource group.
2. On the resource group management page, select a resource group for SQL analysis only scenario and click the Details button.
3. On the details page, click Edit in the parameter management panel to add parameters or modify and delete added parameters. Similarly, static parameters can only take effect after the resource group is restarted, while dynamic parameters do not require a restart of the resource group to take effect.
4. After the modification is completed, click Save. Then you can choose Restart Now, or you can choose Not Restart and Save Only and then restart the resource group at an appropriate time later to make the configuration take effect.
Resource Group Parameters for AI (Machine Learning) Scenario
Note:
1. Currently, only the Spark MLlib-type AI resource groups support adding configurations.
2. Currently, only static configurations can be added, which only take effect on new notebook sessions and do not take effect on existing sessions.
3. The AI Resource Group feature is a whitelist feature. To ensure that it meets your usage scenarios, please submit a ticket contact us for assessment and enablement.
4. This resource group only supports Standard Spark engine Standard-S version 1.1.
Adding Parameters When an AI Resource Group Is Created
As shown in the figure below, select the Spark MLlib type when the AI resource group is created, and choose to add parameters in the Parameter Management panel at the bottom.
2. On the resource group management page, select a Spark MLlib resource group and click Details.
3. On the details page, click Edit in the parameter management panel to add parameters or modify and delete the added parameters. Note that the modified parameters only take effect on the notebook session pulled after modification, and do not take effect on the existing sessions.
Data Exploration Parameters
Note:
1. Currently, only the resource group for SQL analysis only scenario supports adding parameters on the Data Explore page.
2. Note that only dynamic Spark configurations take effect in the subsequent executions against SQL, and static parameters cannot take effect.
3. The parameter configuration at the data exploration level is of higher priority than that at the engine level and resource group level.
As shown in the figure below, on the Data Explore page, select the Standard-Spark engine for Data engine, select the option Select Resource Group for Resource configuration, and click Advanced settings on the page to add configurations.
As shown in the figure below, you can select a built-in configuration or enter the configuration manually.
Spark Job Parameters
Note:
1. Modifications to job parameters only take effect in the jobs that are launched subsequently and will not take effect in the running jobs.
2. The priority of job parameters is higher than that of engine-level parameters.
Adding Parameters When a Job Is Created
Enter Data Job, click Create job, and add parameters in Job parameter.
Editing Parameters of an Existing Job
1. Click Data Job,select an existing job and click Edit.
2. On the Edit job page, modify the job parameters and click Save after the modification.
Engine Network Introduction
Last updated:2025-03-12 18:03:39
Concept
The engine network is built on a Virtual Private Cloud (VPC) and assigns computing engines (such as the standard Spark engine and the standard Presto engine) with fixed network addresses, for example, 10.255.0.0/16. Each engine network is provided with a gateway for external access to standard engines within the network. This allows computing engines to be accessed via JDBC from either a private network (VPC) or a public network.
Note:
If you need to access resources in different VPCs, such as using a DLC engine to access EMR HDFS data, it is recommended to select an IP range with sufficient available addresses that do not conflict with those used by other products. You can purchase multiple computing engines under the same engine network and manage them centrally through the gateway.
Use Limits
Note:
The IP range should be consistent with the VPC IP range settings and created manually. Once created, it cannot be modified.
1. Use any of the following private IP ranges:10.0.0.0 - 10.255.255.255 (mask range: 12-28)
172.16.0.0 - 172.31.255.255 (mask range: 12-28)
192.168.0.0 - 192.168.255.255 (mask range: 16-28)
2. Make sure that a subnet with sufficient IP addresses is allocated to the engine network to prevent IP address exhaustion, which could hinder Pod creation in large-scale workloads. If the required scale is uncertain, it is recommended to use the default configuration.
3. When federated queries is used, ensure that the engine IP range does not overlap with the data source IP range.
4. Engine network configuration: Custom network settings can be configured during the initial purchase. To make changes later, submit a ticket to apply for that.
Network Segmentation
Standard engines under each engine network are managed by a gateway. Proper segmentation of engine networks helps balance the gateway load efficiently and mitigates the risk of single point of failure. We recommend segmenting networks based on business departments or task types.
Segmentation by Business
We recommend segmenting engine networks based on business departments. For example, each business department should have at least one engine network.
Segmentation by Task
We recommend segmenting engine networks based on task types. For example, you can create separate engine networks for different tasks such as BI analysis, data governance, and data analysis.
Note:
The above engine network segmentation recommendations are provided based on our experience for reference. You can also adjust the segmentation based on your actual needs, such as creating a dedicated engine network for handling of large-scale tasks according to the task scale.
Private Network Access
Creating a private link allows you to establish a secure and stable connection between your VPC and the gateway, enabling access to standard engines. On the Cloud Access Management page, you can create a private link, select the source VPC and subnet to be accessed, and obtain an access link upon completion. Any machine within the source VPC can then be connected to standard engines in the engine network.
Public Network Access
Standard engines in the engine network can also be accessed via the public network. For example, certain BI tools deployed on the public network may require a public network connection to the engine.
1. See Private Network Access to create a private link. For example: private network access JBDC link string.
2. Go to the Cloud Load Balancer console, create a public network access instance, and select Configure listener.
3. Go to the Create Listener page, create a listener and select TCP for Listening Protocol. The port should match the private link port by default: 10009 (for accessing the standard Spark engine) or 10999 (for accessing the standard Presto engine).
4. Bind the backend service to the created listener. Select the IP type and enter the private link IP address created earlier, such as 172.22.0.202. Use port 10009 (for accessing the standard Spark engine) or port 10999 (for accessing the standard Presto engine).
5. Use the public network VIP provided by CLB along with port 10009 or 10999 to access engine resources. This converts the access link into a public network connection.
By default, standard engines do not support public network access. If you need to access the public network, such as for installing Python packages in the notebook using magic %pip, submit a ticket to apply.
Gateway Introduction
Last updated:2025-03-12 18:03:39
The DLC gateway is a Serverless unified access gateway service deeply optimized based on Apache Kyuubi. Through the gateway, you can achieve stable and secure access to DLC data and standard computing engines based on Hive JDBC/Presto JDBC/DLC JDBC/TencentCloud API standard interfaces, reducing the complexity of managing access to large-scale computing engines. For example, you can submit SQL tasks and ETL jobs to specified standard computing engines through the gateway.
DLC Gateway
The gateway is a unique service of the DLC standard engine, offering users strengths such as reduced query latency, security and high availability, and flexible integration:
Reduced query latency: The DLC gateway can significantly reduce the time taken on the query link, and improve performance of data interactive analysis, especially for small data volumes.
Support for more access methods: The gateway supports Hive JDBC/Presto JDBC connects to the DLC standard engine, catering to various query scenarios.
Enterprise-level security: Identity authentication and sub-user engine permission control are performed through CAM authentication parameters (AK/SK).
High availability: The gateway provides higher availability and load balancing and supports scaling out for extremely high query concurrency.
Architecture
As shown in the figure below, only one gateway can be created under an engine network. This gateway can simultaneously manage all standard Spark engines and Presto engines created under the engine network.
By default, a user can only have one engine network and can only create one gateway. If the business scenario is complex and there are high requirements for concurrency and other performances, or if some more important businesses require environment isolation, it is recommended that users create multiple engine networks and multiple gateways to physically isolate different tasks.
Note:
1. Creating multiple engine networks and gateways requires the backend to enable the allowlist. Contact DLC development personnel to conduct the operations.
2. Different engine networks and gateways are physically isolated and cannot communicate with each other or access each other's engines.
Creating an Engine Network and Gateway
When the allowlist is not enabled, users have one engine network by default and cannot create another engine network, as shown in the figure below. Users do not need to manually create gateways. When users create the first engine or submit the first task under that engine network, DLC will create a free gateway with specifications of 2 CUs by default under that engine network.
After the allowlist is enabled, users can create multiple engine networks, as shown below. Users can create an engine network by clicking Create engine network. The created engine network does not have a gateway initially. Similarly, when users create the first engine or submit the first task under that engine network, DLC will create a free gateway with the specifications of 2 CUs by default under that engine network.
Users can see which engine network the current engine belongs to through the Engine Network Name/ID column on the engine list page.
Click the Unfold button on the upper right corner to view the engine network list information as shown in the figure below. Click the Details button to view the detailed information of the current engine network, including the number of standard engines under the current engine network, the number of user VPCs connected with the engine network, and the specifications of the gateway.
To avoid wrong cancellation, the system does not allow users to directly delete the engine network. Only when the number of standard engines under the current engine network is 0 can users click Delete Engine Network to delete the engine network.
Gateway Specifications
The DLC will automatically create a gateway with the specifications of 2 CUs for each engine network, and this gateway will not incur any fees. However, the gateway of 2 CUs is only suitable for the testing environment. It is recommended that users scale out the gateway for the production environment.
The DLC offers various gateway specifications. It is recommended to select the gateway specifications based on the number of engines to be managed, the maximum query concurrency QPS of the business scenario, and others. See the following table for details.
Gateway Specifications
Whether the Gateway Supports HA
Number of Managed Spark Resource Groups
Number of Managed Presto Engines
Number of Spark SQL/Presto SQL Concurrent Queries
Number of Concurrent Spark MLlib Notebook Sessions Created Transiently/Max Recommended
Number of Concurrent Spark Batch Tasks Submitted Transiently/Number of Spark Batch Tasks Running Simultaneously
2 CU
No
50
4
100
10/20
30/50
16 CU
Yes
150
12
200
20/80
80/150
32 CU
Yes
400
35
600
100/200
220/400
64 CU
Yes
700
70
1000
200/300
400/600
Upgrading Specifications
Data Lake Compute (DLC) provides 2 CU specifications for users by default. When the business scenario cannot be met and it is necessary to upgrade the specifications, purchase is required to obtain them.
Note:
1. Gateway configuration adjustment will lead to interruption and failure of all currently running tasks. Proceed with caution.
2. The entire change process is expected to take 10 to 15 minutes. If the gateway status does not return to running for a long time, submit a ticket for resolution.
If users need to upgrade the configuration of the gateway, they can follow the steps below.
1. Click on the left side of the sidebar. Standard engine to enter the engine list page.
2. Click Standard Engine on the left to enter the engine list page. At the top of the page, find the to-be-operated engine network and click Gateway> Details to enter the engine network details page.
3. Scroll down to the bottom of the details page and click the Spec configuration button of the gateway.
4. In the pop-up Configuration change page, select the specifications to change to and click Confirm.
FAQs
How to solve the API timeout error when tasks are submitted via JDBC?
First, check the gateway status through the console to see if it is normal and running. If the status of the gateway is Suspend, you can click the Start button to start the gateway and try again. Enter the engine network details page, go to the gateway details at the bottom, and click theStart button.
How to determine whether the current gateway load is normal?
The DLC provides basic monitoring of the gateway, and the health status of the gateway can be judged through the monitoring information. Enter the engine network details page, go to the gateway details at the bottom, and click the Monitor button to enter the gateway monitoring page.
As shown in the figure below, you can see the monitoring information of the gateway's CPU, memory, task threads and other aspects. If the CPU or memory load exceeds 70%, you need to consider whether the gateway load is high and scale out for the gateway.
Meanwhile, users can configure alarms in Tencent Cloud Observability Platform (TCOP). When the CPU utilization and the memory usage of the gateway exceed certain limits, the alarms can reach customers in the first place, enabling them to carry out operations such as scale-out of the gateway in advance.
The configuration process is as follows:
1. Enter the TCOP console, select Alarm Configuration, and click Create Policy.
2. Policy: Any policy
Policy Type: datalake/gateway (dim)
Filters (AND): Select the region where the gateway resides and select the gateway that requires alarm enabled. Multiple filters are allowed.
Trigger Condition: Manually configure the trigger conditions. As shown in the figure below, it It is configured that if either the CPU load or the memory usage exceeds 70%, an alarm will be triggered. Users can configure other alarm trigger conditions according to their needs.
3. Click Next step:Configure Alarm Notification.As shown in the figure below, if If there is an alarm notification template, you can reuse the existing template. If there is not, you can create a template and select the users to be notified after the alarm is triggered or select the WeChat group that the alarms are to be distributed to.
4. After the notification template is configured, click Complete.
Standard Engine Startup and Stop Logs
Last updated:2025-03-21 12:29:26
The log feature of Standard Engine Startup and Stop Logs records the startup and suspension events of each engine, making it easy to monitor engine status, troubleshoot, and optimize resource management.
2. Startup and stop logs of different operation objects:
Gateway: Unfold the overview, click Details, and view the startup and stop logs of the gateway on the details page.
Presto engine: Select the engine instance you want to view in the engine list, click engine name, and enter the basic configuration page to view the startup and stop logs of the computing engine.
Spark engine resource group: In the engine list, select the engine instance you want to view, click resource group management, select the resource group you want to view, and click resource group name to enter the resource group details page to view the startup and stop logs of the resource group.
Startup and Stop Log List
Note:
Support for Spark engine resource group startup and shutdown logs requires a gateway restart operation after March 20, 2025. Specific operation steps: Click on Engine Network > Gateway > Details on the overview card to enter the engine network details page, click Suspend, and then click Start.
Field Name
Description
TraceId
TraceId is a unique identifier for a start-stop process. It can associate the logs of different actions within the same process, helping users identify which logs belong to the same operation or request.
Time
Starting an action corresponds to the operation start time, and completing an action corresponds to the operation completion time.
Action
The actions include CLUSTER_SCALE_IN、CLUSTER_SUSPEND、CLUSTER_SCALE_UP, etc.
Details
CU adjustment of objects before and after operation.
Dependency Package Management
Last updated:2025-10-24 09:21:31
Core Concepts
Hierarchical Model
To ensure consistency and controllability of the dependency environment, above the “Standard Engine” layer, DLC maintains a protected set of dependencies preinstalled by the engine kernel and standard images, referred to as the Engine Kernel Baseline Dependencies (hereinafter, “Baseline Dependencies”). This collection serves as the starting point for all dependency resolution and merging. For details on baseline dependencies of different images, see Runtime Environment.
Description: Preset dependency list delivered with the engine kernel version and standard image.
Features: Non-removable; Cannot be directly overwritten via PyPI. Version adjustment requires controlled "version pinning/rewrite" at the engine level through requirements.txt.
Role: Acts as the global baseline's upper limit to underwrite platform operation stability and consistency.
Standard engine
Role: Performs limited dependency supplementation and controlled rewrite on top of "baseline dependency" to form a tenant engine-level global dependency baseline.
Impact range: all resource groups, jobs, and Notebooks inherited by default.
Cannot directly rewrite: The built-in engine dependency cannot be rewritten via the PyPI method.
Controllable rewrite: Engine-level support through requirements.txt to perform version rewrite for built-in dependencies.
Effective Timing and Installation Status
Effective actions: Install, Uninstall, and Clone take effect during instance startup.
Trigger scenario:
Start job
Restart SQL resource group
Machine learning resource group:
ML open-source framework and Python dependency: Click Restart on the WedataNotebook Exploration webpage.
Spark MLlib dependency: Recreate a Spark session on the WedataNotebook Exploration webpage.
View installation status:
Engine level: Display the status of any compute instance after the last installation (for example, if only the SQL resource group and job A run sequentially, show the corresponding status of job A).
Resource group/job/Notebook level: Display installation status by respective dimension.
Support click dependency entry to view logs for successful installation or failure.
Prerequisites
Note:
The dependency package feature is an allowlist feature. To use this feature, submit a ticket to contact after-sales for enablement.
Purchase standard engine Spark.
To use existing engines, submit a ticket to contact after-sales for upgrading engine image and gateway image to version 2025-09-30 or later.
Description: Shows the final dependent collection and installation status (covering engine/resource group/job level) for rapid troubleshooting.
Resolving Dependency Conflicts
Maven(Jar)
Direct dependency conflict: Post-installation package installation failure.
Transitive dependency conflict: The system automatically removes conflicting transitive dependencies, successfully installed; viewable dependency removal record.
Class conflict: Installation successful but may conflict at runtime.
Unused conflict class: task running properly.
Use conflict class: task failure with the reason displayed in logs.
PyPI(Python)
Duplicate installation at the same level: Installation with the same name or different versions failed due to dependency failure.
Duplicate installation at different levels:
Standard engine/resource group/job level: Install by add time in sequential execution, dependency failed for post-installation.
Notebook level: Can rewrite the version of existing packages at the parent level.
Best Practices
Core Principle
Minimize engine-level dependencies
The engine level is the global baseline at the tenant engine level, impacting the entire system. Unless it is confirmed as a public dependency required for all scenarios, adding excessive dependencies at the engine level is not recommended. Reduce global coupling and cross-team compatibility costs.
Prioritize using resource groups for isolation and hierarchical evolution
Place common dependencies of teams/business lines at the resource group level to naturally isolate differentiated needs of different teams/projects and avoid global pollution.
Make minimal additions at the job/Notebook level
Place only unique, short-term verification, or small-range personalized dependencies for the job/Notebook. When multiple jobs reuse them, move them to the resource group level for unified management.
Scenario-Based Recommendations
Multiple teams share the same engine
The engine maintains a "common business base".
Teams with differentiated dependencies are placed in their respective resource groups to avoid mutual constraints.
Algorithm team quick test
Notebook stage allows quick trial installation; dependencies are fixed at the resource group level before release.
FAQ
Q: How to handle Maven transitive dependency conflicts?
A: The system automatically removes conflicting transitive dependencies and records the details. Please confirm the impact in the installation log and "remove record".
Q: Why does installation/uninstallation not take effect immediately?
A: Dependency changes take effect when the compute instance starts. Restart the resource group or recreate the job/session as per the "action to take effect".
DNS Domain Resolution
Last updated:2025-12-03 15:30:29
By setting the DNS service, the engine can securely and conveniently access external services via domain names.
Prerequisites
1. DNS service created
1.1 The DNS service has been created in the Private DNS console, with the appropriate domain name and resolution record (domain name ⇄ IP mapping relationship) configured. For operation guide, see Create Private Domain.
1.2 Custom DNS service deployment in Tencent Cloud VPC.
2. Network interconnection configured
Configure network connection in the DLC console to make the network where the engine resides accessible to the target IP in the VPC.
Operation Steps
Step 1: Bind Domain Resolution
1. Log in to the DLC console and go to the target standard engine details page.
2. On the details page, go to the domain resolution bind settings tab.
Step 2: Select Parsing Type
Domain resolution supports the following two types:
Private DNS
When a user has created a private DNS service in Private DNS, they can directly select this type.
During the binding process, select the VPC corresponding to the private DNS service.
After binding, the system will automatically synchronize the latest domain name and parsing configuration.
2. Custom Domain Resolution
If you use a self-built DNS service or external parsing scheme, select Custom Domain Resolution.
Manually specify the VPC where the DNS service resides and complete the binding.
Step 3: Verify Access
1. After binding succeeds, the engine automatically loads the parsing configuration.
2. By accessing the configured domain name within the engine, you can parse to the corresponding IP network and access external services.
Note
Private DNS takes effect only within the same VPC or interconnected VPCs.
Custom domain resolution requires ensuring DNS service availability and correct resolution records.
Resource Group
Resource Group Introduction
Last updated:2025-10-10 14:11:24
The resource group is a secondary queue division of the computing resources within a Standard Spark Engine. Resource groups belong to a parent Standard Engine, and resource groups under the same engine share resources with each other. The computing units (CUs) of the DLC Standard Spark Engine can be allocated to multiple resource groups as needed. You can configure each resource group's minimum and maximum CU limits, start and stop policies, concurrency, and dynamic/static parameters to efficiently manage resource isolation and workload in complex scenes such as multi-tenancy and multi-tasking.
For example, you can create separate resource groups within a Standard Spark Engine, such as a Report Resource Group, a Data Warehouse Resource Group, and a Historical Backfill Resource Group. You can set the upper and lower limits of computing units (CUs) for each resource group and assign relevant SQL tasks or jobs, such as reports and data warehouse tasks, to the appropriate resource group, ensuring resource isolation between different types of tasks and preventing individual large queries from monopolizing resources for extended periods.
Features
Resource Group Isolation
Resource groups enable resource isolation within the Standard Spark Engine. You can assign specific resource groups to different users or queries, effectively isolating resources and preventing a single user or large query from monopolizing most of the computing engine's resources.
Resource Group Elasticity
By configuring the number of Executors in a resource group for dynamic allocation, the resource group can adjust the resources used by SQL tasks or jobs based on the workload, effectively improving resource utilization.
The dynamic allocation configuration is shown in the diagram below:
Both Task 01 and Task 02 are set to dynamic allocation, each using 8 CUs at Time A. By Time B, Task 01 only requires 4 CUs, releasing 4 CUs of idle resources for Task 02 to use, thereby improving overall resource utilization. This process is illustrated in the diagram below:
Resource Group Type
Currently, DLC supports three types of resource groups: SQL analysis only resource groups, Job resource groups, and Machine Learning resource groups. It also supports default creation of "SQL analysis only" and "Job" resource groups when purchasing a standard engine, and allows users to independently create "SQL analysis only" and "Machine Learning" resource groups. The following introduces the usage scenarios and features of the three resource groups:
SQL analysis only resource group: can be set and used in modules such as Data Exploration, supporting SQL query analysis scenarios.
Job resource group: for data job scenarios. When creating a data job, select an engine to use its job resource group by default. The job's resource configuration can be set when creating the data job.
Machine Learning resource group: for AI model training scenarios using Python, ML machine learning framework, and PySpark.
Quick Configuration
Resource groups provide quick configuration options. Users can conveniently set the total specification (unit: Number of CUs) of a resource group, and the backend automatically allocates resources based on policies.
Specific policies are as follows:
1. Dynamic allocation is enabled by default.
2. Total specification [4,8): driver and executor use 2CU.
3. Total specification [8,64): driver and executor use 4CU.
4. Total specification [64,∞): driver and executor use 8CU.
Resource Group Monitoring
Resource group monitoring provides users with comprehensive task and resource usage insight to help optimize resource allocation and scheduling efficiency.
Note:
Currently only support "SQL analysis only resource group" and "Job resource group". Other type resource groups are not currently supported.
Resource Group Overview
1. Upper Resource Limit: If dynamic allocation is not enabled for the resource group, it is the fixed resource of the resource group. If dynamic allocation is enabled for the resource group, it is the Max resource set for the resource group.
2. Occupied Resources: Get the occupied resources of the "SQL analysis only resource group" and "Job resource group" in real time when pulling up Pods.
3. Remaining Available Resources: The available resources for the user in the current resource group, which is the Upper Resource Limit minus the Occupied Resources.
Detailed Metric for Resource Group Monitoring
Task metrics (Task)
Count the number of tasks in different statuses, including cancelled, failed, initialization, running, queued, and successful status.
Task duration metrics: average initialization duration, maximum initialization duration, average queue duration, and maximum queue duration. These metrics help analyze task startup and scheduling efficiency.
Resource Aggregated Metrics
Total number of Executor Cores launched by the resource group, reflecting the scale of computing resources applied for.
Total number of active Executor Cores used by the resource group, showing current actual compute resource usage volume.
Compute Unit (CU) Metrics
Resource Group CU usage, quantifying the compute unit resources consumed by the resource group.
Resource Group CU usage rate, reflecting the utilization efficiency of resource group's compute resources.
Usage Limitations
The resource group name should be globally unique. It is recommended to use an all-English name.
Terminology
Description
Illustration
(System created by default)
Exist upon engine creation, and named as default-rg-xxx.
SQL analysis only resource group: created by default when purchasing an engine and named "default-rg-xxx".
The default resource group starts in a suspended status, with settings for automatic start and automatic suspension.
The default resource group supports modification of resource configurations.
The default resource group supports configuring start/stop policies, setting concurrency limits, and adjusting dynamic/static parameters.
The default resource group supports the dependency package management function.
The default resource group cannot be deleted.
Job resource group: created by default when purchasing an engine, does not support suspend, start, or restart operations, and is named "default-job-rg-xxx".
The default resource group starts in a ready state, with automatic start and automatic suspension disabled.
The default resource group does not support modifying resource configurations and defaults to the maximum resource limit of the engine.
The default resource group does not support setting the start/stop policy and number of concurrencies, but supports setting dynamic/static parameters.
The default resource group supports the dependency package management function.
The default resource group cannot be deleted.
(User manually created)
The custom resource group supports the modification of resource configurations.
The custom resource group supports configuring start/stop policies, setting concurrency limits, and adjusting dynamic/static parameters.
The custom resource group can be deleted.
The Job resource group does not support manual creation by user or operations related to the custom resource groups.
Private Connection
Private Connection Introduction
Last updated:2024-09-04 11:15:28
Endpoints are built on Private Link. If you need to access engines and data through JDBC or other methods, you can create an endpoint to establish a secure and stable private connection between your VPC and the access point.
Meson Engine is a high-performance vectorized query engine built into the DLC standard engine Spark. It supports seamless acceleration for Spark SQL workloads and DataFrame API calls, reducing the overall cost of workloads. Compared with open-source Spark, it offers a 2.7x performance improvement in TPC-DS 1TB benchmark. Meson is fully compatible with Apache Spark APIs, requiring no changes to existing business code.
Principle Introduction
With the extensive application of SSDs and significant improvement in network interface card performance, the performance bottleneck of the Spark engine has shifted from the traditional understanding of IO to computing resources mainly driven by CPU. However, CPU optimization schemes around JVM (such as Codegen) face many constraints, such as limits on bytecode length and number of parameters. Developers also find it difficult to leverage some features of modern CPUs on JVM.
The Meson Engine transforms Spark Physical Plan, uses a C++ implemented vectorized acceleration library to execute computations, and returns the executed data in a columnar format, enhancing memory and bandwidth utilization efficiency. This breakthrough in performance bottlenecks can effectively improve the efficiency of Spark jobs.
Usage Restrictions
The Meson Engine currently has usage scenario limits. In restricted scenarios, the Meson engine will perform Fallback and revert to the Native Spark engine for execution. Since Fallback needs to convert data, too many Fallback times may lead to a longer total running time than the Native Spark engine.
Please learn about the main usage limits of Meson Engine in advance.
Supports Parquet data format. ORC support is not currently optimized. Other data formats are not supported.
ANSI mode is not supported.
Applications based on RDD are not supported.
Structured Streaming is not supported.
Custom Python code based on PySpark is not supported.
MEMORY_ONLY CacheTable is not supported.
Applicable Scenarios
The following support capability is provided by the standard engine Standard-S 1.1(native) and above versions.
Note:
Meson does not fully support or unsupported storage formats, data types, operators, and functions will Fallback to the native Spark engine for execution.
Storage Format
Data storage formats supported by the Meson engine:
Standard Engine Standard-S 1.1 (native) supports Meson Engine by default.
Note:
When resources are created, select the accurate engine version. Standard-S 1.1 does not support Meson Engine.
Network Connection Configuration
Last updated:2025-12-02 16:27:57
Data Lake Compute (DLC) supports configuring network (VPC) for data engine, facilitating management of engine access to different data source networks.
Network Configuration Type
According to different business scenarios, DLC provides two network configuration types.
Enhanced network configuration: suitable for accessing the data under one VPC with high speed and stability.
Note:
1. A data engine of a non-Spark job type can only be bound to one enhanced network configuration.
2. If you use an enhanced network, the subnet IP address under your VPC will be used. Please ensure sufficient subnet IP addresses.
Cross-origin network configuration: suitable for cross-origin federated data query that needs to access multiple VPCs. A data engine can support binding multiple cross-origin network configurations.
Network Configuration Status
Initializing: The network configuration is being initialized. At this point, the network is not active.
Success: The network configuration takes effect on the bound engine.
Failure: The network configuration fails and can be deleted and reconfigured.
Network Configuration Security Policy
If you have configured a security group policy for the VPC, you need to add inbound rules for different network configuration types.
Enhanced network: Add inbound rules for the IP range of the VPC where the data source is located to the security group.
Cross-source network: Add inbound rules for the IP range of the engine bound to the network configuration to the security group.
Create Network Configuration
1. Log in to the DLC console and choose service region.
3. Click the Create Network Connection button to enter the Create Configuration page.
The configuration parameters are as follows:
Configuration Content
Required or Not
Filling Instructions
Network Configuration Type
Yes
Select according to the use case
Enhanced network configuration: suitable for data scenarios that require high-speed and stable access to a VPC.
Cross-origin network configuration: suitable for cross-origin federated query analysis scenarios that need to access data under multiple VPCs.
Configuration Name
Yes
Supports Chinese, English, and _, with a number of characters not more than 35.
Instance source
Yes
Two sources are supported:
Data catalog of DLC: Option the data catalog that has created a connection in the data management of DLC currently
New network configuration: Select a new data source to create a network connection. Currently, the data source supports MySQL, Kafka, EMR HDFS (COS, HDFS, Chdfs), Postgresql, SqlServer, Clickhouse. If the data source associated with the network configuration to be created is not yet supported, you can select another option and manually specify a VPC.
Catalog
Yes
Select the corresponding data catalog according to the source of the selected instance. The range of selectable data catalogs will be related to your account permission.
Data source VPC
No
The data engine network will connect all subnets in the VPC.
Bound data engine
Yes
Select the data engine associated with this network configuration. If the data engine is in isolated or initializing status, it will be unable to select.
Configuration Description
No
Not more than 100 characters.
4. Fill in, complete the settings and save. Then you can create a network configuration.
Note:
Once created, the network is in the initialization state. Subsequently, you can view the status in the list.
Delete Network Configuration
You can perform a deletion operation to manage the deletion of network configurations that are no longer needed or have failed to configure. Directions:
3. Find the network configuration that needs to be deleted. Support filtering search. Note the selection of network configuration type.
4. Click the Delete button. Just complete the deletion after secondary confirmation.
Note:
After deletion, this data engine will not be able to use this network configuration. If you need access, reconfiguration is required. Proceed with caution.
Modify Description Information
You can modify the description information of the configured network configuration by modifying the description information. Directions:
3. Find the network configuration that needs to be deleted. Support filtering search. Note the selection of network configuration type.
4. Click the Modify Description Information button to edit.
Storage Configuration
Managed Storage Configuration
Last updated:2025-12-02 16:27:57
Managed storage refers to the storage space hosted on the Data Lake product, with COS as the underlying storage. Managed storage contains data such as native tables, user program packages, and query results. Therefore, to utilize the capabilities of native tables and data optimization, it is necessary to enable managed storage first. The native tables on managed storage are by default in the Iceberg format, so you don’t need to manage the underlying file contents. For details on managed storage billing, please refer to Billing Overview.
Note:
In addition to billing for user data usage, the managed bucket also incurs minimal fees for requests from daily storage routine inspections (including user storage activity level and amount inspections) performed by Data Lake Compute (DLC). To avoid fees from these routine inspections, promptly terminate any managed bucket that is no longer in use.
This document introduces how to enable and configure managed storage.
Enable Managed Storage
Step 1: Enter Managed Storage Configuration
You can log in to the DLC console and click the Storage Configuration module on the left sidebar to go to the Configuring a Managed Bucket page.
Step 2: Creating a Managed Bucket
1. Click Create Managed Bucket to go to the creation page, select the managed bucket type, and click Confirm to complete the creation.
Here, you can specify the managed bucket type as a metadata acceleration bucket or a regular bucket. Metadata acceleration buckets and regular buckets have the same billing method. However, Metadata acceleration buckets require additional configurations to grant engine access permissions. For details, refer to Binding of the Metadata Acceleration Bucket.
2. The storage path for query results can be modified above. The path is used to temporarily store SQL query result data, Spark job shuffle data, and other related data. You need to specify a path to ensure the normal operation of jobs and tasks. If you have created a managed bucket, it is recommended to configure the query result path as Managed Bucket. You can also configure the query result path to a COS Bucket path under your account.
View managed bucket
After enabling managed storage, a bucket will be created, and you can view the buckets and data on managed storage in the Storage Configuration module.
Destroy Managed Storage
Destroying data is a high-risk action; only after all database table data has been deleted, can you proceed to destroy managed storage. Destroying managed storage requires administrator privileges.
Step 1: Delete database table data
To destroy managed storage, you must first delete all database table data on the managed storage.
After deleting the database table data, you can destroy managed storage on the managed storage configuration tab under the Storage Configuration module.
Destroying managed storage will delete all DLC managed buckets, so please proceed with caution.
Binding a Metadata Acceleration Bucket
Last updated:2024-07-31 17:30:27
DLC supports the binding of Fusion Bucket to accelerate Query Analysis Performance. To use this feature, you need to create a Metadata Acceleration Bucket. DLC Managed Storage provides Metadata Acceleration Bucket. Use COS Bucket under the user's account. For details, please see COS>Metadata Acceleration.
When accessing the DLC Metadata Acceleration Bucket, binding of permissions is necessary. The Permission Binding Process is as follows.
2. Enter the Metadata Acceleration Bucket Configuration Page, select the bucket you want to bind, and click Configure.
Note:
Only Metadata Acceleration Buckets are displayed on the Metadata Acceleration Bucket page; ordinary buckets (buckets without the metadata acceleration feature enabled) will not be shown.
3. Click Bind to bind the data engine that needs to access this bucket to the Metadata Acceleration Bucket.
Bind computing resources of SCS
If you use SCS to stream data into the lake, and the storage written to is a Metadata Acceleration Bucket, then you need to configure access permissions for the Metadata Acceleration Bucket under Storage Configuration. Under the Tencent Cloud Product Binding section, create a new product, select Stream Computing Oceanus and the corresponding resources, then click save.
Bind computing resources of non-DLC data engines
Sometimes, the computing resources you need to access the Metadata Acceleration Bucket are not from a DLC data engine. In this case, you can configure access permissions for the Metadata Acceleration Bucket under Storage Configuration.
HDFS User Configuration is used to configure the super user of your computing resources accessing DLC, usually root/hadoop/presto/flink.
HDFS Metadata Permissions Configuration is used to configure the VPC Network Environment you allow to access DLC, usually the VPC where the computing resources of the above mentioned non-DLC data engines are located.
Metadata Management
Data Catalogs and DMC
Last updated:2024-07-31 17:27:26
External data and managed storage data in DLC can be managed through the Data Management Page by executing standard SQL statements and APIs. Through the Console Data Management Page, you can create, edit data catalogs, and create, query, delete databases and tables.
Creating a data catalog
Note:
The platform will automatically create a DataLakeCatalog for you for data management on the lake.
When you have external data sources and wish to perform federated analysis, you can follow the process below to create a data catalog for external data sources.
1. Log in to DLC console, select the service region. The account used to log in must have the permission to create a catalog. For enabling sub-account permissions, refer to Sub-account Permission Management.
3. Enter the data source creation visual interface. After filling in the connection information, complete the network configuration to connect the engine with the external data source.
4. After filling in the data source information, click Confirm to complete the creation of the data source.
5. In the Data Catalog List, view connection information, status, creator, and other information.
Edit Data Catalog
1. Click Data Catalog List > Operations > Edit to modify the Data Catalog's description information, network configuration information, username, password, and running cluster, etc.
2. After modifications, click Create to reconstruct the Data Catalog.
New database
1. Log in to DLC Console, select the service region. The account used to log in must have database creation permissions.
2. Enter Data Management, click on the directory name under the Data Catalog to view the databases within that directory.
3. Click Create Data Catalog to enter the Database Creation Visual Interface.
4. After filling in the relevant database information and saving, the database creation is complete. When creating a database, you can enable data optimization for the entire database.
Database Name: Globally unique, supports English case-sensitive letters, numbers, "_", cannot start with a number, up to 128 characters.
Description: Supports both Chinese and English, up to 2,048 characters.
A root account can create up to 100 databases.
View Database
1. Log in to DLC Console, select the service region. The account used to log in must have database query permissions.
2. Enter Data Management > Database, select the data directory, click Database Name to access the database details, manage the database's tables. For a detailed operation guide, refer to Data Table Management.
Dropping a Database
1. Log in to DLC Console, select the service region. The account used to log in must have database deletion permissions.
2. Enter Data Management, click Delete. After confirming a second time, the database can be deleted.
Data Table Management
Last updated:2025-12-12 11:38:36
Users can create databases by executing DDL statements using either the DLC Console or the API.
Creating a Data Table
Method I: Creating in Data Exploration
1. Log in to the DLC console and select the service region. Ensure the logged-in user has the permission to create data tables.
2. Navigate to the Data Exploration module. In the left list, click an existing database. Let the mouse pointer over the table row and click the
icon. Then click Create Native Table or Create External Table.
Note:
Native tables are stored in DLC managed storage. You do not need to worry about the underlying Iceberg storage format and it supports data optimization capabilities. To use native tables, managed storage must be enabled. For more details, see Managed Storage Configuration.
The underlying data of an external table is stored in your own Cloud Object Storage. You need to specify the data path when creating an external table.
3. After you click Create Native Table/Create External Table, the system will automatically generate an SQL template for creating the data table. Users can modify the SQL template to create the data table. Click Run to execute the SQL statement and complete the creation.
Method II: Creating in Data Management
The Data Management module supports managing both native tables and external tables in DLC managed storage.
1. Log in to the DLC console and select the service region. Ensure the logged-in user has the permission to create data tables.
2. Go to Data Management through the menu on the left, enter Database, and click the name of the database where the data table will be located to enter the database management center page.
3. Click Create Native Table or Create External Table button to enter the data table configuration page.
4. Native tables support three types of data sources: empty table, local upload, and Cloud Object Storage (COS). Different data sources have different creation processes. Native tables also support data optimization capabilities, which can be set to inherit the database governance rules or managed independently.
4.1 Create Empty Table: Create an empty table with no records.
Table Name: Cannot start with a digit, supports uppercase and lowercase letters, digits, and underscores (_), up to 128 characters.
You can provide a description for the data table.
You can manually add and input column names and data types. Supports configuring complex field types such as array, map, and struct.
4.2 Local Upload: Upload a local file to DLC to create a data table, supporting files up to 100 MB.
CSV: Supports visual configuration of CSV parsing rules, including compression format, column delimiter, and field enclosure. It can automatically infer the schema of the data file and parse the first row as column names.
JSON: DLC only recognizes the first level of JSON as columns. It supports automatic schema inference for JSON files, and the system will treat the first level fields as column names.
Supports common big data formats such as Parquet, ORC, and AVRO.
You can manually add and input column names and data types.
If automatic structure inference is selected, DLC will fill in the recognized columns, column names, and data types. If they are incorrect, please modify them manually.
4.3 Create a data table through Cloud Object Storage (COS).
Create a data table by reading the COS data bucket under the current account.
CSV: Supports visual configuration of CSV parsing rules, including compression format, column delimiter, and field enclosure. It can automatically infer the schema of the data file and parse the first row as column names.
JSON: DLC only recognizes the first level of JSON as columns. It supports automatic schema inference for JSON files, and the system will treat the first level fields as column names.
Supports common big data formats such as Parquet, ORC, and AVRO.
You can manually add and input column names and data types.
If automatic structure inference is selected, DLC will fill in the recognized columns, column names, and data types. If they are incorrect, please modify them manually.
5. Data partitioning is typically used to improve query performance by partitioning tables with large quantities of data. DLC supports querying data by partitions. Users need to add partition information at this step. By partitioning your data, you can limit the amount of data scanned by each query, thus improving query performance and reducing usage costs. DLC follows the partitioning rules of Apache Hive.
The partition column corresponds to a subcatalog under the table's COS path, and the catalog naming rule is Partition Column Name=Partition Column Value.
Note:
The example code is for reference only and should be modified based on the actual business scenario. For example, replace "bucket_name" with your bucket name.
If there are multiple partition columns, they need to be nested in the order specified in the CREATE TABLE Statement.
CREATE EXTERNAL TABLE IF NOT EXISTS `COSDataCatalog`.`dlc_demo`.`table_demo`(
`_c0` string,
`_c1` string,
`_c2` string,
`_c3` string
) PARTITIONED BY (`year` string, `month` string, `day` string)
ROW FORMAT SERDE 'org.apache.hadoop.hive.serde2.OpenCSVSerde'
WITH SERDEPROPERTIES ('separatorChar'=',', 'quoteChar'='"')
STORED AS TEXTFILE
LOCATION 'cosn://bucket_name/folder_name/';
Querying Basic Information of Data Tables
Method I: Querying in Data Exploration
In the data table project, let the mouse pointer hover over the Data Table Name row, then click the
icon. From the pull-down menu, click Basic Information to view the basic information of the created data table.
Basic information of the data table includes:
Method II: Viewing in Data Management
1. Log in to the DLC Console and select the service region. Ensure the logged-in user has the permission to view the data table.
2. Go to the metadata management module via the left sidebar. On the database page, click the name of the database where the data table resides. Enter the database management center page. Here, you can query information such as the number of rows, storage space, creator, fields, partitions, etc.
Self-Service Querying for Data Table Partition Information
Note:
Replace the database name and table name in the example below according to your actual business scenario.
Data table management supports querying partition information related to data tables. With the partition information, you can view details, including record quantity, file quantity, data storage capacity, and update time for each partition of the table.
1. Go to DLC console, select the service region. Login user should have the permission to view data tables.
2. Go to Metadata Management via the left sidebar, enter the Database, and click the name of the database where the data table resides to access the Database Management page.
3. Select Database to go to the Data Table management page. Select and click the Data Table, and then select Partition Information to go to the Partition Information page.
The data partition page displays partition information of the table in paginated form. You can query partition details through sorting partitions by fields, including names, record quantity, file data size, and file storage. For example, to view a certain fixed partition, enter the partition name to search.
Note:
1. Partition information statistics are currently only available for DLC native tables.
2. Partition information statistics are currently in the Beta testing phase. To enable the partition information statistics, you may contact us.
Previewing Data Table Data
In the data table project, let the mouse pointer hover over the Data Table Name row, then click the
icon. From the pull-down menu, click Preview Data, and DLC will automatically generate an SQL statement to preview the first 10 rows of data. Execute the SQL statement to query the first 10 rows of the data table.
By default, the data preview feature displays the first 100 rows of data.
Editing Data Table Information
You can edit the description information of a data table in the data management module.
1. Log in to the DLC console and select the service region. Ensure the logged-in user has the permission to edit the data table.
2. Go to Metadata Management > Database via the left sidebar, and click the database name where the data table is located to enter the database management center page.
3. Find the data you need to edit, and click the Edit button on the right to make changes.
4. After modification, click the Confirm button to complete the edit.
Deleting a Data Table
Method I: Deleting in Data Exploration
In the data table project, let the mouse pointer hover over the Data Table Name row, then click the
icon. From the pull-down menu, click Delete Table. DLC will automatically generate an SQL statement to delete the data table. Execute the SQL statement to delete the data table.
When an external table is deleted, only the metadata stored in DLC is deleted. The data source files are not affected.
When a data table under the DataLakeCatalog directory is deleted, all data in the data table will be cleared. Please operate with caution.
Method II: Deleting in Data Management
Currently, Data Management only supports managing database and tables stored in DLC. For external tables, use Method I to delete.
1. Log in to the DLC console and select the service region. Ensure the logged-in user has the permission to delete the data table.
2. Go to Metadata Management > Database via the left sidebar., and click the database name where the data table is located to enter the database management center page.
3. Click the Delete button on the right of the data table that you want to delete. After a second confirmation, the corresponding data table will be deleted, and the data in the data table will be cleared.
Showing Table Creation Statements
In the data table project, let the mouse pointer hover over the Data Table Name row, then click the
icon. From the pull-down menu, click Show table creation statements. DLC will automatically generate and display the SQL statement used to create the data table. Execute the SQL statement to view the CREATE TABLE statement.
System Constraints
DLC allows a maximum quantity of 4096 data tables per database, up to 100,000 partitions per data table, and up to 4096 columns of attributes per data table.
DLC will recognize data files under the same COS path as belonging to the same table. Please ensure that data for separate tables is stored in separate directory structures.
DLC does not support multiple versions of data in COS and only the latest version of data in the COS bucket can be queried.
All tables created in DLC are external tables and the CREATE TABLE SQL statement must include the EXTERNAL keyword.
Table names must be unique within the same database.
Table names are case-insensitive and can only include English letters, digits, and underscores (_), with a maximum length of 128 characters.
For partitioned tables, you must manually implement the ADD PARTITION statement or the MSCK statement to add partition information before you can query the partition data. For more details, see Query partitioned table.
When CSV is used to create a table, DLC will default all field types to string. However, this does not affect the computation and query of the original data fields.
Data View Management
Last updated:2024-07-31 17:28:41
DLC provides data view query capabilities, allowing users to quickly and easily perform data queries and use through the management of data views.
Create View
1. log in to DLC console, select the service region, log in users must have the permission to create views.
2. Enter the Data Exploration page, you can create views using SQL statements. For details of the statement, see SQL Syntax.
3. Select the computing resource, click the Running button to complete view creation.
View Views
You can view the view using SQL statements through Data Exploration, see SQL Syntax for specific syntax. Meanwhile, DLC also offers a Visual Interface for managing views, with the following operations.
1. Log in to the DLC console, select the service region, log in users must have the permission to query views.
2. Enter the Data Management page, click on the Database Name where the view is located to enter the DMC page.
3. Click View to enter View Management.
4. Click the View Name you want to inspect to view its information. You can copy the SQL statement.
Delete View
You can view the view using SQL statements through Data Exploration, see SQL Syntax for specific syntax. Meanwhile, DLC also offers a Visual Interface for managing views, with the following operations.
1. Log in to DLC Console, select the service region, users must have view deletion permissions.
2. Enter the Data Management page, click on the Database Name where the view is located to enter the DMC page.
3. Click View to enter View Management, then click the Delete button to delete the view.
Caution
Deleting a view will clear all data under the view and cannot be recovered. Please proceed with caution.
Function Management
Last updated:2025-12-02 16:27:57
In DLC, you can use User-Defined Functions to process and construct data, and it supports function management.
Creating function
1. Log in to the DLC Console, select the service region. The account must have database operation permissions.
2. Portal 1: Go to the Metadata Management page, switch to the Database page, click the database name where you need to create a function, and switch to the Function page.
Portal 2: Go to the Metadata Management page and switch to the Function page.
3. Select Function, then click on the Create Function button to enter the function creation menu.
The function package supports either local uploads or the use of existing JAR or Python files stored in COS. For local uploads, the maximum file size for JAR files is 5 MB, and for Python files, the limit is 2 MB.
Python UDF registration is effective globally, and the configuration entry is as follows: Navigate to the Data Management page, switch to the Functions tab, and click Create. For the creation and management processes, refer to UDF Function Development Guide.
Select the Spark cluster to run the function. There will be no fees incurred during the execution.
It is recommended to save the function package to the system for easy management and use. It also supports mounting to a specified COS path.
View function information
1. Log in to the DLC Console. The account must have database operation permissions.
2. Choose Metadata Management>Database and click the database name of the function you want to view. Alternatively, go to the Metadata Management page and switch to the Function page for a global view.
3. Select the function to view its Build Status. If the build fails, click the Edit button on the right and submit again.
4. Click on the Function Name to directly view the function details.
Editing Function Information
1. Log in to the DLC Console, select the service region. The account must have database operation permissions.
2. Go to the Metadata Management page and click the database name of the function you want to view.
3. Select a Function and click the Edit button to enter the function information editing page.
The function name, storage method, and upload method cannot be modified at this time. If you need to change this information, please recreate the function.
After modifying the function information, it will be rebuilt. Please proceed with caution.
Deleting function
For functions that no longer need to be managed, you can delete them.
1. Go to the DLC Console, select the service region, log in to an account with database operation permissions.
2. Go to the Data Management Page, click on the database name of the function you want to view.
3. Select the function and click the delete button to delete the function that is no longer needed.
Note:
After deletion, the data under this function will be cleared and cannot be recovered. Please proceed with caution.
Data Recycle Bin
Last updated:2025-08-07 10:35:47
The data recycle bin feature provides temporary storage for deleted Iceberg native tables under the DataLakeCatalog data catalog, to retain accidentally deleted data. Once this feature is enabled, all deleted data files will be stored into the recycle bin, instead of being permanently deleted. Administrators can perform recovery and deletion management on these data tables, while regular users can recover data tables depending on their permissions. This effectively reduces the risk of data loss and improves the efficiency of data management.
You can enable the data recycle bin feature for your DataLakeCatalog data catalog through the metadata management in Data Lake Compute (DLC).
Note:
1. Once the feature is enabled, files in the data recycle bin will still incur storage fees. When the files are permanently deleted from the recycle bin, no charges will be applied. For details, see storage fees.
2. The retention duration for the files in the data recycle bin can be configured to 7 days, 15 days, or 30 days according to the use cases.
Enabling the Data Recycle Bin Feature
Note:
1. Administrator confirmation is required to enable the feature.
2. Once the feature is enabled, any deleted data tables will be retained in the recycle bin by default, and storage fees will be charged.
2. In the left sidebar, select Metadata Management. In the data catalogs, find the DataLakeCatalog data catalog.
3. Click More in the operation column of this catalog. Select Data Recycle Bin, confirm and click the Enable Recycle Bin button.
4. Configure the retention duration for the files in the recycle bin.
Recovering Tables in the Data Recycle Bin
Note:
1. Administrators can recover all data tables in the recycle bin. Regular users can recover data tables from databases for which the users have edit permission.
2. The recovery operation is only supported for a single table, and batch operations are not supported.
3. When another table with the same name already exists in the database to which the table to be recovered belongs, you need to change the name of the existing duplicate table before the recovery.
4. If the database to which the table belongs is deleted, the table cannot be recovered.
2. In the left sidebar, select Metadata Management. In the data catalogs, find the DataLakeCatalog data catalog.
3. Click More in the operation column of this catalog and select Data Recycle Bin.
4. Select the data table to be deleted from the list and click the Delete button in the right operation column. You can also select multiple tables and click the Batch Delete button in the top-left corner.
Managing the Data Recycle Bin Feature
Note:
Only administrators are allowed to manage the data recycle bin feature.
Setting Retention Duration for Files in the Data Recycle Bin
Note:
The retention duration change takes effect immediately. If the duration is set shorter than the original duration, the existing tables in the recycle bin will be permanently deleted immediately. For example, if the retention duration is changed from 15 days to 7 days, tables older than 7 days will be deleted immediately. Please confirm before proceeding.
2. In the left sidebar, select Metadata Management. In the data catalogs, find the DataLakeCatalog data catalog.
3. Click More in the operation column of this catalog and select Data Recycle Bin.
4. Click the Recycle Bin Configurations button to disable the feature.
Partition Field Policy
Last updated:2024-07-31 17:29:14
In Hive, partition information appears in the form of directories. In Iceberg, partition information is recorded in the underlying data files, making Iceberg’s partitions more flexible and allowing the partitioning strategy to evolve with changes in data volume. In DLC, you can create Iceberg tables to utilize features such as hidden partitions.
Note:
By default, native tables are Iceberg tables. External tables, depending on the file format, can choose between Hive or Iceberg tables. For detailed syntax, refer to the document CREATE TABLE.
With hidden partitions, when inserting and querying data, you do not need to specify partition information additionally as required in Hive.
Iceberg partition strategy supports the use of the following functions, with different fields and corresponding partition transformation strategies as shown in the table:
Data Lake Compute (DLC) supports column-level data masking. You can use the data masking feature to associate masking rules for columns involving sensitive data, and you can configure a series of masking algorithms targeting different user groups to achieve refined masking applications based on roles. For example, for mobile number data, you may want to grant full access permissions to the users in the customer service group, grant only the permission to view the last 4 numbers to the users in the analysis group, and grant strict masking permissions that display as NULL to the users in the finance group.
Restrictions and Limitations
The current restrictions and limitations of the DLC data masking feature are as follows.
Supported Engine Types
Currently, only the following engine types with a kernel version later than October 1, 2024, are supported: Spark standard engine, SuperSQL Spark job engine, and SuperSQL SparkSQL engine. Among these, data desensitization for the SuperSQL SparkSQL engine is an allowlist feature. If you need to use it, submit a ticket for activation. For information on DLC engine categories, refer to Data Engine Introduction.
Applicable Scope
1. The data masking feature will only take effect for DLC regular users. For DLC user types, see permission overview.
2. The configuration for a masking policy tag takes about 1 minute to take effect.
3. Only effective for the metadata under the default data catalog, DataLakeCatalog.
Special Restrictions
1. When the SuperSQL SparkSQL engine is used, views are not supported by masking policies.
2. Users or working groups should have the SELECT permission on databases and tables. Otherwise, queries by the user or working group on that table will return an error. For DLC permission types, refer to Sub-Account Permission Management.
Supported Masking Methods
Currently, DLC supports the following data masking methods for column values:
Default Value
The default masking value for the column based on the column's data type is returned. Use this rule when you want to hide the value of the column but display the data type.
The first 4 characters of the column's value are returned, replacing the rest of the string with XXXXX. If the column's value is equal to or less than 4 characters in length, return the column's value after the value has been run through the SHA-256 hash function. You can only use this rule with columns that use the STRING data type.
The last 4 characters of the column's value are returned, replacing the rest of the string with XXXXX. If the column's value is equal to or less than 4 characters in length, then return the column's value after the value has been run through the SHA-256 hash function. Use this rule with columns that use the STRING data type.
The column's value is returned after the value has been run through the SHA-256 hash function. Use this rule when you want the end user to be able to use this column in a JOIN operation for a query. You can only use this rule with columns that use the STRING or BYTES data types.
NULL is returned regardless of the column value's data type. Use this rule when you want to hide both the value and the data type of the column.
Supported data types: Unlimited
Example Value
Masking Value
abcd@example.com
NULL
Date Masking
Only the year part of a date string and defaults the month and date to 01/01 is displayed. Use this rule with columns that use the DATE and TIMESTAMP data types.
Supported data types: TIMESTAMP and DATE
Example Value
Masking Value
2015-03-05T09:32:05.359
2015-01-01 00:00:00
No Masking
Plaintext of the column value is displayed, without being masked.
Supported data types: All
Masking Method Selection Recommendations
You can flexibly select the masking method for the column value based on the following recommendations:
Masking Method
Recommended Scenario
Default Value
Column value is expected to be hidden but data type needs to be displayed to users.
Retaining the first 4 characters
Plaintext of the column value is expected to be hidden but part of the characters for information confirmation needs to be displayed, for example, the first 4 characters of the customer's email address used by the customer service personnel for confirmation.
Retaining the last 4 characters
Plaintext of the column value is expected to be hidden but part of the characters for information confirmation needs to be displayed, for example, the last 4 characters of the customer's mobile number used by the customer service personnel for confirmation.
Hashing
This rule is used in scenarios where end users can use this column in a JOIN operation for a query or use this column for GROUPBY statistics.
Setting as NULL
This rule is used in scenarios where the column value and its data type are expected to be hidden.
Date masking
This rule is used for the scenario where only the year part is displayed and the rest of the date information is hidden, for example, the year of birth for confirmation.
No masking
Recommended for users who need to use the plaintext.
Data Masking Workflow
To configure DLC data desensitization, you can follow the steps below:
A masking policy tag refers to a tag customized by users and associated with columns containing sensitive data. In a masking policy tag, you can configure refined masking methods for multiple user groups. The following example shows the procedure to set a masking policy tag named "mobile number" and set the masking methods for 3 DLC workgroups:
Name of masking policy tag: Mobile number masking
Masking method configurations for workgroups:
Workgroup
Masking Method
Customer service personnel group
No masking
Analysis personnel group
Displaying the last 4 characters
Finance personnel group
Setting as NULL
Effect:
After associating the above masking policy tag with two columns, such as Phone_number1 and Phone_number2, DLC users in the customer service personnel group get the plaintext when querying by Phone_number1 and Phone_number2, DLC users in the analysis personnel group get the result displaying as *********4320, and DLC users in the finance personnel group get the result displaying as NULL.
Masking Policy Execution Priority
Assuming a DLC user is added to multiple working groups, and different masking methods are associated with these different working groups, multiple masking policies may exist for a specific user. If conflicting masking methods exist for a user, the system will apply the method with the highest priority among the working groups of the user, where working groups higher in the list have a higher priority.
For example, in the masking policy tag above, if Zhang San belongs to both the analyst personnel group and the finance personnel group, the query for Zhang San will display data desensitized as, for example, *********4320.
Step 1: Creating a Masking Policy Tag
Creating a Masking Policy Tag
1. Go to the DLC console, choose Metadata Management > Data Desensitization, click Create Masking Policy Tag, and create a masking policy tag in the pop-up dialog box.
2. In Configure Masking Method, select the corresponding working groups to add them to the Selected dialog box, and configure a masking method for each working group.
3. After configuration, you can drag and drop working group modules to sort them from top to bottom, which determines the policy priority. Working groups positioned higher in the list have a higher priority. If no manual sorting is performed, policies will be applied based on the default top-down order.
4. Click OK to complete the creation.
Note:
1. The DLC data desensitization feature currently only takes effect for users within user groups that have been configured with a masking method. It does not take effect for user groups without a configured masking method, or for users not added to any user group.
2. To apply desensitization to all DLC users, it is recommended to:
2.1 Configure a masking method for all user groups.
2.2 Add all DLC users to a user group.
Step 2: Binding the Tag to a Data Column
1. Go to the DLC console, select Metadata Management, and select the data table containing the field to be desensitized from the data catalog.
2. Locate the field requiring desensitization, or search for the field name in the top-right search box. Then, in the Masking Policy Tag column for that field, click
, and select the desired masking policy tag for binding from the dialog box.
3. If no matching masking policy tag is found, click Create Masking Policy Tag in the dialog box to quickly create one.
Note:
1. The various built-in DLC masking methods have field type restrictions. For example, date desensitization can only be associated with columns of TIMESTAMP or DATE data types. For details, refer to Masking Method Selection Recommendations.
2. A field can only be associated with one masking policy tag. However, a single masking policy tag can be reused across multiple data columns.
Effective Time:
After you configure a masking policy tag and bind it to a column, the configuration takes about 1 minute to take effect. During this period, users may still get plaintext in a query. Just wait a moment for the configuration to take effect.
Step 3: Performing a Query
After you bind a masking policy tag to a column requiring desensitization, the configuration is successful if the data type of the column supports all masking methods within that policy tag. Users see the masked results according to the masking method applied to their user groups when querying column data. The following uses a virtual case to further show the effects that the DLC data masking feature can achieve.
Case Description
Assume that company A has a customer list customer_list containing sensitive information, with detailed fields as follows:
Mobile Number
Customer Level
Consumption Amount
Email Address
123456789
High
45,600
abc@example.com
234567891
Medium
15,000
bcd@example.com
345678912
Low
2,000
cde@example.com
456789123
Low
1,000
def@example.com
There are 3 user groups in company A, including the customer service personnel group, the finance personnel group, and the analysis personnel group. Currently, company A hopes that the Mobile Number and Email Address fields containing users' sensitive PII information can only be used by the customer service personnel group, the Consumption Amount field and the Customer Level tag can only be used by the finance personnel group, but the analysis personnel can view the hashed value of the Customer Level to conduct statistical analysis of customer hierarchy.
Based on the above requirements, create the following 3 masking policy tags:
Contact Information Masking
(Bind the policy tag to the Mobile Number and Email Address fields)
Consumption Amount Masking
(Bind the policy tag to the Consumption Amount field)
Customer Level Masking
(Bind the policy tag to the Customer Level field)
Customer service personnel group: No masking
Finance personnel group: NULL
Analysis personnel group: NULL
Customer service personnel group: NULL
Finance personnel group: No masking
Analysis personnel group: NULL
Customer service personnel group: NULL
Finance personnel group: No masking
Analysis personnel group: Hashing
Assume that after the masking policy tags are bound to the corresponding columns as per the above table,
1. For a user existing only within a specific working group, running SELECT * FROM customer_list returns the following results:
Customer service personnel group: This group has been granted a rule of no desensitization for contact information. The following results will be returned:
Mobile Number
Customer Level
Consumption Amount
Email Address
123456789
NULL
NULL
abc@example.com
234567891
NULL
NULL
bcd@example.com
345678912
NULL
NULL
cde@example.com
456789123
NULL
NULL
def@example.com
Finance personnel group: This group has been granted a rule of no desensitization for consumption amount and customer level. The following results will be returned:
Mobile Number
Customer Level
Consumption Amount
Email Address
NULL
High
45,600
NULL
NULL
Medium
15,000
NULL
NULL
Low
2,000
NULL
NULL
Low
1,000
NULL
Analyst personnel group: This group has been assigned hash desensitization for customer level. The following results will be returned. While the actual customer level is obscured, statistical analysis can still be performed using the hash value:
2. If a user exists in both the customer service personnel group and the finance personnel group, according to the top-down priority of masking rules, the effective masking rules for this user are as follows:
Contact Information Desensitization
(Bind the policy tag to the Mobile Number and Email Address fields)
Consumption Amount Desensitization
(Bind the policy tag to the Consumption Amount field)
Customer Level Desensitization
(Bind the policy tag to the Customer Level field)
Customer service personnel group: No desensitization
Customer service personnel group: NULL
Customer service personnel group: NULL
Running SELECT * FROM customer_list returns the following results:
Mobile Number
Customer Level
Consumption Amount
Email Address
123456789
NULL
NULL
abc@example.com
234567891
NULL
NULL
bcd@example.com
345678912
NULL
NULL
cde@example.com
456789123
NULL
NULL
def@example.com
Ops Management
Historical Task Instances
Last updated:2025-06-12 12:01:53
Historical Task Instances focus on recording and managing various types of tasks performed by users in DLC for subsequent tracking, review, and optimization. Through the Historical Task Instances feature, users can quickly view the execution status of tasks, including start and end times, execution status (such as successful or failed), input and output details, and generated logs or error information. It provides users with the convenience of auditing and retrieval, helping users identify task health status, potential issues, and optimize resource configuration, etc.
2. Enter the historical task instances page. Administrators can view all historical operation tasks in the past 45 days, and general users can query tasks related to themselves in the past 45 days.
3. Support filtering and viewing by task type, task status, creator, task time range, task name, ID, content, sub-channel, and other methods.
4. Click the task ID/name. Support view task details, including modules such as basic information, running result, task insights, and task logs.
5. Support user click to modify task configuration, quickly enter job details to adjust configuration for optimization.
Historical Task Instances List
Note:
The *field supports after enabling the insight feature. For enablement method, please see How to Enable Insight Feature.
Field Name
Description
Task ID
Unique identifier of the task.
Task name
Prefix_yyyymmddhhmmss_eight-digit uuid, where yyyymmddhhmmss is the task execution time.
Prefix rule:
1. The job task submitted by the console is prefixed with the job name. For example, if the user-created job is customer_segmentation_job and it is executed at 21:25:10 on November 26, 2024, the task id will be customer_segmentation_job_20241126212510_f2a65wk1. According to the current data format restriction, the job name should be <= 100 characters.
2. SQL type submitted on the data exploration page, prefixed with sql_query. Example: sql_query_20241126212510_f2a65wk1.
3. Data optimization tasks, according to the prefixes of different sub-types of optimization tasks, among them:
3.1 The prefix of the optimizer is only optimizer.
3.2 The SQL type of the optimized instance is optimizer_sql.
3.3 The batch type of the optimized instance is optimizer_batch.
3.4 Configuration task created when configuring the data optimization policy: optimizer_config.
4. Import data task, prefixed with import, for example: import_20241126212510_f2a65wk1.
5. Export data task, prefixed with export, for example: export_20241126212510_f2a65wk1.
6. Wedata submission, prefixed with wd, for example: wd_20241126212510_f2a65wk1.
7. Other API submissions, prefixed with customized, for example: customized_20241126212510_f2a65wk1.
8. Tasks created for metadata operations on the metadata management page, prefixed with metadata, for example: metadata_20241126212510_f2a65wk1.
Task status
Starting
Executing
Queuing up
Successful
Failed
Canceled
Expired
Task run timeout
Task content
Detailed content of the task. For job type tasks, it is a hyperlink to job details; for SQL type tasks, it is the complete sql statement.
Task type
Be divided into Job type, SQL type.
Task source
The origin of this task. Support data exploration tasks, data job tasks, data optimization tasks, import tasks, export tasks, metadata management, Wedata tasks, and API submission tasks.
Sub-channel
Users can customize sub-channels when submitting tasks via the API.
Compute resource
The computing engine/resource group used to run the task.
Consumed CU*H
During task execution, CU*H consumption occurs. Please note that the final CU consumption is subject to the bill, and the final result may vary. In the Spark scenario, it is approximately equal to the sum of Spark task execution durations divided by 3600.
Compute time
1. If the task supports insight feature, it is the execution time within the engine.
2. If the task does not support insight feature:
2.1 For a Spark SQL task, it is the platform scheduling time + consumed queuing time within the engine + execution time within the engine.
2.2 For a Spark job task, it is the platform scheduling time + engine startup duration + queuing time within the engine + execution time within the engine.
The execution time within the engine is the duration from the start execution of the first task of a Spark task to the task completion.
Scanned data volume
The physical data volume read from storage by this task is approximately equal to the sum of Stage Input Size in Spark UI in the Spark scenario.
*Scanned data records
The number of physical data entries read from storage by this task is, in the Spark scenario, approximately equal to the sum of Stage Input Records in Spark UI.
Creator
If it is a job type task, it refers to the creator of the job.
Executor
The user running the task.
Submitted at
The time when the user submits tasks.
*Engine execution time
The time when the first preemption of the CPU starts execution of the task, the start execution time of the first task within the Spark engine.
*Number of output files
The collection of this metric requires upgrading the Spark engine kernel to a version later than 2024.11.16.
Total number of files written by tasks through statements such as Insert. Case-insensitive to task type.
*Output small-sized files
The collection of this metric requires upgrading the Spark engine kernel to a version later than 2024.11.16.
Small File Definition: An individual file size of the output that is less than 4 MB is defined as a small file (controlled by the parameter spark.dlc.monitorFileSizeThreshold, with a default value of 4 MB, which can be configured globally or at the task level for the engine).
This metric definition: Total number of small files written by tasks through statements such as insert.
Case-insensitive to task type.
*Total output lines
The number of records output after this task processes data is, in the Spark scenario, approximately equal to the sum of Stage Output Records in Spark UI.
*Total output size
The Size of the record output after this task processes data is, in the Spark scenario, approximately equal to the sum of Stage Output Size in Spark UI.
*Data shuffle lines
Approximately equal to the sum of Stage Shuffle Read Records in Spark UI in the Spark scenario.
*Data shuffle size
Approximately equal to the sum of Stage Shuffle Read Size in Spark UI in the Spark scenario.
*Health status
Analyze the task to judge the health status of the task and determine whether optimization is required. Please see Task Insight for details.
Historical Task Instances Details
Basic Info
1. Users can view specific task content in execution content. For SQL tasks, view the complete SQL statement; for job tasks, view job details and job parameters.
2. Users can view relevant content about task resources in resource consumption, including consumed CU*H, computational overhead, scanned data volume, compute resource, kernel version, Driver resource, Executor resource, and count of Executors.
3. Users can view basic information of tasks in basic info, including task name, task ID, task type, task source, creator, executor, submission time, and engine execution time.
4. For tasks running on the SuperSQL SparkSQL or SuperSQL Presto engine, users can view the task running progress bar in query statistics, which includes the time taken for stages such as creating tasks, scheduling tasks, executing tasks, and obtaining results.
Running Result
After task completion, users can query the task result on the execution result page. There are two types of task results:
1. Write file information: For file writing tasks running on SuperSQL, standard engine, or Spark kernel engine, support user viewing of write file information.
Average file size
minimum file size
maximum file size
Total file size
2. Execution result: SQL task query statement, which can display the query result of the current task and support users to download query results.
Task Insight
After task completion, users can view task insight results on the task insight page. It supports analyzing the aggregate metrics that each task has executed and insights into optimizable issues. Based on the actual execution situation of the current task, DLC task insight will combine data analysis and algorithm rules to provide corresponding optimization suggestions. For details, please see Task Insight.
Task Log
Users can view the logs of the current task on the task log page.
Note:
Only the job type supports task log viewing.
1. Support switching logs of nodes in different clusters through Pod Name, including Driver, Executor, etc.
2. Support three log level filters: All, Error, Warning.
3. This page only displays the last 1000 logs. If you need to view all log entries, you can export logs.
4. Support viewing log export records and the status of export tasks. In log export records, users can save log files locally.
Historical task(Old version)
Last updated:2025-03-21 12:22:27
To facilitate users in querying historical task records, DLC provides three methods to search and process historical tasks.
View historical tasks run in the Query Editor
1. Log in to DLC console, select the service region.
2. Enter the Data Exploration Page, click on Run History within a single Session to view the task run history for that Session.
3. Click on the history record Batch ID to view the corresponding execution results on the left
Each Session's run history is independent, and a maximum of 45 days of run history is kept.
Historical task result data is saved for 24 hours. To view task results beyond 24 hours, the task must be rerun.
View data import history in the Data Management feature
2. Enter the Historical Operation page, where administrators can view all historical operation tasks from the past 45 days, and ordinary users can query tasks related to themselves from the past 45 days.
3. Supports filtering by task type, execution status, creator, data type, etc.
4. click Run Details to see the task execution details and results.
Historical task result data is saved for 24 hours. To view task results beyond 24 hours, the task must be rerun. You can directly Copy Statement to Data Exploration to execute the task.
You can directly click Task ID to quickly switch and view the task execution details.
For tasks that are running, you can Cancel them.
Session Management
Last updated:2025-03-21 12:22:27
The session management feature is used to record and trace notebook interactive sessions submitted to the DLC engine through the API or Wedata. Users can perform operations such as SQL queries, data processing, and model training through sessions.
Prerequisites
Environment preparation for Data Lake Compute (DLC).
Enable Tencent Cloud DLC engine service.
Creating a session requires purchasing a job type engine.
SuperSQL job engine.
Standard engine: Spark engine or machine learning resource group.
2. Enter the session management page, and users can view all the historical session records.
3. Support filtering and viewing by engine type, status, Kind, engine name, Session ID, and Session Name.
4. Click Session Name/ID. View session details is supported.
5. Support users to click kill to close the session on the console.
6. Support user viewing of the Spark UI of the session.
Session List
Field Name
Description
Session Name/ID
Unique identifier for the session.
Sessions created by the SuperSQL job engine only have a Session ID. Session ID rule: livy-session-uuid.
Sessions created by the standard engine or Spark engine
User-submitted Notebook, prefixed with session_test
User-submitted batch SQL, prefixed with temporary-rg
Status
State of the current session, can be divided into
not_started: The session has not been started. This status indicates that the session request has been accepted, but the session has not yet started for some reason (for example, insufficient resources or configuration problems). Users need to check related configurations or resource status to start the session.
Starting: The session is starting. This status means Livy is allocating resources and initializing the environment for a new Spark session.
idle: The session has started successfully and is in idle state. At this point, you can submit Spark jobs. The Livy session is ready to process requests.
busy: The session is processing one or more jobs. This status indicates that the session is executing tasks and cannot accept new job requests until the current job is completed.
shutting down: The session is deactivating. This status means the user has requested to stop the session, and Livy is performing clearing and resource release operations. The session may stay in this status for a period of time until all running jobs are completed and resources are released.
error: The session encounters an error during startup or execution. This status usually means the session is unable to function normally, possibly due to insufficient resources, configuration errors, or other problems.
dead: The session has died and cannot be recovered.
killed: The session is forcefully terminated. This status means the user has actively terminated the session, possibly because the session is no longer needed or there are problems with the ongoing jobs. A killed session cannot be recovered.
success: The session has been successfully completed. This status usually indicates that all jobs in the session have been successfully executed and completed. The session can be considered successful in this status, and users can view the results or output.
Engine
Computing engine.
Kind
Session type
Spark
Pyspark
SQL
Machine Learning
Python
MLlib
Creator
The user who creates a session.
Validity period
The running time of the session.
Insight Management
Task Insights
Last updated:2025-04-17 15:22:36
Task insights are made from the task perspective, helping you quickly identify the completed tasks for analysis and providing optimization suggestions.
Prerequisites
1. SuperSQL SparkSQL and Spark job engines:
1. For engines purchased after July 18, 2024, task insights are enabled by default.
2. For Spark kernel versions prior to July 18, 2024, the engine kernel should be upgraded to enable task insights. For details on upgrading, see How to Enable Insights.
3. Standard Spark engine:
1. For engines purchased after December 20, 2024, task insights are supported by default.
2. For engines purchased before December 20, 2024, manual activation of task insights is not supported. Submit a ticket to contact after-sales service for activation.
Other types of engines do not support task insights currently.
Directions
Log in to the DLC Console, select the Insight Management feature, and switch to the task insights page.
Insights Overview
Daily-level statistics offer insights into the distribution and trend of tasks requiring optimization, providing a more intuitive understanding of daily tasks.
Task Insights
The task insights feature supports analyzing the summary metrics of each executed task and identifying the possible optimization issues.
After a task is completed, users only need to select the task to be analyzed and click Task Insights in the operation column to view the details.
Based on the actual execution of the current task, DLC task insights leverage data analysis and algorithmic rules to provide the corresponding optimization recommendations.
How to Enable the Insights Feature?
Upgrading Kernel Image for Existing SuperSQL Engines
Note:
For engines purchased after July 18, 2024, or existing engines upgraded to kernel versions after July 18, 2024, Insights are automatically enabled. You can skip this step.
Directions
1. Go to the SuperSQL Engine list page and select the engine for which you want to enable the insights feature.
2. On the engine details page, click Kernel version management > Version upgrade (default upgrade to the latest kernel version).
Overview of Key Insight Metrics
Metric Name
Metric Definition
Engine execution time
Reflects the time the first task was executed on the Spark engine (the time when the task first preempted the CPU for execution).
Execution time within the engine
Reflects the time actually required for computing, namely, the time taken from the start of the first task execution in a Spark task to the completion of the Spark task.
More specifically, it is the sum of the duration from the start of the first task to the completion of the last task for each Spark stage. This sum does not include the queuing time of the task before it starts (that is, excluding other time such as the time required for scheduling between task submission and the start of execution of the Spark task), nor include the time spent waiting for task execution due to insufficient executor resources between multiple Spark stages during the task execution process.
Queuing time (time spent waiting for execution)
Specifies the time taken from task submission to the start execution of the first Spark task. The time taken may include the cold startup duration of the first execution of the engine, the queuing time caused by the concurrent limit of the configuration task, the time waiting for executor resources due to full resources within the engine, and the time taken to generate and optimize the Spark execution plan.
Consumed CU*H
Specifies the sum of the CPU execution duration of each core of the Spark Executor used in computing, per hour (not equivalent to the duration of starting machines in the cluster, because the machines may not participate in task computing after they start. Eventually, the cluster's CU fee is subject to the bill).
In the Spark scenario, it approximately equals to the sum of the execution durations of the Spark task (seconds) / 3600 (per hour).
Data scan size
The amount of physical data read from storage by this task. In the Spark scenario, it approximately equals to the sum of the Stage Input Size in Spark UI.
Total output size
The size of the records output after this task processes the data. In the Spark scenario, it approximately equals to the sum of the Stage Output Size in Spark UI.
Data shuffle size
In the Spark scenario, it approximately equals to the sum of the Stage Shuffle Read Records in Spark UI.
Number of output files
(This metric requires the Spark engine kernel to be upgraded to a version after November 16, 2024)The total number of files written by tasks through statements such as insert.
Number of output small files
(This metric requires the Spark engine kernel to be upgraded to a version after November 16, 2024)Small files are defined as output files with a size less than 4 MB (controlled by the parameter spark.dlc.monitorFileSizeThreshold, default 4 MB, configurable at the engine or task level). This metric represents the total number of small files written by tasks through statements such as insert.
Parallel task
Displays the parallel execution of tasks, making it easier to analyze affected tasks (up to 200 entries).
Overview of Insight Algorithms
Insight Type
Algorithm Description (Continuously Improving and Adding New Algorithms)
Resource preemption
SQL execution task delay time is greater than 1 minute after stage submission, or delay exceeds 20% of the total runtime (the threshold formula dynamically adjusts based on task runtime and data volume).
Task duration in a stage is greater than twice the average duration of other tasks in the same stage (the threshold formula dynamically adjusts based on task runtime and data volume).
Data skew
Task shuffle data is greater than twice the average shuffle data size of other tasks (the threshold formula dynamically adjusts based on task runtime and data volume).
Disk or memory insufficiency
Error stack information during stage execution includes OOM, insufficient disk space, or COS bandwidth limitation errors related to disk or memory insufficiency.
Excessive small file output
(This insights type requires the Spark engine kernel to be upgraded to a version after November 16, 2024)See the metric number of output small files in the list, and the presence of excessive small file output is determined if any of the following conditions are met:
1. Partitioned tables: The number of small files written out by a partition exceeds 200.
2. Non-partitioned tables: The total number of output small files exceeds 1000.
3. If partitioned or non-partitioned tables output more than 3,000 files with an average file size less than 4 MB.
System Management
User and Permission Management
CAM Service
Last updated:2025-01-03 15:27:28
Data Lake Compute has a complete data access control mechanism and divides permissions into operation permissions and data permissions. The former is managed by CAM, while the latter is managed by the permission module of Data Lake Compute.
A root account has all the operation and data permissions of Data Lake Compute by default.
If a sub-user is granted the operation permissions of Data Lake Compute, the sub-user can grant the data permissions to other sub-users and can be regarded as an "admin" of this type of sub-users.
If a sub-user is granted the data read/write permissions, the sub-user can query data as permitted. The data permissions are granted by an "admin".
The data permissions of all sub-users other than root accounts are granted by an "admin". They cannot query data which they don't have permissions on.
A root account has all the operation permissions of Data Lake Compute by default and can grant sub-users the access permissions of Data Lake Compute through CAM, so that the sub-users can have corresponding operation permissions of Data Lake Compute.
Directions
1. Create and authorize a sub-user.
In the CAM console, create a sub-user and grant permissions as instructed in Sub-user authorization.
Preset policy QcloudDLCFullAccess: All the operation permissions in Data Lake Compute.
Custom policy: Specified operation permissions of Data Lake Compute.
2. Log in to the Data Lake Compute console with a sub-user account and verify the permissions.
If the operation succeeds, the authorization has taken effect.
Operation permission category
Data Lake Compute operation permissions are categorized by API as follows.
Permission Type
Description
Metadata management
Manipulate the metadata information of databases and data tables managed in Data Lake Compute.
Task management
Submit and view tasks in Data Lake Compute.
Permission management
Manage users' data access permissions.
System configuration
Perform basic configurations of the Data Lake Compute service.
Sub-user authorization
If you access Data Lake Compute as a root account, skip this step.
On the Policies page in the CAM console, click Create Custom Policy.
In the pop-up window, click Create by Policy Syntax.
On the Create by Policy Syntax page, select Blank Template and click Next.
In the template, enter the Policy Name (e.g., DLCDataAccess) and Description, copy the following policy, paste it into Policy Content, and click Complete. A sub-user bound to the custom policy can log in to the Data Lake Compute console to run SQL tasks but cannot manage data permissions. For more information, see Sub-Account Permission Management.
{
"version":"2.0",
"statement":[
{
"effect":"allow",
"action":[
"dlc:DescribeStoreLocation",
"dlc:DescribeTable",
"dlc:DescribeViews",
"dlc:CancelTask",
"dlc:CreateDatabase",
"dlc:CreateScript",
"dlc:CreateTable",
"dlc:CreateTask",
"dlc:DeleteScript",
"dlc:DescribeDatabases",
"dlc:DescribeScripts",
"dlc:DescribeTables",
"dlc:DescribeTasks",
"dlc:DescribeQueue"
],
"resource":[
"*"
]
}
]
}
3. Bind the preset or custom policy to a sub-account, and the sub-account can log in to and access Data Lake Compute. For more information, see Setting Sub-user Permissions.
Preset policy: QcloudDLCFullAccess.
Custom policy: The policy customized in the above steps for accessing Data Lake Compute.
Permission Overview
Last updated:2024-07-17 15:42:58
Data Lake Compute permissions include data permissions and data engine permissions. If you have the admin permission, you can log in to the Data Lake Compute console or use an API to grant a sub-user data and data engine permissions. Sub-users cannot use, modify, or delete data or data engines before they are authorized.
User and work group
Data Lake Compute provides the user mode and work group mode for personnel permission management.
User: You can select users in CAM, including sub-accounts and collaborator accounts.
Work group: It is a group of users with the same permissions managed in the product.
Note:
If users are granted different permissions from those granted in their work groups, all the granted permissions will take effect.
A work group allows you to quickly grant permissions to a batch of users, so it is recommended for batch user authorization. For detailed directions, see User and User Group.
User type
In Data Lake Compute, User type can be Admin or General user.
Admin: An admin have all the data, engine, and task permissions and can add, authorize, and remove users and work groups in Data Lake Compute.
General user: A general user is added by an admin, has no Data Lake Compute permissions by default, and needs to be authorized. Only data and engine permissions that can be regranted can be granted to general users.
Permission and Operation
Admin
General User
Data permissions
All
None by default (to be authorized by an admin)
Data engine permissions
All
None by default (to be authorized by an admin)
User management
Yes
No
Work group management
Yes
No
Authorization scope
All
Permissions that can be regranted
Note:
The above permissions only include those defined in Data Lake Compute. To perform purchase, configuration adjustment, and refund operations that involve billing, log in to the CAM console and get the financial collaborator permission QCloudFinanceFullAccess (for detailed directions, see Creating and Authorizing Sub-account).
Data permissions
Data Lake Compute data permissions allow operations on data catalogs, databases, and data tables. To facilitate your management and configuration, permissions can be granted in the standard or advanced mode.
In standard mode, you can grant roles while ignoring the specific permission configuration (for more information on roles and permissions, see Sub-Account Permission Management). The authorization granularity can be data catalog, database, or data table. This mode is suitable for quick authorization with no complex permission management involved.
In advanced mode, you can grant permissions at the database, data table, view, or function level. It is suitable for refined permission management.
SQL statements for permission operations are as follows:
Action
CREATE
ALTER
DROP
SELECT
INSERT
DELETE
Target
CREATE DATABASE
✓
-
-
-
-
-
Cataglog
ALTER DATABASE
-
✓
-
-
-
-
Database
DROP DATABASE
-
-
✓
-
-
-
Database
CREATE TABLE
✓
-
-
-
-
-
Database
CREATE TABLE AS SELECT
✓
-
-
✓
✓
-
Database/Table
DROP TABLE
-
-
✓
-
-
-
Table
ALTER TABLE LOCATION
-
✓
-
-
-
-
Table
ALTER PARTITION LOCATION
-
✓
-
-
-
-
Table
ALTER TABLE ADD PARTITION
-
✓
-
-
-
-
Table
ALTER TABLE DROP PARTITION
-
✓
-
-
-
-
Table
ALTER TABLE
-
✓
-
-
-
-
Table
CREATE VIEW
✓
-
-
-
-
-
Database
ALTER VIEW PROPERTIES
-
✓
-
-
-
-
View
ALTER VIEW RENAME
-
✓
-
-
-
-
View
DROP VIEW PROPERTIES
-
✓
✓
-
-
-
View
DROP VIEW
-
-
✓
-
-
-
View
SELECT TABLE
-
-
-
✓
-
-
Table
INSERT
-
-
-
-
✓
-
Table
INSERT OVERWRITE
-
-
-
-
✓
✓
Table
CREATE FUNCTION
✓
-
-
-
-
-
Database
DROP FUNCTION
-
-
✓
-
-
-
Function
SELECT VIEW
-
-
-
✓
-
-
View
SELECT FUNCTION
-
-
-
✓
-
-
Function
Data engine permissions
Data Lake Compute data engine permissions allow using, modifying, manipulating, monitoring, and deleting data engines as detailed below:
Use: The permission to use engines to perform tasks.
Modify: The permission to modify the basic information and configuration information of engines (modifying the configuration information requires the CAM financial collaborator permission).
Manipulate: The permission to suspend and restart engines.
Monitor: The permission to view the running tasks and monitoring information of engines.
Data Lake Compute provides the user mode and work group mode for personnel permission management. For more information on permissions, see Permission Overview.
Description
User: You can select users in CAM, including sub-accounts and collaborator accounts.
Work group: It is a group of users with the same permissions managed in the product.
Note:
If users are granted different permissions from those granted in their work groups, all the granted permissions will take effect.
A work group allows you to quickly grant permissions to a batch of users, so it is recommended for batch user authorization.
User Management
User management requires Data Lake Compute operation permissions. For more information, see CAM Service.
Adding a user
1. Log in to the Data Lake Compute console, select the service region, and go to the Permission management page.
2. Click Add user to add an account with a specified user ID to Data Lake Compute for management.
3. After entering the User ID, bind the user to a work group (which requires the admin permission). If binding is not needed, directly click Complete.
Viewing user information
A Data Lake Compute admin can modify the basic information and permissions of a user.
1. Log in to the Data Lake Compute console, select the service region, and go to the Permission management page.
2. Search for the target User ID and click the Username to view the user information and permissions.
1. Log in to the Data Lake Compute console, select the service region, and go to the Permission management page.
2. Search for the target user account ID and click Edit in the Operation column to enter the edit page.
Removing a user
If you don't want a user to use Data Lake Compute any more, you can use an admin account to remove the user. Then, the Data Lake Compute permission granted to the user will be revoked.
1. Log in to the Data Lake Compute console, select the service region, and go to the Permission management page.
2. Search for and select one or multiple target user account IDs and click Batch remove to remove them from Data Lake Compute.
Work Group Management
Work group management requires Data Lake Compute operation permissions. For more information, see CAM Service.
Adding a work group
You can manage permissions that need to be repeatedly granted to users through a work group. The following describes how to add a work group.
1. Log in to the Data Lake Compute console, select the service region, and go to the Permission management page.
2. Click Work group to enter the work group management page.
3. Click Add work group, enter relevant information, and click Confirm.
Viewing work group information
You can view the information of a work group in the following steps:
1. Log in to the Data Lake Compute console, select the service region, and go to the Permission management page.
2. Click Work group to enter the work group management page.
3. Search for the target work group and click Work group ID or Work group name to view the work group information.
Editing work group information
You can modify the description and users of a work group in the following steps:
1. Log in to the Data Lake Compute console, select the service region, and go to the Permission management page.
2. Click Work group to enter the work group management page.
3. Find the target Work group name and click Edit in the Operation column.
To edit the description, click
.
You can click Bind user to add Data Lake Compute users to the work group.
Select multiple target users and click Batch remove, or click Remove in the Operation column of a specific target user. Removed users will no longer have the permissions of the work group, which does not affect other permissions granted to them though.
Deleting a work group
A Data Lake Compute admin can remove work groups.
Note:
After a work group is removed, all its permissions granted to users in it will be revoked. Note that a removed work group cannot be recovered. Proceed with caution.
1. Log in to the Data Lake Compute console, select the service region, and go to the Permission management page.
2. Click Work group to enter the work group management page.
3. Select multiple target work groups and click Batch remove, or click Remove in the Operation column of a specific target work group.
Sub-Account Permission Management
Last updated:2024-07-17 15:46:12
User permission
User permissions include data permissions and engine permissions (for more information on permissions, see Permission Overview). The former is required to access data in Data Lake Compute, while the latter is used for resource management. Data Lake Compute enables permission management at the database, table, and column levels, so that you can authorize a user or work group for refined data permission management in different use cases.
User and work group
You can authorize a user or create and authorize a work group of users. For detailed directions, see User and Work Group.
User: You can select users in CAM, including sub-accounts and collaborator accounts.
Work group: It is a group of users with the same permissions managed in the product.
Note:
If users are granted different permissions from those granted in their work groups, all the granted permissions will take effect.
A work group allows you to quickly grant permissions to a batch of users, so it is recommended for batch user authorization.
Granting a user a permission
Grant permissions to the specified user.
1. Set a user to Admin or General user. Admins have the permissions of all the data and engines by default with no need to be bound to a work group. They can also manage admin users other than the root account. Set an admin with caution.
2. Bind a work group: General users need to be granted permissions or bound to a work group before they can access resources.
3. Add a data permission: In the User list, click Authorize in the Operation column and select Data permission to grant permissions at the data catalog or database/table level.
Add a data catalog permission. You can grant permissions to create databases under DataLakeCatalog and create other data catalogs.
Add a database/table permission: You can grant permissions in Standard or Advanced mode. In standard mode, you can grant database/table permissions in the specified catalog and set Query & analytics, Data edit, and Owner permissions.
Specific permissions are as follows:
Permission Type
Database
Data Table
View and Function
Query & analytics
• Query all the tables, views, and functions in databases.• Create data tables.
Query
Query
Data edit
• Modify and delete databases and create tables.• Permissions of all the tables, views, and functions.
• Query, insert, update, and delete data.• Modify and delete tables.
Query, create, modify, and delete.
Owner (grants the permission to re-authorize permissions in addition to data edit permissions)
• Modify and delete databases and create tables.• Permissions of all the tables, views, and functions.
• Query, insert, update, and delete data.• Modify and delete tables.
Query, create, modify, and delete.
Advanced permission settings: When selecting a single database, you can further set the permissions to query, insert, update, and delete tables, views, and functions; when selecting multiple databases, you can only set permissions at the database level.
In advanced mode, you can set permissions at the column level. When selecting a single data table, you can add the permission to query columns. You can select one or more columns or all of them for authorization.
Click Confirm and perform queries in the Data Explore module. Enter the following SQL statement to preview the information of col1 and run the statement to view the preview result of the column.
The permission is not granted for data column b in the data table. If you enter the SQL statement to view the information of b, the query cannot be performed due to lack of permission.
4. Add an engine permission: In the User list, click Authorize in the Operation column and select Engine permission to grant permissions to use, modify, manipulate, monitor, and delete specified resources.
Modifying a user permission
1. In the User list, click Authorize and select Data permission or Engine permission.
The following takes data permission as an example. On the Data permission authorization page, click Add permission or Remove to modify a permission. The steps for engine permission modification are similar.
2. Modify Work group or User type. Click Operation > Edit to enter the Edit user page, where you can modify the Username, User type, and Description. You can also add/remove general users to/from a work group.
Click Edit to modify User type.
Viewing a user's permissions
1. Click a user ID in the user list to enter the user details page.
2. View the user's work group, data permission, and engine permission information
Revoking a user's permissions
Remove permissions to be revoked from the permission list of a user. This operation requires the admin permission.
Adding and removing a work group permission
Only admins can add or remove work group permissions in a similar way to manipulate data permissions. Users in a work group have all the permissions of the group, so you can bind users to a work group to grant them the data and engine permissions of the work group. Admins don't need to be bound to a work group.
Monitoring and Alarms
Data Engine Monitoring
Last updated:2024-07-31 17:31:18
Data Lake Compute (DLC) provides monitoring services for data engines based on the Tencent Cloud Observability Platform (TCOP), ensuring you can understand the real-time status of data engines and configure data alarms. For alarm configuration methods, see Monitoring Alarm Configuration.
Usage Notice
Before using the Data Lake Compute (DLC) monitoring service, you need to activate the TCOP service. If this service is not yet activated, you can use the root account to activate it.
The use of the TCOP service may incur related charges. For detailed pricing information, see Billing Overview.
Monitoring Access
Access Point I: Data Lake Compute (DLC) Console
Note:
The account must have monitoring permissions for the data engine.
1. Log in to the DLC console and select the service region.
2. Navigate to the SuperSQL engine page from the left menu.
3. Viewing methods supported:
Method 1: Select the engine type to enter the matching engine monitoring list.
Method 2: Select the target engine from the engine list and click Monitoring to view the target engine monitoring.
Access Point Two: TCOP
1. Log in to the TCOP with an account that has the necessary permissions.
2. Select Cloud Product Monitoring from the left menu, find Data Lake Compute DLC, and choose the type of monitoring you need to view.
3. After selecting the monitoring type, you will enter the monitoring page. Select the corresponding region to view the monitoring resource information for that region.
4. Click the Engine ID to enter the detailed monitoring page.
Monitoring Granularity Configuration
You can configure the monitoring data time range, time granularity, and auto-update interval at the top of the monitoring page.
Monitoring data time range: Accurate to the minute, supports selecting data for a specific time period.
Time granularity: Interval between monitoring points, configurable to 1 minute or 5 minutes.
Auto-update data: Configures the automatic refresh interval for page data, with options to set it to off, 30 seconds, 5 minutes, 30 minutes, or 1 hour.
Monitoring Data Comparison
You can select a time period for data comparison. After selecting the comparison time range through one click, you can view the comparison data in the data compass below.
Monitoring Metrics
Monitoring Type
Monitoring Metrics
CPU
Maximum CPU utilization of all Driver nodes
Maximum CPU utilization of all Executor nodes
Average CPU utilization of all Driver nodes
Average CPU utilization of all Executor nodes
Maximum CPU utilization of all clusters
Average CPU utilization of all clusters
Memory
Maximum memory utilization of all Driver nodes
Maximum memory utilization of all Executor nodes
Average memory utilization of all Driver nodes
Average memory utilization of all Executor nodes
Maximum memory utilization of all clusters
Average memory utilization of all clusters
Tasks
Number of canceled tasks
Number of failed tasks
Number of initialized tasks
Average task initialization time
Maximum task initialization time
Number of queued tasks
Average task queue time
Maximum task queue time
Number of running tasks
Number of successful tasks
Network
Maximum inbound bandwidth of all Driver nodes network
Maximum inbound bandwidth of all Executor nodes network
Average inbound bandwidth of all Driver nodes network
Average inbound bandwidth of all Executor nodes network
Maximum outbound bandwidth of all Driver nodes network
Maximum outbound bandwidth of all Executor nodes network
Average outbound bandwidth of all Driver nodes network
Average outbound bandwidth of all Executor nodes network
Cloud Disk
Maximum cloud disk utilization of all Driver nodes
Maximum cloud disk utilization of all Executor nodes
Average cloud disk utilization of all Driver nodes
Average cloud disk utilization of all Executor nodes
CU
Job Engine CU Count
CU Utilization
Data Job Monitoring
Last updated:2024-07-31 17:31:39
DLC provides monitoring services for data jobs based on TCOP service, ensuring that you can understand the operation of data jobs in real time and configure data alarms.
Notes
Before using the monitoring service of DLC, you need to activate the TCOP service (for usage details, refer to TCOP Documentation). If the service has not been activated, it can be done using the root account.
Fees may be incurred during the use of TCOP service; for detailed fee information, refer to TCOP Billing Overview.
2. Or enter the Data Job page from the left sidebar.
3. In the top right corner, click Job Monitoring to go to the monitoring page. Or click the Monitoring feature of the target job to enter its monitoring page.
Entrance two: TCOP
1. Log in to TCOP Console. Account must have the required permissions.
2. In the left menu, select Cloud Product Monitoring, find DLC, and choose the type of monitoring you wish to view.
3. After selecting the monitoring type, enter the monitoring page and select the respective region to view the monitoring job information for that region.
4. Click Job ID to enter the monitoring details.
Monitoring Granularity Configuration
Supports configuring the monitoring data time period, time granularity, and automatic update time range through the monitoring settings at the top.
Monitoring Data Time Range: Precise to minutes, supports selecting data for a specific period.
Time Granularity: Monitoring point interval time, supports configuring for 1 minute or 5 minutes.
Automatic Data Update: Page data auto-refresh configuration, supports configuring off, 30s, 5min, 30min, 1h.
Monitoring Data Comparison
Supports selecting data for a specific period to compare monitoring data. After clicking to select the comparison time range, you can view the comparison data in the data compass below.
Monitoring Metric
Monitoring Type
Monitoring Metric
Job
Job error Log Count
Job warn Log Count
Access Point Gateway Engine Monitoring
Last updated:2024-07-31 17:31:54
DLC provides monitoring services for the access point gateway engine based on TCOP service, ensuring you can understand the gateway status in real time.
Notes
Before using DLC's monitoring service, you need to activate the TCOP service (for usage details, see TCOP Documentation). If the service has not been activated yet, it can be activated using the root account.
TCOP service usage may incur related tariffs, for detailed tariff information, see TCOP Billing Overview.
Monitoring Entrance
Entrance one: DLC Console
1. Log in to the <1>Standard Engine> page, and select the Service Region.
2. Select the Standard Engine, and click on Monitoring at the access point to enter the monitoring data display interface.
Configuration Entrance: TCOP
1. Log in to the TCOP Console, the account must have the relevant permissions.
2. From the left menu, select Cloud Product Monitoring, enter the Policy Management page under Alarm Management, select Data Lake Computing, and choose the corresponding Access Point Gateway Engine.
Access Point Gateway Engine Monitoring Configuration Type
Creating alarm policy
1. DLC Access Point Gateway supports alarm capabilities. Log in to TCOP, click Alarm Management, and select the Policy Management page.
2. Click New Policy, for policy type choose "Data Lake Computing". Access Point Gateway supports alarms for three dimensions, including:
"Gateway" alarm dimension is: appid/gatewayid.
"Gateway (Multi-dimensional)" alarm dimension is: appid/gatewayid/instanceid.
"Gateway Engine (Multi-dimensional)" alarm dimension is: appid/gatewayid/engineid/processid.
For example, to configure an alert for the CPU utilization of an Access Point Gateway, you can choose to configure one, several instances under a specific Access Point Gateway, or any instance node triggering the threshold to alert.
Alert supports more dimensions, and the alert method is more flexible.
Basic Metrics are recommended to use this approach.
API Gateway
Mainly aimed at monitoring the overall load situation of the current gateway, aggregating basic metrics according to Access Point Gateway Nodes, and supporting Service-level Metric Alerts.
For example: execute_statement_num (number of statements executed), opened_operation_num (number of operations opened),
launch_engine_num (number of engines started), engine_process_thread_num (number of threads started by the engine).
Supports Dashboard. Suitable for Single-node access point gateway or service metric alert.
Gateway Engine (Multidimensional)
The Gateway Engine refers to the monitoring and alarm of the process of starting the DLC engine by the Access Point Gateway.
For example:
engine_process_thread_num (number of threads started by the engine), mainly aimed at monitoring the process information of the engine started by the current Access Point Gateway
Supports fine-grained alerting, for example: commonly configure any engine's process count under a specific Access Point Gateway ID to reach the threshold to trigger an alert. Suitable for alerting on process metrics started by the Access Point Gateway.
Monitoring Alarm Configuration
Last updated:2024-07-31 17:32:15
Configuring New Alarm Policy
Supports configuring monitoring alarms for specific metrics. You can go to Creating Alarm Policy to configure the content of the alarm.
Or click the monitoring content for which you need to configure an alarm to enter the configuration page, where you can configure the content of the alarm.
Managing an alarm policy
To manage configured alarm policies, you can perform configuration management through the Policy Management page.
Configuration Instructions
Configuration Item
Configuration Instructions
Policy name
Name of the alarm policy, up to 60 characters
Remarks
Remarks for the alarm policy, up to 100 characters
Monitoring Type
Please select Cloud Product Monitoring
Policy Type
Please select DLC
Policy Tag
Support for managing policy content via Tag requires relevant permissions to operate
Alarm Object
You can configure alarms for Instance ID (supports multiple selections), grouped instances, and all instances
Alert Configuration Template
You can choose a template or configure manually. Administrators need to create the template in advance, and it supports configuring multiple alert rules
Notification Template
Supports creating or selecting existing notification templates, with support for configuring up to 3 templates
Audit Log
Last updated:2024-07-31 17:30:53
DLC provides an operation log audit service based on Tencent Cloud's CloudAudit service, ensuring you can understand the system operation records in real time and check the operation information.
Notes
Before using the audit CLS of DLC, you need to activate Tencent Cloud's CloudAudit service. If the service is not yet activated, you can activate it with the primary account.
Use Instructions
The Data Lake Computing Console currently displays up to 3 months of log information. To view older log information, you can go to CloudAudit.
The audit logs contain console operations and API call operations. Currently, it supports viewing log information for engine management, task management, data source management, workgroup management, user management, scheduled task instance management, scheduled task management, and scheduling plan management.