Symptom
The file system is created and configured to automatically mount to the cloud disk on a Linux CVM, but automount fails upon the CVM restart.
Possible Causes
Reason 1: Cloud disk automount is not configured in the fstab
configuration file of the CVM.
Reason 2: Incorrect configuration of the fstab
configuration file.
For example, if the device name is used for automatic mounting and it changes when CVM restarts, the startup will fail.
Solutions
Solution to reason 1:
Refer to the following method to reconfigure the /etc/fstab
file to automatically mount cloud disks after a CVM restarts:
Using the soft link of the disk (recommended)
Using the Universally Unique Identifier (UUID) of the file system
Solution to reason 2:
Log in to the Linux CVM using VNC and enter single user mode. In this mode, fix and reconfigure the /etc/fstab
configuration file. For detailed directions, see Fixing the /etc/fstab
fie. Troubleshooting
Configuring the /etc/fstab
file
2. Choose a configuration method to obtain information.
Using the soft link of elastic cloud disks (recommended)
Using the UUID of the file system
Using device name (not recommended)
Analyzing the configuration method
Pros: The soft link of an elastic cloud disk is fixed and unique. It does not change with operations such as mounting, unmounting, and formatting partitions.
Cons: Only an elastic cloud disk can use the soft link, which operates imperceptibly for the partition formatting operation.
Run the following command to view the soft link of the elastic cloud disk.
The following information appears:
Analyzing the configuration method
Automatic mounting configuration may fail due to changes in a file system's UUID.
For example, reformatting a file system will change its UUID.
Run the following command to view the UUID of the file system.
The following information appears:
Analyzing the configuration method
Automatic mounting configuration may fail due to changes in device name.
For example, if an elastic cloud disk on the CVM is unmounted and then remounted, the device name may change when the operating system recognizes the file system again.
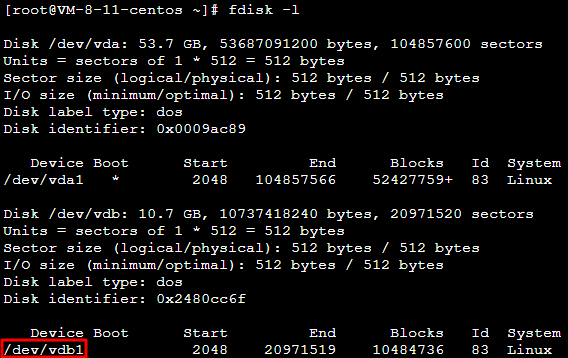
Run the following command to view the device name.
The following information appears:
3. Run the following command to back up the /etc/fstab
file to the /home
directory, for example:
4. Run the following command to use VI editor to open the /etc/fstab
file.
5. Press i to enter the edit mode, and append the following content to the next line of the last line of the file.
<Device information> <Mount point> <File system format> <File system installation option> <File system dump frequency> <File system check sequence at launch>
Refer to the following examples according to the configuration method selected in step 2. (Recommended) Take the soft link of an elastic cloud disk as an example. Add the following content:
/dev/disk/by-id/virtio-disk-drkhklpe-part1 /data/newpart ext4 defaults 0 2
Take the UUID of the file system as an example. Add the following content:
UUID=d489ca1c-5057-4536-81cb-ceb2847f9954 /data/newpart ext4 defaults 0 2
(Not recommended) Take the device name as an example. Add the following content:
/dev/vdb1 /data/newpart ext4 defaults 0 2
6. Press ESC, enter :wq, and press Enter to save the configuration and exit the editor.
7. Run the following command to check whether the /etc/fstab
file has been written successfully.
If information similar to what is shown below is returned, the file has been written. The file system will automatically mount when the operating system is started. You can restart CVM to verify the result.
Fixing the /etc/fstab
file
3. Run the following command to back up the /etc/fstab
file to the /home
directory, for example:
4. Run the following command to use VI editor to open the /etc/fstab
file.
5. Press i to enter the edit mode. Move the cursor to the beginning of the error line and enter #
to comment out this configuration, as shown below.
Note:
This line configures data disk automount. However, due to misconfiguration, the cloud disk could not be mounted when CVM restarts.
6. Press ESC, enter :wq, and press Enter to save the configuration and exit the editor.
7. Enter exit
to exit the single user mode.
8. Wait until restarting is completed. Log in to the CVM.
Was this page helpful?