
接入流程说明

最后更新时间:2025-04-15 11:14:49
接入准备
注册腾讯云企业账号,请见 注册指引。
完成企业实名认证,请见 企业实名指引。
登录慧眼控制台 开通服务。
联系我们 获取最新的 SDK 及 License。
整体架构图
下图为活体人脸比对 SDK 集成的架构图:
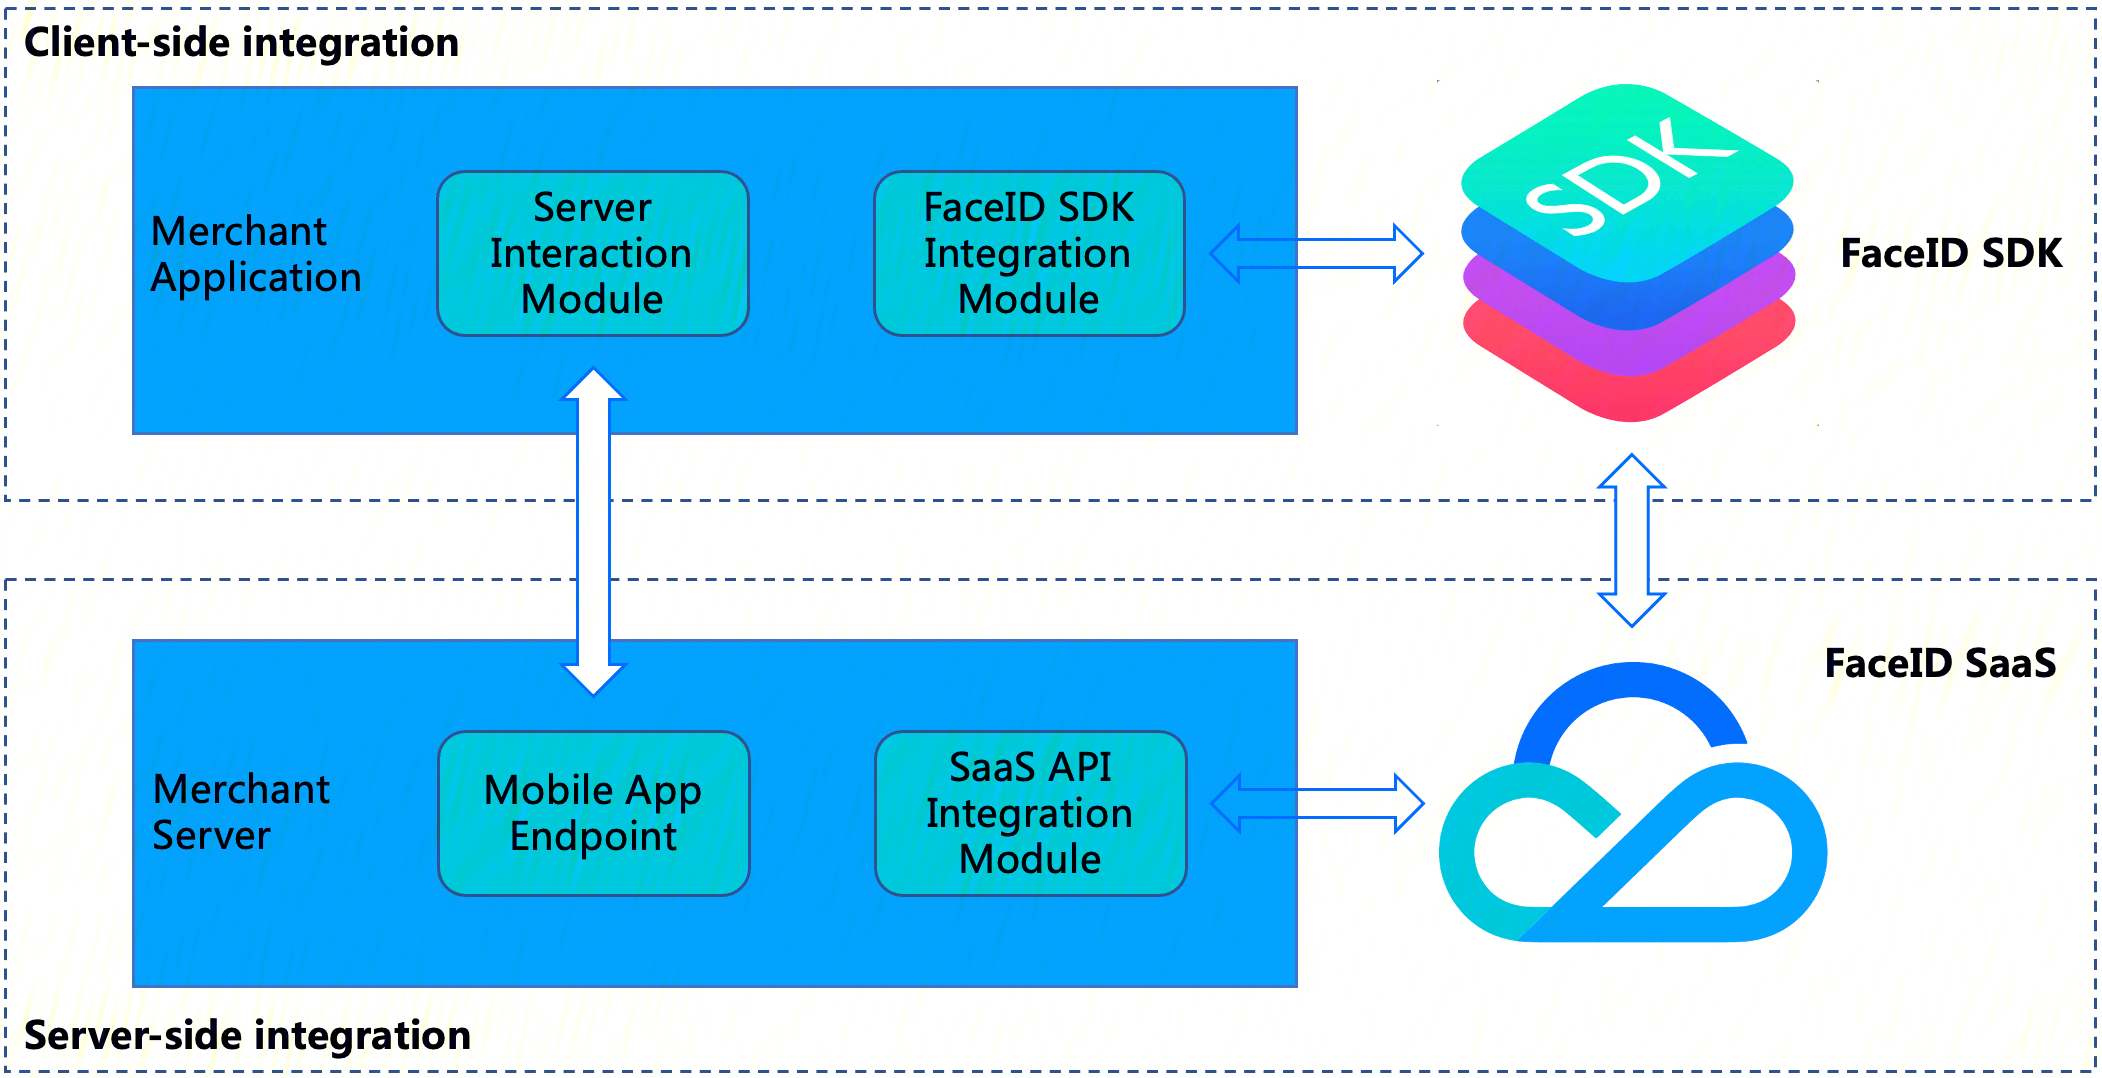
慧眼 SDK 集成包括两部分:
客户端集成: 将慧眼 SDK 集成到客户终端业务 App 中。
服务器端集成: 在您的(商家)服务器中公开您的(商家)应用程序的端点,以便商家应用程序可以与商家服务器交互,然后访问 FaceId SaaS API 以获取串联活体比对流程的
SdkToken以及通过SdkToken拉取最终的核身结果。整体交互流程
集成方只需要传入 Token 并启动对应的慧眼 SDK 的活体检测方法,便可以完成活体检测,并返回活体结果。
1. Token 的获取可以参考云 API 接口:GetFaceldTokenIntl
2. 用户主动拉取活体结果的云 API 接口:GetFaceIdResultIntl
下图展示了 SDK、客户端以及服务器端的整体交互逻辑,图中负责模块解析:
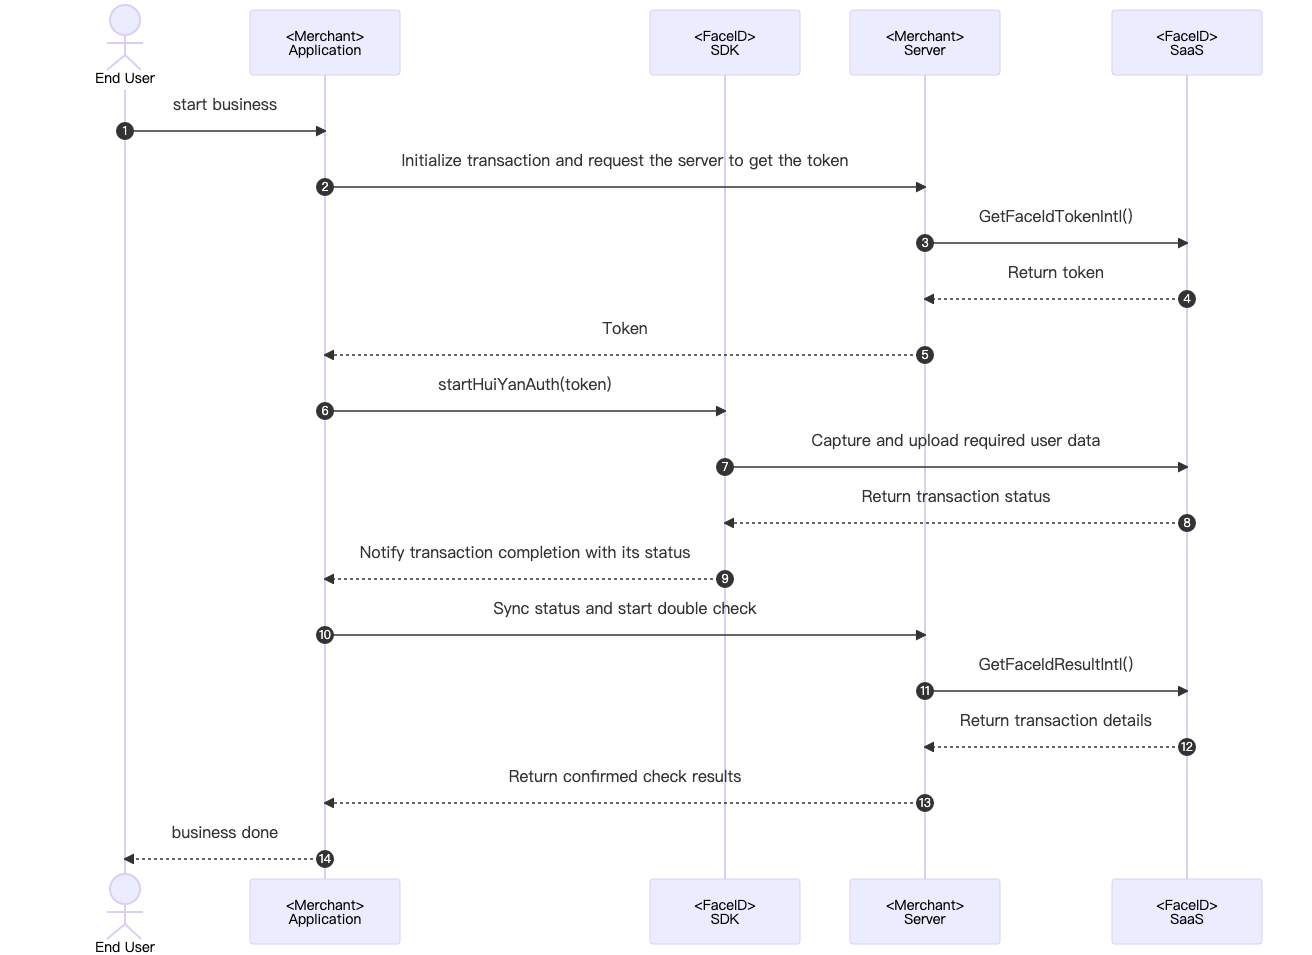
具体的推荐交互流程详细交互如下:
1. 用户触发终端 Merchant Application 准备调用核身业务场景。
2. Merchant Application 发送请求到 Merchant Server,告知启动一次核身业务需要活体业务Token。
3. Merchant Server 传入相关参数调用云API接口GetFaceldTokenIntl。
4. FaceID SaaS 接收到GetFaceldTokenIntl调用后,下发此次业务的token给 Merchant Server。
5. Merchant Server可以将获取到的业务Token,下发给客户的 Merchant Application。
6. Merchant Application 调用慧眼SDK的启动接口startHuiYanAuth传入token与配置信息,开始核身验证。
7. FaceID SDK 捕捉并上传所需的用户数据,包括活体数据等,上传至 FaceID SaaS 。
8. FaceID SaaS 在完成核身检测(包括活体与比对流程)以后,会返回结果给 FaceID SDK 。
9. FaceID SDK 主动触发回调给 Merchant Application 通知核验完成以及核验状态。
10. Merchant Application 接收到回调以后,可以发送请求通知 Merchant Server去主动获取本次核身的结果,进行确认检查。
11. Merchant Server主动调用 FaceID SaaS 的接口GetFaceIdResultIntl传入相关参数以及本次业务的Token,去获取本次核身的结果。
12. FaceID SaaS 接收到GetFaceIdResultIntl调用后,会返回本次核身的结果到 Merchant Server。
13. Merchant Server接收到本次核身的结果后,可以下发需要的信息到 Merchant Application。
14. Merchant Application 展示最后的结果,呈现在 UI 界面上,告知用户核身的结果。
接入流程
服务器端集成
1. 集成准备
在服务端集成之前,你需要按照获取API秘钥指引中的说明进行操作,开通腾讯云慧眼服务,并且拿到了腾讯云api访问秘钥SecretId和SecretKey。除此之外你还需要按照连接腾讯云API接口中的操作流程,引入你所熟悉开发语言的SDK包到你服务端模块中,以确保可以成功调用腾讯云API以及正确处理API请求和响应。
2. 开始集成
为了确保你的(商户)客户端应用程序能够跟你的(商户)服务端正常交互,商户服务端需要调用慧眼提供的API接口 GetFaceIdTokenIntl 获取SDKToken串联整个活体比对流程以及调用 GetFaceIdResultIntl 接口获取活体比对结果,商户服务端需要提供相应的端点给商户客户端调用,下面的示例代码使用 Golang语言作为案例,展示如何在服务端调用腾讯云API接口并拿到正确的响应结果。
注意: 该示例中仅仅演示商户服务端与腾讯云API服务交互所需要的处理逻辑,如果有需要的话你需要自己实现你的业务逻辑,比如:
当你通过 GetFaceIdTokenIntl 接口获取活体比对SDKToken之后,可以将客户端应用程序需要的其他响应同SDKToken一并返回给客户端。
当你通过 GetFaceIdResultIntl 接口获取活体比对结果之后,可以将返回的最佳帧照片保存起来,以便后续业务逻辑使用。
var FaceIdClient *faceid.Clientfunc init() {// 初始化客户端配置对下,您可以指定超时时间和其他配置项prof := profile.NewClientProfile()prof.HttpProfile.ReqTimeout = 60// TODO 需要替换成您调用账号的 SecretId 和 SecretKeycredential := cloud.NewCredential("SecretId", "SecretKey")var err error// 初始化调用慧眼人脸核身服务的客户端FaceIdClient, err = faceid.NewClient(credential, "ap-singapore", prof)if nil != err {log.Fatal("FaceIdClient init error: ", err)}}// GetFaceIdToken 获取人脸核身Tokenfunc GetFaceIdToken(w http.ResponseWriter, r *http.Request) {log.Println("get face id token")// 步骤1: 解析请求参数_ = r.ParseForm()var SecureLevel = r.FormValue("SecureLevel")// 步骤2: 初始化请求对象,并给必要的参数赋值request := faceid.NewGetFaceIdTokenIntlRequest()request.SecureLevel = &SecureLevel// 步骤3: 通过FaceIdClient调用人脸核身服务response, err := FaceIdClient.GetFaceIdTokenIntl(request)// 步骤4: 处理腾讯云API的响应,并构造返回对象if nil != err {_, _ = w.Write([]byte("error"))return}SdkToken := response.Response.SdkTokenapiResp := struct {SdkToken *string}{SdkToken: SdkToken}b, _ := json.Marshal(apiResp)// ... 其他业务处理代码//步骤5: 返回服务响应_, _ = w.Write(b)}// GetFaceIdResult 获取人脸核身核验结果func GetFaceIdResult(w http.ResponseWriter, r *http.Request) {// 步骤1: ... 解析请求参数_ = r.ParseForm()SdkToken := r.FormValue("SdkToken")// 步骤2: 初始化请求对象,并给必要的参数赋值request := faceid.NewGetFaceIdResultIntlRequest()request.SdkToken = &SdkToken// 步骤3: 通过FaceIdClient调用人脸核身服务response, err := FaceIdClient.GetFaceIdResultIntl(request)// Step 4: 处理腾讯云API的响应,并构造返回对象if nil != err {_, _ = w.Write([]byte("error"))return}result := response.Response.ResultapiResp := struct {Result *string}{Result: result}b, _ := json.Marshal(apiResp)// ... 其他业务处理代码//步骤5: 返回服务响应_, _ = w.Write(b)}func main() {// 注册http接口路径http.HandleFunc("/api/v1/get-token", GetFaceIdToken)http.HandleFunc("/api/v1/get-result", GetFaceIdResult)// 监听端口err := http.ListenAndServe(":8080", nil)if nil != err {log.Fatal("ListenAndServe error: ", err)}}
3. 接口测试
当你完成了集成之后,可以通过postman或者curl命令来测试当前的集成是否正确,通过访问http://ip:port/api/v1/get-token 接口查看是否正常返回
SdkToken , 访问http://ip:port/api/v1/get-result 接口查看 Result 字段的响应是否为0以判断服务端集成是否成功,具体的响应结果详见API接口部分的介绍。Android 端集成
1. 依赖环境
当前Android端慧眼SDK适用于API 19 (Android 6) 及以上版本。
2. SDK 接入步骤
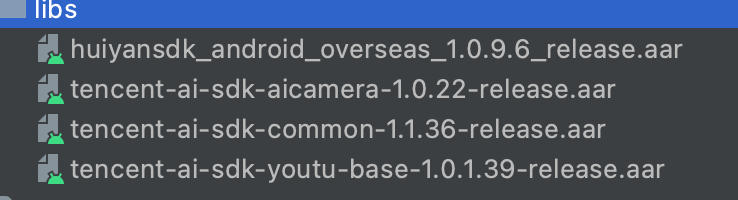
1. 将huiyansdk_android_overseas_1.0.9.6_release.aar(具体版本号以官网下载为准)和 tencent-ai-sdk-youtu-base-1.0.1.39-release.aar、tencent-ai-sdk-common-1.1.36-release.aar、tencent-ai-sdk-aicamera-1.0.22-release.aar(具体版本号以最终提供为准) 添加到您工程的libs目录下。
2. 在您工程的 build.gradle 中进行如下配置:
// 设置ndk so架构过滤(以armeabi-v7a为例)ndk {abiFilters 'armeabi-v7a'}dependencies {// 引入慧眼SDKimplementation files("libs/huiyansdk_android_overseas_1.0.9.5_release.aar")// 慧眼通用算法SDKimplementation files("libs/tencent-ai-sdk-youtu-base-1.0.1.32-release.aar")// 通用能力组件库implementation files("libs/tencent-ai-sdk-common-1.1.27-release.aar")implementation files("libs/tencent-ai-sdk-aicamera-1.0.18-release.aar")// 慧眼SDK需要依赖的第三方库// gsonimplementation 'com.google.code.gson:gson:2.8.5'}
3. 同时需要在AndroidManifest.xml文件中进行必要的权限声明
<!-- 摄像头权限 --><uses-permission android:name="android.permission.CAMERA" /><uses-featureandroid:name="android.hardware.camera"android:required="true" /><uses-feature android:name="android.hardware.camera.autofocus" /><!-- SDK需要的权限 --><uses-permission android:name="android.permission.INTERNET" /><!-- SDK可选需要的权限 --><uses-permission android:name="android.permission.WRITE_EXTERNAL_STORAGE" />
对于需要兼容Android 6.0以上的用户,以上权限除了需要在AndroidManifest.xml文件中声明权以外,还需使用代码动态申请权限。
3. 初始化接口
在您APP初始化的时候调用,推荐在Application中调用,主要是进行一些SDK的初始化操作。
@Overridepublic void onCreate() {super.onCreate();instance = this;// SDK需要在Application初始化时进行初始化HuiYanOsApi.init(getApp());}
4. 启动核身检测接口
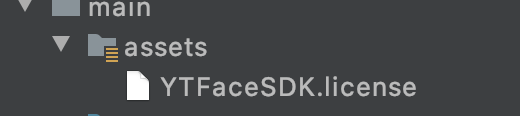
// HuiYanOs的相关参数HuiYanOsConfig huiYanOsConfig = new HuiYanOsConfig();// 此license文件存放在assets下huiYanOsConfig.setAuthLicense("YTFaceSDK.license");if (compatCheckBox.isChecked()) {huiYanOsConfig.setPageColorStyle(PageColorStyle.Dark);}// 是否需要返回最佳帧if (needBestImageCB.isChecked()) {huiYanOsConfig.setNeedBestImage(true);}// 启动方法,开始的活体,currentToken为后台下发数据HuiYanOsApi.startHuiYanAuth(currentToken, huiYanOsConfig, new HuiYanOsAuthCallBack() {@Overridepublic void onSuccess(HuiYanOsAuthResult authResult) {showToast("活体通过!");if (!TextUtils.isEmpty(authResult.getBestImage())) {CommonUtils.decryptBestImgBase64(authResult.getBestImage(), false);}}@Overridepublic void onFail(int errorCode, String errorMsg, String token) {String msg = "活体失败 " + "code: " + errorCode + " msg: " + errorMsg + " token: " + token;Log.e(TAG, "onFail" + msg);showToast(msg);}});
注意:当前的"YTFaceSDK.license"文件是需要您主动申请的,暂时您可以联系客服人员进行license申请。将申请完成后的license文件放到assets文件下。
5. SDK 资源释放
在您APP退出使用的时候,可以调用SDK资源释放接口。
@Overrideprotected void onDestroy() {super.onDestroy();// 退出时做资源释放HuiYanOsApi.release();}
6. 混淆规则配置
如果您的应用开启了混淆功能,为确保SDK的正常使用,请把以下部分添加到您的混淆文件中。
#慧眼SDK的混淆包含-keep class com.tencent.could.huiyansdk.** {*;}-keep class com.tencent.could.aicamare.** {*;}-keep class com.tencent.could.component.** {*;}-keep class com.tencent.youtu.** {*;}-keep class com.tenpay.utils.SMUtils {*;}
iOS 端集成
1. 依赖环境
1. 开发环境 Xcode 11.0 或以上
2. 慧眼iOS SDK 适用于手机iOS9.0及以上版本
2. SDK接入步骤
手动接入方式
1. 导入相关库及文件
Link Binary With Libraries导入相关Framework
2. SDK依赖的库如下
├──HuiYanOverseasSDK.framework├──YtSDKKitSilentLiveness.framework├──YtSDKKitReflectLiveness.framework├──YtSDKKitActionLiveness.framework├──YtSDKKitFramework.framework├──tnnliveness.framework├──YTFaceAlignmentTinyLiveness.framework├──YTFaceTrackerLiveness.framework├──YTFaceDetectorLiveness.framework├──YTPoseDetector.framework├──YTCommonLiveness.framework├──TXYCommonDevice.framework├──TXYCommonNetworking.framework├──TXYCommonUtils.framework├──YTCv.framework├──YtSDKKitFrameworkTool.framework├──YTSm.framework└──YTFaceLiveReflect.framework
3. Link Binary With Libraries导入系统Framework
├── AVFoundation.framework├── libc++.tbd└── Accelerate.framework
4. Copy Bundle Resources中导入模型
└── face-tracker-v003.bundle
5. Copy Bundle Resources导入资源文件
└── HuiYanSDKUI.bundle
使用Pod方式接入
1. 将CloudHuiYanSDK_FW文件夹复制到集成项目Podfile同级目录下
2. 在Podfile设置
target 'HuiYanAuthDemo' douse_frameworks!pod 'CloudHuiYanSDK_FW', :path => './CloudHuiYanSDK_FW'end
3. pod install 更新
Build Phases设置
1. Other Linker Flags 新增 -ObjC
2. 接入ViewController.m 设置后缀为.mm(swift 工程添加系统库libc++.tbd)
权限设置
SDK需要手机网络及 摄像头使用权限,请添加对应的权限声明。在主项目info.plist 配置中添加下面key-value值。
<key>Privacy - Camera Usage Description</key><string>人脸核身需要开启您的摄像头权限,用于人脸识别</string>
3. 开启活体检测接口
#import <HuiYanOverseasSDK/HuiYanOsApi.h>#import <HuiYanOverseasSDK/HuiYanOSKit.h>//获取tokenNSString *faceToken = self.tokenTextField.text;// 配置SDKHuiYanOsConfig *config = [[HuiYanOsConfig alloc] init];//设置licconfig.authLicense = [[NSBundle mainBundle] pathForResource:@"xxx.lic" ofType:@""];//准备阶段超时配置config.prepareTimeoutMs = 20000;//检测阶段超时配置config.authTimeOutMs = 20000;config.isDeleteVideoCache = YES;config.languageType = EN;// config.userLanguageFileName = @"ko";// config.userLanguageBundleName = @"UseLanguageBundle";config.iShowTipsPage = YES;config.isGetBestImg = YES;[[HuiYanOSKit sharedInstance] startHuiYaneKYC:faceToken withConfig:configwitSuccCallback:^(HuiYanOsAuthResult * _Nonnull authResult, id _Nullable reserved) {NSString *bestImg = authResult.bestImage;NSString *token = authResult.faceToken;} withFailCallback:^(int errCode, NSString * _Nonnull errMsg, id _Nullable reserved) {NSString *showMsg = [NSString stringWithFormat:@"err:%d:%@",errCode,errMsg];NSLog(@"err:%@",showMsg);}];
注意:
当前的"xxx.lic"文件是需要您主动申请的,暂时您可以联系客服人员进行license申请。
4. SDK 资源释放
在您APP退出使用的时候,可以调用SDK资源释放接口。
// 退出时做资源释放- (void)dealloc {[HuiYanOsApi release];}//[iOS demo](https://github.com/TencentCloud/huiyan-faceid-demo/tree/main/faceid-iOS-example)[Android demo](https://github.com/TencentCloud/huiyan-faceid-demo/tree/main/id-verification-android-example)
文档反馈