What is Cloud Application Rendering (CAR)
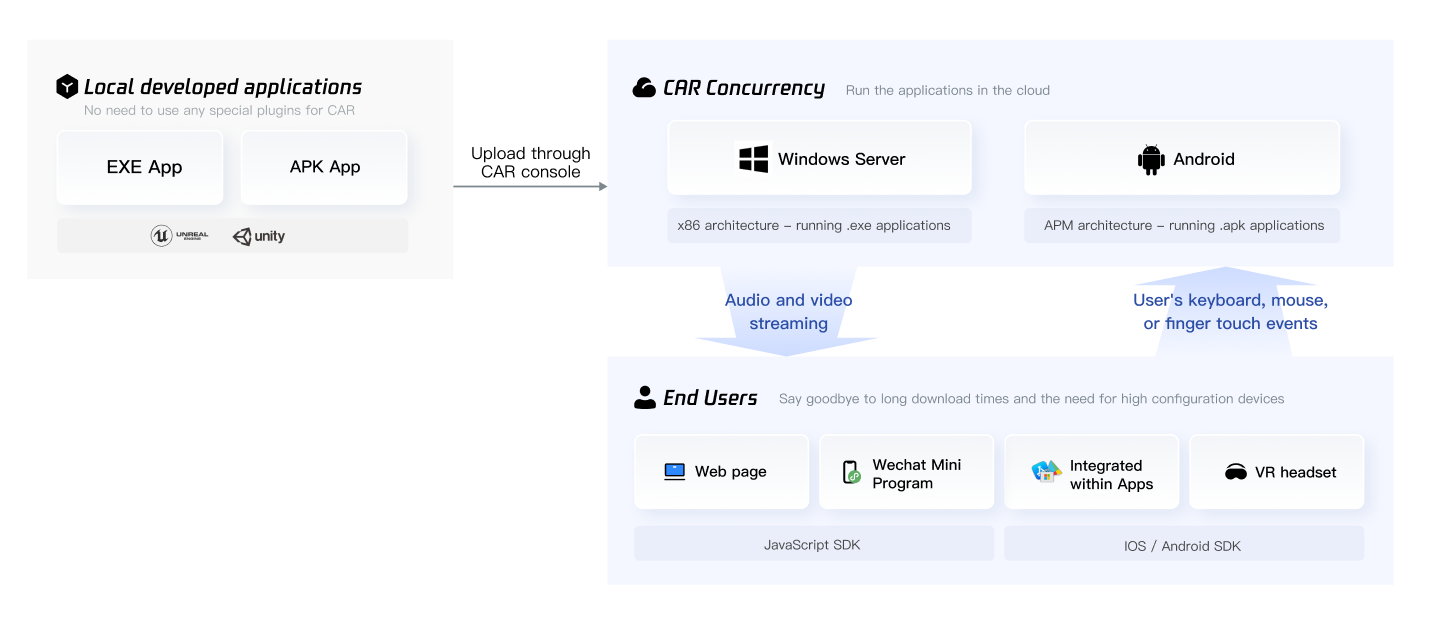
Cloud Application Rendering is a PaaS product with features like
Application self-upload and update,
Concurrency (Virtual Machine) self-management,
Automatic concurrency scheduling based on global end-user location for optimal proximity,
Ultra-low latency audio and video streaming,
JavaScript, iOS, and Android SDK
and so on.
It runs your developed EXE/APK applications on cloud concurrencies, allowing end-users to experience them through web pages without downloading. The provided terminal SDKs transmit audio and video results to end users' devices and send real-time user operations back to the concurrencies. To integrate CAR, you only need to ensure that the application can run normally in a Windows Server 2019 / 2022 or Android environment, without using any special plugins, making cloudification easy.
Sign up for a Tencent Cloud account and activate CAR
CAR Integration
Before integration, we hope you can first understand the three basic concepts of CAR:
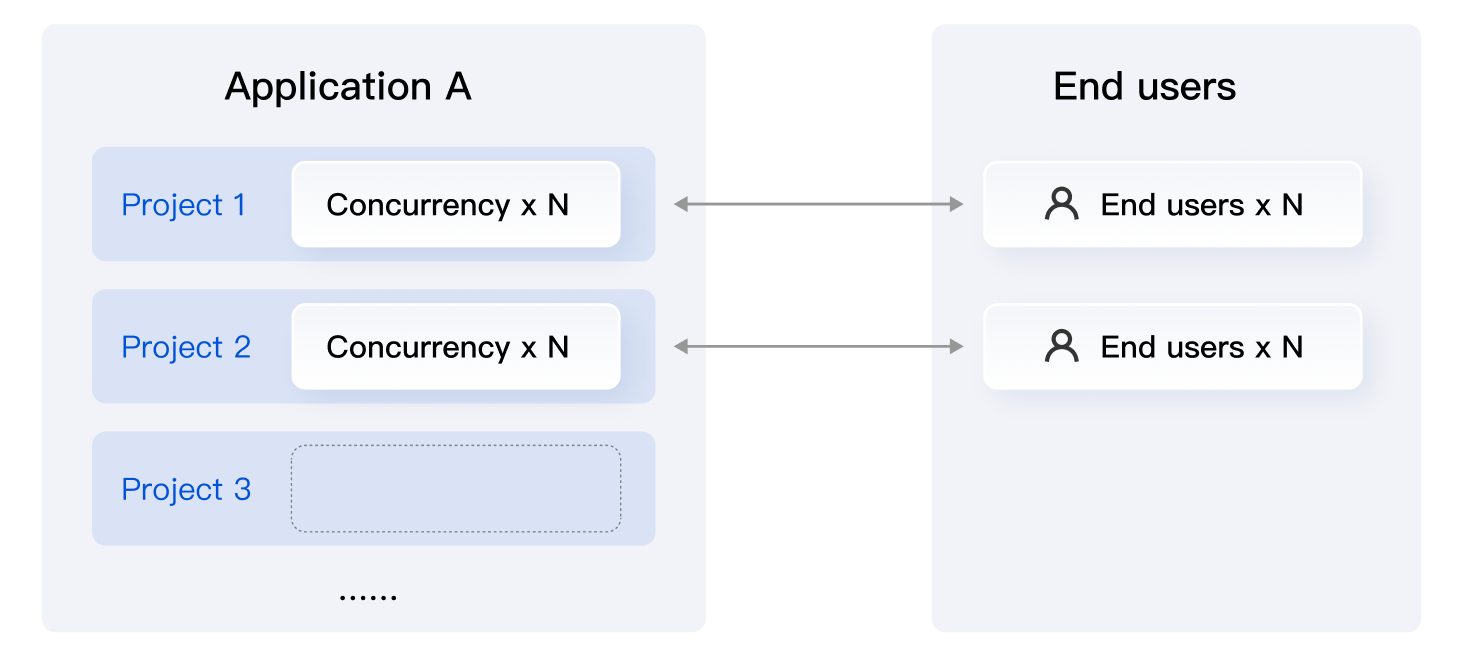
Application: Your developed application. Upload it to the console to run it in the cloud concurrency.
Project: Group concurrencies through projects and associate them with applications. Create different projects for an application to meet various testing and deployment scenarios without repeatedly uploading the application.
Concurrency: The only billing item for CAR. One concurrency equals one virtualized cloud instance, including virtual computing resources such as CPU, bandwidth, disk, and GPU, used to run your application in the cloud.
Note:
For more information on concurrency configuration and specifications, please refer to Billing. At present, only PC desktop applications (.exe) can be uploaded through the console, and only x86 concurrency (Windows Server 2019/2022 system) is available. If you want to deploy a .apk application and use ARM concurrency (Android system), please contact your Tencent Cloud sales representative.
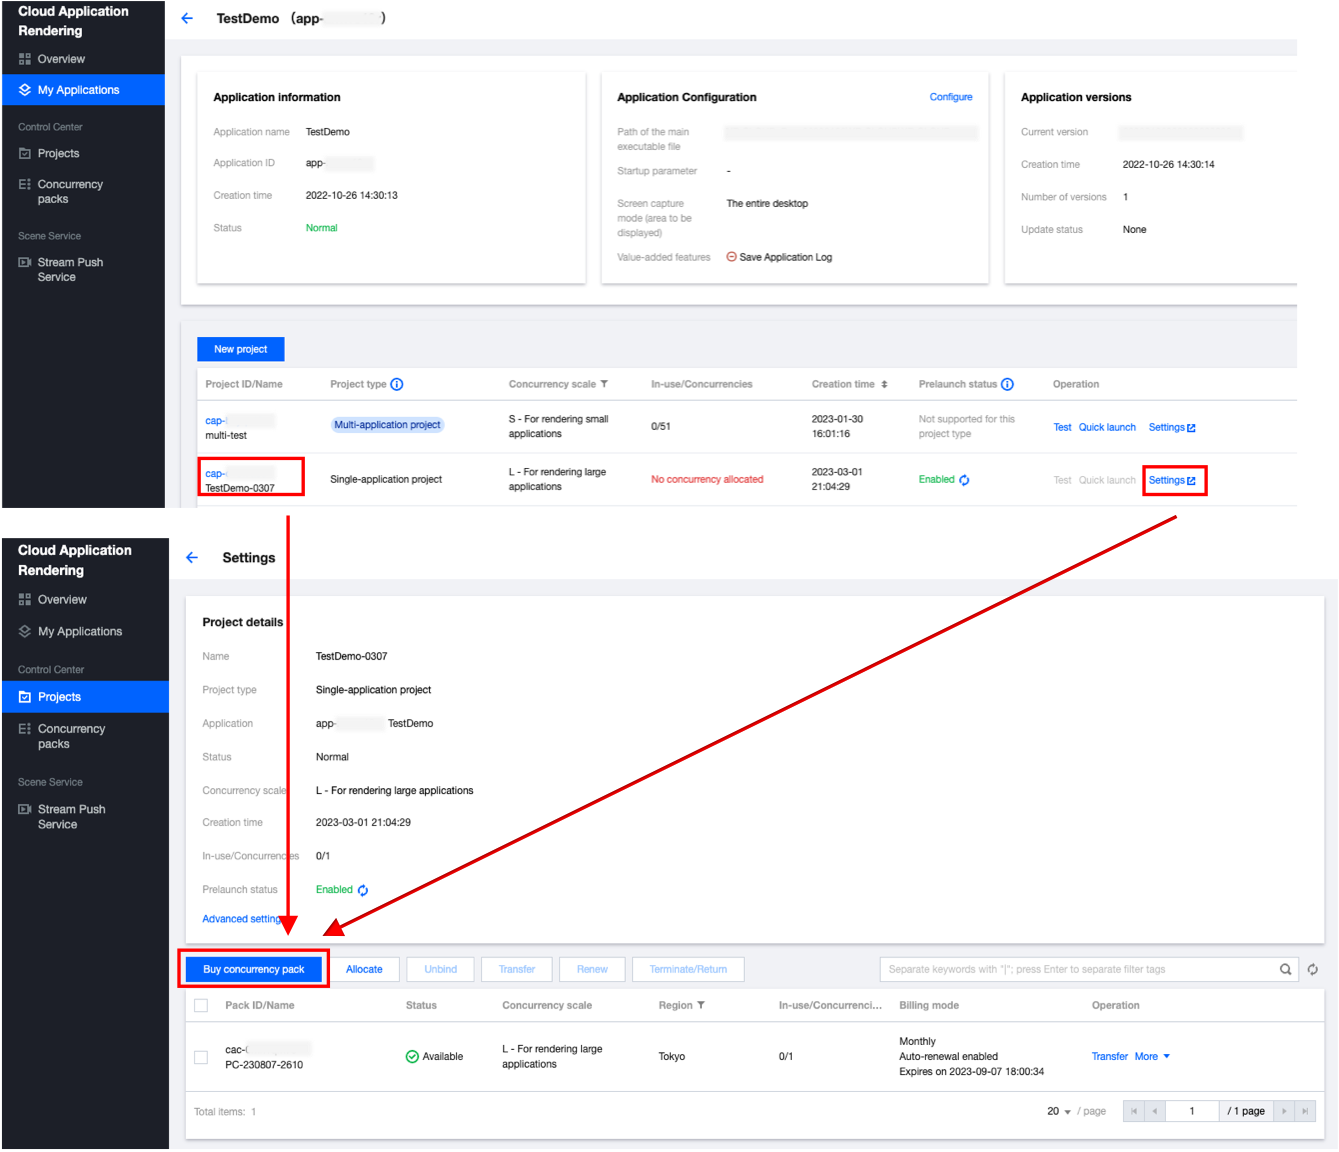
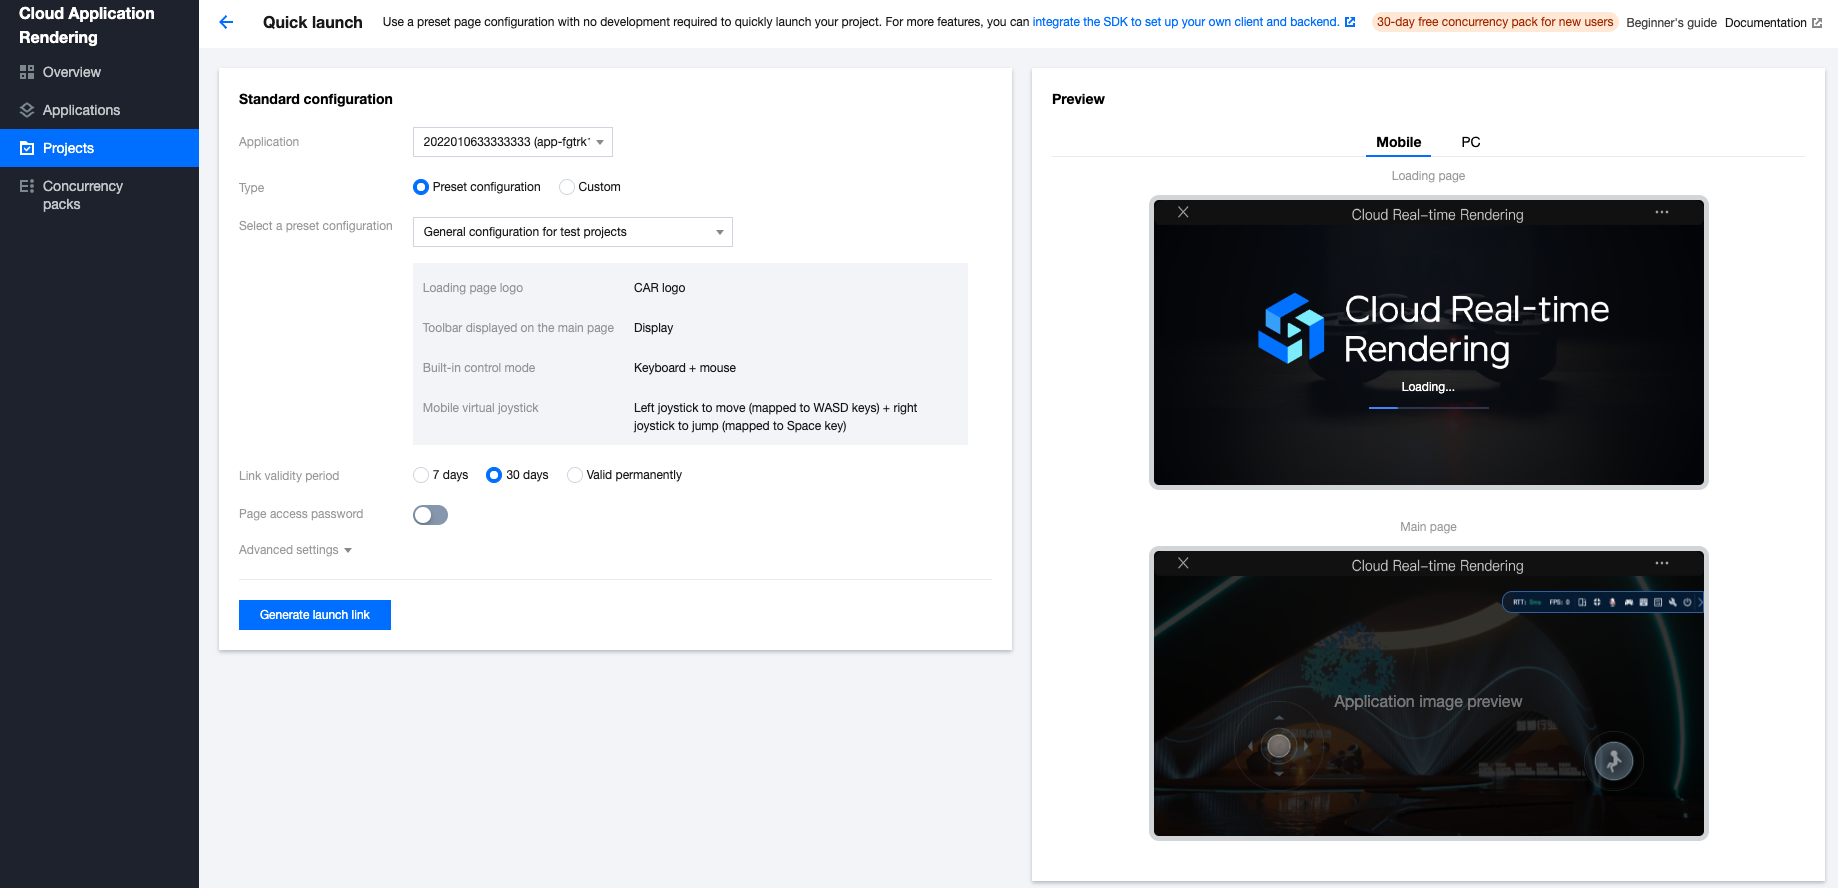
In the console, it is recommended that you follow the sequence of (1) Creating an application, (2) Creating a project & purchasing concurrency packs to obtain a project associated with a specific application and allocated with available concurrency. Next, you can carry out a (3) Performance test on this project, experience the basic effect of your cloud application, and choose the most suitable concurrency scale. After completing the performance test, you can (4) Launch the project. We support: Quick Launch (no development required): Quickly generate a standardized front-end page through simple configurations in the console.
By using the provided backend and client demo for integration, you can build your own backend services and client programs to meet your unique business requirements.
Step 1. Create application
1. Upload an application:
1.1 Before
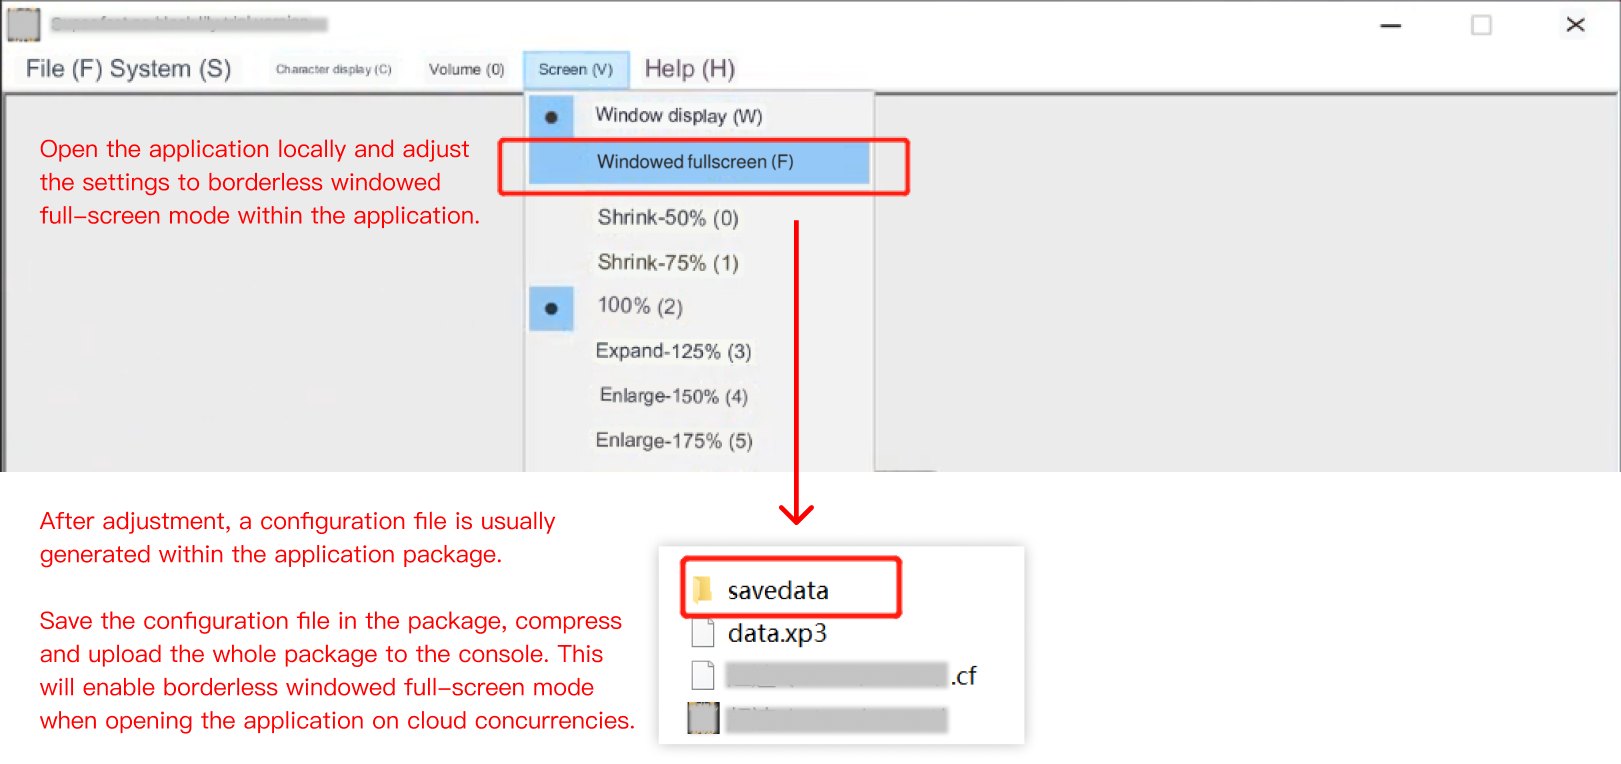
you upload an application to CAR, we recommend that you first set the application to a borderless windowed mode that can adapt the desktop resolution so that you can later use the adaptive resolution feature. This feature can make the application display full-screen, adapt to the resolution of end-user devices, and have no black borders on the screen. This operation needs to be performed at the application layer, not in the console.
For some applications, you can adjust the display mode in the settings and upload the generated configuration file along with the package to the console.
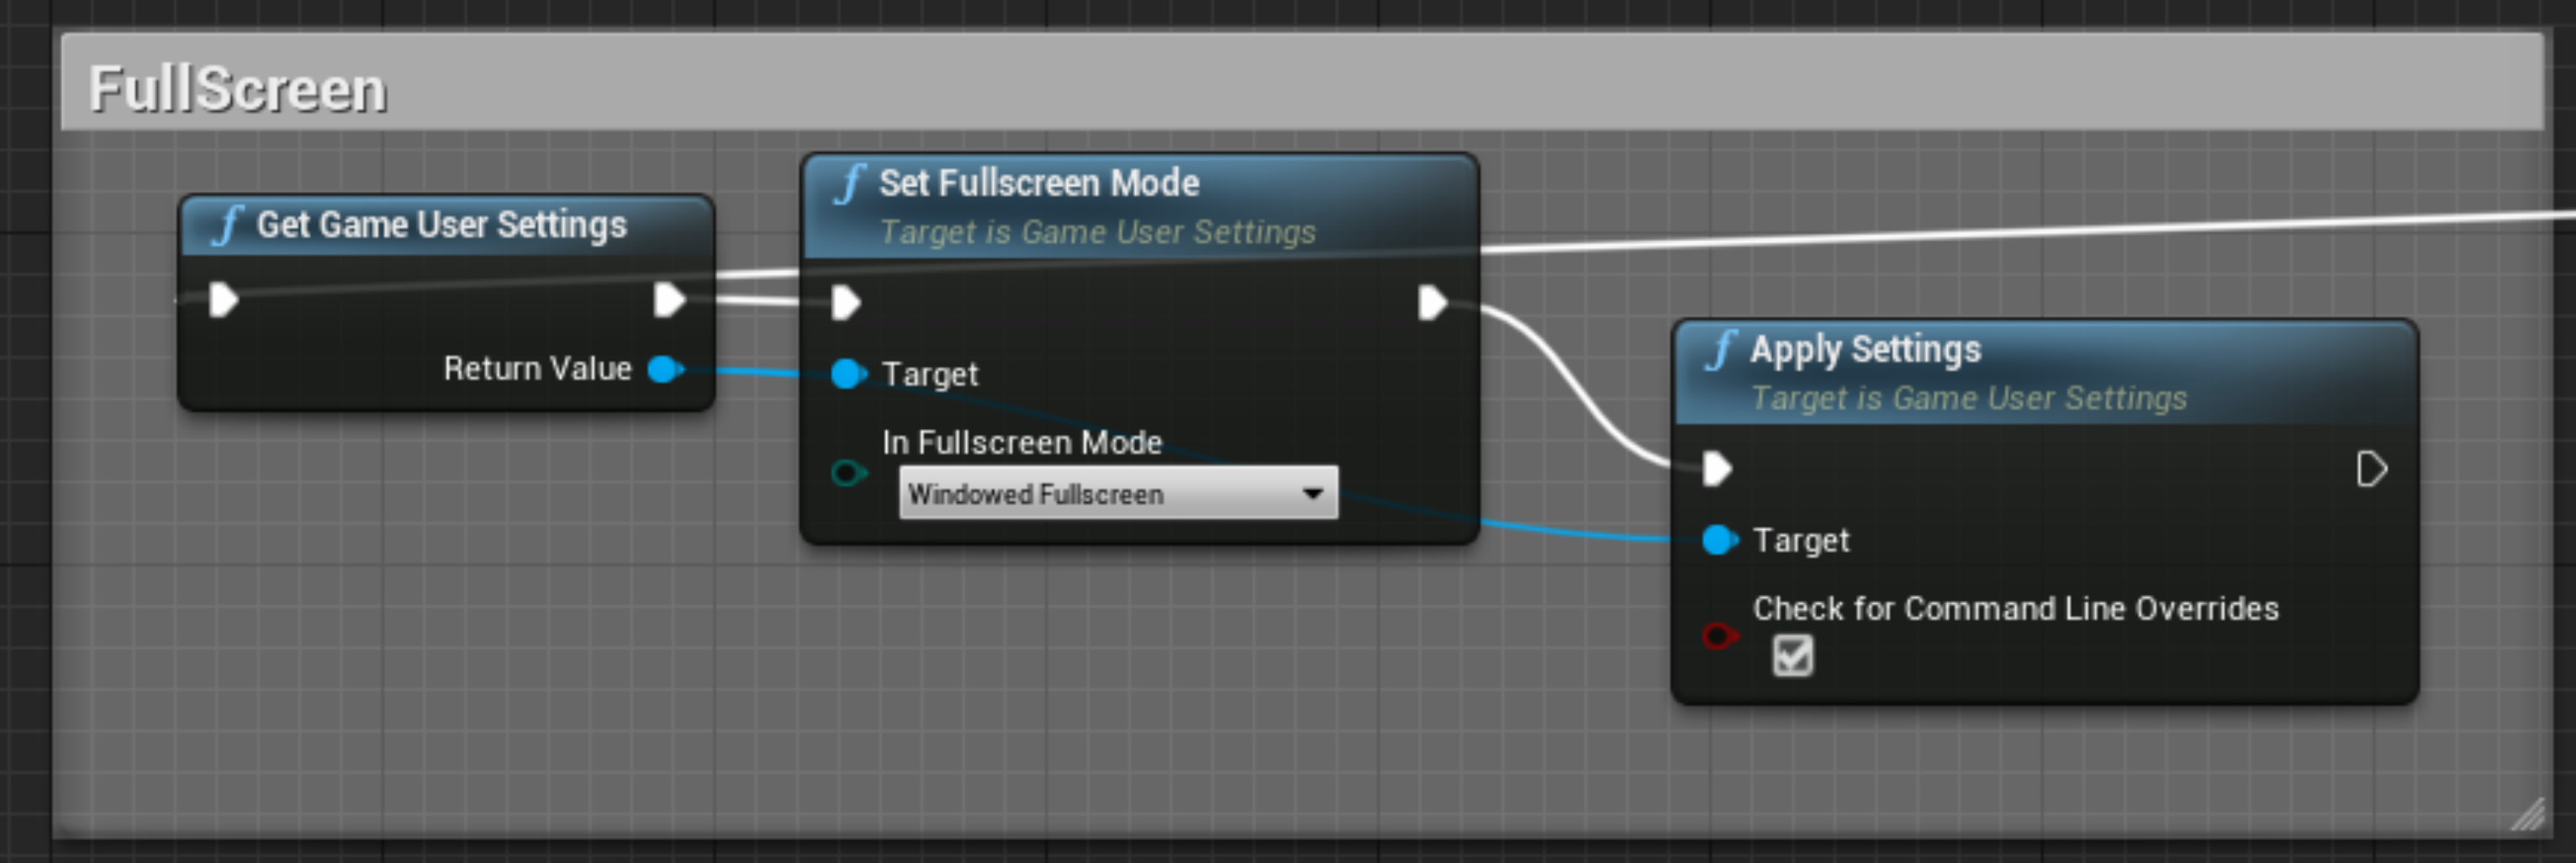
You can also adjust the relevant display configurations during application development. For Unreal Engine, You can add a blueprint as shown below to BeginPlay in Map. In Fullscreen Mode should be set to Windowed Fullscreen.
For the Unity application, refer to the following image for instructions on how to configure the fullscreen mode.
Alternatively, you can add the application startup parameter -screen-fullscreen 1. For Unity application parameters, refer to the Unity documentation. Note:
An application is not in the borderless windowed mode when displayed in fullscreen mode.
The Adaptive Resolution feature is achieved by modifying the "default resolution of cloud desktop". However, when the application is in full-screen mode, the desktop resolution is controlled by the application. In this case, a crash may occur when the desktop resolution is modified. How do I differentiate between borderless windowed mode and fullscreen mode?
You can press Alt+Tab. Borderless windowed applications do not cause the monitor to flicker when the window is switched, while fullscreen applications do cause the monitor to flicker.
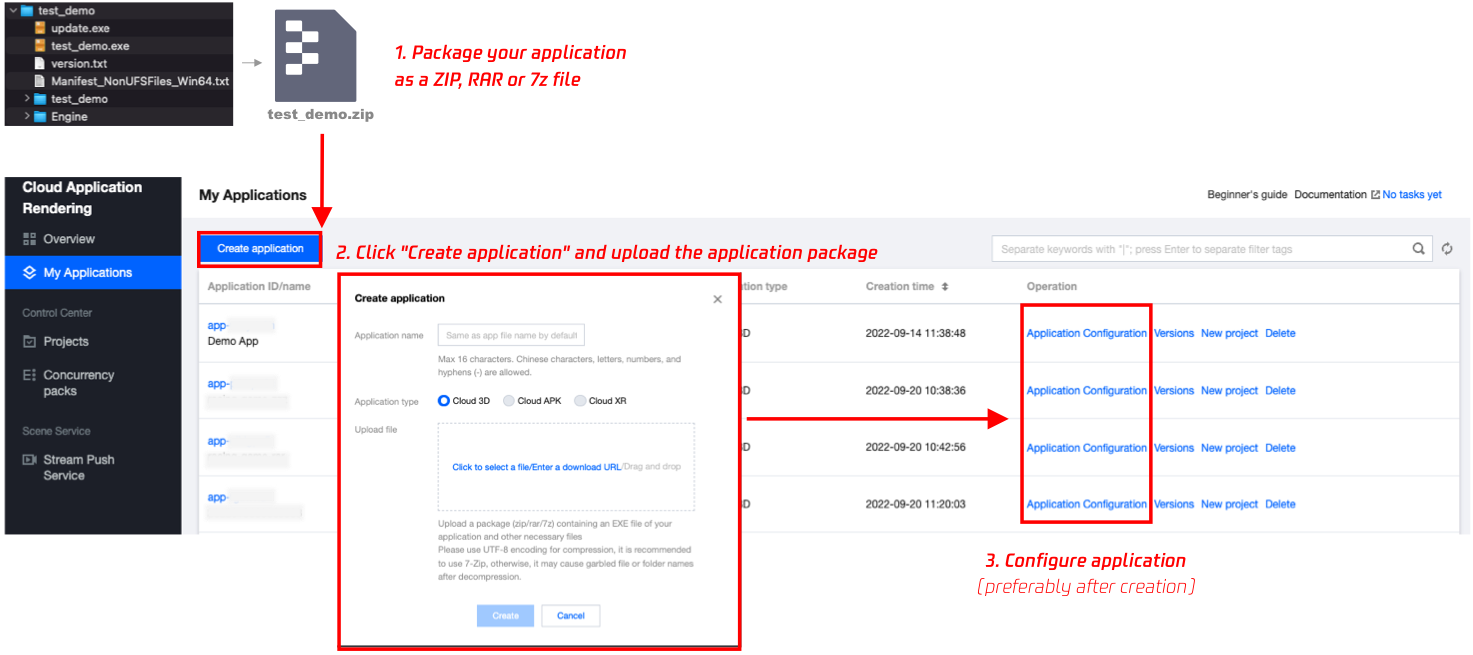
1.2 Package the application as a ZIP, RAR, or 7z file. Go to the My Applications page in the CAR console, upload the application, and wait for the application to be created.
Please use UTF-8 encoding for compression (recommended to use 7-Zip) to prevent garbled file or folder names after decompression.
Cloud rendering supports three types of applications: Cloud 3D, Cloud XR, and Cloud APK.
Cloud 3D: Traditional 3D (non-AR/VR class) applications, operated generally with a keyboard and mouse, such as virtual event applications and PC games. The application running on the cloud needs to be in the EXE format and can be adapted to a variety of platforms such as web pages, mini-programs, Android/iOS applications, etc.
Cloud XR (beta): VR/AR/MR applications, generally operated with dual-hand controllers. The XR application running on the cloud needs to be in the EXE format, and can be adapted to Pico/Oculus, mobile phones/tablets, PCs, holographic terminals, and other platforms.
Cloud APK (beta): Applications in the APK format.
Note:
Cloud APK and Cloud XR are currently in beta, and self-upload is not currently supported. If you want to use, please contact your Tencent Cloud sales rep.
2. Configure the application
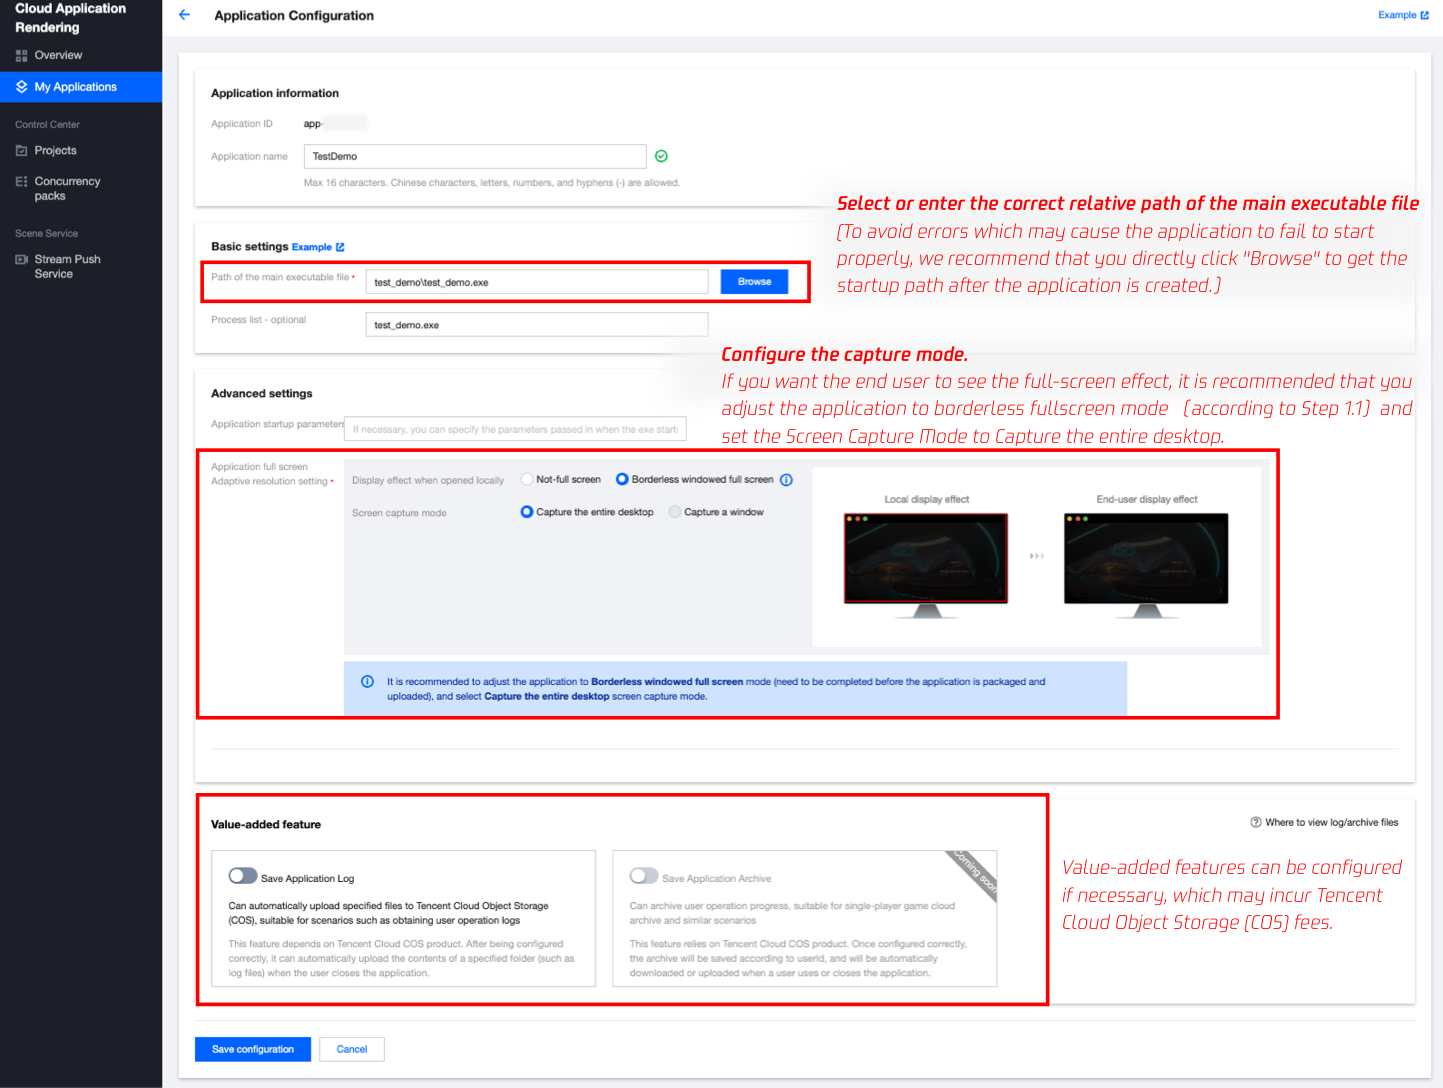
Path of the main executable file: To avoid filling in errors that may cause the application to fail to start, it is recommended that you wait for the application to be created and then click Browse to select the right path.
Application full-screen/adaptive resolution settings:
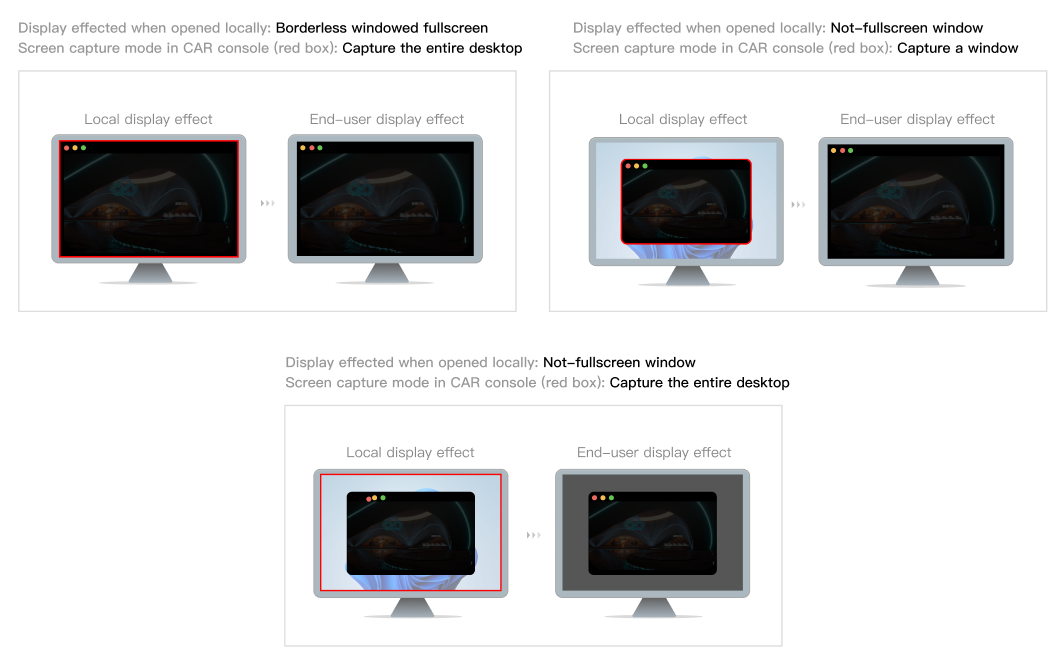
If you have adjusted the application to borderless fullscreen mode according to Step 1.1, set the Screen Capture Mode to Capture the entire desktop. If your application only has a not-fullscreen window mode and cannot be adjusted to borderless fullscreen mode, you can use theCapture a window mode. You need to fill in the correct Window title and Class name according to the instructions. If the window title isn't customized during development, the window title for `Demo.exe` will be `Demo`. If your application is built by Unreal Engine, enter `UnrealWindow` for the Class name. Step 2. Create a project and purchase concurrency packs:
Test Project and Free Concurrency Pack for New Users:
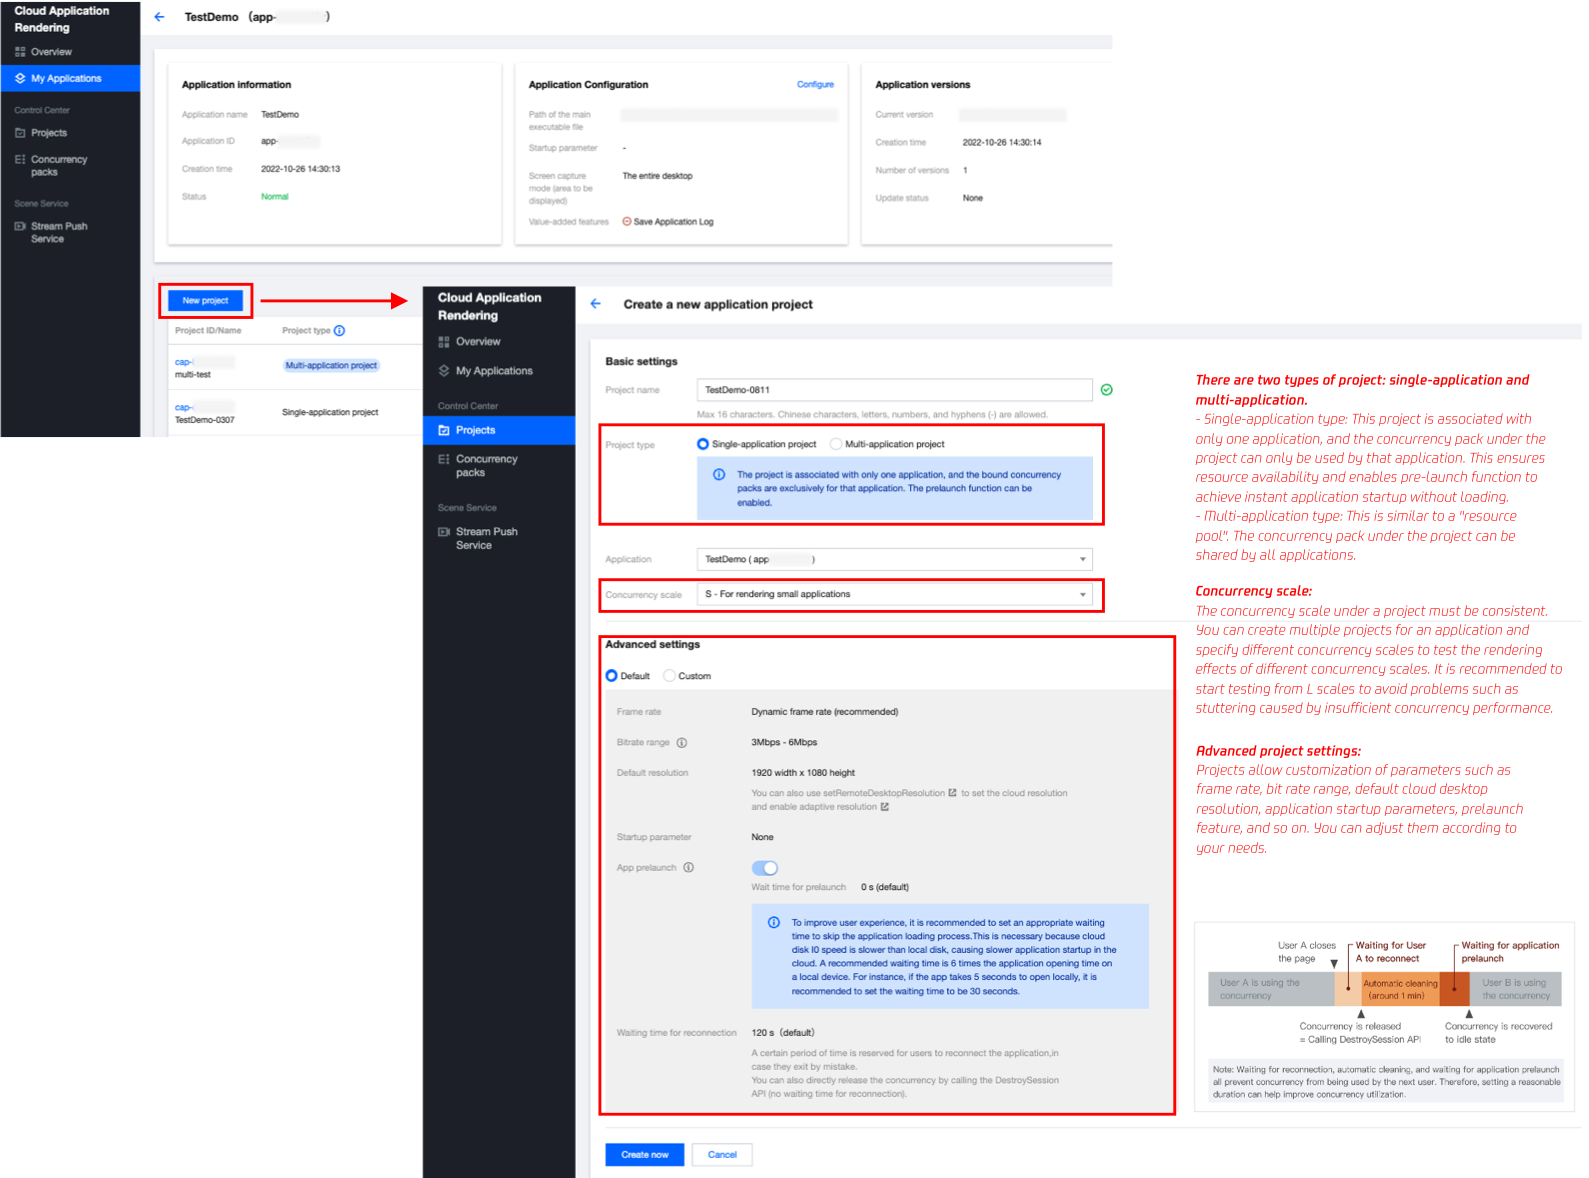
1. If you wish to test other concurrency scales or purchase a concurrency pack for official use, please create a new project.
Project type: Supports two types of projects: single-application and multi-application. Single-application type ensures that the concurrency package under the project is only used by a single application, while the concurrency packs under a multi-application project can be shared by multiple applications as a "resource pool". Click to view how to achieve concurrency resource sharing through multi-application projects. Concurrency scale: The concurrency scale under a project must be consistent. You can create multiple projects for an application and specify different concurrency scales to test the rendering effects of different concurrency scales. It is recommended to start testing from L scales to avoid problems such as stuttering caused by insufficient concurrency performance. For specific configurations of different concurrency scales, please refer to Billing. Advanced project settings: Projects allow customization of parameters such as frame rate, bit rate range, default cloud desktop resolution, application startup parameters, prelaunch feature, and so on. You can adjust them according to your needs. For details, please refer to the advanced project settings instructions. 2. Purchase the specified concurrency packs for the project and proceed to the next step.
Step 3. Start a test:
Click Test to generate a test link and password. Open the test link to test the basic effect of operating your cloud application.
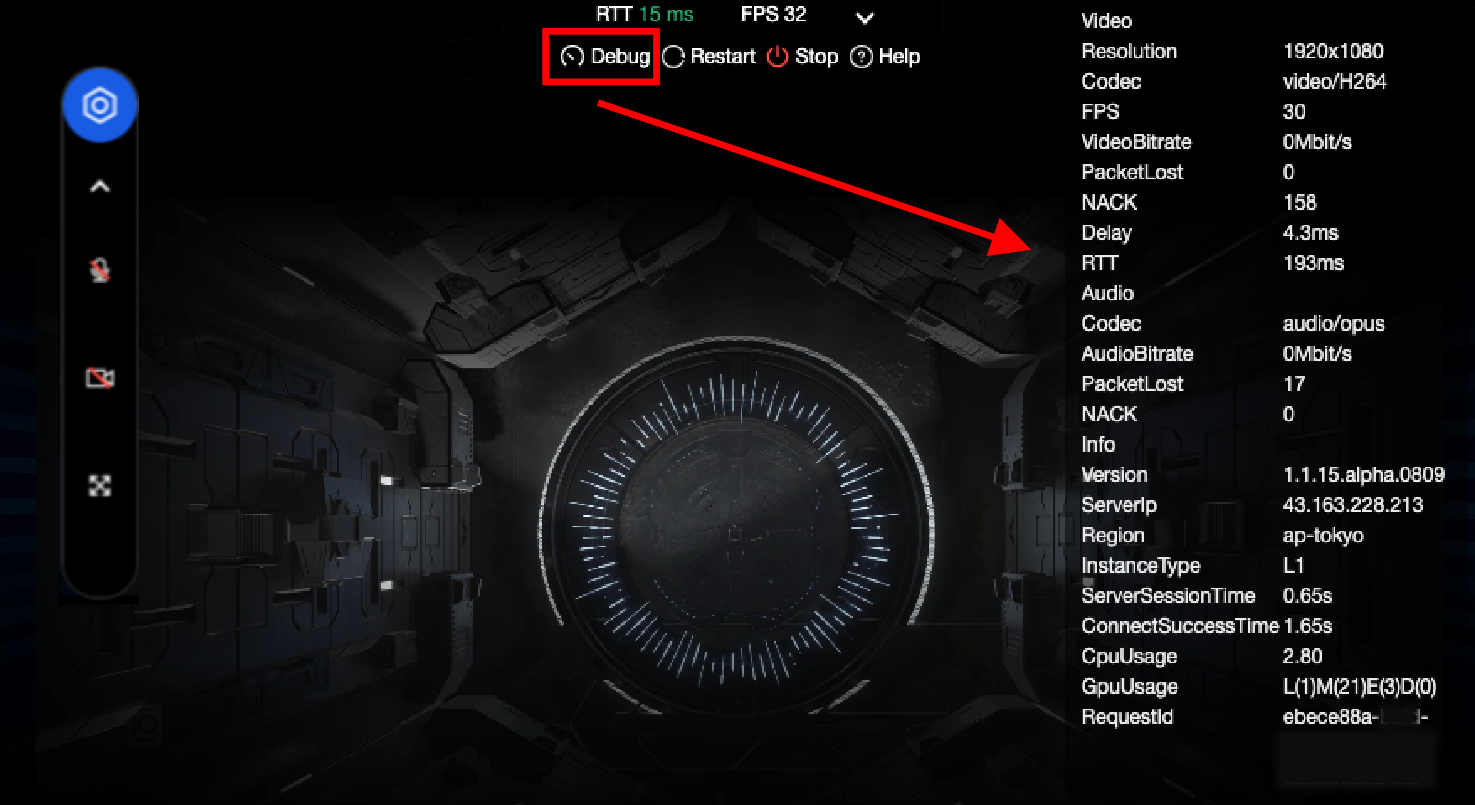
You can open the "Debug" tool (shortcut key Ctrl+~) in the toolbar of the test page and pay attention to the following data to choose the most suitable concurrency scale:
FPS (frames per second): The frame rate should be maintained at 30 or above under normal circumstances. If the FPS suddenly drops when entering certain specific scenes or performing specific operations, it may be due to a sudden increase in GPU computing power consumption that the current concurrency scale cannot handle, resulting in dropped frames. It is recommended that you try a higher concurrency scale.
RTT (round-trip time): If the RTT is higher than 100ms, there may be noticeable delays. It is recommended that you first check if there is any network jitter and try accessing it using a 4G/5G network. If the concurrency region is too far from your physical location, it will also cause high RTT.
Region (concurrency region): The area where the concurrency is located. If you purchase concurrency in multiple regions under a project, we will automatically schedule the nearest idle concurrency based on the end user's IP address. For example, if there are concurrencies in both Singapore and North America regions under a project, users in North America will connect to the concurrency in North America, while users in Southeast Asia will connect to the concurrency in Singapore. InstanceType (concurrency scale): There are three concurrency scales: S, M, and L which are suitable for small, medium, and large applications, respectively. For detailed configurations, please refer to Billing. If your application requires high computing power but uses a lower concurrency scale, it may cause high CPU/GPU usage and result in stuttering, crashing, and other issues. CpuUsage (CPU usage): If you find that the FPS data is dropping, check if there is 90-100% CPU usage. If so, it means that the concurrency scale is insufficient to handle the workload. Please try a higher concurrency scale.
GpuUsage (GPU usage): L=load, M=memory, E=encoder, D=decoder. Pay attention to the value of L (load). If you find that the FPS data is dropping, check if L appears with a value of 90-100%. If so, it means that the concurrency scale is insufficient to handle the workload. Please try a higher concurrency scale.
RequestId: If you encounter any problems/questions, please try to keep the connection and contact us, providing the RequestId.
Common issues encountered during testing:
A message is displayed indicating that there are no idle concurrencies:
Check whether there are any idle concurrencies under the project. When a user exits the application, it takes about one minute for the concurrency to be automatically cleared. Only then will the concurrency become idle so that a new user can connect to it.
The application cannot start / black screen:
If the cloud rendering service is stuck on loading and cannot be accessed, you can try testing it on a 4G network to see if the Wi-Fi or company intranet is restricting UDP. The cloud rendering service relies on UDP data transmission and reception, and it is necessary to open UDP port 60000-60100 to all source IPs on the client. If there are no special security concerns, we recommend you open all UDP ports.
If the message "Startup failed, please check the startup path configuration" is displayed, check if the main executable path of the application is correctly filled in.
If the application uses the Capture a window mode, check whether the window title and class name are correctly entered. If they are configured incorrectly, a black screen will occur. The application starts slowly:
Generally, the prelaunch feature is used to load an application in advance so the application will already be running when a user connects to it. Because multi-application projects do not support prelaunch, the applications under those projects take a longer time to start.
For a single-application project, you can enable prelaunch so that the application will be loaded in seconds when the user connects to it.
When a user exits the application, the concurrency they were connected to will be repossessed, cleared, and reset, and when the concurrency becomes idle, the application will be prelaunched again. If the next user enters the application just when the concurrency becomes idle, the application may have not been completely prelaunched.
The RTT data is abnormal: We recommend that you first check for local network jitter. You can try accessing over a 4G/5G network. If the concurrency region is too far from your physical location, it will also cause high RTT. In this case, you may want to consider purchasing concurrency in a region closer to your physical location.
The application is slow or stuttering: This may be because your application has high requirements for computing power but the concurrency scale is low (such as S). We recommend you try a higher concurrency scale.
Prompt "Cloud rendering has been disconnected": If you are using your company's Wi-Fi network, it is recommended to check whether the network meets the CAR service environment, that is, the UDP ports have been opened. At the same time, you can also check if there are any jitter issues with your local network and try accessing the link again via 4G/5G mobile networks. Step 4. Launch project
After completing the test, you have determined the most suitable concurrency specification for your application and would like to create a client that can be officially provided to the end users. At this point, you can choose from the following two methods:
Method one. Quick Launch (no development required)
CAR supports standardized configuration of pages, allowing zero development to generate links for your project and application. For detailed operation steps, please refer to the quick launch guide. Method two. Integrate CAR PaaS
To implement specific requirements and guarantee the optimal user experience, you might want to develop and set up your own backend service and client program and connect to CAR PaaS's APIs and SDKs for JavaScript, Android, and iOS. We provide demos for reference to help you quickly set up and deploy your own backend service and client program. 1. Deploy the backend demo:
Deploy the backend demo locally or on any server as instructed here. The demo is lightweight and has no special requirements for server configuration. Deploying your own backend is a necessary step for using CAR services:
For the security of your assets and services, the SecretId and SecretKey of your Tencent Cloud account (which can be obtained on the Manage API Key page in the console) that are needed in order to access the CAR TencentCloud API service must be processed on your backend service. In addition, management of user sessions and other features such as user queue must be implemented on your backend service. For more information, see Basic logic of the business backend and client. 2. Deploy the client demo:
Taking the demo for JavaScript as an example,
2.1 Download TCGSDK to C or D drive on the local PC or the Downloads folder on Mac and keep the path of the folder such as c:/cloudgame-js-sdk. |
src="path/to/tcg-sdk"
| TCGSDK path, for example: src="./cloudgame-js-sdk/dist/tcg-sdk/index.js"
|
url = 'http://xxxx/StartProject'
| Replace xxxx with the URL of the business backend demo such as url = 'http://192.168.0.1:3000/StartProject' |
ProjectId: 'cap-12345'
ApplicationId: 'app-12345'
UserId: 'user-id'
| ProjectId: The ID of the project created in the console, prefixed with "cap-".
ApplicationId: The ID of the application created in the console,
UserId: The unique ID of the end user currently connected to CAR, which is customized by you and is not understood by CAR. It can be randomly generated with the timestamp and should be kept unchanged during user reconnection.
|
2.4 For mobile operations, CAR provides the Joystick plugin to map WASD/up, down, left, and right arrow keys. 2.5 We recommend that you integrate the user queue system to improve the user experience when the number of users requesting your application becomes greater than the maximum number of concurrencies. The queue logic involves the frontend and backend. For the frontend code, see Queue. The signature logic can be added based on your business needs. For the backend implementation, see Queue Feature. 3. Test, debug, and launch your application:
After correctly performing the operations in the console and successfully deploying your backend and client services, you can open the demo HTML file in Chrome (recommended). The rendered application image will be displayed after being loaded successfully, and you can then interact with the application with the mouse/WASD.
You can perform more custom development based on the demo. If you encounter any problems during the testing process, contact us and provide the RequestId. Relevant guides:
Technical Integration: Contains detailed directions on implementing the queue feature, data channel, heartbeat connection, adaptive resolution, enabling the mic, etc. JavaScript SDK Documentation: Contains the demos for JavaScript and detailed documentation of the rich TCGSDK APIs, making it easier for you to perform custom development. Android SDK Documentation: Contains detailed documentation of the SDK for Android as well as three demo projects and an APK for trial purposes. iOS SDK Documentation: Contains detailed documentation of the SDK for iOS and a simple demo for integrating the SDK. Appendix
Basic logic of the business backend and client
1. The client initializes the CAR SDK:
No matter which type of client you use, you can get ClientSession after the SDK is initialized successfully. ClientSession will be used by the business server to get ServerSession subsequently. The specific initialization and acquisition methods for each client type are as detailed below:
2. The backend service reserves a concurrency:
Your backend service calls the CAR API ApplyConcurrent() to reserve a concurrency and proceeds to the next step after receiving the success callback. 3. The backend service gets ServerSession:
Your backend service calls the CAR API CreateSession(ClientSession) to get ServerSession in the success callback and return it to the client. 4. Start CAR:
The call method to start CAR after ServerSession is received varies slightly for SDKs for different client types. See the following guides based on your specific client type:


