
跨账号 VPC 间服务共享
最后更新时间:2023-11-28 16:41:35
跨账号 VPC 间服务共享
最后更新时间: 2023-11-28 16:41:35
本文指导您如何快速创建私有连接服务,将您账号下 VPC 中部署的云服务共享同地域给其他账号下的 VPC 访问。
背景信息
VPC 是您独有的云上私有网络,不同 VPC 之间默认完全隔离。您可以通过私有连接(Private Link)服务,实现腾讯云 VPC 与其他 VPC 上安全稳定的访问连接,简化网络架构,避免公网访问服务带来的潜在安全风险。
使用 Private Link 建立连接,您需要创建终端节点服务和终端节点。在创建终端节点服务之前,您需要创建一个内网4层负载均衡实例,并创建监听器关联已经部署业务的云服务器实例,之后在创建终端节点服务时关联该负载均衡实例,此时终端节点服务将作为服务提供方的业务访问入口,供服务使用方创建的终端节点来申请连接,连接建立成功后,服务使用方即可访问服务提供方的部署业务服务。
场景示例
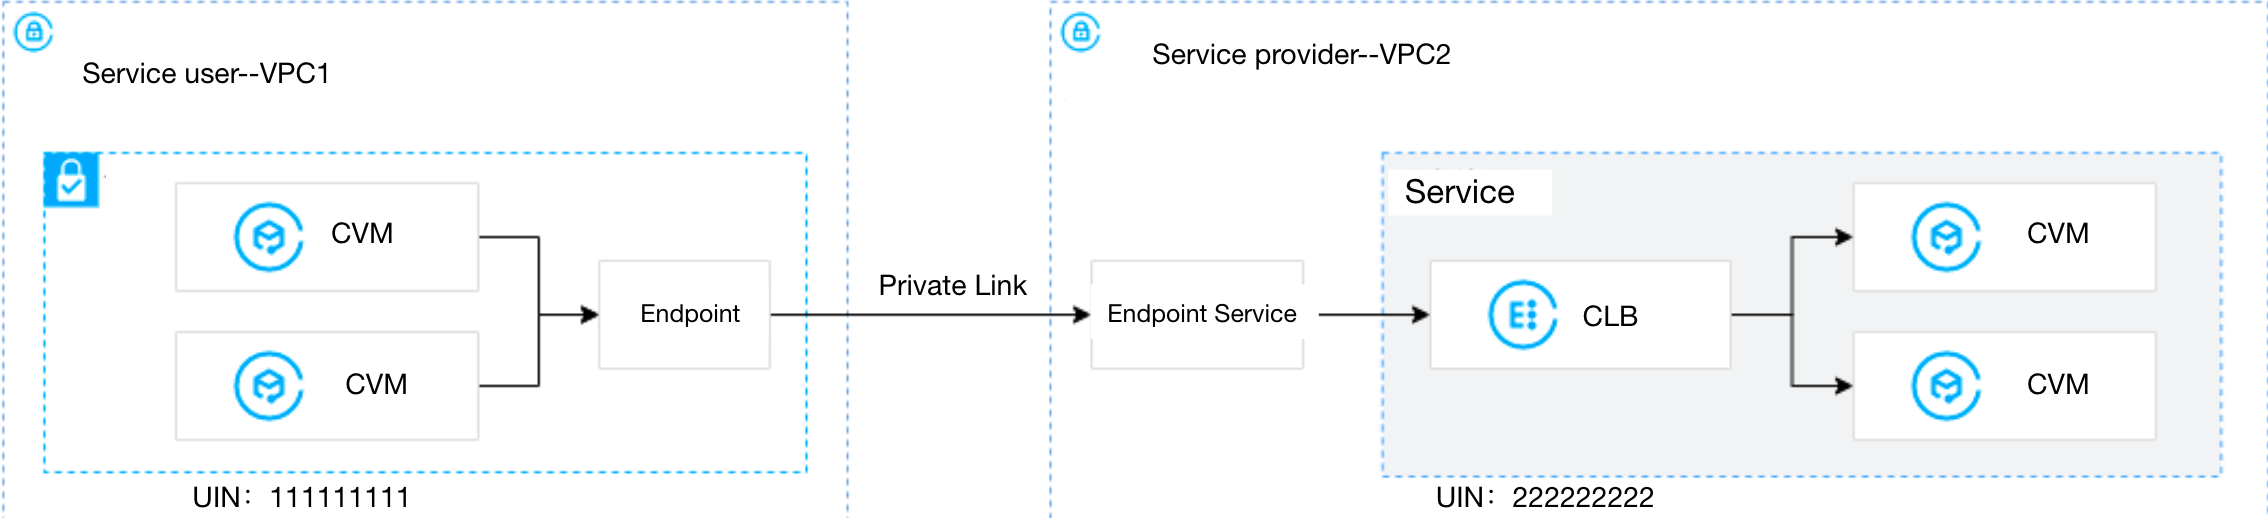
本文以下图业务场景为例。某公司业务部署在 VPC2,现需要将该业务共享给公司内其他部门的其他账户的 VPC1 访问。为避免公网访问带来的潜在安全风险,使用腾讯云私有连接 Private Link 来实现 VPC1 到 VPC2 的安全内网访问方案。
前提条件
已创建服务提供方 VPC2 和服务使用方 VPC1。
请服务使用方将 UIN 账号告知服务提供方,由服务提供方添加白名单后才允许连通,同时获取服务提供方的 UIN 账号。
在服务提供方 VPC2 中已创建内网4层 CLB 实例,并在 CLB 后端云服务器实例中部署相关服务资源,请确保后端云服务器实例可以正常处理负载均衡转发的请求,具体请参加 负载均衡快速入门。
服务提供方需将负载均衡的 VPORT 提前告知服务使用方。
请确保服务提供方 VPC2 中负载均衡后端云服务器关联的安全组已放通11.163.0.0/16地址段。
操作步骤
步骤1:服务提供方创建终端节点服务
说明
本例中服务提供方 VPC2 中已创建4层内网 CLB,CLB 后端云服务器实例已部署相关业务服务,且云服务器实例安全组已放通11.163.0.0/16网段。
1. 登录 私有网络控制台。
2. 在左侧导航栏单击私有连接 > 终端节点服务。
3. 单击新建,在弹出的新建终端节点服务界面,配置相关参数。
参数名称 | 描述 |
服务名称 | 自定义终端节点服务的名称。 |
所在地域 | 终端服务节点所在地域。 |
所属网络 | 选择所属 VPC,本例选择 VPC2。 |
负载均衡 | 选择 VPC 下已创建的负载均衡,本例选择 VPC2 中已创建好的 CLB 实例。 |
自动接受 | 指定终端节点服务是、否自动接受终端节点发起的连接请求,本例选择否: 当选择是,自动接受时,终端节点服务默认接受所有连接的终端节点的请求,终端节点创建成功后,状态即为可用。 当选择否,不接受自动连接时,终端节点连接状态将为待接受,需要终端节点服务手动执行接受连接才能将状态从待接受变为可用。 |
4. 完成参数设置后,单击确定完成终端节点服务的创建。
步骤2:添加服务使用方账户白名单
1. 单击已创建的终端节点服务右侧的更多>管理用户白名单,或者单击终端节点服务 ID 进入详情页下的白名单页签。
2. 在白名单管理界面,单击添加。
3. 在弹出的对话框中,请根据实际情况输入服务使用方的UIN账号,及描述信息,并单击确定。
步骤3:服务使用方创建终端节点
1. 单击左侧导航栏单击终端节点。
2. 单击新建,在弹出的新建终端节点界面,配置相关参数。
参数名称 | 描述 |
名称 | 自定义终端节点的名称。 |
所属地域 | 终端节点所在地域 |
所属网络 | 选择终端节点所在的 VPC,本例选择 VPC1。 |
所属子网 | 选择终端节点所在的子网。 |
IP 地址 | 终端节点的 IP 地址。可以指定 IP 地址,IP 地址为 VPC1 内的内网 IP,也可以选择自动分配 IP。 |
对端账户类型 | 选择待连接的终端节点服务所属账户,本例选择其他账户: 同账号VPC间访问,选择我的账户。 跨账号VPC间访问,选择其他账户。 |
选择服务 | 输入终端节点服务的 ID 后单击验证,只有验证通过的服务才可建立连接。 |
3. 完成参数配置后,单击确定,当前终端节点的连接状态为待接受。
步骤4:管理终端节点的连接请求
跨账号需要服务提供方接受使用方发起的连接请求,方可连通。
1. 单击已创建的终端节点服务右侧的更多 > 管理终端节点连接,或者单击终端节点服务 ID 进入详情页下的终端节点页签。
2. 单击接受连接,在弹出的确认连接对话框中继续单击确定,接受后,终端节点的状态变为可用。
步骤5:服务使用方发起访问请求进行连接验证
1. 登录服务使用方 VPC1 下的某台 CVM,通过 VIP+VPORT 访问服务提供方的后端服务。
2. 本例使用 telnet 验证连通性,执行 telnet VIP VPORT。
说明
如果服务器没有安装 telnet,请先执行
yum install telnet 安装 telnet。
如果出现如下信息,表示已连接:

文档反馈