The core goal of CDS deployment is to install the Agent on database servers or application servers accessing the database. The Agent deployment process is as follows:
1. Configure data asset instances.
2. Enable CASB audit permissions.
3. Deploy agent, supporting online deployment or downloading the agent.
4. Install agent.
Deployment Location of Agent
Based on the actual deployment method of the database added in the cloud environment, you need to deploy the agent at the following locations:
Self-built database on Cloud Virtual Machine (CVM): The agent needs to be deployed on the CVM where the database is located.
CloudDB: The agent needs to be deployed on the corresponding application server, usually the server where the application system accessing the database is located.
Online deployment for Linux: For Linux systems on Tencent Cloud's private network, online deployment is recommended.
Note:
Agent for Tencent Cloud private network: Ensure that the VPC where the agent is deployed is already in the VPC channel list. Add the asset of this VPC, and a VPC channel will be automatically created.
Agent not on Tencent Cloud: Agent not on Tencent Cloud needs to be added to the allowlist to report traffic normally. You can contact us for assistance in allowlist.
The server on which the agent is deployed must have the following ports open: Port 8081 (heartbeat communication port), Port 7000 (log collection traffic communication port), and Port 7001 (daemon communication port).
Deploying Agent
Online Deployment
1. Log in to CDS Console, in the left navigation bar, click Agent Management > Agent Deployment to enter the Agent Deployment page.
2. On the Agent Deployment page, click Linux Online Deployment.
3. On the Agent Online Deployment page, select the region and VPC where the CVM is located and click Deploy after the CVM, then the agent will be automatically deployed. For agents that have been deployed, you can execute the uninstall operation (even if the agent is not connected, it can still be uninstalled online). You can also select multiple CVMs for batch deployment.
Note:
Currently, online deployment is only applicable to Linux operating systems within the private network of Tencent Cloud.
Using online deployment requires that the CVM instance has TencentCloud Automation Tools (TAT) installed.
Downloading Agent
1. Log in to CDS Console, in the left navigation bar, click Agent Management > Agent Deployment to enter the Agent Deployment page.
2. On the Agent Deployment page, choose to download either the Linux agent or the Windows agent.
Note:
Agent installation packages are distinguished by file name for different deployment scenes. Check carefully before deployment to avoid mistakes.
For example, dsaagent_innernet_linux_xxx.zip is for Linux agent on the private network of Tencent Cloud.
For example, dsaagent_outnet_win_xxx.zip is for Windows agent not on Tencent Cloud.
Installing Agent
After downloading the agent, it needs to be installed on the respective server to realize auditing.
If you are using CVM and self-built database mode, it is recommended to install the agent on the database server.
If you are using CloudDB, you need to install the agent on the application server that connects to the database.
Linux Version
Note:
You need to install Python 2 before you deploy the agent on Linux.
1. Upload the agent installation package dsaagent_innernet_linux _xxx.zip to the machine where the agent needs to be installed, for example, to the /data directory.
2. Use the command unzip dsaagent_innernet_xxx.zip to unzip the package, then the /data/CapAgent directory will be created.
3. Execute the command chmod -R 755 CapAgent.
4. Execute cd CapAgent/bin, then execute nohup ./start.sh 1>/dev/null 2>/dev/null.
5. In the command line, execute netstat -ano | grep 7000. If the result is as shown in the following picture, the connection has been successfully created.
Description
Other Commands
To stop the agent: nohup ./stop.sh 1>/dev/null 2>/dev/null.
To restart the agent: nohup ./restart.sh 1>/dev/null 2>/dev/null.
Windows Version
CDS Agent Windows version only supports Windows Vista/2008 and above.
1. Download the Windows version of the agent, then unzip it to the installation directory.
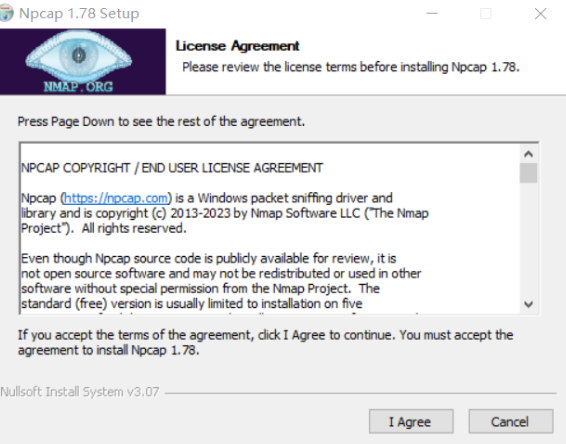
2. Install Npcap.
2.1 Enter the thirdparty directory under CapAgent, double-click npcap-1.78.exe, then click I Agree.
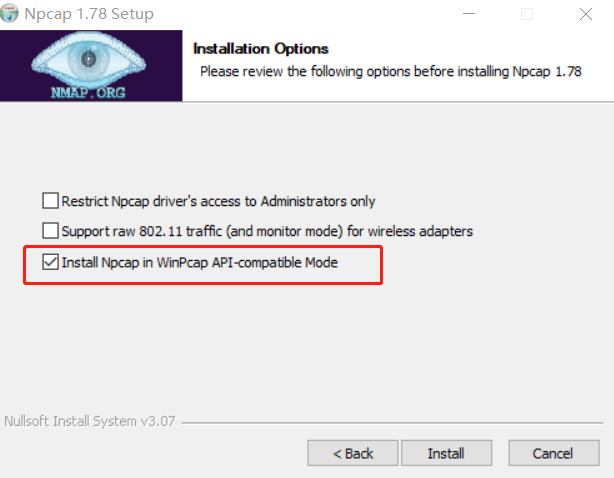
2.2 Check Install Npcap in WinPcap API-compatible Mode, then click Install.
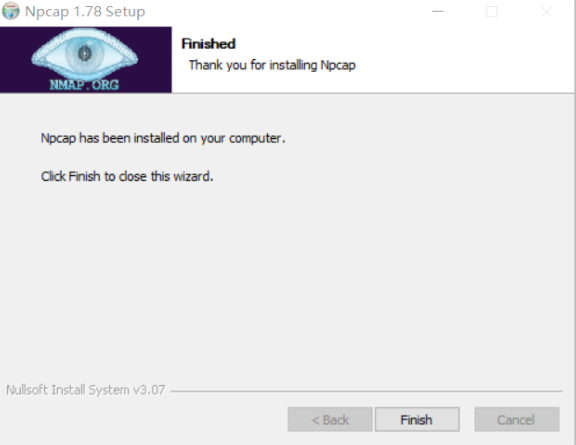
2.3 Click Next > Finish, then Npcap will be successfully installed.
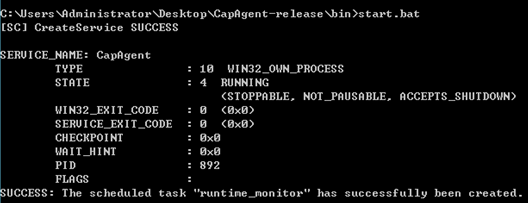
3. Enter the bin directory under CapAgent and double-click the star.bat file as an administrator.
4. After the file is successfully executed, the console will display the results as shown below. Meanwhile, you can see the CapAgentForWin.exe process in the Task Manager.
5. Check whether CapAgentForWin has successfully started and connected to the audit service.
5.1 In Task Manager, confirm that the CapAgentForWin process is running.
5.2 In the cmd console, execute netstat -ano | findstr 7000. If the result is as shown below, the connection has been successfully created.
Description
If CapAgentForWin is not running or the netstat -ano | findstr 7000 command fails to be executed, you can contact us for support.
6. Stop agent.
Simply double-click the stop.bat file in the CapAgent_win/bin directory.