Business Process
This document summarizes some common business processes in one-to-one audio and video calls, helping you better understand the implementation process of the entire scenario.
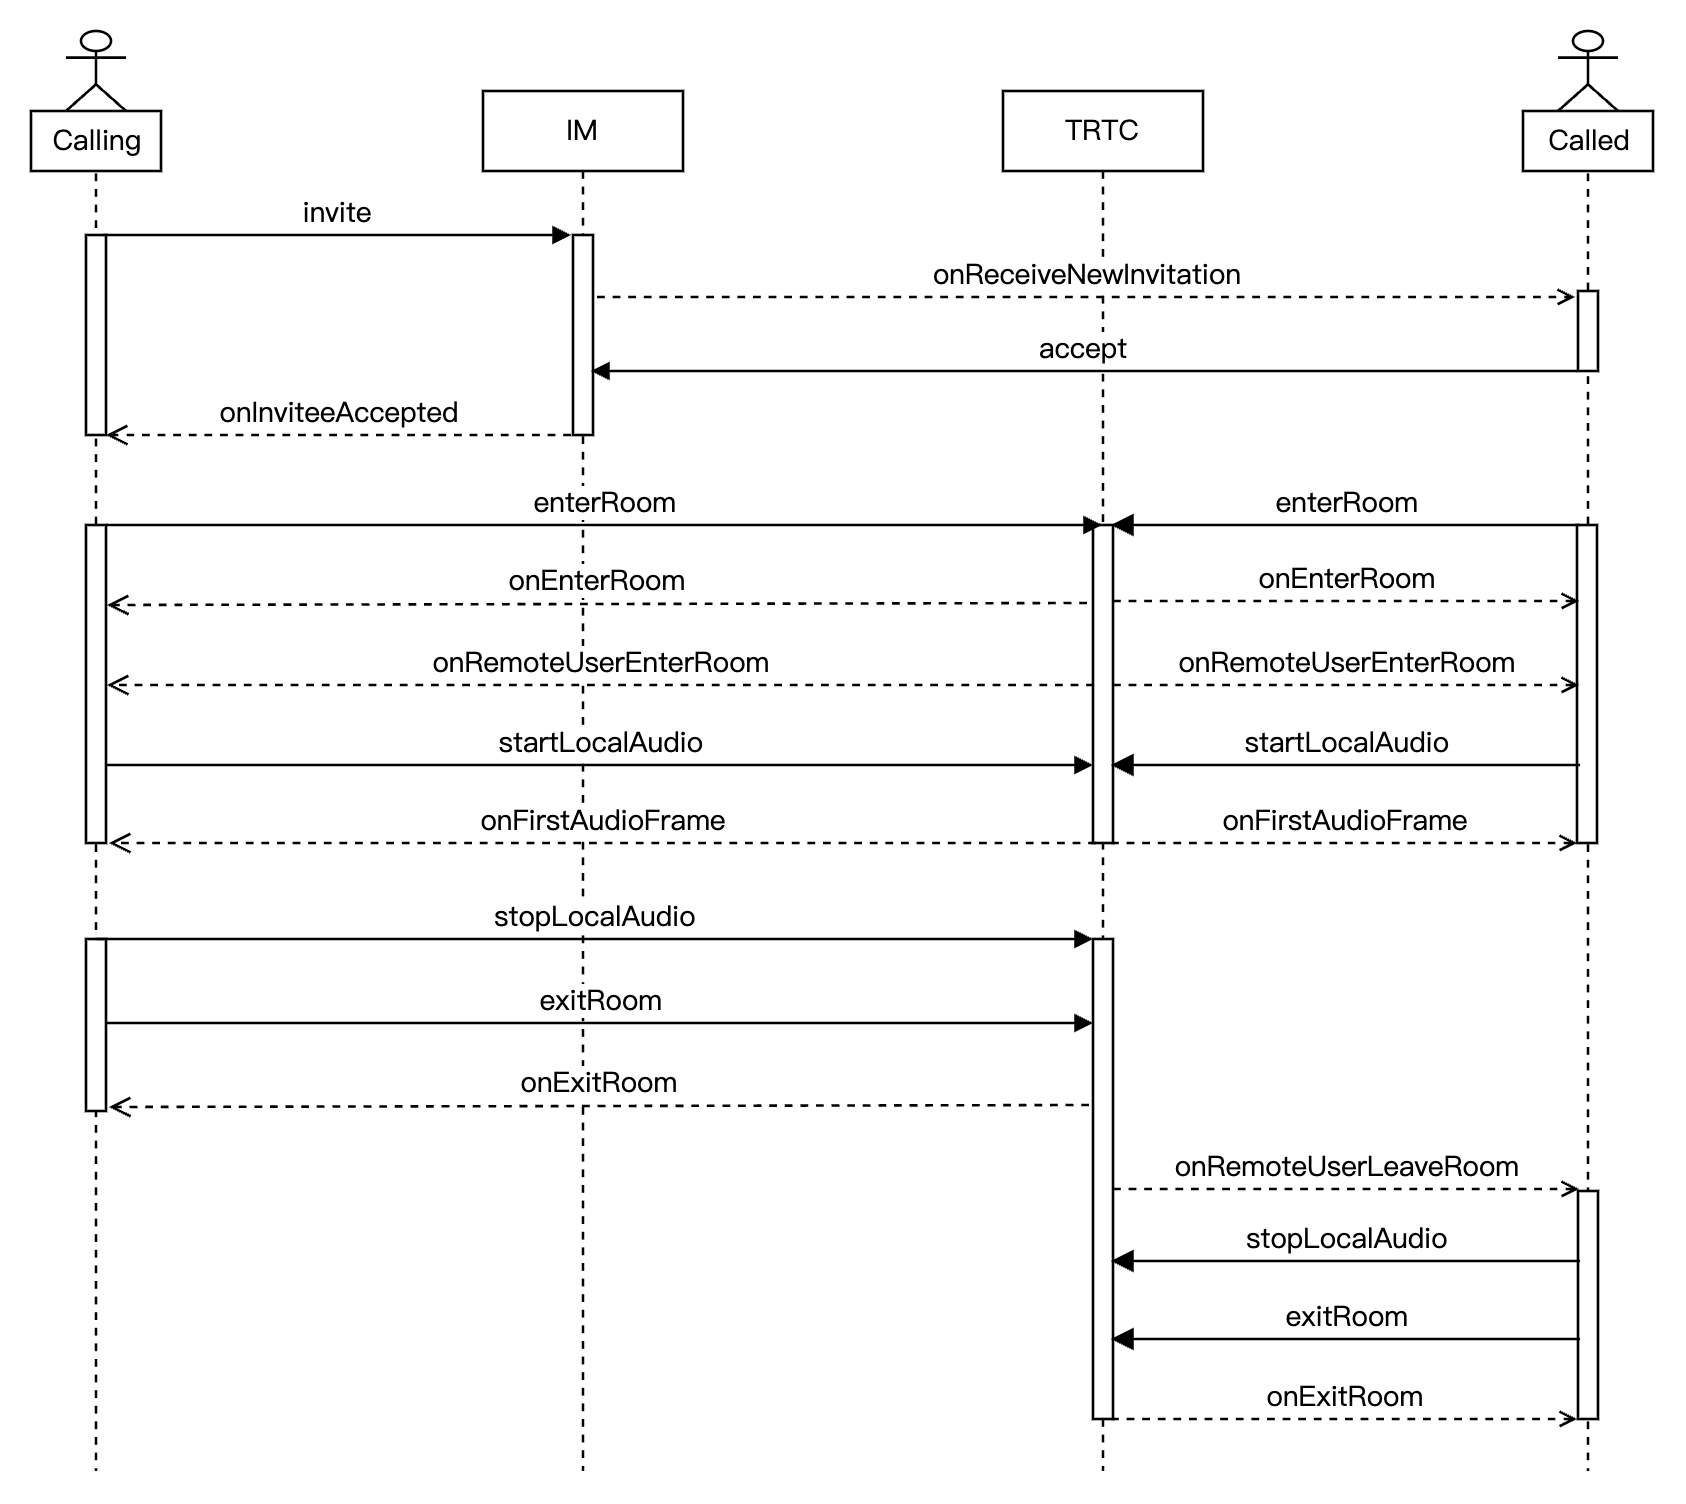
The following diagram shows the sequence of one-to-one audio call, including processes such as calling, answering, talking, and hanging up.
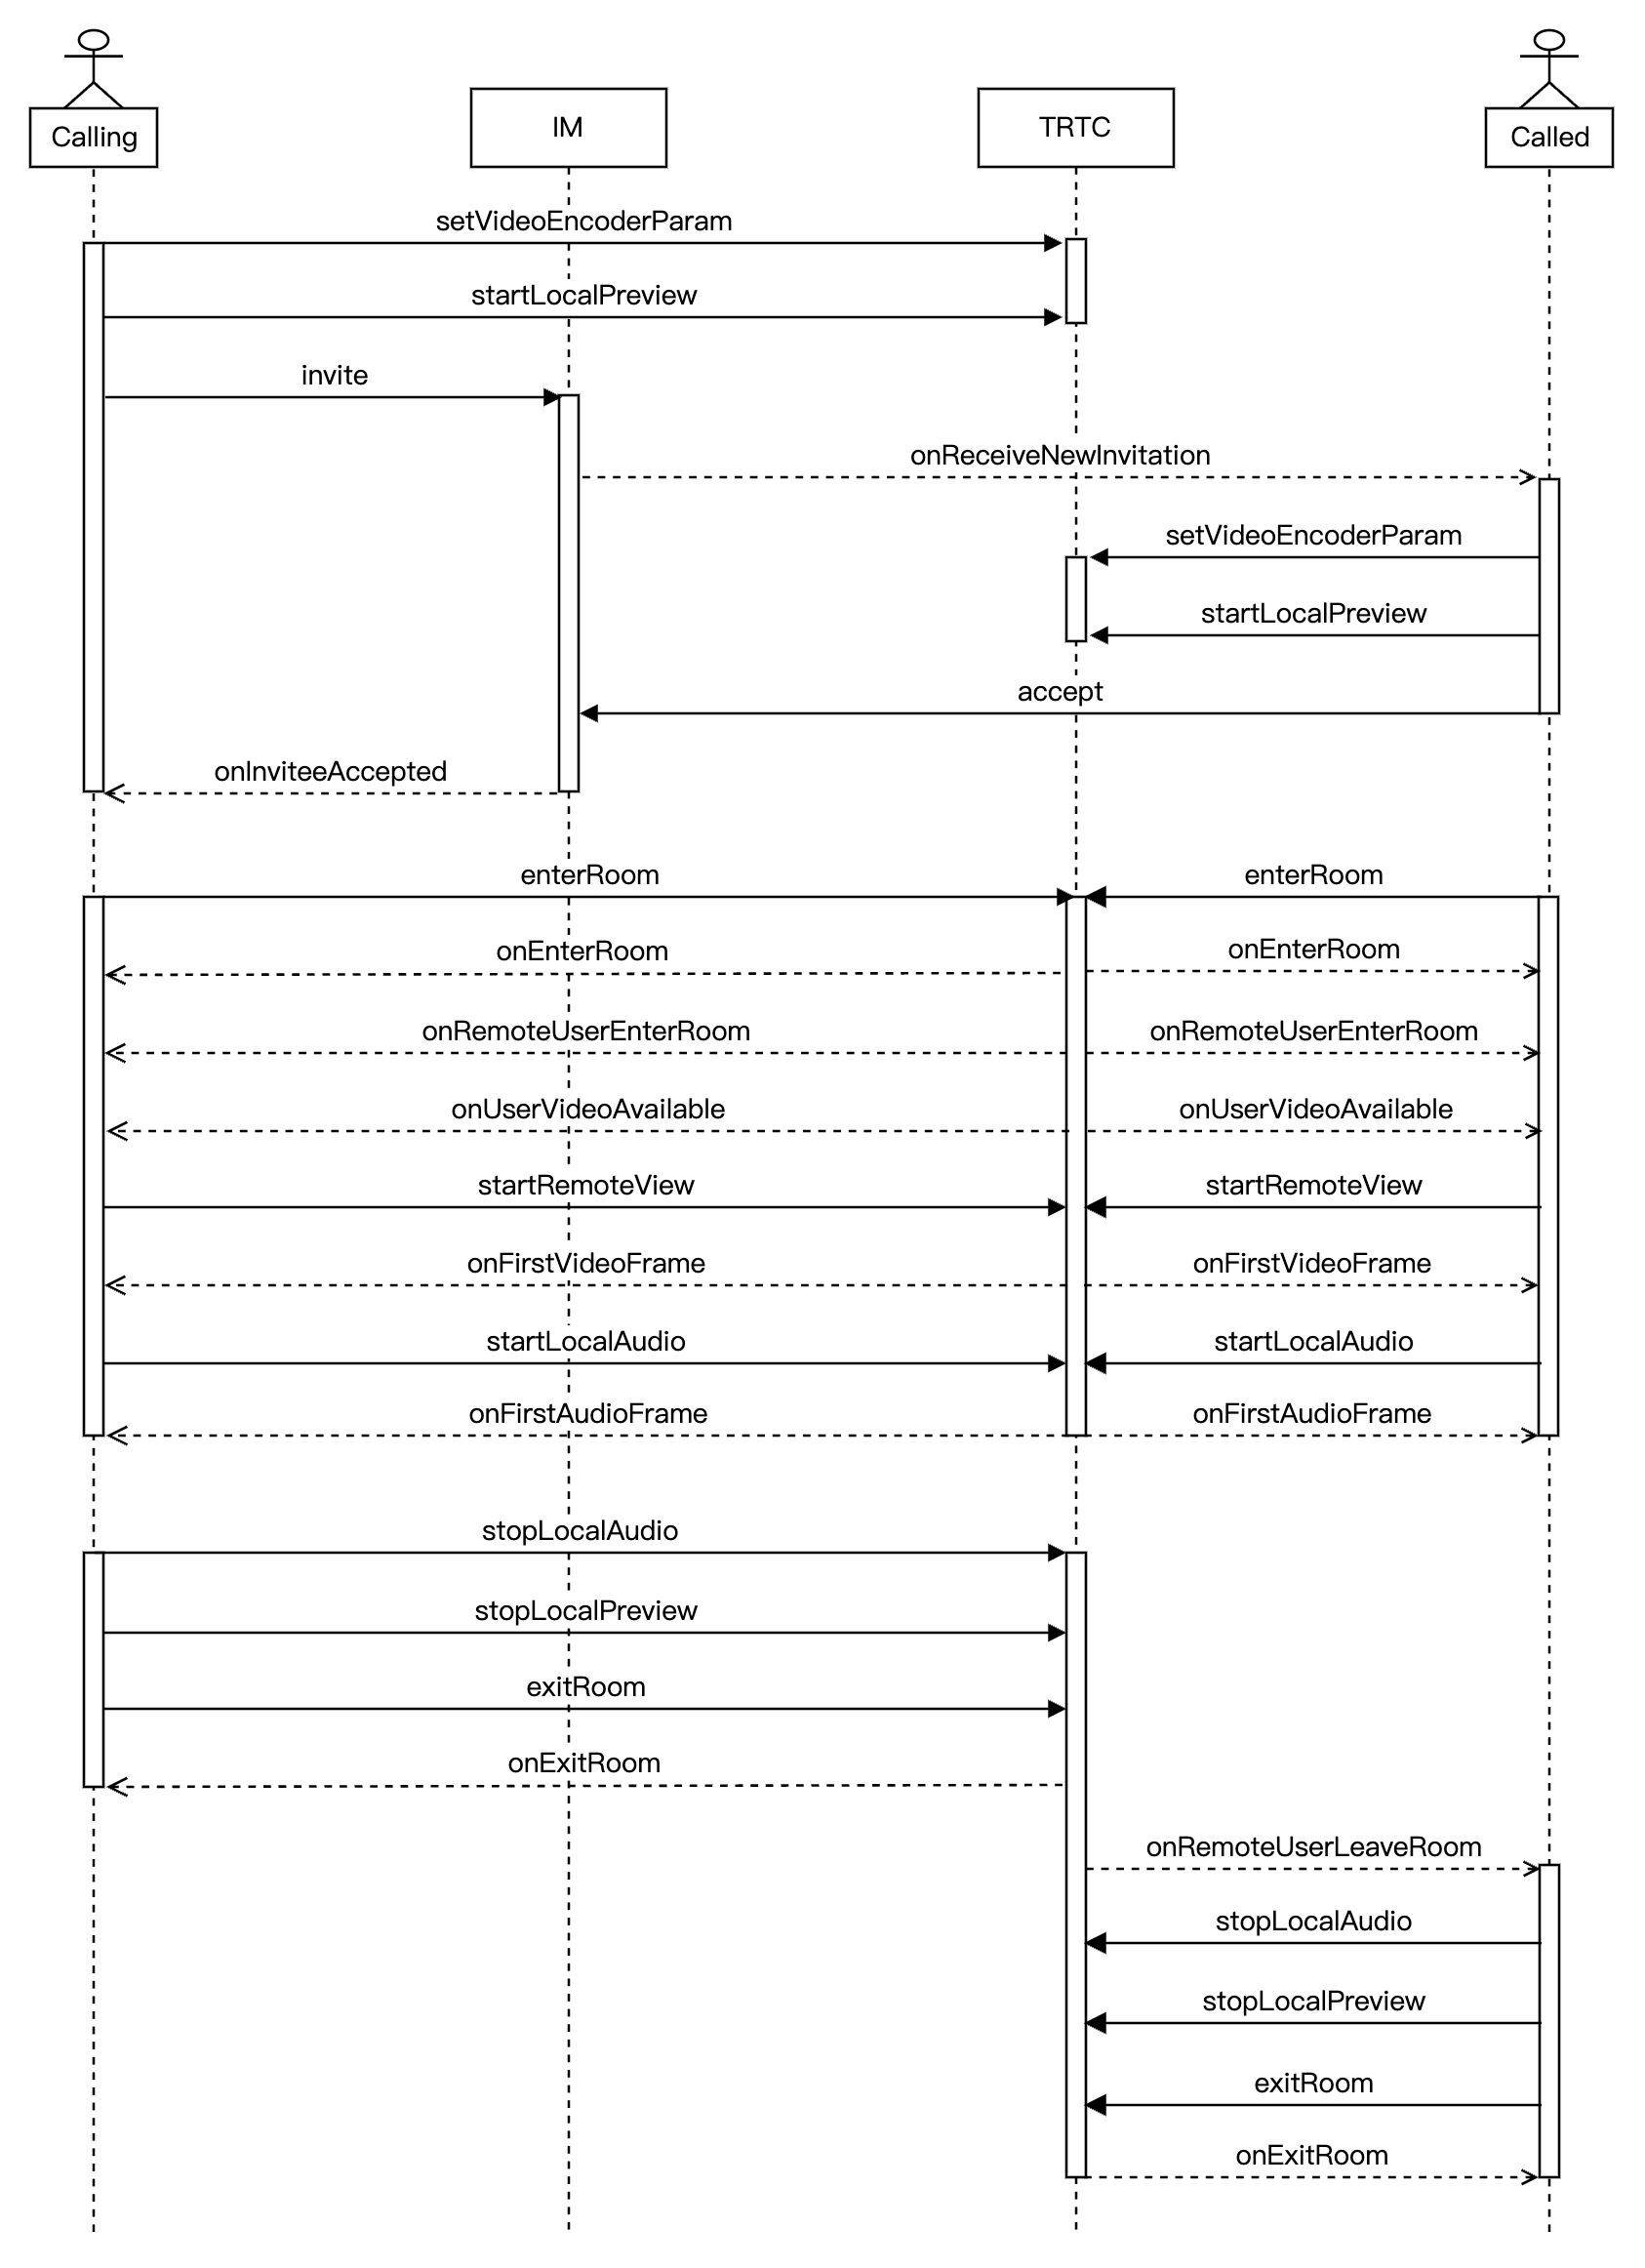
The following diagram shows the sequence of one-to-one video call, including processes such as calling, answering, talking, and hanging up.
Integration Preparations
Step 1: activate the service
1. First, you need to log in to the TRTC Console to create an application. At this time, an IM trial application with the same SDKAppID as the current TRTC application will be automatically created in the Instant Messaging (IM) Console. The accounts and authentication systems for both can be reused. Subsequently, you can choose to upgrade the TRTC or IM application version as needed. For example, the advanced versions can unlock more value-added features and services. Note:
It is recommended to create two separate applications for testing and production environments. Each account (UIN) is provided with 10,000 minutes of free usage per month within one year.
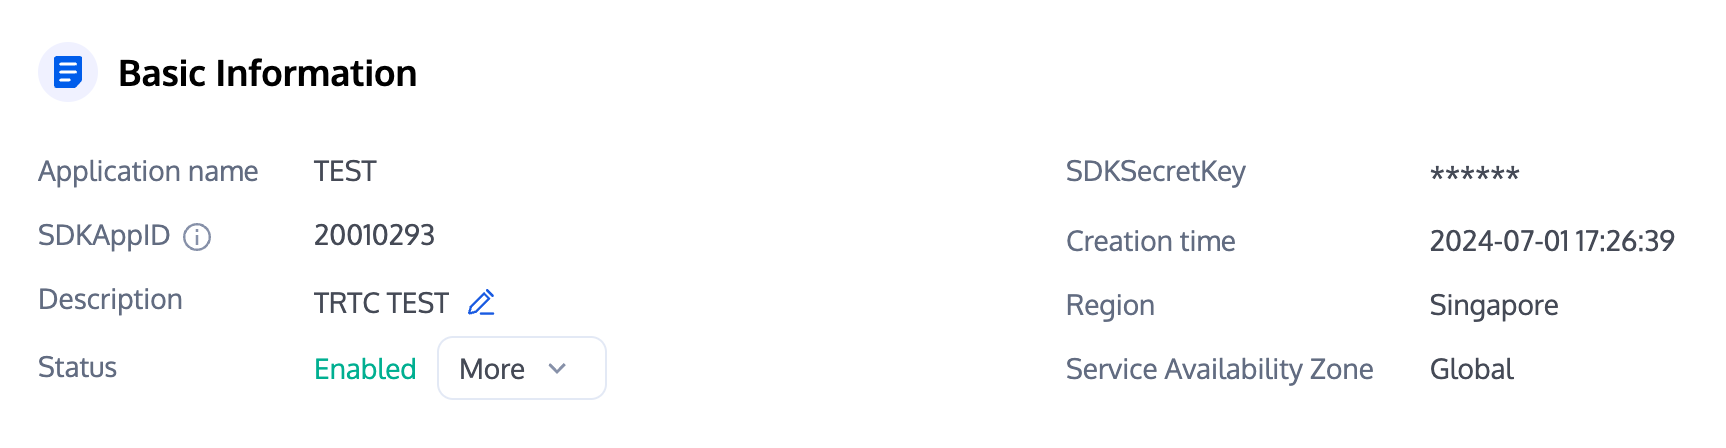
2. Once the application is created, you can find basic information about it under the Application Management - Application Overview section. It is important to store the SDKAppID and SDKSecretKey for later use and to avoid key leakage to prevent unauthorized traffic usage.
Step 2: import SDK
The TRTC SDK and IM SDK have been released to the mavenCentral repository. You can configure gradle to download and update automatically.
1. Add the dependency for the appropriate version of the SDK in dependencies.
dependencies {
// TRTC SDK lite version, includes two features: TRTC and live streaming playback
implementation 'com.tencent.liteav:LiteAVSDK_TRTC:latest.release'
// Add IM SDK. It is recommended to use the latest version number
implementation 'com.tencent.imsdk:imsdk-plus:Version number'
// If you need to add Quic plugin, uncomment the next line (Note: Version number of the plugin needs to be the same as that of the IM SDK)
// implementation 'com.tencent.imsdk:timquic-plugin:Version number'
}
Note:
Quic plugin offers axp-quic Multiplexing Transmission Protocol, providing better resistance to poor networks. Even with a packet loss rate of 70%, it still can offer services. Available only for Flagship users. For non-Flagship users, purchase the Flagship package before use, and see Pricing Instructions. To ensure proper functionality, update Terminal SDK to version 7.7.5282 or above. 2. Specify the CPU architecture used by the app in defaultConfig.
defaultConfig {
ndk {
abiFilters "armeabi-v7a", "arm64-v8a"
}
}
Note:
The TRTC SDK supports architectures including armeabi, armeabi-v7a and arm64-v8a. Additionally, it supports architectures for simulators including x86 and x86_64.
The IM SDK supports architectures including armeabi-v7a, arm64-v8a, x86, and x86_64. To reduce the size of the installer package, you can choose to package SO files for only a subset of these architectures.
Step 3: project configuration
1. To configure app permissions in AndroidManifest.xml, for audio/video call scenarios, both the TRTC SDK and IM SDK require the following permissions:
<uses-permission android:name="android.permission.INTERNET" />
<uses-permission android:name="android.permission.ACCESS_NETWORK_STATE" />
<uses-permission android:name="android.permission.ACCESS_WIFI_STATE" />
<uses-permission android:name="android.permission.RECORD_AUDIO" />
<uses-permission android:name="android.permission.MODIFY_AUDIO_SETTINGS" />
<uses-permission android:name="android.permission.BLUETOOTH" />
<uses-permission android:name="android.permission.CAMERA" />
<uses-feature android:name="android.hardware.camera.autofocus" />
Note:
Do not set android:hardwareAccelerated="false". Disabling hardware acceleration will result in failure to render the other party's video stream.
The TRTC SDK does not have built-in permission request logic. You need to declare the corresponding permissions yourself. Some permissions (such as storage, recording and camera), also require runtime dynamic requests.
If the Android project's targetSdkVersion is 31 or higher, or if the target device runs Android 12 or a newer version, the official requirement is to dynamically request android. permission.BLUETOOTH_CONNECTpermission in the code to use the Bluetooth feature properly. For more information, see Bluetooth Permissions. 2. Since we use Java's reflection features inside the SDK, you need to add relevant SDK classes to the non-obfuscation list in the proguard-rules.pro file:
-keep class com.tencent.** { *; }
Step 4: authentication credential
UserSig is a security signature designed by the cloud platform to prevent attackers from accessing your cloud account. Cloud services such as Real-Time Communication (TRTC) and Instant Messaging (IM) adopt this security protection mechanism. Authentication is required for TRTC upon entering a room, and for IM during login.
Production stage: It is recommended to use the server computing UserSig solution, which has a higher security level and helps prevent the client from being decompiled and reversed, to avoid the risk of key leakage.
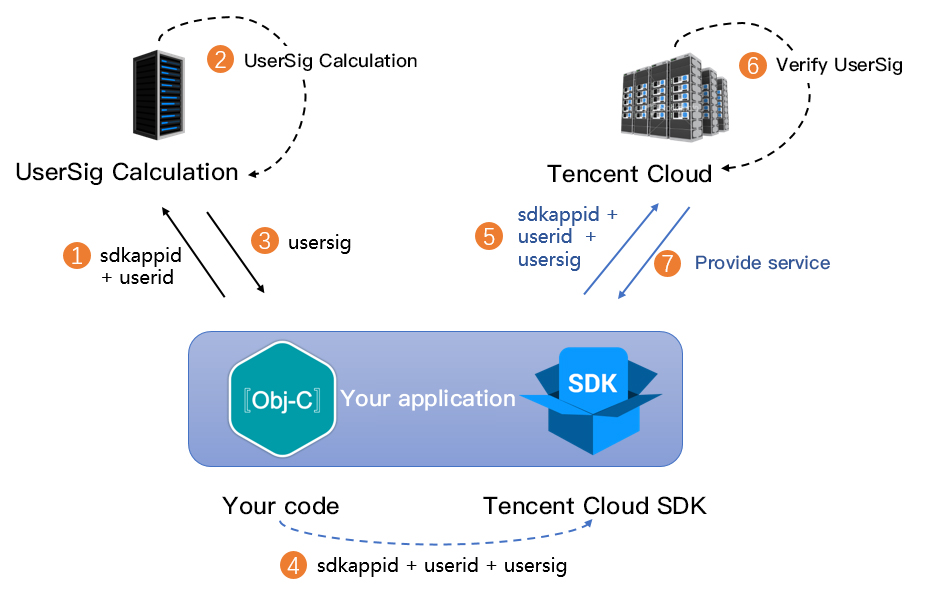
The specific implementation process is as follows:
1. Before calling the initialization API of the SDK, your app must first request UserSig from your server.
2. Your server generates the UserSig based on the SDKAppID and UserID.
3. The server returns the generated UserSig to your app.
4. Your app sends the obtained UserSig to the SDK through a specific API.
5. The SDK submits the SDKAppID + UserID + UserSig to the cloud server for verification.
6. The cloud platform verifies the validity of the UserSig.
7. Once the verification is passed, it will provide instant communication services to the IM SDK and real-time audio and video services to the TRTC SDK.
Note:
The method of generating UserSig locally during the debugging and testing stage is not recommended for the online environment because it may be easily decompiled and reversed, causing key leakage.
We provide server computation source code for UserSig in multiple programming languages (Java/GO/PHP/Nodejs/Python/C#/C++). For details, see Server Computation of UserSig. Step 5: initialize the SDK
1. Initialize IM SDK and Add Event Listeners
V2TIMManager.getInstance().addIMSDKListener(imSdkListener);
V2TIMManager.getInstance().initSDK(context, sdkAppID, null);
private V2TIMSDKListener imSdkListener = new V2TIMSDKListener() {
@Override
public void onConnecting() {
Log.d(TAG, "IM SDK is connecting to the Cloud Virtual Machine");
}
@Override
public void onConnectSuccess() {
Log.d(TAG, "IM SDK has successfully connected to the Cloud Virtual Machine");
}
};
V2TIMManager.getInstance().removeIMSDKListener(imSdkListener);
V2TIMManager.getInstance().unInitSDK();
Note:
If the lifecycle of your application is consistent with the SDK lifecycle, you do not need to deinitialize before exiting the application. However, if you only initialize the SDK when entering a specific interface and no longer use it after exiting that interface, you can deinitialize the SDK.
2. Create TRTC SDK Instances and Set Event Listeners
TRTCCloud mTRTCCloud = TRTCCloud.sharedInstance(context);
mTRTCCloud.addListener(trtcSdkListener);
private TRTCCloudListener trtcSdkListener = new TRTCCloudListener() {
@Override
public void onError(int errCode, String errMsg, Bundle extraInfo) {
Log.d(TAG, errCode + errMsg);
}
@Override
public void onWarning(int warningCode, String warningMsg, Bundle extraInfo) {
Log.d(TAG, warningCode + warningMsg);
}
};
mTRTCCloud.removeListener(trtcSdkListener);
TRTCCloud.destroySharedInstance();
Note:
It is recommended to listen to SDK event notifications. Perform log printing and handling for some common errors. For details, see Error Code Table. Integration Process
Step 1: log in
After the IM SDK is initialized, you need to call the SDK log in API to authenticate your account identity and gain permissions to use features. Before using any other features, ensure you are successfully logged in, or you might encounter feature malfunctions or unavailability. If you only need to use TRTC's audio and video services, you can skip this step.
Sequence Diagram
Log in operation
V2TIMManager.getInstance().login(userID, userSig, new V2TIMCallback() {
@Override
public void onSuccess() {
Log.i("imsdk", "success");
}
@Override
public void onError(int code, String desc) {
Log.i("imsdk", "failure, code:" + code + ", desc:" + desc);
}
});
Log out operation
V2TIMManager.getInstance().logout(new V2TIMCallback() {
@Override
public void onSuccess() {
Log.i("imsdk", "success");
}
@Override
public void onError(int code, String desc) {
Log.i("imsdk", "failure, code:" + code + ", desc:" + desc);
}
});
Note:
If the lifecycle of your application matches that of the IM SDK, you do not need to log out before exiting the application. However, if you only use the IM SDK after entering specific interfaces and no longer use it after exiting those interfaces, you can log out and deinitialize the IM SDK.
Step 2: call
Sequence Diagram
Initiate Call
1. Caller's local video preview (only for video calls; ignore this step for audio calls)
TRTCCloudDef.TRTCVideoEncParam encParam = new TRTCCloudDef.TRTCVideoEncParam();
encParam.videoResolution = TRTCCloudDef.TRTC_VIDEO_RESOLUTION_960_540;
encParam.videoFps = 15;
encParam.videoBitrate = 850;
encParam.videoResolutionMode = TRTCCloudDef.TRTC_VIDEO_RESOLUTION_MODE_PORTRAIT;
mTRTCCloud.setVideoEncoderParam(encParam);
mTRTCCloud.startLocalPreview(isFrontCamera, previewView);
Note:
Call the above APIs before enterRoom. The SDK will only enable the camera preview and will wait until you call enterRoom to start local video streaming. 2. Caller sends call invitation signaling
JSONObject jsonObject = new JSONObject();
try {
jsonObject.put("cmd", "av_call");
JSONObject msgJsonObject = new JSONObject();
msgJsonObject.put("callType", "videoCall");
msgJsonObject.put("roomId", generateRoomId());
jsonObject.put("msg", msgJsonObject);
} catch (JSONException e) {
e.printStackTrace();
}
String data = jsonObject.toString();
V2TIMManager.getSignalingManager().invite(receiver, data, false, v2TIMOfflinePushInfo, timeout, new V2TIMCallback() {
@Override
public void onError(int code, String desc) {
}
@Override
public void onSuccess() {
}
});
Note:
In audio and video call scenarios, it is usually necessary to configure offline push information v2TIMOfflinePushInfo in the invitation signaling. For details, see Offline Push Message. It is recommended to set a reasonable timeout parameter timeout in the invitation signaling, in seconds. The SDK will perform timeout detection to realize auto hang up after call timeout.
3. Callee receives the call invitation notification
V2TIMManager.getSignalingManager().addSignalingListener(new V2TIMSignalingListener() {
@Override
public void onReceiveNewInvitation(String inviteID, String inviter,
String groupId, List<String> inviteeList, String data) {
if (!data.isEmpty()) {
try {
JSONObject jsonObject = new JSONObject(data);
String command = jsonObject.getString("cmd");
JSONObject messageJsonObject = jsonObject.getJSONObject("msg");
if (command.equals("av_call")) {
String callType = messageJsonObject.getString("callType");
String roomId = messageJsonObject.getString("roomId");
}
} catch (JSONException e) {
e.printStackTrace();
}
}
}
});
Note:
Caller initiates a call request. When the callee receives the call request, the business side needs to implement the rendering of the call page and the playing of the call ringtone on its own.
4. Callee's local video preview (only for video calls; ignore this step for audio calls)
if (callType.equals("videoCall")) {
TRTCCloudDef.TRTCVideoEncParam encParam = new TRTCCloudDef.TRTCVideoEncParam();
encParam.videoResolution = TRTCCloudDef.TRTC_VIDEO_RESOLUTION_960_540;
encParam.videoFps = 15;
encParam.videoBitrate = 850;
encParam.videoResolutionMode = TRTCCloudDef.TRTC_VIDEO_RESOLUTION_MODE_PORTRAIT;
mTRTCCloud.setVideoEncoderParam(encParam);
mTRTCCloud.startLocalPreview(isFrontCamera, previewView);
}
Cancel Call
1. Caller cancels the call request
V2TIMManager.getSignalingManager().cancel(inviteId, data, new V2TIMCallback() { @Override public void onError(int code, String desc) {
2. Callee receives the cancellation notification
@Override
public void onInvitationCancelled(String inviteID, String inviter, String data) {
Call Timeout
Both caller and callee will receive a timeout notification. They also terminate the call page, and stop the call ringtone.
@Override
public void onInvitationTimeout(String inviteID, List<String> inviteeList) {
}
Step 3: answer
Answer signaling
1. Callee sends answer signaling
V2TIMManager.getSignalingManager().accept(inviteId, data, new V2TIMCallback() { @Override public void onError(int code, String desc) {
if (callType.equals("videoCall")) {
startVideoCall();
} else {
startAudioCall();
}
}
});
2. Caller receives answer notification
@Override
public void onInviteeAccepted(String inviteID, String invitee, String data) {
if (callType.equals("videoCall")) {
startVideoCall();
} else {
startAudioCall();
}
}
Audio Call
1. Both caller and callee enter the same TRTC room to start an audio call.
private void startAudioCall() {
TRTCCloudDef.TRTCParams params = new
TRTCCloudDef.TRTCParams();
params.sdkAppId = SDKAPPID;
params.userSig = USERSIG;
params.strRoomId = roomId;
params.userId = userId;
mTRTCCloud.startLocalAudio(TRTCCloudDef.TRTC_AUDIO_QUALITY_SPEECH);
mTRTCCloud.enterRoom(params, TRTCCloudDef.TRTC_APP_SCENE_AUDIOCALL);
}
Note:
Starting local audio capture startLocalAudio allows you to set audio quality parameters at the same time. For audio calls, it is recommended to set TRTC_AUDIO_QUALITY_SPEECH. Under the SDK's default auto subscription mode, after a user enters a room, they will immediately receive the audio stream from that room, which will be automatically decoded and played without manual pulling.
2. Notification of room entry result, indicates call status.
boolean isOnCalling = false;
@Override
public void onEnterRoom(long result) {
if (result > 0) {
isOnCalling = true;
} else {
isOnCalling = false;
}
}
Video Call
1. Both caller and callee enter the same TRTC room to start a video call.
private void startVideoCall() {
TRTCCloudDef.TRTCParams params = new TRTCCloudDef.TRTCParams();
params.sdkAppId = SDKAPPID;
params.userSig = USERSIG;
params.strRoomId = roomId;
params.userId = userId;
mTRTCCloud.startLocalAudio(TRTCCloudDef.TRTC_AUDIO_QUALITY_SPEECH);
mTRTCCloud.enterRoom(params, TRTCCloudDef.TRTC_APP_SCENE_VIDEOCALL);
}
Note:
Starting local audio capture startLocalAudio allows you to set audio quality parameters at the same time. For video calls, it is recommended to set TRTC_AUDIO_QUALITY_SPEECH. In the SDK's default automatic subscription mode, audio is automatically decoded and played back, while video requires manual invocation of startRemoteView to pull and render the remote video stream.
2. Notification of room entry result, indicates call status. Pull remote video stream.
boolean isOnCalling = false;
@Override
public void onEnterRoom(long result) {
if (result > 0) {
isOnCalling = true;
} else {
isOnCalling = false;
}
}
@Override
public void onUserVideoAvailable(String userId, boolean available) {
if (available) {
mTRTCCloud.startRemoteView(userId, TRTCCloudDef.TRTC_VIDEO_STREAM_TYPE_BIG, view);
} else {
mTRTCCloud.stopRemoteView(userId, TRTCCloudDef.TRTC_VIDEO_STREAM_TYPE_BIG);
}
}
Step 4: reject call
Sequence Diagram
Proactive Rejection
1. Callee sends rejection signal
private void rejectInvite(String inviteId, String data, final V2TIMCallback callback) {
V2TIMManager.getSignalingManager().reject(inviteId, data, new V2TIMCallback() {
@Override
public void onError(int code, String desc) {
if (callback != null) {
callback.onError(code, desc);
}
}
@Override
public void onSuccess() {
if (callback != null) {
callback.onSuccess();
}
}
});
}
JSONObject jsonObject = new JSONObject();
try {
jsonObject.put("cmd", "av_call");
JSONObject msgJsonObject = new JSONObject();
msgJsonObject.put("callType", "videoCall");
msgJsonObject.put("reason", "active");
jsonObject.put("msg", msgJsonObject);
} catch (JSONException e) {
e.printStackTrace();
}
rejectInvite(inviteId, jsonObject.toString(), new V2TIMCallback() { @Override public void onError(int code, String desc) {
2. Caller receives rejection notification
@Override
public void onInviteeRejected(String inviteID, String invitee, String data) {
if (!data.isEmpty()) {
try {
JSONObject jsonObject = new JSONObject(data);
String command = jsonObject.getString("cmd");
JSONObject messageJsonObject = jsonObject.getJSONObject("msg");
if (command.equals("av_call")) {
String reason = messageJsonObject.getString("reason");
if (reason.equals("active")) {
} else if (reason.equals("busy")) {
}
}
} catch (JSONException e) {
e.printStackTrace();
}
}
}
Busy Line Rejection
Callee receives a new call invitation, if the local call status is in a call, the caller automatically rejects the call.
@Override
public void onReceiveNewInvitation(String inviteID, String inviter,
String groupId, List<String> inviteeList, String data) {
if (!data.isEmpty()) {
try {
JSONObject jsonObject = new JSONObject(data);
String command = jsonObject.getString("cmd");
JSONObject messageJsonObject = jsonObject.getJSONObject("msg");
if (command.equals("av_call") && isOnCalling) {
JSONObject jsonObject = new JSONObject();
try {
jsonObject.put("cmd", "av_call");
JSONObject msgJsonObject = new JSONObject();
msgJsonObject.put("callType", "videoCall");
msgJsonObject.put("reason", "busy");
jsonObject.put("msg", msgJsonObject);
} catch (JSONException e) {
e.printStackTrace();
}
rejectInvite(inviteId, jsonObject.toString(), new V2TIMCallback() {
@Override
public void onError(int code, String desc) {
}
@Override
public void onSuccess() {
}
});
}
} catch (JSONException e) {
e.printStackTrace();
}
}
}
Note:
Both proactive rejection and busy line rejection use the reject signaling for implementation, but it's important to distinguish them through the reason field of the custom data in the signaling. Step 5: hang up
Sequence Diagram
Hang Up Call
1. Either party exits the room, and reset the local call status.
private void hangup() {
mTRTCCloud.stopLocalAudio();
mTRTCCloud.stopLocalPreview();
mTRTCCloud.exitRoom();
}
@Override
public void onExitRoom(int reason) {
isOnCalling = false;
}
2. The other party receives a notification that the remote side has exited the room, locally executes to exit room and resets the call status.
@Override
public void onRemoteUserLeaveRoom(String userId, int reason) {
hangup();
}
@Override
public void onExitRoom(int reason) {
isOnCalling = false;
}
Step 6: feature control
Turn on/off microphone
mTRTCCloud.muteLocalAudio(false);
mTRTCCloud.muteLocalAudio(true);
Turn on/off speaker
mTRTCCloud.muteAllRemoteAudio(false);
mTRTCCloud.muteAllRemoteAudio(true);
Turn on/off camera
mTRTCCloud.startLocalPreview(isFrontCamera, videoView);
mTRTCCloud.stopLocalPreview();
Hands-free/Earpiece Switching
mTRTCCloud.getDeviceManager().setAudioRoute(TXDeviceManager.TXAudioRoute.TXAudioRouteEarpiece);
mTRTCCloud.getDeviceManager().setAudioRoute(TXDeviceManager.TXAudioRoute.TXAudioRouteSpeakerphone);
Camera Switching
boolean isFrontCamera = mTRTCCloud.getDeviceManager().isFrontCamera();
mTRTCCloud.getDeviceManager().switchCamera(!isFrontCamera);
Advanced Features
Network Status Prompt
During audio and video calls, it is often necessary to prompt when the other party's network status is poor, thereby creating an expectation of call lag.
@Override
public void onNetworkQuality(TRTCCloudDef.TRTCQuality localQuality, ArrayList<TRTCCloudDef.TRTCQuality> remoteQuality) {
if (remoteQuality.size() > 0) {
switch (remoteQuality.get(0).quality) {
case TRTCCloudDef.TRTC_QUALITY_Excellent:
Log.i(TAG, "The other party's network is very good");
break;
case TRTCCloudDef.TRTC_QUALITY_Good:
Log.i(TAG, "The other party's network is quite good");
break;
case TRTCCloudDef.TRTC_QUALITY_Poor:
Log.i(TAG, "The other party's network is average");
break;
case TRTCCloudDef.TRTC_QUALITY_Bad:
Log.i(TAG, "The other party's network is poor");
break;
case TRTCCloudDef.TRTC_QUALITY_Vbad:
Log.i(TAG, "The other party's network is very poor");
break;
case TRTCCloudDef.TRTC_QUALITY_Down:
Log.i(TAG, "The other party's network is extremely poor");
break;
default:
Log.i(TAG, "Undefined");
break;
}
}
}
Note:
localQuality represents the local user network quality assessment result, and its userId field is empty.
remoteQuality represents the remote user network quality assessment result, which is influenced by factors on both the remote and local sides.
Call Duration Statistics
It is recommended to use the time when a remote user joins the TRTC room as the start time for calculating call duration, and the time when the local user exits the room as the end time for calculating call duration.
long callStartTime = 0;
long callFinishTime = 0;
long callDuration = 0;
@Override
public void onRemoteUserEnterRoom(String userId) {
callStartTime = System.currentTimeMillis();
}
@Override
public void onExitRoom(int reason) {
callFinishTime = System.currentTimeMillis();
callDuration = (callFinishTime - callStartTime) / 1000;
}
Note:
In cases of exceptions such as forced closure or network disconnection, the client may not be able to log the relevant times. These can be monitored through Server Event Callback to track events of entering and exiting the room and calculate the duration of the call. Video Beauty Effects
TRTC supports integrating third-party beauty effect products. Use the example of Special Effect to demonstrate the process of integrating the third-party beauty features.
2. Resource copying (if any). If your resource files are built into the assets directory, you need to copy them to the App's private directory before use.
XmagicResParser.setResPath(new File(getFilesDir(), "xmagic").getAbsolutePath());
XmagicResParser.copyRes(getApplicationContext());
XmagicResParser.setResPath (local path of the downloaded resource file);
3. Set the video data callback for third-party beauty features. Pass the results of the beauty SDK processing each frame of data into the TRTC SDK for rendering processing.
mTRTCCloud.setLocalVideoProcessListener(TRTCCloudDef.TRTC_VIDEO_PIXEL_FORMAT_Texture_2D, TRTCCloudDef.TRTC_VIDEO_BUFFER_TYPE_TEXTURE, new TRTCCloudListener.TRTCVideoFrameListener() {
@Override
public void onGLContextCreated() {
if (mXmagicApi == null) {
XmagicApi mXmagicApi = new XmagicApi(context, XmagicResParser.getResPath(), new XmagicApi.OnXmagicPropertyErrorListener());
} else {
mXmagicApi.onResume();
}
}
@Override
public int onProcessVideoFrame(TRTCCloudDef.TRTCVideoFrame srcFrame, TRTCCloudDef.TRTCVideoFrame dstFrame) {
if (mXmagicApi != null) {
dstFrame.texture.textureId = mXmagicApi.process(srcFrame.texture.textureId, srcFrame.width, srcFrame.height);
}
return 0;
}
@Override
public void onGLContextDestory() {
mXmagicApi.onDestroy();
}
});
Note:
Steps 1 and 2 vary depending on the different third-party beauty products. Step 3 is a general and important step for integrating third-party beauty features into TRTC.
Window Size Switching
In TRTC, there are many APIs that require you to control the video screen. All these APIs require you to specify a video rendering control. On the Android platform, TXCloudVideoView is used as the video rendering control, and both SurfaceView and TextureView rendering schemes are supported. Below are the methods for specifying the type of rendering control and updating the video rendering control.
1. If you want mandatory use of a certain scheme, or to convert the local video rendering control to TXCloudVideoView, you can code as follows.
TextureView textureView = findViewById(R.id.texture_view);
TXCloudVideoView cloudVideoView = new TXCloudVideoView(context);
cloudVideoView.addVideoView(textureView);
SurfaceView surfaceView = findViewById(R.id.surface_view);
TXCloudVideoView cloudVideoView = new TXCloudVideoView(surfaceView);
2. If your business involves scenarios of switching display zones, you can use the TRTC SDK to update the local preview screen and update the remote user's video rendering control feature.
mTRTCCloud.updateLocalView(videoView);
mTRTCCloud.updateRemoteView(userId, streamType, videoView);
Note:
videoView is a target video rendering control of type TXCloudVideoView. streamType only supports TRTC_VIDEO_STREAM_TYPE_BIG and TRTC_VIDEO_STREAM_TYPE_SUB.
Offline Push Message
In audio/video call scenarios, the offline push message feature is usually necessary, allowing the called user's App to receive new incoming call messages even when it's not online. For detailed guidance on integrating offline push, see Offline Message Push. Below, we will focus on explaining the implementation of step 7: Send Offline Push Message, and step 8: Parse Offline Push Messages. Send Offline Push Message
When sending a call invitation using invite, you can set offline push parameters through V2TIMOfflinePushInfo. By calling ext of V2TIMOfflinePushInfo to set custom ext data, when the user receives an offline push message to start the App, they can obtain the ext field in the callback of clicking the notification, and then redirect to the specified UI interface based on the content of the ext field. JSONObject contentObj = new JSONObject();
try {
contentObj.put("cmd", "av_call");
JSONObject contentDetailObj = new JSONObject();
contentDetailObj.put("callType", "videoCall");
contentDetailObj.put("roomId", generateRoomId());
contentObj.put("cmdInfo", contentDetailObj);
} catch (JSONException e) {
e.printStackTrace();
}
String data = contentObj.toString();
OfflineMessageContainerBean containerBean = new OfflineMessageContainerBean();
OfflineMessageBean entity = new OfflineMessageBean();
entity.content = data;
entity.sender = TUILogin.getLoginUser();
entity.action = OfflineMessageBean.REDIRECT_ACTION_CALL;entity.sendTime = System.currentTimeMillis() / 1000;entity.nickname = mNickname;entity.faceUrl = mFaceUrl;containerBean.entity = entity;V2TIMOfflinePushInfo v2TIMOfflinePushInfo = new V2TIMOfflinePushInfo();v2TIMOfflinePushInfo.setExt(new Gson().toJson(containerBean).getBytes());
v2TIMOfflinePushInfo.setAndroidHuaWeiCategory("IM");
v2TIMOfflinePushInfo.setAndroidVIVOCategory("IM");
v2TIMOfflinePushInfo.setTitle(mNickname);v2TIMOfflinePushInfo.setDesc("You have a new call invitation");
v2TIMOfflinePushInfo.setAndroidSound("phone_ringing");
V2TIMManager.getSignalingManager().invite(receiver, data, false, v2TIMOfflinePushInfo, timeout, new V2TIMCallback() {
@Override
public void onError(int code, String desc) {
}
@Override
public void onSuccess() {
}
});
Note:
To be compatible with the parsing format of offline push messages on different platforms, it is recommended to use the wrapper class <1>OfflineMessageContainerBean to set the pass-through parameter ext.
Parse Offline Push Messages
When an offline push message in the notification column is received and clicked, it will automatically redirect to the interface you configured earlier. You can retrieve the passed offline push parameters in the onResume() method of the interface startup by calling getIntent().getExtras(), and then custom the redirection. For details, see the handleOfflinePush() method in TUIKitDemo. private void handleOfflinePush() {
if (V2TIMManager.getInstance().getLoginStatus() == V2TIMManager.V2TIM_STATUS_LOGOUT) {
Intent intent = new Intent(MainActivity.this, SplashActivity.class);
if (getIntent() != null) {
intent.putExtras(getIntent());
}
startActivity(intent);
finish();
return;
}
final OfflineMessageBean bean = OfflineMessageDispatcher.parseOfflineMessage(getIntent());
if (bean != null) {
setIntent(null);
NotificationManager manager = (NotificationManager) getSystemService(Context.NOTIFICATION_SERVICE);
if (manager != null) {
manager.cancelAll();
}
if (bean.action == OfflineMessageBean.REDIRECT_ACTION_CALL) {
Intent startActivityIntent = new Intent(context, MyCustomActivity.class);
startActivityIntent.putExtras(getIntent());
startActivityIntent.setFlags(Intent.FLAG_ACTIVITY_NEW_TASK);
context.startActivity(startActivityIntent);
}
}
}
Note:
By clicking the message in the Notification colunm in FCM, you will by default redirect to the application's default Launcher interface. You can retrieve the passed offline push parameters by calling getIntent().getExtras() in the onResume() method of the interface startup, and then custom the redirection.
Exception Handling
TRTC exception error handling
When the TRTC SDK encounters an unrecoverable error, the error is thrown in the onError callback. For details, see Error Code Table. UserSig related
UserSig verification failure leads to room-entering failure. You can use the UserSig tool for verification. |
ERR_TRTC_INVALID_USER_SIG | -3320 | Room entry parameter userSig is incorrect. Check if TRTCParams.userSig is empty. |
ERR_TRTC_USER_SIG_CHECK_FAILED | -100018 | UserSig verification failed. Check if the parameter TRTCParams.userSig is filled in correctly or has expired. |
Room entry and exit related
If room entry is failed, you should first verify the correctness of the room entry parameters. It is essential that the room entry and exit APIs are called in a paired manner. This means that, even in the event of a failed room entry, the room exit API must still be called.
|
ERR_TRTC_CONNECT_SERVER_TIMEOUT | -3308 | Room entry request timed out. Check if your internet connection is lost or if a VPN is enabled. You may also attempt to switch to 4G for testing. |
ERR_TRTC_INVALID_SDK_APPID | -3317 | Room entry parameter sdkAppId is incorrect. Check if TRTCParams.sdkAppId is empty |
ERR_TRTC_INVALID_ROOM_ID | -3318 | Room entry parameter roomId is incorrect.Check if TRTCParams.roomId or TRTCParams.strRoomId is empty. Nnote that roomId and strRoomId cannot be used interchangeably. |
ERR_TRTC_INVALID_USER_ID | -3319 | Room entry parameter userId is incorrect. Check if TRTCParams.userId is empty. |
ERR_TRTC_ENTER_ROOM_REFUSED | -3340 | Room entry request was denied. Check if enterRoom is called consecutively to enter rooms with the same ID. |
Device related
Errors for related monitoring devices. Prompt the user via UI in case of relevant errors.
|
ERR_CAMERA_START_FAIL | -1301 | Failed to enable the camera. For example, if there is an exception for the camera's configuration program (driver) on a Windows or Mac device, you should try disabling then re-enabling the device, restarting the machine, or updating the configuration program. |
ERR_MIC_START_FAIL | -1302 | Failed to open the mic. For example, if there is an exception for the camera's configuration program (driver) on a Windows or Mac device, you should try disabling then re-enabling the device, restarting the machine, or updating the configuration program. |
ERR_CAMERA_NOT_AUTHORIZED | -1314 | The device of camera is unauthorized. This typically occurs on mobile devices and may be due to the user having denied the permission. |
ERR_MIC_NOT_AUTHORIZED | -1317 | The device of mic is unauthorized. This typically occurs on mobile devices and may be due to the user having denied the permission. |
ERR_CAMERA_OCCUPY | -1316 | The camera is occupied. Try a different camera. |
ERR_MIC_OCCUPY | -1319 | The mic is occupied. This occurs when, for example, the user is currently having a call on the mobile device. |
Troubleshooting for not receiving offline push
1. OPPO Phone
General reasons for not receiving push notifications on OPPO phones include:
As required by OPPO push official website, ChannelID must be configured on OPPO phones running Android 8.0 or higher. Otherwise, the push message cannot be displayed. For the configuration method, see OPPO Push Configuration. In the message, if the </1> custom content for offline push pass-through custom content for offline push pass-through <1> is not in JSON format, the OPPO mobile phone will not receive the push. The notification column display feature is disabled by default for OPPO installation application. You need to check the switch status.
2. Send a message as a custom message
The offline push for custom messages is different from that for normal messages. As we cannot parse the content of custom messages, we cannot determine the push's content. Therefore, by default, there is no offline push. If you need an offline push, you need to set the desc field in offlinePushInfo when using sendMessage, and the desc information will by default be displayed during the push. 3. Device notification column settings impact
The direct manifestation of offline push is notification column alerts. Thus, like other notifications, it is subject to device notification settings. Take Huawei as an example:
"Settings - Notifications - Lock Screen Notifications - Hide or Do Not Show Notifications" will affect the display of offline push notifications when the screen is locked.
"Settings - Notifications - More Notification Settings - Show Notification Icons (Status Column)" will affect the display of offline push notification icon in the status column.
"Settings - Notifications - Application Notifications Management - Allow Notifications" will directly affect the display of offline push notifications.
"Settings - Notifications - Application Notifications Management - Notification Sound" and "Settings - Notifications - Application Notifications Management - Notification Mute" will affect the offline push notification ringtone.
4. After the process is completed, the offline push cannot be received
First, verify whether normal push is possible using the Offline Testing Tool in the IM Console. In cases of push failure with an abnormal device status, check if the parameters configured in the IM console are correct. Additionally, verify the code initiation and registration logic, including whether the manufacturer push service registration and the IM offline push configuration setup are correctly set. For push failures with a normal device status, check if the Channel ID is correctly filled in or if the backend service operates normally. The offline push feature relies on the vendor's capabilities. Some simple characters may be filtered by the vendor and cannot be passed through and pushed.
If offline push messages are not pushed timely or cannot be received, you need to check the vendor's push restrictions.
Failed to redirect to the page
Click the notification column of an offline push message to redirect to the specified interface. The backend delivers the redirection modes and page parameters that you configure for various vendors in the console to vendor servers based on vendor API rules. When you click the notification column for offline push messages, the system opens and redirects to the corresponding page. The opening of the corresponding page also depends on the manifest file. Only when the configuration in the manifest file is consistent with that in the console, the corresponding page can be opened and redirected properly.
1. First, you need to check whether the configuration in the console and that in the manifest file are correct and consistent with each other. For more information, see the TUIKitDemo configuration. Note that the API modes may vary by vendors.
2. If the system redirects to the configuration page, you need to check whether the parsing of offline messages on the configuration page and the page redirection are proper.