- Release Notes and Announcements
- User Guide
- Product Introduction
- Purchase Guide
- Getting Started
- User Guide
- Quota Management
- Managing Functions
- Web Function Management
- Log Management
- Concurrence Management
- Trigger Management
- Version Management
- Alias Management
- Permission Management
- Managing Monitors and Alarms
- Network Configuration
- Layer Management
- Execution Configuration
- Extended Storage Management
- DNS Caching Configuration
- Resource Managed Mode Management
- Triggers
- Development Guide
- Developer Tools
- Code Development
- Web Framework Development
- Deploying Framework on Command Line
- Quickly Deploying Egg Framework
- Quickly Deploying Express Framework
- Quickly Deploying Flask Framework
- Quickly Deploying Koa Framework
- Quickly Deploying Laravel Framework
- Quickly Deploying Nest.js Framework
- Quickly Deploying Next.js Framework
- Quickly Deploying Nuxt.js Framework
- Quickly Deploying Django Framework
- Best Practice
- Overview
- Solutions with Tencent Cloud Services
- Business Development
- ServerlessFramework Practices
- API Gateway
- TRTC Practices
- COS Practices
- CKafka Practice
- CLS
- CLB Practice
- MPS
- CDN
- CDWPG
- VOD
- SMS
- ES
- Scheduled Task
- Video Processing
- Success Stories
- API Documentation
- History
- Introduction
- API Category
- Making API Requests
- Trigger APIs
- Function APIs
- Invoke
- UpdateFunctionConfiguration
- UpdateFunctionCode
- ListFunctions
- GetFunctionLogs
- GetFunction
- DeleteFunction
- CreateFunction
- CopyFunction
- PublishVersion
- ListVersionByFunction
- GetFunctionAddress
- DeleteAlias
- UpdateAlias
- ListAliases
- GetAlias
- CreateAlias
- PutTotalConcurrencyConfig
- PutReservedConcurrencyConfig
- PutProvisionedConcurrencyConfig
- GetReservedConcurrencyConfig
- GetProvisionedConcurrencyConfig
- DeleteReservedConcurrencyConfig
- DeleteProvisionedConcurrencyConfig
- UpdateFunctionEventInvokeConfig
- GetFunctionEventInvokeConfig
- InvokeFunction
- GetRequestStatus
- Namespace APIs
- Layer Management APIs
- Async Event Management APIs
- Other APIs
- Data Types
- Error Codes
- Function and Layer Status Description
- SDK Documentation
- FAQs
- Related Agreement
- Contact Us
- Glossary
Overview
This document describes how to create a service in API Gateway and related API rules, connect them to the SCF function created in step 1, and test them with APIs in the console.
Note:The API service and function must be in the same region. In this tutorial, the Beijing region is used to create the API service.
Creating API Service and Rule
- Log in to the API Gateway console and select Service on the left sidebar.
- At the top of the Service page, select the Beijing region and click Create to enter the API service creation page.
- In the Create Service pop-up window, set the following parameter information and click Submit.
- Service Name: enter
blogAPI. - Access Mode: select Public Network.
- Select the created
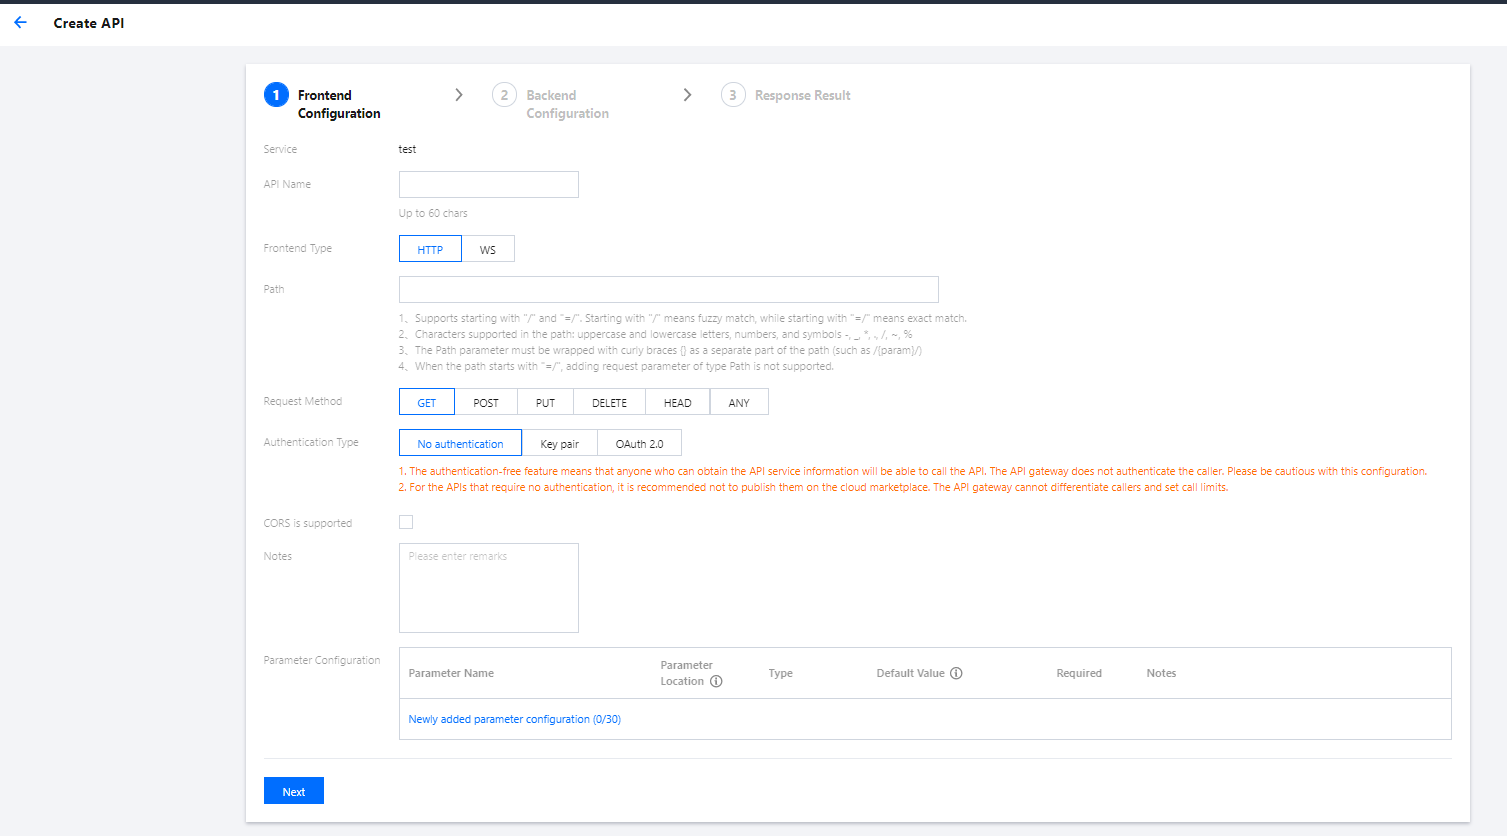
blogAPIservice in the service list to enter the Manage API page. - Click Create to enter the Create API page. In the Frontend Configuration step, refer to the following main parameters to create the API:
- API Name: custom API name.
- Path:
/article. - Request Method: GET.
- Authentication Type: select No authentication.
Keep the remaining options as default and click Next.
- In the Backend Configuration step, refer to the following main parameters to create the API:
- Backend Type: select Cloud Function.
- Cloud Function: select the
blogArticlefunction created in step 1.
Keep the remaining options as default and click Next.
- Click Complete in Response Result to complete the API creation. Select Test as the Publishing Environment in the pop-up window and click Publish service.
- Click Create on the Manage API tab again to create an API as shown below:
- Path:
/article/{articleId}. - Request Method: GET.
- Authentication Type: select No authentication.
- Parameter Configuration: select Add parameter configuration and refer to the following parameters for configuration:
- Parameter Name: articleId
- Parameter Location: Path
- Type: int
- In the Backend Configuration step, refer to the following main parameters to create the API:
- Backend Type: select Cloud Function.
- Cloud Function: select the
blogArticlefunction created in step 1.
Keep the remaining options as default and click Next.
- Click Complete in Response Result to complete the API creation. Select Test as the Publishing Environment in the pop-up window and click Publish service.
Debugging API Rules
To debug the API
/articlecreated in step 5 above, click Debug, send a request on the debugging page, and check whether the response body in the returned result is shown as follows:[{"id": 1, "category": "blog", "title": "hello world", "time": "2017-12-05 13:45"}, {"id": 2, "category": "blog", "title": "record info", "time": "2017-12-06 08:22"}, {"id": 3, "category": "python", "title": "python study", "time": "2017-12-06 18:32"}]To debug the API
/article/{articleId}created in step 8 above, click API Debug, modify the request parameter value to 1, send a request on the debugging page, and check whether the response body in the returned result is shown as follows:{"id": 1, "category": "blog", "title": "hello world", "content": "first blog! hello world!", "time": "2017-12-05 13:45"}
Note:You can also change the value of the request parameter
articleIdto another number and check the response content.

 예
예
 아니오
아니오
문제 해결에 도움이 되었나요?