Overview
With bot and application security, you can enable and configure modules in bot management, observe and analyze traffic through bot traffic analysis and access logs. Then, you can set refined policies based on the session status to protect core website APIs and businesses from bot attacks.
Bot management supports configuration of bot scenario types, client risk identification (browser bot defense module), threat intelligence module, AI evaluation module, bot flow statistics module, action score, custom rules, token configuration, and legitimate bots. You can configure these modules for refined bot management as shown below:
Prerequisites
Scenario-Based Bot Configuration
Leveraging Tencent's years of expertise in bot governance, this feature offers client risk identification (browser bot defense module), threat intelligence module, AI policy module, bot analytics module, action score, session management, legitimate bots, and custom rules specifically for flash sales, price/content crawling, and login scenarios. It simplifies configuration and makes everything easy to use.
1. Log in to the WAF console and select Configuration center > Bot and application security on the left sidebar. 2. On the Bot and application security page, select the target domain name in the top-left corner and click Bot management.
3. On the Bot management tab, click Create scenario.
4. In the pop-up window, configure parameters and click Create now.
Note:
The flash sales, login, or price/content crawling scenario and custom scenario are mutually exclusive.
Parameter description:
Scenario name: Scenario name, which can contain up to 50 characters.
Business scenario type: You can select multiple ones, including flash sales, login, price/content crawling, and custom scenarios.
Client type: Type of the client accessing the protected object.
Priority: Scenario execution priority, which is an integer between 1–100. The smaller the value, the higher the priority.
Scope: The scenario scope under the domain name, which can be All scopes or Custom scope.
5. The scenario-based management list will display the data of the created scenario card, which can be further configured.
Session Management
This feature allows you to configure the token location of a session to differentiate between access behaviors of different users through the same IP. Therefore, you can precisely handle a user with abnormal access behavior without affecting other users.
1. Log in to the WAF console and select Configuration center > Bot and application security on the left sidebar. 2. On the Bot and application security page, select the target domain name in the top-left corner and click Bot management.
3. In Global settings on the Bot management tab, click Configure now in the Session management module section.
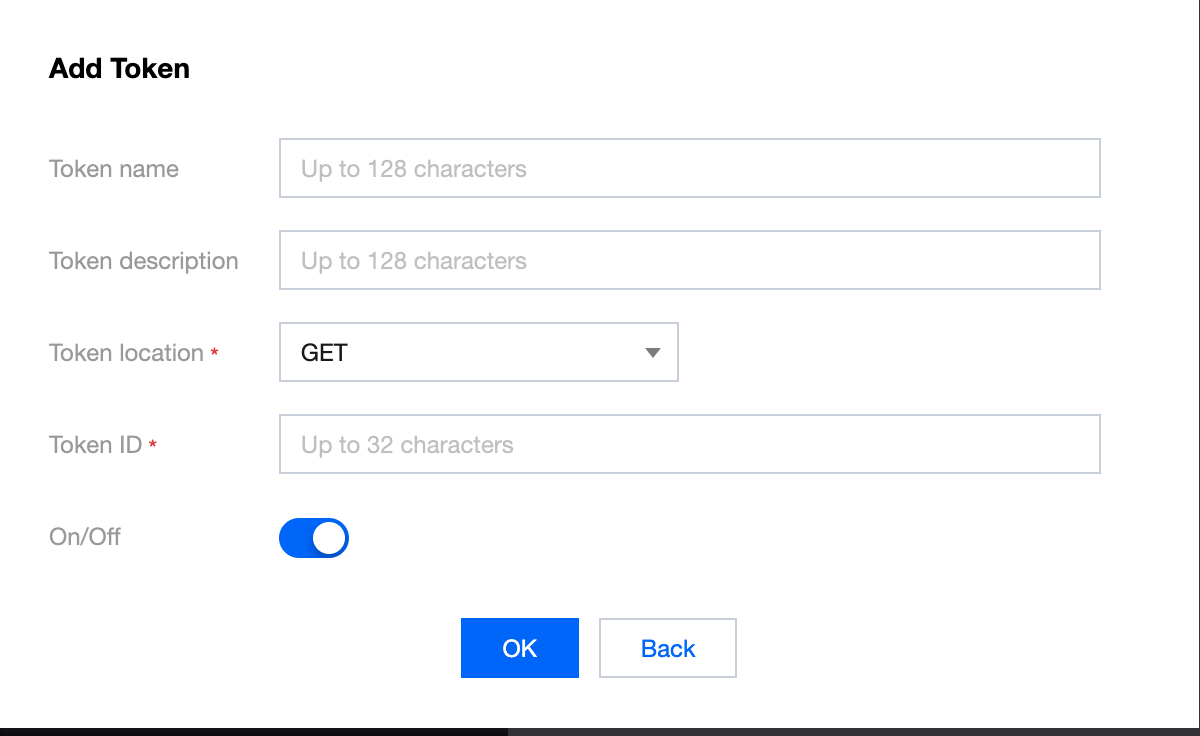
4. On the Session management page, click Add a configuration, configure parameters, and click OK.
Parameter description: Token name: Custom name, which can contain up to 128 characters.
Token description: Custom description, which can contain up to 128 characters.
Token location: It can be HEADER, COOKIE, GET, or POST. Here, GET and POST are HTTP request content parameters rather than HTTP header information.
Token ID: Token ID.
Client Risk Identification (Browser Bot Defense Module)
The client risk identification feature uses the dynamic identity verification technology and generates a unique ID for each client's business request to detect possible bots and malicious crawlers in the access to websites or HTML5 pages.
Note:
This feature does not support CLB-WAF, wildcard domain names, and applications. It applies only to websites and HTML5 pages. If non-dynamic verification is involved, the automated API script needs to be first added to the allowlist.
Adding to allowlist
The allowlist is mainly used to allow APIs that don't need to be set.
1. Log in to the WAF console and select Configuration center > Bot and application security on the left sidebar. 2. On the Bot and application security page, select the target domain name in the top-left corner and click Bot management.
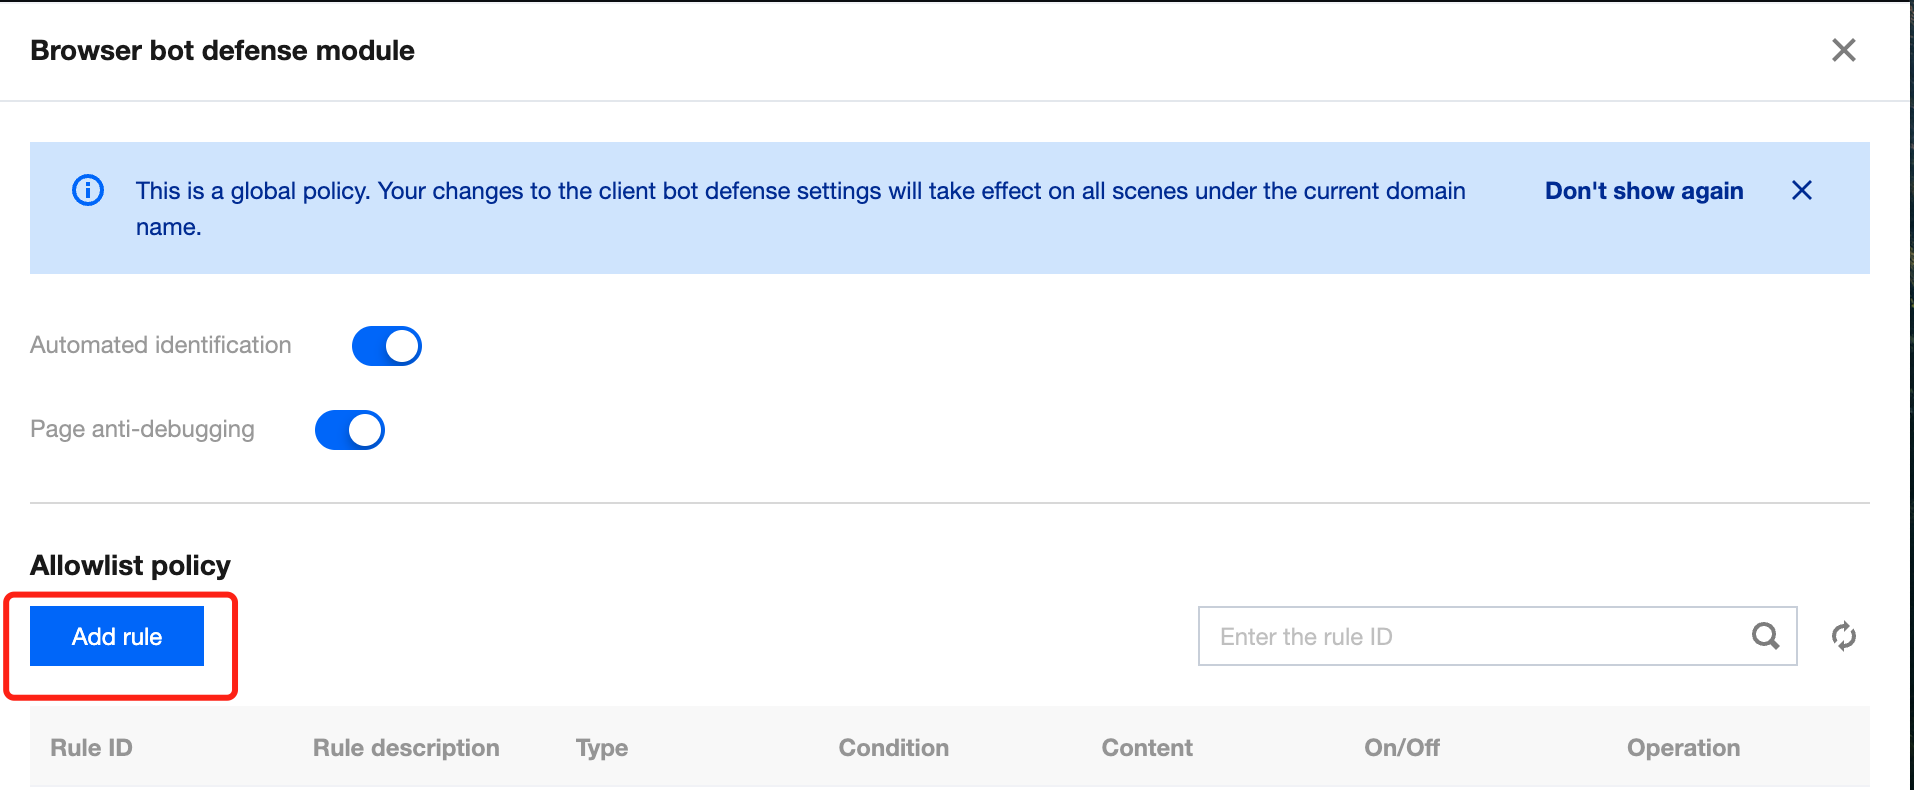
3. In Global settings on the Bot management tab, click Configure now in the Browser bot defense module section.
4. On the Browser bot defense module page, click Add rule.
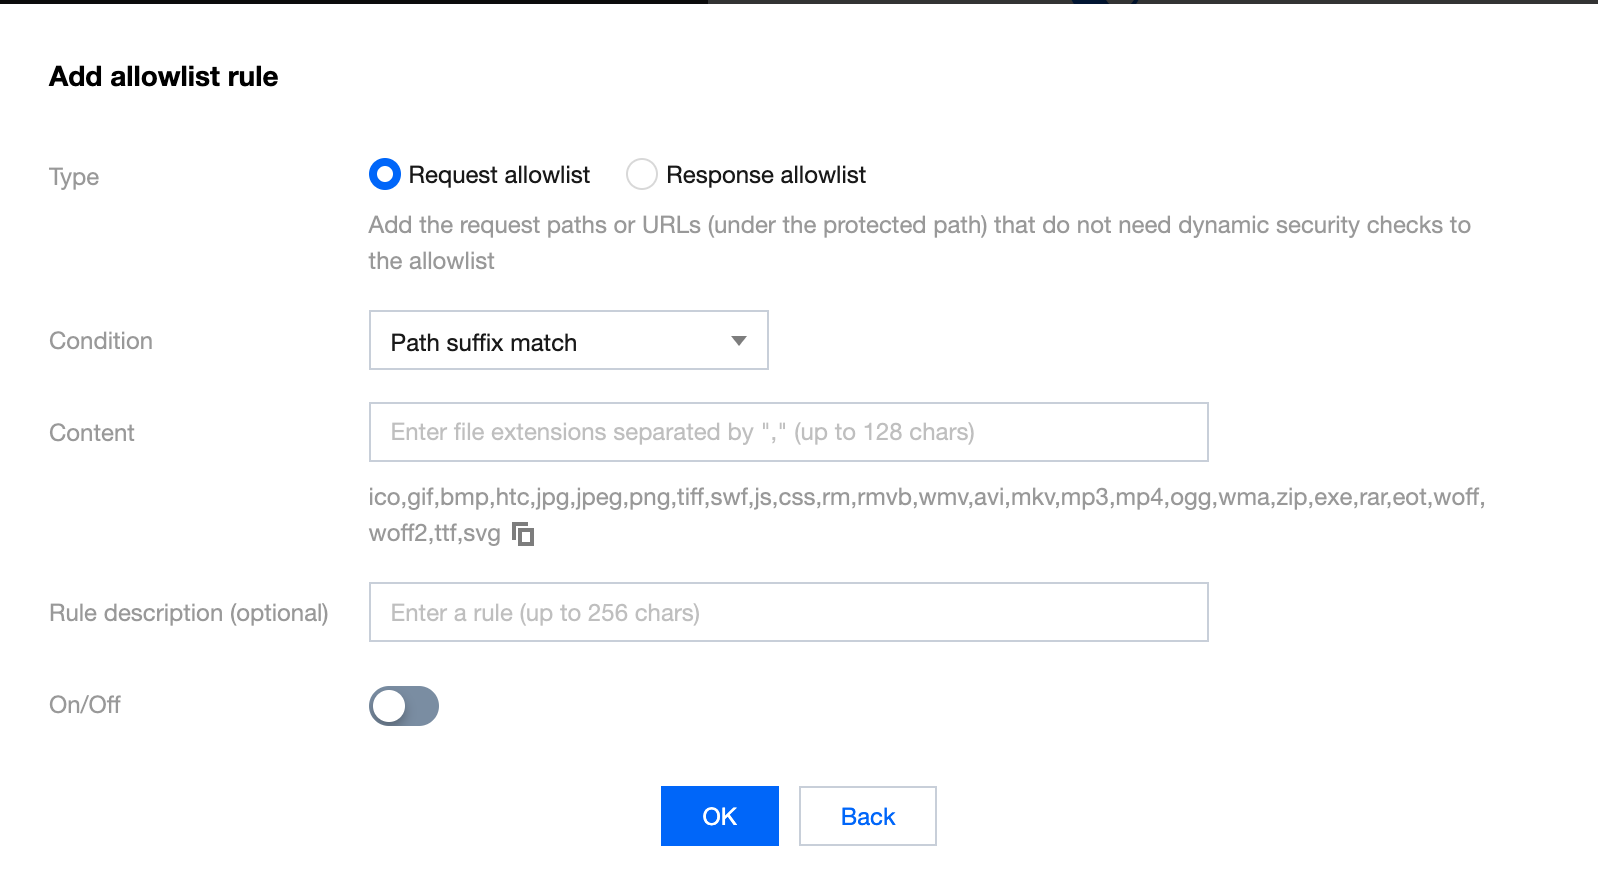
5. In the Add allowlist rule pop-up window, configure parameters and click OK.
Case 1: A large number of requests from automated scripts
There are a large number of requests from automated scripts. In this case, you can block CURL
, SOAPUI
, JMETER
, POSTMAN
, and similar requests.
1. Log in to the WAF console and select Configuration center > Bot and application security on the left sidebar. 2. On the Bot and application security page, select the target domain name in the top-left corner and click Bot management.
3. In Global settings on the Bot management tab, click Configure now in the Browser bot defense module section.
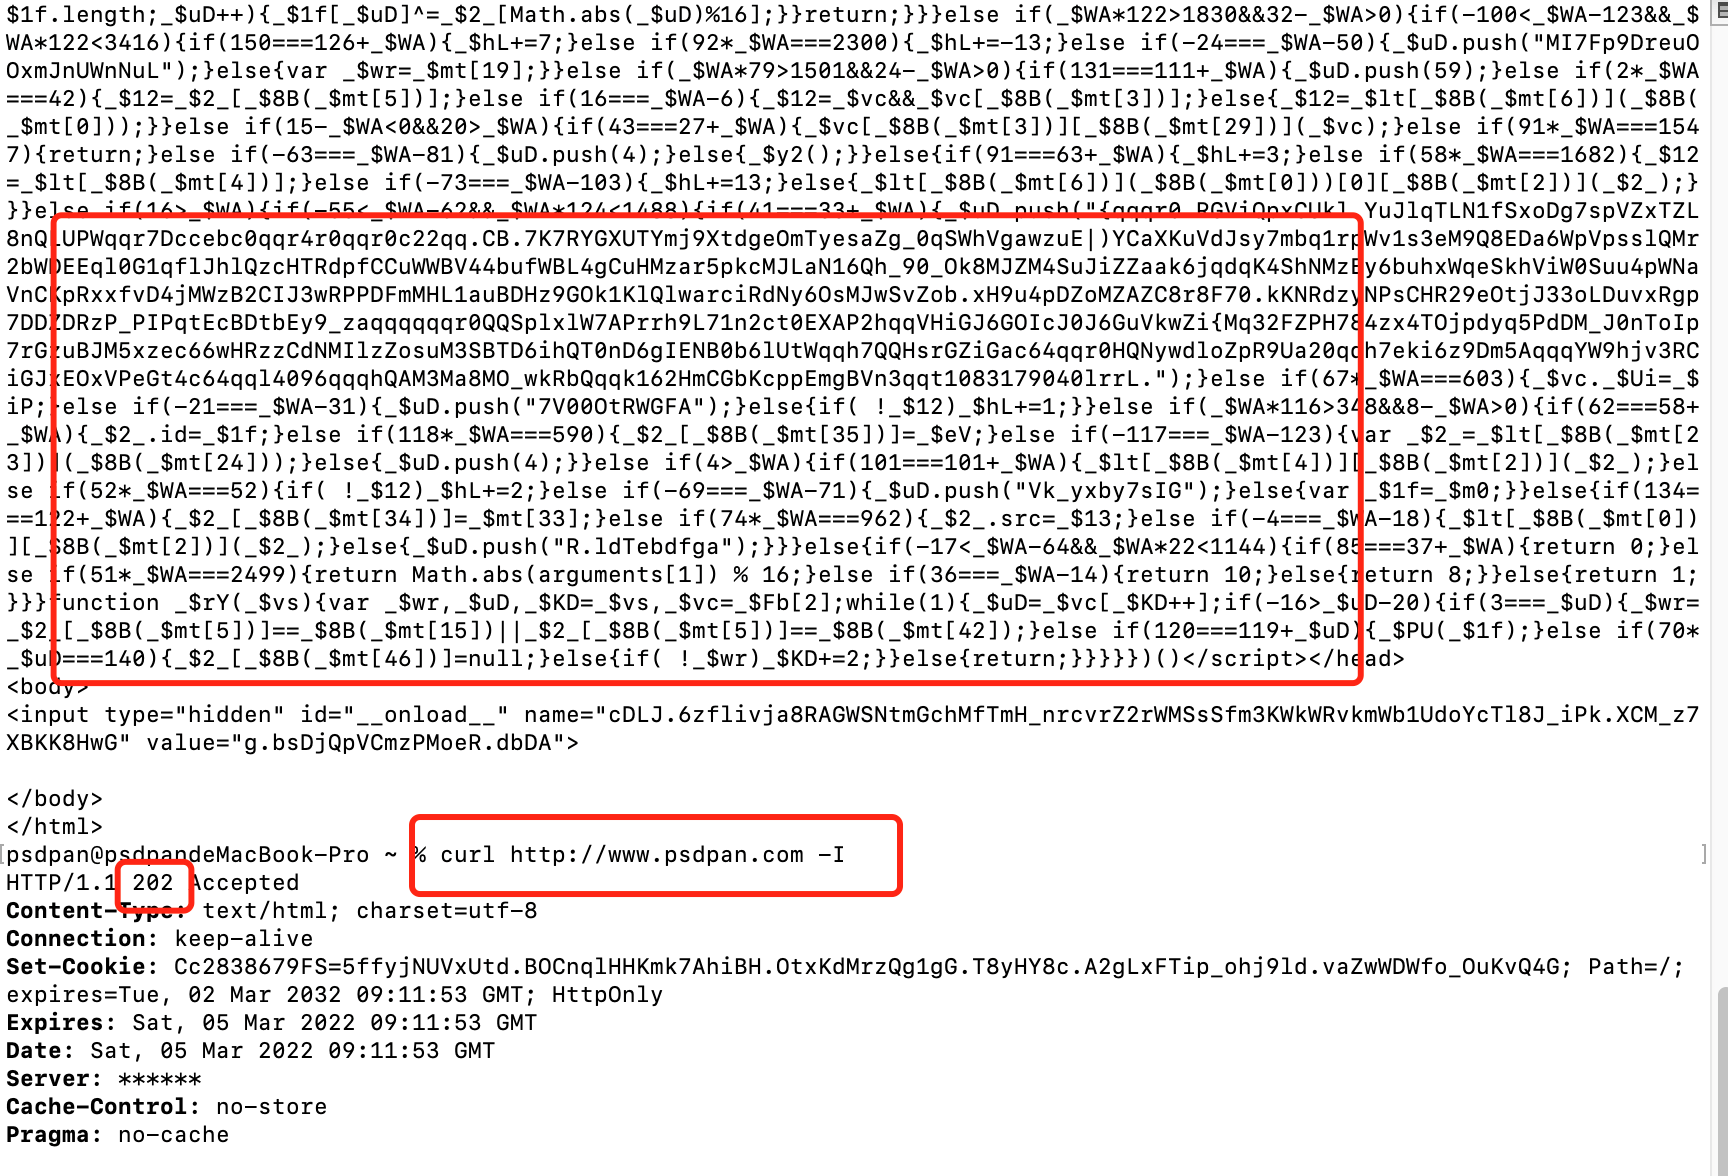
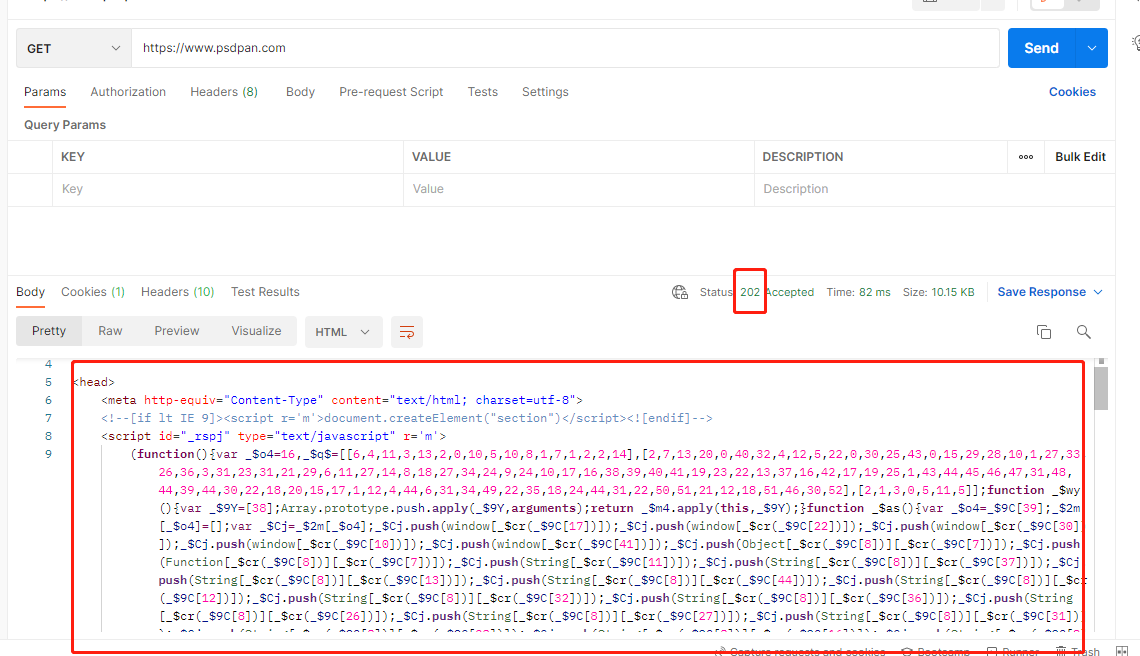
4. Click of Automated identification to confirm the allowlist. 5. On the configuration page of a certain scenario, click Browser bot defense module, click , and select Block for Defense mode. 6. Below are the results of the CURL
, SELENIUM
, and POSTMAN
requests:
Case 2: Prohibiting webpage debugging
Prohibit webpage debugging to avoid targeted crawler writing.
1. Log in to the WAF console and select Configuration center > Bot and application security on the left sidebar. 2. On the Bot and application security page, select the target domain name in the top-left corner and click Bot management.
3. In Global settings on the Bot management tab, click Configure now in the Browser bot defense module section.
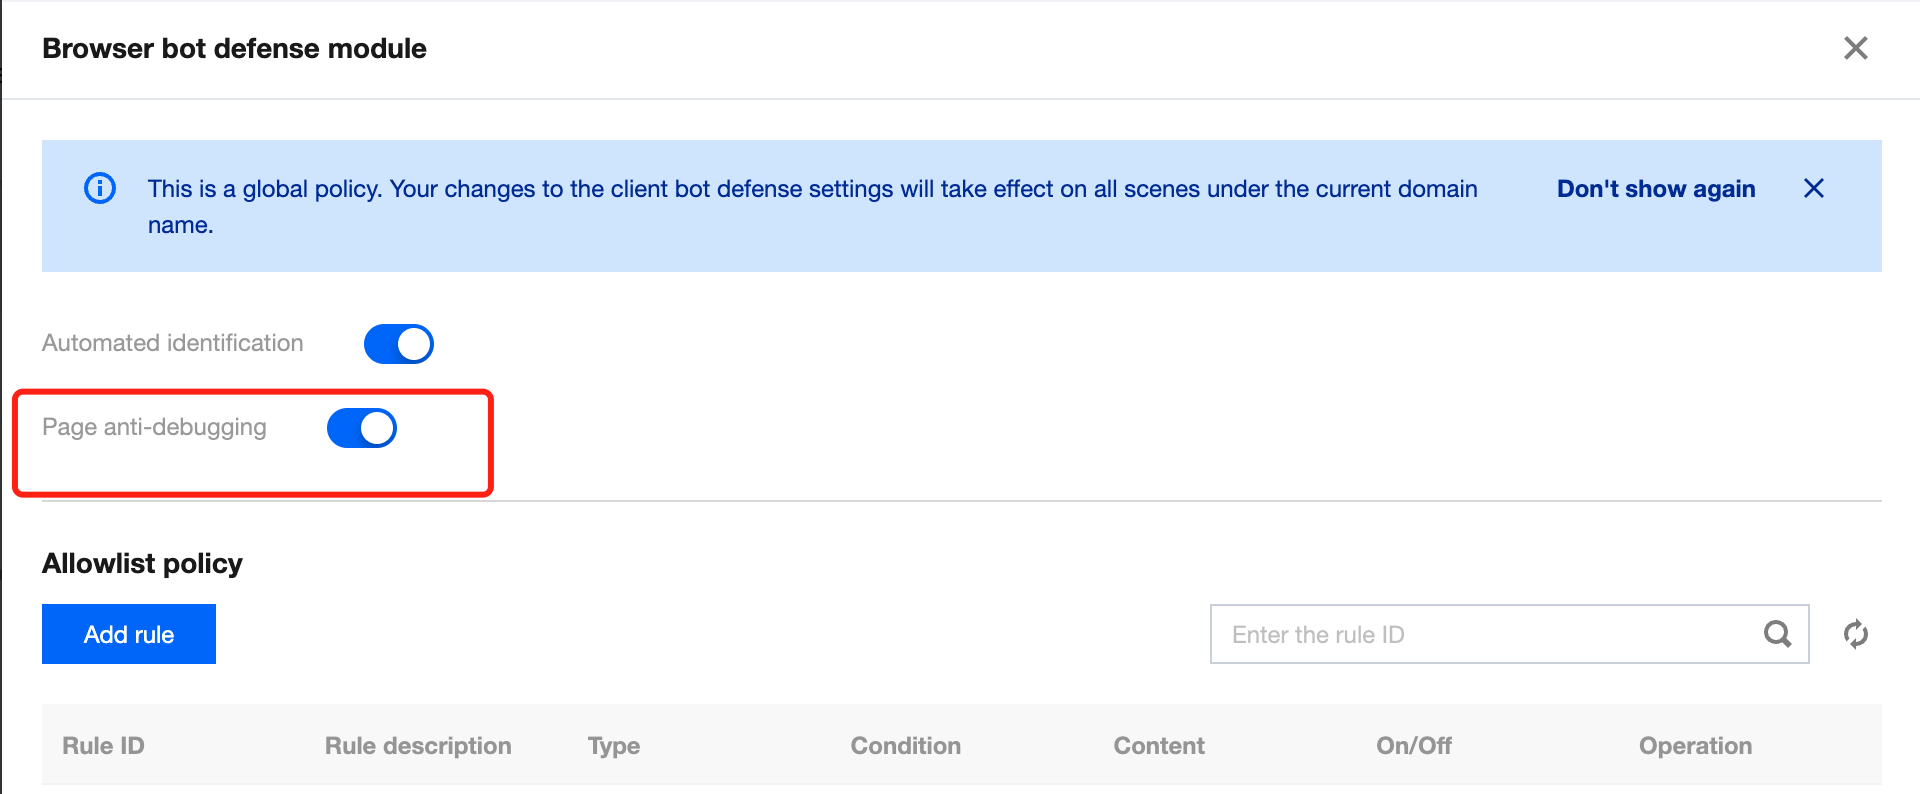
4. Click of Page anti-debugging to confirm the allowlist. 5. On the configuration page of a certain scenario, click Browser bot defense module, click , and select Block for Defense mode. 6. Below is the result of the Chrome request:
Threat Intelligence Module
The threat intelligence module feature is built on Tencent's nearly 20 years of experience in cybersecurity and big data intelligence. It determines the status of an IP in real time and uses a scoring mechanism to quantify a risk. It precisely identifies the access from a malicious dynamic IP and IDC. In addition, it intelligently identifies the features of a malicious crawler to cope with risky access requests from malicious crawlers, distributed crawlers, proxies, credential stuffing, and bargain hunting.
Note:
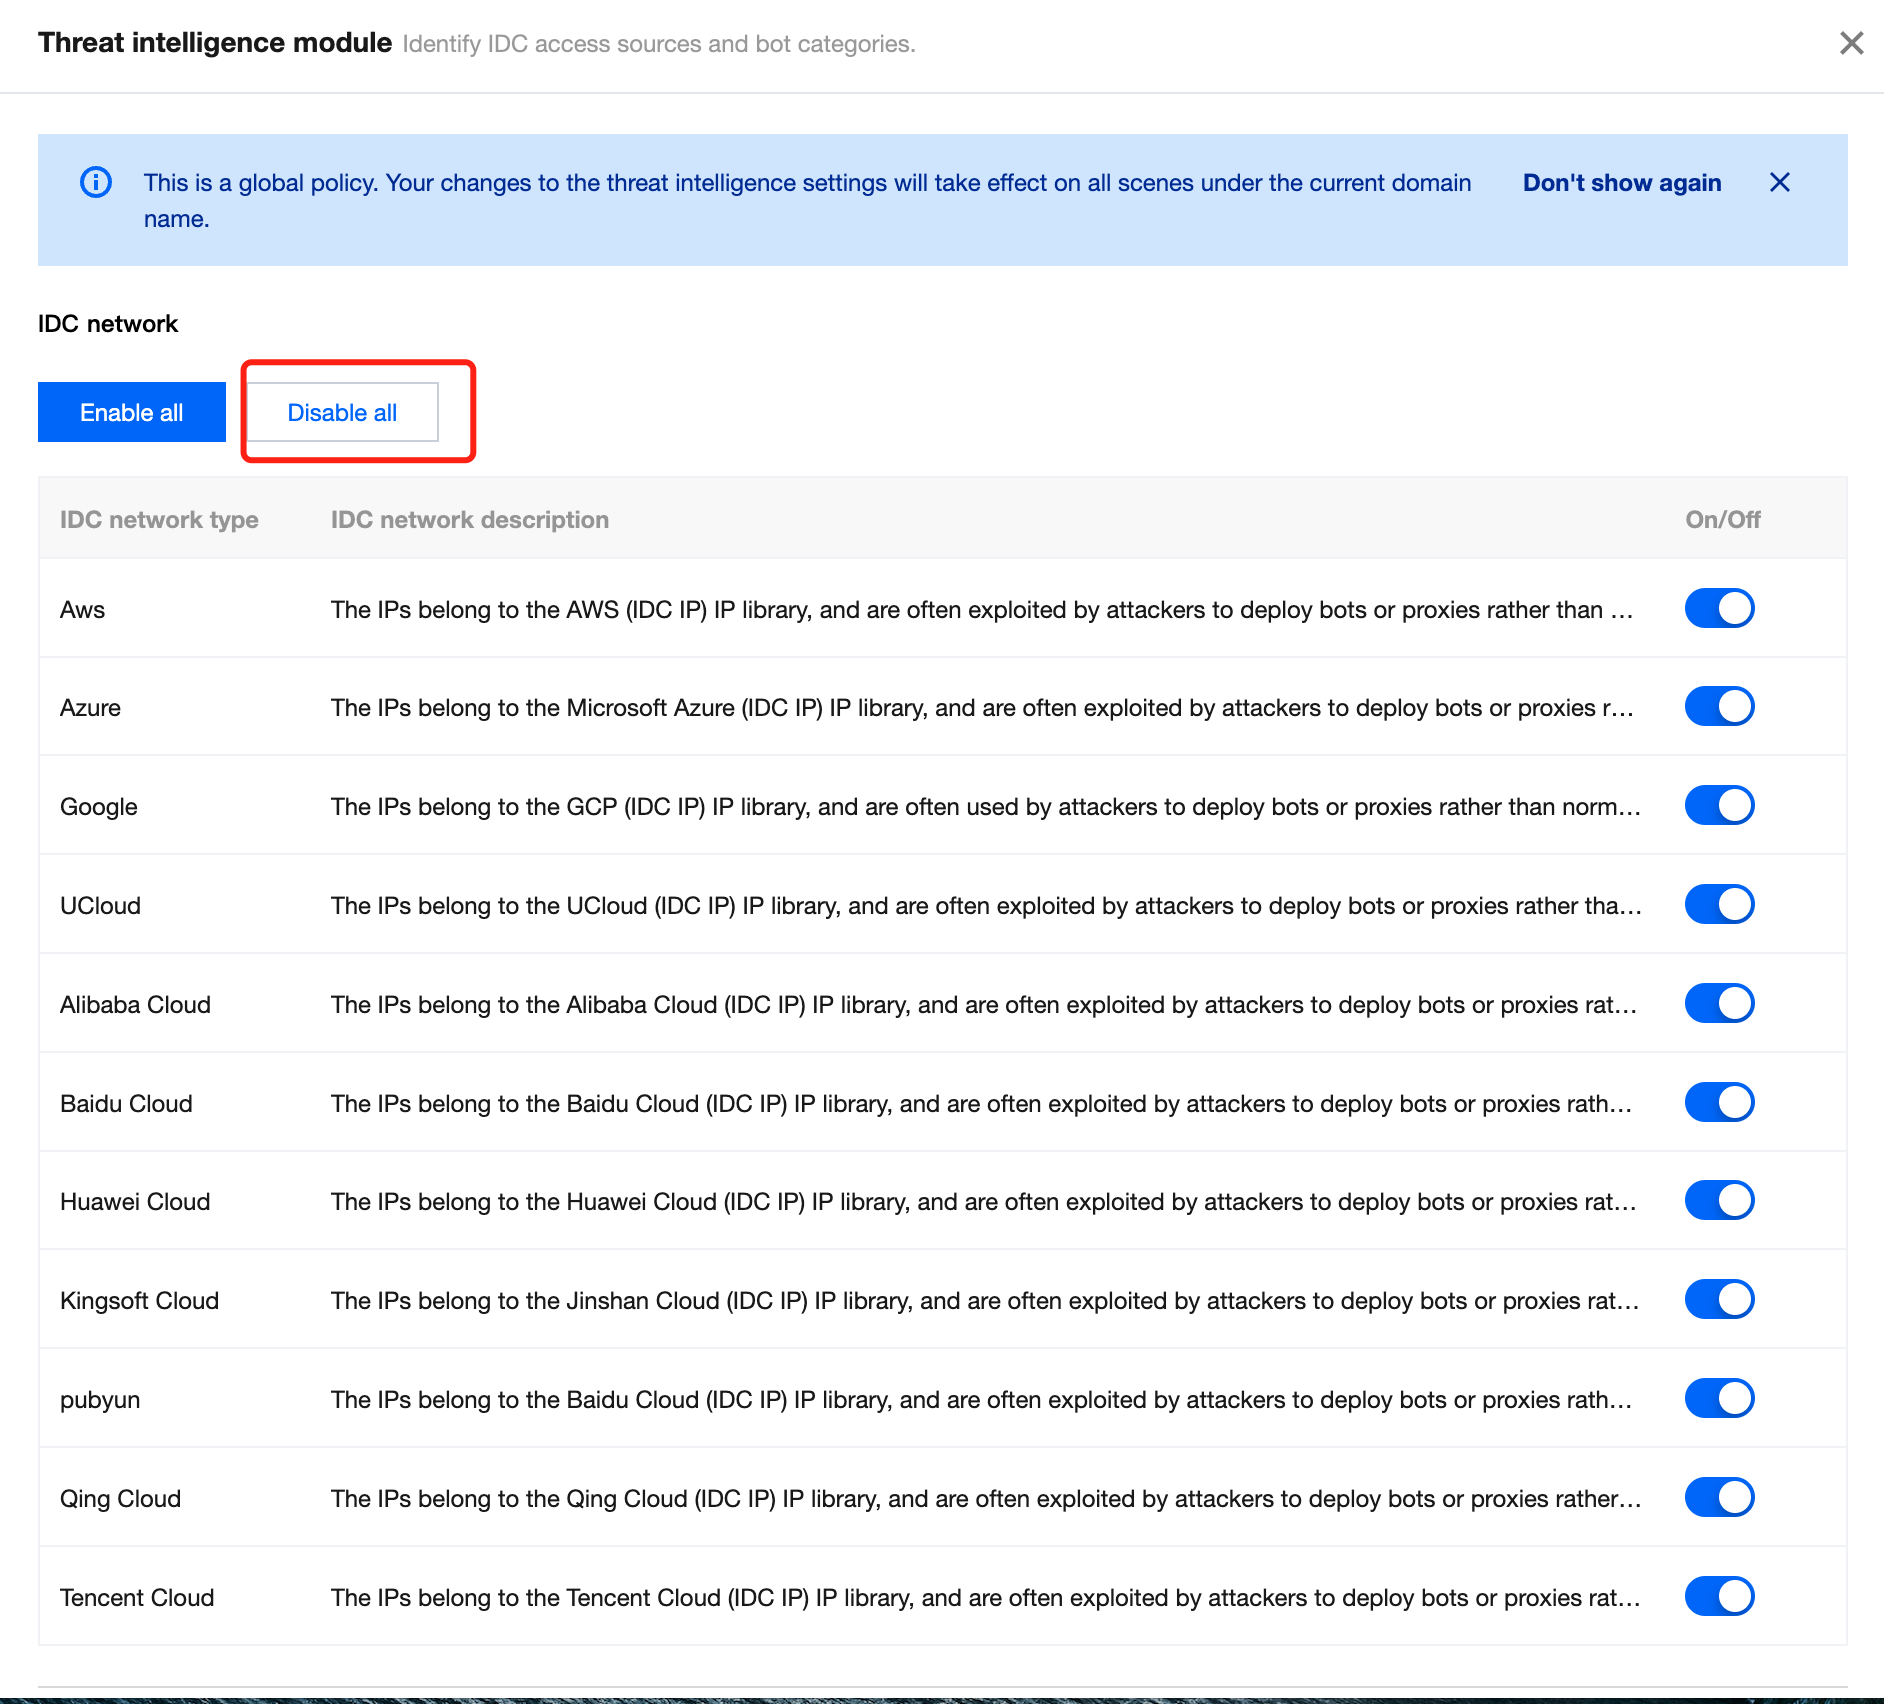
Before enabling the threat intelligence module feature, you need to check whether the business has IDC traffic access, and if so, disable IDC before enabling threat intelligence module.
1. Log in to the WAF console and select Configuration center > Bot and application security on the left sidebar. 2. On the Bot and application security page, select the target domain name in the top-left corner and click Bot management.
3. In Global settings on the Bot management tab, click Configure now in the Threat intelligence module section.
4. On the Threat intelligence module page, check whether there is IDC traffic access, and if so, click Disable all of IDC network.
5. If there is no IDC traffic access, click the configuration page of a certain scenario, click Bot flow statistics module, and click in the Threat intelligence module section.
AI Evaluation Module
The AI evaluation module feature builds AI evaluation models from AI technologies and Tencent's experiences in controlling risks and fighting cybercrimes. Through big data analysis and AI modeling of access traffic, it quickly identifies malicious requesters and defends against risky access requests from APT and hidden threat bots.
Note:
The AI evaluation module implements automatic learning based on AI modeling and can be directly enabled. If there is a false positive, add the URL to the allowlist.
Enabling the AI evaluation module
1. Log in to the WAF console and select Configuration center > Bot and application security on the left sidebar. 2. On the Bot and application security page, select the target domain name in the top-left corner and click Bot management.
3. In Global settings on the Bot management tab, click Configure now in the AI policy module section.
Adding to allowlist
Background
On the AI evaluation module tab, the request is normal but reported as abnormal.
Directions
1. Log in to the WAF console and select Configuration center > Bot and application security on the left sidebar. 2. On the Bot and application security page, select the target domain name in the top-left corner and click Bot management.
3. In Global settings on the Bot managementtab, click Configure now in the AI evaluation module section.
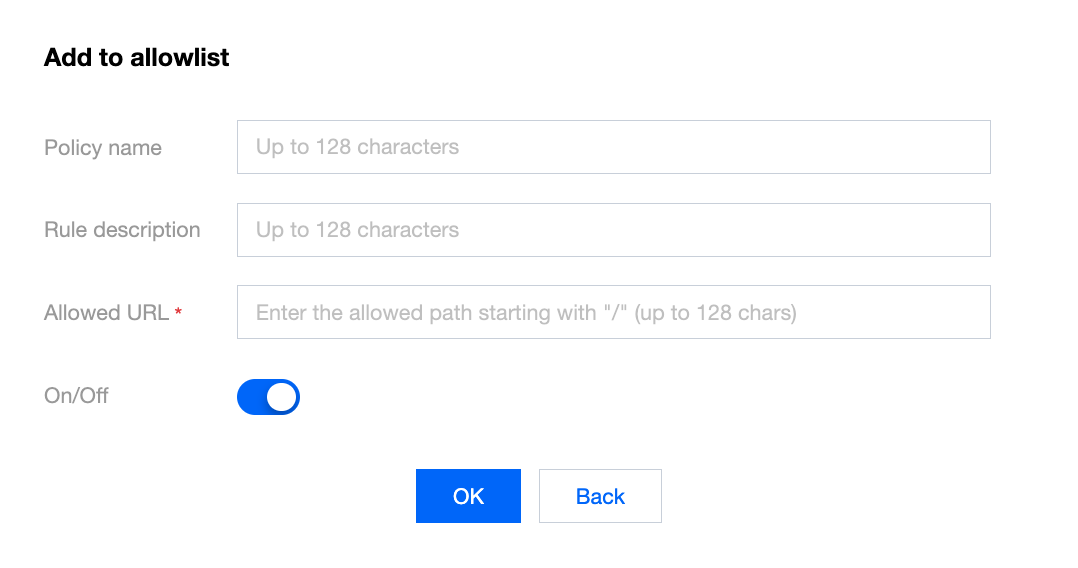
4. On the AI evaluation module page, click Add to allowlist, enter the name, description, and URL, and click OK.
5. Click the configuration page of a certain scenario, click Bot flow statistics module, and click in the AI policy module section. Bot Flow Statistics Module
Based on big data analysis, the bot flow statistics module feature automatically classifies customer traffic by feature and identifies abnormal and malicious traffic. It automatically adjusts the malicious traffic threshold and handles risky access requests from general and high-frequency bots. With auto-adjustment modeling, it resolves most of the bot behavior bypasses.
Note:
You can directly enable the bot flow statistics module. The smart mode is recommended.
1. Log in to the WAF console and select Configuration center > Bot and application security on the left sidebar. 2. On the Bot and application security page, select the target domain name in the top-left corner and click Bot management.
3. In Global settings on the Bot management tab, click Configure now in the AI evaluation module section.
Action Policy
The action score feature leverages the threat intelligence module, AI evaluation module, and bot flow statistics module to provide a comprehensive score ranging from 0 to 100 for the risk level of an access request to a website. The higher the score, the more likely it is from a bot, and the higher the risk level. With the score provided by bot analytics, the risk level of an access request is intelligently identified, and you can precisely block a risky access request by configuring different action policies, the scope of each action policy, and actions in different score ranges.
Background
When the threat intelligence module, AI evaluation module, or bot flow statistics module identifies a large amount of traffic, you can customize actions for configuration analysis, as the default configuration cannot implement precise blocking.
Directions
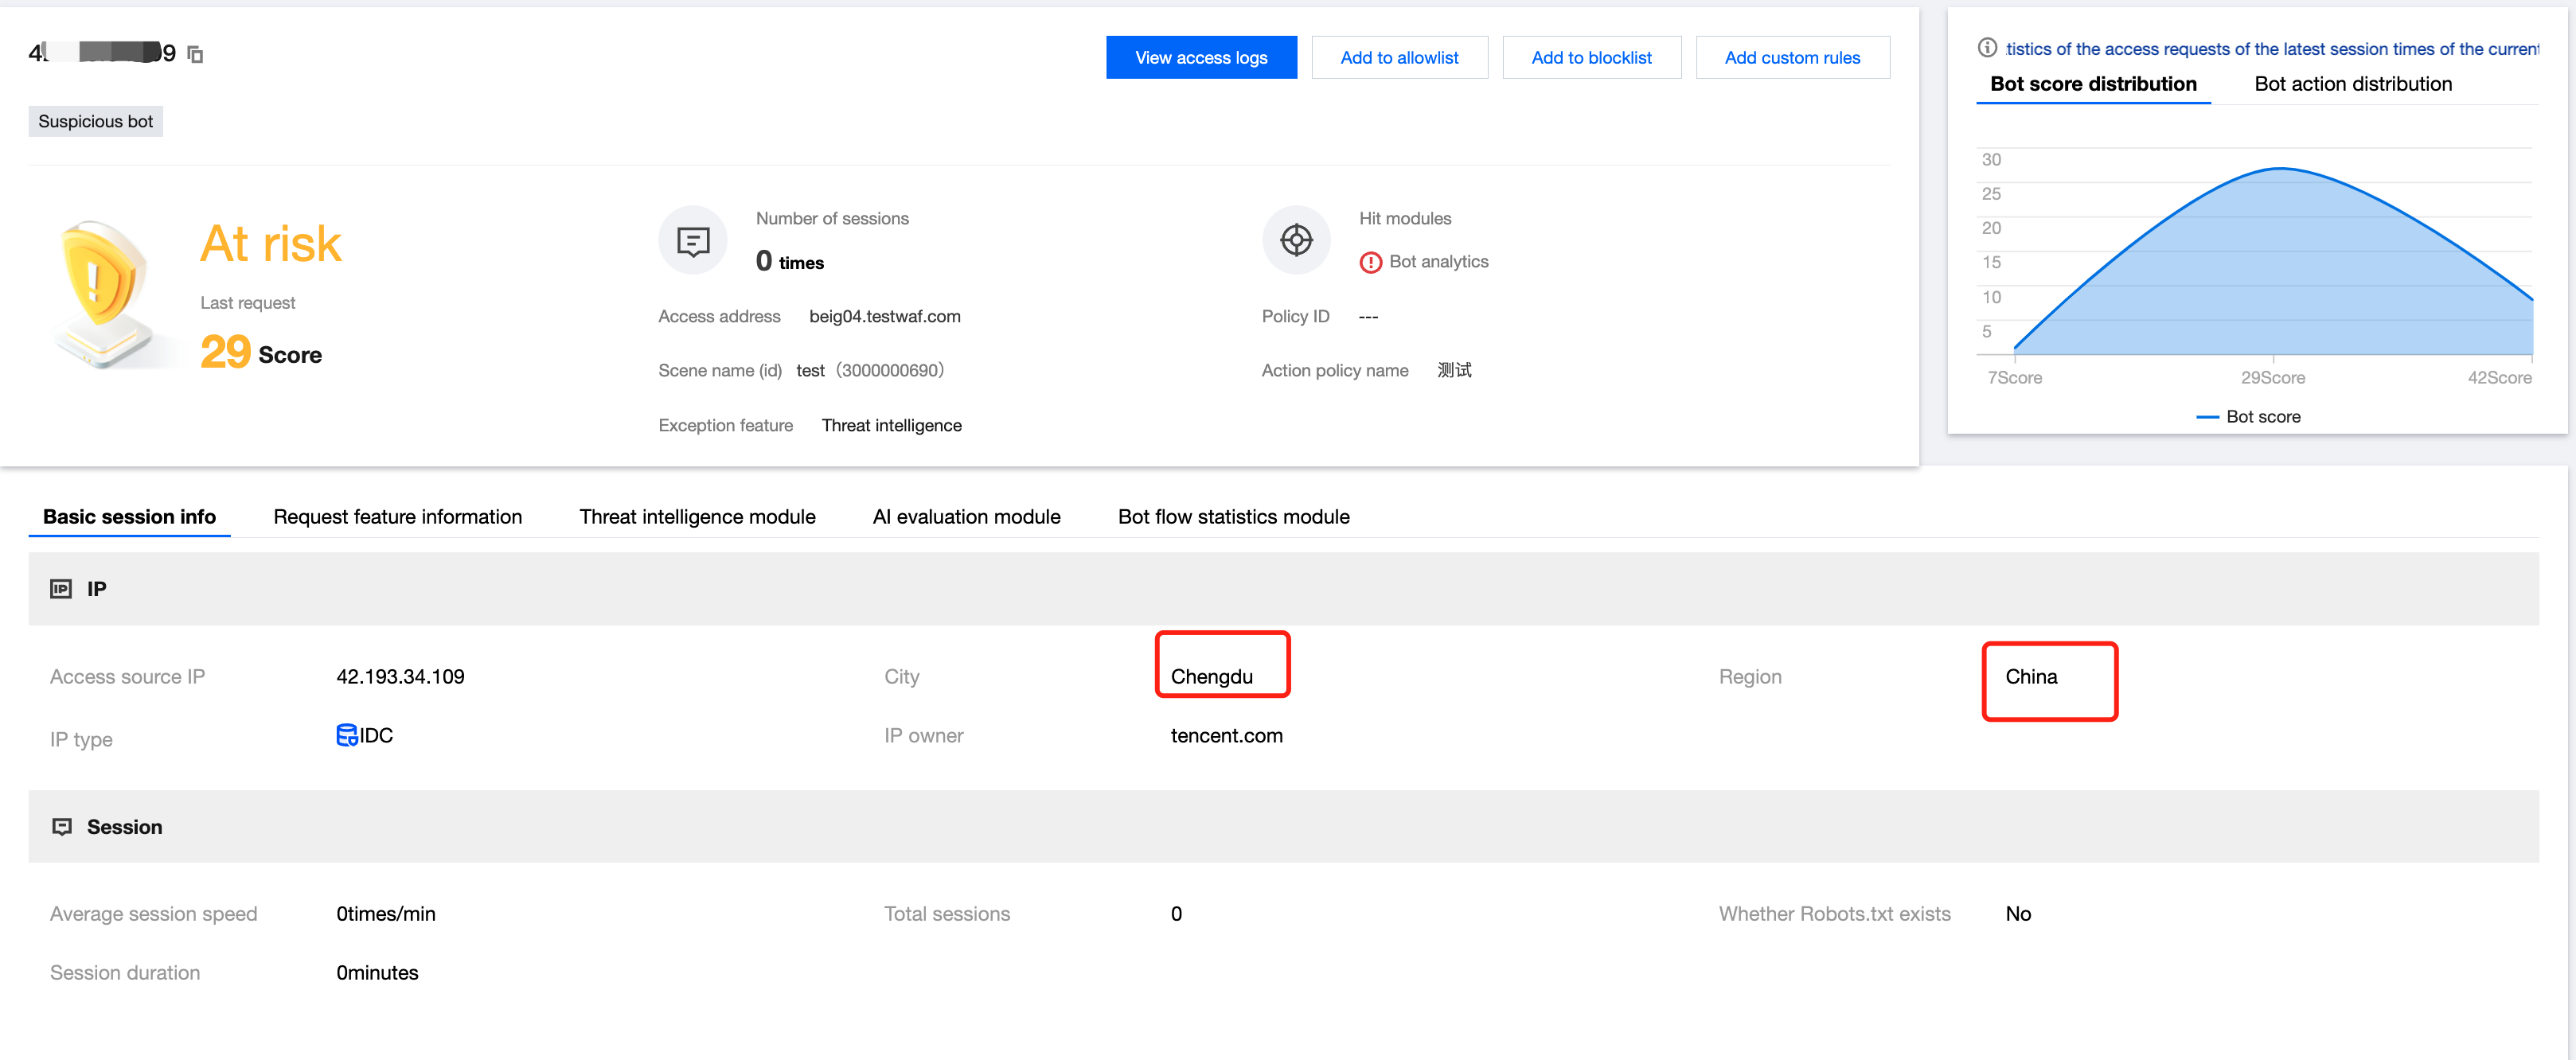
1. Log in to the WAF console and select Bot traffic analysis on the left sidebar. 2. On the Bot traffic analysis page, select the target domain name in the top-left corner, select the target access source, and click View details.
3. In the Basic session info section on the details page, view the region and IP region.
4. If the business doesn't have traffic in that region, the score is abnormal. Then, you can customize an action for more precise settings.
5. On the Bot and application security page, select the target domain name in the top-left corner and click Bot management.
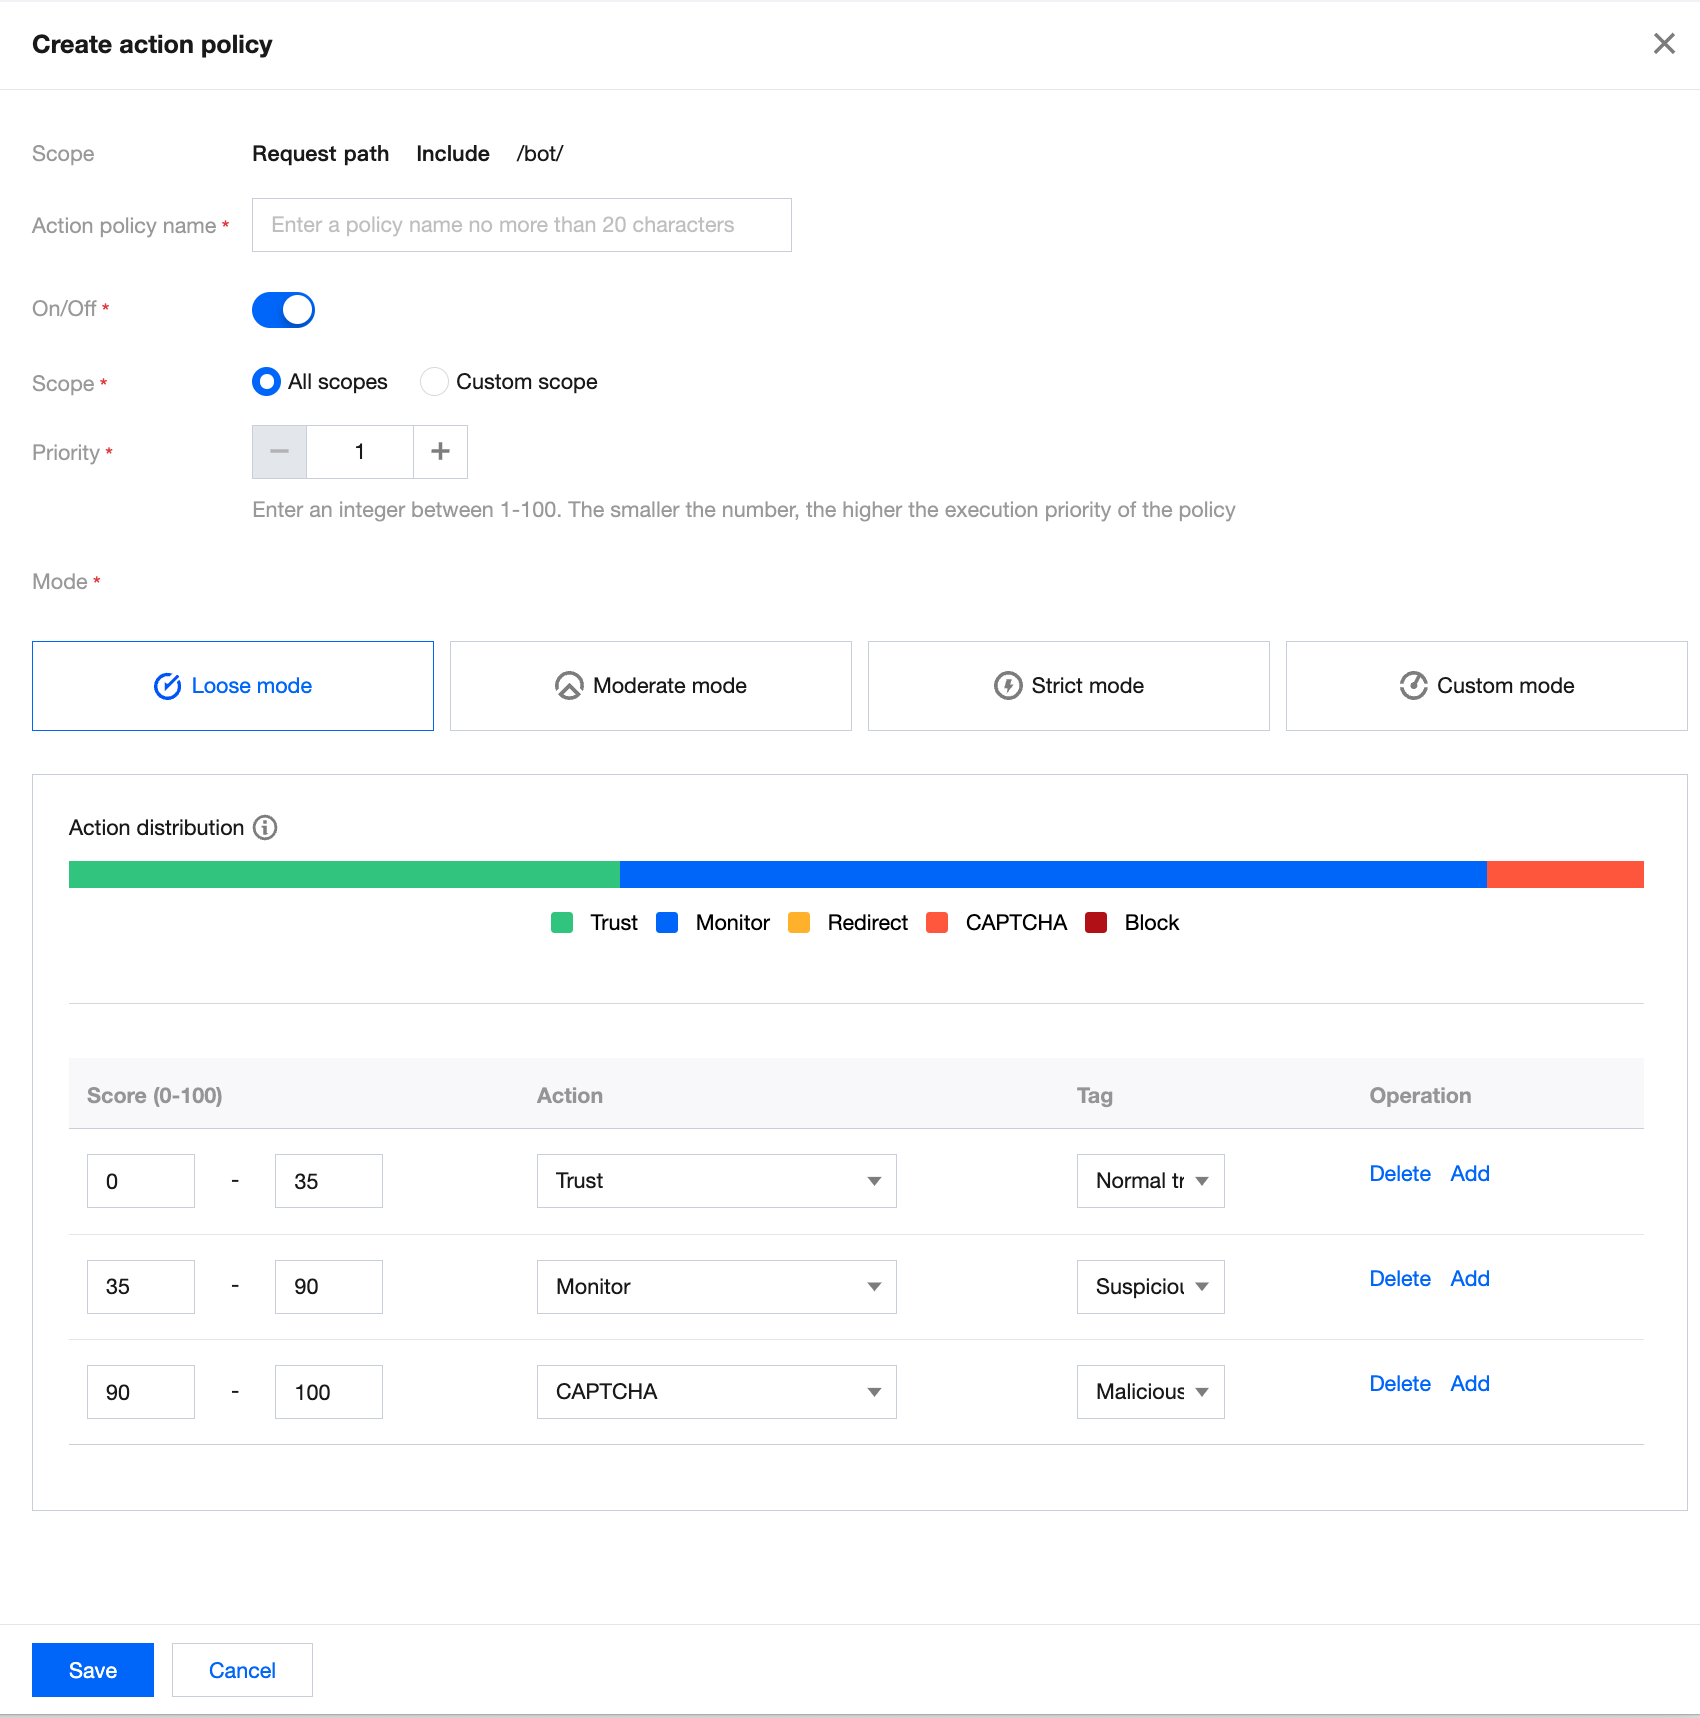
6. Click the configuration page of a certain scenario, click Bot flow statistics module, and click Add action policy in the Action policy module section.
7. On the displayed page, configure parameters and click Publish.
Parameter description: Policy name: Enter name of the action policy.
On/Off: Specify whether to apply the current action policy.
Scope: The scope of the current action policy.
Priority: Action policy execution priority, which is an integer between 1–100. The smaller the value, the higher the priority.
Mode: By default, there are loose, moderate, strict, and custom modes. The first three modes are preset, representing different recommended categories and handling policies for bots at different risk levels in bot traffic management. Once modified, they become the custom mode.
Score range: A score ranges from 0 to 100. Ten score entries can be added to each range, which is left-closed and right-open and cannot be overlapped. You can set a range to null, and then no action will be processed in it.
Action: You can set an action to Trust, Monitor, Redirect (to a certain website URL), CAPTCHA, or Block.
Tag: You can set a tag of Friendly bots, Malicious bots, Normal traffic, or Suspicious bots.
Friendly bots: The bot is friendly and legal for the website by default.
Suspicious bots: The system finds the access source traffic suspicious but cannot determine if it is malicious to the website.
Normal traffic: The access traffic is regarded as from a real user.
Malicious bots: The bot has malicious traffic and is unfriendly to the website.
Legitimate Bot
This feature allows legitimate bots (such as search engines and feed bots) to get website data so that the website can be normally indexed.
1. Log in to the WAF console and select Configuration center > Bot and application security on the left sidebar. 2. On the Bot and application security page, select the target domain name in the top-left corner and click Bot management.
3. In Global settings on the Bot management tab, click Configure now in the Legitimate bots module section.
4. On the Legitimate bots page, click to enable the feature.
Custom Rule
This feature allows you to precisely handle compliant crawlers and access requests with different features.
Note:
Currently, when you are creating a scenario-based bot rule, a custom rule set has been preset for the scenario.
The content is for reference only and cannot be used as the standard business configuration. Web crawlers fall into diverse categories and generally vary by business type.
Case details
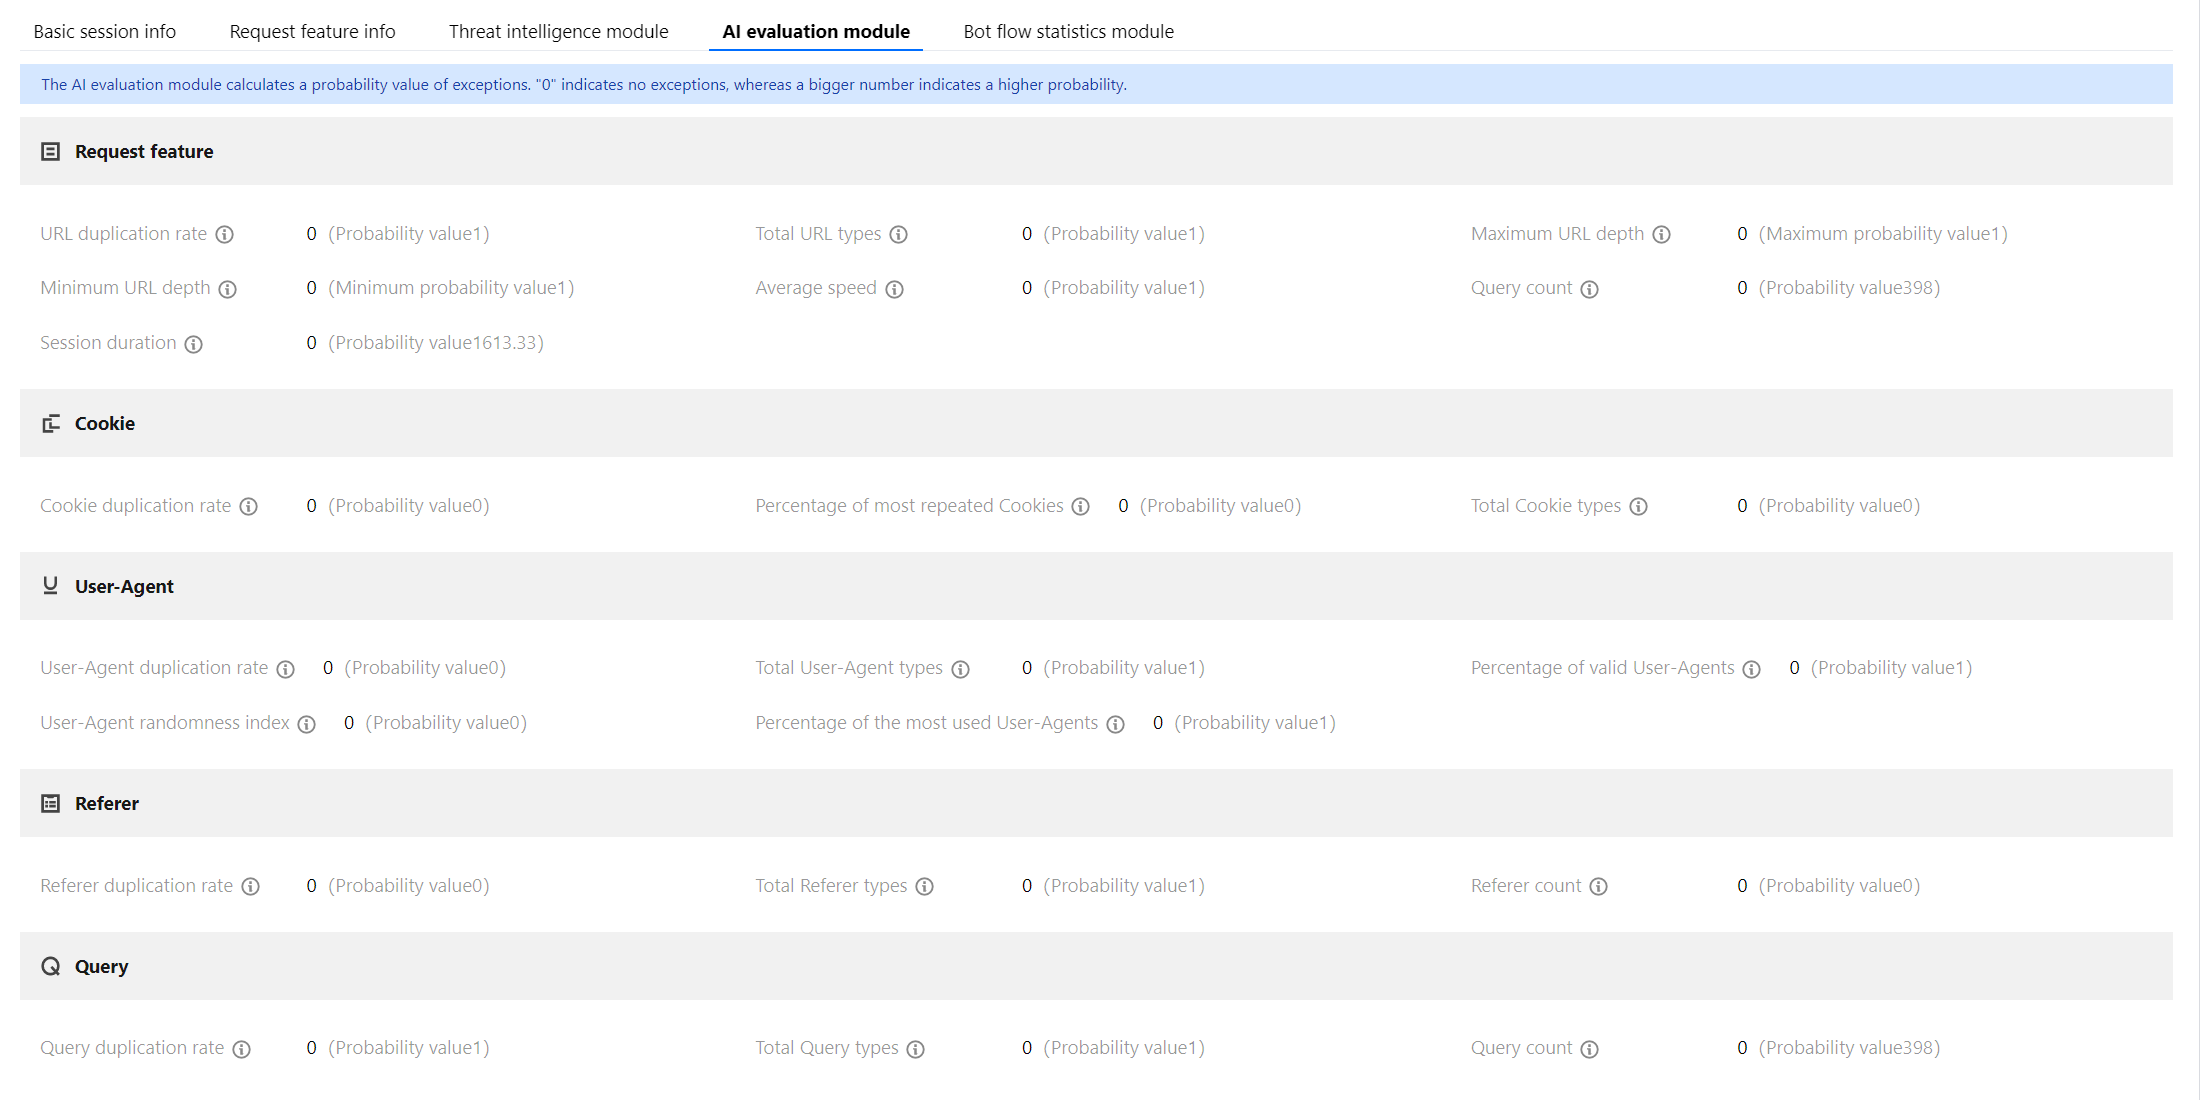
If requests cannot be blocked by setting an action score, you need to set the abnormal behavior characteristics. After identifying the exception in Bot traffic analysis, click Details to view the exception data and compare it with normal business data.
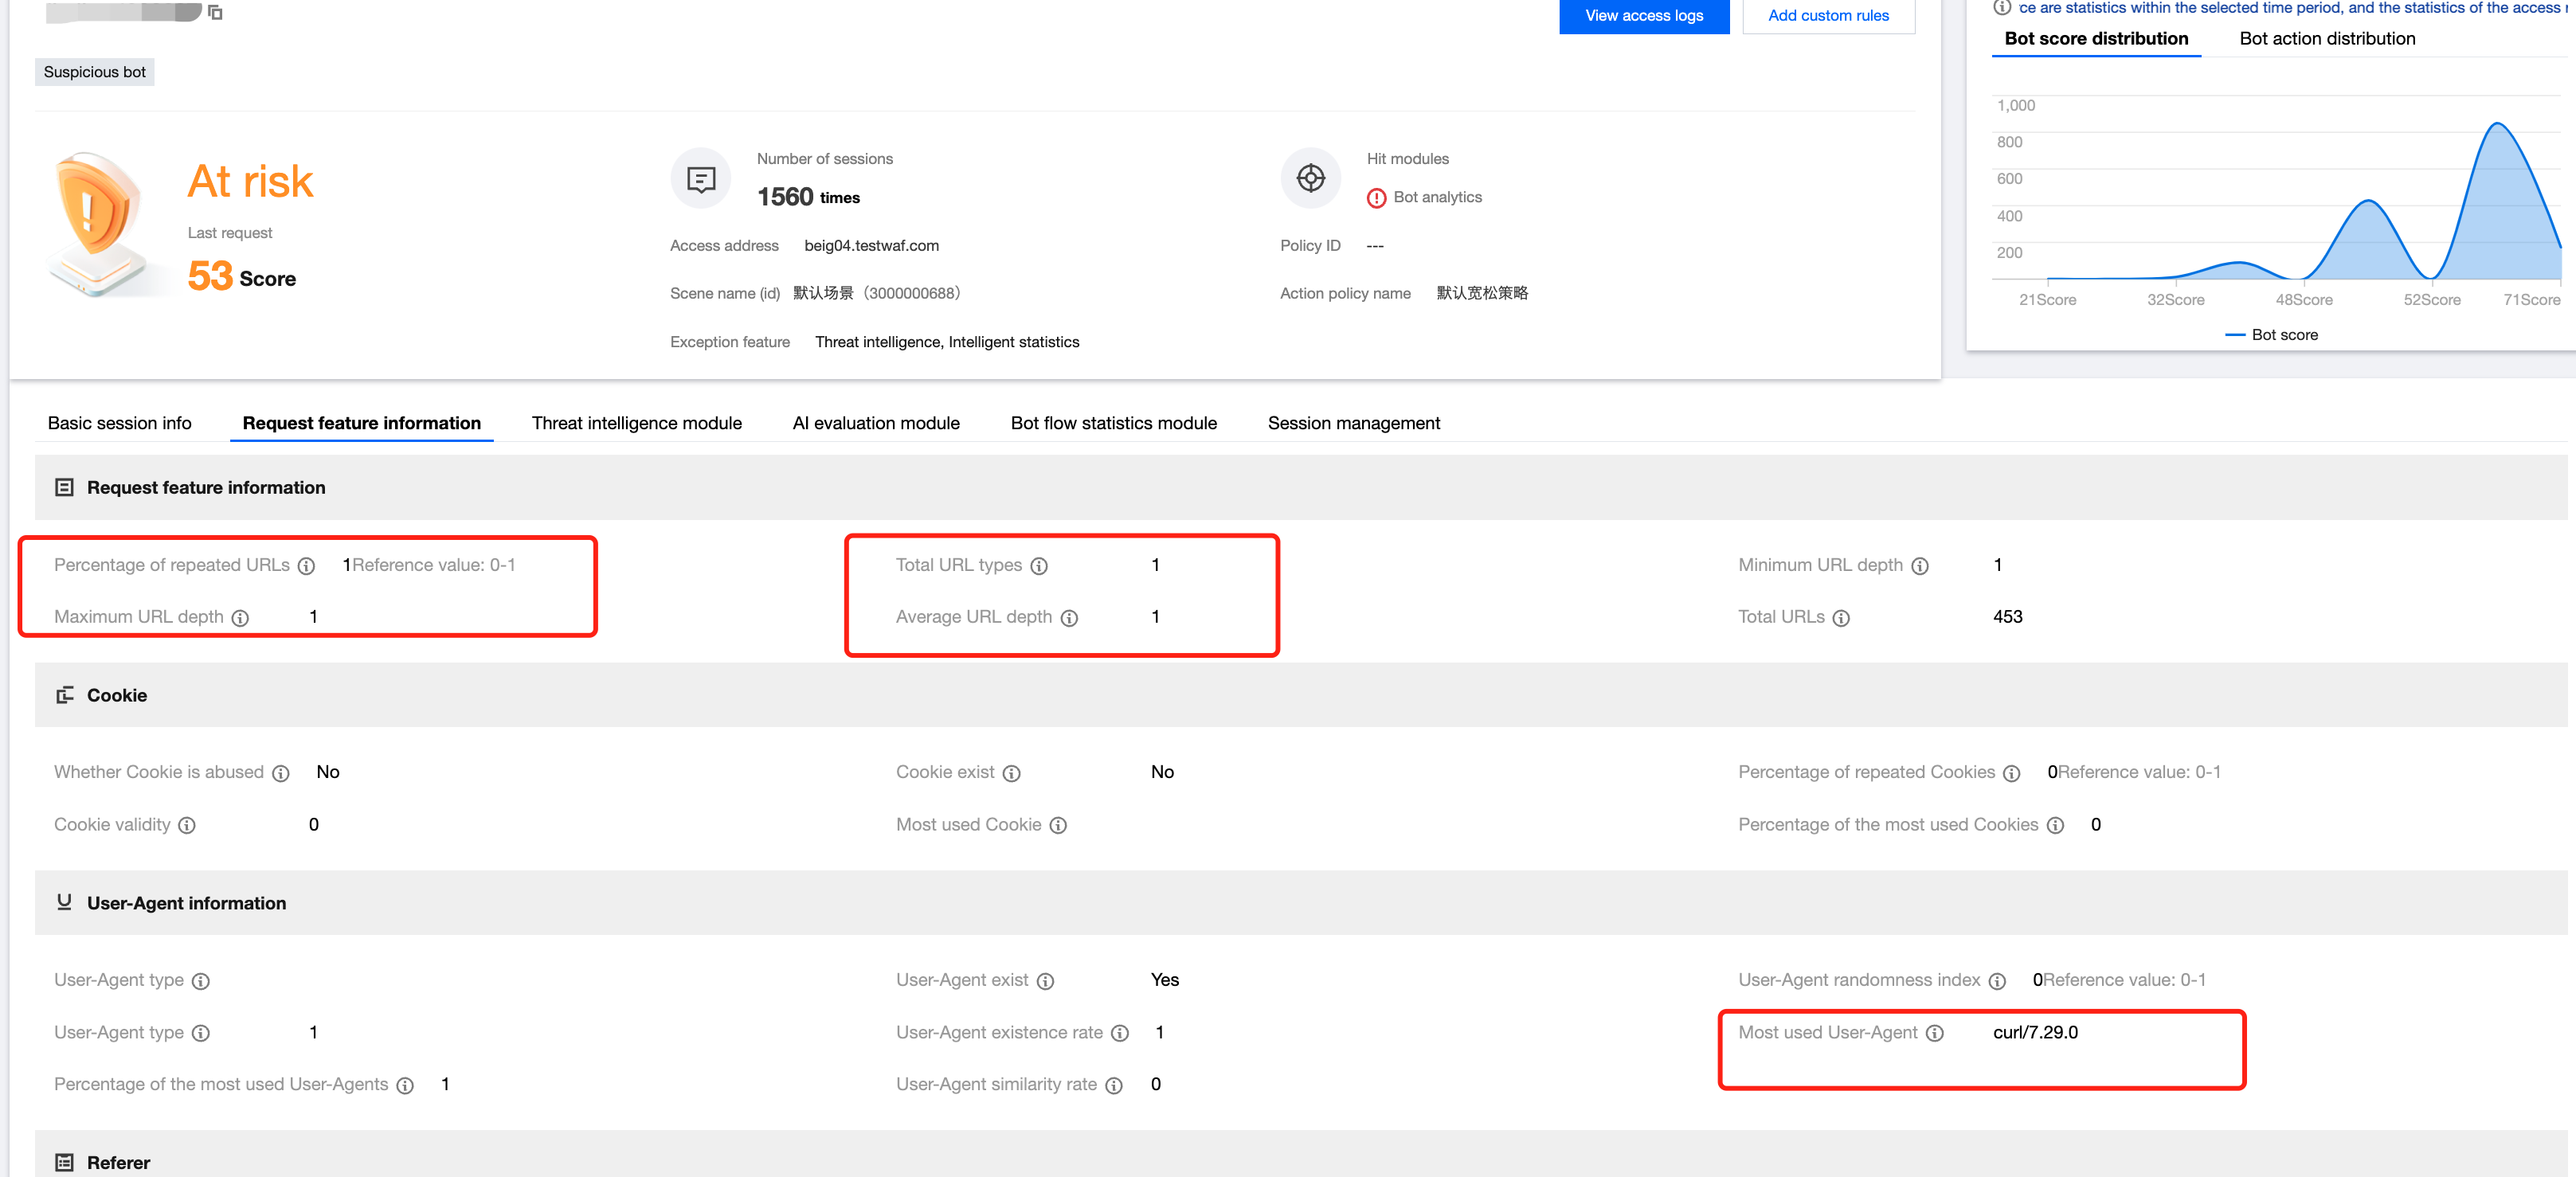
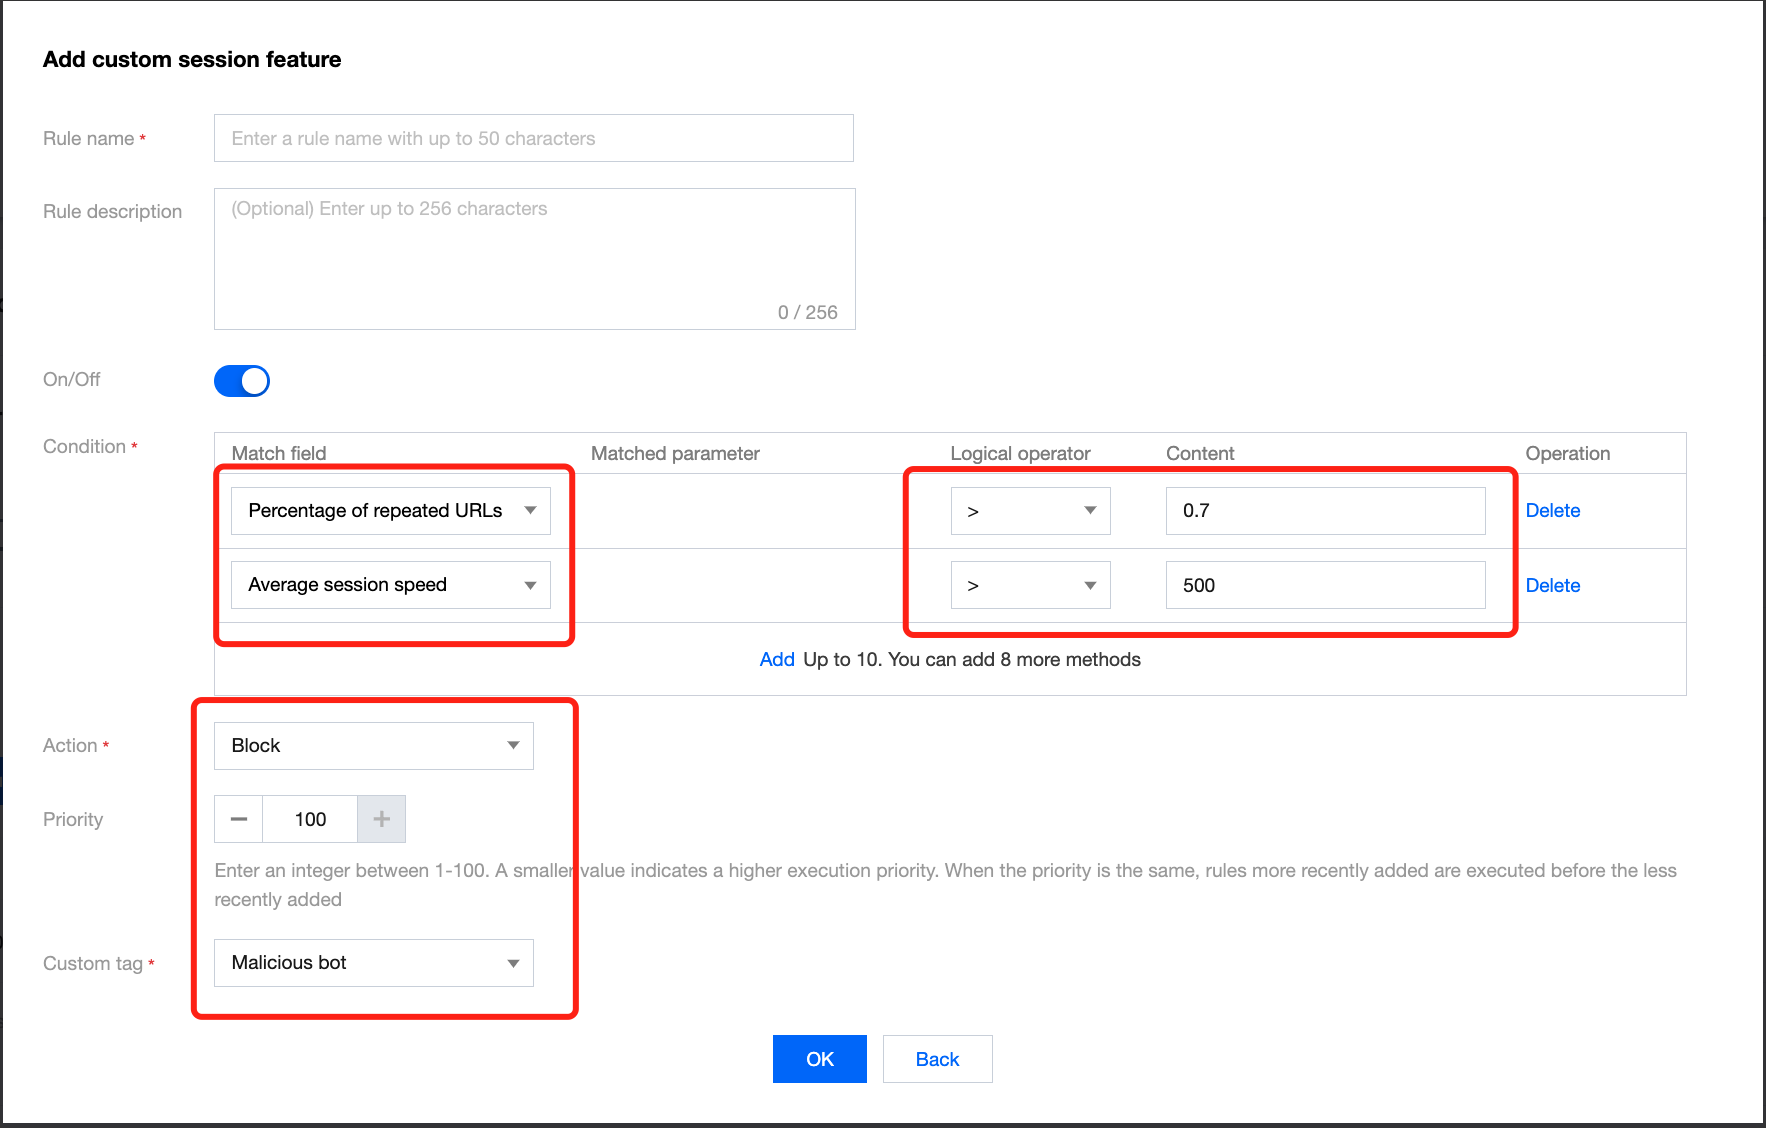
For example, if the URL duplication is 1
, the number of sessions is 100 per minute, and User-Agents are misused , you need to check whether there are similar requests or proxies in the business, and if not, there is a malicious attack. Then, you can view the exception and configure the blocking policy as follows.
Case study
1. Log in to the WAF console and click Bot traffic analysis on the left sidebar. 2. On the Bot traffic analysis page, select the target domain name in the top-left corner and select the target access source. You can see that the IP request is fast, there is a single URL, and the threat intelligence is IDC.
3. Click View details. In the Basic session info tab, you can view the average number of sessions per minute and the total number of sessions. Then, set the policy accordingly.
4. On the Threat intelligence tab, check whether the IP has been used by a real user based on the intelligence data.
5. On the Request feature info tab, view the request details.
Policy configuration
1. Log in to the WAF console and select Configuration center > Bot and application security on the left sidebar. 2. On the Bot and application security page, select the target domain name in the top-left corner and click Bot management.
3. Click the configuration page of a certain scenario and click Custom rules.
4. On the Custom rules page, click Add a configuration. Based on the above analysis, set the percentage of repeated URLs to a value greater than 0.7 (no other data exceeds this value during the process) and the number of sessions per minute to a value greater than 500. Then, click OK.
Note:
Currently, when you are creating a scenario-based bot rule, a custom rule set has been preset for the scenario.
Was this page helpful?