- Release Notes and Announcements
- Tencent Cloud Network Overview
- Product Introduction
- Purchase Guide
- Quick Start
- Operation Guide
- Network Topology
- Network performance dashboard
- Virtual Private Cloud (VPC)
- Subnets
- Route Tables
- IPs and ENIs
- Bandwidth Package
- Network Connection
- Security Management
- Diagnostic Tools
- Alarming and Monitoring
- Practical Tutorial
- View the Total Bandwidth for Single-Region Traffic-Based Billing
- Migrating from the Classic Network to VPC
- Best Practices of Security Group Change
- Configuring CVM Instance as Public Gateway
- Building HA Primary/Secondary Cluster with HAVIP + Keepalived
- Creating a High-availability Database by Using HAVIP + Windows Server Failover Cluster
- Hybrid Cloud Primary/Secondary Communication (DC and VPN)
- Hybrid Cloud Primary/Secondary Communication (CCN and VPN)
- CVM Access to Internet Through EIP
- Troubleshooting
- API Documentation
- History
- Introduction
- API Category
- Making API Requests
- VPC APIs
- CreateAssistantCidr
- DeleteAssistantCidr
- DeleteTrafficPackages
- DescribeClassicLinkInstances
- DescribeTrafficPackages
- ModifyAssistantCidr
- AssignIpv6CidrBlock
- CreateDefaultVpc
- CreateLocalGateway
- DeleteLocalGateway
- DescribeAccountAttributes
- DescribeAssistantCidr
- DescribeLocalGateway
- DescribeUsedIpAddress
- DescribeVpcInstances
- DescribeVpcIpv6Addresses
- DescribeVpcPrivateIpAddresses
- ModifyLocalGateway
- UnassignIpv6CidrBlock
- AttachClassicLinkVpc
- CheckAssistantCidr
- DeleteVpc
- DescribeVpcResourceDashboard
- DetachClassicLinkVpc
- CreateVpc
- DescribeVpcs
- AdjustPublicAddress
- ModifyVpcAttribute
- ModifyReserveIpAddress
- DescribeReserveIpAddresses
- DeleteReserveIpAddresses
- CreateReserveIpAddresses
- Route Table APIs
- EIP APIs
- Highly Available Virtual IP APIs
- ENI APIs
- AssignIpv6Addresses
- AssignPrivateIpAddresses
- AssociateNetworkInterfaceSecurityGroups
- CreateAndAttachNetworkInterface
- CreateNetworkInterface
- DescribeNetworkInterfaceLimit
- DisassociateNetworkInterfaceSecurityGroups
- ModifyIpv6AddressesAttribute
- ModifyNetworkInterfaceAttribute
- UnassignIpv6Addresses
- DeleteNetworkInterface
- DescribeNetworkInterfaces
- DetachNetworkInterface
- MigrateNetworkInterface
- MigratePrivateIpAddress
- ModifyPrivateIpAddressesAttribute
- UnassignPrivateIpAddresses
- AttachNetworkInterface
- Bandwidth Package APIs
- NAT Gateway APIs
- CreateNatGatewayDestinationIpPortTranslationNatRule
- CreateNatGatewaySourceIpTranslationNatRule
- DeleteNatGateway
- DeleteNatGatewayDestinationIpPortTranslationNatRule
- DeleteNatGatewaySourceIpTranslationNatRule
- DescribeNatGatewayDestinationIpPortTranslationNatRules
- DescribeNatGatewayDirectConnectGatewayRoute
- DescribeNatGatewaySourceIpTranslationNatRules
- DescribeNatGateways
- DisassociateNatGatewayAddress
- ModifyNatGatewayDestinationIpPortTranslationNatRule
- ModifyNatGatewaySourceIpTranslationNatRule
- RefreshDirectConnectGatewayRouteToNatGateway
- ResetNatGatewayConnection
- AssociateNatGatewayAddress
- CreateNatGateway
- ModifyNatGatewayAttribute
- Direct Connect Gateway APIs
- CreateDirectConnectGateway
- CreateDirectConnectGatewayCcnRoutes
- DeleteDirectConnectGateway
- DeleteDirectConnectGatewayCcnRoutes
- DescribeDirectConnectGatewayCcnRoutes
- DescribeDirectConnectGateways
- InquirePriceCreateDirectConnectGateway
- ModifyDirectConnectGatewayAttribute
- ReplaceDirectConnectGatewayCcnRoutes
- AssociateDirectConnectGatewayNatGateway
- DisassociateDirectConnectGatewayNatGateway
- Cloud Connect Network APIs
- AcceptAttachCcnInstances
- DescribeCrossBorderCompliance
- DetachCcnInstances
- EnableCcnRoutes
- ModifyCcnAttachedInstancesAttribute
- ModifyCcnAttribute
- RejectAttachCcnInstances
- ResetAttachCcnInstances
- CreateCcn
- DeleteCcn
- DisableCcnRoutes
- SetCcnRegionBandwidthLimits
- AttachCcnInstances
- DescribeCcnRegionBandwidthLimits
- AuditCrossBorderCompliance
- DescribeCcnAttachedInstances
- DescribeCcnRoutes
- DescribeCcns
- GetCcnRegionBandwidthLimits
- ModifyCcnRegionBandwidthLimitsType
- Network ACL APIs
- Network Detection-Related APIs
- Flow Log APIs
- Gateway Traffic Monitor APIs
- Private Link APIs
- CreateVpcEndPoint
- CreateVpcEndPointService
- CreateVpcEndPointServiceWhiteList
- DeleteVpcEndPoint
- DeleteVpcEndPointService
- DeleteVpcEndPointServiceWhiteList
- DescribeVpcEndPointServiceWhiteList
- DisassociateVpcEndPointSecurityGroups
- ModifyVpcEndPointAttribute
- ModifyVpcEndPointServiceWhiteList
- ModifyVpcEndPointServiceAttribute
- DescribeVpcEndPoint
- EnableVpcEndPointConnect
- DescribeVpcEndPointService
- Other APIs
- Subnet APIs
- VPN Gateway APIs
- RenewVpnGateway
- ModifyVpnGatewayRoutes
- CreateVpnGatewayRoutes
- DeleteVpnGatewayRoutes
- DescribeCustomerGateways
- DescribeVpnConnections
- DescribeVpnGatewayCcnRoutes
- DescribeVpnGatewayRoutes
- DownloadCustomerGatewayConfiguration
- ModifyVpnGatewayCcnRoutes
- SetVpnGatewaysRenewFlag
- CreateCustomerGateway
- CreateVpnConnection
- CreateVpnGateway
- DeleteCustomerGateway
- DeleteVpnConnection
- DeleteVpnGateway
- DescribeCustomerGatewayVendors
- DescribeVpnGateways
- GenerateVpnConnectionDefaultHealthCheckIp
- InquiryPriceRenewVpnGateway
- InquiryPriceResetVpnGatewayInternetMaxBandwidth
- ModifyCustomerGatewayAttribute
- ModifyVpnConnectionAttribute
- ModifyVpnGatewayAttribute
- ResetVpnConnection
- ResetVpnGatewayInternetMaxBandwidth
- InquiryPriceCreateVpnGateway
- Security Group APIs
- DescribeSecurityGroupReferences
- CloneSecurityGroup
- DeleteSecurityGroup
- DeleteSecurityGroupPolicies
- DescribeSecurityGroupAssociationStatistics
- DescribeSecurityGroupPolicies
- DescribeSecurityGroups
- ModifySecurityGroupAttribute
- ModifySecurityGroupPolicies
- ReplaceSecurityGroupPolicies
- ReplaceSecurityGroupPolicy
- CreateSecurityGroupPolicies
- CreateSecurityGroupWithPolicies
- CreateSecurityGroup
- Network Parameter Template-Related APIs
- CreateAddressTemplate
- CreateAddressTemplateGroup
- DeleteAddressTemplate
- DeleteAddressTemplateGroup
- DeleteServiceTemplate
- DeleteServiceTemplateGroup
- DescribeAddressTemplateGroups
- DescribeAddressTemplates
- DescribeServiceTemplateGroups
- DescribeServiceTemplates
- ModifyAddressTemplateAttribute
- ModifyAddressTemplateGroupAttribute
- ModifyServiceTemplateGroupAttribute
- CreateServiceTemplate
- CreateServiceTemplateGroup
- ModifyServiceTemplateAttribute
- Snapshot Policy APIs
- Error Codes
- Data Types
- FAQs
- Contact Us
- Glossary
Building HA Primary/Secondary Cluster with HAVIP + Keepalived
마지막 업데이트 시간:2024-10-22 16:45:21
This document describes how to use Keepalived with HAVIP to build a high availability primary/secondary cluster in the Tencent Cloud VPC.
Note:
HAVIP is currently in beta, and switching between primary/secondary servers may take 10 seconds. To try it out, please submit a ticket.
Basic Principle
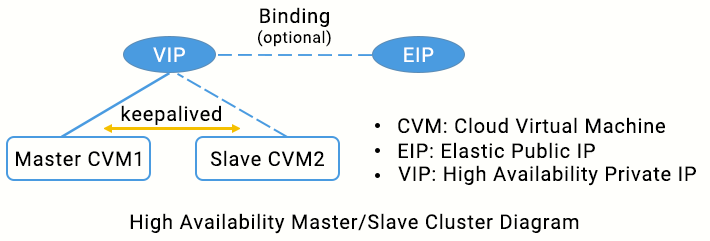
Typically, a high availability primary/secondary cluster consists of two servers: an active primary server and a standby secondary server. The two servers share the same VIP (virtual IP) which is only valid for the primary server. When the primary server fails, the secondary server will take over the VIP to continue providing services. This mode is widely used in MySQL source/replica switch and Ngnix web access.
Keepalived is a VRRP-based high availability software that can be used to build a high availability primary/secondary cluster among VPC-based CVMs. To use Keepalived, first complete its configuration in the
keepalived.conf file.
In traditional physical networks, the primary/secondary status can be negotiated with Keepalived’s VRRP protocol. The primary device periodically sends free-of-charge ARP messages to purge the MAC table or terminal ARP table of the uplink exchange to trigger the VIP migration to the primary device.
In a Tencent Cloud VPC, a high availability primary/secondary cluster can also be implemented by deploying Keepalived on CVMs, with the following differences:
The VIP must be a HAVIP applied for from Tencent Cloud.
HAVIP is subnet-sensitive and can only be bound to a server under the same subnet through announcement.
Note
We recommend VRRP communications in unicast mode.
Note:
In this document, we use unicast mode for VRRP communications. If you want to use multicast mode, please submit a ticket. After the application is approved, enable the VPC multicast feature. For more information, see Enabling or Disabling Multicast. You do not need to configure the "unicast_peer" parameter in the keepalived configuration file.
We recommend that you use Keepalived 1.2.24 or later versions.
Ensure that the
garp parameters have been configured. Because Keepalived relies on ARP messages to update the IP address, these configurations ensure that the primary device always sends ARP messages for the communication.garp_master_delay 1garp_master_refresh 5
Configure a unique VRRP router ID for each primary/secondary cluster in the VPC.
Do not use the strict mode. Ensure the “vrrp_strict” configurations have been deleted.
Control the number of HAVIPs bound to a single ENI to be no more than 5. If you need to use multiple VIPs, add or modify
vrrp_garp_master_repeat 1 in the “global_defs” section of the Keepalived configuration file.Specify the
adver_int parameter properly to balance anti-network jitter and disaster recovery speed. If the advert_int parameter is set too small, frequent switchover and temporary active-active (split brain) may occur in case of network jitter. If the advert_int parameter is set too large, it takes a long time for primary-secondary switching to take place after the primary server fails, which cause long service interruption. Please fully assess the impact of the active-active (split brain) status on your businesses.Set the
interval parameter in the specific execution item of track_script script (such as checkhaproxy) to a larger value, avoiding the FAULT status caused by script execution timeout.Optional: be aware of increased disk usage due to log printing. This can be solved using logrotate or other tools.
Operation Directions
Note:
This document uses the following environments as an example. Please replace with your actual configurations.
Primary CVM: HAVIP-01, 172.16.16.5
Secondary CVM: HAVIP-02, 172.16.16.6
HAVIP: 172.16.16.12
EIP: 81.71.14.118
Image: CentOS 7.6 64-bit
Step 1: apply for a VIP
1. Log in to the VPC console.
2. Select IP and ENI > HAVIP in the left sidebar to enter the HAVIP management page.
3. Select the target region on the HAVIP management page and click Apply.
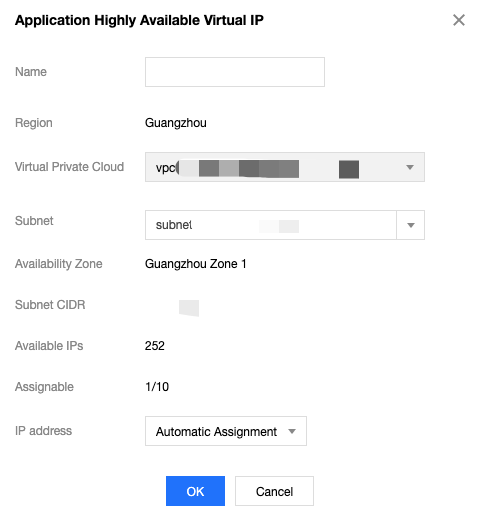
4. In the pop-up dialog box, enter the name, select a VPC and a subnet for the HAVIP, and click OK.
Note:
The IP address of the HAVIP can be automatically assigned or manually specified. If you choose to enter an IP address, make sure that the entered private IP address is within the subnet IP range and is not a reserved IP address of the system. For example, if the subnet IP range is
10.0.0.0/24, the entered private IP address should be within 10.0.0.2 - 10.0.0.254.
Then you can see the HAVIP you applied for.

Step 2: install Keepalived (version 1.2.24 or later) on primary and secondary CVMs
This document uses CentOS 7.6 as an example to install Keepalived.
1. Run the following command to verify whether the Keepalived version meets the requirements.
yum list keepalived
If yes, proceed to step 2
If no, proceed to step 3
2. In
stall th
e software package using the yum command.yum install -y keepalived
3. Install the software package using the source code.
tar zxvf keepalived-1.2.24.tar.gzcd keepalived-1.2.24./configure --prefix=/make; make installchmod +x /etc/init.d/keepalived // Prevent occurrence of env: /etc/init.d/keepalived: Permission denied
Step 3: configure Keepalived, and bind HAVIP to the primary and secondary CVMs.
1. Log in to the primary CVM HAVIP-01 and run
vim /etc/keepalived/keepalived.conf to modify its configurations.Note:
In this example, HAVIP-01 and HAVIP-02 are configured with the same weight. Both are in the BACKUP status, with a priority of 100. This will reduce the number of switchovers caused by network jitter.
! Configuration File for keepalivedglobal_defs {notification_email {acassen@firewall.locfailover@firewall.locsysadmin@firewall.loc}notification_email_from Alexandre.Cassen@firewall.locsmtp_server 192.168.200.1smtp_connect_timeout 30router_id LVS_DEVELvrrp_skip_check_adv_addrvrrp_garp_interval 0vrrp_gna_interval 0}vrrp_script checkhaproxy{script "/etc/keepalived/do_sth.sh" # Check whether the service process runs normally. Replace “do_sth.sh” with your actual script name. Run it as needed.interval 5}vrrp_instance VI_1 {# Select proper parameters for the primary and secondary CVMs.state BACKUP # Set the initial status to `Backup`interface eth0 # The ENI such as `eth0` used to bind a VIPvirtual_router_id 51 # The`virtual_router_id` value for the clusternopreempt # Non-preempt mode# preempt_delay 10 # Effective only when `state` is `MASTER`priority 100 # Configure the same weight for the two devicesadvert_int 5authentication {auth_type PASSauth_pass 1111}unicast_src_ip 172.16.16.5 # Private IP address of the local deviceunicast_peer {172.16.16.6 # IP address of the peer device}virtual_ipaddress {172.16.16.12 # HAVIP}notify_master "/etc/keepalived/notify_action.sh MASTER"notify_backup "/etc/keepalived/notify_action.sh BACKUP"notify_fault "/etc/keepalived/notify_action.sh FAULT"notify_stop "/etc/keepalived/notify_action.sh STOP"garp_master_delay 1 # How long it will take before the ARP cache can be updated after the CVM switches to the primary statusgarp_master_refresh 5 # Time interval between which the primary node sends ARP messagestrack_interface {eth0 # ENI that bound with VIP, such as `eth0`}track_script {checkhaproxy}}
2. Press Esc to exit the edit mode and enter :wq! to save and close the file.
3. Log in to the secondary CVM HAVIP-02 and run
vim /etc/keepalived/keepalived.conf to modify its configurations.! Configuration File for keepalivedglobal_defs {notification_email {acassen@firewall.locfailover@firewall.locsysadmin@firewall.loc}notification_email_from Alexandre.Cassen@firewall.locsmtp_server 192.168.200.1smtp_connect_timeout 30router_id LVS_DEVELvrrp_skip_check_adv_addrvrrp_garp_interval 0vrrp_gna_interval 0}vrrp_script checkhaproxy{script "/etc/keepalived/do_sth.sh"interval 5}vrrp_instance VI_1 {# Select proper parameters for the primary and secondary CVMs.state BACKUP #Set the initial status to `Backup`interface eth0 # The ENI such as `eth0` used to bind a VIPvirtual_router_id 51 # The`virtual_router_id` value for the clusternopreempt #Non-preempt mode# preempt_delay 10 # Effective only when `state` is `MASTER`priority 100 # Configure the same weight for the two devicesadvert_int 5authentication {auth_type PASSauth_pass 1111}unicast_src_ip 172.16.16.6 #Private IP of the local deviceunicast_peer {172.16.16.5 #IP address of the peer device}virtual_ipaddress {172.16.16.12 # HAVIP}notify_master "/etc/keepalived/notify_action.sh MASTER"notify_backup "/etc/keepalived/notify_action.sh BACKUP"notify_fault "/etc/keepalived/notify_action.sh FAULT"notify_stop "/etc/keepalived/notify_action.sh STOP"garp_master_delay 1 # How long it will take before the ARP cache can be updated after the CVM switches to the primary statusgarp_master_refresh 5 #Time interval between which the primary node sends ARP messagestrack_interface {eth0 # ENI that bound with VIP, such as `eth0`}track_script {checkhaproxy}}
4. Press Esc to exit the edit mode and enter :wq! to save and close the file.
5. Restart Keepalived for the configuration to take effect.
systemctl start keepalived
6. Check the primary/secondary status of the two CVMs, and confirm that both have HAVIP correctly bound.
Note:
In this example, HAVIP-01 starts the Keepalived first and will normally serve as the primary node.
Log in to the HAVIP console. You will see that HAVIP is bound to the primary CVM HAVIP-01, as shown below.

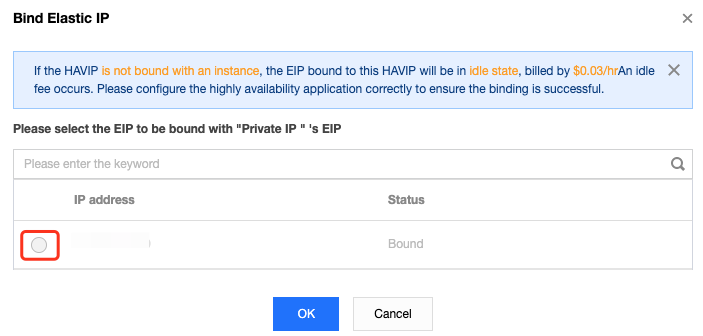
Step 4: bind an EIP to HAVIP (optional)

2. In the pop-up dialog box, select the EIP to be bound and click OK. If no EIP is available, first go to the EIP console to apply.

Step 5: use notify_action.sh for simple logging (optional)
The Keepalived’s main logs are still recorded in “/var/log/message”, and you can add the “notify” script for simple logging.
1. Log in to the CVM and run the
vim /etc/keepalived/notify_action.sh command to add the following “notify_action.sh” script.#!/bin/bash#/etc/keepalived/notify_action.shlog_file=/var/log/keepalived.loglog_write(){echo "[`date '+%Y-%m-%d %T'`] $1" >> $log_file}[ ! -d /var/keepalived/ ] && mkdir -p /var/keepalived/case "$1" in"MASTER" )echo -n "$1" > /var/keepalived/statelog_write " notify_master"echo -n "0" /var/keepalived/vip_check_failed_count;;"BACKUP" )echo -n "$1" > /var/keepalived/statelog_write " notify_backup";;"FAULT" )echo -n "$1" > /var/keepalived/statelog_write " notify_fault";;"STOP" )echo -n "$1" > /var/keepalived/statelog_write " notify_stop";;*)log_write "notify_action.sh: STATE ERROR!!!";;esac
2. Run the
chmod a+x /etc/keepalived/notify_action.sh command to modify the script permission.Step 6: verify whether VIP and public IP are switched normally during primary/secondary switch
Simulate the CVM failure by restarting the Keepalived process or restarting the CVM to check whether the VIP can be migrated.
If the primary/secondary switch succeeds, the secondary CVM will become the server bound with the HAVIP in the console.
You can also ping a VIP from within the VPC to check the time lapse from network interruption to recovery. Each switch may cause an interruption for about 4 seconds. If you ping the EIP bound to HAVIP over a public network, the result will be the same.
Run the
ip addr show command to check whether the HAVIP is bound to the primary ENI.
 예
예
 아니오
아니오
문제 해결에 도움이 되었나요?