
直播截图

最后更新时间:2024-10-21 17:46:05
StreamLive 支持以固定的时间间隔截取直播流的图像,并生成图片。
注意事项
截图功能将产生截图费用,单价为:0.0176美元/千张,详情请参考:StreamLive 计费说明。
如果您需要将截图输出至第三方的对象存储服务,我们将按照实际的转推用量,收取直播转推流量费用,详情请参考:StreamLive 计费说明。
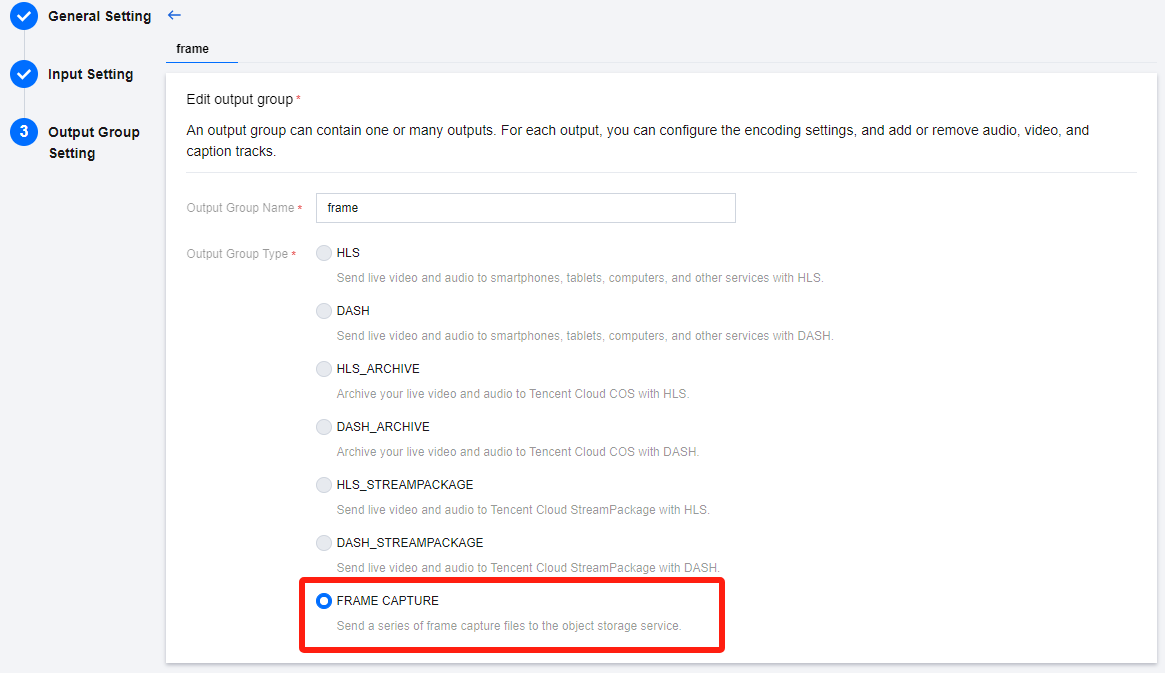
截图类型的 Output Group,仅支持一个 Output。
使用前提
已开通 StreamLive 服务。
配置直播截图
1. 登录 StreamLive 控制台,进入频道配置的 设置输出组。对于输出组,选择输出组类型为:FRAME CAPTURE。
2. 请填写至少一个输出目的地。
如果需要将截图输出至 腾讯云对象存储服务,将目的地类型选为:Tencent Cloud COS。
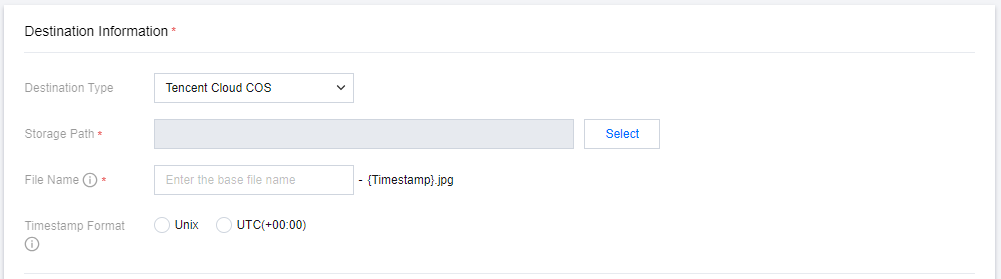
配置项 | 说明 |
存储路径 Storage Path | 选择存储路径时,系统会校验您是否已对 StreamLive 进行授权,授予 StreamLive 对腾讯云 COS 的读、写权限。因为只有授权后,StreamLive 才可以读取存储路径信息,并且往 COS 中进行图片存储。 如果您已授权过 StreamLive 读、写 COS,您可以直接单击 Select 以选择截图存储路径。 如果您未授权过 StreamLive 读、写 COS,单击 Select 后,请先根据系统指引先完成授权,再选择截图存储路径。 |
文件名 File Name | 文件名由两部分组成:用户自定义名称、文件生成时间戳。 用户自定义名称:必填,支持输入1 - 32个字符的数字、字母、下划线、中划线。 文件生成时间戳:支持 Unix、UTC(+0:00) 两种形式,可以在时间戳格式中设置。 |
时间戳格式 Timestamp Format | 支持 Unix、UTC(+0:00) 两种形式。 |
注意:
请确保存储路径+文件名的唯一性,如果对两个截图输出设置了相同的存储路径+文件名,在生成时间也相同时,截图文件可能会存在相互被覆盖的情况。
如果需要将截图输出至 AWS S3,将目的地类型选为:Amazon S3。
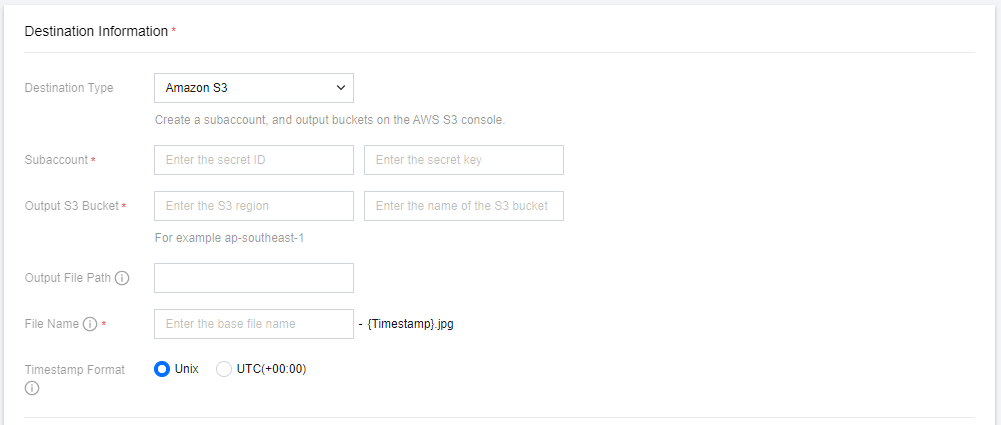
配置项 | 说明 |
子账号信息 Subaccount | 在 AWS Identity and Access Management (IAM) 中,通过 Add users 创建子账号,赋予子账号相应的S3存储桶权限,并且记录下 Access key ID 和 Secret access key,填入此处的 secret ID、secret key。具体可以参考:配置AWS子账号及权限。 |
S3存储桶 Output S3 Bucket | S3 地域:填写 S3 存储桶的所在地域,填写时参考以下格式 "ap-southeast-1"。 S3 存储桶名称 |
文件输出路径 Output File Path | 填写文件夹目录路径,以/开头和结尾,例如:/output/。如未填写,则默认使用此S3存储桶下的根目录。 |
文件名 File Name | 文件名由两部分组成:用户自定义名称、文件生成时间戳。 用户自定义名称:必填,支持输入1 - 32个字符的数字、字母、下划线、中划线。 文件生成时间戳:支持 Unix、UTC(+0:00) 两种形式,可以在时间戳格式中设置。 |
时间戳格式 Timestamp Format | 支持Unix、UTC(+0:00)两种形式。 |
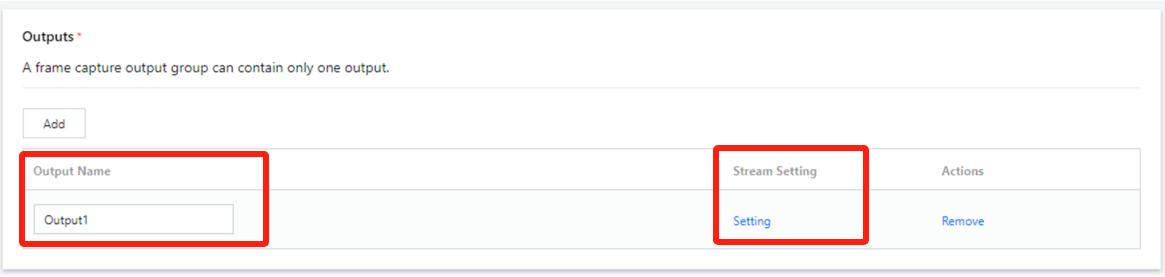
3. 设置输出名称,支持1 - 32位的字母、数字、下划线,并且请确保在 Channel 下 output name 的唯一性。然后,可以单击 Setting,进行截图参数设置。并且,截图类型的 Output Group,仅支持一个 Output。
4. 进入 Setting 页面,进行详细参数配置。
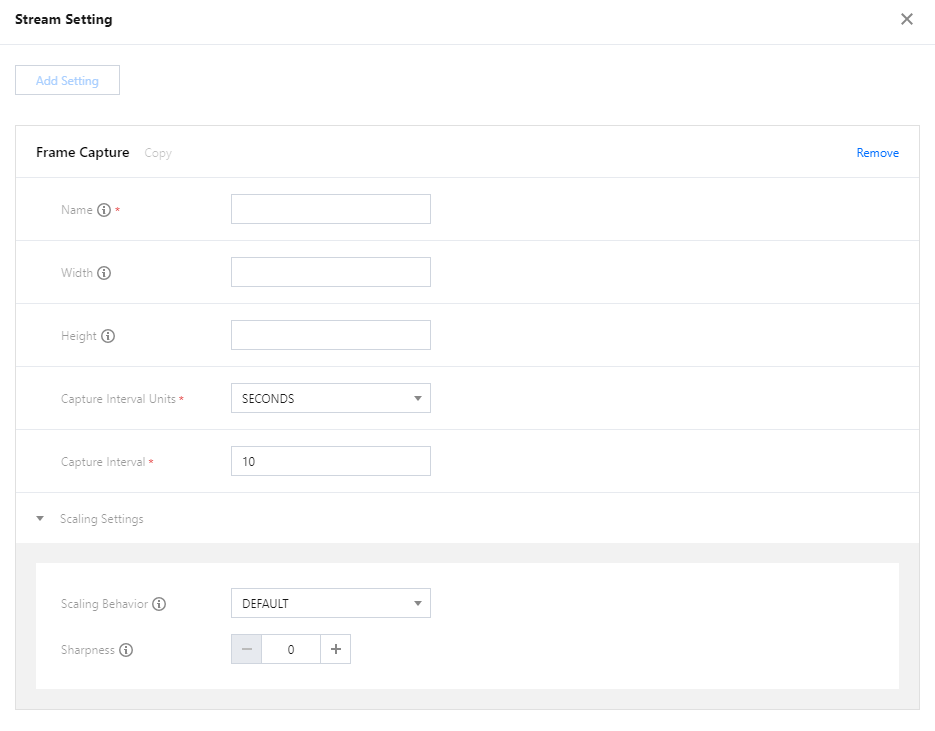
配置项 | 说明 |
模板名称 Name | 详细的配置参数将通过此名称进行保存。可以输入1 - 20个字符的字母、数字。 也可以通过单击上方的 Copy,来复用已有的参数模板。 |
输出画面宽、高 Width、Height | 输出画面的分辨率,按宽、高分别填写。 如果不填或者填数值0,代表分辨率随源流画面。 如果填写数值,需要是0-3000之间的偶数。 |
截图间隔单位 Capture Interval Units | 目前仅支持单位为秒。 |
截图间隔 Capture Interval | 可以填1-3600之间的正整数,代表1-3600秒。 |
画面缩放行为 Scaling Behavior | 当源流画面与设置的输出画面分辨率存在差距时,可以定义画面缩放行为: DEFAULT:在源流画面周围补充黑色画面,以达到输出画面的分辨率。 STRETCH_TO_OUTPUT:对源流画面进行拉伸,以达到输出画面的分辨率。 |
锐化度 Sharpness | 调整用于缩放图像锐化滤镜的强度。0代表最柔和,100代表最锐利的。对于大多数内容,建议设置为50。 |
5. 单击确认 Confirm,以保存当前配置。
配置 AWS 子账号及权限
1. 创建 policy
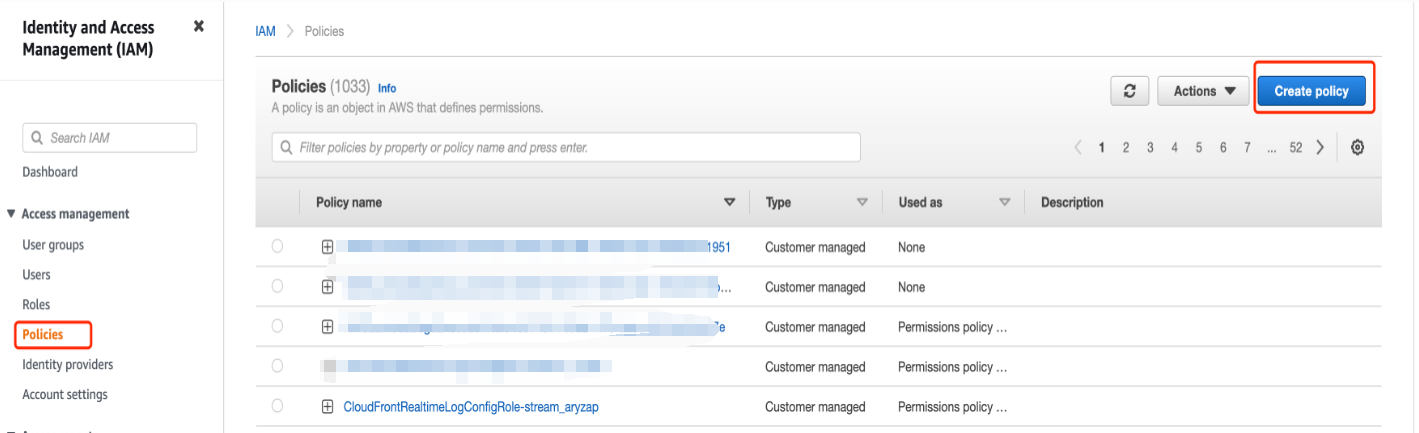
1.1 进入 AWS 控制台的 Identity and Access Management (IAM) 模块,单击 Policies,然后单击 Create policy。
1.2 选择 json 模式,对于 StreamLive 访问S3存储桶,只需要开放 PutObject 权限。并将 S3 bucket 的 ARN 填入 json 的 Resource 中。
注意:
S3 ARN 信息可以在 AWS S3 存储桶的 Properties 中进行查看。
json 中 Resource 的 S3 bucket 的 ARN 需要连接上/*填入,例如 S3 bucket 的 ARN 为 arn:aws:s3:::thebucketname,则填入的应为: arn:aws:s3:::thebucketname/*。
如果仅对指定存储桶开放 PutObject 权限,可以参考:
{
    "Version": "2012-10-17",
    "Statement": [
        {
            "Sid": "Statement1",
            "Effect": "Allow",
            "Action": [
                "s3:PutObject"
            ],
            "Resource": [
                "arn:aws:s3:::thebucketname/*"
            ]
        }
    ]
}
如果对您所有存储桶开放 PutObject 权限,可以参考:
{
    "Version": "2012-10-17",
    "Statement": [
        {
            "Sid": "Statement1",
            "Effect": "Allow",
            "Action": [
                "s3:PutObject"
            ],
            "Resource": [
                "*"
            ]
        }
    ]
}
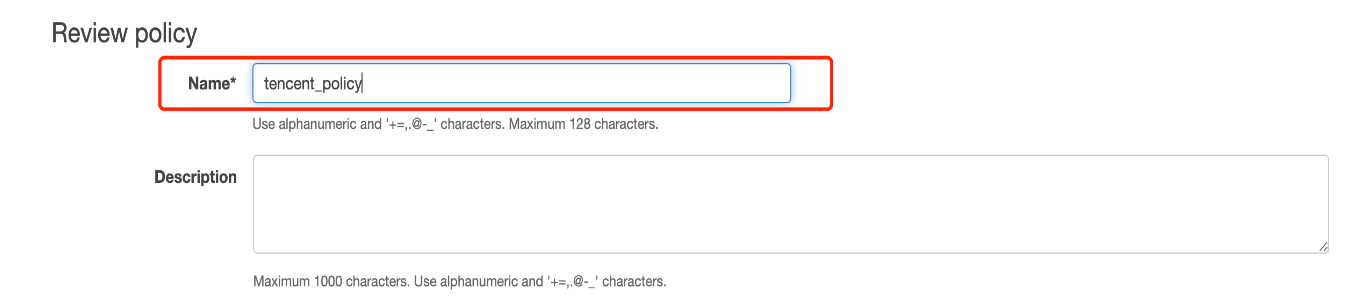
1.3 输入 Policy name 后单击 Create policy 完成创建。
2. 创建子账号并关联S3权限
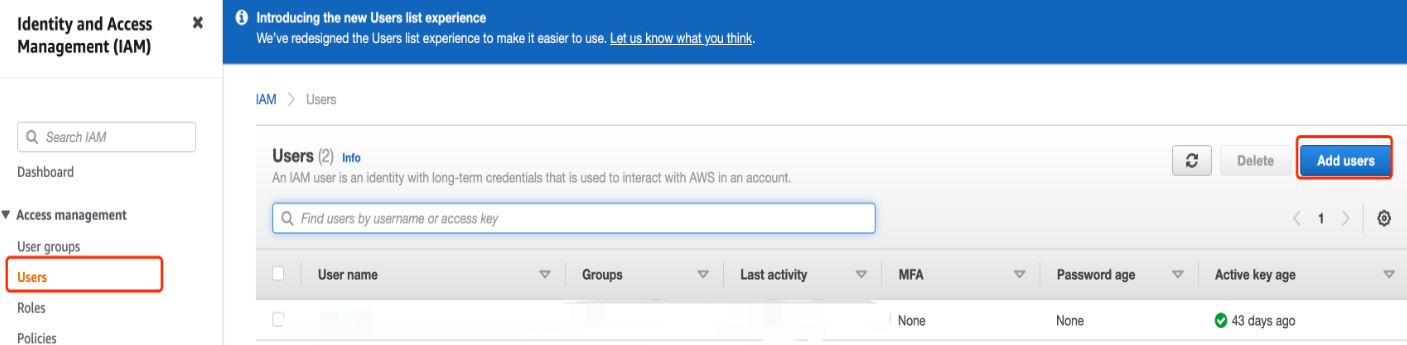
2.1. 进入 AWS 控制台的 Identity and Access Management (IAM) 模块,单击 Users,然后单击 Add users 添加用户。
2.2. 输入User name,单击 Next。
2.3. 单击 Attach existing policies directly 选项,在搜索栏中填入刚才创建的 Policy name 进行搜索,并勾选上。然后继续完成子账号创建。
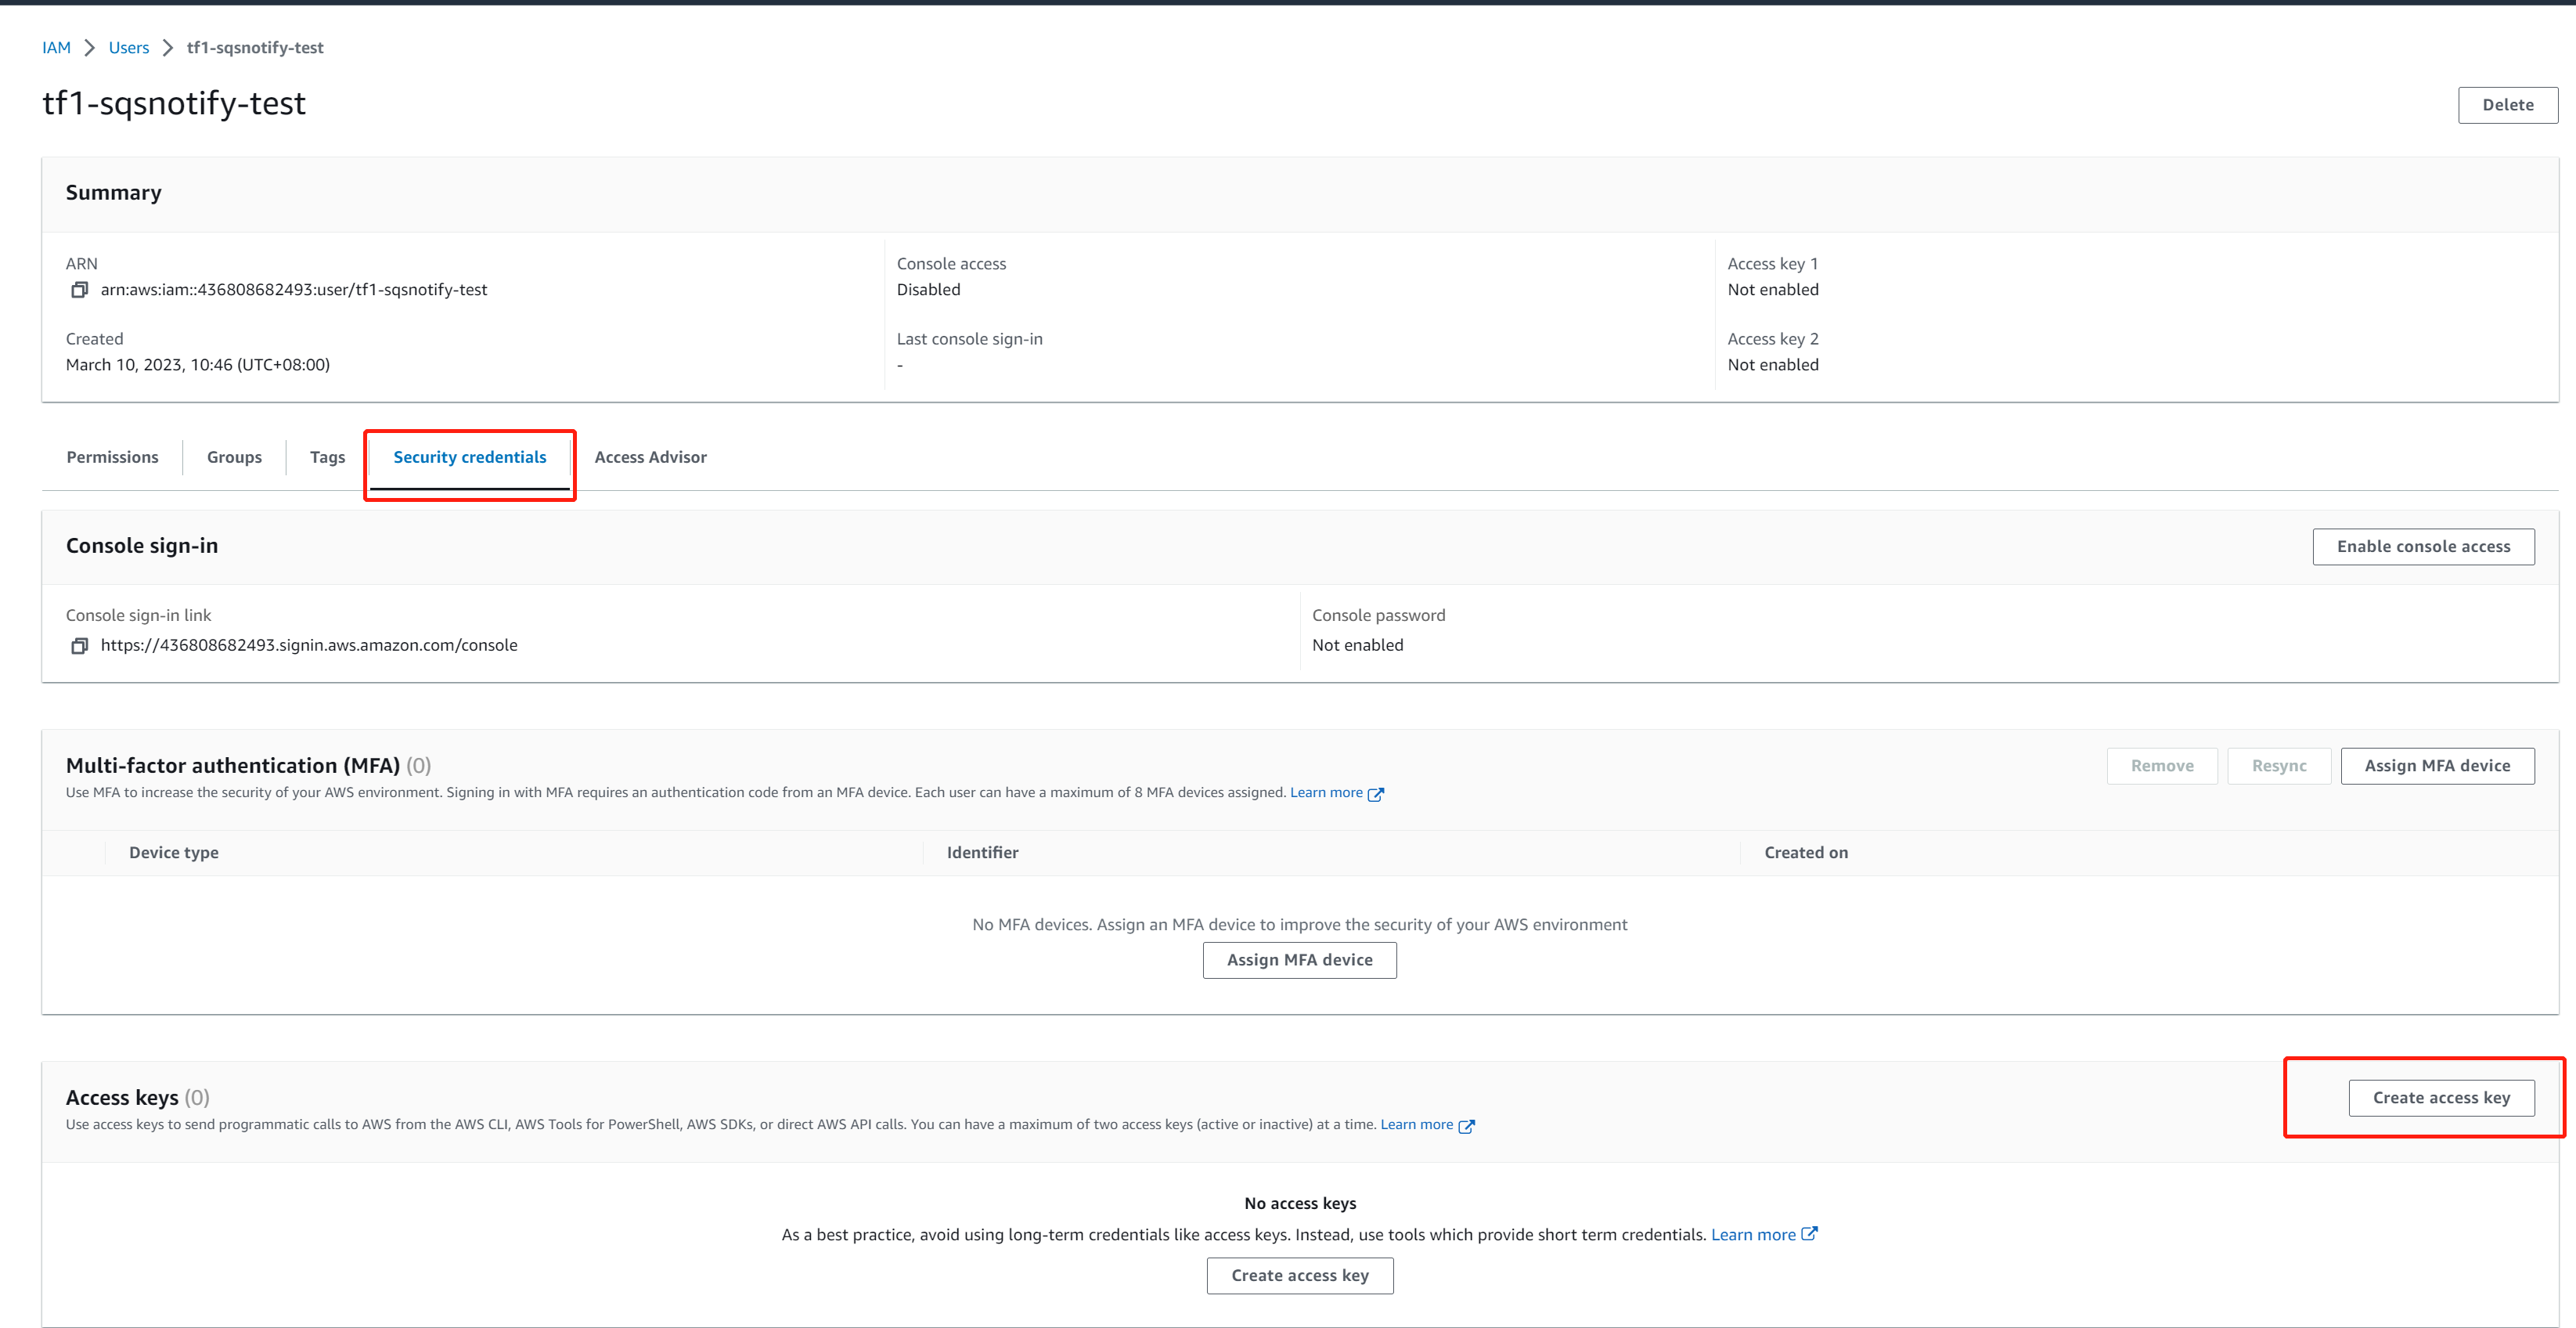
3. 获取子账号的 Access key ID 和 Secret access key
3.1. 进入子账号详情页面,单击 Security credentials > Access keys > Create access key。
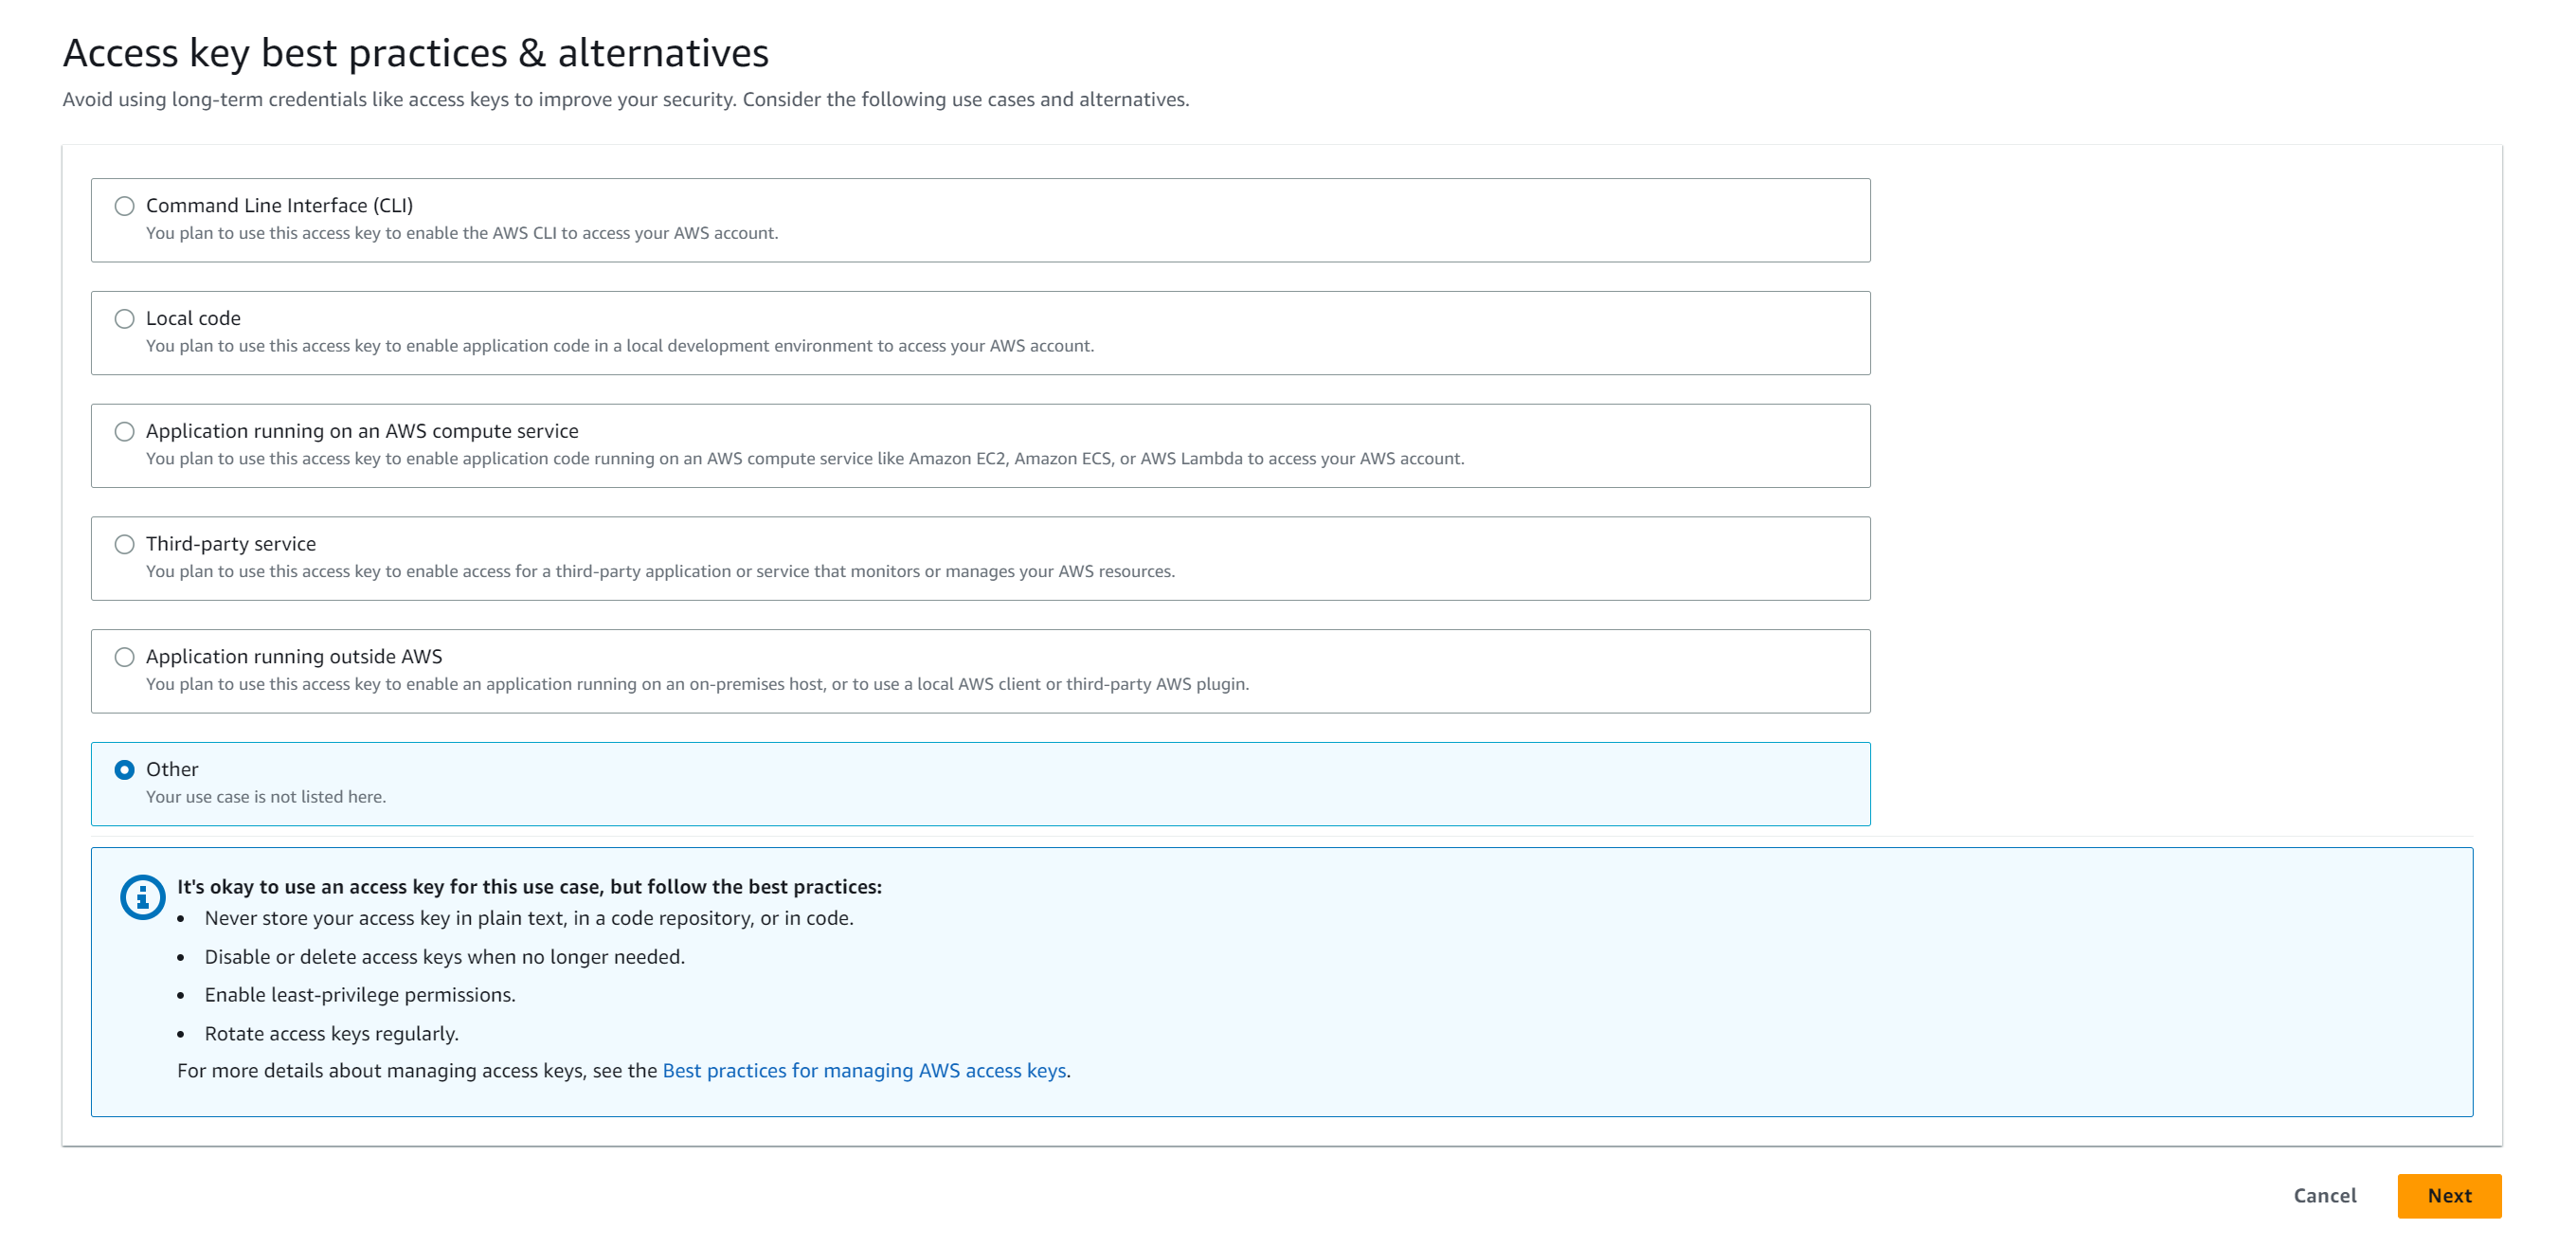
3.2. 选择 Other,单击 Next 创建。请保存好您的 Access key ID 和 Secret access key。
文档反馈