Tencent Cloud CLB comes with various protocols such as TCP, UDP, TCP SSL, HTTP, and HTTPS, providing businesses with domain names and URL-based forwarding services. This document guides you to quickly create a CLB instance and forward client requests to two CVM instances.
Prerequisites
2. You have deployed real servers on the two CVM instances. This document takes HTTP forwarding as an example. Nginx servers have been deployed on CVM instances rs-1 and rs-2, and the two instances return two HTML static pages saying "Hello nginx! This is rs-1!" and "Hello nginx! This is rs-2!". For more information, see Deploying Nginx on CentOS. Note:
This document describes the steps for bill-by-IP accounts. For bill-by-CVM accounts, first purchase public network bandwidth for CVM instances. This is because the current bandwidth attributes are on CVM instances instead of CLB instances. If you are unsure of your account type, see Checking Account Type. In this example, different services deployed on real servers will return different values. In practice, the services deployed on real servers are identical to provide a consistent experience for all users.
Step 1: Purchasing a CLB Instance
After a successful purchase, the system will automatically assign a VIP to the CLB instance. The VIP will be used as the IP address to provide services to clients.
2. On the CLB purchase page, select the region in which your CVM instances are located, and select CLB as the instance type and Public network as the network type. For more information, see Product Attribute Selection. Note:
Currently, the static single-line IP is supported only in Guangzhou, Shanghai, Nanjing, Jinan, Hangzhou, Fuzhou, Beijing, Shijiazhuang, Wuhan, Changsha, Chengdu, and Chongqing. For the support information in other regions, see the console. This feature is currently in beta. To try it out, contact the sales rep for application. Once your application is approved, you can select an ISP (China Mobile, China Unicom, or China Telecom) on the purchase page.
3. Click Buy now and complete the payment.
4. Return to the Instance management page, select the region to see the new instance. Step 2: Configuring a CLB Listener
A CLB listener is used for forwarding through a specified protocol and port. This document demonstrates how to configure a CLB instance to forward client HTTP requests.
Configuring the HTTP listening protocol and port
When a client initiates a request, the CLB instance will receive the request according to the listening frontend protocol and port, and forward the request to the real server.
2. On the Instance management page, click Configure listener in the Operation column of the target CLB instance.
3. On the Listener management tab, click Create in the HTTP/HTTPS listener section. 4. In the pop-up window, configure the following items and click Submit.
Listener name: The name can contain up to 60 characters, including letters, digits, hyphens (-), underscores (_), and dots(.).
Listener protocol and port: For example, HTTP:80.
Configuring the listener's forwarding rule
If a client initiates a request, the CLB instance will forward the request according to the configured forwarding rule of the listener.
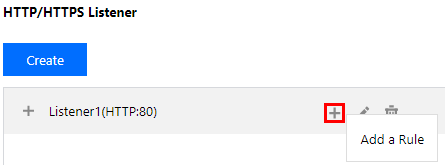
1. On the Listener management tab, click + on the right of the new listener.
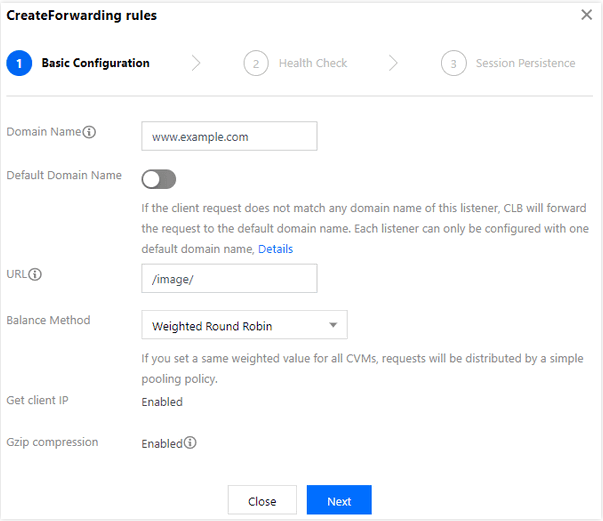
2. In the pop-up window, configure the domain name, URL, and balancing method on the Basic configuration tab and then click Next.
Domain name: The domain name of your real server, for example, www.example.com.
Default Domain: If a client request does not match any listener domain names, the CLB instance will forward the request to the default domain name (default server). Each listener can be configured with only one default domain name. If a listener has no default domain name, the CLB instance will forward the request to the first domain name. In this example, the default domain name is not configured.
URL: The access path to your real server, for example, /image/.
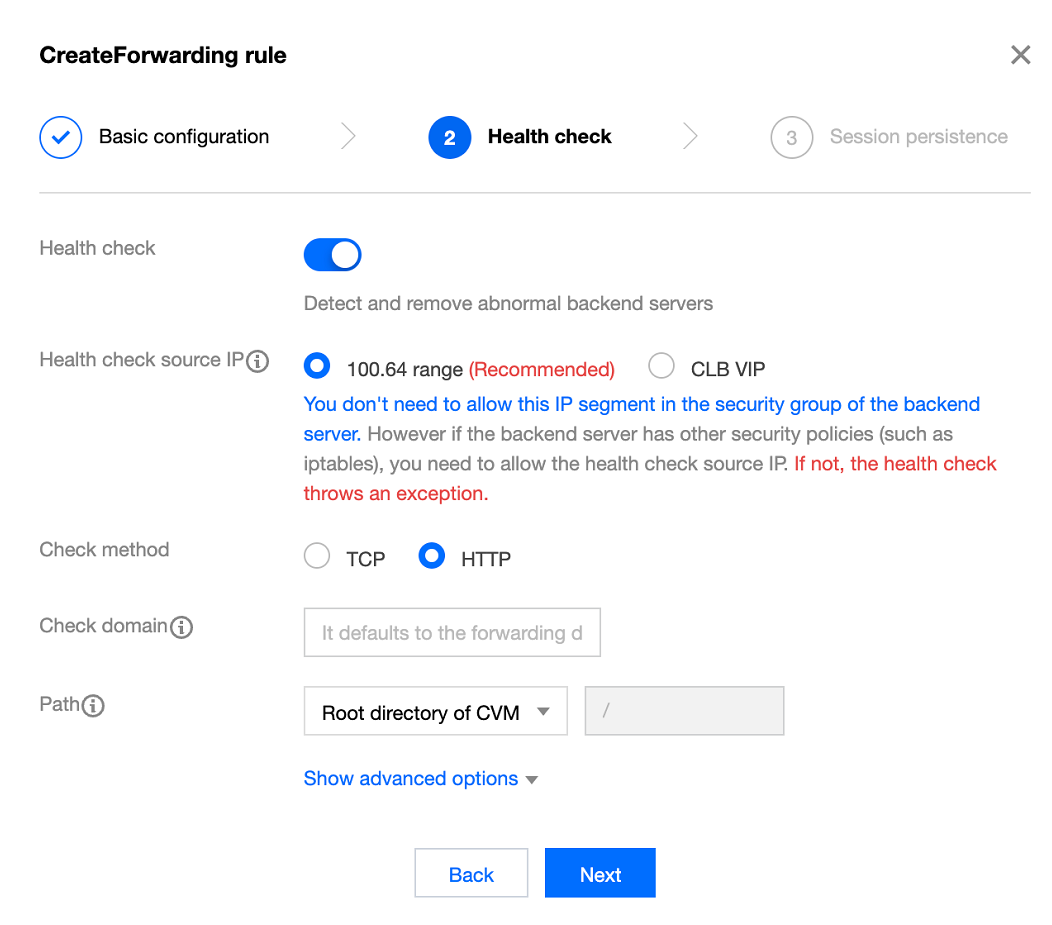
3. Enable health check, retain the default values for Check domain and Path, and click Next. 4. Disable session persistence and click Submit.
Note:
Forwarding rules: Each listener can be configured with multiple domain names, and each domain name can be configured with multiple URLs. You can select a listener or domain name, and then click the + icon to create new rules.
Session persistence: If session persistence is disabled and the round-robin balancing method is selected, requests from the same client will be assigned to different real servers in sequence; if session persistence is enabled, or session persistence is disabled but the ip_hash balancing method is selected, requests from the same client will always be assigned to the same real server.
Binding real servers to the listener
If a client initiates a request, the CLB instance will forward the request to the CVM instance that is bound to its listener for processing.
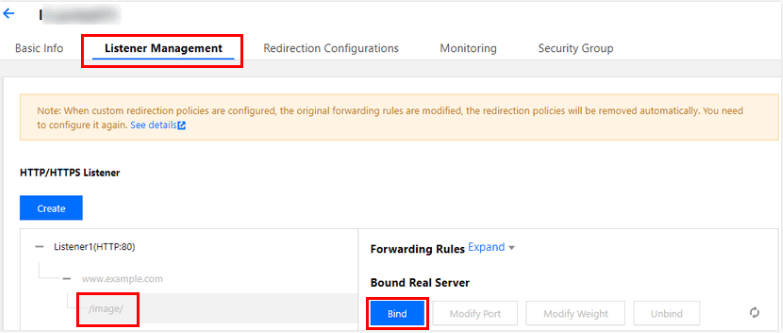
1. On the Listener management tab, click + to expand the new listener. Click the URL, and click Bind in the Forwarding rules section on the right.
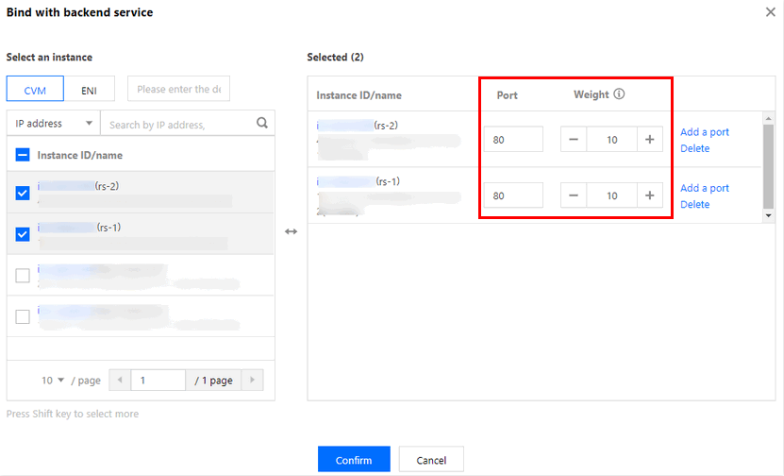
2. In the pop-up window, select CVM as the instance type, select the two CVM instances rs-1 and rs-2 (which are in the same region as the CLB instance), set their ports to 80 and weights to 10 (the default value), and click Confirm.
3. Now you can view the bound CVM instances and their health check status in the Forwarding Rules section. If the port health status is Healthy, the CVM instances can normally process requests forwarded by the CLB instance.
Note:
One forwarding rule (listening protocol, port, domain name, and URL) can be bound with multiple ports of the same CVM instance. If a user deploys the same service on the ports 80 and 81 of rs-1, both ports can be bound with the sample forwarding rule and both will receive requests forwarded by the CLB instance.
Step 3: Configuring a Security Group
After creating a CLB instance, you can configure a security group to isolate public network traffic. For more information, see Configuring CLB Security Group. After configuring a security group, you can enable or disable the Bypass Backend Security Group feature:
Method 1: Enabling Bypass Backend Security Group
Method 2: Allowing specific client IP addresses in the CVM security group
Step 4: Verifying the CLB Service
After configuring a CLB instance, you can verify whether it is effective by accessing different real servers via different domain names and URLs under the same CLB instance, or verifying the Content-based Routing feature.
Method 1: Configuring hosts and mapping the domain name to the CLB instance
1. In a Windows device, modify the hosts file in the directory C:\Windows\System32\drivers\etc, and map the domain name to the CLB instance's VIP.
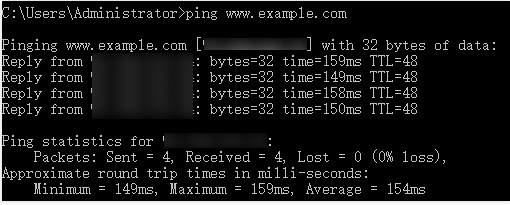
2. To verify whether the hosts is successfully configured, you can run a ping command in the cmd.exe to test whether the domain name is successfully bound with the VIP. If there are data packs returned, they are successfully bound.
3. Test the CLB service by accessing http://www.example.com/image/ via a browser. If your page returns the image below, then the request has been forwarded to the CVM instance rs-1 by the CLB instance, and the CVM has normally processed the request and returned the service page.
4. The balancing method of the listener is Weighted round robin, and the weights of the two CVM instances are 10. You can refresh the browser to initiate the request again. If a result is returned as shown in the image below, the request is forwarded to the CVM instance rs-2 by the CLB instance.
Note:
The / in the image/ cannot be omitted. / indicates that image is a default directory instead of a file name.
Method 2: Mapping the domain name to the CLB instance through DNSPod
2. Log in to the DNSPod console. In the domain name list, click DNS in the Operation column of the target domain name. 3. Open the Record Management tab, click Add Records to add an A record for the domain name with the following parameters:
Host: The prefix of the domain name. *.example.com is used in this example, indicating resolving all prefixes.
Record Type: Select A.
Split Zone: Select Default.
Value: Click Associate Tencent Cloud Resources and then tick the CLB instance created above.
TTL: Leave it as the default value 600s.
4. Click Save.
5. About 10 minutes later, open the bound CNAME domain name (www.example.com) in a browser. If the corresponding page can be normally displayed, it indicates that the CLB instance is in effect.
Configuring Redirection (optional)
Automatic redirection (forced HTTPS): When a PC or mobile browser accesses a web service with an HTTP request, an HTTPS response is returned to the browser after the request passes through the CLB proxy, forcing the browser to access the webpage by using HTTPS.
Manual redirection: If you want to temporarily deactivate your web business in cases such as product sellout, page maintenance, or update and upgrade, you need to redirect the original page to a new page. Otherwise, the old address in a visitor's favorites and search engine database will return a 404 or 503 error message page, degrading the user experience, resulting in traffic waste, and even invalidating the accumulated scores on search engines.
Related Operations


