- Release Notes and Announcements
- User Tutorial
- Product Introduction
- Purchase Guide
- Getting Started
- Operation Guide
- Operation Overview
- Access Management
- SDK Connection
- Daily Instance Operation
- Viewing Instance Information
- Viewing Memcached Edition Instances
- Assigning Instance to Project
- Editing Instance Tag
- Setting Maintenance Time
- Changing Instance Specification
- Adjusting the Number of Connections
- Enabling/Disabling Read/Write Separation
- Clearing Instances
- Returning and Isolating Instance
- Restoring Isolated Instance
- Eliminating Instance
- Upgrading Redis Edition Instances
- Managing Redis Edition Nodes
- Multi-AZ Deployment Management
- Backup and Restoration
- Data Migration for Redis Edition Instances
- Migration Scheme Overview
- Migration with DTS
- Migrating with Redis-Port
- Version Upgrade with DTS
- Check on Migration from Standard Architecture to Cluster Architecture
- Migration Guide for Legacy Cluster Edition
- Pika-to-Redis Data Migration Scheme
- SSDB-to-Redis Data Migration Scheme
- Common Error Messages
- FAQs
- Migration with redis-port
- Account and Password (Redis Edition)
- Parameter Configuration
- Slow Query
- Network and Security
- Monitoring and Alarms
- Redis Edition Event Management
- Global Replication for Redis Edition
- Performance Optimization
- Sentinel Mode
- Development Guidelines
- Command Reference
- Troubleshooting
- Practical Tutorial
- API Documentation
- History
- Introduction
- API Category
- Making API Requests
- Instance APIs
- AddReplicationInstance
- AllocateWanAddress
- ChangeInstanceRole
- ChangeMasterInstance
- CleanUpInstance
- ClearInstance
- CloseSSL
- CreateInstanceAccount
- CreateReplicationGroup
- DeleteInstanceAccount
- DeleteReplicationInstance
- DescribeAutoBackupConfig
- DescribeBandwidthRange
- DescribeInstanceAccount
- DescribeInstanceDTSInfo
- DescribeInstanceZoneInfo
- DescribeInstances
- DescribeProxySlowLog
- DescribeSlowLog
- DescribeTendisSlowLog
- DestroyPostpaidInstance
- DestroyPrepaidInstance
- DisableReplicaReadonly
- EnableReplicaReadonly
- InquiryPriceCreateInstance
- InquiryPriceUpgradeInstance
- KillMasterGroup
- ModifyAutoBackupConfig
- ModifyInstance
- ModifyInstanceAccount
- ModifyInstanceReadOnly
- ModifyMaintenanceWindow
- ModifyNetworkConfig
- OpenSSL
- ReleaseWanAddress
- RenewInstance
- ResetPassword
- StartupInstance
- SwitchProxy
- UpgradeInstanceVersion
- UpgradeProxyVersion
- UpgradeSmallVersion
- UpgradeVersionToMultiAvailabilityZones
- DescribeCommonDBInstances
- ChangeReplicaToMaster
- CloneInstances
- CreateInstances
- DescribeInstanceDealDetail
- DescribeInstanceNodeInfo
- DescribeInstanceShards
- DescribeMaintenanceWindow
- DescribeParamTemplateInfo
- DescribeReplicationGroup
- DescribeSSLStatus
- DescribeTaskInfo
- DescribeTaskList
- ModifyInstancePassword
- RemoveReplicationInstance
- UpgradeInstance
- DescribeInstanceEvents
- DescribeReplicationGroupInstance
- ModifyInstanceAvailabilityZones
- ModifyInstanceEvent
- ModifyReplicationGroup
- SwitchAccessNewInstance
- DescribeInstanceSupportFeature
- Parameter Management APIs
- Other APIs
- Backup and Restoration APIs
- Region APIs
- Monitoring and Management APIs
- Log APIs
- Data Types
- Error Codes
- FAQs
- Service Agreement
- Glossary
- Contact Us
Overview
TencentDB for Redis® provides read-write permission control and routing policy control through the account mechanism, which helps meet the needs of business permission management in complex scenarios. Currently, only the TencentDB for Redis® Memory Edition (excluding Redis 2.8) supports account settings.
Account types
Default account: An account with only a password. When creating an instance, set the password for accessing the database as instructed in Creating TencentDB for Redis® Instance.
Custom account: An account with an account name. The authentication method of a custom account is
account name@password, which is used as the password parameter for accessing Redis, such as redis-cli -h 1.1.1.1 -p 6379 -a readonlyuser@password.Account match priority
When there is a default account with the @ separator, it will be matched first before a custom account. Custom accounts will be matched with the first @ symbol as the separator.
TencentDB for Redis® uses a passwordless authentication method different from that of Redis Community Edition. Specifically, after password exemption access is enabled for an instance, if the password in the access parameter is not empty, authentication will fail in the former but will succeed in the latter.
Permission settings
Read-only permission: The account has the permission to read but not modify data.
Read-write permission: The account has the permission to read and write data.
Read-only routing policy
By configuring a read-only routing policy, you can distribute read requests from the specified account to the specified (master or replica) node.
If read-only replica is not enabled for an instance, the instance will not support routing to replica nodes. This feature can be enabled on the Node Management page.
If an instance has an account accessing a replica node, the read-only replica feature cannot be disabled. To disable it, you need to delete the account first.
Prerequisites
You have created a TencentDB for Redis® instance, and the instance is running.
You have planned the accounts to be defined and their passwords, read-write permissions, and read-only routing policies.
Creating a custom account
1. Log in to the TencentDB for Redis® console.
2. Above the Instance List on the right, select the region.
3. In the instance list, find the target instance.
4. Click the target instance ID to enter the Instance Details page.
5. Select the Account Management tab and click Create Account.

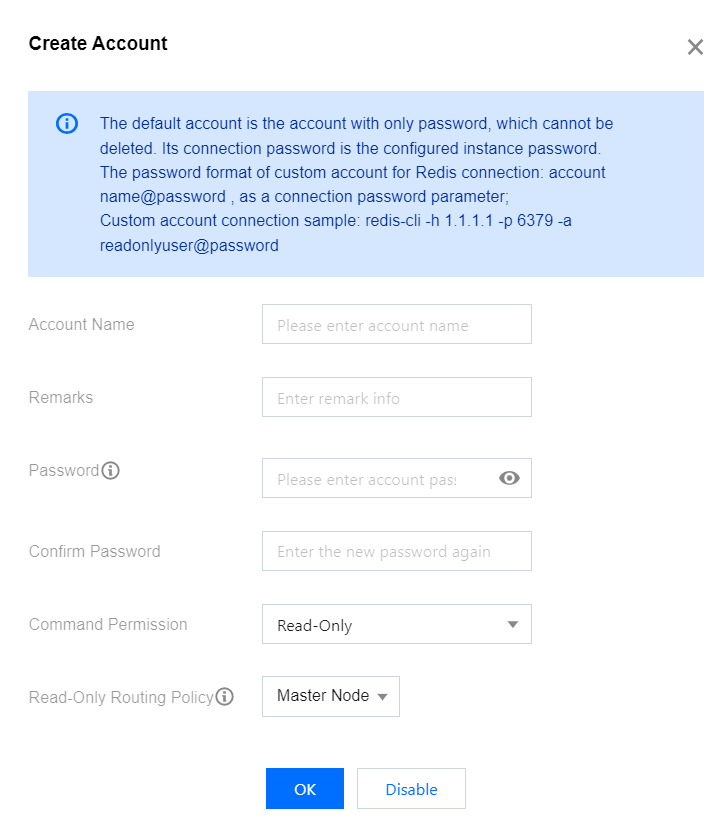
6. In the Create Account pop-up window, set the custom account name and password.

Parameter | Description |
Account Name | Set the custom account name. Contain only letters, digits, or symbols (-_). Contain up to 32 characters. |
Password | Set the custom account password. Contain [8,30] characters. Contain at least two of the following four types: lowercase letters, uppercase letters, digits, and symbols (()`~!@#$%^&*-+=_|{}[]:;<>,.?/). Cannot start with a slash (/). |
Confirm Password | Enter the password again. |
Command Permission | Select the account permission in the drop-down list, which can be read-only or read-write. |
Read-only Routing Policy | Specify to distribute the read requests of the account to the master or replica node. If the read-only replica feature is not enabled, you cannot select replica node here. For detailed directions, see Enabling/Disabling Read/Write Separation. |
7. Click OK. Then, you can use the created custom account to access the database as instructed in Connecting to TencentDB for Redis® Instance.
Deleting a custom account
1. Log in to the TencentDB for Redis® console.
2. Above the Instance List on the right, select the region.
3. In the instance list, find the target instance.
4. Click the target instance ID to enter the Instance Details page.
5. In the account list on the Account Management tab, find the target custom account.
6. Click Delete in the Operation column.
7. In the Delete Account pop-up window, confirm the information of the account to be deleted and click Confirm Deletion.
Note:
The default account (i.e., the account with a password only) cannot be deleted.
After the account is deleted, existing connections using the account will not be closed. New connections using the account cannot be verified.
Modifying the account permission
1. Log in to the TencentDB for Redis® console.
2. Above the Instance List on the right, select the region.
3. In the instance list, find the target instance.
4. Click the target instance ID to enter the Instance Details page.
5. In the account list on the Account Management tab, find the target custom account.
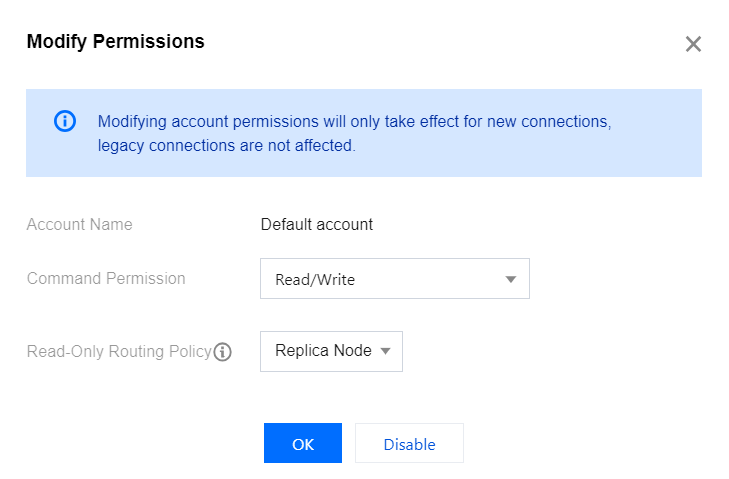
6. Click Modify Permissions in the Operation column.
7. In the Modify Permission pop-up window, select the read-write permission of the account in the drop-down list after Command Permission, and select the target node for read-only routing in the drop-down list after Read-only Routing Policy.

Note:
The command permission of the default account can only be read-write but not read-only.
If the read-only replica feature is not enabled, you cannot select replica node for the read-only routing policy. For detailed directions, see Enabling/Disabling Read/Write Separation.
8. Click OK.

 はい
はい
 いいえ
いいえ
この記事はお役に立ちましたか?