- 新手指引
- 产品动态
- 产品简介
- 购买指南
- ES 内核增强
- 快速入门
- ES Serverless 服务指南
- 数据应用指南
- ES 集群指南
- 实践教程
- API 文档
- History
- Introduction
- API Category
- Instance APIs
- CreateIndex
- DeleteIndex
- DescribeInstanceLogs
- UpdateInstance
- RestartInstance
- DescribeInstances
- DeleteInstance
- CreateInstance
- DescribeInstanceOperations
- UpgradeLicense
- UpgradeInstance
- UpdatePlugins
- RestartNodes
- RestartKibana
- UpdateRequestTargetNodeTypes
- GetRequestTargetNodeTypes
- DescribeViews
- UpdateDictionaries
- UpdateIndex
- DescribeIndexMeta
- DescribeIndexList
- Making API Requests
- Data Types
- Error Codes
- 常见问题
- 词汇表
腾讯云 Elasticsearch Service 提供的实例包含 ES 集群和 Kibana 控制台,其中 ES 集群通过在用户 VPC 内的私有网络 VIP 地址 + 端口进行访问,Kibana 控制台提供外网地址供用户在浏览器端访问,至于数据源,当前只支持用户自行接入 ES 集群。下面以最典型的日志分析架构 Filebeat + Elasticsearch + Kibana 和 Logstash + Elasticsearch + Kibana 为例,介绍如何将用户的日志导入到 ES,并可以在浏览器访问 Kibana 控制台进行查询与分析。
Filebeat + Elasticsearch + Kibana
部署 Filebeat
下载 Filebeat 组件包并解压
Filebeat 版本应该与 ES 版本保持一致。
wget https://artifacts.elastic.co/downloads/beats/filebeat/filebeat-6.4.3-linux-x86_64.tar.gz
tar xvf filebeat-6.4.3-linux-x86_64.tar.gz
配置 Filebeat
本示例以 nginx 日志为输入源,输出项配置为 ES 集群的内网 VIP 地址和端口,如果使用的是白金版的集群,output 中需要增加用户名密码验证。
进入 filebeat-6.4.3-linux-x86_64 目录,修改 filebeat.yml 配置文件,文件内容如下:
filebeat.inputs:
- type: log
        enabled: true
        paths:
          - /var/log/nginx/access.log
output.elasticsearch:
        hosts: ["10.0.130.91:9200"]
        protocol: "http"
        username: "elastic"
        password: "test"
- 执行 Filebeat
在 filebeat-6.4.3-linux-x86_64 目录中,执行:nohup ./filebeat -c filebeat.yml 2>&1 >/dev/null &
查询日志
- 在 ES 控制台集群列表页中,选择【操作】>【Kibana】,进入 Kibana 控制台。

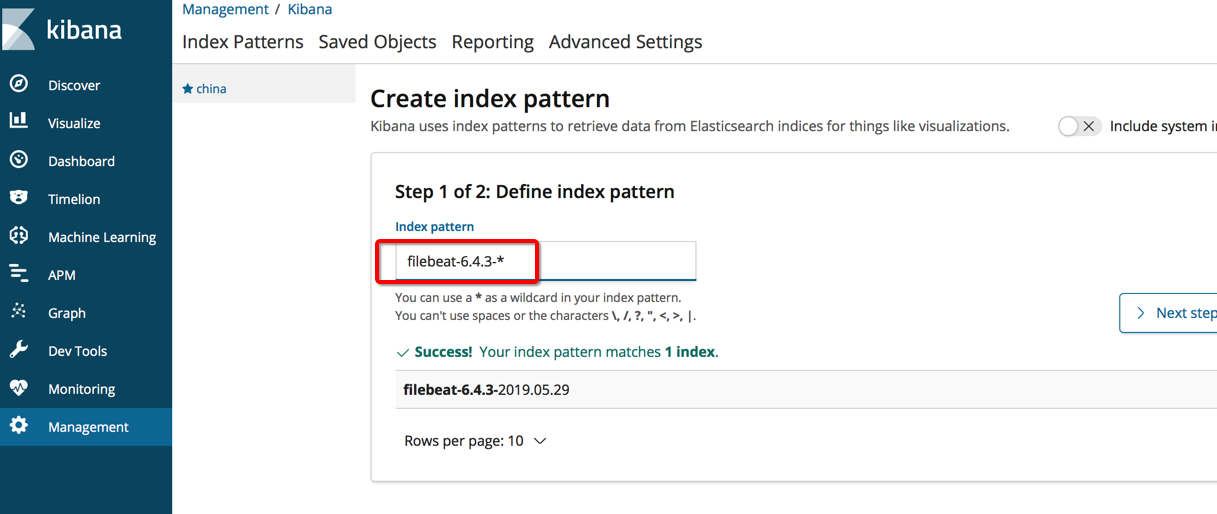
- 进入【Management】>【Index Patterns】,添加名为
filebeat-6.4.3-*的索引 pattern。

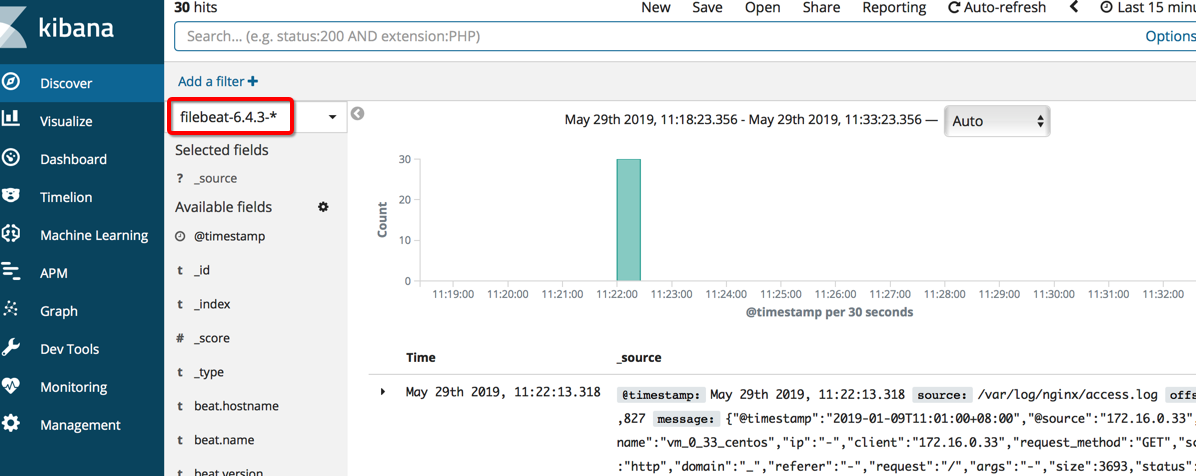
- 单击【Discover】,选择
filebeat-6.4.3-*索引项,即可检索到 nginx 的访问日志。

Logstash + Elasticsearch + Kibana
环境准备
- 用户需要创建和 ES 集群在同一 VPC 的 CVM,根据需要可以创建多台 CVM 实例,在 CVM 实例中部署 logstash 组件;
- CVM 需要有2G以上内存;
- 在创建好的 CVM 中安装 Java8 或以上版本。
部署 Logstash
下载 Logstash 组件包并解压
logstash 版本应该与 ES 版本保持一致。
wget https://artifacts.elastic.co/downloads/logstash/logstash-6.4.3.tar.gz
tar xvf logstash-6.4.3.tar.gz
配置 Logstash
本示例以 nginx 日志为输入源,输出项配置为 ES 集群的内网 VIP 地址和端口,创建 test.conf 配置文件,文件内容如下:input { file { path => "/var/log/nginx/access.log" # nginx 访问日志的路径 start_position => "beginning" # 从文件起始位置读取日志,如果不设置则在文件有写入时才读取,类似于 tail -f } } filter { } output { elasticsearch { hosts => ["http://172.16.0.145:9200"] # ES 集群的内网 VIP 地址和端口 index => "nginx_access-%{+YYYY.MM.dd}" # 索引名称, 按天自动创建索引 user => "elastic" # 用户名 password => "yinan_test" # 密码 } }
ES 集群默认开启了允许自动创建索引配置,上述 test.conf 配置文件中的nginx_access-%{+YYYY.MM.dd}索引会自动创建,除非需要提前设置好索引中字段的 mapping,否则无需额外调用 ES 的 API 创建索引。
- 启动 logstash
进入 logstash 压缩包解压目录 logstash-6.4.3 下,执行以下命令,后台运行 logstash,注意配置文件路径填写为自己创建的路径。nohup ./bin/logstash -f test.conf 2>&1 >/dev/null &
查看 logstash-6.4.3 目录下的 logs 目录,确认 Logstash 已经正常启动,正常启动的情况下会记录如下日志:
Sending Logstash logs to /root/logstash-6.4.3/logs which is now configured via log4j2.properties
[2019-05-29T12:20:26,630][INFO ][logstash.setting.writabledirectory] Creating directory {:setting=>"path.queue", :path=>"/root/logstash-6.4.3/data/queue"}
[2019-05-29T12:20:26,639][INFO ][logstash.setting.writabledirectory] Creating directory {:setting=>"path.dead_letter_queue", :path=>"/root/logstash-6.4.3/data/dead_letter_queue"}
[2019-05-29T12:20:27,125][WARN ][logstash.config.source.multilocal] Ignoring the 'pipelines.yml' file because modules or command line options are specified
[2019-05-29T12:20:27,167][INFO ][logstash.agent           ] No persistent UUID file found. Generating new UUID {:uuid=>"2e19b294-2b69-4da1-b87f-f4cb4a171b9c", :path=>"/root/logstash-6.4.3/data/uuid"}
[2019-05-29T12:20:27,843][INFO ][logstash.runner          ] Starting Logstash {"logstash.version"=>"6.4.3"}
[2019-05-29T12:20:30,067][INFO ][logstash.pipeline        ] Starting pipeline {:pipeline_id=>"main", "pipeline.workers"=>1, "pipeline.batch.size"=>125, "pipeline.batch.delay"=>50}
[2019-05-29T12:20:30,871][INFO ][logstash.outputs.elasticsearch] Elasticsearch pool URLs updated {:changes=>{:removed=>[], :added=>[http://elastic:xxxxxx@10.0.130.91:10880/]}}
[2019-05-29T12:20:30,901][INFO ][logstash.outputs.elasticsearch] Running health check to see if an Elasticsearch connection is working {:healthcheck_url=>http://elastic:xxxxxx@10.0.130.91:10880/, :path=>"/"}
[2019-05-29T12:20:31,449][WARN ][logstash.outputs.elasticsearch] Restored connection to ES instance {:url=>"http://elastic:xxxxxx@10.0.130.91:10880/"}
[2019-05-29T12:20:31,567][INFO ][logstash.outputs.elasticsearch] ES Output version determined {:es_version=>6}
[2019-05-29T12:20:31,574][WARN ][logstash.outputs.elasticsearch] Detected a 6.x and above cluster: the type event field won't be used to determine the document type {:es_version=>6}
[2019-05-29T12:20:31,670][INFO ][logstash.outputs.elasticsearch] New Elasticsearch output {:class=>"LogStash::Outputs::ElasticSearch", :hosts=>["http://10.0.130.91:10880"]}
[2019-05-29T12:20:31,749][INFO ][logstash.outputs.elasticsearch] Using mapping template from {:path=>nil}
[2019-05-29T12:20:31,840][INFO ][logstash.outputs.elasticsearch] Attempting to install template {:manage_template=>{"template"=>"logstash-*", "version"=>60001, "settings"=>{"index.refresh_interval"=>"5s"}, "mappings"=>{"_default"=>{"dynamic_templates"=>[{"message_field"=>{"path_match"=>"message", "match_mapping_type"=>"string", "mapping"=>{"type"=>"text", "norms"=>false}}}, {"string_fields"=>{"match"=>"*", "match_mapping_type"=>"string", "mapping"=>{"type"=>"text", "norms"=>false, "fields"=>{"keyword"=>{"type"=>"keyword", "ignore_above"=>256}}}}}], "properties"=>{"@timestamp"=>{"type"=>"date"}, "@version"=>{"type"=>"keyword"}, "geoip"=>{"dynamic"=>true, "properties"=>{"ip"=>{"type"=>"ip"}, "location"=>{"type"=>"geo_point"}, "latitude"=>{"type"=>"half_float"}, "longitude"=>{"type"=>"half_float"}}}}}}}}
[2019-05-29T12:20:32,094][INFO ][logstash.outputs.elasticsearch] Installing elasticsearch template to _template/logstash
[2019-05-29T12:20:33,242][INFO ][logstash.inputs.file     ] No sincedb_path set, generating one based on the "path" setting {:sincedb_path=>"/root/logstash-6.4.3/data/plugins/inputs/file/.sincedb_d883144359d3b4f516b37dba51fab2a2", :path=>["/var/log/nginx/access.log"]}
[2019-05-29T12:20:33,329][INFO ][logstash.pipeline        ] Pipeline started successfully {:pipeline_id=>"main", :thread=>"#<Thread:0x12bdd65 run>"}
[2019-05-29T12:20:33,544][INFO ][logstash.agent           ] Pipelines running {:count=>1, :running_pipelines=>[:main], :non_running_pipelines=>[]}
[2019-05-29T12:20:33,581][INFO ][filewatch.observingtail  ] START, creating Discoverer, Watch with file and sincedb collections
[2019-05-29T12:20:34,368][INFO ][logstash.agent           ] Successfully started Logstash API endpoint {:port=>9600}
有关 Logstash 的更多功能,请查看 elastic 官方文档。
查询日志
参考 查询日志。
更多有关 Kibana 控制台的功能,请查看 elastic 官方文档。

 是
是
 否
否
本页内容是否解决了您的问题?