Windows and macOS
마지막 업데이트 시간:2025-02-18 09:36:17
Windows and macOS
마지막 업데이트 시간: 2025-02-18 09:36:17
To provide cross-platform desktop applications, the development for Windows and macOS utilizes Electron. This article mainly describes how to quickly integrate Tencent Cloud LCIC Electron SDK into your project.
Prerequisites
You have completed the procedures for Sign up for a Tencent Cloud account and Identity Verification.
Step 1: Create New Application
1. Log in to the Low-code Interative Classroom, and select Quick Start from the left navigation bar.
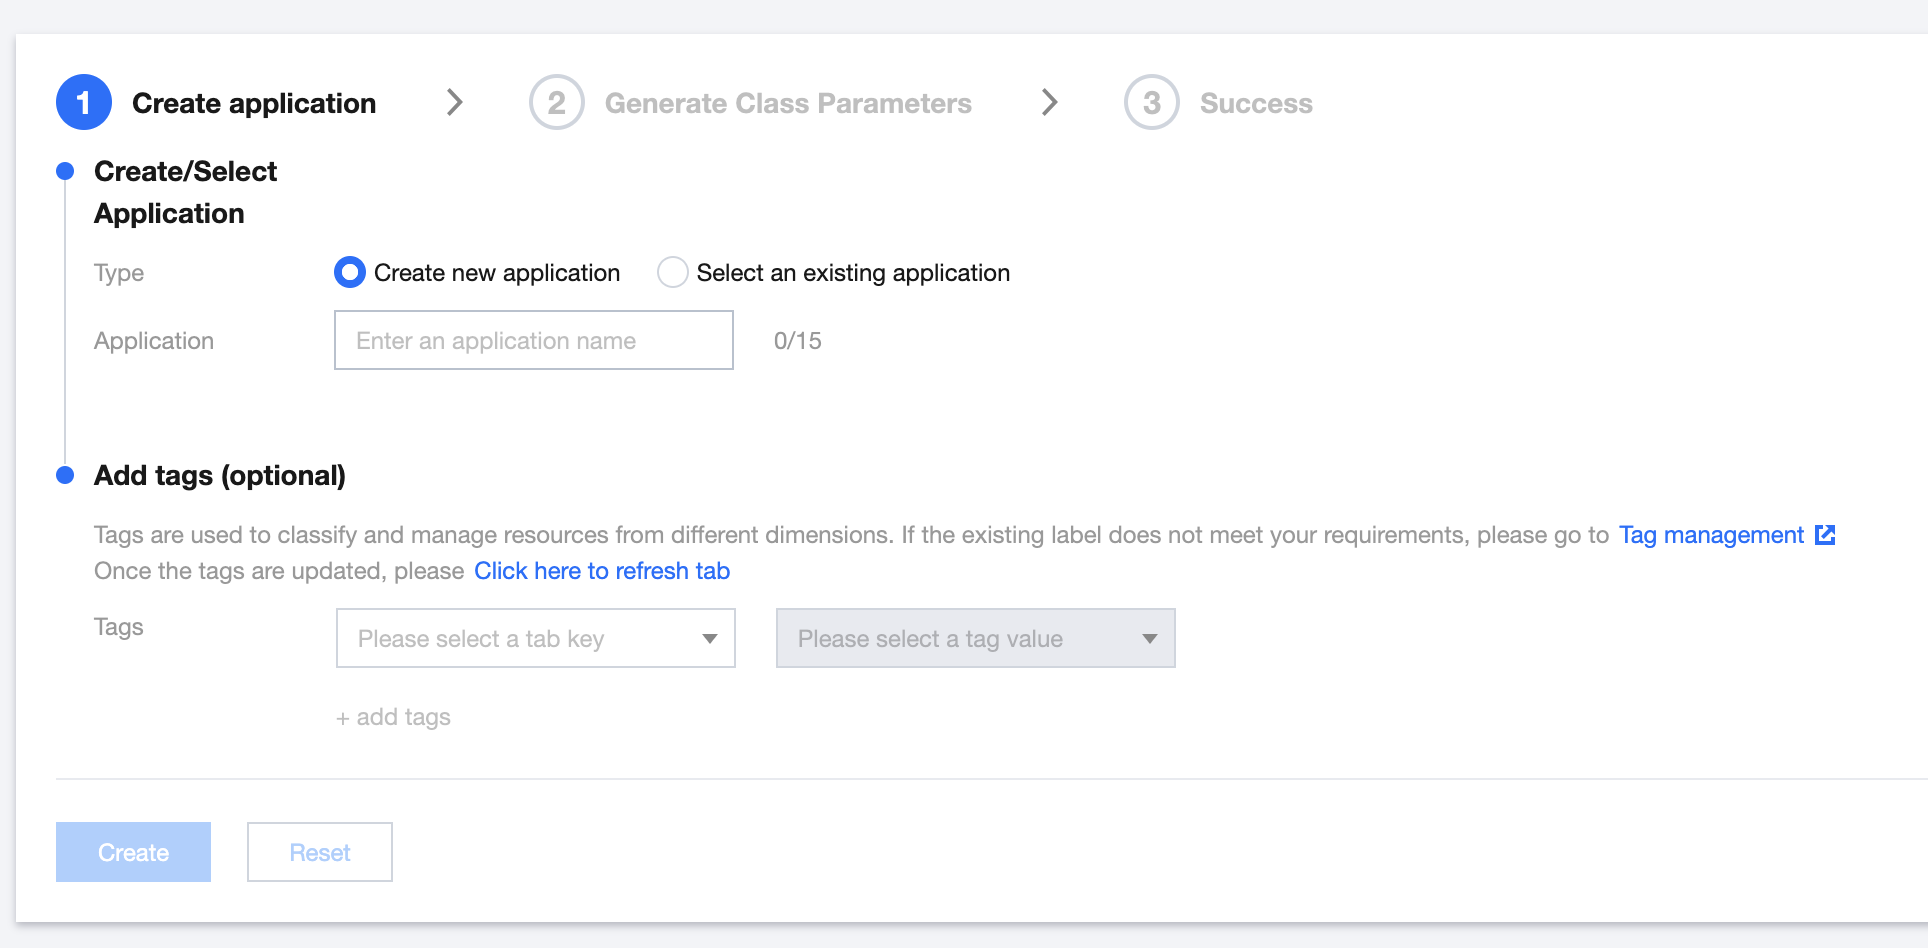
2. By default, you enter the "Create application" interface, where you can select "Create new application" for the application type. Enter the application name, such as TestLCIC.
If you have already created an application, you can click "Select an existing application" for the application type.
Note:
Each account can get a trial version application for free. If there are no trial applications under the current account, you can directly create one to experience. To create a commercial application, you can create the corresponding version of the application on the Purchase Page according to business needs.
3. Based on actual business requirements, add or edit tags, and then click Create.
Note:
Application names may only contain underscores, digits, or letters.
Tags are used to identify and organize your resources in Tencent Cloud. For instance, a corporation with several business units, each of which has one or more LCIC applications, can use tags to label departmental information on LCIC applications. Tags are optional, and you can add or edit them based on your actual business needs.
Step 2: Enter SDKAppId and Key (SecretKey)
1. Choose Application Management > Settings to obtain the SDKAppId.
2. Enter the Cloud Access Management obtain the key. If there is no key, you need to create a new one in API Key Management. For details, refer to Key Management.

Step 3: Obtain Parameters Required to Enter the Classroom
1. By calling the TencentCloud API interface RegisterUser to register users, you can obtain the corresponding user ID (
userid) information.2. By calling the TencentCloud API interface LoginUser to log in, you can obtain the user authentication
token information.3. By using the Application Programming Interface CreateRoom to create a classroom, you can obtain the Classroom ID (
classid) information.4. Specify the version of the classroom you need to integrate: latest.
5. The parameters
scene, debugjs, and debugcss are optional and only need to be set when you customize the UI. For more information, refer to Custom UI Integration. debugjs and debugcss are used only for debugging custom layouts and components, and are only accessible through addresses localhost or 127.0.0.1. Do not use these parameters in the release phase.6.
lng, location, and layout are also optional parameters. You can determine whether to enter these parameters based on actual business needs. If not, they will use the default values. The layout parameter is only effective when the classroom layout is set to video + document layout (videodoc).Field | Type | Meaning | Remarks | Mandatory | |
userid | String | Username | Yes | | |
classid | String | Classroom ID | Yes | | |
token | String | Backend authentication parameters | Yes | | |
version | String | Version number of the classroom | (This parameter will be officially deprecated from tcic-electron-sdk version 1.9.0) The corresponding version can be selected from the release logs. | No | |
scene | String | Scene name | It is used to distinguish different custom layouts. It is configured through the SetAppCustomContent interface. | No | |
role | String | Role for entering the classroom, default is empty | Optional parameter supervisor (Patrol Classes/Content Review) is only available to registered users who can patrol classes within the application. | No | |
debugjs | String | JS link of the custom defined UI | It is obtained through the custom defined UI integration. | No | |
debugcss | String | CSS link of the custom defined UI | It is obtained through the custom defined UI integration. | No | |
lng | String | Language parameter, which is zh-CN by default | Supports Chinese (simplified), Chinese (traditional), English, Korean, and Japanese. Corresponding parameters can be concatenated to display the corresponding languages. Parameters: zh-CN, zh-TW, en-US, ka, ja. Also supports multilingual languages such as Spanish, French, German, Thai, Malay, and Indonesian. You can contact sales or product for details. | No | |
location | Boolean | Whether to report geographical location information | It is set to false by default, indicating no reporting. | No | |
layout | String | Page layout | It is set to top (top) by default. Currently, it supports double row layout (double), right layout (right), left layout (left), and three-part layout (three). | No | |
Step 4: Enter the Classroom
For different business needs, we offer the following two integration methods.
Method 1: URL Concatenation
This capability allows the client to be launched through a browser. The clients are classified into Tencent Cloud-provided LCIC-Demo Client and the Customized Client. The difference lies in the client icon, name, and initial page.
Directly Launching the Client Through a Browser
1. Download and install the client.
macOS
2. The client is launched through a link. When you access or navigate to the URL
tcic://class.qcloudclass.com/latest/class.html?classid=${classId}&userid=${userId}&token=${token} in a browser, the browser will request to open the LCIC-Demo Client.Transfer Page Invocation Method (Recommended)
By integrating LCIC Electron SDK quickly and easily, you can jump to the transfer page on the business side. If the recognition is successful, it will directly jump. If it fails, downloading the client is prioritized. If you cancel or opt not to download the client, the web version of the class page is opened through redirection.
Specific Process:
Before entering the classroom, it is necessary to jump to a transfer page first, where the user jump logic is handled. By obtaining the class parameters and appending them to this URL
tcic://class.qcloudclass.com/latest/class.html?classid=${classId}&userid=${userId}&token=${token}, the client application can be invoked.Download ElectronProtocolCheck.js and integrate it into your own project. The sample code in the transfer page is as follows:
// For ElectronProtocolCheck file code, see the GitHub exampleimport ElectronProtocolCheck from './ElectronProtocolCheck';// The ID required to enter the classroomconst classId = 368507569;// The ID of the user currently entering the classroomconst userId = "JIUzI1NiIsIn123456";// The token needs to be dynamically obtained from the backend interface to prevent login state expiration and invalidationconst token = 'yJhbGciOiJIUzI1NiIsInR5cCI6IkpXVCJ9.eyJleHAiOjE2ODAwNzQwMjEsImlhdCI6MTY3OTQ2OTIyMSwiaXNzIjoibFpNQ2tvTjNkSGlnVmhhcXJkdFc0cU9JYWpleVh2RWwiLCJzY2hvb2xfaWQiOjM5MjMxOTMsInVzZXJfaWQiOiIyTG9XREU2aHhzOUNCNVhCczZHT1BnVXpweUgifQ.2wzh6eUC4llbbGhchGDOYbDrsdSdymfP3zjLLPjnOII';const url = `tcic://class.qcloudclass.com/latest/class.html?classid=${classId}&userid=${userId}&token=${token}`;console.log(`callClient->start: ${url}`);// Invoke clientElectronProtocolCheck(url,successCallBack: (res) => {// Call successfulconsole.log('callClient->success! ');},failCallBack: (res) => {console.log('callClient->failed! ');// If the call fails, it is recommended to pop up a window that suggests the download here.// If the user clicks to download --> Change the pop-up window information, and open the client.// If the user cancels the download or closes the pop-up window, let the user try the Web/H5 version of the classroom.// You can also add a timeout pop-up window. Generally, if the user does not click within 2500 ms, a modal click box can be displayed.},unsupportedCallBack: () {// For browsers that are not supported, you can use a web link to load.});
Note:
In the concatenated URL, if the pass-in
userid matches the teacherid specified for the current classroom, the current user is a teacher. If it matches the current classroom's assistant ID (assistantid), the user is an assistant. Otherwise, the user is a student.Method 2: SDK Integration
1. Due to some dependency libraries, ensure that you use the following base library versions.
Development framework | Version |
Electron | 10.4.3+ |
Node | 10.14.1+ |
2. Use the npm command to install the SDK package in your project.
npm install tcic-electron-sdk@latest
Note:
3. After importing the module into the project script, call the initialization interface and pass in the previously obtained parameters to launch the in-class page.
const TCIC = require('tcic-electron-sdk')TCIC.initialize({classId: '368507569',userId: '123456',token: 'yJhbGciOiJIUzI1NiIsInR5cCI6IkpXVCJ9.eyJleHAiOjE2ODAwNzQwMjEsImlhdCI6MTY3OTQ2OTIyMSwiaXNzIjoibFpNQ2tvTjNkSGlnVmhhcXJkdFc0cU9JYWpleVh2RWwiLCJzY2hvb2xfaWQiOjM5MjMxOTMsInVzZXJfaWQiOiIyTG9XREU2aHhzOUNCNVhCczZHT1BnVXpweUgifQ.2wzh6eUC4llbbGhchGDOYbDrsdSdymfP3zjLLPjnOII',// If the url is provided, the url parameter takes precedence over the above parameters.url: 'https://class.qcloudclass.com/latest/class.html?classid=xxxx&userid=xxx',onReady() {// Optional, callback when pulling up the classroom window.},onClose() {// Optional, callback when all windows are closed.},sign: string, // Optional, user signature used by customer business.cid: string, // Optional, user id used by customer business.uid: string, // Optional, user id used by customer business.})
Advanced Features
Assembly Line Packaging Integration
If you need the generated client to have its own brand logo and application name while being able to quickly integrate existing business systems, you can use the assembly line packaging method for integration.
1. Configure the Business Logic
After packaging, you can enter the class through the
window global variable's joinClass method on the business side. If the course entry logic has been implemented through URL or SDK integration on the business side, see the following example for compatibility.const options = {classId: '368507569',userId: '123456',token: 'yJhbGciOiJIUzI1NiIsInR5cCI6IkpXVCJ9.eyJleHAiOjE2ODAwNzQwMjEsImlhdCI6MTY3OTQ2OTIyMSwiaXNzIjoibFpNQ2tvTjNkSGlnVmhhcXJkdFc0cU9JYWpleVh2RWwiLCJzY2hvb2xfaWQiOjM5MjMxOTMsInVzZXJfaWQiOiIyTG9XREU2aHhzOUNCNVhCczZHT1BnVXpweUgifQ.2wzh6eUC4llbbGhchGDOYbDrsdSdymfP3zjLLPjnOII',};// Logic method for clicking to enter the classroomwindow.joinClass(options);// How to maintain compatibility with the existing logic? Refer to the code logic below.// Check whether the method exists.if (window.joinClass) {window.joinClass(options);} else {// Original logic for entering the classroom}
The current client should be closed on the business side through the
window global variable's closeWin method.window.closeWin();
2. Prepare the corresponding Bill of Materials, as detailed below:
Field | Meaning | Mandatory |
AppName | App name, such as XX Classroom | Yes |
Logo | Application Logo, which should be an ico/png image with specifications of 256x256 | Yes |
URL | Business URL | Yes |
Note:
The Business URL should be a complete URL already in a logged-in status. If not logged in, it should automatically redirect to the login entry. The configured Business URL should not be a login page. Otherwise, users will need to log in every time they open it.
3. Send a packaging application email in the following format and attach the above materials as an attachment. Once the information and materials are confirmed to be correct, we will complete the packaging within 1 working day.
Note:
Recipient: mediaservices@tencent.com
Topic
Client Packaging Application
Content
Company Name: xxx Limited Company
Individual Name:
Contact Information:
Packaging Materials (Attachment)
Custom UI Integration
To meet the diverse needs of different customers, LCIC Electron currently also offers an integration plan for Custom UI. You can define the layout and style of the course on the business side. Through customizing the interface, you can get the JS and CSS links on the business side. Just concatenate the
debugjs and debugcss parameters to the above link (these parameters are for debugging purposes only), as shown in the following code:// URL Concatenation Methodconst url = `tcic://class.qcloudclass.com/latest/class.html?classid=${classId}&userid=${userId}&token=${token}debugjs=%!s(<nil>)&debugcss=%!s(<nil>)`;// SDK Integration MethodTCIC.initialize({classId: '368507569',userId: '123456',token: 'yJhbGciOiJIUzI1NiIsInR5cCI6IkpXVCJ9.eyJleHAiOjE2ODAwNzQwMjEsImlhdCI6MTY3OTQ2OTIyMSwiaXNzIjoibFpNQ2tvTjNkSGlnVmhhcXJkdFc0cU9JYWpleVh2RWwiLCJzY2hvb2xfaWQiOjM5MjMxOTMsInVzZXJfaWQiOiIyTG9XREU2aHhzOUNCNVhCczZHT1BnVXpweUgifQ.2wzh6eUC4llbbGhchGDOYbDrsdSdymfP3zjLLPjnOII',debugjs: '%!s(<nil>)',debugcss: '%!s(<nil>)',})// Pipeline Packaging Methodconst options = {classId: '368507569',userId: '123456',token: 'yJhbGciOiJIUzI1NiIsInR5cCI6IkpXVCJ9.eyJleHAiOjE2ODAwNzQwMjEsImlhdCI6MTY3OTQ2OTIyMSwiaXNzIjoibFpNQ2tvTjNkSGlnVmhhcXJkdFc0cU9JYWpleVh2RWwiLCJzY2hvb2xfaWQiOjM5MjMxOTMsInVzZXJfaWQiOiIyTG9XREU2aHhzOUNCNVhCczZHT1BnVXpweUgifQ.2wzh6eUC4llbbGhchGDOYbDrsdSdymfP3zjLLPjnOII',debugjs: '%!s(<nil>)',debugcss: '%!s(<nil>)',};window.joinClass(options);
Once the custom JS and CSS debugging is completed, you can use the TencentCloud API interface SetAppCustomContent or Console > Application Configuration > Settings to bind the scene with the custom JS, CSS links. By appending the
scene parameter to the URL or adding it to the corresponding entry when you enter the classroom, the layout and components of the specific scene will be loaded. When dealing with multiple class types and layouts, you can switch scenes using this parameter on the business side.Custom Business Domain
On the in-class page, if you need to hide the classroom domain and only display the business domain on the business side, you can create a custom business domain through the CDN Console (CDN) and set it to origin from the classroom domain. For detailed process, refer to Custom Business Domain.
Other Related Documents
피드백