- Product Introduction
- Purchase Guide
- Operation Guide
- Console Overview
- Organization Settings
- Department Management
- Member Account Management
- Viewing Member List and Basic Information
- Removing Organization Member
- Adding Organization Member
- Canceling Member Invitation
- Binding Tags to Members and Departments
- Creating Member Login Permission
- Configuring Member Login Permission
- Authorizing Sub-Users to Log in to Member Accounts
- Configuring Message Subscription for Created Member
- Binding Security Information for Members
- Deleting Created Organization Member
- Enabling Member Deletion Permission
- Member Finance Management
- Member Access Management
- Service Control Policy
- Overview
- Enabling Service Control Policy
- Creating Custom Service Control Policy
- Viewing Service Control Policy Details
- Modifying Custom Service Control Policy
- Deleting Custom Service Control Policy
- Binding Custom Service Control Policy
- Unbinding Custom Service Control Policy
- Disabling Service Control Policy
- Service Control Policy
- Resource Management
- Member Audit
- Identity Center Management
- API Documentation
- History
- Introduction
- API Category
- Making API Requests
- Organization Settings APIs
- Department and Member Management APIs
- ListOrganizationIdentity
- Unified Member Login APIs
- Organization Service Management APIs
- Resource Sharing APIs
- Identity Center Management APIs
- Identity Center User Management APIs
- Identity Center User Group Management APIs
- Identity Center Management SCIM Synchronization APIs
- Identity Center Single Sign-On Management APIs
- Identity Center Permission Configuration Management APIs
- ListRoleConfigurationProvisionings
- CreateRoleConfiguration
- ListRoleConfigurations
- ListPermissionPoliciesInRoleConfiguration
- GetRoleConfiguration
- RemovePermissionPolicyFromRoleConfiguration
- UpdateCustomPolicyForRoleConfiguration
- UpdateRoleConfiguration
- AddPermissionPolicyToRoleConfiguration
- DeleteRoleConfiguration
- Identity Center Multi-Account Authorization Management APIs
- Identity Center Sub-User Synchronization Management APIs
- Data Types
- Error Codes
- TCO API 2018-12-25
- History
- Introduction
- API Category
- Making API Requests
- Read APIs
- Write APIs
- UpdateOrganizationNode
- UpdateOrganizationMember
- SendOrganizationInvitation
- QuitOrganization
- MoveOrganizationMembersToNode
- DenyOrganizationInvitation
- DeleteOrganizationNodes
- DeleteOrganizationMemberFromNode
- DeleteOrganization
- CreateOrganization
- CancelOrganizationInvitation
- AddOrganizationNode
- AcceptOrganizationInvitation
- DeleteOrganizationMembers
- Data Types
- Error Codes
- Related Agreement
- FAQs
- Glossary
This document provides an example showing how to create a CAM sub-account (user1) with the same name as an Identity Center user (user1) in a member account (member_1) by configuring CAM user synchronization.
The sub-account created through CAM user synchronization is granted with no permissions. You should grant permissions to the user in the CAM console for the member account.
If you need to preset permissions through the Identity Center, see Configure CAM Role Synchronization.
Directions
Step 1: Inputting Enterprise Employee Information
Input enterprise employee information into User Management of the Identity Center. Currently, the Identity Center only supports creating a user manually.
1. Log in to TCO > Identity Center.
2. In the left sidebar, select User Management > Users and then click Create User.
3. On the Create User page, configure basic information of a user.
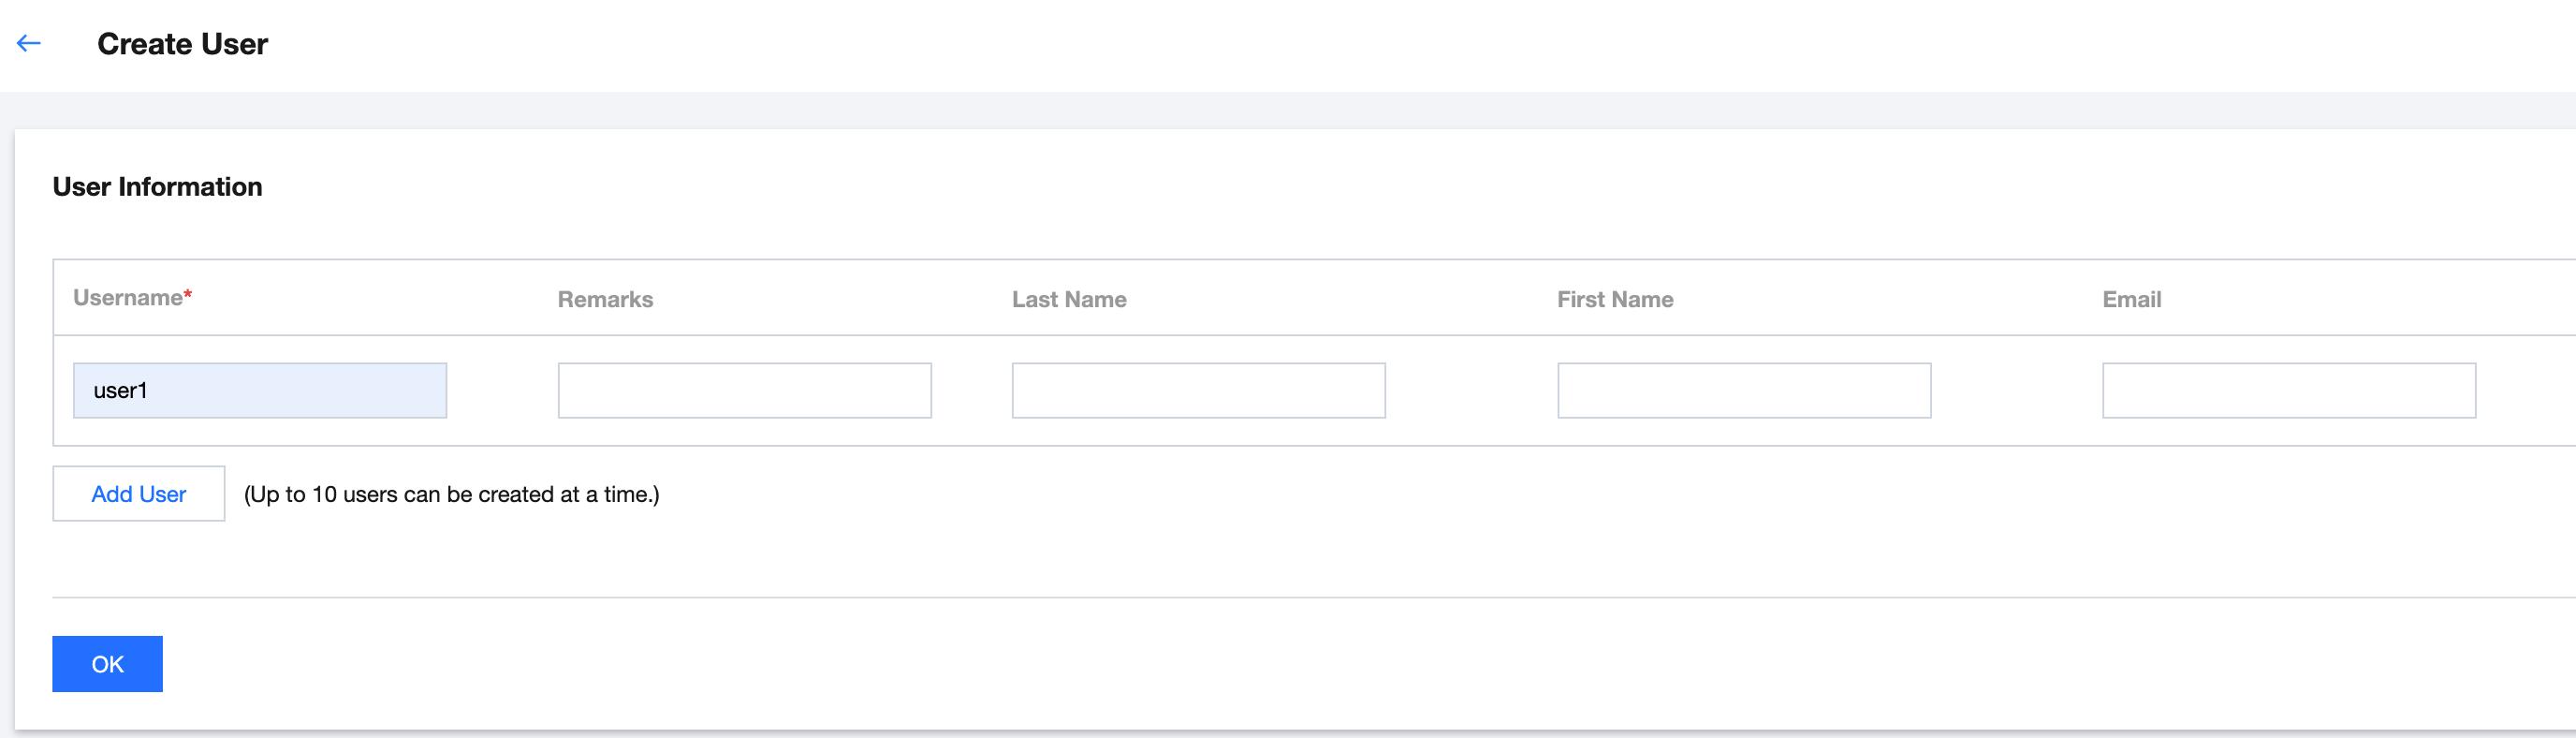
Username: Required. It must be unique within the space. The username can contain up to 64 characters including English letters, digits, plus signs (+), equal signs (=), commas (,), periods (.), at signs (@), hyphens (-), and underscores (_). It is configured as user1 here.
Remarks, Last Name, First Name, and Email: Optional. You can input them as needed.
4. Click OK to complete the creation.
Step 2: Configuring CAM User Synchronization
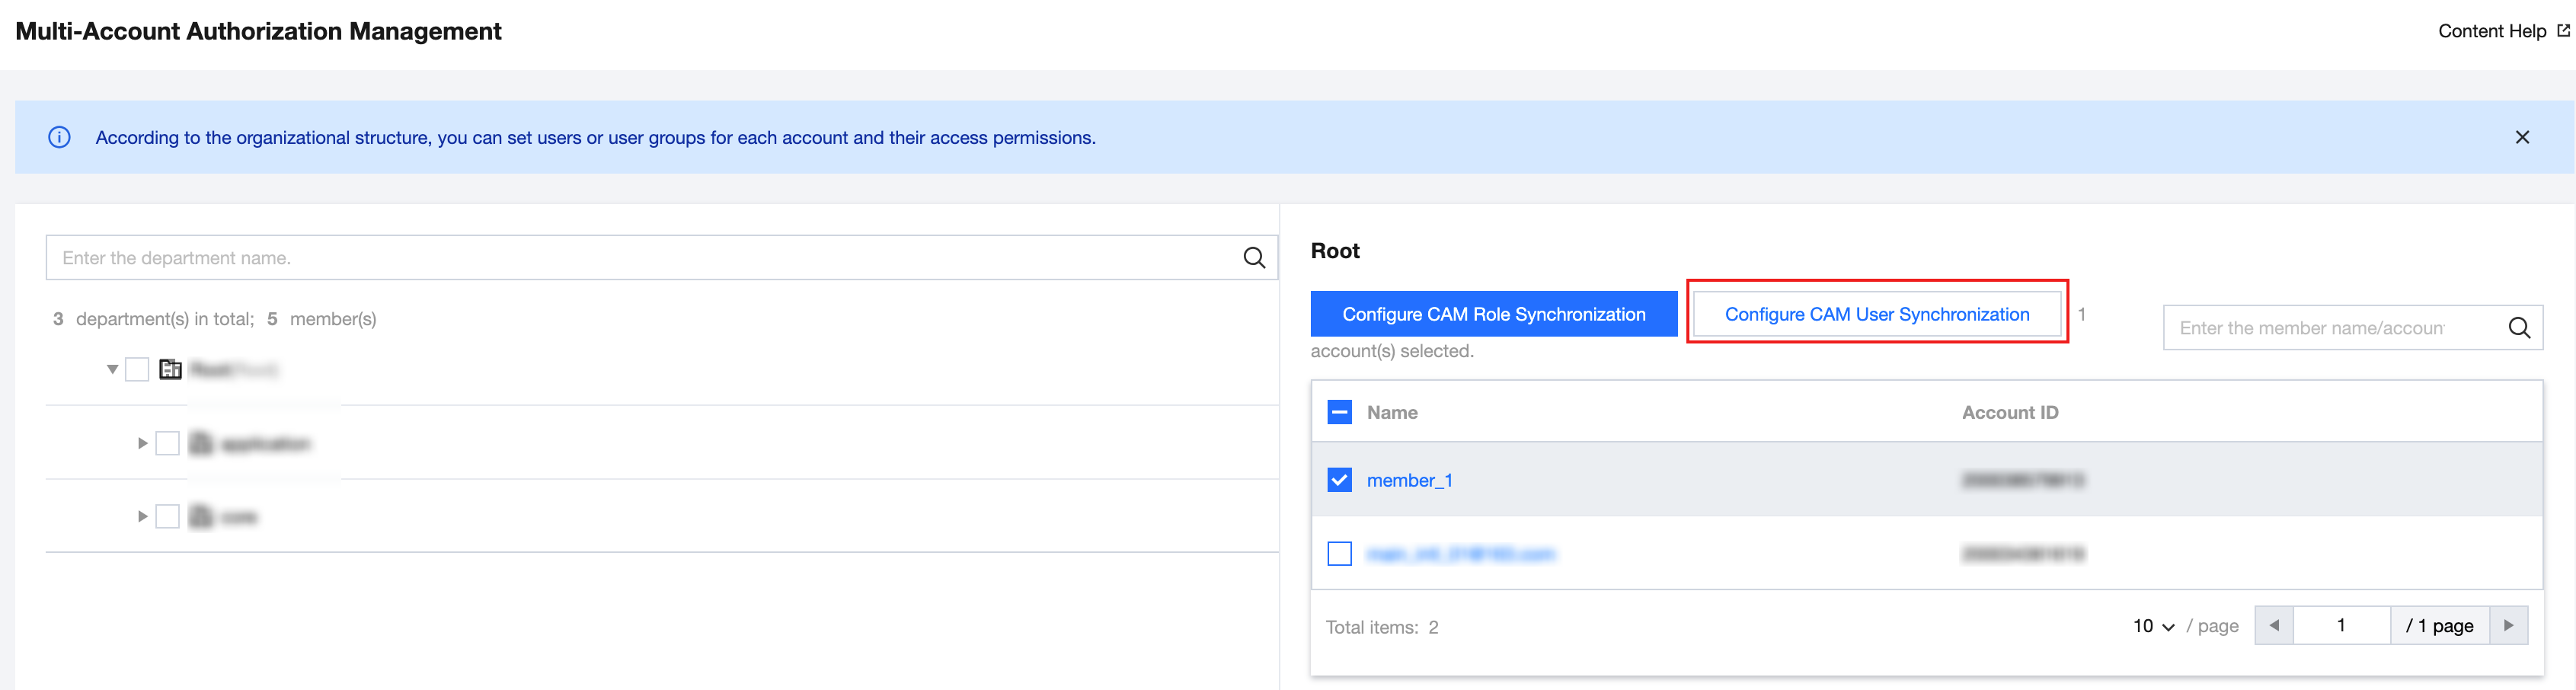
1. In the left sidebar, click CAM Synchronization > Multi-Account Authorization Management.
2. On the Multi-Account Authorization Management page, select a target account.
Note:
In this example, a member account (member_1) is selected.
3. Click Configure CAM User Synchronization.
4. On the Configure CAM User Synchronization page, select a target user or user group and then click Next.
Note:
In this example, an Identity Center user (user1) is selected.
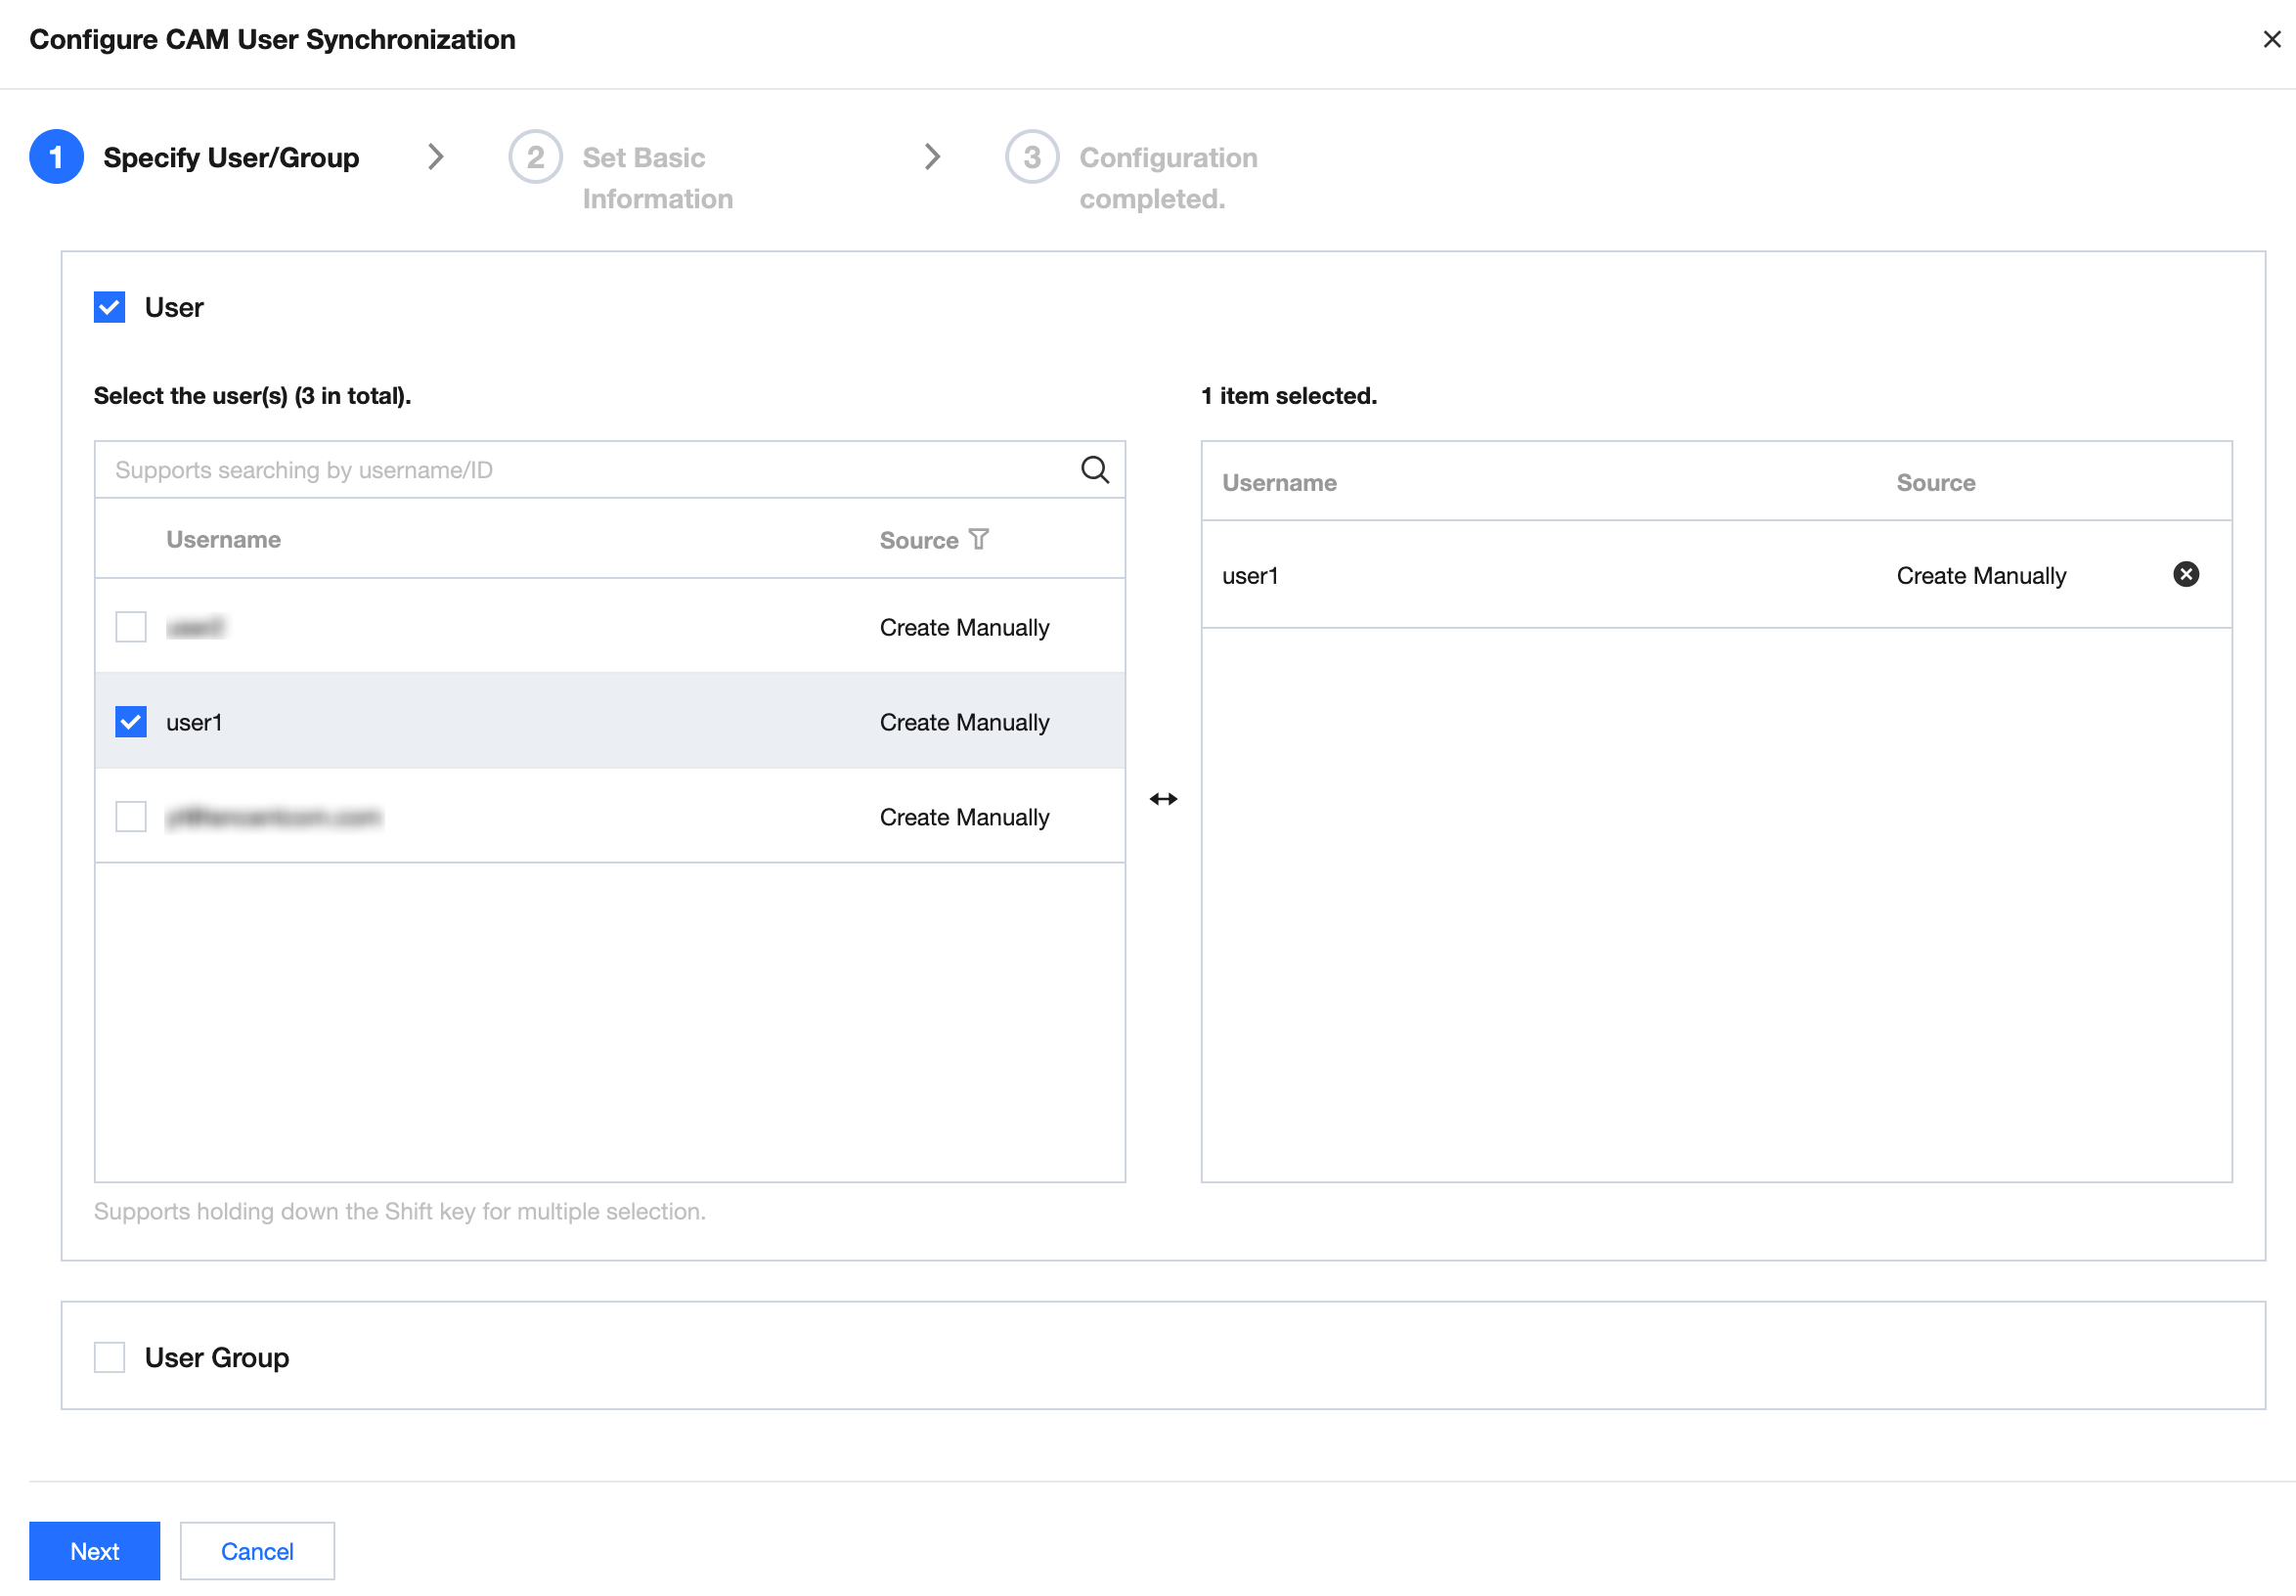
5. Configure basic information. For details of the basic information, see Configure CAM User Synchronization. After inputting the information, click Next.
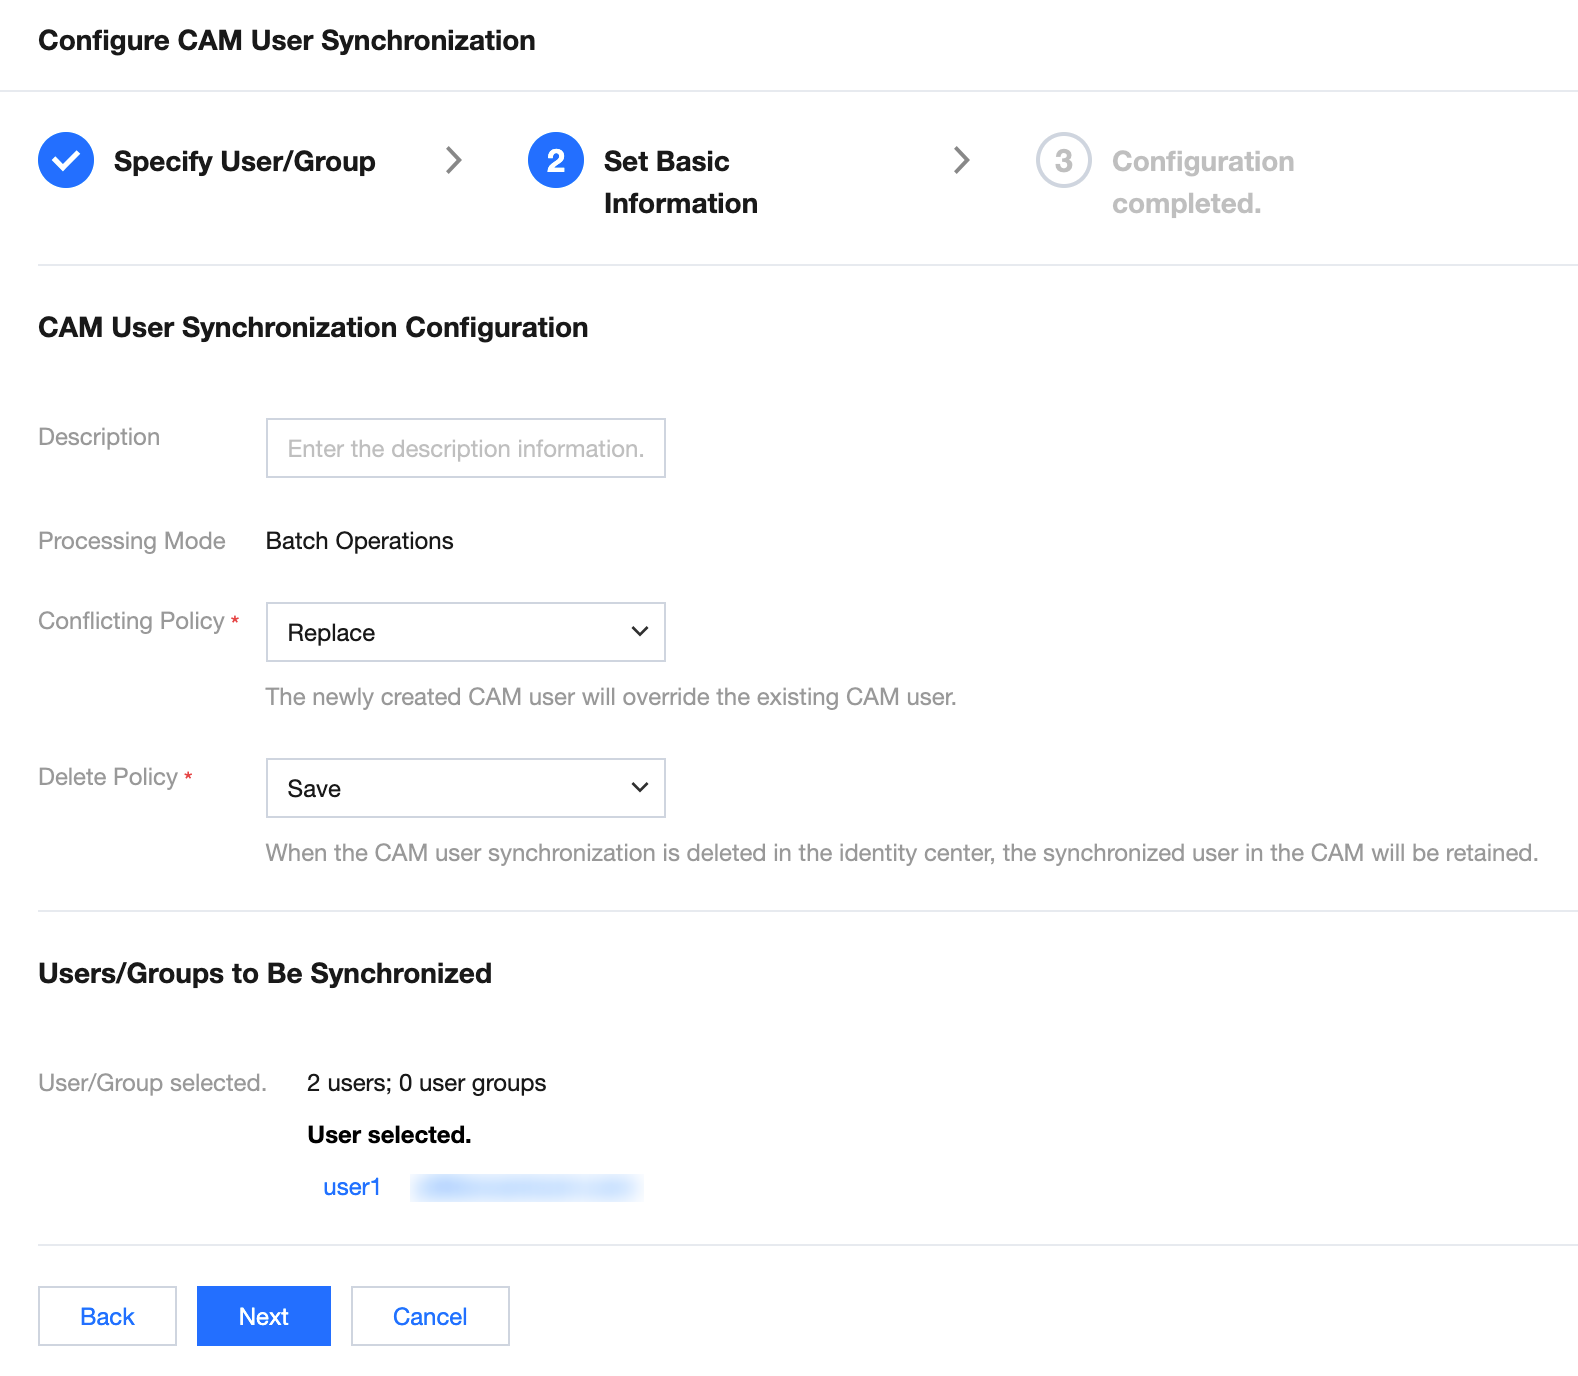
6. Click Submit. After a successful configuration message is displayed, click Complete.
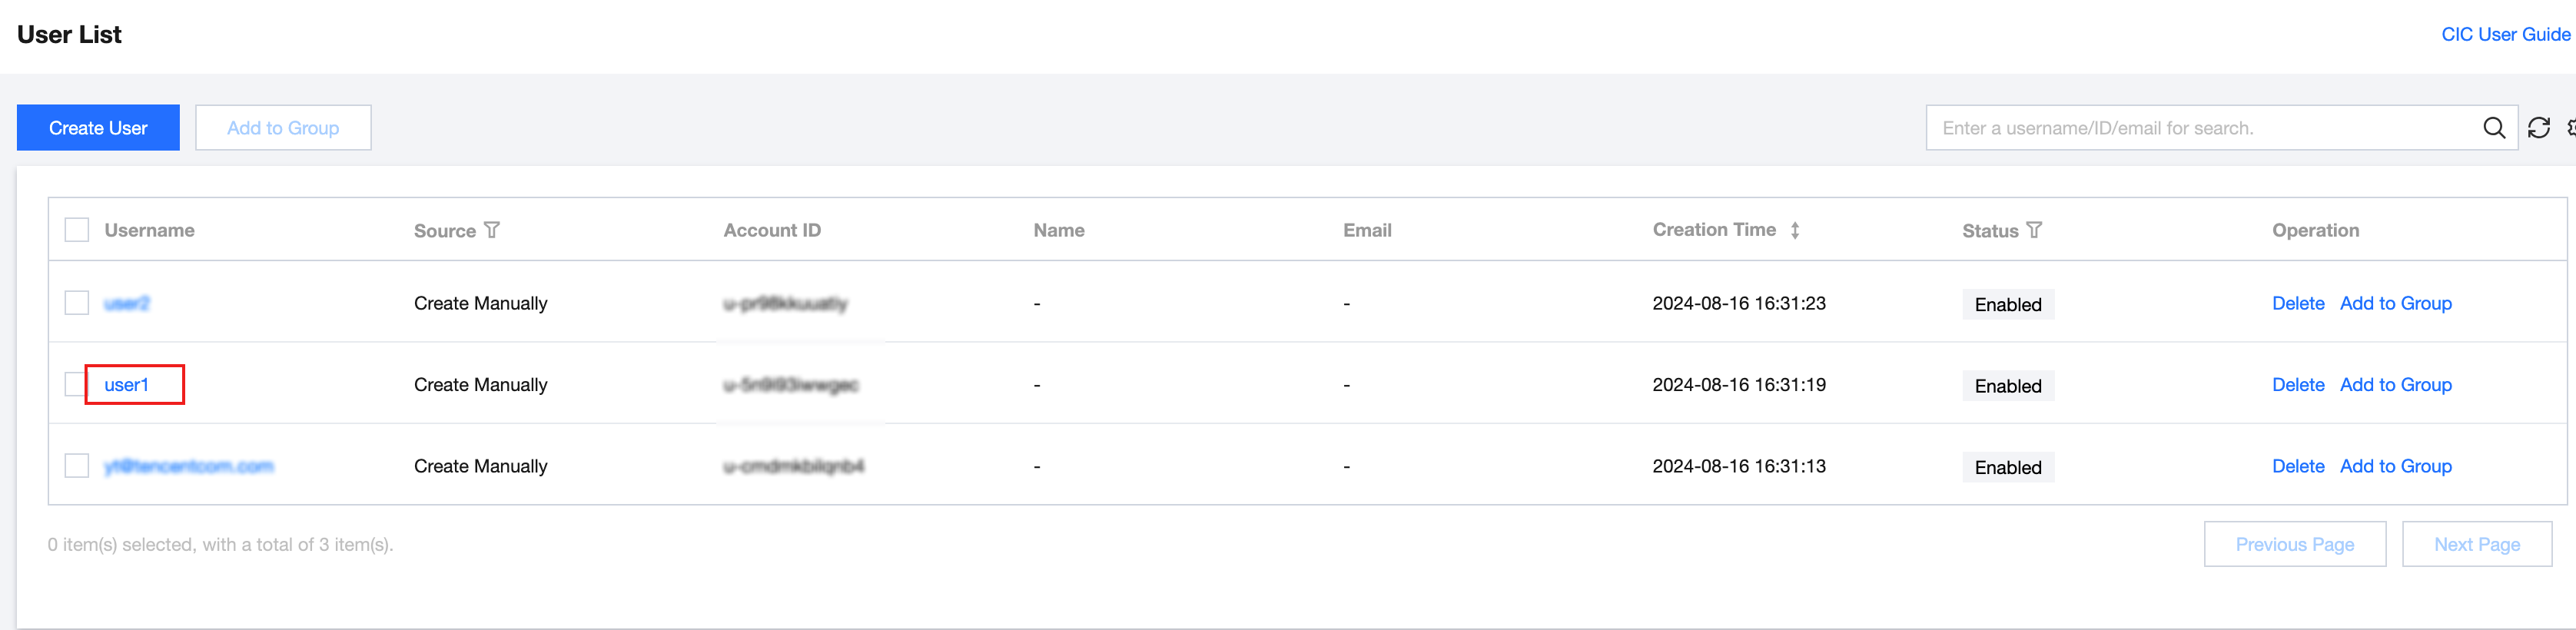
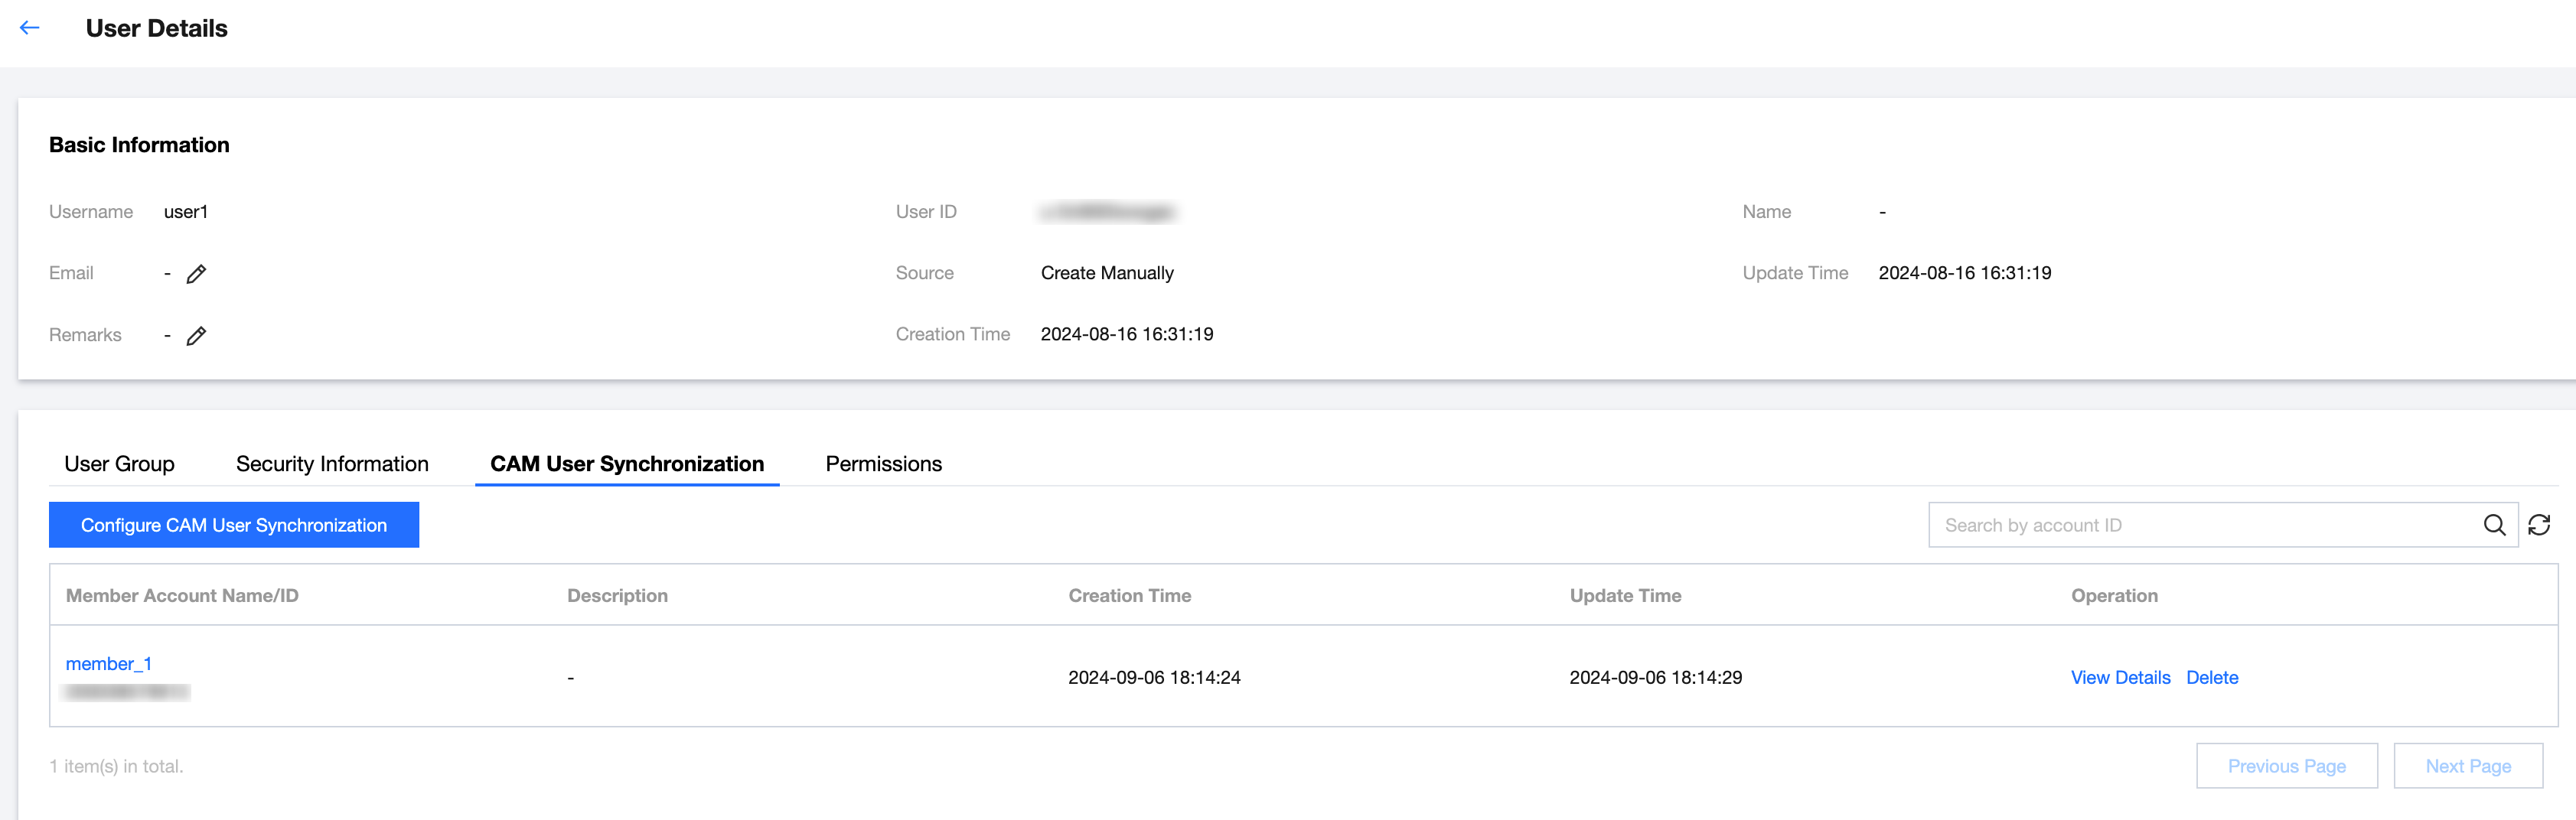
7. After the configuration is completed, you can view the user synchronization list through the following methods:
Click CAM Synchronization > User Synchronization Management.

Or click User Management > Users, enter the user details page of user1, and then select the CAM User Synchronization tab.
Effect in CAM
1. After the configuration is completed, the system will create a CAM sub-user (user1) with the same name as the Identity Center user (user1) in the member account (member_1) through synchronization.
Note:
The user type in CAM is Users Synchronized form Identity Center.
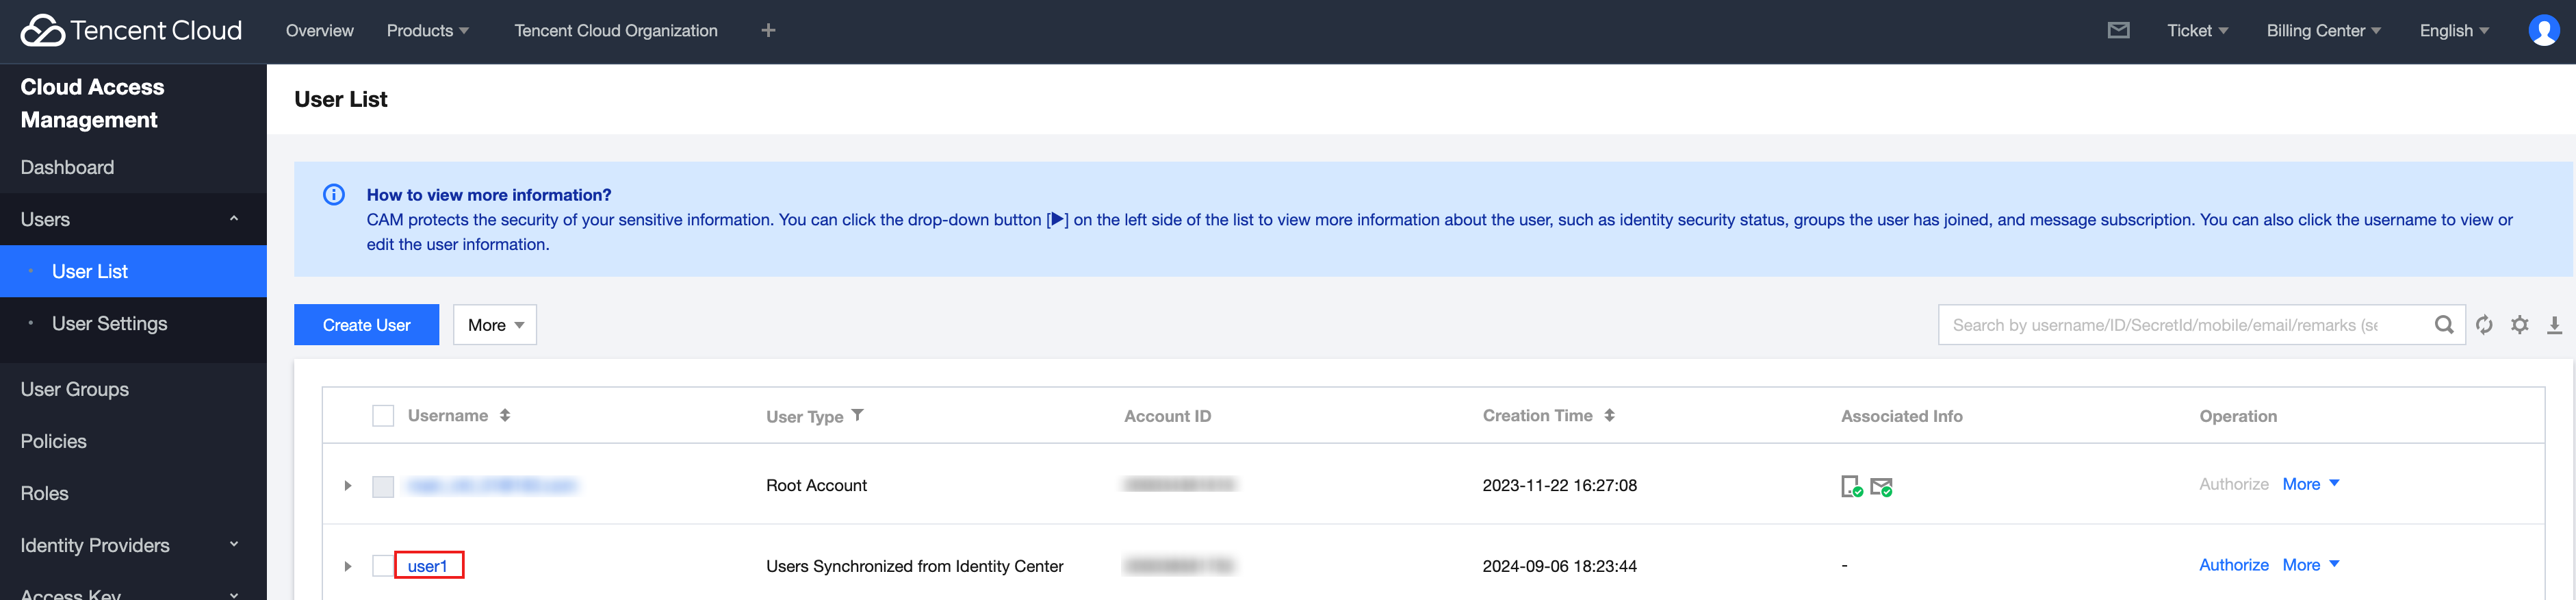
2. You can click the target username to view associated policies.
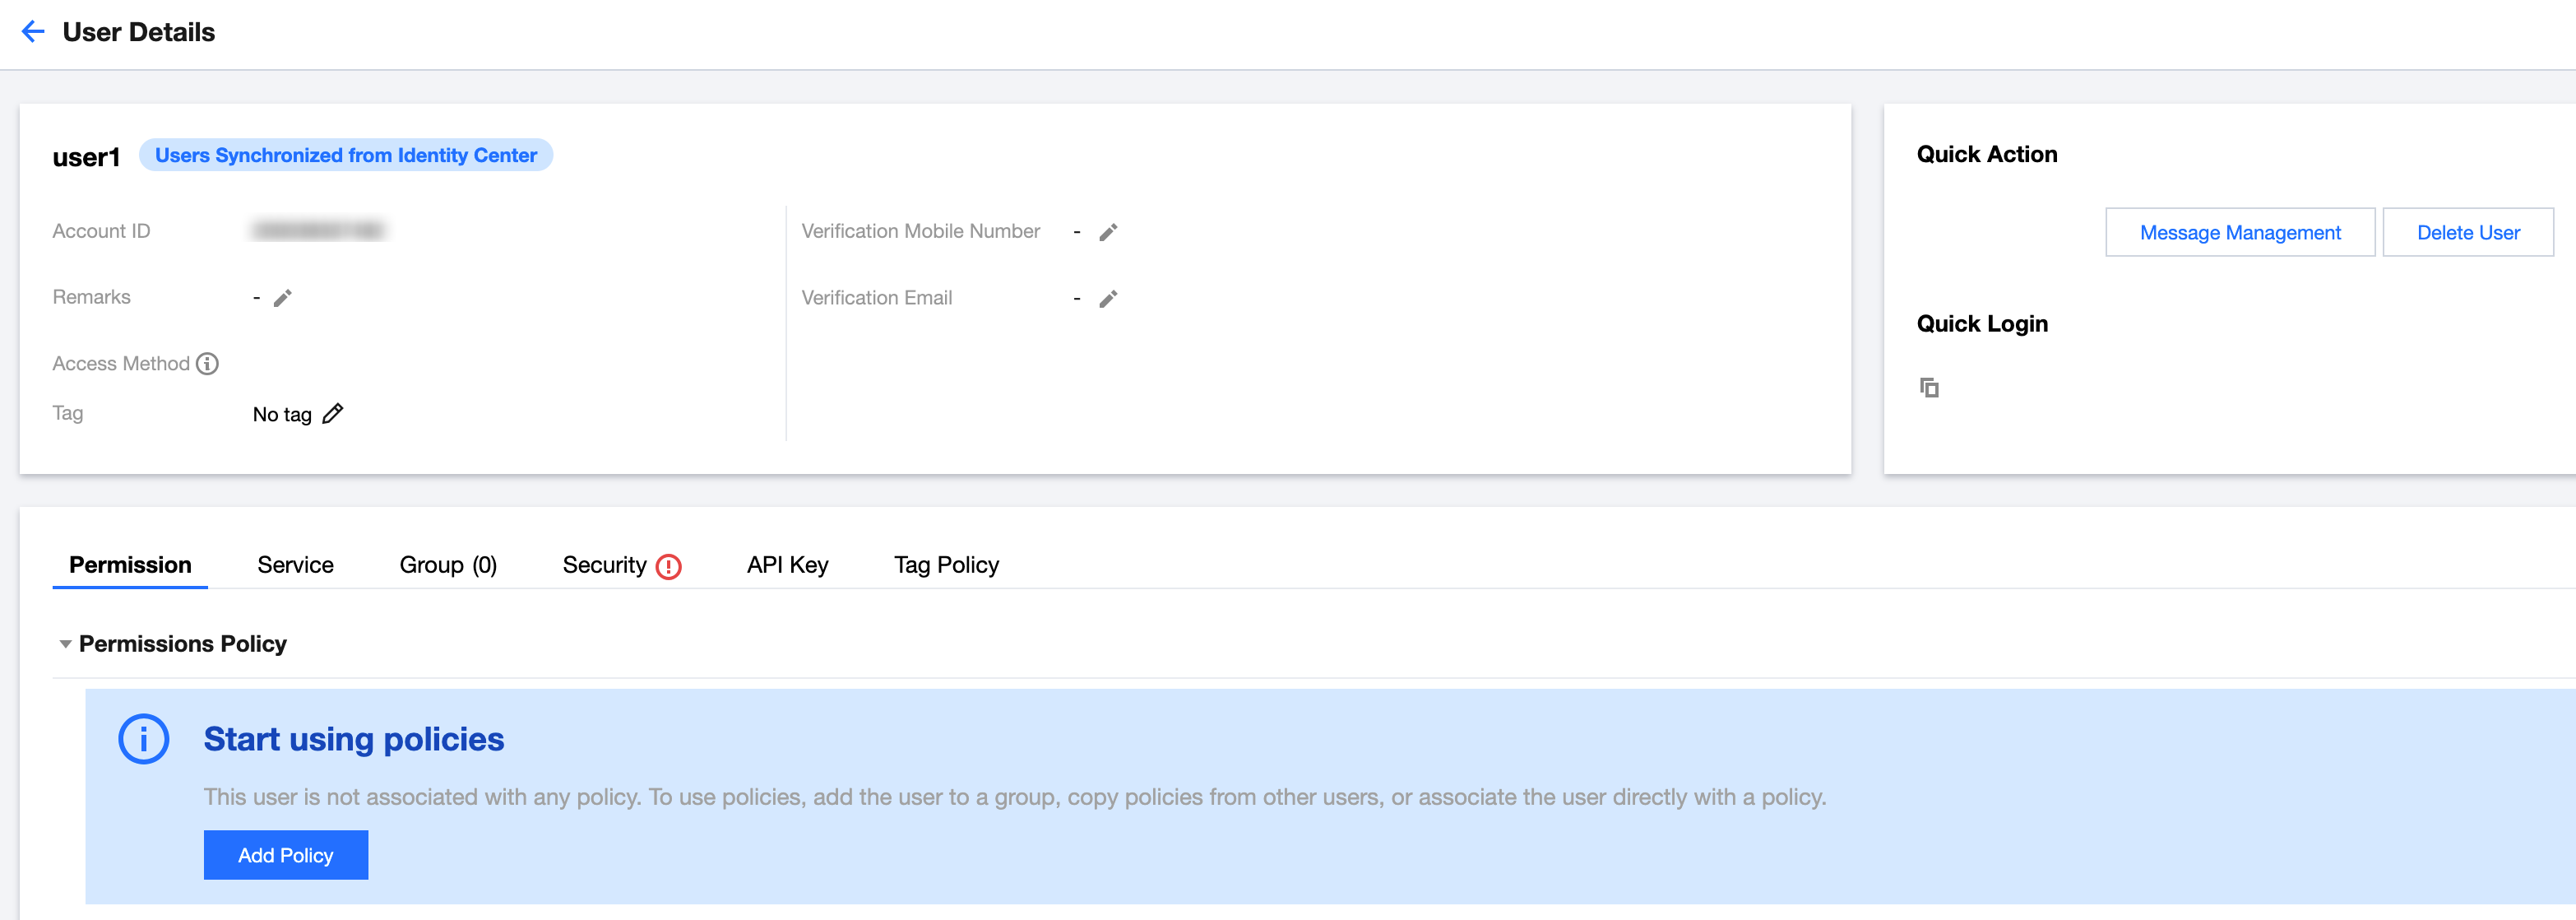
Note:
The sub-user created through synchronization has no permissions. You should configure permission policies for the user (user1) in CAM.
Step 3: Logging In as a Sub-Account
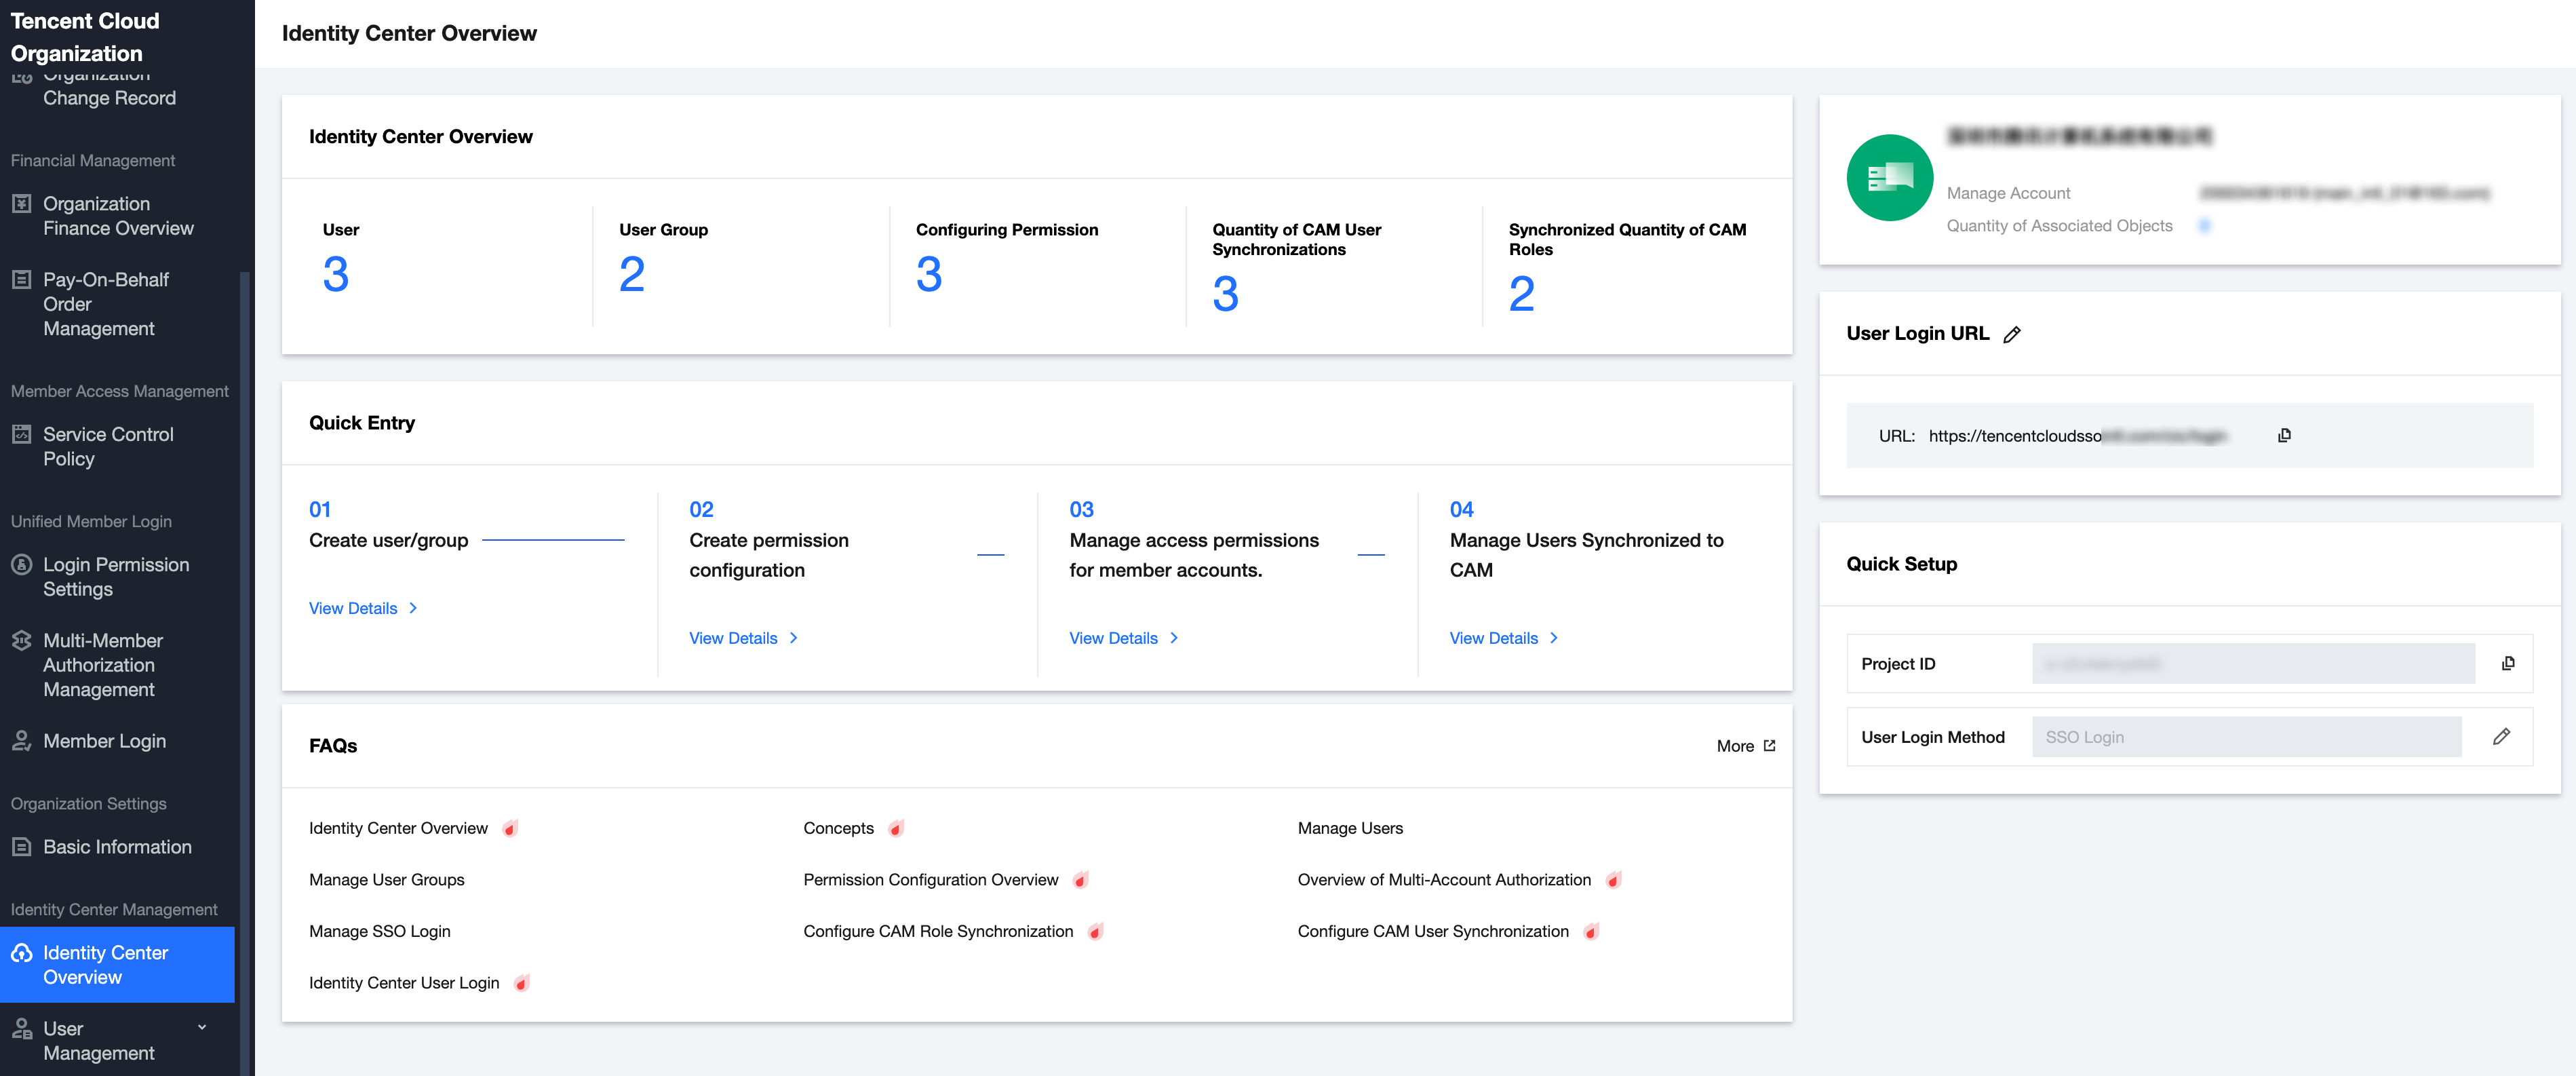
Obtaining a User Login URL
1. In the left sidebar, click Identity Center Overview.
2. On the right side of the overview page, view or copy the user login URL.
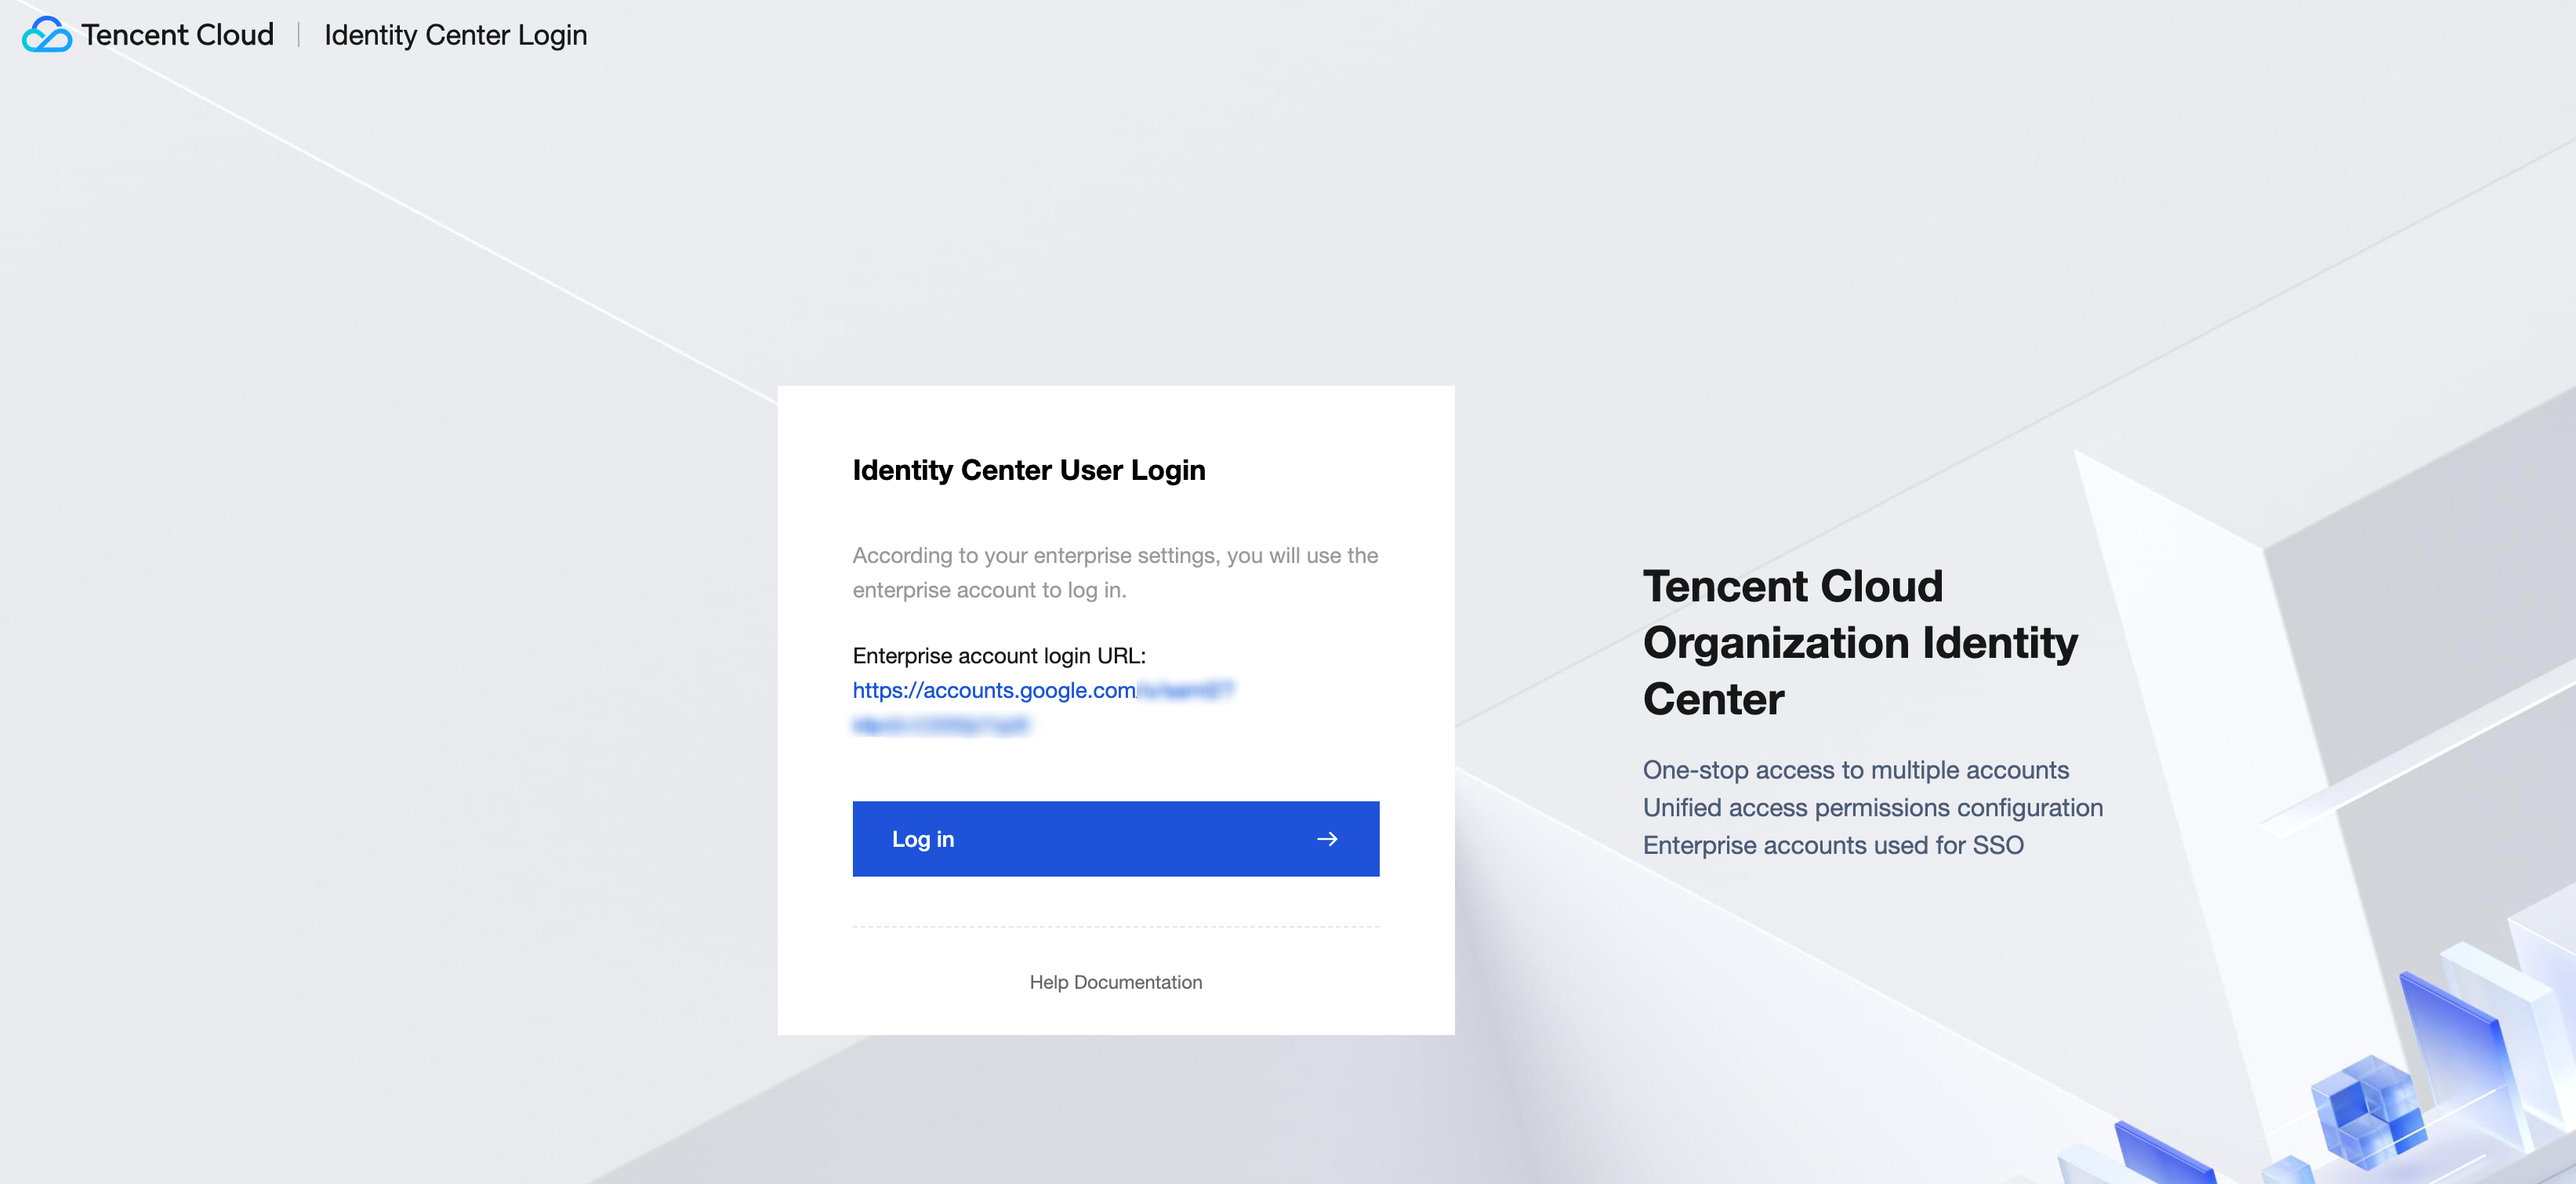
Accessing the User URL in the Browser
1. On the Identity Center login page, click Login.
Note:
Currently, only user-based SSO is supported. Account password login is not supported yet. You should configure SSO first.
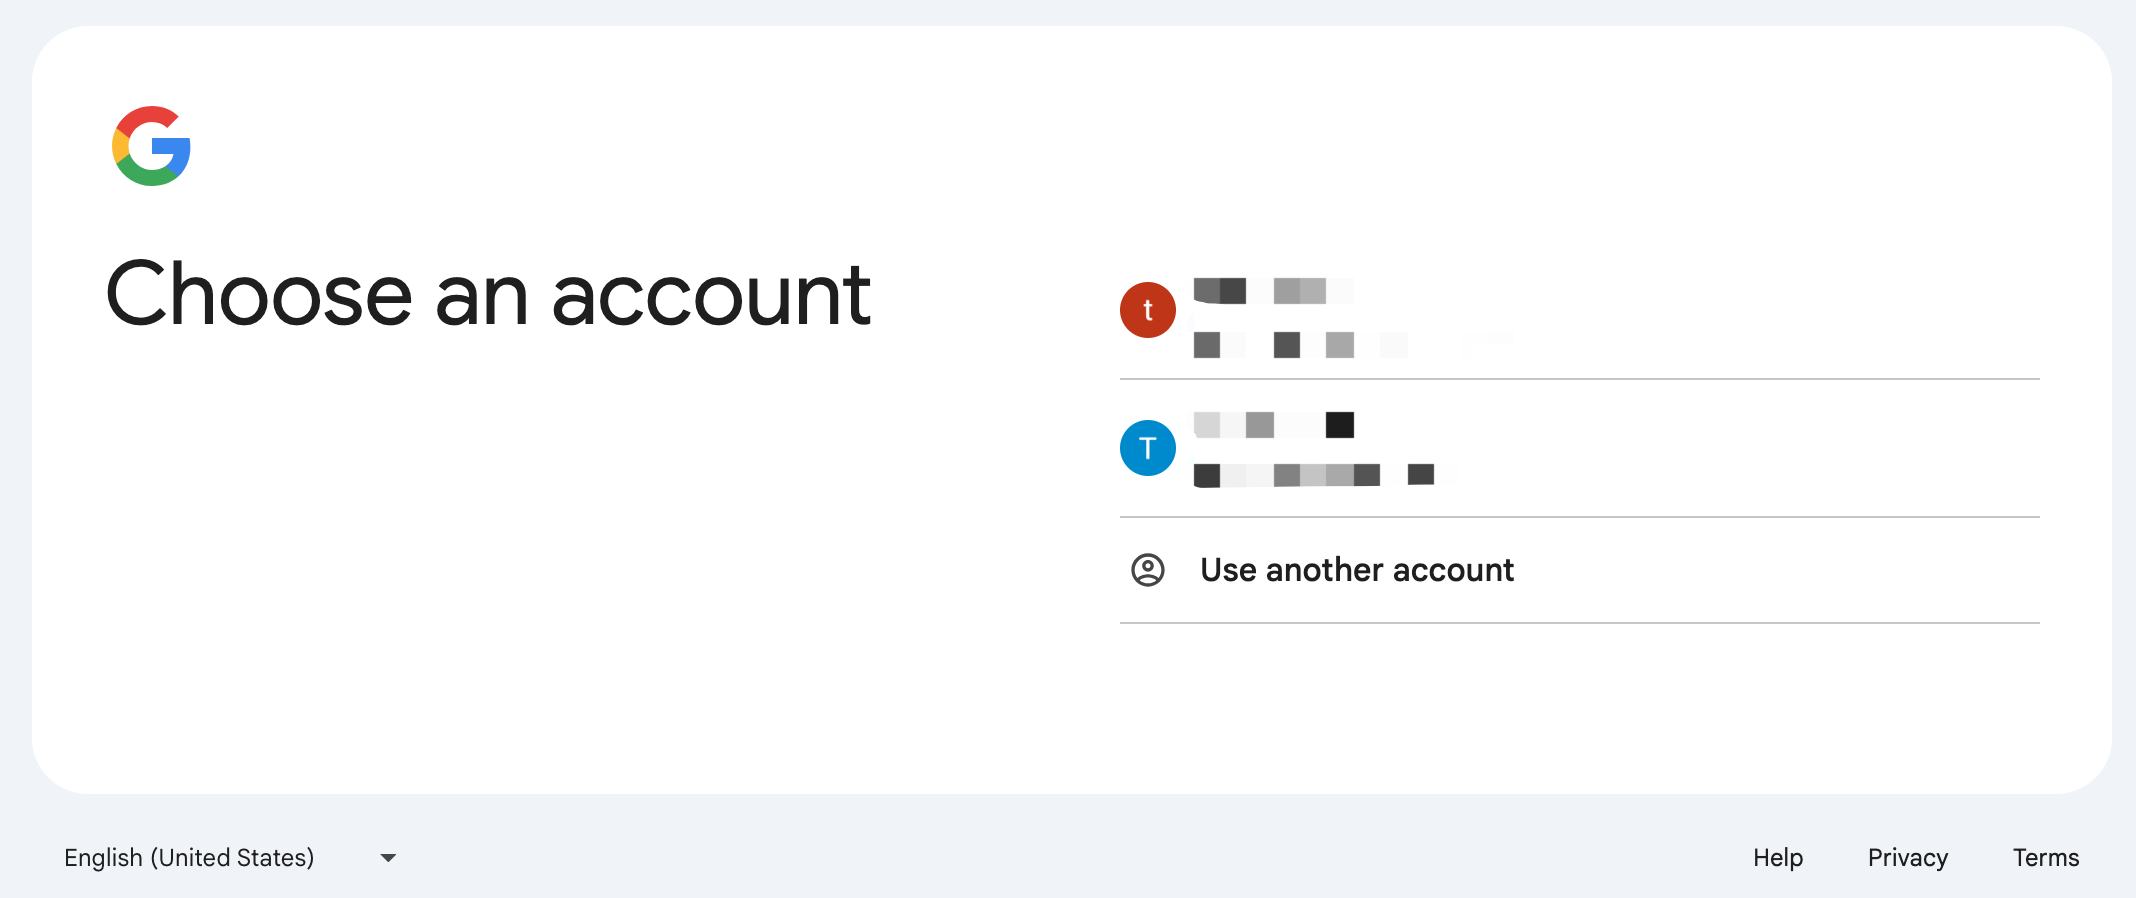
2. The system will automatically redirect to the **login page of an enterprise identity provider (IdP)**. Google IdP is used in this example.
3. After verification is passed, click the Login as CAM User tab and select a member account (member_1) for login.


 Yes
Yes
 No
No
Was this page helpful?