Overview
Tencent Cloud RT-Cube Player for iOS is an open-source Tencent Cloud player component. It can provide powerful playback functionality similar to Tencent Video with just a few lines of code. It has basic features such as landscape/portrait mode switching, definition selection, gestures, and small window playback, as well as special features such as video buffering, software/hardware decoding switching, and adjustable-speed playback. It supports more formats and has better compatibility and functionality than system-default players. In addition, it features instant broadcasting of the first frame and low latency and offers advanced capabilities like video thumbnail.
If the Player component cannot meet your custom requirements and you have development experience, you can integrate the RT-Cube Player SDK as instructed in Integration Guide to customize the player UI and playback features. Prerequisites
1. Activate VOD. If you don't have an account yet, sign up first. 2. Download and install Xcode from App Store.
Content Summary
Directions
Step 1. Download the player code package
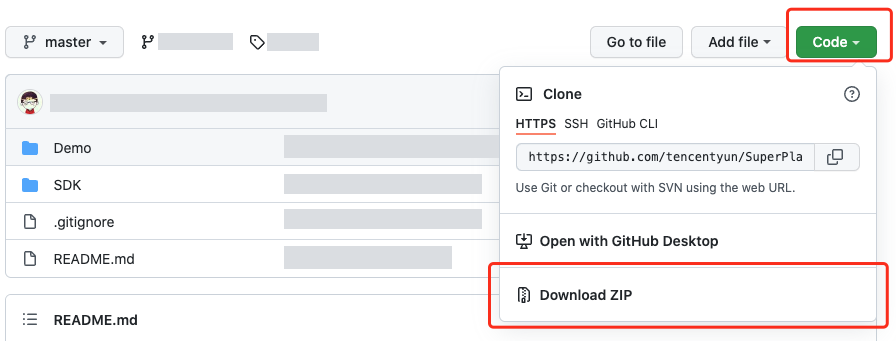
You can download a ZIP file of the Player component from the GitHub page or use the Git clone command to download the component. Download using a Git command
Go to the Player GitHub page and click Code > Download ZIP.
1. First, make sure that your computer has Git installed; if not, you can install it as instructed in Git Installation Tutorial. 2. Run the following command to clone the code of the Player component to your local system.
git clone git@github.com:tencentyun/SuperPlayer_iOS.git
If you see the following information, the project code has been cloned to your local system successfully.
Cloning to 'SuperPlayer_iOS'...
remote: Enumerating objects: 2637, done.
remote: Counting objects: 100% (644/644), done.
remote: Compressing objects: 100% (333/333), done.
remote: Total 2637 (delta 227), reused 524 (delta 170), pack-reused 1993
Receiving the object: 100% (2637/2637), 571.20 MiB | 3.94 MiB/s, done.
Processing delta: 100% (1019/1019), done.
Below is the directory structure of the component's source code after decompression:
|
SDK | Stores the Superplayer framework and static library. |
Demo | The folder of the Player demo. |
App | The entry point UI. |
SuperPlayerDemo | The Player demo. |
SuperPlayerKit | The Player component. |
Step 2. Integrate the component
Manually download the SDK
1. To install the component using CocoaPods, add the code below to the Podfile:
Directly integrate SuperPlayer as a Pod:
To use the Player edition, add the following dependency to podfile:
To use the All-in-one edition, add the following dependency to podfile:
pod 'SuperPlayer/Professional'
2. Run pod install or pod update.
1. Download the SDK and demo at GitHub. 2. Import TXLiteAVSDK_Player.framework into your project and select Do Not Embed.
3. Copy Demo/TXLiteAVDemo/SuperPlayerKit/SuperPlayer to your project directory.
4. Third-party dependency libraries of SuperPlayer include AFNetworking, SDWebImage, Masonry, and TXLiteAVSDK_Player.
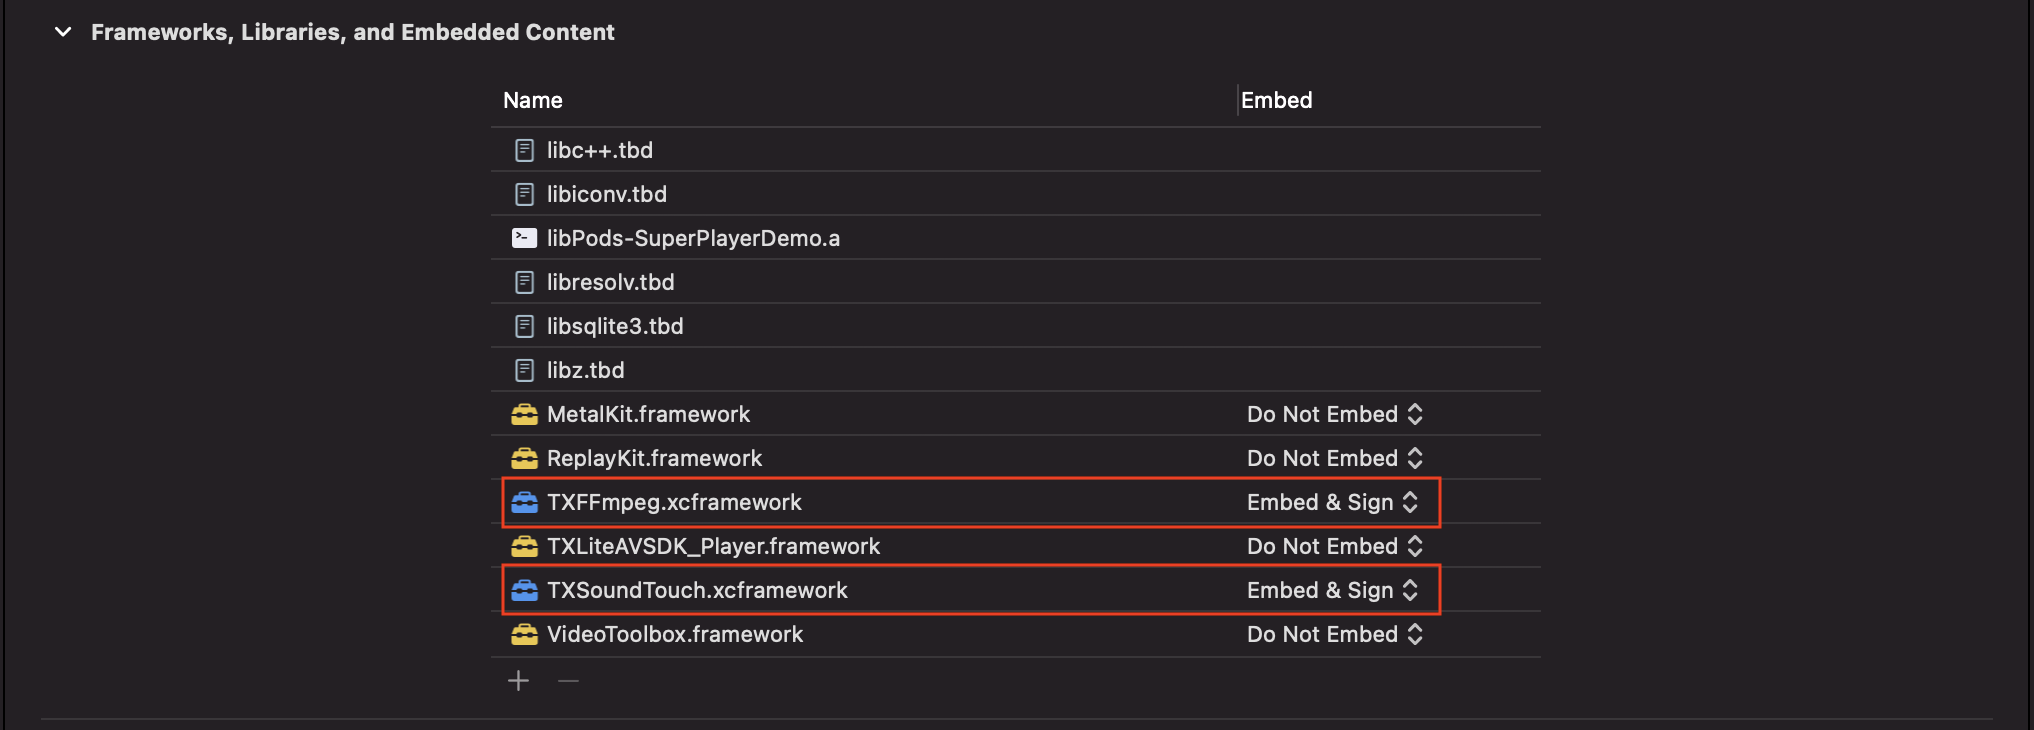
5. To integrate TXLiteAVSDK_Player manually, you need to add the required system frameworks and libraries:
System frameworks: MetalKit, ReplayKit, SystemConfiguration, CoreTelephony, VideoToolbox, CoreGraphics, AVFoundation, Accelerate, MobileCoreServices, and VideoToolbox.
System libraries: libz, libresolv, libiconv, libc++, and libsqlite3.
In addition, you need to add TXFFmpeg.xcframework and TXSoundTouch.scframework under the TXLiteAVSDK_Player file as dynamic libraries.
6. If you integrate TXLiteAVSDK_Player as a Pod, no libraries need to be added.
Step 3. Use the player features
This step describes how to create a player and use it for video playback.
Create a SuperPlayerView object to play videos (SuperPlayerView is the main class of the Superplayer).
// Import the header file
#import <SuperPlayer/SuperPlayer.h>
// Create a player
_playerView = [[SuperPlayerView alloc] init];
// Set a delegate for events
_playerView.delegate = self;
// Set the parent view. _playerView will be automatically added under holderView.
_playerView.fatherView = self.holderView;
2. License configuration.
If you have the required license, get the license URL and key in the RT-Cube console. If you don't have the required license, please contact us to get a license. After getting the license information, before calling relevant APIs of the SDK, initialize the license through the following API. We recommend you set the following in - [AppDelegate application:didFinishLaunchingWithOptions:]:
- (BOOL)application:(UIApplication *)application didFinishLaunchingWithOptions:(NSDictionary *)launchOptions {
NSString * const licenceURL = @"<The license URL obtained>";
NSString * const licenceKey = @"<The key obtained>";
[TXLiveBase setLicenceURL:licenceURL key:licenceKey];
NSLog(@"SDK Version = %@", [TXLiveBase getSDKVersionStr]);
}
3. Video playback:
This step describes how to play back a video. The RT-Cube Player for iOS supports playback through FileId in VOD or URL. We recommend you integrate the FileId because it allows you to use more VOD capabilities. A video
file ID is returned by the server after the video is uploaded. 1. After a video is published from a client, the server will return a file ID to the client.
2. When the video is uploaded to the server, the corresponding FileId will be included in the notification of upload confirmation.
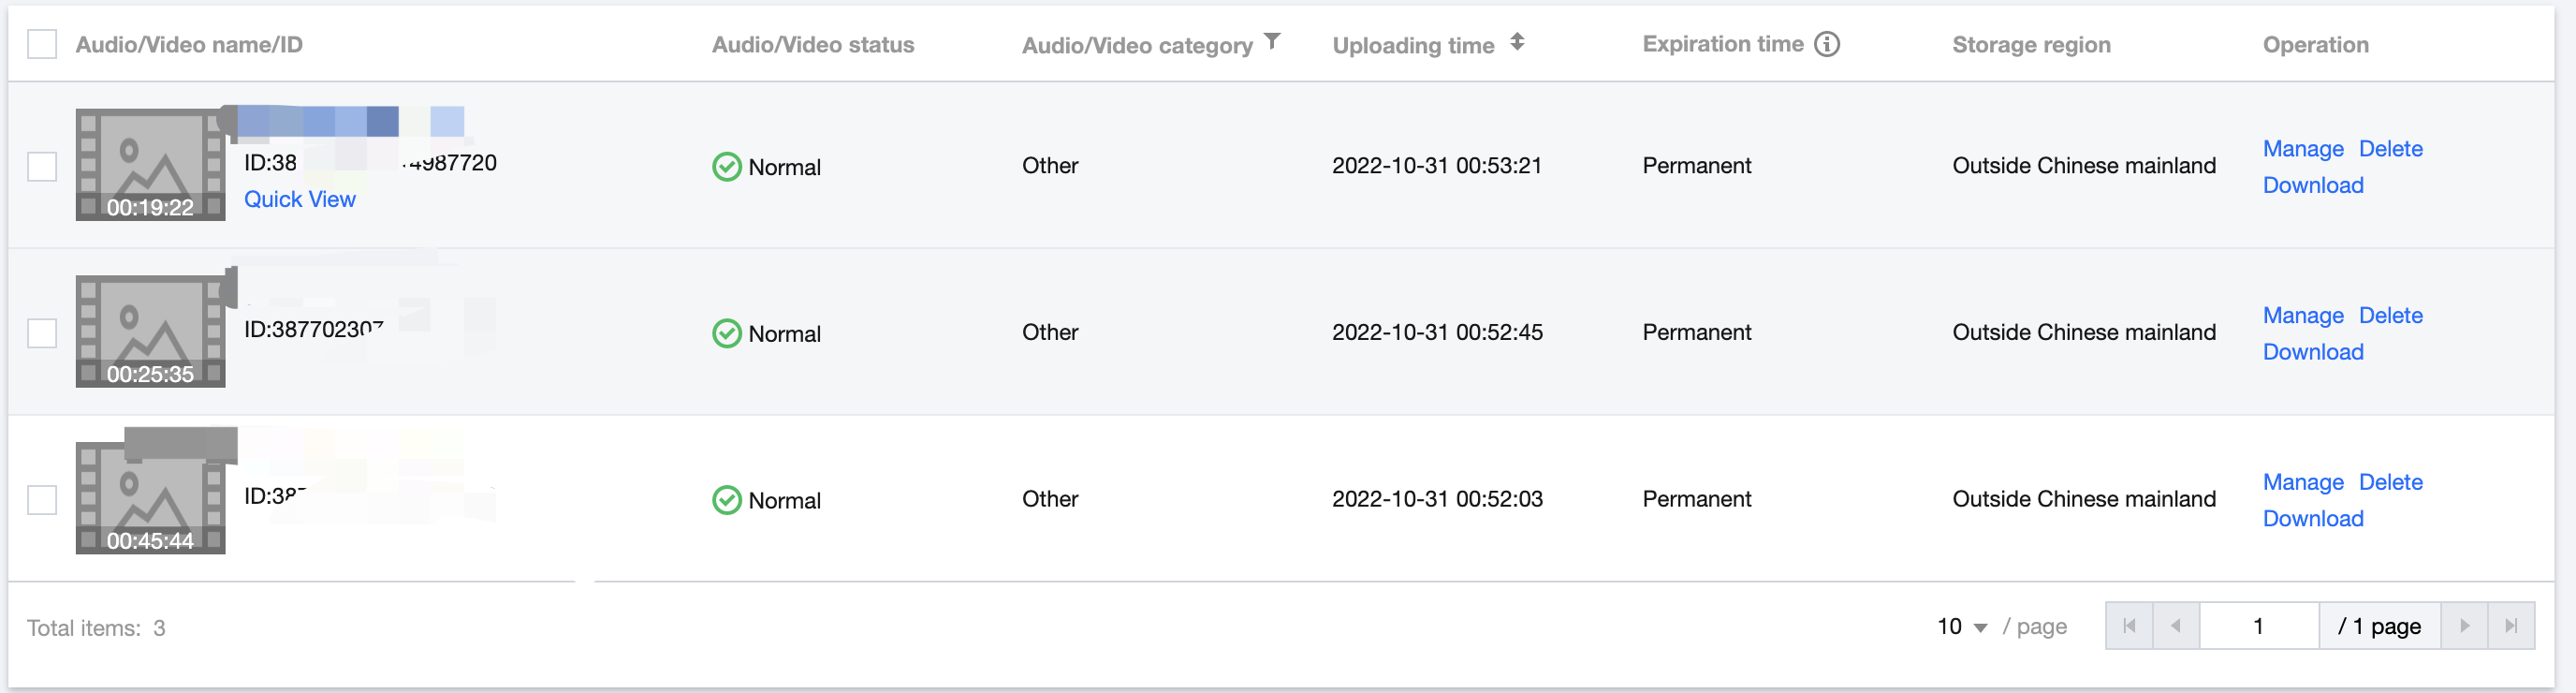
If the video you want to play is already saved with VOD, you can go to Media Assets to view its file ID. Note:
To play by VOD file ID, you need to use the Adaptive-HLS template (ID: 10) to transcode the video or use the player signature psign to specify the video to play; otherwise, the playback may fail. For more information on how to transcode a video and generate psign, see Play back a video with the Player component and Player Signature. If a "no v4 play info" exception occurs during playback through FileId, the above problem may exist. In this case, we recommend you make adjustments as instructed above. You can also directly get the playback link of the source video for playback through URL. We recommend you transcode videos for playback because untranscoded videos may experience compatibility issues during playback.
// If you haven't enabled hotlink protection and a "no v4 play info" error occurs, we recommend you transcode your video using the Adaptive-HLS template (ID: 10) or get the playback URL of the video and play it by URL.
SuperPlayerModel *model = [[SuperPlayerModel alloc] init];
model.appId = 1400329071;// Configure AppId
model.videoId = [[SuperPlayerVideoId alloc] init];
model.videoId.fileId = @"5285890799710173650"; // Configure `FileId`
// If you enable hotlink protection, you need to enter a `psign` (player signature) for playback. For more information on the signature and how to generate it, see [Player Signature](https://intl.cloud.tencent.com/document/product/266/38099).
//model.videoId.pSign = @"eyJhbGciOiJIUzI1NiIsInR5cCI6IkpXVCJ9.eyJhcHBJZCI6MTQwMDMyOTA3MSwiZmlsZUlkIjoiNTI4NTg5MDc5OTcxMDE3MzY1MCIsImN1cnJlbnRUaW1lU3RhbXAiOjEsImV4cGlyZVRpbWVTdGFtcCI6MjE0NzQ4MzY0NywidXJsQWNjZXNzSW5mbyI6eyJ0IjoiN2ZmZmZmZmYifSwiZHJtTGljZW5zZUluZm8iOnsiZXhwaXJlVGltZVN0YW1wIjoyMTQ3NDgzNjQ3fX0.yJxpnQ2Evp5KZQFfuBBK05BoPpQAzYAWo6liXws-LzU";
[_playerView playWithModelNeedLicence:model];
SuperPlayerModel *model = [[SuperPlayerModel alloc] init];
model.videoURL = @"http://your_video_url.mp4";
[_playerView playWithModelNeedLicence:model];
Stop playback.
If the player is no longer needed, call resetPlayer to reset the player and free up memory.
[_playerView resetPlayer];
At this point, you have learned how to create a player, use it to play videos, and stop playback.
More Features
1. Full screen playback
The Player component supports full screen playback, where it allows setting screen lock, volume and brightness control through gestures, on-screen commenting, screencapturing, and definition selection. This feature can be tried out in TCToolkit App > Player > Player Component, and you can enter the full screen playback mode by clicking the full screen icon. You can call the API below to go full screen from the windowed playback mode:
- (void)superPlayerFullScreenChanged:(SuperPlayerView *)player {
// You can customize the logic after switching to the full screen mode here
}
Features of full screen playback mode
Tap the back button to return to the windowed mode. The delegate method that will be triggered after the SDK implements the logic for exiting full screen is as follows:
// The back button tapping event
- (void)superPlayerBackAction:(SuperPlayerView *)player;
Triggered by tapping of the back button at the top left
// The exit full screen notification
- (void)superPlayerFullScreenChanged:(SuperPlayerView *)player;
Screen locking disables touch screen and allows users to enter an immersive playback mode. The SDK will handle the tapping event and no callbacks will be sent.
// Use the API below to enable/disable screen locking
@property(nonatomic, assign) BOOL isLockScreen;
After the on-screen commenting feature is enabled, text comments sent by users will be displayed on the screen.
Get the SPDefaultControlView object and, during initialization of the player view, set an event for the on-screen comment button of SPDefaultControlView. The on-screen comment content and view are customized by yourself. For details, see CFDanmakuView, CFDanmakuInfo, and CFDanmaku in SuperPlayerDemo.
SPDefaultControlView *dv = (SPDefaultControlView *)**self**.playerView.controlView;
[dv.danmakuBtn addTarget:**self** action:**@selector**(danmakuShow:) forControlEvents:UIControlEventTouchUpInside];
CFDanmakuView: Configure the attributes of on-screen commenting during initialization.
// The following attributes are required--------
// On-screen time
@property(nonatomic, assign) CGFloat duration;
// On-screen time in the center, at top, and at bottom
@property(nonatomic, assign) CGFloat centerDuration;
// On-screen comment line height
@property(nonatomic, assign) CGFloat lineHeight;
// Spacing between on-screen comment lines
@property(nonatomic, assign) CGFloat lineMargin;
// Maximum number of on-screen comment lines
@property(nonatomic, assign) NSInteger maxShowLineCount;
// Maximum number of on-screen comment lines in the center, at top, and at bottom
@property(nonatomic, assign) NSInteger maxCenterLineCount;
The Player component allows users to take and save a screenshot of a video during playback. The SDK will handle the screenshot button tapping event and no callbacks will be sent for successful or failed screenshots. Screenshots are saved to the phone album.
Users can change the video definition (such as SD, HD, and FHD) during playback. After the definition selection button is tapped, the SDK will implement the logic for displaying the definition selection view and handle the selection event. No callbacks will be sent.
2. Floating window playback
The Player component supports playback in a small floating window, which allows users to switch to another page of the application without interrupting the video playback. You can try out this feature in TCToolkit App > Player > Player Component by clicking Back in the top-left corner. // Tapping the back button during playback in portrait mode will trigger the API
[SuperPlayerWindowShared setSuperPlayer:self.playerView];
[SuperPlayerWindowShared show];
// The API triggered by tapping the floating window to return to the main window
SuperPlayerWindowShared.backController = self;
3. Thumbnail
The Player component supports customizing a video thumbnail, which is displayed before the callback is received for playing back the first video frame. This feature can be tried out in TCToolkit App > Player > Player Component > Thumbnail Customization Demo. When the Player component is set to the automatic playback mode PLAY_ACTION_AUTO_PLAY, the video will be played back automatically, and the thumbnail will be displayed before the first video frame is loaded.
When the Player component is set to the manual playback mode PLAY_ACTION_MANUAL_PLAY, the video will be played back only after the user clicks Play. The thumbnail will be displayed until the first video frame is loaded.
You can set the thumbnail by specifying the URL of a local or online file. For detailed directions, see the code below. If you play by VOD file ID, you can also set the thumbnail in the VOD console.
SuperPlayerModel *model = [[SuperPlayerModel alloc] init];
SuperPlayerVideoId *videoId = [SuperPlayerVideoId new];
videoId.fileId = @"8602268011437356984";
model.appId = 1400329071;
model.videoId = videoId;
// Playback mode, which can be set to automatic (`PLAY_ACTION_AUTO_PLAY`) or manual (`PLAY_ACTION_MANUAL_PLAY`)
model.action = PLAY_ACTION_MANUAL_PLAY;
// Specify the URL of an online file to use as the thumbnail. If `coverPictureUrl` is not set, the thumbnail configured in the VOD console will be used.
model.customCoverImageUrl = @"http://1500005830.vod2.myqcloud.com/6c9a5118vodcq1500005830/cc1e28208602268011087336518/MXUW1a5I9TsA.png";
[self.playerView playWithModelNeedLicence:model];
4. Video playlist loop
The Player component supports looping a video playlist:
After a video ends, the next video in the list can be played automatically or users can manually start the next video.
After the last video in the list ends, the first video in the list will start automatically.
You can try out this feature in TCToolkit App > Player > Player Component > Video List Loop Demo. // Step 1. Create a `NSMutableArray` for the loop data
NSMutableArray *modelArray = [NSMutableArray array];
SuperPlayerModel *model = [SuperPlayerModel new];
SuperPlayerVideoId *videoId = [SuperPlayerVideoId new];
videoId.fileId = @"8602268011437356984";
model.appId = 1252463788;
model.videoId = videoId;
[modelArray addObject:model];
model = [SuperPlayerModel new];
videoId = [SuperPlayerVideoId new];
videoId.fileId = @"4564972819219071679";
model.appId = 1252463788;
model.videoId = videoId;
[modelArray addObject:model];
// Step 2. Call the loop API of `SuperPlayerView`
[self.playerView playWithModelListNeedLicence:modelArray isLoopPlayList:YES startIndex:0];
(void)playWithModelListNeedLicence:(NSArray *)playModelList isLoopPlayList:(BOOL)isLoop startIndex:(NSInteger)index;
API parameters:
|
| | |
| | Whether to loop the playlist |
| | Index of the video from which to start the playback |
5. Picture-in-Picture (PiP) feature
The Picture-in-Picture (PiP) feature has been launched on iOS 9 but can currently be used only on iPads. To use PiP on an iPhone, you need to update the iOS version to iOS 14.
The Player component supports both in-app PiP and system-wide PiP. To use the feature, you need to enable background modes: In Xcode, choose your target, click Signing & Capabilities > +Capability > Background Modes, and select Audio, AirPlay, and Picture in Picture.
Code sample for using PiP capabilities:
// Enter the PiP mode
if (![TXVodPlayer isSupportPictureInPicture]) {
return;
}
[_vodPlayer enterPictureInPicture];
// Exit the PiP mode
[_vodPlayer exitPictureInPicture];
6. Video preview
The Player component supports video preview, which is useful if you want to allow non-subscribers to watch the beginning of a video. We offer parameters for you to set the video preview duration, pop-up message, and preview end screen. You can find a demo for this feature in the TCToolkit app: Player > Player Component > Preview Feature Demo. // Step 1. Create a preview model
TXVipWatchModel *model = [[TXVipWatchModel alloc] init];
model.tipTtitle = @"You can preview 15 seconds of the video. Become a subscriber to watch the full video.";
model.canWatchTime = 15;
// Step 2. Set the preview model
self.playerView.vipWatchModel = model;
// Step 3. Call the method below to display the preview
[self.playerView showVipTipView];
TXVipWatchModel class parameter description:
|
| | |
| | Preview duration in seconds |
7. Dynamic watermark
The Player component allows you to add a randomly moving text watermark to protect your content against piracy. Watermarks are visible in both the full screen mode and windowed mode. The text, font size, and color of a watermark are customizable. You can find a demo for this feature in the TCToolkit app: Player > Player Component > Dynamic Watermark Demo. // Step 1. Create a video source information model
SuperPlayerModel * playermodel = [SuperPlayerModel new];
// Add other information of the video source
// Step 2. Create a dynamic watermark model
DynamicWaterModel *model = [[DynamicWaterModel alloc] init];
// Step 3. Set the data of the dynamic watermark
model.dynamicWatermarkTip = @"shipinyun";
model.textFont = 30;
model.textColor = [UIColor colorWithRed:255.0/255.0 green:255.0/255.0 blue:255.0/255.0 alpha:0.8];
playermodel.dynamicWaterModel = model;
// Step 4. Call the method below to display the dynamic watermark
[self.playerView playWithModelNeedLicence:playermodel];
Parameters for DynamicWaterModel:
Demo
To try out more features, you can directly run the demo project or scan the QR code to download the TCToolkit App demo.
Running a demo project
1. In the Demo directory, run the pod update command to generate the TXLiteAVDemo.xcworkspace file again.
2. Double-click the file to open it, modify the certificate, and run the project on a real device.
3. After the demo is run successfully, go to Player > Player Component to try out the player features.
You can try out more features of the Player component in TCToolkit App > Player.