The Tencent Cloud RT-Cube Player for Android is an open-source player component of Tencent Cloud. It integrates quality monitoring, video encryption, Top Speed Codec, definition selection, and small window playback and is suitable for all VOD and live playback scenarios. It encapsulates complete features and provides upper-layer UIs to help you quickly create a playback program comparable to mainstream video applications.
If the Player component cannot meet your custom requirements and you have development experience, you can integrate the RT-Cube Player SDK as instructed in Integration Guide to customize the player UI and playback features.
Prerequisites
1. To try out all features of the player, we recommend you activate VOD. If you don't have an account yet, sign up for one first. If you don't use the VOD service, you can skip this step; however, you will only be able to use basic player features after integration.
2. Download and install Android Studio. If you have already done so, skip this step.
Content Summary
1. How to integrate the Player component for Android
remote: Total 2637(delta 227), reused 524(delta 170), pack-reused 1993
Receiving the object: 100% (2637/2637), 571.20 MiB |3.94 MiB/s, done.
Processing delta: 100% (1019/1019), done.
After the project is downloaded, the directory generated after decompression of the source code is as follows:
Filename
Description
LiteAVDemo(Player)
The Player demo project, which can be run directly after being imported into Android Studio.
app
The entry of the main UI
superplayerkit
The Player component (SuperPlayerView), which provides common features such as playback, pause, and gesture control.
superplayerdemo
The Player component demo code
common
Tool module
SDK
Player SDK, including LiteAVSDK_Player_x.x.x.aar (SDK provided in AAR format) and LiteAVSDK_Player_x.x.x.zip (SDKs provided in lib and JAR formats)
Player Documentation (Android).pdf
The Player component user guide
Step 2. Integrate the component
This step describes how to integrate the player. You can integrate the project by using Gradle for automatic loading, manually downloading the AAR and importing it into your current project, or importing the JAR and SO libraries.
Automatic loading in Gradle (AAR)
Manual download in Gradle (AAR)
SDK integration (jar + so)
1. Download the SDK + demo package for Android here.
2. Copy the Demo/superplayerkit module to your project and then configure as follows:
Import superplayerkit into setting.gradle in your project directory.
include ':superplayerkit'
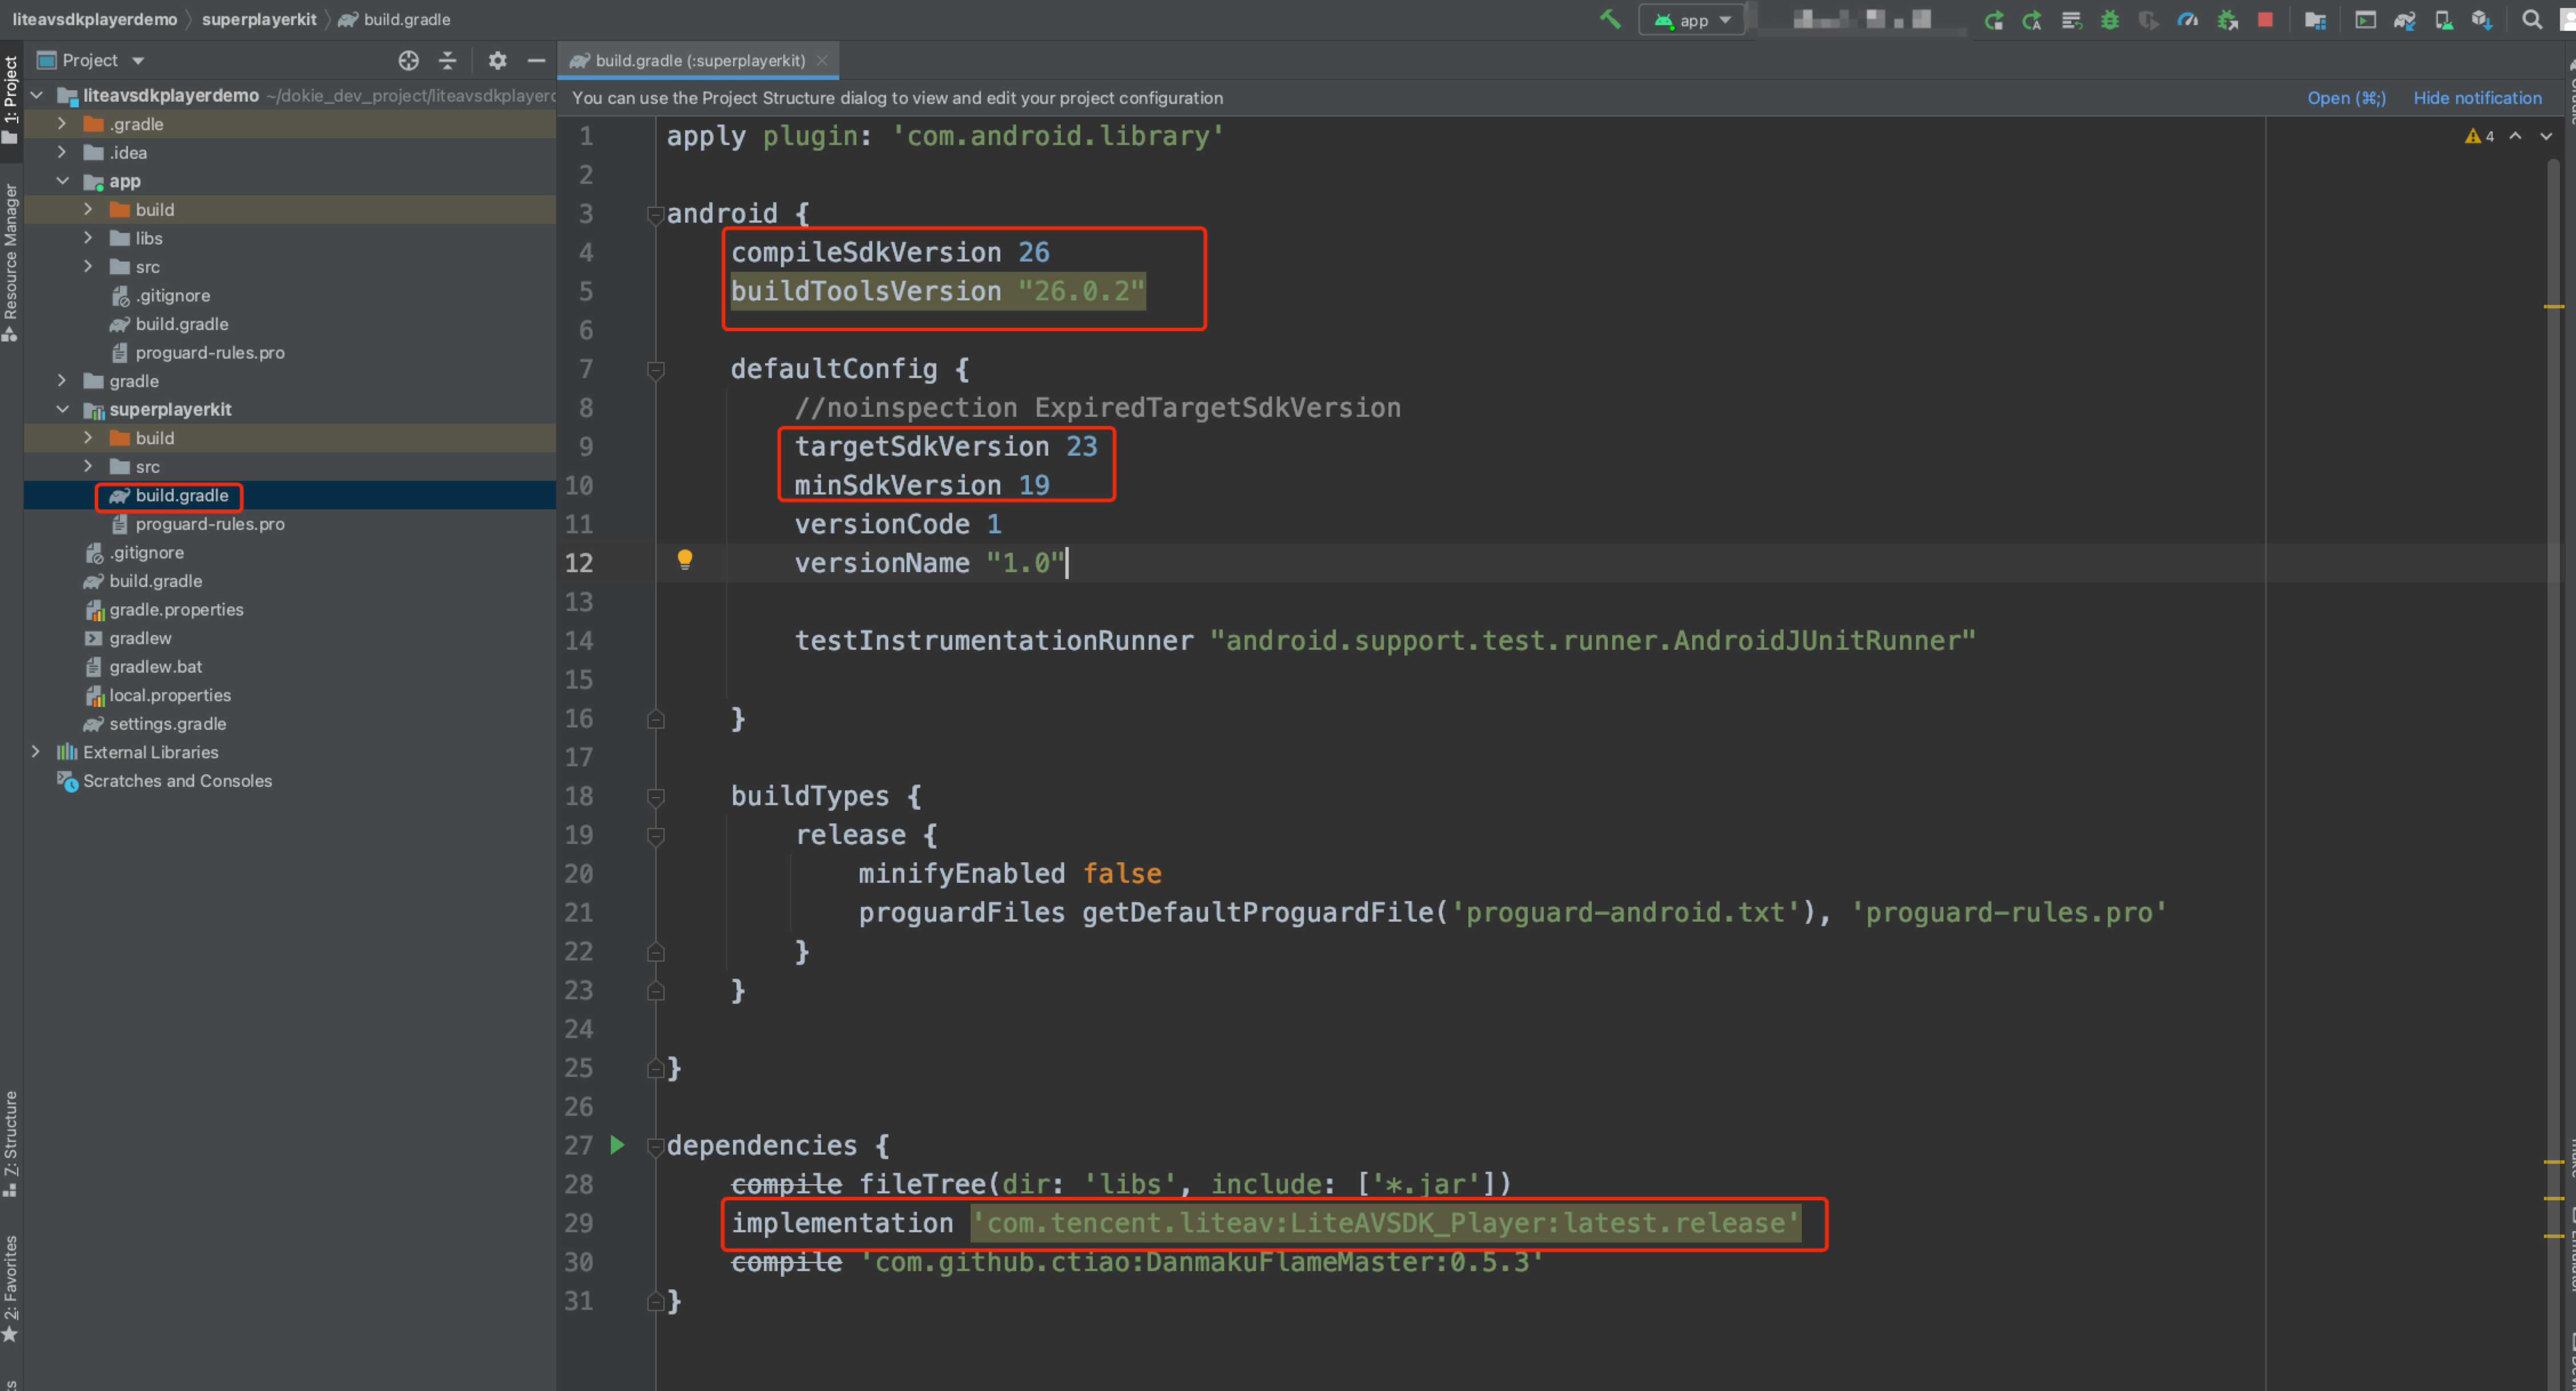
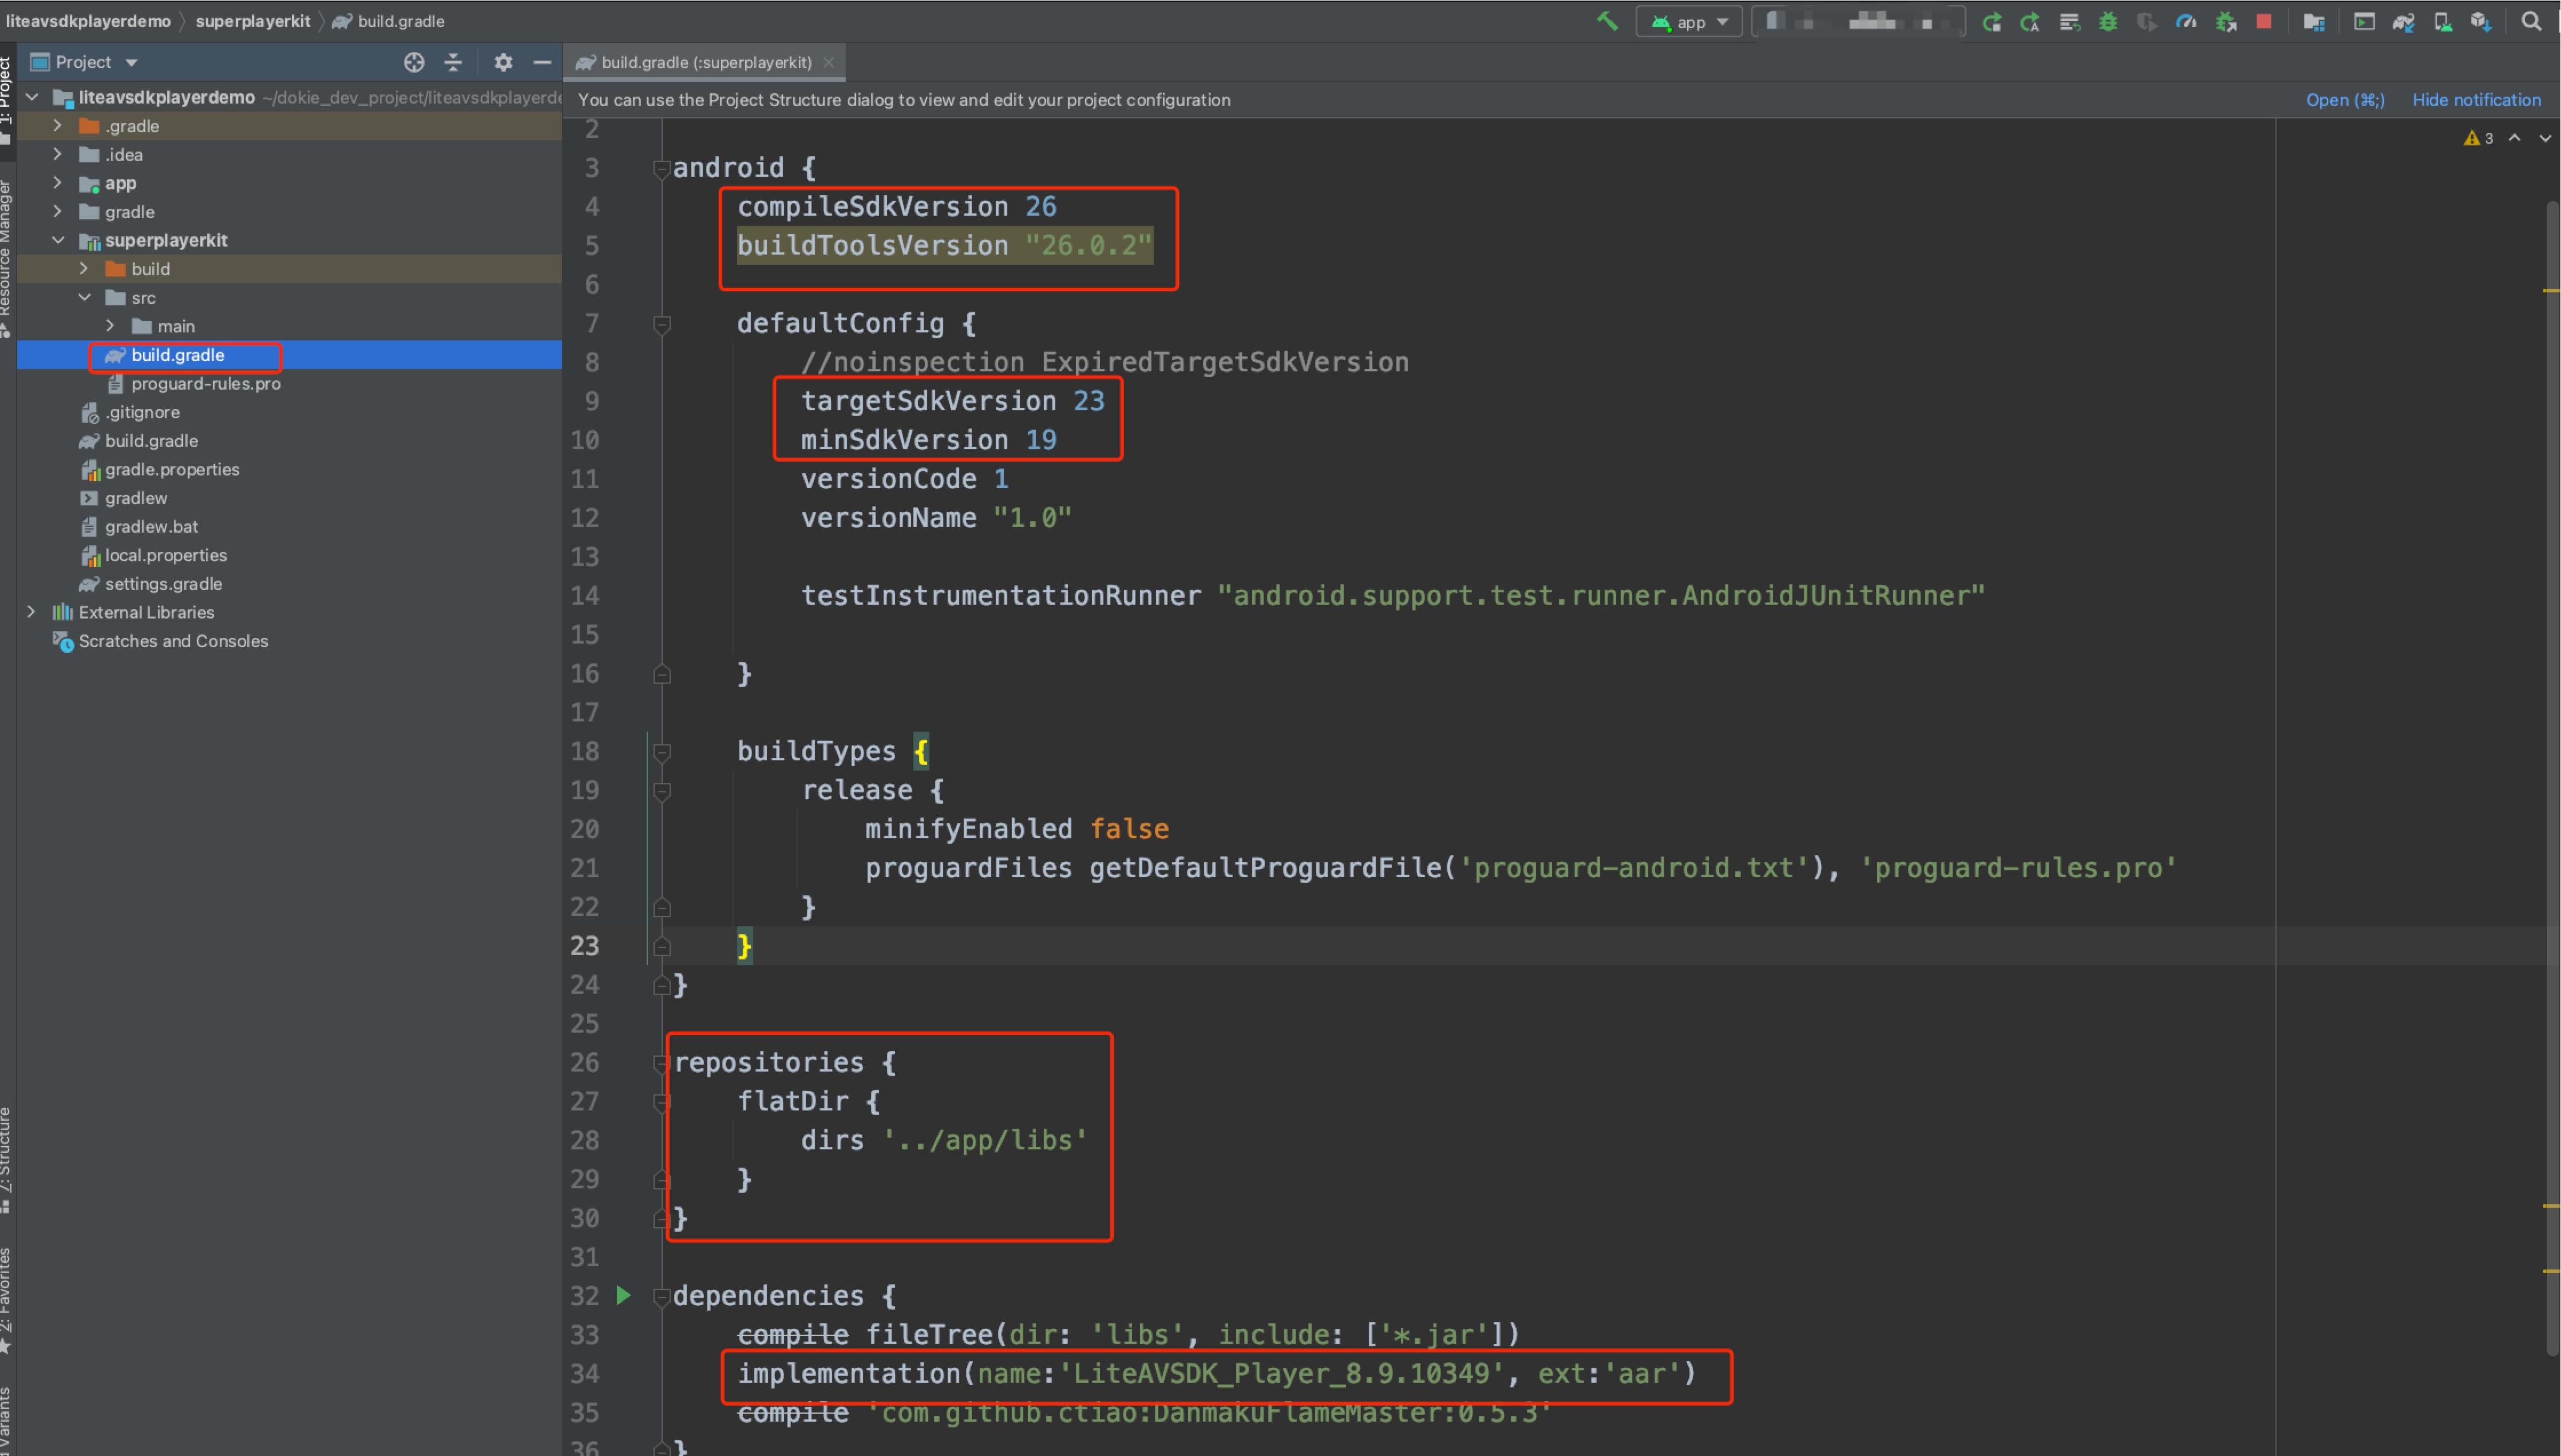
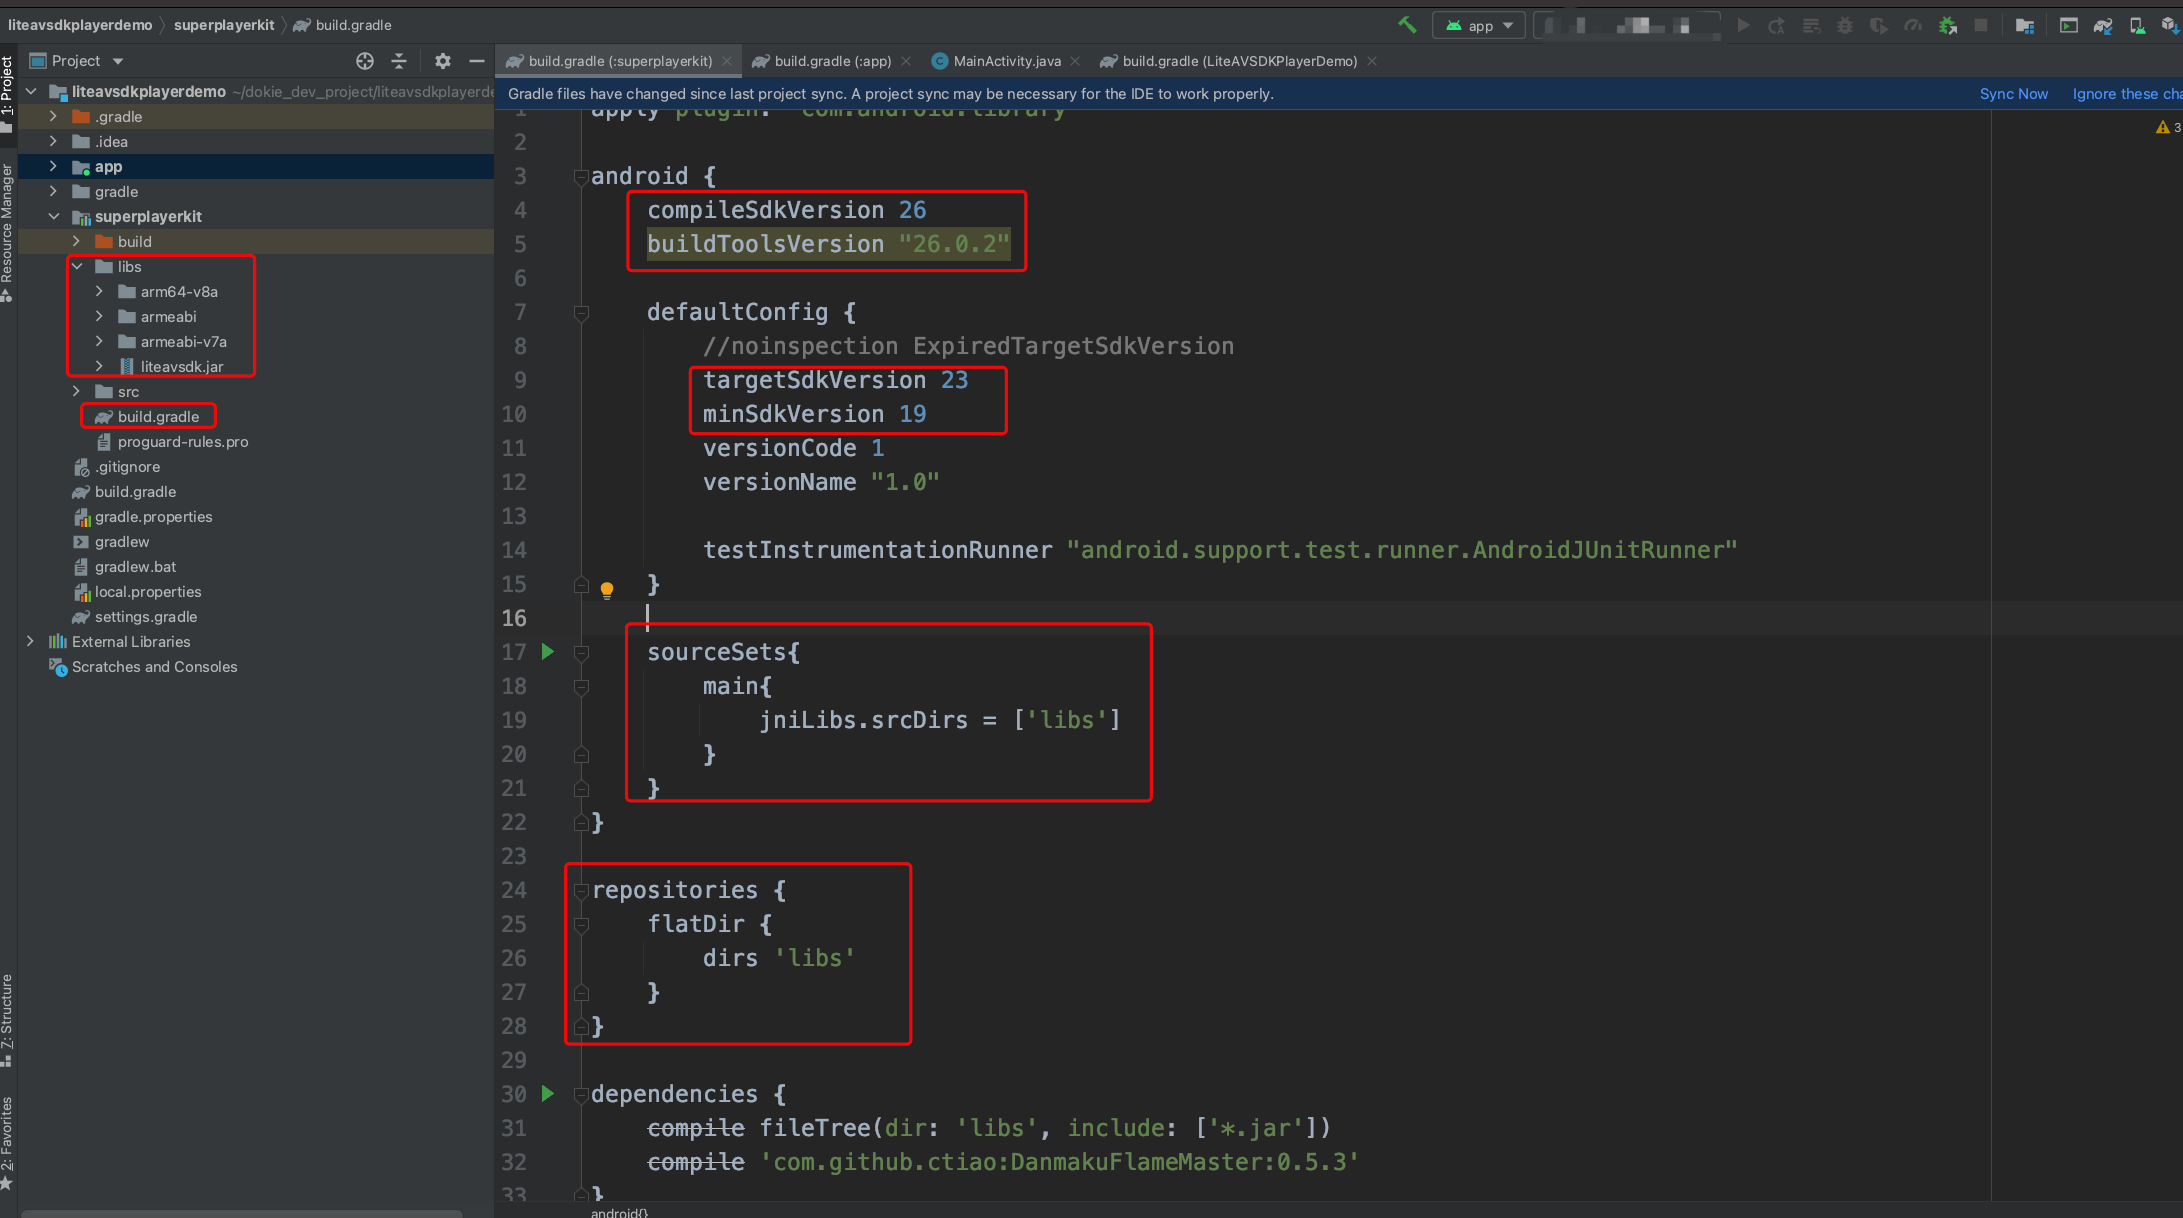
Open the build.gradle file of the superplayerkit project and modify the constant values of compileSdkVersion, buildToolsVersion, minSdkVersion, targetSdkVersion, and rootProject.ext.liteavSdk.
compileSdkVersion 26
buildToolsVersion "26.0.2"
defaultConfig {
targetSdkVersion 23
minSdkVersion 19
}
dependencies {
// To integrate an older version, change `latest.release` to the corresponding version number, such as `8.5.290009`
Import the common module into your project as instructed above and configure it.
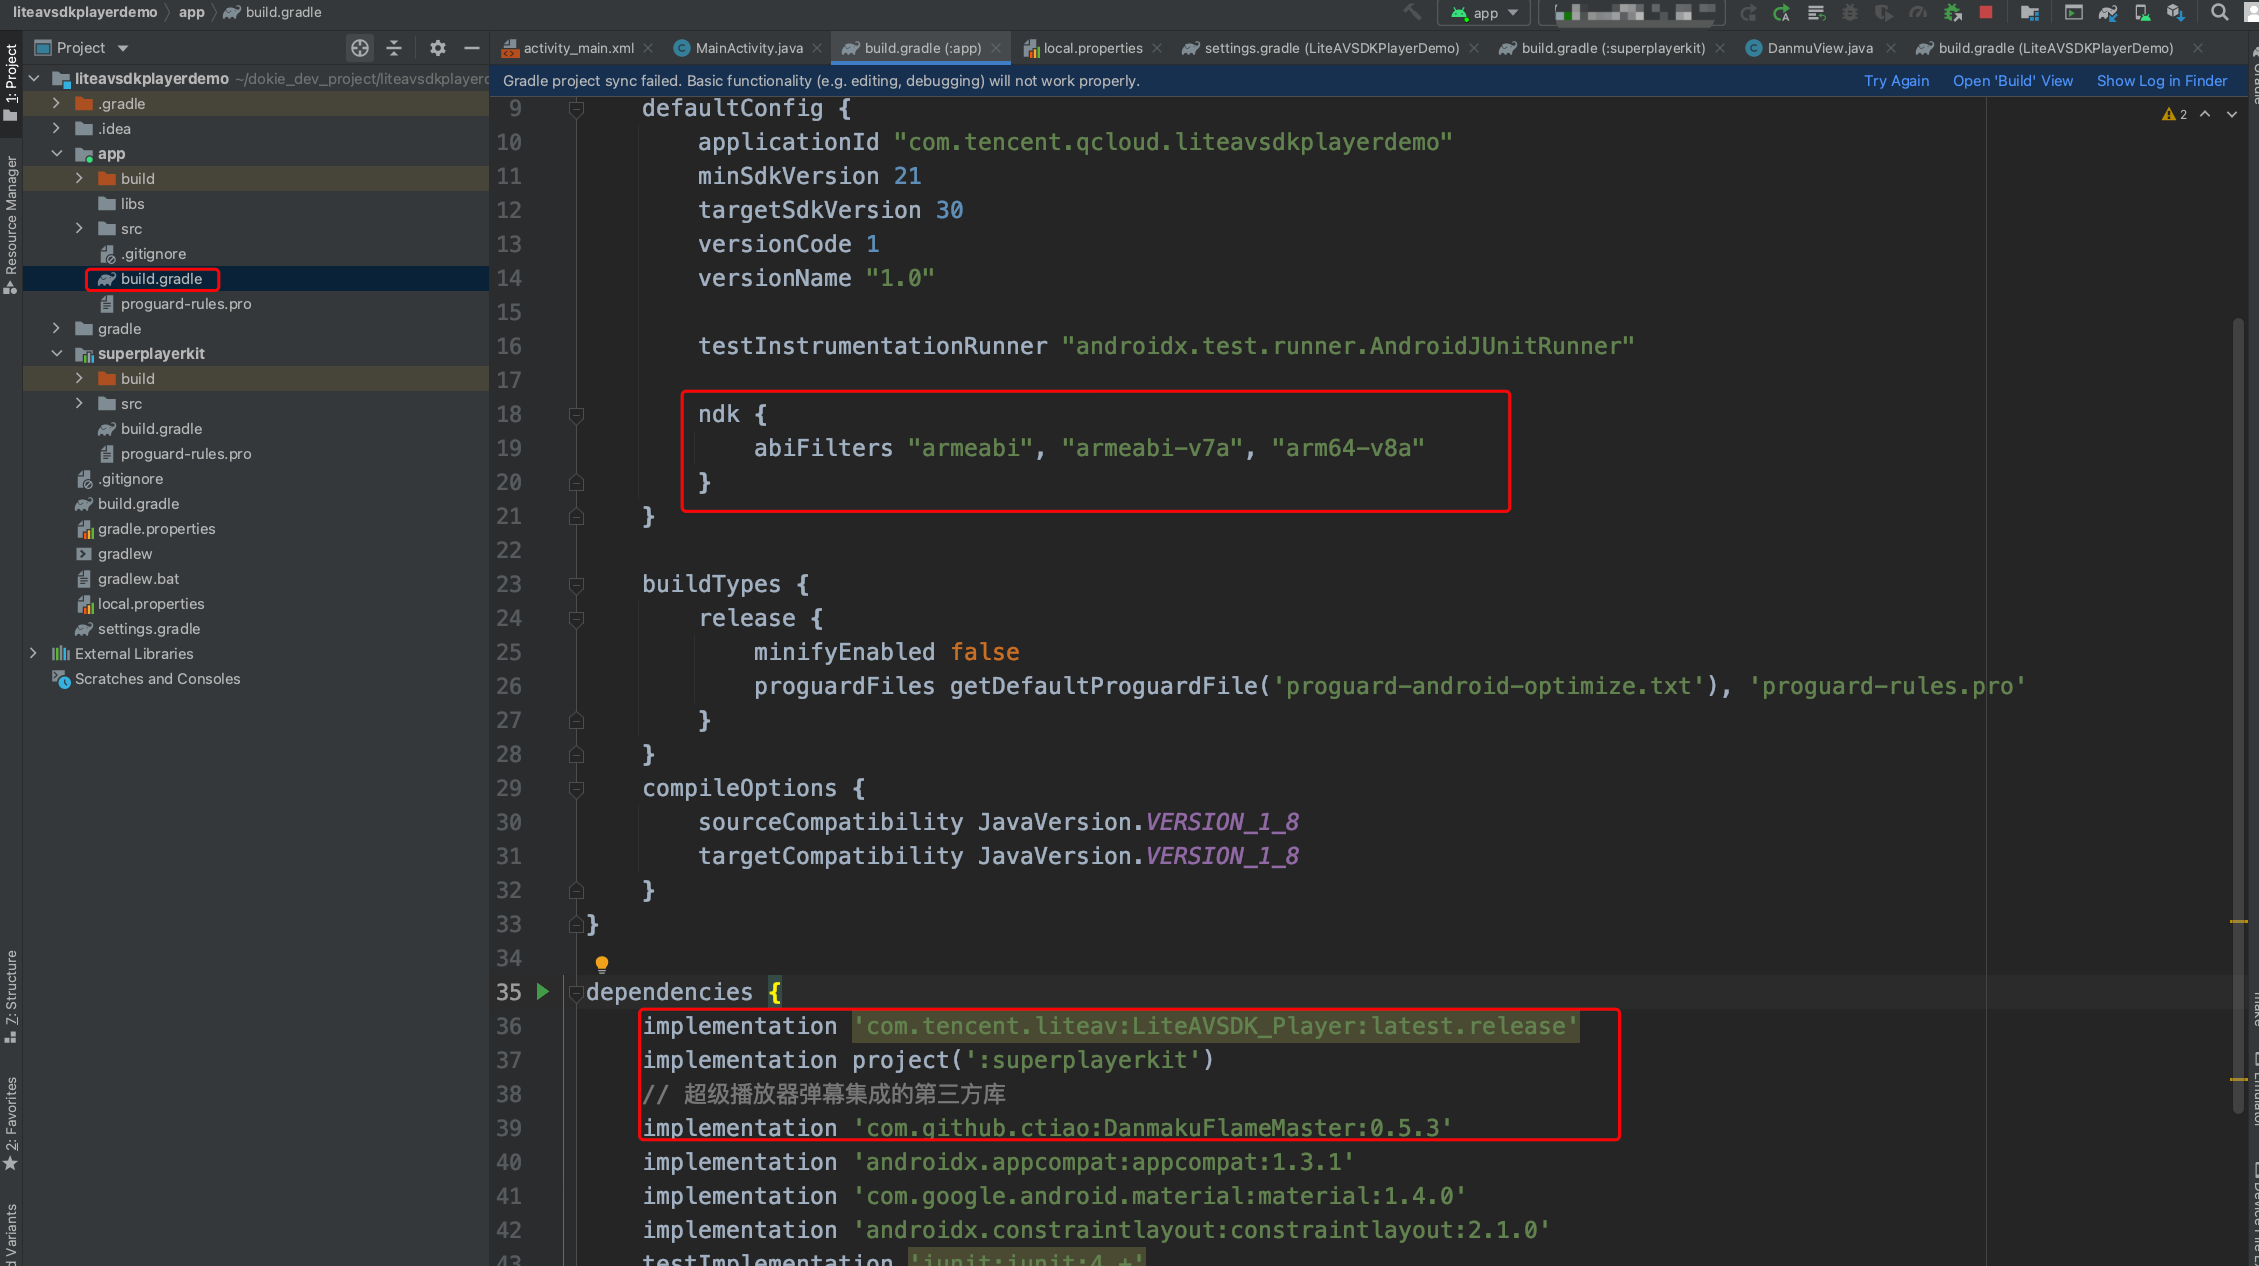
3. Configure the mavenCentral repository in Gradle, and LiteAVSDK will be automatically downloaded and updated. Open app/build.gradle and configure as follows:
3.1 Add the LiteAVSDK_Player dependencies to dependencies.
3.2 In the defaultConfig of app/build.gradle, specify the CPU architecture to be used by the application (currently, LiteAVSDK supports armeabi, armeabi-v7a, and arm64-v8a, which you can configure as needed).
ndk {
abiFilters "armeabi", "armeabi-v7a", "arm64-v8a"
}
If you haven't used the download cache feature (APIs in TXVodDownloadManager) of the SDK v9.4 or earlier and don't need to play back the downloaded files in the SDK v9.5 or later, you don't need to use the SO file of the feature, which helps reduce the size of the installation package. For example, if you have downloaded a cached file by using the setDownloadPath and startDownloadUrl functions of the TXVodDownloadManager class in the SDK v9.4 or earlier, and the getPlayPath path called back by TXVodDownloadManager is stored in the application for subsequent playback, you will need libijkhlscache-master.so to play back the file at the getPlayPath path; otherwise, you won't need it. You can add the following to app/build.gradle:
3.3 Add the mavenCentral repository to the build.gradle in your project directory.
repositories {
mavenCentral()
}
4. Click
Sync Now to sync the SDK. If mavenCentral can be connected to, the SDK will be automatically downloaded and integrated into the project very soon.
1. Download the SDK + demo package for Android here.
2. Import SDK/LiteAVSDK_Player_XXX.aar (XXX is the version number) into the libs folder under app and copy the Demo/superplayerkit module to the project.
3. Import superplayerkit into setting.gradle in your project directory.
include ':superplayerkit'
4. Open the build.gradle file of the superplayerkit project and modify the constant values of compileSdkVersion, buildToolsVersion, minSdkVersion, targetSdkVersion, and rootProject.ext.liteavSdk.
6. Add the following to the project's build.gradle:
allprojects {
repositories {
flatDir {
dirs 'libs'
}
}
}
7. In the defaultConfig of app/build.gradle, specify the CPU architecture to be used by the application (currently, LiteAVSDK supports armeabi, armeabi-v7a, and arm64-v8a).
ndk {
abiFilters "armeabi", "armeabi-v7a", "arm64-v8a"
}
If you haven't used the download cache feature (APIs in TXVodDownloadManager) of the SDK v9.4 or earlier and don't need to play back the downloaded files in the SDK v9.5 or later, you don't need to use the SO file of the feature, which helps reduce the size of the installation package. For example, if you have downloaded a cached file by using the setDownloadPath and startDownloadUrl functions of the TXVodDownloadManager class in the SDK v9.4 or earlier, and the getPlayPath path called back by TXVodDownloadManager is stored in the application for subsequent playback, you will need libijkhlscache-master.so to play back the file at the getPlayPath path; otherwise, you won't need it. You can add the following to app/build.gradle:
If you do not want to import the AAR library, you can also integrate LiteAVSDK by importing JAR and SO libraries.
1. Download the SDK + demo package for Android here and decompress it. Find SDK/LiteAVSDK_Player_XXX.zip (XXX is the version number) in the SDK directory. After decompression, you can get the libs directory, which contains the JAR file and folders of SO files as listed below:
2. Copy the Demo/superplayerkit module to your project and import superplayerkit into setting.gradle in your project directory.
include ':superplayerkit'
3. Copy the libs folder obtained by decompression in step 1 to the superplayerkit project root directory.
4. Modify the superplayerkit/build.gradle file:
compileSdkVersion 26
buildToolsVersion "26.0.2"
defaultConfig {
targetSdkVersion 23
minSdkVersion 19
}
Import the common module into your project as instructed above and configure it.
Configure sourceSets and add the SO library import code.
sourceSets{
main{
jniLibs.srcDirs = ['libs']
}
}
Configure repositories, add flatDir, and specify the path of the local repository.
repositories {
flatDir {
dirs 'libs'
}
}
5. In the defaultConfig of app/build.gradle, specify the CPU architecture to be used by the application (currently, LiteAVSDK supports armeabi, armeabi-v7a, and arm64-v8a).
ndk {
abiFilters "armeabi", "armeabi-v7a", "arm64-v8a"
}
6. Click Sync Now to sync the SDK.
At this point, you have completed integrating the RT-Cube Player for Android.
Step 3. Configure application permissions
Configure permissions for your application in AndroidManifest.xml. LiteAVSDK needs the following permissions:
In the proguard-rules.pro file, add the classes related to the TRTC SDK to the "do not obfuscate" list:
-keep class com.tencent.** { *;}
At this point, you have completed configuring permissions for the RT-Cube Player application for Android.
Step 5. Use the player features
This step describes how to create a player and use it for video playback.
1. Player creation.
The main class of the player is SuperPlayerView, and videos can be played back after it is created. FileId or URL can be integrated for playback. Create SuperPlayerView in the layout file:
If you have the required license, get the license URL and key in the RT-Cube console.
If you don't have the required license, contact us to get it.
After obtaining the license information, before calling relevant APIs of the SDK, initialize the license through the following API. We recommend you set the following in the Application class:
Log.i(TAG,"onLicenceLoaded: result:"+ result +", reason:"+ reason);
}
});
}
}
3. Video playback.
This step describes how to play back a video. The RT-Cube Player for Android can be used for VOD and live playback as follows:
VOD
playback
: The Player component supports two VOD playback methods, namely, through FileID or URL.
Live playback: The Player component can use the playback through URL method for live playback. A live audio/video stream can be pulled for playback simply by passing in its URL. For more information on how to generate a Tencent Cloud live streaming URL, see Splicing Live Streaming URLs.
VOD and live playback through URL
VOD playback through `FileID`
A URL can be the playback address of a VOD file or the pull address of a live stream. A video file can be played back simply by passing in its URL.
SuperPlayerModel model =newSuperPlayerModel();
model.appId =1400329073;// Configure `AppId`
model.url ="http://your_video_url.mp4";// Configure a URL for your video for playback
mSuperPlayerView.playWithModelNeedLicence(model);
A video file ID is returned by the server after the video is uploaded.
1. After a video is published from a client, the server will return a file ID to the client.
2. After a video is uploaded to the server, the notification for successful upload will contain a file ID for the video.
If the video you want to play is already saved with VOD, you can go to Media Assets to view its file ID.
Note:
To play by VOD file ID, you need to use the Adaptive-HLS template (ID: 10) to transcode the video or use the player signature psign to specify the video to play; otherwise, the playback may fail. For more information on how to transcode a video and generate psign, see Play back a video with the Player component and Player Signature.
If a "no v4 play info" exception occurs during playback through FileId, the above problem may exist. In this case, we recommend you make adjustments as instructed above. You can also directly get the playback link of the source video for playback through URL.
We recommend you transcode videos for playback because untranscoded videos may experience compatibility issues during playback.
// If you haven't enabled hotlink protection and a "no v4 play info" error occurs, we recommend you transcode your video using the Adaptive-HLS template (ID: 10) or get the playback URL of the video and play it by URL.
// If you enable hotlink protection, you need to enter a `psign`(player signature)for playback. For more information on the signature and how to generate it, see [Player Signature](https://www.tencentcloud.com/document/product/266/38099).
If the player is no longer needed, call resetPlayer to reset the player and free up memory.
mSuperPlayerView.resetPlayer();
At this point, you have learned how to create a player, use it to play videos, and stop playback.
More Features
This section describes several common player features. For more features, see Demo. For features supported by the Player component, see Feature Description.
1. Full screen playback
The Player component supports full screen playback. In full screen mode, users can lock the screen, control volume and brightness with gestures, send on-screen comments, take screenshots, and switch the video definition. You can try out this feature in TCToolkit App > Player > Player Component, and you can enter the full screen playback mode by clicking the full screen icon in the bottom-right corner.
You can call the API below to enter full screen from the windowed playback mode:
Screen locking disables touch screen and allows users to enter an immersive playback mode.
// API triggered after tapping
toggleLockState();
After the on-screen commenting feature is enabled, text comments sent by users will be displayed on the screen.
// Step 1. Add an on-screen comment to the on-screen comment view
addDanmaku(String content,boolean withBorder);
// Step 2. Enable or disable on-screen commenting
toggleBarrage();
The Player component allows users to take and save a screenshot of a video during playback. Click the button in image 4 to capture the screen, and you can save the captured screenshot with the mSuperPlayer.snapshot API.
The Player component supports playback in a small floating window, which allows users to switch to another application without interrupting the video playback. You can try out this feature in TCToolkit App > Player > Player Component by clicking Back in the top-left corner.
Floating window playback relies on the following permission in AndroidManifest:
The Player component supports customizing a video thumbnail, which is displayed before the callback is received for playing back the first video frame. You can try out this feature in TCToolkit App > Player > Player Component > Thumbnail Customization Demo.
When the Player component is set to the automatic playback mode PLAY_ACTION_AUTO_PLAY, the video will be played back automatically, and the thumbnail will be displayed before the first video frame is loaded.
When the Player component is set to the manual playback mode PLAY_ACTION_MANUAL_PLAY, the video will be played back only after the user clicks Play. The thumbnail will be displayed until the first video frame is loaded.
You can set the thumbnail by specifying the URL of a local or online file. For detailed directions, see the code below. If you play by VOD file ID, you can also set the thumbnail in the VOD console.
SuperPlayerModel model =newSuperPlayerModel();
model.appId ="Your `appid`";
model.videoId =newSuperPlayerVideoId();
model.videoId.fileId ="Your `fileId`";
// Playback mode, which can be set to automatic (`PLAY_ACTION_AUTO_PLAY`) or manual (`PLAY_ACTION_MANUAL_PLAY`)
model.playAction = PLAY_ACTION_MANUAL_PLAY;
// Specify the URL of an online file to use as the thumbnail. If `coverPictureUrl` is not set, the thumbnail configured in the VOD console will be used.
Index of SuperPlayerModel from which to start the playback
5. Preview
The Player component supports the video preview feature, which allows non-member viewers to view a preview of the video. You can pass in different parameters to control the video preview duration, prompt message, and preview end screen. You can try out this feature in Tencent Cloud Toolkit App > Player > Player Component > Preview Feature Demo.
Method1:
// Step 1. Create a video model
SuperPlayerModel mode =newSuperPlayerModel();
//... Add the video source information
// Step 2. Create a preview information model
VipWatchModel vipWatchModel =newVipWatchModel("You can preview %ss and activate the VIP membership to watch the full video",15);
mode.vipWatchMode = vipWatchModel;
// Step 3. Call the method for playing back videos
mSuperPlayerView.playWithModelNeedLicence(mode);
Method2:
// Step 1. Create a preview information model
VipWatchModel vipWatchModel =newVipWatchModel("You can preview %ss and activate the VIP membership to watch the full video",15);
// Step 2. Call the method for setting the preview feature
The Player component allows you to add a randomly moving text watermark to protect your content against piracy. Watermarks are visible in both the full screen mode and windowed mode. The text, font size, and color of a watermark are customizable. You can find a demo for this feature in the TCToolkit app: Player > Player Component > Dynamic Watermark Demo.
To try out more features, you can directly run the project demo or scan the QR code to download the TCToolkit App demo.
Running a demo project
1. Select File > Open on the navigation bar of Android Studio. In the pop-up window, select the $SuperPlayer_Android/Demo directory of the demo project. After the demo project is imported successfully, click Run app to run the demo.
2. After running the demo successfully, go to Player > Player Component to try out the player features.
TCToolkit app
You can try out more features of the Player component in TCToolkit App > Player.