This document introduces the instructions and operations for setting account CAM verification through the console.
Note:
If you need to enable account CAM verification, submit a ticket to apply for the allowlist features. Background
In scenarios where cloud databases are used, it is often necessary to create separate accounts and passwords for the databases and grant access and operation permissions to corresponding users. This method of account management is complex and prone to security issues such as account and password leaks. Based on this background, TencentDB for SQL Server supports the CAM verification feature for accounts. By connecting sub-accounts of Tencent Cloud platform with database accounts and adding CAM credential authentication, the complexity of account permission management is simplified, therefore enhancing database security and account management efficiency.
Overview
If you have high security requirements, you can use this feature to bind CAM with database accounts for verification. You can obtain the corresponding password when requesting to access the database, thereby enhancing database security. It is recommended that CAM verification be enabled in the following two scenarios.
Using CAM verification as a verification mechanism for temporary, individual access to the database.
Using CAM verification as a verification mechanism only for workloads that can be easily retried.
Notes
Use long connections to access the database whenever possible.
Before enabling CAM verification, ensure that the related CAM permission rules are configured in advance.
After enabling CAM verification, you will not be able to change the password.
After disabling CAM verification, you will not be able to obtain access credentials through CAM. Therefore, you need to enter a new password when disabling CAM verification.
Feature Limits
It is recommended to enable CAM verification for no more than 10 accounts within a single instance.
After CAM verification is enabled, the password reset operation for this account is not supported.
Only an account with a single server address is supported to enable CAM verification.
CAM verification cannot be enabled repeatedly for the same account.
The root account does not support CAM verification.
Prerequisites
The instance is running.
Step 1: Configure CAM permission rules
Before using the CAM verification feature with the account, you need to configure the related CAM permission rules.
Policy Content
{
"statement": [
{
"action": [
"cam:BuildDataFlowAuthToken"
],
"effect": "allow",
"resource": [
"qcs::cam::uin/<User uin>:resourceUser/<Instance ID>/<Username>",
]
}
],
"version": "2.0"
}
<User uin>: Replace with the actual account ID.
<Instance ID>: Replace with the actual instance ID to be authorized.
<Username>: Replace with the actual username to be authorized.
Operation Instructions
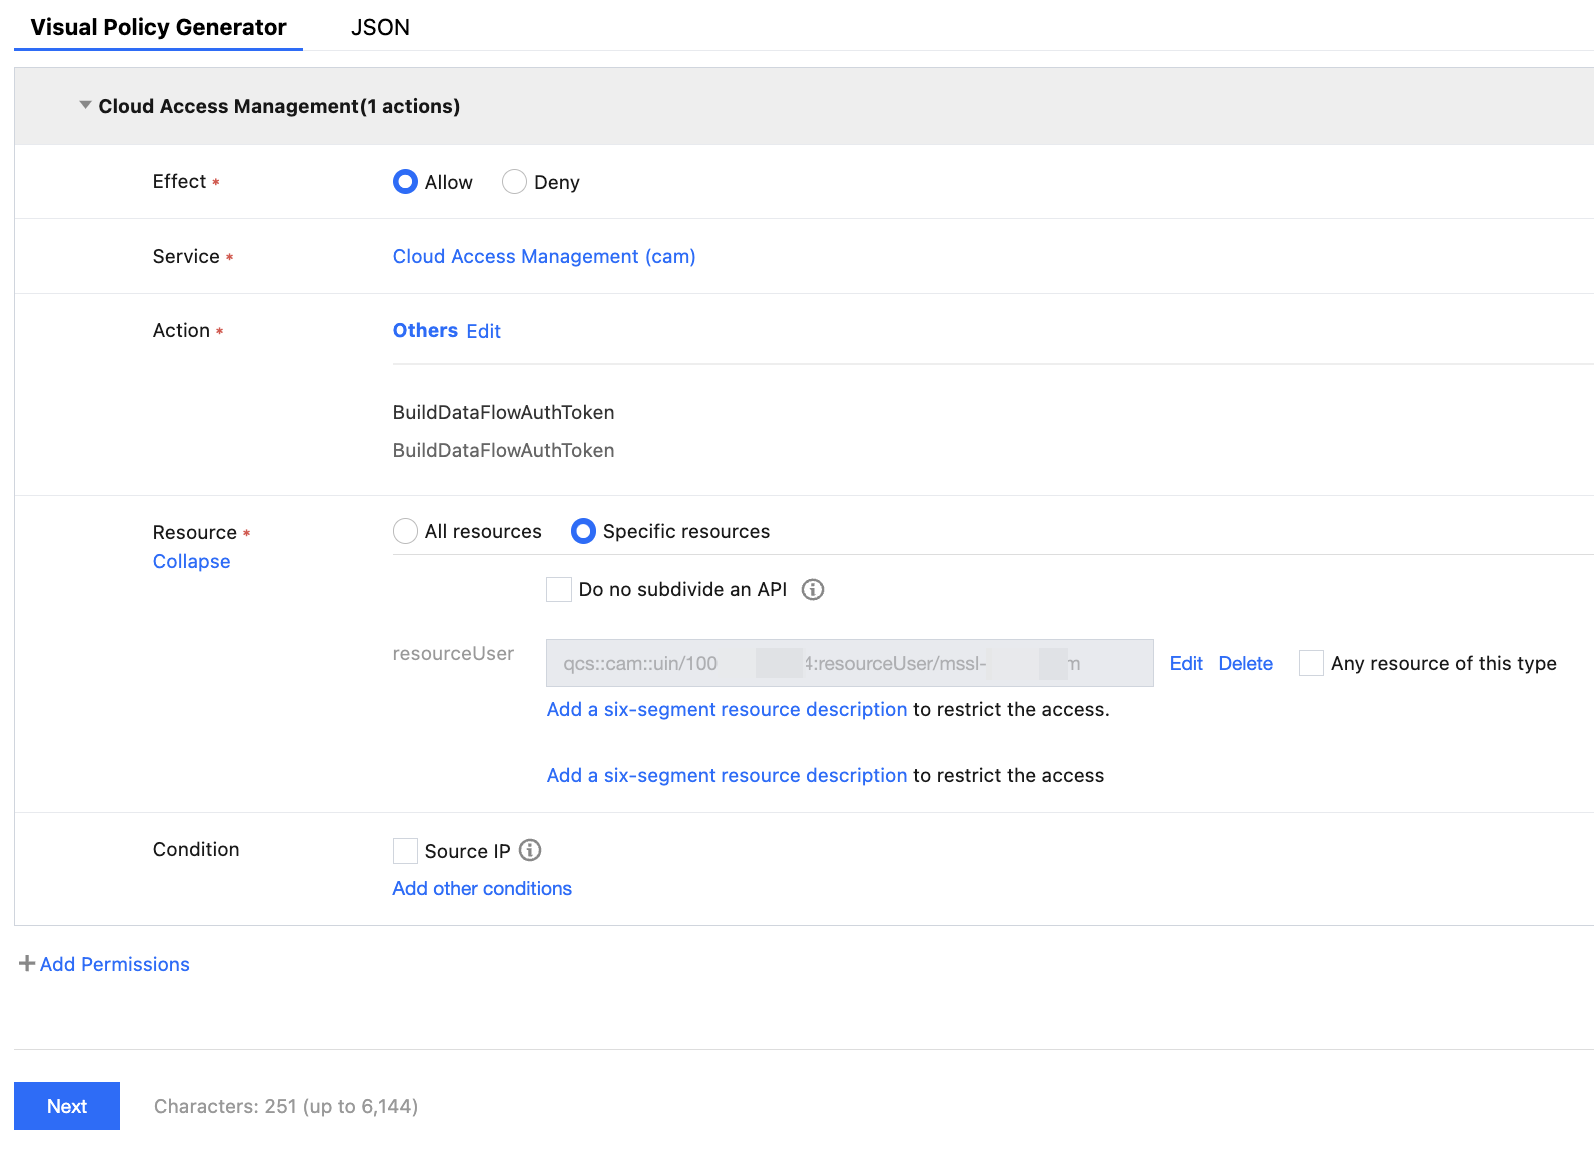
1. Log in to the CAM console with the admin account. On the Policies page, create a custom policy using the Policy Generator (refer to Creating Custom Policy). Effect: Allow
Service: Cloud Access Management (CAM)
Action: Others - BuildDataFlowAuthToken
Resource: Specific resources - Adding six-segment resources
Filling in resources: Instance ID/Account Name
2. Click Next, name your custom policy, and assign the policy to the target sub-account.
3. Click Complete to finish the authorization.
Step 2: Enable CAM verification
There are two scenarios for enabling CAM verification: enabling CAM verification when creating an account and enabling CAM verification for an existing account. You can follow the steps below for each scenario.
Scenario 1: Enabling CAM verification when creating an account
Scenario 2: Enabling CAM verification for an existing account
2. In the instance list, click Instance ID or click Manage in the Operation column to enter the instance management page.
3. On the instance management page, choose Account Management > Create Account, enter relevant information in the pop-up window, and click OK after confirmation.
Note:
For detailed steps on creating an account with different permissions, refer to Account Management. The following describes the steps related to enabling CAM verification. Enable CAM verification: Turn on the switch for "Enable CAM verification", read the important notice in the pop-up window, and click OK.
2. In the instance list, click Instance ID or click Manage in the Operation column to enter the instance management page.
3. On the instance management page, choose Account Management.
4. On the account management page, find the target account and click Enable CAM Verification in its operations column.
5. Read the important notice in the pop-up window, and then click OK.
Step 3: Obtain the password through code calling in the application
Once the account has the relevant CAM permission specifications and CAM verification is enabled, you can obtain the password through code calling in Java or other languages in the application to connect to the database instance.
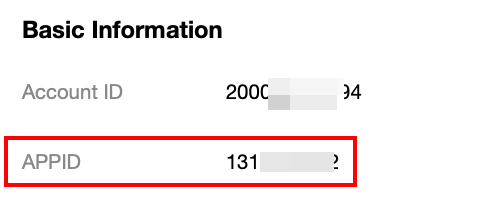
1. In the Tencent Cloud console, query the APPID of the account on the Account Information page. 3. Use the following code in the application.
<dependency>
<groupId>com.tencentcloudapi</groupId>
<artifactId>tencentcloud-dbauth-sdk-java</artifactId>
<version>1.0.4</version>
</dependency>
Indirect dependency: tencentcloud-sdk-java 3.1.1039 or later versions.
<dependency>
<groupId>com.tencentcloudapi</groupId>
<artifactId>tencentcloud-sdk-java</artifactId>
<version>3.1.1039</version>
</dependency>
Example of obtaining the password through code calling
package com.tencentcloud.dbauth;
import com.tencentcloudapi.common.Credential;
import com.tencentcloud.dbauth.model.GenerateAuthenticationTokenRequest;
import com.tencentcloudapi.common.exception.TencentCloudSDKException;
import com.tencentcloudapi.common.profile.ClientProfile;
import com.tencentcloudapi.common.profile.HttpProfile;
public class GenerateDBAuthentication {
public static void main(String[] args) {
String region = "<Instance region>";
String instanceId = "<Instance ID>";
String userName = "<Username>";
Credential credential = new Credential(System.getenv("<TENCENTCLOUD_SECRET_ID>"), System.getenv("<TENCENTCLOUD_SECRET_KEY>"));
System.out.println(getAuthToken(region, instanceId, userName, credential));
}
public static String getAuthToken(String region, String instanceId, String userName, Credential credential) {
try {
HttpProfile httpProfile = new HttpProfile();
httpProfile.setEndpoint("cam.tencentcloudapi.com");
ClientProfile clientProfile = new ClientProfile();
clientProfile.setHttpProfile(httpProfile);
GenerateAuthenticationTokenRequest tokenRequest = GenerateAuthenticationTokenRequest.builder()
.region(region)
.credential(credential)
.userName(userName)
.instanceId(instanceId)
.clientProfile(clientProfile)
.build();
return DBAuthentication.generateAuthenticationToken(tokenRequest);
} catch (TencentCloudSDKException e) {
e.printStackTrace();
}
return "";
}
}
<Instance region>: Replace with the region of the instance you need to access, for example, ap-guangzhou.
<Instance ID>: Replace with the ID of the instance you need to access.
<Username>: Replace with the actual username to log in.
<TENCENTCLOUD_SECRET_ID>: Replace with the SecretID obtained from the CAM console.
<TENCENTCLOUD_SECRET_KEY>: Replace with the SecretKey obtained from the CAM console.
Step 4: Use the identity token to connect to TencentDB for SQL Server
Note:
Using the JDBC driver for connection is the standard way for Java programs to connect to relational databases. Detailed installation and connection methods for the JDBC driver can be found in Using the JDBC Driver. After obtaining the identity token AuthToken in Step 3, you can use it to connect to TencentDB for SQL Server. The following connection command is an example for connecting to the database using JDBC. String connectionUrl = "jdbc:sqlserver://localhost:1433;databaseName=<Database name>;user=<Username>;password=<Password>;encrypt=false;";
Connection con = DriverManager.getConnection(connectionUrl);
<Database name>: Replace with the name of the database you need to access.
<Username>: Replace with the actual username to log in.
<Password>: Replace with the AuthToken obtained in Step 3. Appendix 1: Resetting Password
When the CAM verification feature is enabled for the account, you can update the password through the password reset operation. If the account is set to change the password every 12 hours, you can immediately update the password before the rotation cycle is reached by performing the password reset operation.
Note:
Note that the current login credentials will become invalid after the password is reset. You need to check whether the database access status meets expectations.
2. In the instance list, click Instance ID or click Manage in the Operation column to enter the instance management page.
3. On the instance management page, choose Account Management.
4. On the account management page, find the target account and click Reset Password in its operations column.
5. Read the risk warning in the pop-up window, and then click OK.
Appendix 2: Disabling CAM Verification
Note:
After disabling CAM verification, you will not be able to obtain access credentials through CAM. Please update your password promptly.
2. In the instance list, click Instance ID or click Manage in the Operation column to enter the instance management page.
3. On the instance management page, choose Account Management.
4. On the account management page, find the target account and click Disable CAM Verification in its operations column.
5. In the pop-up window, enter the new password and confirm the password, and then click OK.
Appendix 3: Error Code
If the returned result contains an Error field, it indicates that the API call failed. For details on error codes, refer to Error Codes. The error codes related to the TencentDB for SQL Server account CAM verification feature are as follows:
Common Error Codes
|
AuthFailure.InvalidAuthorization | The Authorization in the request header does not comply with Tencent Cloud standards. |
AuthFailure.InvalidSecretId | Invalid key (not TencentCloud API key type). |
AuthFailure.MFAFailure | |
AuthFailure.SecretIdNotFound | Key does not exist. Check in the Console if the key has been deleted or disabled. If the status is normal, check if the key is entered correctly, ensuring there are no spaces before or after it. |
AuthFailure.SignatureExpire | Signature expired. The timestamp and the server time must not differ by more than five minutes. Check if the local time is synchronized with the standard time. |
AuthFailure.SignatureFailure | Signature error. There is a signature calculation error. Check the signature calculation process according to the signature method documentation in the calling method. |
AuthFailure.TokenFailure | token error. |
AuthFailure.UnauthorizedOperation | Request unauthorized. Refer to the CAM documentation for authentication description. |
Business Error Codes
|
FailedOperation.BuildAuthToken | Abnormal AuthToken generation. |
FailedOperation.FlowAuthIllegal | Credential operation failed. |
Appendix 4: Connecting to the a Database via Python
1. In the Tencent Cloud console, and on the Account Information page, query the account's APPID. 3. Install the TencentDB CAM Python SDK in your project by using pip. Run the following command in the command line:
pip install git+https://github.com/TencentCloud/dbauth-sdk-python.git
Note that if both Python 2 and Python 3 environments are available, it is required to run the pip3 command in the Python 3 environment.
Indirect dependency: tencentcloud-sdk-python version 3.0.1224 and later.
Example of Connecting to the Database via Python
import logging
import os
import time
import pymssql
from dbauth.db_authentication import DBAuthentication
from dbauth.model.generate_authentication_token_request import GenerateAuthenticationTokenRequest
from tencentcloud.common import credential
from tencentcloud.common.exception.tencent_cloud_sdk_exception import TencentCloudSDKException
from tencentcloud.common.profile.client_profile import ClientProfile
from tencentcloud.common.profile.http_profile import HttpProfile
logging.basicConfig(
level=logging.INFO,
format='[%(asctime)s] - [%(threadName)s] - {%(module)s:%(funcName)s:%(lineno)d} %(levelname)s - %(message)s',
datefmt='%Y-%m-%d %H:%M:%S'
)
log = logging.getLogger(__name__)
def main():
region = "ap-guangzhou"
instance_id = "mssql-123456"
user_name = "camtest"
host = "gz-mssql-123456.sql.tencentcdb.com"
port = 24398
db_name = "test"
secret_id = os.environ['AK']
secret_key = os.environ['SK']
connection = None
try:
connection = get_db_connection_using_cam(secret_id, secret_key, region,
instance_id, user_name, host, port, db_name)
with connection.cursor() as cursor:
cursor.execute("SELECT 'Success!';")
result = cursor.fetchone()
log.info(result[0])
except Exception as e:
log.error(f"An error occurred: {e}")
finally:
if connection:
connection.close()
def get_db_connection_using_cam(secret_id, secret_key, region, instance_id, user_name, host, port, db_name):
cred = credential.Credential(secret_id, secret_key)
max_attempts = 3
last_exception = None
for attempt in range(1, max_attempts + 1):
try:
auth_token = get_auth_token(region, instance_id, user_name, cred)
connection = pymssql.connect(
host=host,
port=port,
user=user_name,
password=auth_token,
database=db_name
)
return connection
except Exception as e:
last_exception = e
log.info(f"Attempt {attempt} failed.")
time.sleep(5)
log.error(f"All attempts failed. error: {last_exception}")
raise last_exception
def get_auth_token(region, instance_id, user_name, cred):
try:
http_profile = HttpProfile()
http_profile.endpoint = "cam.tencentcloudapi.com"
client_profile = ClientProfile()
client_profile.httpProfile = http_profile
request = GenerateAuthenticationTokenRequest(
region=region,
instance_id=instance_id,
user_name=user_name,
credential=cred,
client_profile=client_profile,
)
return DBAuthentication.generate_authentication_token(request)
except TencentCloudSDKException as err:
log.error(err)
raise
if __name__ == "__main__":
main()