Real-time writing of MySQL data is mainly used for importing real-time incremental data. Batch writing is mainly used for importing data stored in tables. The following will explain the import methods separately.
Real-time Writing of MySQL Data
Real-time writing of MySQL data is mainly achieved through the Binlog Load mechanism. Binlog Load provides a CDC (Change Data Capture) feature that allows Doris to incrementally synchronize user data update operations on MySQL.
Applicable Scenario
INSERT/UPDATE/DELETE Support
Filtering Query
DDL statements are currently incompatible
Basic Principles
In the current version design, Binlog Load needs to depend on canal as an intermediate medium. Canal pretends to be a secondary node to access and parse the Binlog on the MySQL primary node, and then be accessed by Doris to obtain the parsed data. This mainly involves the MySQL end, the Canal end, and the Doris end. The overall data flow goes like this:
+---------------------------------------------+
| Mysql |
+----------------------+----------------------+
| Binlog
+----------------------v----------------------+
| Canal Server |
+-------------------+-----^-------------------+
Get | | Ack
+-------------------|-----|-------------------+
| FE | | |
| +-----------------|-----|----------------+ |
| | Sync Job | | | |
| | +------------v-----+-----------+ | |
| | | Canal Client | | |
| | | +-----------------------+ | | |
| | | | Receiver | | | |
| | | +-----------------------+ | | |
| | | +-----------------------+ | | |
| | | | Consumer | | | |
| | | +-----------------------+ | | |
| | +------------------------------+ | |
| +----+---------------+--------------+----+ |
| | | | |
| +----v-----+ +-----v----+ +-----v----+ |
| | Channel1 | | Channel2 | | Channel3 | |
| | [Table1] | | [Table2] | | [Table3] | |
| +----+-----+ +-----+----+ +-----+----+ |
| | | | |
| +--|-------+ +---|------+ +---|------+|
| +---v------+| +----v-----+| +----v-----+||
| +----------+|+ +----------+|+ +----------+|+|
| | Task |+ | Task |+ | Task |+ |
| +----------+ +----------+ +----------+ |
+----------------------+----------------------+
| | |
+----v-----------------v------------------v---+
| Coordinator |
| BE |
+----+-----------------+------------------+---+
| | |
+----v---+ +---v----+ +----v---+
| BE | | BE | | BE |
+--------+ +--------+ +--------+
As shown above, users submit a data synchronization Job to FE.
FE will start a canal client for each data synchronization Job to subscribe to and obtain data from the canal server.
The receiver in the client will receive data through the Get command. Each time a data batch is obtained, it will be distributed to the corresponding channels by the consumer. Each channel will generate a sub-task for this data batch to send data.
On FE, a Task is a subtask of a channel to send data to BE, which includes the data of the same batch distributed to the current channel.
A channel controls the start, commit, and termination of a single table transaction. In one transaction cycle, multiple batches of data are generally obtained from the consumer, so multiple sub-tasks for sending data to BE are generated. Before a Transaction is successfully committed, these Tasks will not take effect.
When certain conditions (such as exceeding a certain time period, reaching the maximum data size to be committed) are met, the consumer will block and notify each channel to commit the transaction.
When and only when all channels have been committed successfully, will the Ack command notify the canal and continue obtaining and consuming data.
If any channel fails to commit, it will re-obtain the data from the last successful consumption position and commit again (channels already committed will not commit again to ensure idempotence).
Throughout the entire data synchronization job, the FE continuously obtain data from the canal and submits it to the BE, thus completing data synchronization, through the above process.
Configuring the MySQL
In the master-slave synchronization of the MySQL Cluster pattern, the binary log file (Binlog) records all data changes on the primary node. Data synchronization and backup among multiple nodes in the cluster are all done through Binlog logs, thereby improving the availability of the cluster. The architecture usually consists of one primary node (responsible for write operations) and one or more secondary nodes (responsible for read operations), and all data changes occurring on the primary node will be replicated to the secondary nodes.
Note
Currently, only MySQL version 5.7 and above support the Binlog Load feature.
To enable the binary binlog feature in MySQL, you need to edit the my.cnf configuration file.
[mysqld]
log-bin = mysql-bin # Enable binlog
binlog-format=ROW # Chooses the ROW mode
Descriptions on the MySQL
On MySQL, the naming format for Binlog is mysql-bin.000001, mysql-bin.000002..., and under certain conditions, MySQL will automatically split Binlog logs:
MySQL has been restarted.
Enter the command flush logs in the client.
The Binlog file size exceeds 1GB.
To locate the latest consumption position of Binlog, you can use the binlog filename and position (offset). For example, each secondary node will save the current binlog position being consumed for easy disconnection, reconnection and continued consumption.
For the primary node, it only writes to the Binlog. Multiple secondary nodes can connect to a single primary node simultaneously, consuming different parts of the Binlog log without affecting each other.
Binlog logs support two main formats (there is also a mixed format):
Statement-based format: The Binlog only saves the SQL statements executed on the primary node, and the secondary nodes replicate and re-execute them locally
Row-based format: The Binlog reports changes to each row's data on the primary node, and the secondary nodes replicate and execute each row's changes locally
The first format only writes the executed SQL statements. Although the log volume is small, it has the following disadvantages:
1. It does not save the actual data of each row.
2. UDFs executed on the primary node, as well as random and time functions, may result in inconsistencies on the secondary nodes.
3. The execution order of limit statements might not be consistent.
Therefore, we need to choose the second format to parse each row of data from the Binlog log.
In the row-based format, the Binlog records information about each binlog event's timestamp, server id, and offset, such as the following transaction with two insert statements:
begin;
insert into canal_test.test_tbl values (3, 300);
insert into canal_test.test_tbl values (4, 400);
commit;
There will be four binlog events corresponding to this: one begin event, two insert events, and one commit event:
SET TIMESTAMP=1538238301/*!*/;
BEGIN
/*!*/.
# at 211935643
# at 211935698
#180930 0:25:01 server id 1 end_log_pos 211935698 Table_map: 'canal_test'.'test_tbl' mapped to number 25
#180930 0:25:01 server id 1 end_log_pos 211935744 Write_rows: table-id 25 flags: STMT_END_F
...
'/*!*/;
### INSERT INTO canal_test.test_tbl
### SET
### @1=1
### @2=100
# at 211935744
#180930 0:25:01 server id 1 end_log_pos 211935771 Xid = 2681726641
...
'/*!*/;
### INSERT INTO canal_test.test_tbl
### SET
### @1=2
### @2=200
# at 211935771
#180930 0:25:01 server id 1 end_log_pos 211939510 Xid = 2681726641
COMMIT/*!*/;
As shown in the figure, each insert event contains the modified data. When performing Delete/Update operations, one event can also include multiple rows of data, making the Binlog log more compact.
Enabling GTID Mode (Optional)
A Global Transaction ID (GTID) identifies a transaction committed on the primary node, which is unique and valid globally. After the Binlog is enabled, the GTID is written into the Binlog file and corresponds to a transaction.
To enable MySQL's GTID mode, you need to edit the my.cnf configuration file settings as follows:
gtid-mode=on // Enable gtid mode
enforce-gtid-consistency=1 // Force consistency between gtid and transactions
Under the GTID mode, the master server can conveniently index transactions, recover data, and replicate replicas without the need of the Binlog's filename and offset.
Under GTID mode, due to the GTID's global validity, secondary nodes no longer need to locate the Binlog position on the primary node via saving the filename and offset, they can locate it via the data itself. During data synchronization, secondary nodes will skip any GTID transactions recognized as already executed.
The GTID is represented as a pair of coordinates, source_id identifying the primary node, and transaction_id representing the execution order of this transaction on the primary node (up to 263-1).
GTID = source_id:transaction_id
For example, the GTID of the 23rd transaction executed on the same primary node is:
3E11FA47-71CA-11E1-9E33-C80AA9429562:23
Configuring of Canal
Canal is a subproject under Alibaba's Otter project, mainly used for MySQL database incremental log parsing. It provides incremental data subscription and consumption, for cross-server synchronization scenarios. It is recommended to use Canal version 1.1.5 or above. Download here. After the download is completed, please follow the steps below to finish the deployment.
1. Decompressing the Canal Deployer.
2. Create a new folder under the conf directory and rename it as the root directory of the instance. The directory name will be referred to as 'destination' in the following content.
3. Modify the instance configuration file (you can copy from conf/example/instance.properties):
2013-02-05 22:50:45.636 [main] INFO c.a.o.c.i.spring.support.PropertyPlaceholderConfigurer - Loading properties file from class path resource [canal.properties]
2013-02-05 22:50:45.641 [main] INFO c.a.o.c.i.spring.support.PropertyPlaceholderConfigurer - Loading properties file from class path resource [xxx/instance.properties]
2013-02-05 22:50:45.803 [main] INFO c.a.otter.canal.instance.spring.CanalInstanceWithSpring - start CannalInstance for 1-xxx
2013-02-05 22:50:45.810 [main] INFO c.a.otter.canal.instance.spring.CanalInstanceWithSpring - start successful....
Explanation of Canal
Canal simulates its own MySQL dump protocol, pretending to be a secondary node, obtaining the binlog log of the primary node and parsing it.
Multiple instances can be started on a Canal server. Each instance can be considered as a secondary node and each instance consists of the following parts:
-------------------------------------------------
| Server |
| -------------------------------------------- |
| | Instance 1 | |
| | ----------- ----------- ----------- | |
| | | Parser | | Sink | | Store | | |
| | ----------- ----------- ----------- | |
| | ----------------------------------- | |
| | | MetaManager | | |
| | ----------------------------------- | |
| -------------------------------------------- |
-------------------------------------------------
Parser: Data source access, simulating slave protocol to interact with the master, protocol parsing.
Sink: A linker for parser and store, performing data filtering, processing, and distribution.
Store: Data Storage.
Meta Manager: Metadata management module.
Each instance has its own unique identifier in the cluster, which is the server id.
Within the canal server, the instance is represented by a string. This unique string is known as the destination. The Canal client needs to connect to the corresponding instance through the destination.
Note
The canal client coresponds to canal instance one to one. The binlog load has limited that multiple data synchronization jobs cannot connect to the same destination.
The data flow within the instance is binlog -> parser -> sink -> store.
The instance parses the binlog logs through the parser module. The parsed data is cached in the store. When a user submits a data synchronization job to the Front End (FE), and a client subscription is started and the data in the corresponding instance's store is obtained.
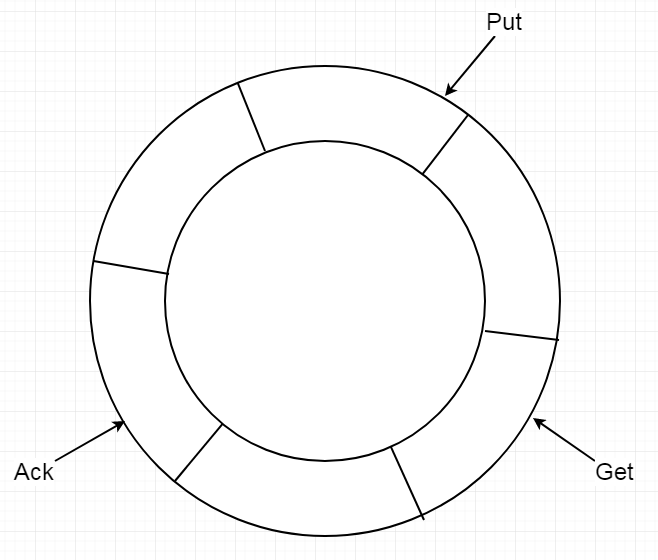
The store is actually a circular queue, and the user can configure its length and storage space.
The store uses three pointers to manage data in the queue:
1. Get pointer: The get pointer represents the last position obtained by the client.
2. Ack pointer: The ack pointer records the last successfully consumed position.
3. Put pointer: Represents the last successful write position of the sink module in the store.
Canal client asynchronously obtains data in the store
get 0 get 1 get 2 put
| | | ...... |
v v v v
--------------------------------------------------------------------- store circular queue
^ ^
| |
ack 0 ack 1
When canal client calls the get command, canal server generates a data batch to send to the client and moves the get pointer to the right. The client can obtain multiple batches until the get pointer catches up with the put pointer.
When data consumption is successful, the client returns a ck + batch ID notification that the consumption was successful, moves the ack pointer to the right, the store deletes this batch's data from the queue, freeing up space to obtain data from the upstream sink module, and moves the put pointer to the right.
When data consumption fails, the client returns a rollback notification indicating the consumption failed. The store resets the get pointer and moves it to the left to the ack pointer position so that the data the client obtains next time can start again from the ack pointer.
Like secondary nodes in MySQL, canal also needs to save the latest consumption position of the client. All metadata in canal (such as GTID, Binlog location) is managed by MetaManager. Currently, metadata is stored in json format in the meta.dat file in the root directory of the instance by default.
Basic Operations
Configuring Target Table Properties
Users need to create the corresponding target table on the Doris side first.
Binlog Load can only support unique type target tables, and the Batch Delete feature of the target table must be activated.
For more information on the method to enable Batch Delete, see bulk delete feature in ALTER TABLE PROPERTY.
Example:
The Doris table structure must be kept consistent with the MySQL table structure field order.
Creating Synchronization Job
CREATE SYNC `demo`.`job`
(
FROM `source_test` INTO `target_test`
(id,name)
)
FROM BINLOG
(
"type" = "canal",
"canal.server.ip" = "127.0.0.1",
"canal.server.port" = "11111",
"canal.destination" = "xxx",
"canal.username" = "canal",
"canal.password" = "canal"
);
For detailed syntax for creating a data synchronization job, see HELP CREATE SYNC JOB after connecting to Doris. Here, we mainly explain the precautions when creating the Job.
Syntax:
CREATE SYNC [db.]job_name
(
channel_desc,
channel_desc
...
)
binlog_desc
job_name
job_name is the unique identifier for the data synchronization Job in the current database, and there can only be one job running with the same job_name.
channel_desc
channel_desc is used to define the data channel under the task, which can represent the mapping relationship from the mysql source table to the doris target table. When this item is set, if multiple mapping relationships exist, it must be satisfied that the mysql source table should be in a one-to-one relationship with the doris target table. All other mapping relationships (such as one-to-many relationship) are considered illegitimate when grammar is checked.
column_mapping
column_mapping mainly refers to the mapping relationship between the columns of the mysql source table and the doris target table. If not specified, FE will default the column from source and the column of the target table to correspond one to one in order. However, we still recommend explicitly specifying the mapping of columns so that when the structure of the target table changes (for example, adding a nullable column), the data synchronization job can still proceed. Otherwise, when the above change occurs, because the column mapping relationship is no longer corresponding one to one, the import will report an error.
binlog_desc
binlog_desc includes properties defining necessary information for connecting to the remote Binlog address, the currently supported connection types is only canal mode, and all the configuration items need to be prefixed with canal.
1.1 canal.server.ip: The IP address of the canal server.
1.2 canal.server.port: The port number of the canal server.
1.3 canal.destination: The string identifier of the instance mentioned above.
1.4 canal.batchSize: The maximum size of each batch obtained from the canal server, the default is 8192.
1.5 canal.username: The username of the instance.
1.6 canal.password: The password of the instance.
1.7 canal.debug: When set as true, it will print detailed information of each batch and each row, which may affect performance.
Viewing Job Status
The specific command and example of job status can be viewed through the SHOW SYNC JOB command.
The meaning of the returned result set parameters are as follows:
State
The current stage of the job. The conversion between job statuses is shown in the following figure:
+-------------+
create job | PENDING | resume job
+-----------+ <-------------+
| +-------------+ |
+----v-------+ +-------+----+
| RUNNING | pause job | PAUSED |
| +-----------------------> |
+----+-------+ run error +-------+----+
| +-------------+ |
| | CANCELLED | |
+-----------> <-------------+
stop job +-------------+ stop job
system error
After the job is submitted, the status is PENDING. After FE schedules the start of the canal client, the status changes to RUNNING. Users can use the STOP/PAUSE/RESUME three commands to control the stop, pause and resume of job, and the job status after operation is CANCELLED/PAUSED/RUNNING respectively.
The final stage of the Job is CANCELLED. When the Job status changes to CANCELLED, it will not be able to be resumed. When an error occurs in the job, if the error is irreversible, the status will change to CANCELLED, otherwise it will become PAUSED.
Channel
The mapping relationship from all source tables to target tables of the job.
Status
The current binlog consumption position (if the GTID pattern is set, GTID will be displayed) and the delay time of doris execution compared with mysql.
JobConfig
The information of the remote server that is connected, such as the address of the canal server and the destination of the connected instance.
Controlling the Job
The user can use the STOP/PAUSE/RESUME three commands to control the stop, pause, and resume of the job. It can be done using STOP SYNC JOB, PAUSE SYNC JOB, and RESUME SYNC JOB.
Related Parameters
Configuring CANAL
The following configuration belongs to the configuration at the canal end, mainly adjusts the configuration values by modifying the canal.properties in the conf directory.
canal.ip
The IP address of the canal server.
canal.port
The port of the canal server.
canal.instance.memory.buffer.size
The queue length of the store circular queue at the canal end must be set to the power of 2, with a default length of 16384. This value is equal to the maximum number of events that can be cached at the canal end, and it also directly determines the maximum number of events that can be contained in one transaction at the Doris end. It is recommended to make it large enough to avoid the lower the upper limit of the amount of data that can be accommodated in a transaction at the Doris end, resulting in too frequent submission of transaction and data version accumulation.
canal.instance.memory.buffer.memunit
The default space occupied by an event at the canal end is 1024 bytes. This value multiplied by the length of the store circular queue is equal to the maximum value of the store space. For example, if the store queue length is 16384, the space of the store is 16MB. However, the actual size of an event is not equal to this value, but is determined by how many lines of data there are in this event and the length of each line of data. For example, the insert event of a table with only two columns has only 30 bytes, but the delete event may involve several thousand bytes. This is because the number of lines of delete event is usually more than insert event.
FE configuration
The following configuration belongs to the system-level configuration of data synchronization job, mainly adjusting the configuration values by modifying fe.conf.
sync_commit_interval_second
The maximum time interval to commit a transaction. If there is still uncommitted data in the channel after this time, the consumer will notify the channel to commit the transaction.
min_sync_commit_size
The minimum number of events required to commit a transaction. If the number of events received by Fe is less than it, it will continue to waitfor the next batch of data until the time exceeds `sync_commit_interval_second`. The default value is 10000 events, if you want to modify this configuration, please make sure this value is less than the `canal.instance.memory.buffer.size` configuration at the canal end (default 16384). Otherwise, Fe will try to obtain more events than store queue length before ack, causing store queue block until timeout.
min_bytes_sync_commit
The minimum data size required to commit a transaction. If Fe receives data smaller than it, it will continue to wait for the next batch of data until the time exceedssync_commit_interval_second. The default value is 15MB, if you want to modify this configuration, please make sure this value is less than the multiplication of canal.instance.memory.buffer.size and canal.instance.memory.buffer.memunit at the canal end (default 16MB). Otherwise, Fe will try to obtain more data than store space before ack, causing store queue block until timeout.
max_bytes_sync_commit
The maximum value of data when a transaction is submitted. If Fe receives data that is larger than this value, it will immediately commit the transaction and send the accumulated data. The default value is 64MB. If you want to modify this configuration, make sure that this value is greater than the multiplication of canal.instance.memory.buffer.size and canal.instance.memory.buffer.memunit (default 16MB) and min_bytes_sync_commit.
max_sync_task_threads_num
The maximum number of threads in the data synchronization job thread pool. This thread pool is only available in the entire FE and is used to handle tasks sent by all data synchronizations jobs to the BE. Thread pool is implemented in the SyncTaskPool class.
FAQs
1. Will modifying the table structure affect the data synchronization job?
Yes, it will. Data synchronization job cannot prohibit the alter table operation. Change in table structure may lead to job error and pause if the column mapping cannot be matched. We recommend explicitly specifying the column mapping relationship in the data synchronization job or reducing these issues by adding Nullable columns or columns with default values.
2. Will the data synchronization job continue to run after the database is deleted?
No. Errors of not finding metadata may occur in the log a few seconds after the database is deleted, and the data synchronization job will be stopped when checked by FE's scheduled inspection.
3. Can multiple data synchronization jobs be configured with the same ip:port + destination?
No. When a data synchronization job is created, ip:port + destination is checked for duplication with existing jobs to avoid multiple jobs connecting to the same instance.
4. Why is the precision of floating-point type data different between the Mysql and Doris during data synchronization?
The precision of floating-point types in Doris itself differs from that in Mysql. Decimal type can be used as an alternative.
Writing MySQL Bulk Data
Several import methods we introduced earlier can be used for bulk writing Mysql data:
1. Using JDBC to synchronize data: obtain data from mysql through a JDBC connection, and using another JDBC connect to Doris and bulk insert data obtained from mysql.
2. Synchronizing Data Through the external table.
3. Export mysql table data to local files in csv / json format then import using Stream load.
4. Export mysql table data to local files in csv / json format then upload to HDFS / S3 storage systems and import using Broker load.
5. Export mysql table data to local files in csv / json format then upload to HDFS storage system and import using spark load.
Notes
Each import method has its own precautions.
1. With the JDBC synchronization method, be mindful of the number of data entries inserted in one SQL. If the number of inserted entries is too large, it's not suitable for online environments.
2. ODBC external tables are not suitable for importing a large amount of data one time, it's recommended to import them in multiple batches.
3. The suggested data volume for a single import with stream load is between 1GB and 10GB. If the historical data is significant, it's recommended to split them into multiple batches to import.
4. The volume of data for a single broker load should ideally not exceed 3GB. If the historical data is extensive, it's recommended to split it into multiple batches to import.
5. If data exceeds 3GB, consider using spark load directly. However, performance may deteriorate slightly for smaller data volumes when spark load is used.