- Product Introduction
- Purchase Guide
- Getting Started
- User Guide
- Overview
- Users
- Access Key
- User Groups
- Role
- Identity Provider
- SSO Overview
- Practical Scenarios for SSO
- User-Based SSO
- Role-Based SSO
- Overview
- Overview of SAML Role-Based SSO
- Overview of OIDC Role-Based Single Sign-On
- SAML 2.0-Based Federation
- Accessing Tencent Cloud Console as SAML 2.0 Federated Users
- Creating a SAML IdP
- Creating an OIDC Identity Provider
- Managing IdPs
- Azure Active Directory Single Sign-On
- OneLogin Single Sign-On
- Okta Single Sign-On
- ADFS SSO to Tencent Cloud
- Implementing OIDC-Based Role-Based SSO
- Policies
- Permissions Boundary
- Troubleshooting
- Downloading Security Analysis Report
- CAM-Enabled Role
- Overview
- Compute
- Container
- Microservice
- Essential Storage Service
- Data Process and Analysis
- Data Migration
- Relational Database
- Enterprise Distributed DBMS
- NoSQL Database
- Database SaaS Tool
- Networking
- CDN and Acceleration
- Network Security
- Data Security
- Application Security
- Domains & Websites
- Big Data
- Middleware
- Interactive Video Services
- Media On-Demand
- Cloud Real-time Rendering
- Game Services
- Cloud Resource Management
- Management and Audit Tools
- Monitor and Operation
- CAM-Enabled API
- Overview
- Compute
- Edge Computing
- Container
- Distributed cloud
- Microservice
- Serverless
- Essential Storage Service
- Data Process and Analysis
- Data Migration
- Relational Database
- Enterprise Distributed DBMS
- NoSQL Database
- Database SaaS Tool
- Networking
- CDN and Acceleration
- Network Security
- Endpoint Security
- Data Security
- Business Security
- Application Security
- Domains & Websites
- Big Data
- Voice Technology
- Image Creation
- AI Platform Service
- Natural Language Processing
- Optical Character Recognition
- Middleware
- Communication
- Interactive Video Services
- Stream Services
- Media On-Demand
- Media Process Services
- Cloud Real-time Rendering
- Game Services
- Education Sevices
- Cloud Resource Management
- Management and Audit Tools
- Monitor and Operation
- More
- Practical Tutorial
- Security Practical Tutorial
- Multi-Identity Personnel Permission Management
- Authorizing Certain Operations by Tag
- Supporting Isolated Resource Access for Employees
- Enterprise Multi-Account Permissions Management
- Reviewing Employee Operation Records on Tencent Cloud
- Implementing Attribute-Based Access Control for Employee Resource Permissions Management
- During tag-based authentication, only tag key matching is supported
- Business Use Cases
- TencentDB for MySQL
- CLB
- CMQ
- COS
- Authorizing Sub-account Full Access to Specific Directory
- Authorizing Sub-account Read-only Access to Files in Specific Directory
- Authorizing Sub-account Read/Write Access to Specific File
- Authorizing Sub-account Read-only Access to COS Resources
- Authorizing a Sub-account Read/Write Access to All Files in Specified Directory Except Specified Files
- Authorizing Sub-account Read/Write Access to Files with Specified Prefix
- Authorizing Another Account Read/Write Access to Specific Files
- Authorizing Cross-Account ’s Sub-account Read/Write Access to Specified File
- Authorizing Sub-account Full Access to COS Resources under the Account
- CVM
- Authorizing Sub-account Full Access to CVMs
- Authorizing Sub-account Read-only Access to CVMs
- Authorizing Sub-account Read-only Access to CVM-related Resources
- Authorizing Sub-account Access to Perform Operations on CBSs
- Authorizing Sub-account Access to Perform Operations on Security Groups
- Authorizing Sub-account Access to Perform Operations on EIPs
- Authorizing Sub-account Access to Perform Operations on Specific CVM
- Authorizing Sub-account Access to Perform Operations on CVMs in Specific Region
- Authorizing Sub-account Full Access to CVMs Except Payment
- VPC
- Authorizing Sub-account Access to Perform Operations on Specific VPC and Resources of This VPC
- Authorizing Sub-account Access to Perform Operations on VPC Except on Routing Table
- Authorizing Sub-account Access to Perform Operations on VPN
- Authorizing Sub-account Full Access to VPCs
- Authorizing a Sub-account Full Access to VPCs Except Payment
- Authorizing Sub-account Read-only Access to VPCs
- VOD
- Others
- API Documentation
- History
- Introduction
- API Category
- User APIs
- DescribeSafeAuthFlagColl
- CreateGroup
- UpdateUser
- UpdateGroup
- RemoveUserFromGroup
- ListUsersForGroup
- ListUsers
- ListGroupsForUser
- ListGroups
- GetUser
- GetGroup
- DeleteUser
- DeleteGroup
- AddUserToGroup
- AddUser
- SetMfaFlag
- GetCustomMFATokenInfo
- ConsumeCustomMFAToken
- ListCollaborators
- ListAccessKeys
- PutUserPermissionsBoundary
- DeleteUserPermissionsBoundary
- DescribeSubAccounts
- GetSecurityLastUsed
- GetAccountSummary
- GetUserAppId
- UpdateAccessKey
- DeleteAccessKey
- CreateAccessKey
- Role APIs
- GetRole
- UpdateRoleDescription
- UpdateAssumeRolePolicy
- ListAttachedRolePolicies
- DetachRolePolicy
- DescribeRoleList
- DeleteRole
- CreateRole
- AttachRolePolicy
- UpdateRoleConsoleLogin
- GetServiceLinkedRoleDeletionStatus
- DeleteServiceLinkedRole
- CreateServiceLinkedRole
- PutRolePermissionsBoundary
- DeleteRolePermissionsBoundary
- DescribeSafeAuthFlag
- DescribeSafeAuthFlagIntl
- UntagRole
- TagRole
- Making API Requests
- Identity Provider APIs
- Policy APIs
- UpdatePolicy
- ListPolicies
- ListEntitiesForPolicy
- ListAttachedUserPolicies
- ListAttachedGroupPolicies
- GetPolicy
- DetachUserPolicy
- DetachGroupPolicy
- DeletePolicy
- CreatePolicy
- AttachUserPolicy
- AttachGroupPolicy
- SetDefaultPolicyVersion
- ListPolicyVersions
- GetPolicyVersion
- DeletePolicyVersion
- CreatePolicyVersion
- ListAttachedUserAllPolicies
- Data Types
- Error Codes
- FAQs
- Glossary
Creating Custom Polices through Tag Authorization
마지막 업데이트 시간:2024-01-23 17:54:33
Overview
This document describes the process of creating customized policies through tag authorization. After the policy is generated, it will possess the authority over a category of tag attribute resources. For definitions related to the policy, please refer to Concepts.
Directions
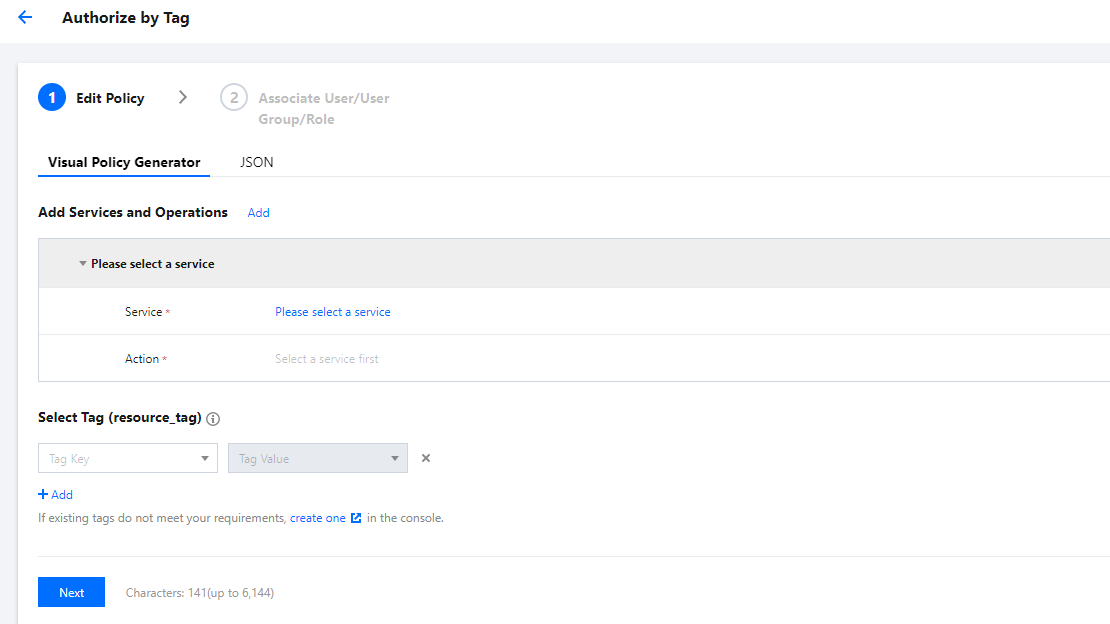
1. On the Policies page of the Cloud Access Management Console, click Create Custom Policy in the upper left corner.
2. In the pop-up window for selecting the creation method, click Authorize by Tag to navigate to the page for tag-based authorization.
3. In the service and action addition area of the Visual Policy Generator, enter the following information, and edit an authorization statement.
Service (Required): Select the product to be authorized.
Action (required): Select the actions you want to authorize.
Note
The operation involves all interfaces of the service. You can filter and view whether an interface supports tag-based authorization by using the "Supports Authorization by Tag" filter.
Yes: Supports tag-based authorization, which will include operation permissions for resources associated with corresponding tags.
No: Does not support tag-based authorization, which will include operation permissions for all resources.
To support the authorization of multiple services, click "Add" in the upper left corner to continue adding multiple authorization statements and configure authorization policies for other services.
Multiple statements can be added to one policy.
4. In the Select Tag section, choose the tag information that needs to be authorized. You can add multiple tags. Click Next to proceed to the Associate User/User Group/Role page.
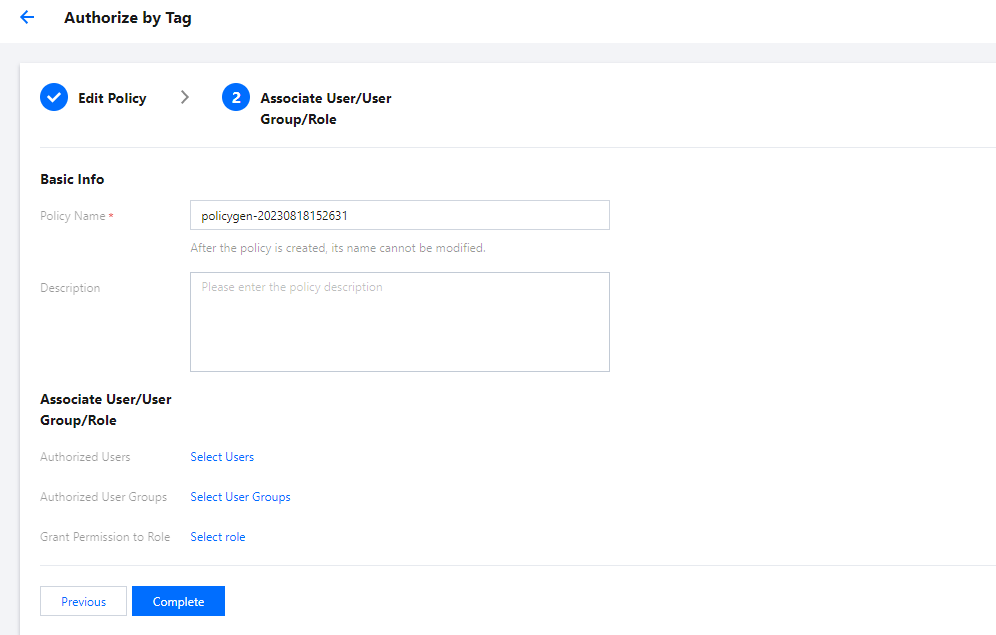
5. On the Associate User/User Group/Role page, enter the policy name and description information. You can also associate users/user groups/roles for quick authorization.
Note
The policy name is automatically generated by the console, with the default prefix "policygen" and a suffix number according to the creation date. You can customize the name as needed.
6. Click Complete to finish creating the customized policy.

 예
예
 아니오
아니오
문제 해결에 도움이 되었나요?