- Release Notes and Announcements
- Product Introduction
- Purchase Guide
- Getting Started
- Operation Guide
- Instance Management
- Creating Instance
- Naming with Consecutive Numeric Suffixes or Designated Pattern String
- Viewing Instance
- Upgrading Instance
- Downgrading Instance Configuration
- Terminating/Returning Instances
- Change from Pay-as-You-Go to Monthly Subscription
- Upgrading Instance Version
- Adding Routing Policy
- Public Network Bandwidth Management
- Connecting to Prometheus
- AZ Migration
- Setting Maintenance Time
- Setting Message Size
- Topic Management
- Consumer Group
- Monitoring and Alarms
- Smart Ops
- Permission Management
- Tag Management
- Querying Message
- Event Center
- Migration to Cloud
- Data Compression
- Instance Management
- CKafka Connector
- Practical Tutorial
- Practical Tutorial of CKafka Client
- Connector Practical Tutorial
- Connecting Flink to CKafka
- Connecting Schema Registry to CKafka
- Connecting Spark Streaming to CKafka
- Connecting Flume to CKafka
- Connecting Kafka Connect to CKafka
- Connecting Storm to CKafka
- Connecting Logstash to CKafka
- Connecting Filebeat to CKafka
- Multi-AZ Deployment
- Log Access
- Replacing Supportive Route (Old)
- Practice Tutorial for Cluster Bandwidth in High CPU Utilization Scenarios
- Practice Tutorial for Cluster Capacity Planning
- Troubleshooting
- API Documentation
- History
- Introduction
- API Category
- Making API Requests
- DataHub APIs
- ACL APIs
- Topic APIs
- DescribeTopicProduceConnection
- BatchModifyGroupOffsets
- BatchModifyTopicAttributes
- CreateConsumer
- CreateDatahubTopic
- CreatePartition
- CreateTopic
- CreateTopicIpWhiteList
- DeleteTopic
- DeleteTopicIpWhiteList
- DescribeDatahubTopic
- DescribeTopic
- DescribeTopicAttributes
- DescribeTopicDetail
- DescribeTopicSubscribeGroup
- FetchMessageByOffset
- FetchMessageListByOffset
- ModifyDatahubTopic
- ModifyTopicAttributes
- DescribeTopicSyncReplica
- Instance APIs
- Route APIs
- Other APIs
- Data Types
- Error Codes
- SDK Documentation
- General References
- Conducting Production and Consumption Pressure Testing on CKafka
- Configuration Guide for Common Parameters in CKafka
- Connecting to Legacy Self-Built Kafka
- Suggestions for CKafka Version Selection
- CKafka Data Reliability Description
- Connector
- FAQs
- Service Level Agreement
- Contact Us
- Glossary
Apache Flume is a distributed, reliable, and highly available log collection system that supports a wide variety of data sources such as HTTP, log files, JMS, and listening ports. It can efficiently collect, aggregate, move, and store massive amounts of log data to a specified storage system like Kafka, HDFS, and Solr search server.
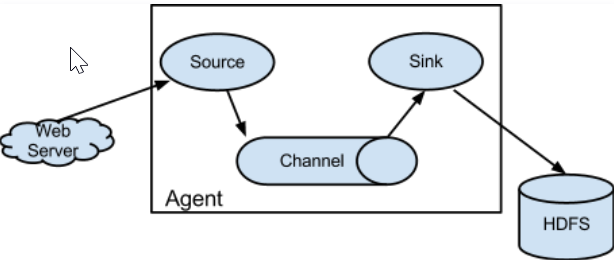
Flume is structured as follows:

Agents are the smallest unit that runs independently in Flume. A Flume agent is a JVM composed of three main components: source, sink, and channel.


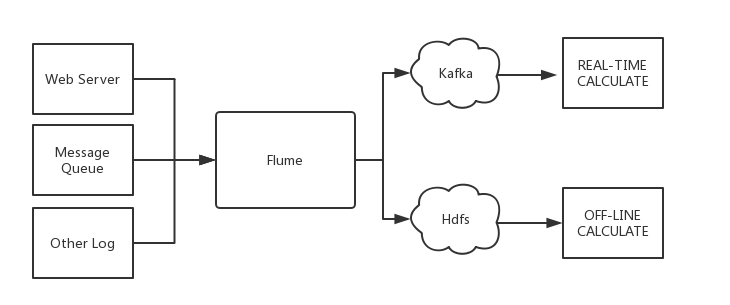
Flume and Kafka
When you store data in a downstream storage module or compute module such as HDFS or HBase, you need to consider a lot of complex factors such as the number of concurrent writes, system load, and network delay. As a flexible distributed system, Flume provides various APIs and customizable pipelines.
In the production process, Kafka can act as a cache when the production and consumption are at different paces. It has a high throughput thanks to the partition structure and data appending feature. It is also very fault-tolerant because of the replication structure.
Therefore, Flume and Kafka can work together to meet most requirements in production environments.
Connecting Flume to Open-Source Kafka
Preparations
Download Apache Flume (v1.6.0 or later is compatible with Kafka).
Download Kafka (v0.9.x or later is required as v0.8 is no longer supported).
Confirm that Kafka's source and sink components are already in Flume.
Connection method
Kafka can be used as a source or sink to import or export messages.
Configure Kafka as the message source, that is, pull data as a consumer from Kafka into a specified sink. The main configuration items are as follows:
Configuration Item | Description |
channels | The configured channel |
type | It must be org.apache.flume.source.kafka.KafkaSource |
kafka.bootstrap.servers | Kafka broker server address |
kafka.consumer.group.id | ID of Kafka's consumer group |
kafka.topics | Data source topics in Kafka |
batchSize | Size of each write into the channel |
batchDurationMillis | The maximum write interval |
Sample:
tier1.sources.source1.type = org.apache.flume.source.kafka.KafkaSourcetier1.sources.source1.channels = channel1tier1.sources.source1.batchSize = 5000tier1.sources.source1.batchDurationMillis = 2000tier1.sources.source1.kafka.bootstrap.servers = localhost:9092tier1.sources.source1.kafka.topics = test1, test2tier1.sources.source1.kafka.consumer.group.id = custom.g.id
Configure Kafka as the message receiver, that is, push data to the Kafka server as a producer for subsequent operations. The main configuration items are as follows:
Configuration Item | Description |
channel | The configured channel |
type | It must be org.apache.flume.sink.kafka.KafkaSink |
kafka.bootstrap.servers | Kafka broker server |
kafka.topics | Data target topics in Kafka |
kafka.flumeBatchSize | Size of each written batch |
kafka.producer.acks | Production policy of Kafka producer |
Sample:
a1.sinks.k1.channel = c1a1.sinks.k1.type = org.apache.flume.sink.kafka.KafkaSinka1.sinks.k1.kafka.topic = mytopica1.sinks.k1.kafka.bootstrap.servers = localhost:9092a1.sinks.k1.kafka.flumeBatchSize = 20a1.sinks.k1.kafka.producer.acks = 1
Connecting Flume to CKafka
Step 1. Obtain the CKafka instance access address
1. Log in to the CKafka console.
2. Select Instance List on the left sidebar and click the ID of the target instance to enter the instance details page.
3. You can obtain the instance access address in the Access Mode module on the Basic Info tab page.


Step 2. Create a topic
1. On the instance details page, select the Topic Management tab at the top.
2. On the topic management page, click Create to create a topic named
flume_test.

Step 3. Configure Flume
1. Download the Apache Flume toolkit and decompress it.
2. Write the configuration file
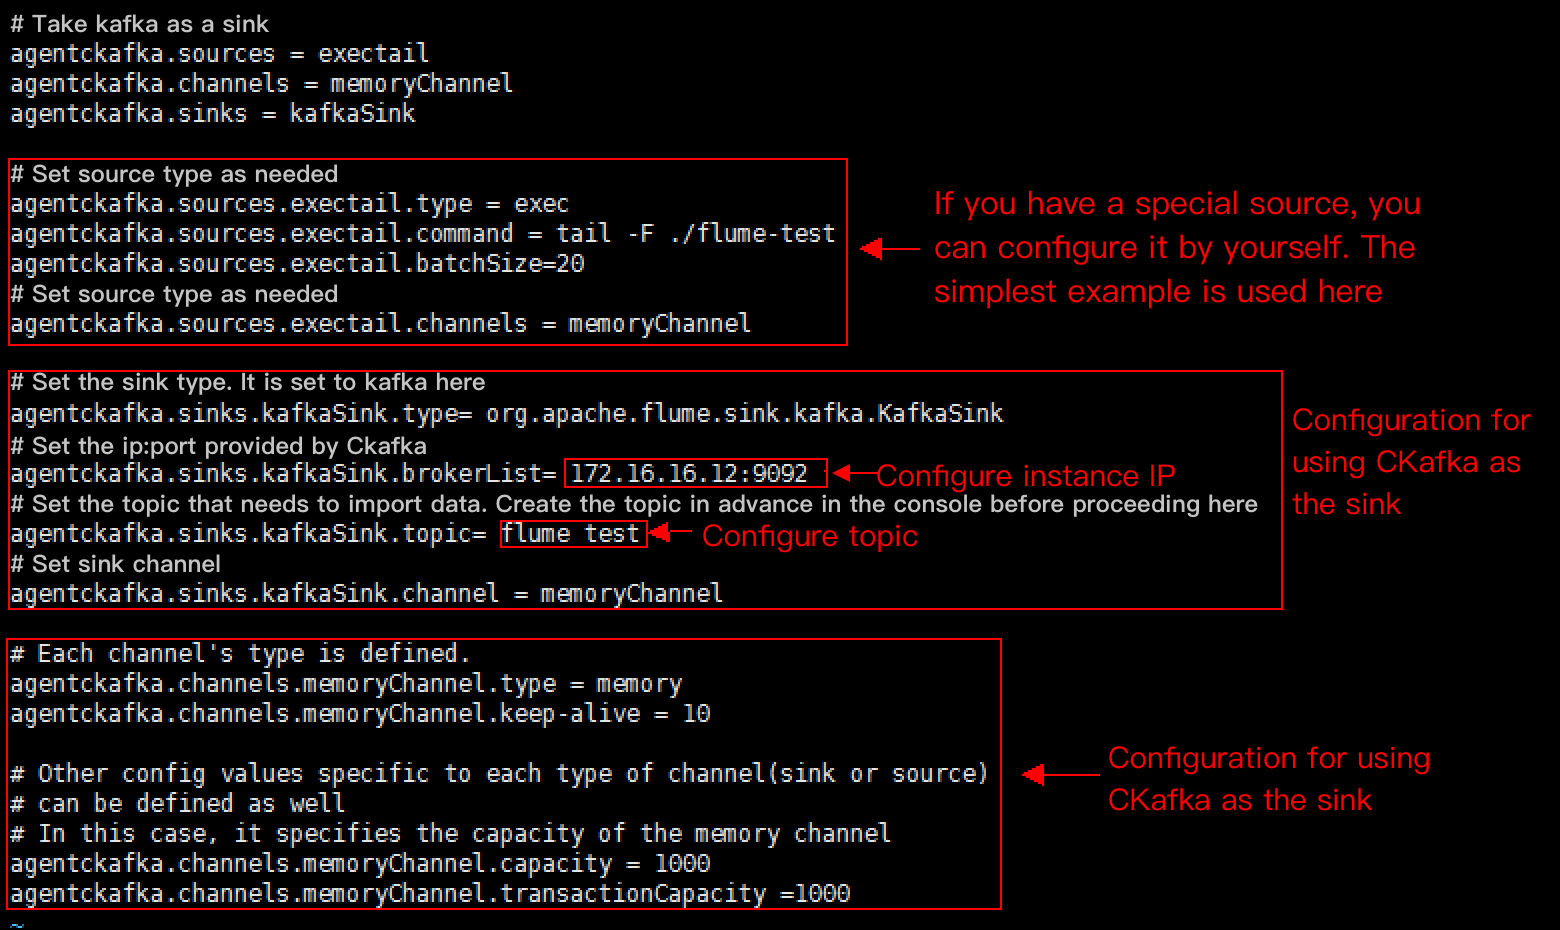
flume-kafka-sink.properties. Below is a simple demo (configured in the conf folder in the extracted directory) for Java. If there is no special requirement, simply replace your own instance IP address and topic in the configuration file. In this demo, the source is tail -F flume-test, which is the newly added information in the file.

The sample code is as shown below:
# Demo for using Kafka as the sinkagentckafka.source = exectailagentckafka.channels = memoryChannelagentckafka.sinks = kafkaSink# Set the source type based on different requirements. If you have a special source, you can configure it by yourself. The simplest example is used here.agentckafka.sources.exectail.type = execagentckafka.sources.exetail.command = tail -F ./flume.testagentckafka.sources.exectail.batchSize = 20# Set the source channelagentckafka.sources.exectail.channels = memoryChannel# Set the sink type. It is set to Kafka hereagentckafka.sinks.kafkaSink.type = org.apache.flume.sink.kafka.KafkaSink# Set the ip:port provided by CKafkaagentckafka.sinks.kafkaSink.brokerList = 172.16.16.12:9092 # Configure the instance IP address# Set the topic to which data is to be imported. Create the topic in the CKafka console in advanceagentckafka.sinks.kafkaSink.topic = flume test #Configure the topic# Set the sink channelagentckafka.sinks.kafkaSink.channel = memoryChannel# Use the default configuration for the channel# Each channel's type is definedagentckafka.channels.memoryChannel.type = memoryagentckafka.channels.memoryChannel.keep-alive = 10# Other config values specific to each type of channel (sink or source) can be defined as well# In this case, it specifies the capacity of the memory channelagentckafka.channels.memoryChannel.capacity = 1000agentckafka.channels.memoryChannel.transactionCapacity = 1000
3. Run the following command to start Flume:
./bin/flume-ng agent -n agentckafka -c conf -f conf/flume-kafka-sink.properties
4. Write messages to the
flume-test file. At this time, the messages will be written by Flume to CKafka.

5. Start the CKafka client for consumption.
./kafka-console-consumer.sh --bootstrap-server xx.xx.xx.xx:xxxx --topic flume_test --from-beginning --new-consumer
Note:
Enter the access address of the CKafka instance just created for the
bootstrap-server field and the name of the topic just created for topic.You can see that the messages have been consumed.


Step 1. Obtain the CKafka instance access address
1. Log in to the CKafka console.
2. Select Instance List on the left sidebar and click the ID of the target instance to enter the instance details page.
3. You can obtain the instance access address in the Access Mode module on the Basic Info tab page.


Step 2. Create a topic
1. On the instance details page, select the Topic Management tab at the top.
2. On the topic management page, click Create to create a topic named
flume_test.
Step 3. Configure Flume
1. Download the Apache Flume toolkit and decompress it.
2. Write the configuration file
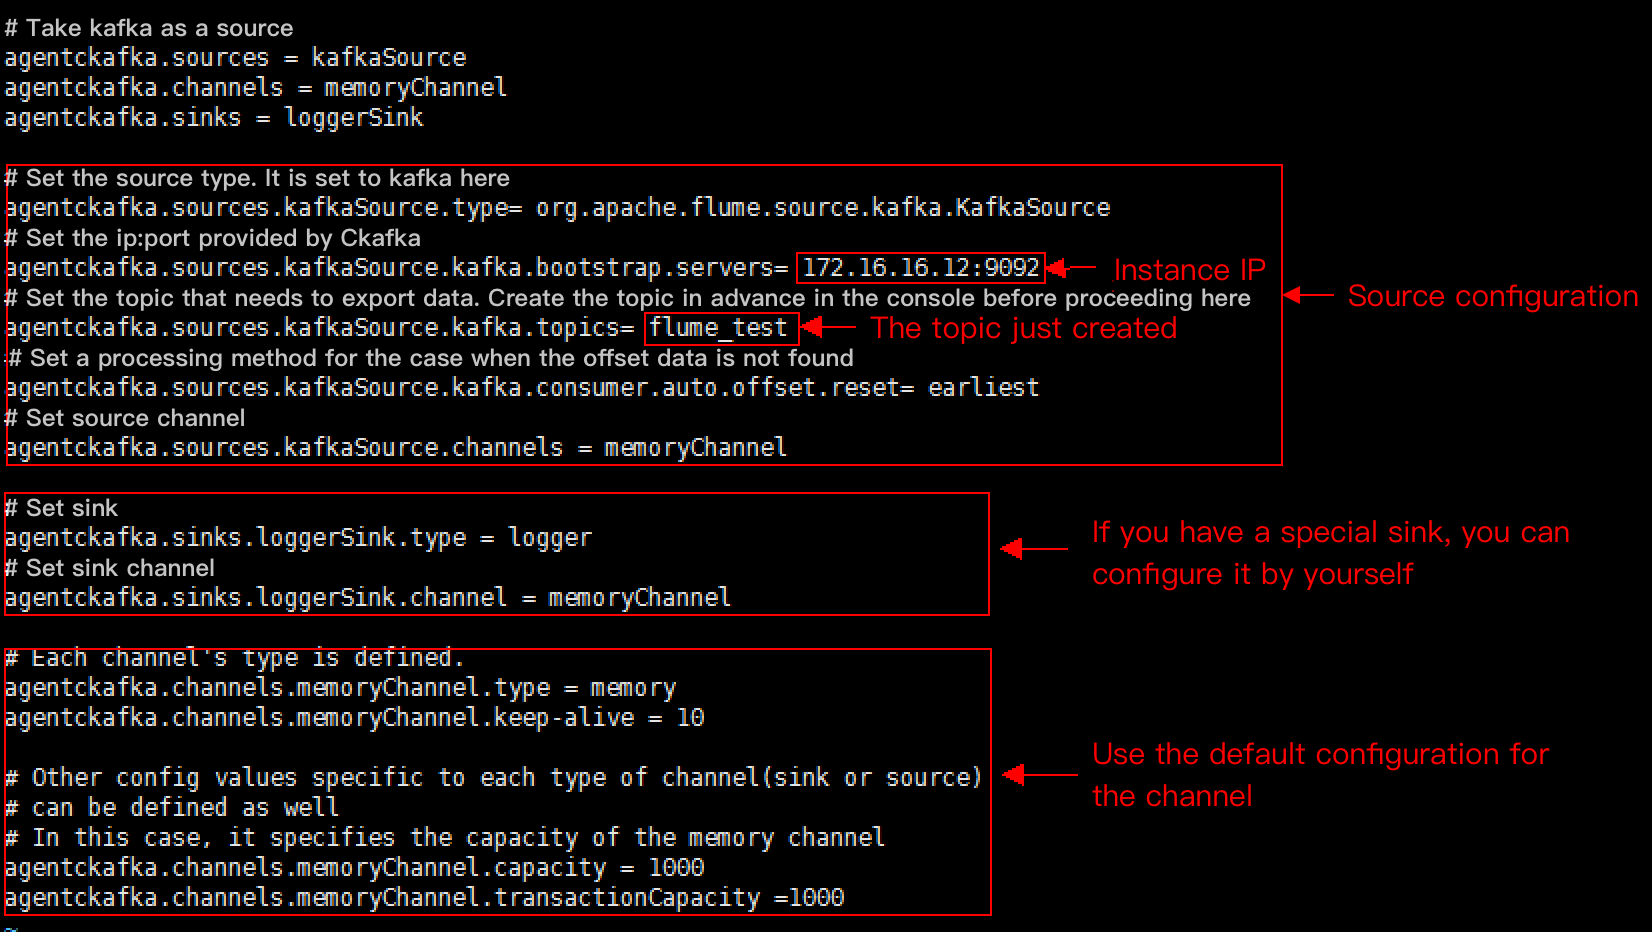
flume-kafka-source.properties. Below is a simple demo (configured in the conf folder in the extracted directory). If there is no special requirement, simply replace your own instance IP address and topic in the configuration file. The sink is logger in this example.

3. Run the following command to start Flume:
./bin/flume-ng agent -n agentckafka -c conf -f conf/flume-kafka-source.properties
4. View the logger output information. The default path is
logs/flume.log.

 예
예
 아니오
아니오
문제 해결에 도움이 되었나요?