- Release Notes and Announcements
- Product Introduction
- Purchase Guide
- Getting Started
- Operation Guide
- Instance Management
- Creating Instance
- Naming with Consecutive Numeric Suffixes or Designated Pattern String
- Viewing Instance
- Upgrading Instance
- Downgrading Instance Configuration
- Terminating/Returning Instances
- Change from Pay-as-You-Go to Monthly Subscription
- Upgrading Instance Version
- Adding Routing Policy
- Public Network Bandwidth Management
- Connecting to Prometheus
- AZ Migration
- Setting Maintenance Time
- Setting Message Size
- Topic Management
- Consumer Group
- Monitoring and Alarms
- Smart Ops
- Permission Management
- Tag Management
- Querying Message
- Event Center
- Migration to Cloud
- Data Compression
- Instance Management
- CKafka Connector
- Practical Tutorial
- Practical Tutorial of CKafka Client
- Connector Practical Tutorial
- Connecting Flink to CKafka
- Connecting Schema Registry to CKafka
- Connecting Spark Streaming to CKafka
- Connecting Flume to CKafka
- Connecting Kafka Connect to CKafka
- Connecting Storm to CKafka
- Connecting Logstash to CKafka
- Connecting Filebeat to CKafka
- Multi-AZ Deployment
- Log Access
- Replacing Supportive Route (Old)
- Practice Tutorial for Cluster Bandwidth in High CPU Utilization Scenarios
- Practice Tutorial for Cluster Capacity Planning
- Troubleshooting
- API Documentation
- History
- Introduction
- API Category
- Making API Requests
- DataHub APIs
- ACL APIs
- Topic APIs
- DescribeTopicProduceConnection
- BatchModifyGroupOffsets
- BatchModifyTopicAttributes
- CreateConsumer
- CreateDatahubTopic
- CreatePartition
- CreateTopic
- CreateTopicIpWhiteList
- DeleteTopic
- DeleteTopicIpWhiteList
- DescribeDatahubTopic
- DescribeTopic
- DescribeTopicAttributes
- DescribeTopicDetail
- DescribeTopicSubscribeGroup
- FetchMessageByOffset
- FetchMessageListByOffset
- ModifyDatahubTopic
- ModifyTopicAttributes
- DescribeTopicSyncReplica
- Instance APIs
- Route APIs
- Other APIs
- Data Types
- Error Codes
- SDK Documentation
- General References
- Conducting Production and Consumption Pressure Testing on CKafka
- Configuration Guide for Common Parameters in CKafka
- Connecting to Legacy Self-Built Kafka
- Suggestions for CKafka Version Selection
- CKafka Data Reliability Description
- Connector
- FAQs
- Service Level Agreement
- Contact Us
- Glossary
Overview
The CKafka connector offers data distribution capabilities, allowing you to distribute CKafka data to Elasticsearch Service (ES) for massive data storage and search, real-time log analysis, and other operations.
Note:
Only ES 7.0 and later are supported.
Prerequisites
Currently, this feature depends on the ES service, and you should enable the relevant product features to use it.
A data distribution target ES connection has been successfully established.
Directions
Creating Data Distribution Task
1. Log in to the CKafka Console .
2. In the left sidebar, click Connectors > Task List , select the right region, and then click Create Task .
3. Fill in the task name, select Data Distribution as the task type, select ES as the data target type, and click Next .
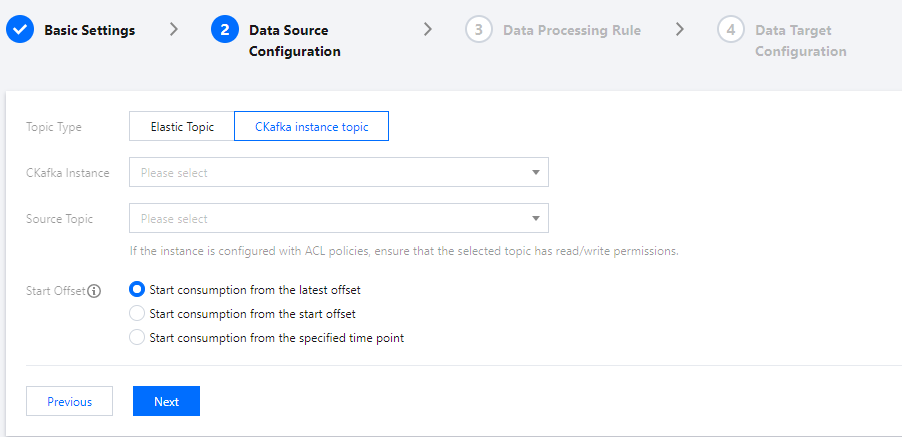
4. Configure the data source information.

Topic Type: Select the data source Topic.
Elastic Topic: Select the pre-created elastic Topic. For details, see Topic Management.
CKafka Instance Topic: Select the instance and Topic created in CKafka. If the instance has ACL policies configured, ensure the selected topic has read and write permissions. For details, see Creating Topic.
Start Offset: Select how to handle historical messages during dump by setting the Topic offset.
5. After setting the above information, click Next , click Preview Topic Message , and the first message from the source topic will be obtained and parsed.
Note
Currently, message parsing should meet the following requirements:
The message is a JSON string.
The source data should be in a single-layer JSON format. For nested JSON, you can use Data Processing to perform simple message format conversion.
6. (Optional) Toggle on the Process Source Data for source data. For detailed configuration, please see Simple Data Processing.
7. Click Next to configure the data target information.

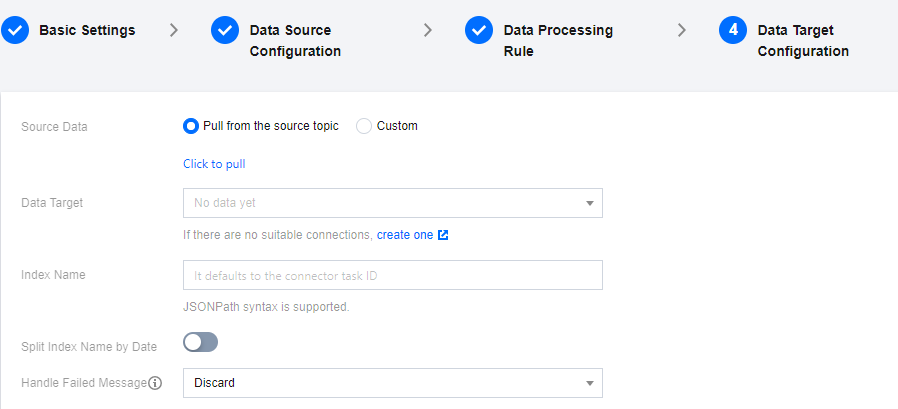
Source Data: Click to pull data from the source Topic. If the source Topic has no data, you can also use custom data.
Data Target: Select the target of the pre-created data stream ES connection.
Index Name: Enter the index name. The index name should be in lowercase and support jsonpath syntax.
Split Index Name by Date: Optional. If enabled, you need to choose a date format. The index written to ES will be %(index_name)_%(date).
Handle Failed Message: Select how to handle messages that failed to deliver. Supports Discard , Retain and Ship to CLS (requires specifying the target log set and log topic and granting access to CLS) three methods.
Retain: It is suitable for testing environments. The task will terminate without retrying if it fails to run and will record the failure reason in the Event Center.
Discard: It is suitable for production environments. If the task fails to run, the current failure message will be ignored. It is recommended to use the Retain mode for testing. Once the test is error-free, switch to Discard mode for production.
Delivery to CLS: It is suitable for strict production environments. If the task fails to run, the failure message, metadata, and failure reason will be uploaded to the specified CLS topic.
Dead Letter Queue: It is suitable for strict production environments. If the task fails to run, the failure message, metadata, and failure reason will be sent to the specified CKafka Topic.
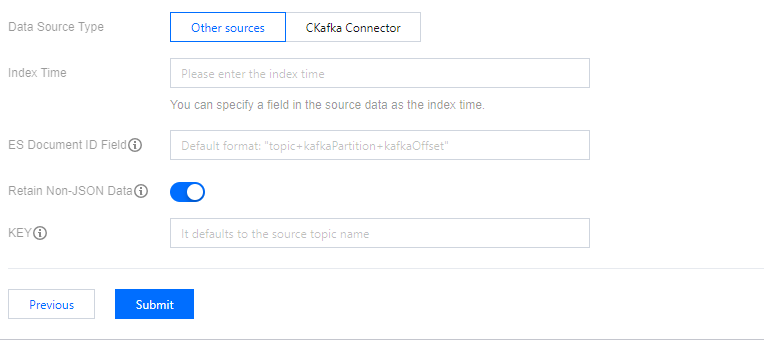
Data Source Type

Index Time: You can specify a field from the source data as the index time. The default is the message delivery time.
ES Document ID Field: You can specify the value of this field as the value of ES Document ID. The default is
topic+kafkaPartition+kafkaOffset .Retain Non-JSON Data: If enabled, for non-JSON data, a KEY will be designated for assembly and delivery. If disabled, non-JSON data will be discarded.
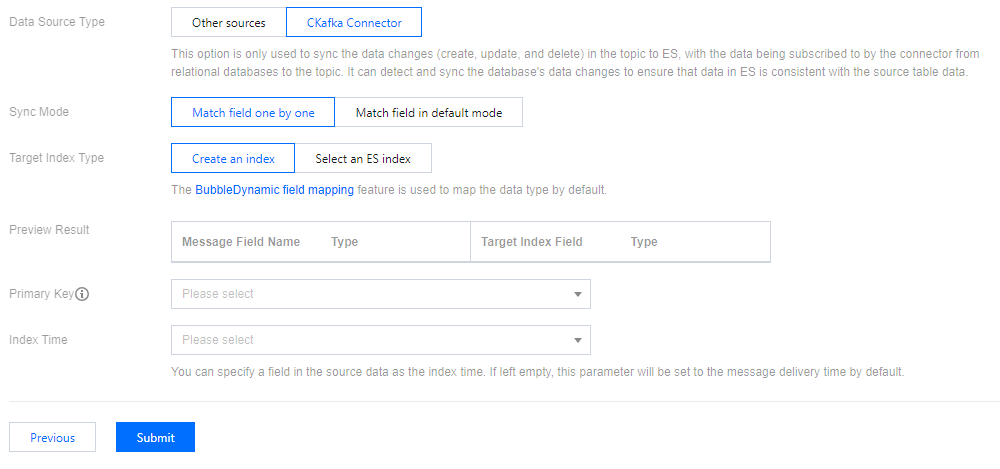
This option is only used to synchronize updates of data (add, delete, modify) from relational databases to Topic. It will synchronize with ES. It will detect the addition, deletion, and modification of actions in the database to keep the ES data consistent with the source table data.

Sync Mode: If you select match field one by one, you can define the mapping relationship between the custom message field names and target index fields. If you select match field in default mode, the message key will be used as the field name in the ES index mapping.
Target Index Type: You can select to create a index or select from an existing ES index.
Primary Key: Specify the primary key of the database table as the value of the ES Document ID.
Index Time: You can specify a field from the source data as the index time. The default is the message delivery time.
8. Click Submit . You can see the created task in the task list and view the task creation progress in the status bar.

 예
예
 아니오
아니오
문제 해결에 도움이 되었나요?