After purchasing a Memcached Edition instance, you can view detailed information about the instance in the console in an intuitive and fast way. This includes the instance's running status, capacity usage, cluster primary-secondary relationship, network status, and other information. You can also efficiently manage the ops of the instance.
Prerequisites
The instance has not been terminated or isolated in the recycle bin.
2. Select the region at the top of the instance list page on the right.
3. Find the target instance in the instance list.
You can use the search box at the upper-right corner of the instance list to search for the target instance by entering the instance ID, instance name, private IP, or tag key. Only instance names support fuzzy search.
If the target instance is not found in the instance list, go to the Recycle Bin in the left sidebar to check if the instance has been isolated due to expired fees. For more information, see Recycle Bin.
4. Check the running status, configuration specifications, architecture version, and capacity usage of the target instance.
Instance List Information
Parameter Explanation
Instance ID / Name
Instance ID: The unique identifier for the instance.
Name: The name set when the instance is created. Hover over the instance name and click
to edit the instance name again for easier identification and management.
Monitoring/Status/Task
Monitoring: Click
to quickly view the instance's monitoring metric data on the monitoring panel. For more information, see Monitoring Feature.
Status: The running status of the instance. The normal status is Running.
Task: When a task is being executed, this will display the current task being performed on the instance, such as changing configuration.
Project
The project to which the instance belongs. A Tencent Cloud account can create multiple projects. At the console's upper-right corner, go to Account Center > Project Management to create projects, manage projects, or view project billing details. If you need to transfer an instance to another project, see Assigning Instance to Project.
AZ
Indicates the availability zone (AZ) information specified for the instance. If the
appears next to the AZ, it means the instance is deployed across multiple AZs. Hover over the icon to view detailed information about the instance's multiple AZs.
Deployment Mode
Indicates whether the instance is deployed across multiple AZs.
Single AZ: The instance is deployed in a single AZ within the same region.
Multi-AZ: The instance is deployed across different AZs within the same region.
Network
Displays the name of the VPC, subnet name, and the private network IPv4 address of the instance. Click the VPC name (in blue) to view detailed network information. The private network IPv4 address is used when the database access is configured. For more information, see Connecting to TencentDB for Redis® Instance.
Billing Mode
Billing mode: Pay-as-you-go or monthly subscription. These two billing methods differ in how charges are applied. For more information, see Billing Overview.
Auto-Renewal
Indicates whether the instance has auto-renewal enabled.
Architecture
Displays the database version and architecture. Only Memcached 1.6 cluster architecture is supported.
Instance Edition
Currently, only Memcached Edition is supported.
Used/Total
Displays the used memory capacity and the total memory capacity of the current instance.
Creation Time
The specific date and time when the instance is created.
Tag
Displays the instance's tag information. Tags can be used to manage instances. For how to edit tags, see Editing Instance Tag.
Click Configure and select to increase or reduce the number of nodes, increase or delete replicas, or add or remove shards. You can scale the memory capacity of instance nodes, adjust the number of replicas, or manage the number of shards in a cluster architecture. For detailed instructions, see Changing Instance Specifications.
Select More > Security Group to reconfigure the security group's inbound rules. For detailed instructions, see Configure Security Group.
For monthly subscription billing mode, select More > Return and Refund; for pay-as-you-go instances, select More > Terminate to return the instance and isolate it in the recycle bin. For detailed instructions, see Destroy Instance.
Select More > Edit Tag to modify the tag key values of the instance. For detailed instructions, see Editing Instance Tag.
Viewing Instance Details
In the Instance ID / Name column of the target instance, click the Instance ID in blue text to enter the Instance details page.
Interface Area
Interface Parameter
Parameter Explanation
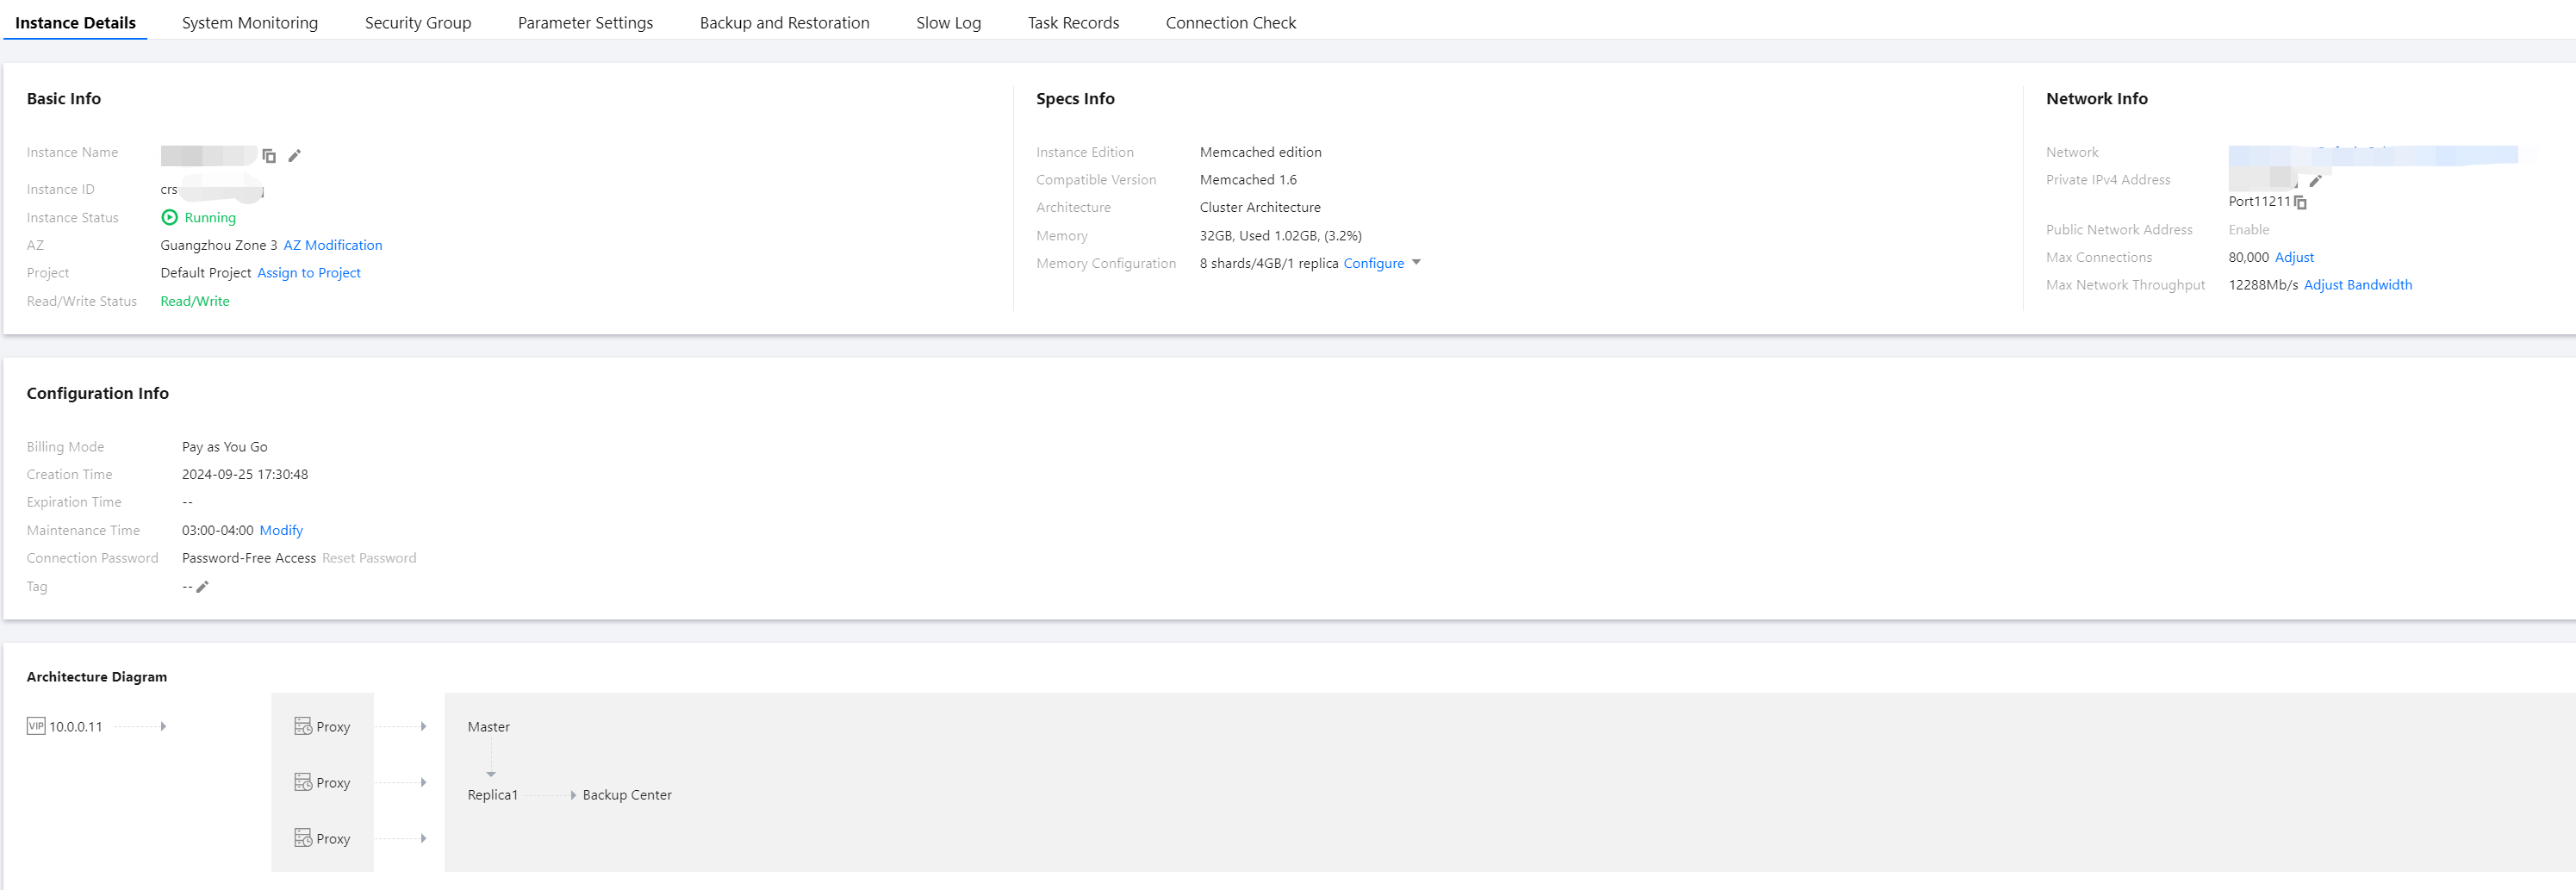
Basic Info
Instance Name
The name set when an instance is created. Hover over the instance name and click
to edit it again for easier recognition and management.
Instance ID
The unique identifier for the instance.
Instance Status
The current operational status of the instance. Normal status is Running.
AZ
The region and AZ the instance belongs to. Click AZ Modification to upgrade the deployment from a single to multiple availability zones. For detailed instructions, see Select another availability zone.
Project
The project the instance belongs to. Click Assign to Project to reassign the instance to another project. For detailed instructions, see Assign an instance to a project.
Read/Write Status
The current read and write status of the database.
Specification Information
Instance Edition
Currently, only the Memcached Edition is supported.
Compatible Versions
Only the Memcached 1.6 is supported.
Architecture
The deployment architecture of the instance.
Memory
The total memory capacity of the current instance, used capacity, and the percentage of used capacity.
Memory configuration
The memory configuration of the purchased instance, including: the number of shards/memory capacity per shard/number of replicas. Click Configure to adjust the memory capacity of nodes, the number of shards, and the number of replica nodes. For more information, see Changing Instance Specifications.
Network Information
Network
The VPC name of the instance. Click Change Network to switch the VPC and subnet. For detailed instructions, see Configuring Network. To create a VPC, see Create a VPC.
Private IPv4 Address
The private network IP address assigned to the database instance. You need to configure this IP when accessing the database. For detailed instructions, see Connecting to Redis Instance.
Click
to modify the IP address and port number.
Click
to copy the IP address and port number.
Max Connections
The maximum number of client connections currently limited by the database. Click Adjust to modify the number of allowed connections. For detailed instructions, see Adjusting the Number of Connections.
Max Network Throughput
The maximum network throughput for database access, including inbound and outbound traffic limits. Click Adjust Bandwidth to add additional bandwidth. For detailed instructions, see Bandwidth Adjustment.
Configuration Information
Billing Mode
The billing mode of the instance: Pay-as-you-go or monthly subscription.
Creation Time
The time the instance is created.
Expiration Time
In the Monthly Subscription billing mode, the expiration time of the instance is displayed.
Maintenance Window
The instance's maintenance time window. To ensure database stability, the backend system periodically performs maintenance during this window. Click Modify to adjust the maintenance time window, and it is recommended to set this during off-peak business hours. For detailed instructions, see Set Maintenance Time Window.
Connection password
The password required to connect to the database. Click Reset Password to change the password or enable password-free authentication. For detailed instructions, see Reset password.
Tag
The tags associated with the instance. You can modify the tags. For detailed instructions, see Edit Instance Tag.
Architecture Diagram
The architecture diagram showing how the database instance is deployed.
Additional Operations
Changing the Instance Name
1. In the Instance List, hover over the instance name you want to modify and click
to the right of it.
2. In the instance name input box, reconfigure the name for better recognition and management. The name should meet the following requirements:
The character length should be between [1, 60].
You can use Chinese characters, English letters, digits, underscores (_), and hyphens (-).
One Chinese character counts as 3 characters, while one English letter, digit, or special character counts as one character.
Setting Fields of the Instance List
1. At the upper-right corner of the instance list, click
.
2. On the Display Settings page, select the fields you want to display.
3. Click OK to view the reset fields in the instance list.
Exporting the Instance List
At the upper-right corner of the instance list, click