This article provides instructions for using DTS to synchronize local IDC self-built database services to Tencent Cloud.
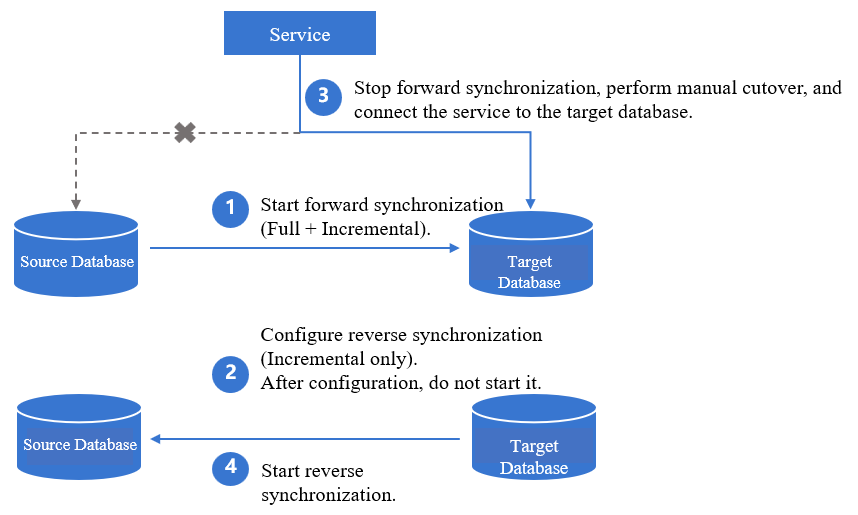
In the scenario of service migration, after the local database is synchronized to the cloud, a cutover must be performed. To prevent abnormalities in the cloud database after the service cutover, it is recommended to use the DTS data synchronization module to configure a reverse escape link, so that when the database on the cloud is synchronized abnormally, the service can switch back to the local database.
Preparations
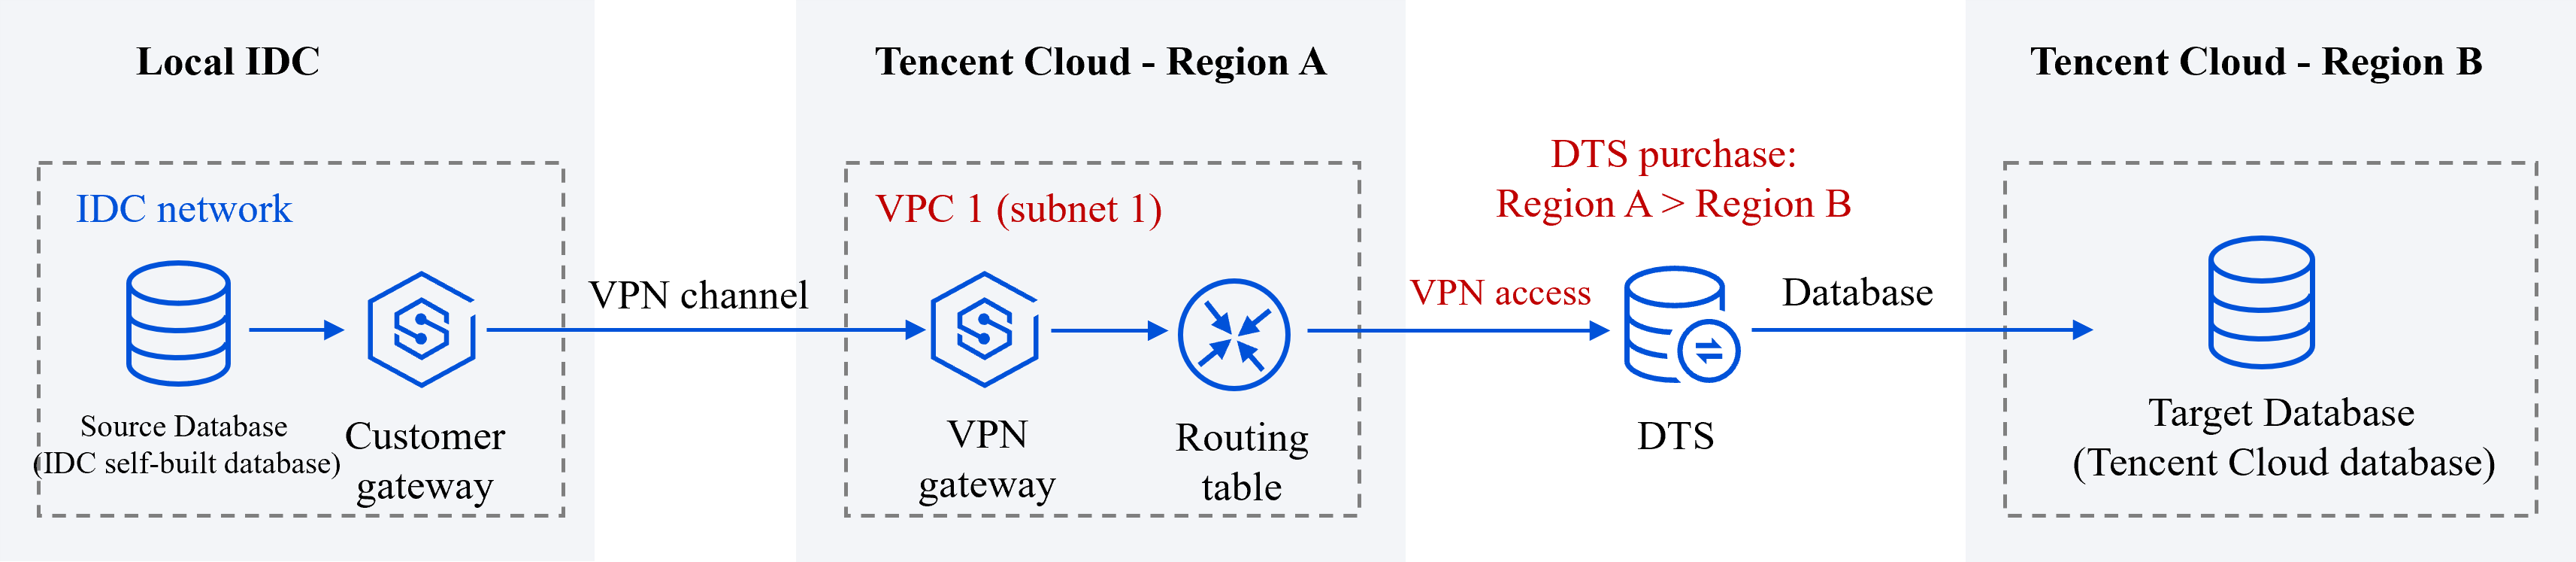
1. Preparation for Network Connection Establishment
Using DTS for database synchronization requires opening up connectivity between the source/target database and Tencent Cloud VPC, so that DTS can connect to the source/target database.
In this example, the source database is a self-build IDC database. DTS can connect through Public Network/VPN Access/Driect Connet/CCN Methods. We will use VPN Access as an example. The target database is a Tencent Cloud database instance.
1. Connect the local IDC nearby access to Tencent Cloud VPC.
2. When a DTS task is purchased later, Source Instance Region needs to select the region where the source library’s Tencent Cloud VPC is located, which is VPC1's region Beijing. Target Instance Region needs to select the region where the target database is located, which is Guangzhou.
3. In the subsequent DTS task configuration, in the source library settings, Access Type choose VPN Access, for VPC and Subnet , select VPC1 and choose one of its subnets, subnet1; in the target library settings, Access Type choose Database.
2. Preparation for Account and Permission
Create an account for executing DTS tasks and grant it permissions. The following is an introduction using MySQL as an example.
Authorization for the source database is as follows:
#Creating Execution Task Account
CREATEUSER'account'@'%' IDENTIFIED BY'password';
#Grant Permissions
GRANT RELOAD,LOCKTABLES,REPLICATION CLIENT,REPLICATION SLAVE,SHOWVIEW, PROCESS,SELECTON*.*TO'account'@'%' IDENTIFIED BY'password';
Forward synchronization and reverse synchronization are two independent unidirectional sync tasks. Each independent task's constraints, operational limits, etc., need to meet the basic requirements of the sync tasks, see Data Synchronization" section for corresponding sync links.
DBbridge, when executing full data synchronization, will occupy certain source database resources, which may lead to an increase in the load on the source database, adding to the database's own pressure. If your database configuration is too low, it's recommended to proceed during the business off-peak period.
Summary of Directions
In scenarios where DTS is used for database migration, to prevent data anomalies in the target database after cutover, it is recommended to use data synchronization configuration to establish a reverse escape route. This allows for a business switchback to the source database if an anomaly occurs in the target database.
1. Configure and initiate the forward synchronization task, opting for full + incremental synchronization.
Key configurations in the forward task: For Initialization Type , select Structure Initialization + Full Data Initialization; for Existing Table with Same Name , choose Pre-validate and report error.
2. Configure the reverse task for incremental synchronization only. After configuration, do not start it immediately.
Key configurations in the reverse task: For Initialization Type , do not select any; for Existing Table with Same Name , choose Ignore and Continue Execution.
3. Forward synchronization is completed, stop the forward task, perform manual cutover, and connect the service to the target database.
4. Start the reverse synchronization task to synchronize the incremental data from the target database back to the source database.
5. (Optional) If the data in the target database is abnormal after cutover, stop the reverse synchronization and switch the service back to the source database.
Detailed Operation Information
Note:
The overviews for different database links are similar. The following introduces syncing from MySQL to MySQL as an example. For more information, see Data Synchronization section under Link Configuration Guide.
Step One: Purchasing DTS
Log in to the data synchronization purchase page, select the appropriate configuration, and click Buy Now .
1. Forward task.
Source Instance Region is to choose the region associated with the source library’s Tencent Cloud VPC, which is Beijing for VPC1. Target Instance Region is to choose the region where the target database is located, which is Guangzhou.
2. Reverse task.
The database type and region selection of the source and target instances are opposite.
Step Two: Creating and Starting Forward Synchronization
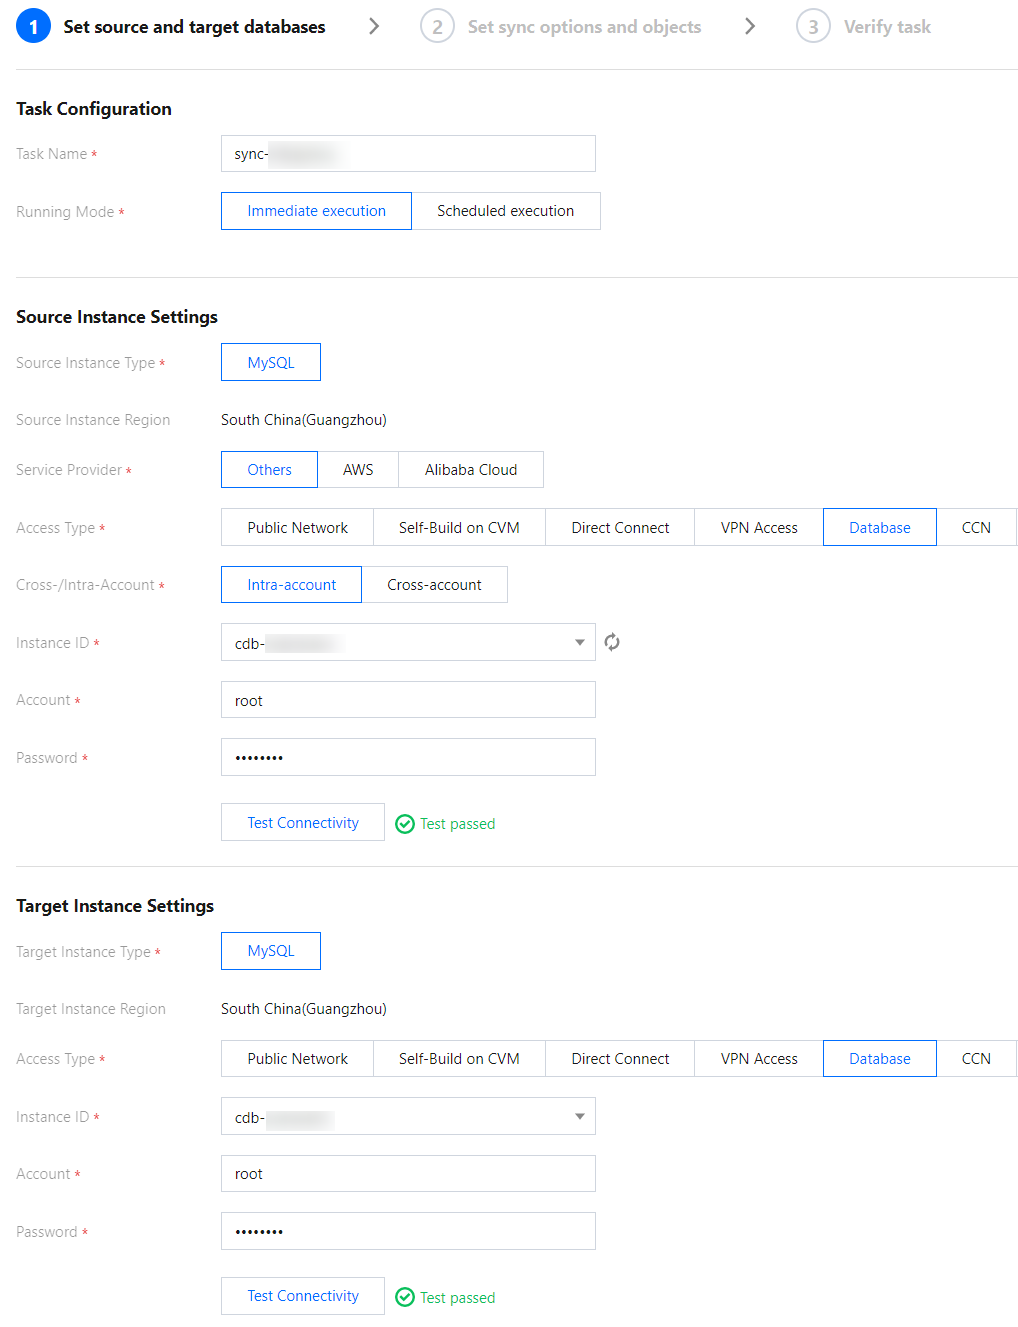
1. After successful purchase, return to the data sync list, and you can see the newly created data sync task, click Configure in the Operation column to enter the sync task configuration page.
2. On the sync task configuration page, configure the source and target instances and their accounts and passwords, test the connectivity, and click Next.
Category
Parameter
Description
Task Configuration
Task Name
DTS will automatically generate a task name, which is customizable.
Running Mode
Immediate execution and scheduled execution are supported.
Source Instance Settings
Source Instance Type
Select the source instance type selected during purchase, which cannot be changed once configured.
Source Instance Region
Select the source instance region selected during purchase, which cannot be changed once configured.
Service Provider
For a self-built database (such as a CVM-based one) or TencentDB database, select Others. For a third-party cloud database, select the corresponding service provider.
In this scenario, select Others.
Access Type
Select a type based on your scenario. In this scenario, select Direct Connect or VPN Access
, and you need to configure VPN-IDC interconnection as instructed in
Public Network: The source database can be accessed through a public IP.
Self-Build on CVM: The source database is deployed in a CVM instance.
Direct Connect: The source database can be interconnected with VPCs through Direct Connect.
VPN Access: The source database can be interconnected with VPCs through VPN Connections.
Database: The source database is a TencentDB instance.
CCN: The source database can be interconnected with VPCs through CCN.
VPC: The source and target databases are both deployed in Tencent Cloud VPCs. To use the VPC access type, submit a ticket for application.
VPC-based Direct Connect Gateway/VPN Gateway
Only VPC-based Direct Connect gateway is supported. You need to confirm the network type associated with the gateway.
VPN Gateway: Select a VPN Gateway instance.
VPC
Select a VPC and subnet associated with the VPC-based Direct Connect Gateway or VPN Gateway.
Host Address
IP address or domain name for accessing the source MySQL instance.
Port
Port for accessing the source MySQL instance.
Account
Account of the source instance, which must have the required permissions.
Password
Password of the source instance account.
Target Instance Settings
Target Instance Type
The target instance type selected during purchase, which cannot be changed.
Target Instance Region
The target instance region selected during purchase, which cannot be changed.
Access Type
Select a type based on your scenario. In this scenario, select Database.
Instance ID
Target instance ID.
Account
Account of the target instance, which must have the required permissions.
Password
Password of the target instance account.
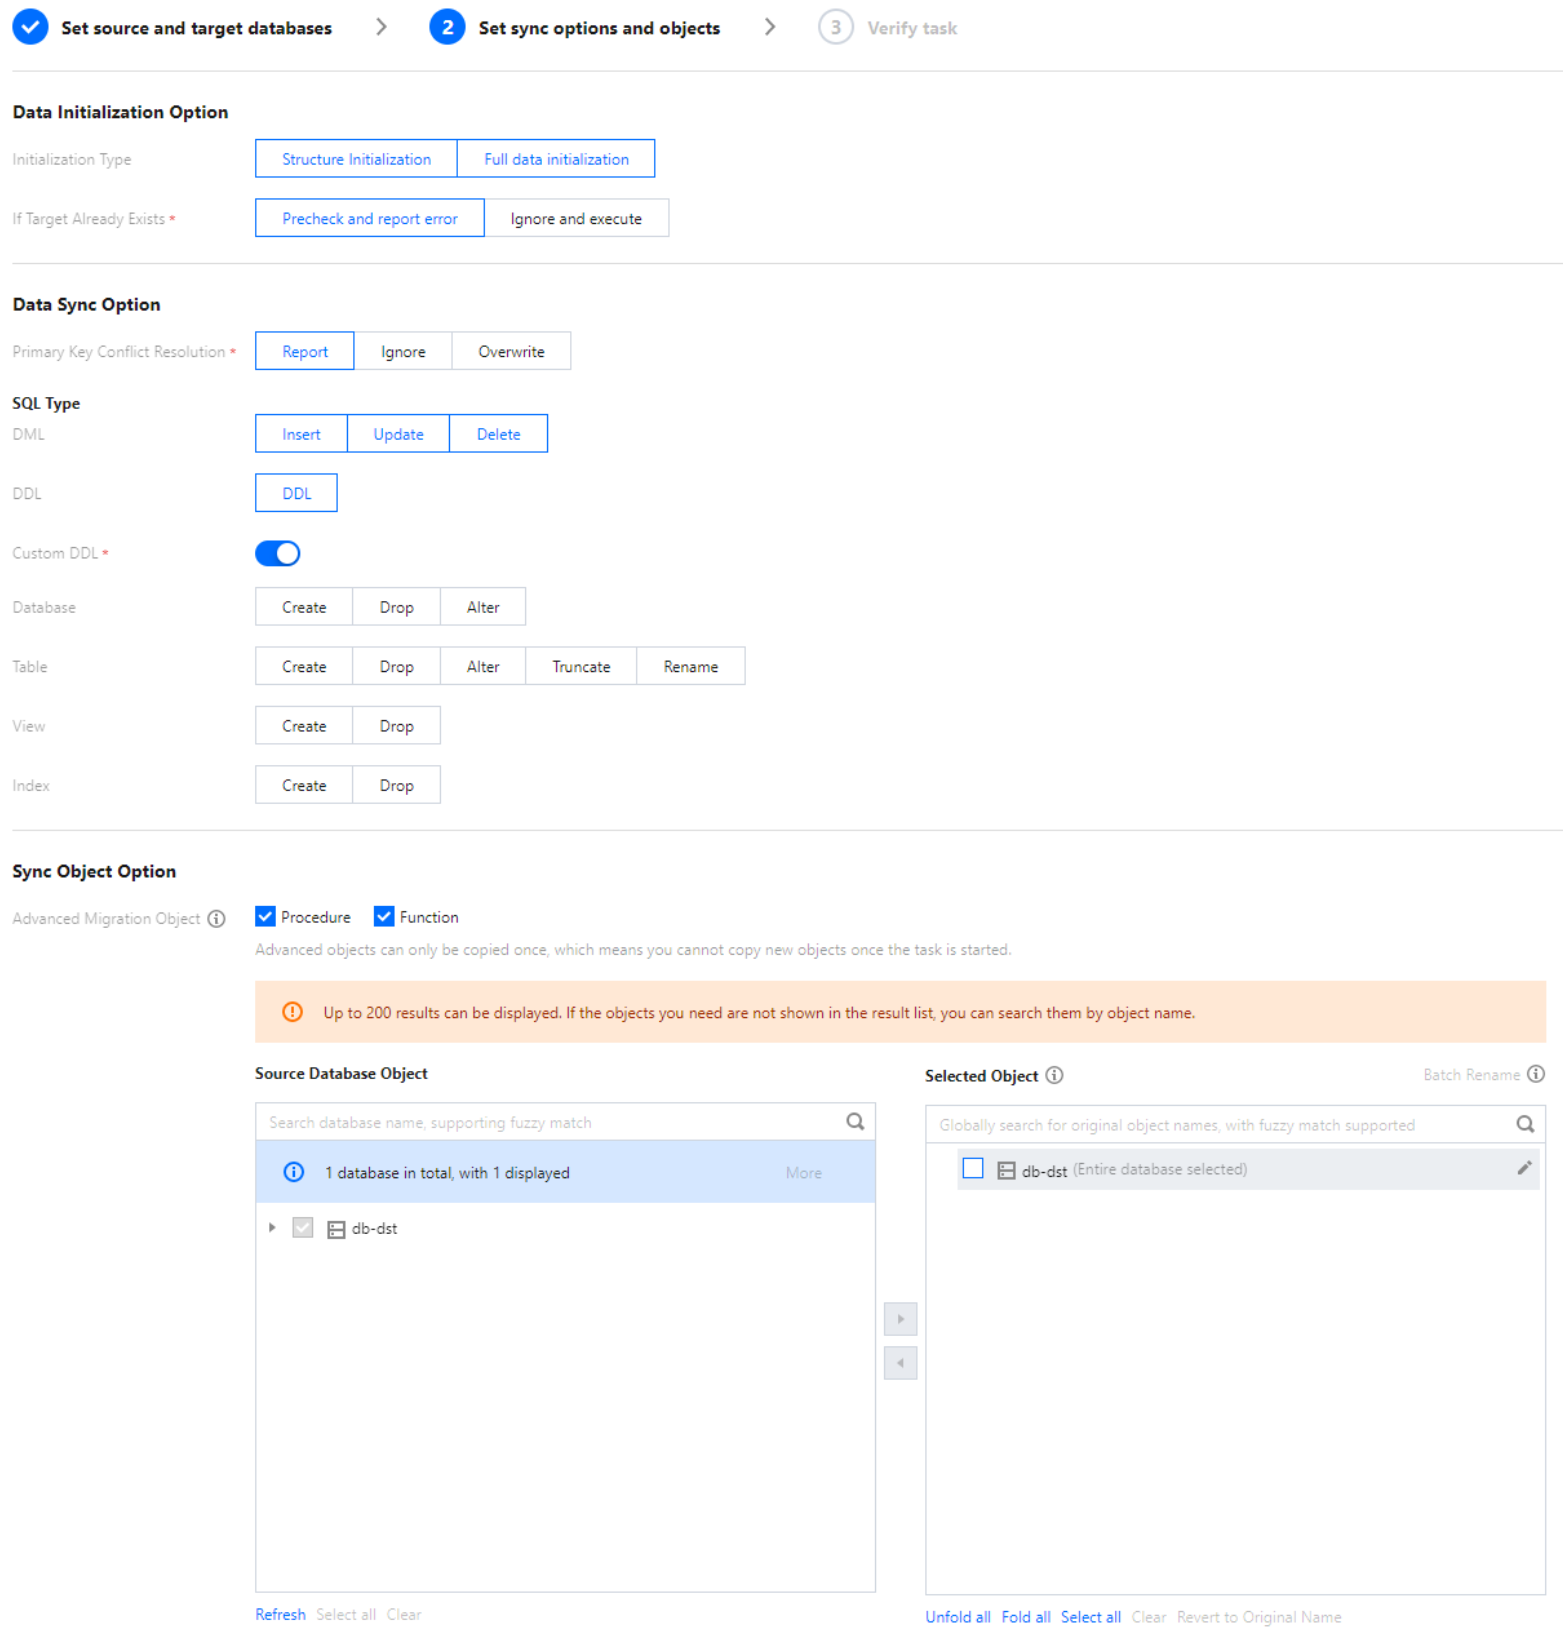
3. On the Set sync options and objects page, set the data initialization, data sync, and sync object options and click Save and Go Next.
Note:
If you only select Full data initialization for Initialization Type, the system will assume by default that you have created the table structures in the target database and will neither sync table structures nor check whether the source and target databases have tables with the same name. Therefore, if you select Precheck and report error for If Target Already Exists, the precheck and error reporting feature won't take effect.
If you select Full data initialization only, you need to create the table structures in the target database in advance.
If you want to rename a table (for example, rename table A table B) during sync, you must select the entire database (or entire instance) where table A resides rather than only table A as the sync object; otherwise, the system will report an error.
Category
Parameter
Description
Data Initialization Option
Initialization Type
Structure initialization: Table structures in the source instance will be initialized into the target instance before the sync task runs.
Full data initialization: Data in the source instance will be initialized into the target database before the sync task runs. Both options are selected by default, and you can deselect them as needed.
If Target Already Exists
Precheck and report error: If a table with the same name exists in both the source and target databases, an error will be reported, and the task will stop.
Ignore and execute: Full and incremental data will be directly added to tables in the target instance.
Data Sync Option
Conflict Resolution Method
Report: If a primary key conflict is found during data sync, an error will be reported, and the data sync task will be paused.
Ignore: If a primary key conflict is found during data sync, the primary key record in the target database will be retained.
Overwrite: If a primary key conflict is found during data sync, the primary key record in the source database will overwrite that in the target database.
SQL Type
Supported operations include INSERT, UPDATE, DELETE, and DDL. If you select Custom DDL, you can select different DDL statement sync policies as needed. For more information, see Setting SQL Filter Policy.
Sync Object Option
Database and Table Objects of Source Instance
Select the objects to be synced. You can select basic databases, tables, views, procedures, and functions.
The sync of advanced objects is a one-time operation: only advanced objects already in the source database before the task start can be synced, while those added to the source database after the task start will not be synced to the target database. For more information, see Syncing Advanced Object.
Selected Object
Database/Table mapping (renaming) is supported. Hover over a database or table name, click the displayed Edit icon, and enter a new name in the pop-up window.
When advanced objects are selected for sync, we recommend you not rename databases/tables; otherwise, sync of the advanced objects may fail.
Online DDL temp tables can be synced (through tools such as gh-ost or pt-online-schema-change). Click Edit of a table and select a temp table name in the pop-up window. For more information, see Syncing Online DDL Temp Table.
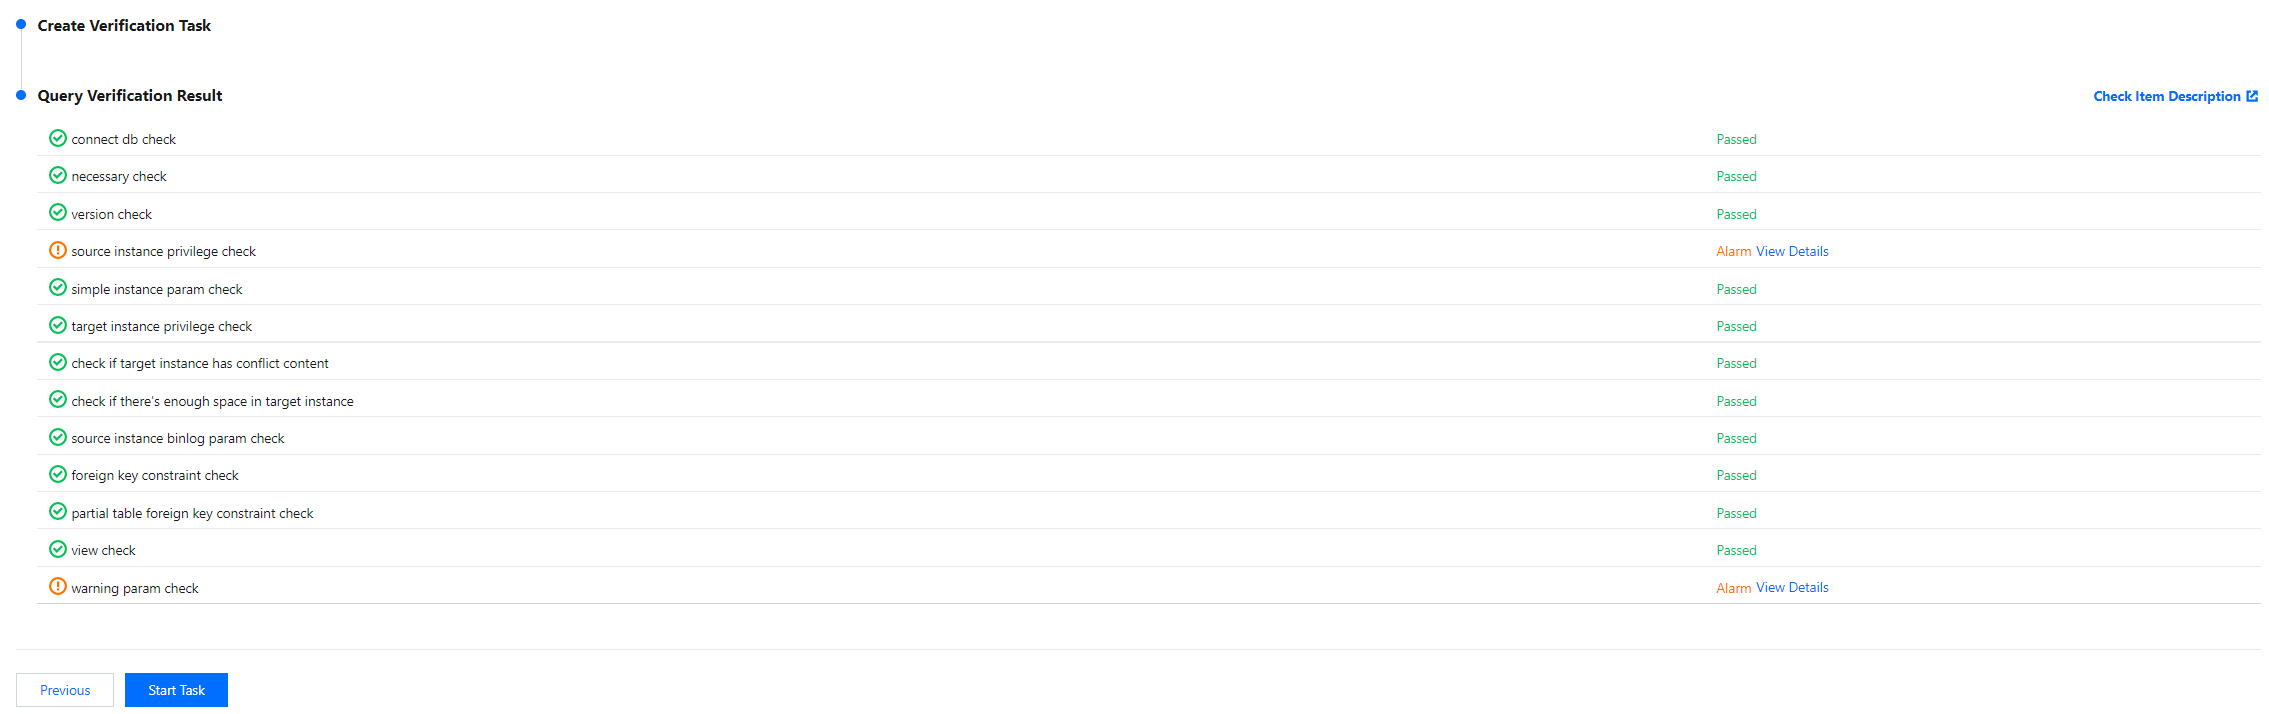
4. On the Verify task page, complete the verification. After all check items are passed, click Start Task.
If the verification fails, fix the problem as instructed in Check Item Overview and initiate the verification again.
Failed: It indicates that a check item fails and the task is blocked. You need to fix the problem and run the verification task again.
Alarm: It indicates that a check item doesn't completely meet the requirements, and the task can be continued, but the business will be affected. You need to assess whether to ignore the alarm or fix the problem and continue the task based on the alarm message.
5. Return to the data sync task list, and you can see that the task has entered the Running status.
Note:
You can click More > Stop in the Operation column to stop a sync task. You need to ensure that data sync has been completed before stopping the task.
6. (Optional) You can click a task name to enter the task details page and view the task initialization status and monitoring data.
Step Three: Configuring Reverse Synchronization
The operations for reverse synchronization are basically the same as those for forward synchronization; only the differences are described below.
1. Set the synchronization source and target database.
In this step, the source and target databases are swapped compared to the forward task.
2. Set synchronization options and synchronization objects.
Initialization Type: Do not select any.
Existing Table with Same Name: Choose Ignore and Continue Execution.
Primary Key Conflict Resolution Mechanism: Choose based on the business scenario.
Synchronization Operation Type: Keep consistent with the forward task.
3. On the validation task page, perform the validation. After passing the validation, start the task.
Step Four: Service Cutover
Wait until both the data gap and latency gap in the forward synchronization task are 0, then you can start the cutover.
1. After the data validation is correct, proceed with the business cutover. For data validation here, you can use Creating Data Consistency Check Task (MySQL) for auxiliary verification.
2. Terminate the forward synchronization task.
3. Manually connect the source database business to the target database.
Step Five: Starting Reverse Synchronization
Start the reverse task.
Step Six (Optional): Reverse Cutover
If data exception of target database is detected, stop reverse synchronization and switch the service back to the source database.