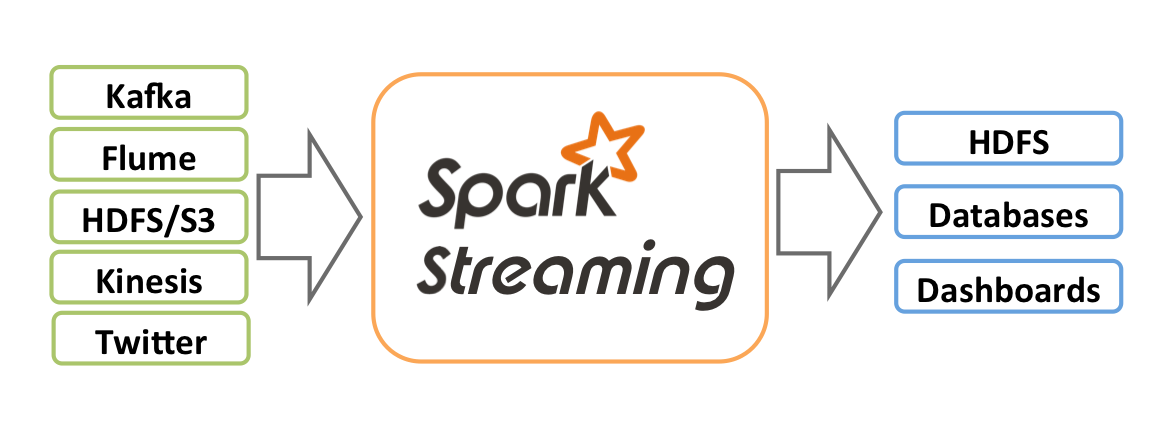
As an extension of Spark Core, Spark Streaming is used for high-throughput and fault-tolerant processing of continuous data. Currently supported external input sources include Kafka, Flume, HDFS/S3, Kinesis, Twitter, and TCP socket.
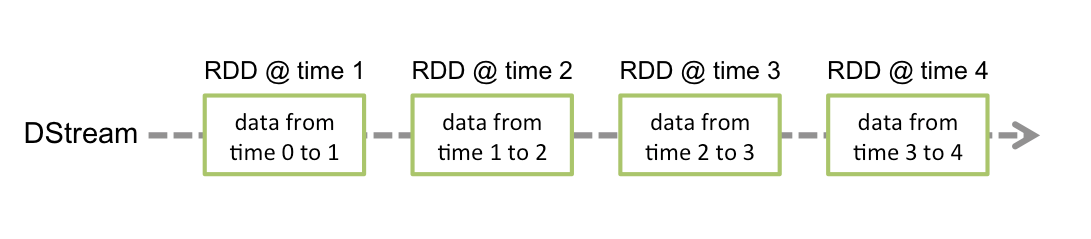
Spark Streaming abstracts continuous data into a Discretized Stream (DStream), which consists of a series of continuous resilient distributed datasets (RDDs). Each RDD contains data generated at a certain time interval. Processing DStream with functions is actually processing these RDDs.
When Spark Streaming is used as data input for Kafka, the following stable and experimental Kafka versions are supported:
|
| | |
| | |
| | |
| | |
| | |
| | |
| | |
Dynamic Topic Subscription | | |
Currently, CKafka is compatible with version above 0.9. The Kafka dependency of v0.10.2.1 is used in this practice scenario.
Directions
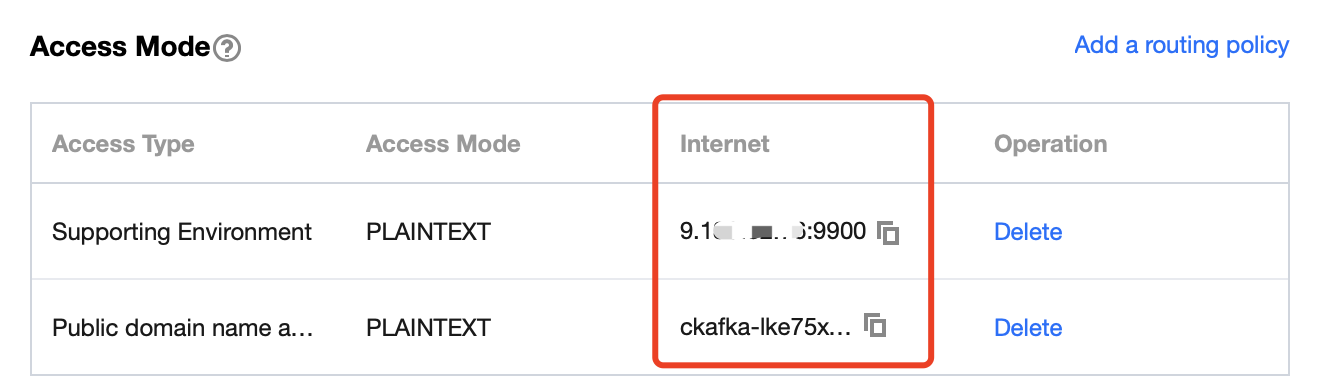
Step 1. Get the CKafka instance access address
2. Select Instance List on the left sidebar and click the ID of the target instance to enter its basic information page.
3. On the instance's basic information page, get the instance access address in the Access Mode module, which is the bootstrap-server required by production and consumption.
Step 2. Create a topic
1. On the instance's basic information page, select the Topic Management tab at the top.
2. On the topic management page, click Create to create a topic named test. This topic is used as an example below to describe how to produce and consume messages.
Step 3. Prepare the CVM environment
CentOS 6.8
|
| |
| |
| |
| |
| Installed on CentOS by default |
| |
For specific installation steps, see [Configuring environment](#Configuring environment).
Step 4. Connect to CKafka
Producing Messages to CKafka
Consuming Messages from CKafka
The Kafka dependency of v0.10.2.1 is used here.
1. Add dependencies to build.sbt:
name := "Producer Example"
version := "1.0"
scalaVersion := "2.11.8"
libraryDependencies += "org.apache.kafka" % "kafka-clients" % "0.10.2.1"
2. Configure producer_example.scala:
   import java.util.Properties   import org.apache.kafka.clients.producer._   object ProducerExample extends App {    val  props = new Properties()    props.put("bootstrap.servers", "172.16.16.12:9092") // Private IP and port in the instance information
    props.put("key.serializer", "org.apache.kafka.common.serialization.StringSerializer")    props.put("value.serializer", "org.apache.kafka.common.serialization.StringSerializer")
    val producer = new KafkaProducer[String, String](props)    val TOPIC="test"  // Specify the topic to produce to    for(i<- 1 to 50){           val record = new ProducerRecord(TOPIC, "key", s"hello $i") // Produce a message whose `key` is "key" and `value` is "hello i"           producer.send(record)    }    val record = new ProducerRecord(TOPIC, "key", "the end "+new java.util.Date)    producer.send(record)    producer.close() // Disconnect at the end   }
For more information on how to use ProducerRecord, see ProducerRecord. DirectStream
1. Add depe
ndencies to build.sbt: name := "Consumer Example"
version := "1.0"
scalaVersion := "2.11.8"
libraryDependencies += "org.apache.spark" %% "spark-core" % "2.1.0"
libraryDependencies += "org.apache.spark" %% "spark-streaming" % "2.1.0"
libraryDependencies += "org.apache.spark" %% "spark-streaming-kafka-0-10" % "2.1.0"
2. Configure DirectStream_example.scala:
import org.apache.kafka.clients.consumer.ConsumerRecord
import org.apache.kafka.common.serialization.StringDeserializer
import org.apache.kafka.common.TopicPartition
import org.apache.spark.streaming.kafka010._
import org.apache.spark.streaming.kafka010.LocationStrategies.PreferConsistent
import org.apache.spark.streaming.kafka010.ConsumerStrategies.Subscribe
import org.apache.spark.streaming.kafka010.KafkaUtils
import org.apache.spark.streaming.kafka010.OffsetRange
import org.apache.spark.streaming.{Seconds, StreamingContext}
import org.apache.spark.SparkConf
import org.apache.spark.SparkContext
import collection.JavaConversions._
import Array._
object Kafka {
def main(args: Array[String]) {
val kafkaParams = Map[String, Object](
"bootstrap.servers" -> "172.16.16.12:9092",
"key.deserializer" -> classOf[StringDeserializer],
"value.deserializer" -> classOf[StringDeserializer],
"group.id" -> "spark_stream_test1",
"auto.offset.reset" -> "earliest",
"enable.auto.commit" -> "false"
)
val sparkConf = new SparkConf()
sparkConf.setMaster("local")
sparkConf.setAppName("Kafka")
val ssc = new StreamingContext(sparkConf, Seconds(5))
val topics = Array("spark_test")
val offsets : Map[TopicPartition, Long] = Map()
for (i <- 0 until 3){
val tp = new TopicPartition("spark_test", i)
offsets.updated(tp , 0L)
}
val stream = KafkaUtils.createDirectStream[String, String](
ssc,
PreferConsistent,
Subscribe[String, String](topics, kafkaParams)
)
println("directStream")
stream.foreachRDD{ rdd=>
// Output the obtained message
rdd.foreach{iter =>
val i = iter.value
println(s"${i}")
}
// Get the offset
val offsetRanges = rdd.asInstanceOf[HasOffsetRanges].offsetRanges
rdd.foreachPartition { iter =>
val o: OffsetRange = offsetRanges(TaskContext.get.partitionId)
println(s"${o.topic} ${o.partition} ${o.fromOffset} ${o.untilOffset}")
}
}
// Start the computation
ssc.start()
ssc.awaitTermination()
}
}
RDD
1. Configure build.sbt in the way as detailed here. 2. Configure RDD_example:
import org.apache.kafka.clients.consumer.ConsumerRecord
import org.apache.kafka.common.serialization.StringDeserializer
import org.apache.spark.streaming.kafka010._
import org.apache.spark.streaming.kafka010.LocationStrategies.PreferConsistent
import org.apache.spark.streaming.kafka010.ConsumerStrategies.Subscribe
import org.apache.spark.streaming.kafka010.KafkaUtils
import org.apache.spark.streaming.kafka010.OffsetRange
import org.apache.spark.streaming.{Seconds, StreamingContext}
import org.apache.spark.SparkConf
import org.apache.spark.SparkContext
import collection.JavaConversions._
import Array._
object Kafka {
def main(args: Array[String]) {
val kafkaParams = Map[String, Object](
"bootstrap.servers" -> "172.16.16.12:9092",
"key.deserializer" -> classOf[StringDeserializer],
"value.deserializer" -> classOf[StringDeserializer],
"group.id" -> "spark_stream",
"auto.offset.reset" -> "earliest",
"enable.auto.commit" -> (false: java.lang.Boolean)
)
val sc = new SparkContext("local", "Kafka", new SparkConf())
val java_kafkaParams : java.util.Map[String, Object] = kafkaParams
// Pull messages in the corresponding offset range from the partition in order. The request will be blocked if no messages can be pulled, until the specified waiting time elapses or the number of produced new messages reaches the number for messages to be pulled
val offsetRanges = Array[OffsetRange](
OffsetRange("spark_test", 0, 0, 5),
OffsetRange("spark_test", 1, 0, 5),
OffsetRange("spark_test", 2, 0, 5)
)
val range = KafkaUtils.createRDD[String, String](
sc,
java_kafkaParams,
offsetRanges,
PreferConsistent
)
range.foreach(rdd=>println(rdd.value))
sc.stop()
}
}
For more information on how to use kafkaParams, see kafkaParams. Configuring environment[](id:Configuring environment)
Installing sbt
2. After decompression, create an sbt_run.sh script with the following content in the sbt directory and add executable permissions:
#!/bin/bash
SBT_OPTS="-Xms512M -Xmx1536M -Xss1M -XX:+CMSClassUnloadingEnabled -XX:MaxPermSize=256M"
java $SBT_OPTS -jar `dirname $0`/bin/sbt-launch.jar "$@"
3. Run the following command:
./sbt-run.sh sbt-version
The display of sbt version indicates a successful installation.
Installing Protobuf
1. Download an appropriate version of Protobuf. 2. Decompress and enter the directory.
./configure
make && make install
You should install gcc-g++ in advance, and the root permission may be required during installation.
3. Log in again and enter the following on the command line:
4. The display of Protobuf version indicates a successful installation.
Installing Hadoop
2. Add a Hadoop user.
useradd -m hadoop -s /bin/bash
3. Grant admin permissions.
4. Add the following in a new line under root ALL=(ALL) ALL:
hadoop ALL=(ALL) ALL
Save and exit.
5. Use Hadoop for operations.
6. Configure SSH password-free login.
cd ~/.ssh/
ssh-keygen -t rsa
cat id_rsa.pub >> authorized_keys
chmod 600 ./authorized_keys
7. Install Java.
sudo yum install java-1.8.0-openjdk java-1.8.0-openjdk-devel
8. Configure ${JAVA_HOME}.
Add the following at the end:
export JAVA_HOME=/usr/lib/jvm/java-1.8.0-openjdk-1.8.0.121-0.b13.el6_8.x86_64/jre
export PATH=$PATH:$JAVA_HOME
Modify the corresponding path based on the installation information.
9. Decompress Hadoop and enter the directory.
The display of version information indicates a successful installation.
10. Configure the pseudo-distributed mode (so that you can build different forms of clusters as needed).
Add the following at the end:
export HADOOP_HOME=/usr/local/hadoop
export PATH=$HADOOP_HOME/bin:$PATH
Modify the corresponding path based on the installation information.
11. Modify /etc/hadoop/core-site.xml.
<configuration>
<property>
<name>hadoop.tmp.dir</name>
<value>file:/usr/local/hadoop/tmp</value>
<description>Abase for other temporary directories.</description>
</property>
<property>
<name>fs.defaultFS</name>
<value>hdfs://localhost:9000</value>
</property>
</configuration>
12. Modify /etc/hadoop/hdfs-site.xml.
<configuration>
<property>
<name>dfs.replication</name>
<value>1</value>
</property>
<property>
<name>dfs.namenode.name.dir</name>
<value>file:/usr/local/hadoop/tmp/dfs/name</value>
</property>
<property>
<name>dfs.datanode.data.dir</name>
<value>file:/usr/local/hadoop/tmp/dfs/data</value>
</property>
</configuration>
13. Change JAVA_HOME in /etc/hadoop/hadoop-env.sh to the Java path.
export JAVA_HOME=/usr/lib/jvm/java-1.8.0-openjdk-1.8.0.121-0.b13.el6_8.x86_64/jre
14. Format the NameNode.
./bin/hdfs namenode -format
The display of Exitting with status 0 indicates a success.
15. Start Hadoop.
NameNode, DataNode, and SecondaryNameNode processes will exist upon successful startup.
Installing Spark
As Hadoop has already been installed, select Pre-build with user-provided Apache Hadoop here.
Note:
This example also uses the hadoop user for operations.
1. Decompress and enter the directory.
2. Modify the configuration file.
cp ./conf/spark-env.sh.template ./conf/spark-env.sh
vim ./conf/spark-env.sh
Add the following in the first line:
export SPARK_DIST_CLASSPATH=$(/usr/local/hadoop/bin/hadoop classpath)
Modify the path based on the Hadoop installation information.
3. Run the example.
The display of an approximate value of π output by the program indicates a successful installation.