In big data scenarios, frequent fragmented writes generate a large number of small files, which significantly slow down performance. Based on extensive production practice experience, DLC offers you efficient, simple, and flexible data optimization capabilities that can handle near real-time scenarios with large data volumes.
Note:
1. In Upsert scenarios, a large number of small files and snapshots will be generated. You need to configure data optimization before writing to avoid the need for extensive resource processing of historical backlog of small files after writing.
2. Currently, data optimization capability only supports DLC native tables.
3. The initial execution of data optimization tasks may be slow, depending on the stock data volume size and the selected engine resource specifications.
4. It is recommended to separate the data optimization engine from the business engine to avoid the situation where data optimization tasks and business tasks compete for resources, causing delays in business tasks.
Configure data optimization through the DLC console
DLC data optimization strategies can also be set in the data directory, database, and data table. When data optimization strategies are not specifically set for a database or data table, they will inherit the optimization strategy from the previous level. When configuring data optimization, users need to select an engine. To execute data optimization tasks, if the user currently does not have a data engine, they may refer to Purchasing Dedicated Data Engine to make a purchase. DLC data governance supports Spark SQL Engine and Spark Job Engine.
Note:
1. If a user chooses the Spark Job Engine as the data optimization resource, DLC will create data optimization tasks on that engine. Depending on the size of the cluster, the optimized task data created will vary. For instance, if the cluster size is smaller than 32 CU, one data optimization task will be created to execute all optimization tasks. If the cluster size is larger than 32 CU, two data optimization tasks will be created to separately execute write optimization and data deletion optimization.
2. When choosing a Spark Job as a data optimization resource, some resources need to be reserved. If the optimization tasks queue exceeds 50, DLC will launch temporary data optimization tasks to quickly process the backlog of optimization tasks.
Data Directory Configuration Steps
You can use DLC's Data Catalog Editing Feature to configure data optimization capabilities for your data directory.
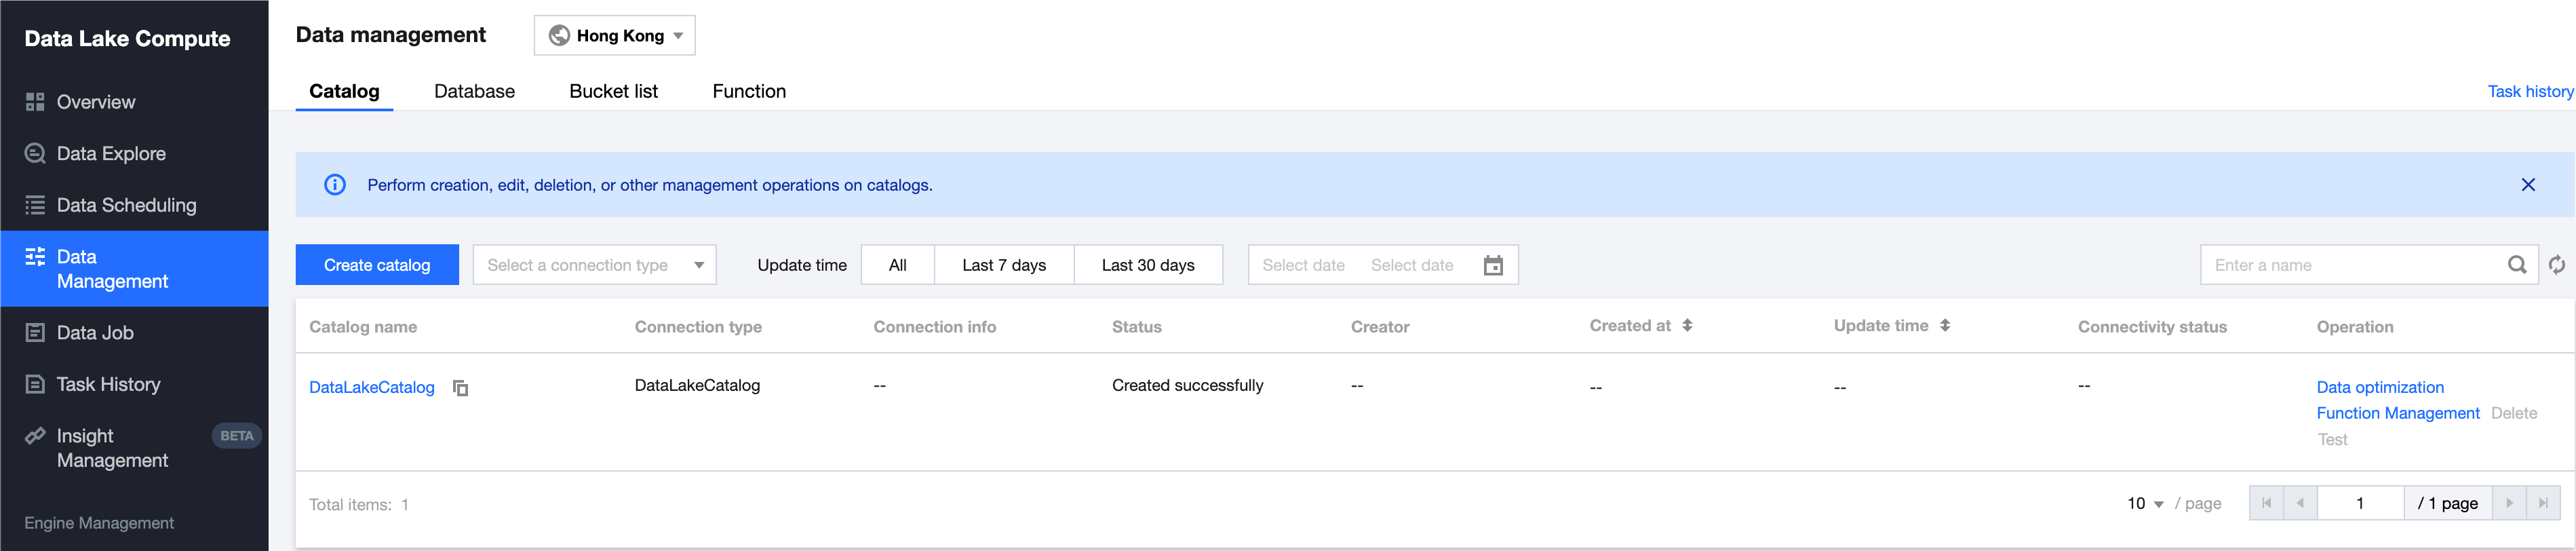
1. Go to the Data Management Module in the DLC Console, enter the Data Management page, and click Data Optimization.
2. Open the Data Optimization page of the data directory, configure the corresponding data optimization resources and policies. Once confirmed, the data optimization feature will automatically apply to that data directory.
Note:
Only supports configuring data optimization for the DataLakeCatalog data directory.
Database Configuration Steps
If you want to configure a data optimization strategy for a specific database individually, you can use the database editing capabilities of DLC to configure data optimization capabilities for the database.
1. Enter the DLC console Data Management Module, enter the Database page, enter the database list under DataLakeCatalog.
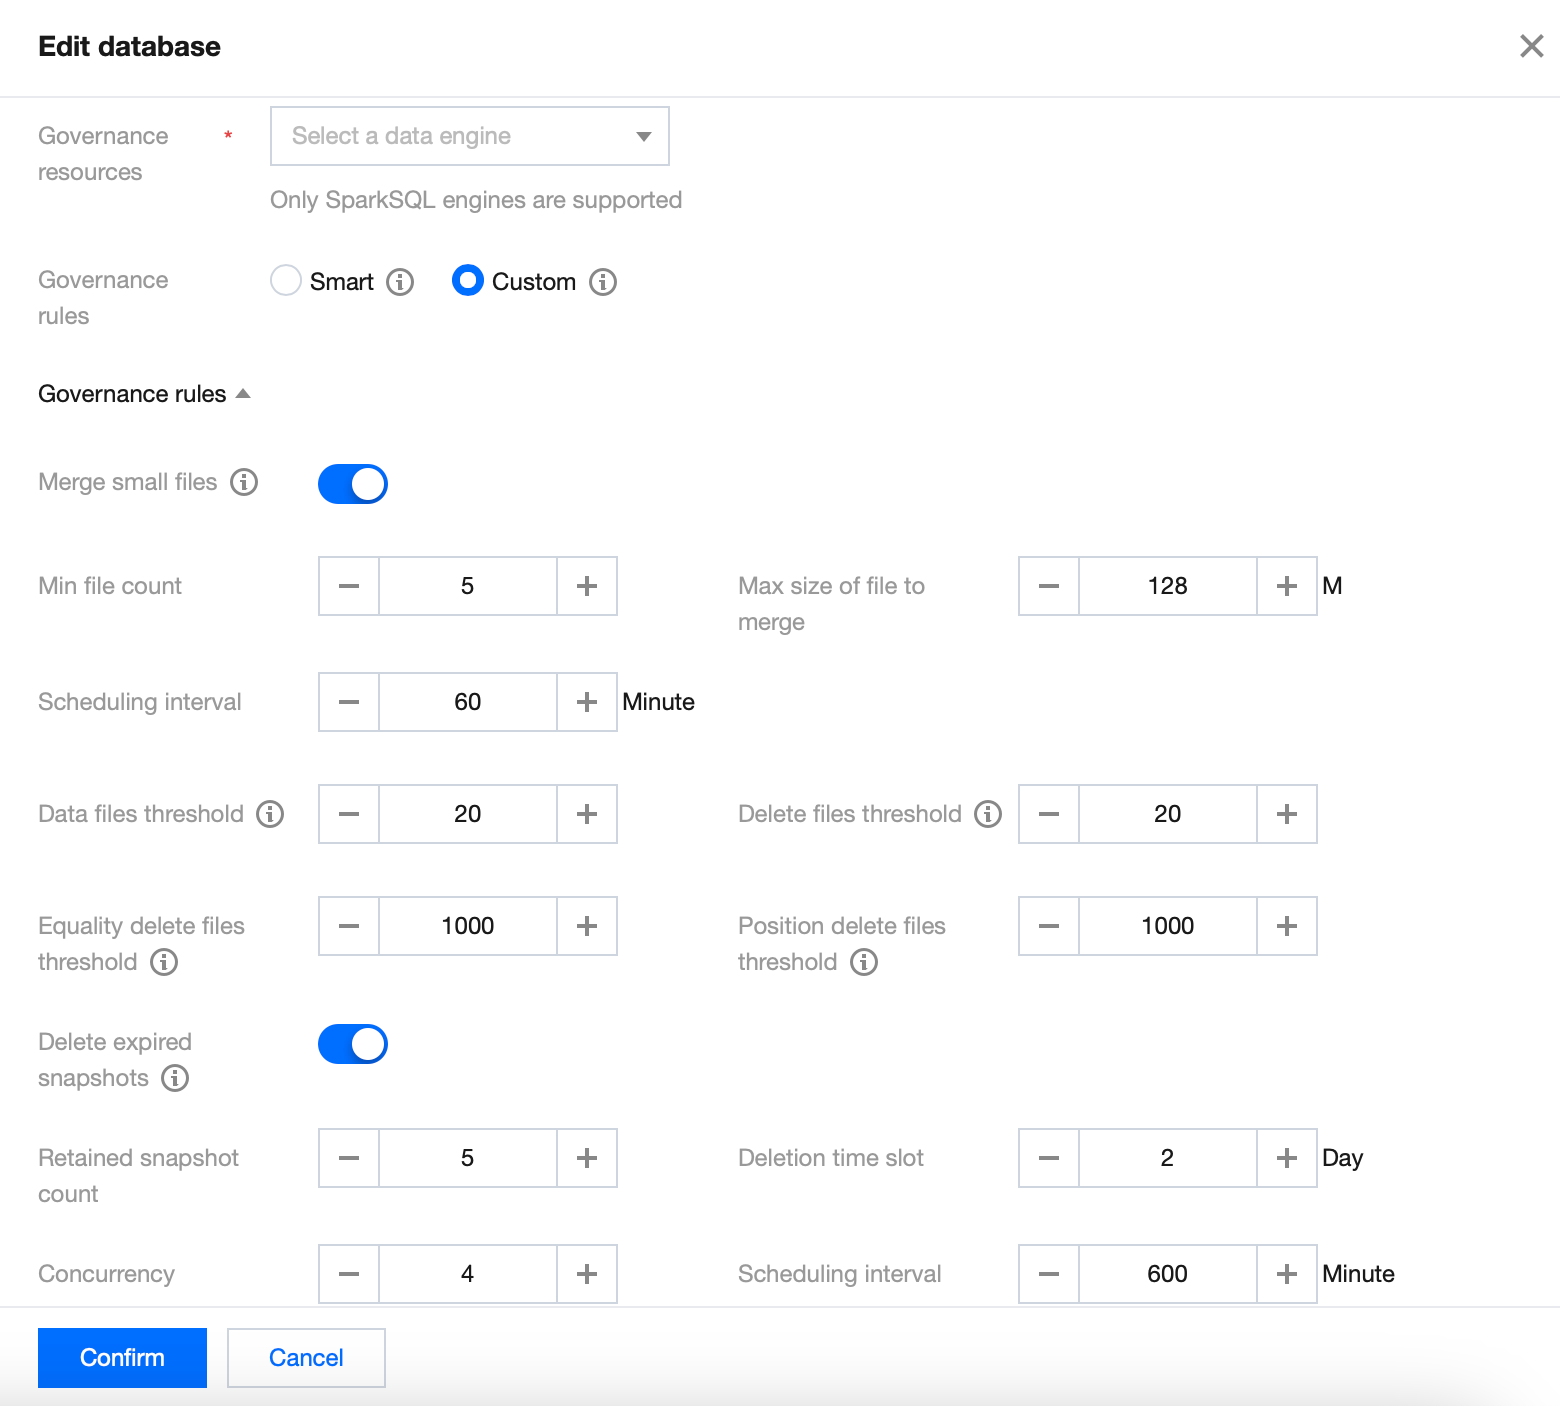
2. Open the database page, click Data Optimization Configuration. Once confirmed, the data optimization strategy will automatically apply to that database.
Note:
When creating a database and editing data, the default to show data optimization strategy inherits the data optimization strategy of the superior data directory. If you want to customize the data optimization strategy, you need to select Custom Configuration and configure data optimization resources and policies.
Data Table Configuration Steps
If you want to configure a data optimization strategy for a specific data table individually, you can use the data table editing capabilities of DLC to configure data optimization capabilities for the data table.
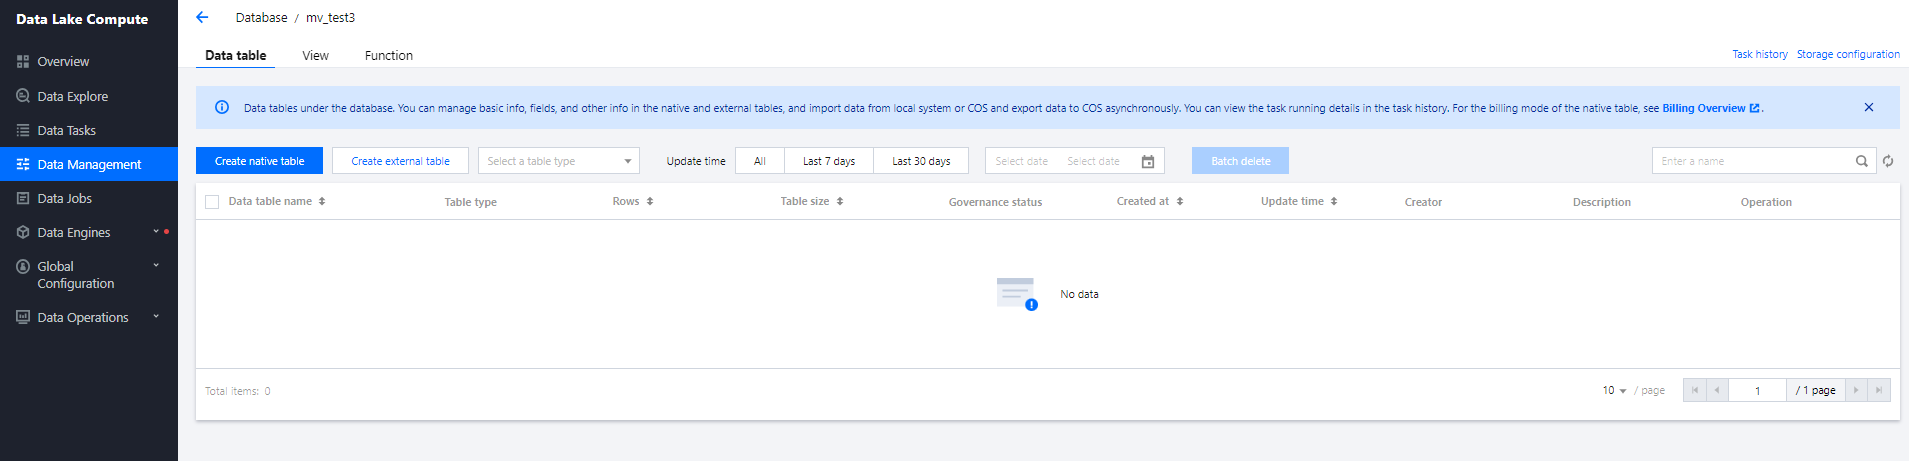
1. Enter the DLC console Data Management Module, enter the Database page, select a database, then enter the Data Table list page, and click Create Native Table.
2. Open the Create Native Table page, configure the corresponding optimization resources, and once confirmed, the data optimization strategy will automatically apply to that data table.
3. For already created tables, you can click Data Optimization Configuration to edit the existing data table's data optimization strategy.
Note:
When creating or editing a data table, the default data optimization strategy displayed inherits from the parent data table's data optimization strategy. If you want to customize the data optimization strategy, you need to select Custom Configuration and configure data optimization resources and policies.
Optimize data through attribute field configuration
Besides the above visualization method for configuring data optimization, you can also manually specify library and table field attributes for configuration. For example:
// for table govern policy
ALTERTABLE
`DataLakeCatalog`.`wd_db`.`wd_tb`
SET
TBLPROPERTIES (
'smart-optimizer.inherit'='none',
'smart-optimizer.written.enable'='enable'
)
// for database govern policy
ALTERDATABASE
`DataLakeCatalog`.`wd_db`
SET
DBPROPERTIES (
'smart-optimizer.inherit'='none',
'smart-optimizer.written.enable'='enable'
)
The attribute values for data optimization can be modified via the ALTER statement. The attribute value definitions are as follows:
Attribute Value
Meaning
Default Value
Value Description
smart-optimizer.inherit
Whether to Inherit from the Parent Strategy
default
none: Does not inherit
default: Inherit
smart-optimizer.written.enable
Whether Write Optimization is Enabled
disable
disable: Not Enabled
enable: Enabled
smart-optimizer.written.advance.compact-enable
(Optional) Advanced Write Optimization Parameters, Whether to Start Small File Merge
enable
disable: Not Enabled
enable: Enabled
smart-optimizer.written.advance.delete-enable
(Optional) Advanced Write Optimization Parameters, Whether to Start Data Cleanup
enable
disable: Not Enabled
enable: Enabled
smart-optimizer.written.advance.min-input-files
(Optional) Merge Minimum Number of Input Files
5
When the number of files in a table or partition exceeds the minimum number of files, the platform will automatically check and initiate file optimization merge. File optimization merge can effectively improve analyze query performance. The larger the minimum number of files, the higher the resource load. The smaller the minimum number of files, the more flexible the execution, and tasks will be more frequent. It is recommended to set the value to 5.
During file optimization merge, files will be combined to meet the target size as much as possible. It is recommended to set the value to 128M.
smart-optimizer.written.advance.retain-last
(Optional) Snapshot Expiration Time, Unit Days
5
When the snapshot retention time exceeds this value, the platform will mark the snapshot as expired. The longer the snapshot expiration time, the slower the snapshot cleanup speed, and the more storage space is occupied.
smart-optimizer.written.advance.before-days
(Optional) Number of Expired Snapshots to Retain
2
Expired snapshots exceeding the retention count will be cleaned up. The more expired snapshots retained, the more storage space is occupied. It is recommended to set the value to 5.
The platform will periodically scan snapshots and expire them. The shorter the execution cycle, the more sensitive the snapshot expiration will be, but it may consume more resources.
(Optional) Enable Merge for COW Tables (V1 Table or V2 Non-Upsert Table)
disable
Once this configuration item is enabled, the system will automatically generate file merge tasks for COW tables.
Note: COW tables usually have a large data volume, and file merging may consume a lot of resources. You can choose whether to enable file merging for COW tables based on resource availability and table size.
smart-optimizer.written.advance.strategy
(Optional) File Merge Strategy
binpack
binpack (default merge strategy): Merges data files that meet the merge conditions into larger data files using the append method.
sort: The sort strategy merges files based on specified fields. You can choose query condition fields that are frequently used in your business scenarios as the sorting fields. Merging in this way can improve query performance.
smart-optimizer.written.advance.sort-order
(Optional) When the file merge strategy is sort, the configured sort collation
-
If you haven't configured a sorting strategy, the Upsert Table will sort using the configured upsert key values (by default, the first two key values) in an ASC NULLS LAST manner. If a sorting strategy cannot be found for COW Table during a sort merge, the binpack default merge strategy will be used.
The platform will periodically scan and clean up orphan files. The shorter the execution cycle, the more sensitive the cleanup of orphan files will be, but it
may consume more resources.
Optimization Suggestions
The DLC backend regularly statistics native table metric items and combine these metrics with best practices to provide optimization suggestions for native tables. There are four categories of optimization suggestion items, including basic configuration for table usage scenarios, data optimization recommendations, and recommendations for data storage distribution items.
Optimization recommendation check items
Sub-check item
Meaning
Business Scenario
Optimization Suggestions
Basic attribute configuration check of the table
Metadata governance enabled
Check whether metadata governance is enabled to prevent metadata volume expansion due to frequent table writes
append/merger into/upsert
Recommended to enable
Bloom filter set
Check if the bloom filter is set. After enabling the bloom filter for MOR tables, it quickly filters the deletes files, speeding up MOR table queries and deletes file merges
upsert
Must enable
Metrics key attributes configured
Check if metrics are set to full. Once this attribute is enabled, it will record all metrics information, preventing incomplete metrics information recording due to excessively long table locations
append/merger into/upsert
Must enable
Data optimization configuration check
Small File Merge
Check if small file merging is enabled
merge into/upsert
Must enable
Snapshot Expiration
Check if snapshot expiration is enabled
append/merge into/upsert
Recommended to enable
Remove orphaned files
Check if removing orphaned files is enabled
append/merge into/upsert
Recommended to enable
Recent governance task check items
Recent governance task check items
If data governance is enabled, the system will track the execution of data governance tasks. If multiple tasks in a row time out or fail, it will be deemed in need of optimization
append/merger into/upsert
Recommended to enable
Data Storage Distribution
Average File Size
Collect summary information from snapshots, calculate the average file size, and if the average file size is less than 10MB, it will be deemed in need of optimization
append/merger into/upsert
Recommended to enable
MetaData Meta File Size
Collect table metadata.json Meta File Size, if the file size exceeds 10MB, it will be deemed in need of optimization
append/merger into/upsert
Recommended to enable
Number of Table Snapshots
Collect Number of Table Snapshots, if the number of snapshots exceeds 1000, it will be deemed in need of optimization
append/merger into/upsert
Recommended to enable
Optimization Suggestions for Basic Configuration Items of Table Attributes
Check and configure Metadata Governance Method
Step1 Inspection Method
Use 'show TBLPROPERTIES' to view table attributes and check if "write.metadata.delete-after-commit.enabled", "write.metadata.previous-versions-max" are configured.
Step2 Configuration Method
If Step1 finds that it's not configured, you can configure it using the following Alter table DDL, with the method referenced below.
To enable automatic metadata governance, "write.metadata.delete-after-commit.enabled" should be set to true. The number of historical metadata to retain can be set according to the actual situation, for example, setting "write.metadata.previous-versions-max" to 100 will retain up to 100 historical metadata.
Inspecting and Setting Bloom Filter Method
Step1 Inspection Method
Use show TBLPROPERTIES to view table attributes, and check if "write.parquet.bloom-filter-enabled.column.{column}" is set to true.
Step2 Configuration Method
If Step1 finds that it's not configured, you can configure it using the following Alter table DDL, with the method referenced below.
It is recommended to enable bloom in upsert scenarios, and configure it based on the upsert primary key. If there are multiple primary keys, it is advisable to set it for the first two primary key fields.
After updating the bloom fields, if there are upstream writes from inlong/oceans/flink, you must restart the upstream import job.
Check and configure table key attributes metrics
Step1 Inspection Method
View table properties using `show TBLPROPERTIES` and check if "write.metadata.metrics.default" is configured as "full".
Step2 Configuration Method
If Step1 finds that it's not configured, you can configure it using the following Alter table DDL, with the method referenced below.
View table properties using `show TBLPROPERTIES` and check if data optimization is configured. Refer to DLC Native Table Core Capabilities for the attribute configuration values for data optimization.
Visual inspection through the DLC Console
Go to the Data Management Module in the DLC Console, enter the Database page, select a database to access the Data Table list page, choose the table to inspect, and proceed to Data Optimization Configuration.
Step2 Configuration Method
Follow the guidance to enable data optimization.
Recent recommendations for data governance optimization task items
Check if data governance is functioning properly
Step1 Inspection Method
Enter the DLC Console Data Management Module, enter the Database page, select a database and then enter the Data Table list page, click on the data table name, enter Optimized Monitoring, choose Optimization Task then select Today's Optimization, check for tasks that failed in the last three hours, if there are any, the check is not passed. Select the failed task, in View Details look at the Execution Results.
Step2 Fix Methods
Summary of Reasons and Solutions for Failed Scenario Data Optimization Tasks.
1. Data Governance Configuration Error led to failure.
Sort Merge Strategy was enabled, but the collation was incorrectly configured, or a nonexistent rule was set.
The configuration for the data governance engine has changed, leading to the inability to find an appropriate engine when running governance tasks.
2. Task Execution Timed Out.
Note:
After repairing the recent data optimization task performance, it is necessary to wait three hours before checking if it has recovered.
Data Storage Distribution Item Optimization Suggestions
Note:
Failure in this scenario check is usually due to large data volume. It's recommended to handle it manually before considering addition to Data Optimization Governance.
It is recommended to use the more efficient Spark job engine.
When manually merging small files, configure the target-file-size-bytes parameter based on the business scenario. For upsert operations, it is advised not to exceed 134217728, i.e., 128M. For append/merge into operations, it is advised not to exceed 536870912, i.e., 512M.
When using the Spark job engine to handle snapshot expiration, the max_concurrent_deletes parameter can be increased.
Average Data File Size Check Failure Handling Method
Step1 Summary of Reasons
The average size of data files is too small, usually occurring in the following scenarios:
The table is partitioned too finely, resulting in each partition having only a small amount of data.
When tables are written using the Insert into/overwrite method, the upstream data is dispersed, such as when the upstream data is also from a partitioned table with little data within partitions.
The table is written to the MOR Table using the merge into method, but small file merging has not been performed.
The table is written using the upsert method, but small file merging has not been performed.
Step2 Fix Methods
Refer to the following SQL to manually perform small file merging.
'max-concurrent-file-group-rewrites',--Subject to actual resource conditions, the higher the concurrency, the more resources used, and the faster the file merging
'5',
'partial-progress.enabled',
'true',
'partial-progress.max-commits',
'10',
'max-file-group-size-bytes',
'10737418240',
'min-input-files',
'30',
'target-file-size-bytes',
'134217728'
)
)
MetaData Meta File Size Check Failure Handling Method
Step1 Summary of Reasons
MetaData file size is too large, usually caused by an excessive number of data files, mainly due to the following reasons:
The table has been written to using the append method for a long time, and each write involves a large number of scattered files.
The table has the attributes of an MOR table and has been written to long-term using the merge into method, but small file merging is not enabled.
The table has not undergone snapshot expiration for an extended period, maintaining a large number of historical snapshot data files.
The table partitions are large, and each partition contains a large number of small files.
Step2 Fix Methods
Refer to manually perform small file merging.
Refer to the following SQL to manually execute the expired snapshot SQL and clean up historical snapshots.
CALLDataLakeCatalog.system.rewrite_data_files(table=>'test_db.test_tb',options=> map('delete-file-threshold','10','max-concurrent-file-group-rewrites',--The higher the concurrency, and the faster the file merge'5','partial-progress.enabled','true','partial-progress.max-commits','10','max-file-group-size-bytes','10737418240','min-input-files','30','target-file-size-bytes','134217728'))
Based on the service scenario, the written files are aggregated to a certain extent to avoid scattered files.
If the data is written into insert into/insert overwrite, you can automatically add a repartition in either of the following ways.
1. This parameter takes effect when both of the following parameters are true. In this case, you can use the preceding parameters to control the number or size of automatically adapted partitions after repartition.
spark.sql.adaptive.enabled:This parameter must be true. The default value is true for cluster creation.
spark.sql.adaptive.insert.repartition:This parameter must be true. The default value is false for cluster creation.
2. Specify the following parameters to take effect. This case repartition spark. The partition number after SQL. The adaptive. Insert. The repartition. ForceNum the specified value.
spark.sql.adaptive.insert.repartition.forceNum:This parameter specifies the value of the partition to be partitioned. It is left blank by default when the cluster is created.
Check the number of snapshots. This operation fails to pass the check
Step1 Cause summary
Snapshots do not expire for a long time.
The upsert writes data to the checkpoint interval improperly, resulting in a large number of snapshots.
Step2 Repair method
See Snapshot expiration SQL to perform snapshot expiration operations.
Adjust the flink write checkpoint interval. It is recommended that the checkpoint interval of DLC native table upsert be 3 to 5 minutes.