Data Lake Compute supports the execution of programs written in Python. This example demonstrates the detailed operations of reading and writing data on Cloud Object Storage (COS), creating libraries and tables on Data Lake Compute, and reading and writing tables, assisting users in job development on Data Lake Compute.
Environment Preparation
Dependencies: PyCharm or other Python programming development tools.
Development Process
Development Flowchart
The development process for Data Lake Compute Spark JAR jobs is as follows:
Resource Creation
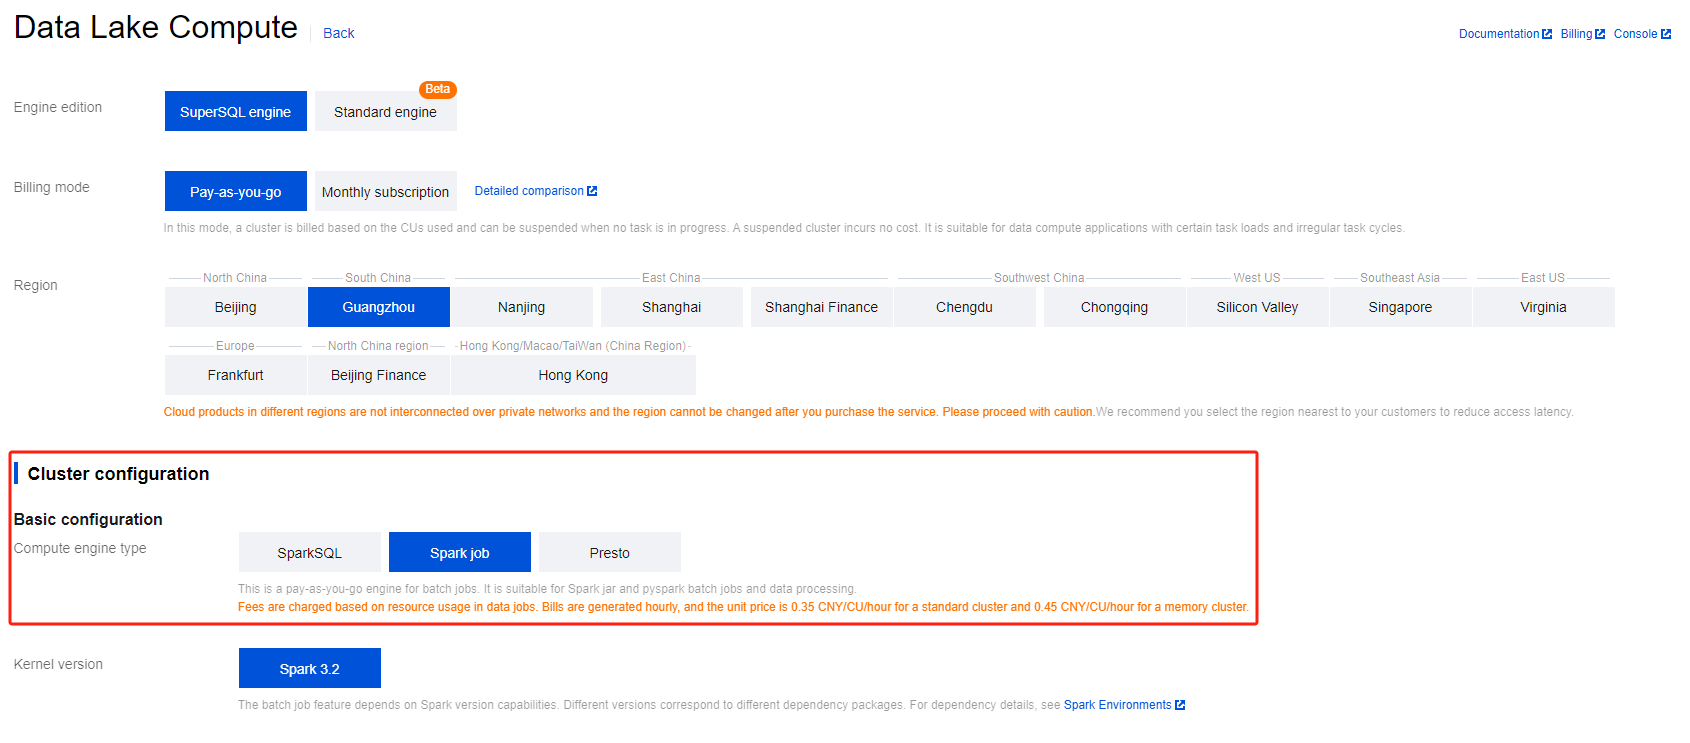
For the first time running a job on Data Lake Compute, you need to create new Spark job compute resources, for instance, creating a Spark job resource named "dlc-demo".
1. Log in to the Data Lake Compute DLC Console, select the service region, and click on Data Engine in the navigation menu.
2. Click Create Resource in the upper left corner to enter the resource configuration purchase page.
3. In the Cluster Configuration > Calculation Engine Type option, select Spark as the job engine.
Fill in "dlc-demo" for Information Configuration > Resource Name. For a detailed introduction to creating new resources, please refer to Purchasing a Dedicated Data Engine.
4. Click Activate Now to confirm the resource configuration information.
5. Upon verifying that the information is accurate, click Submit to complete the resource configuration.
Uploading Data to COS
Create a bucket named "dlc-demo" and upload the file people.json for the example of reading and writing data from COS. The content of the people.json file is as follows:
Click Create Bucket in the upper left corner, fill in the name field with "dlc-dmo", and click Next to complete the configuration.
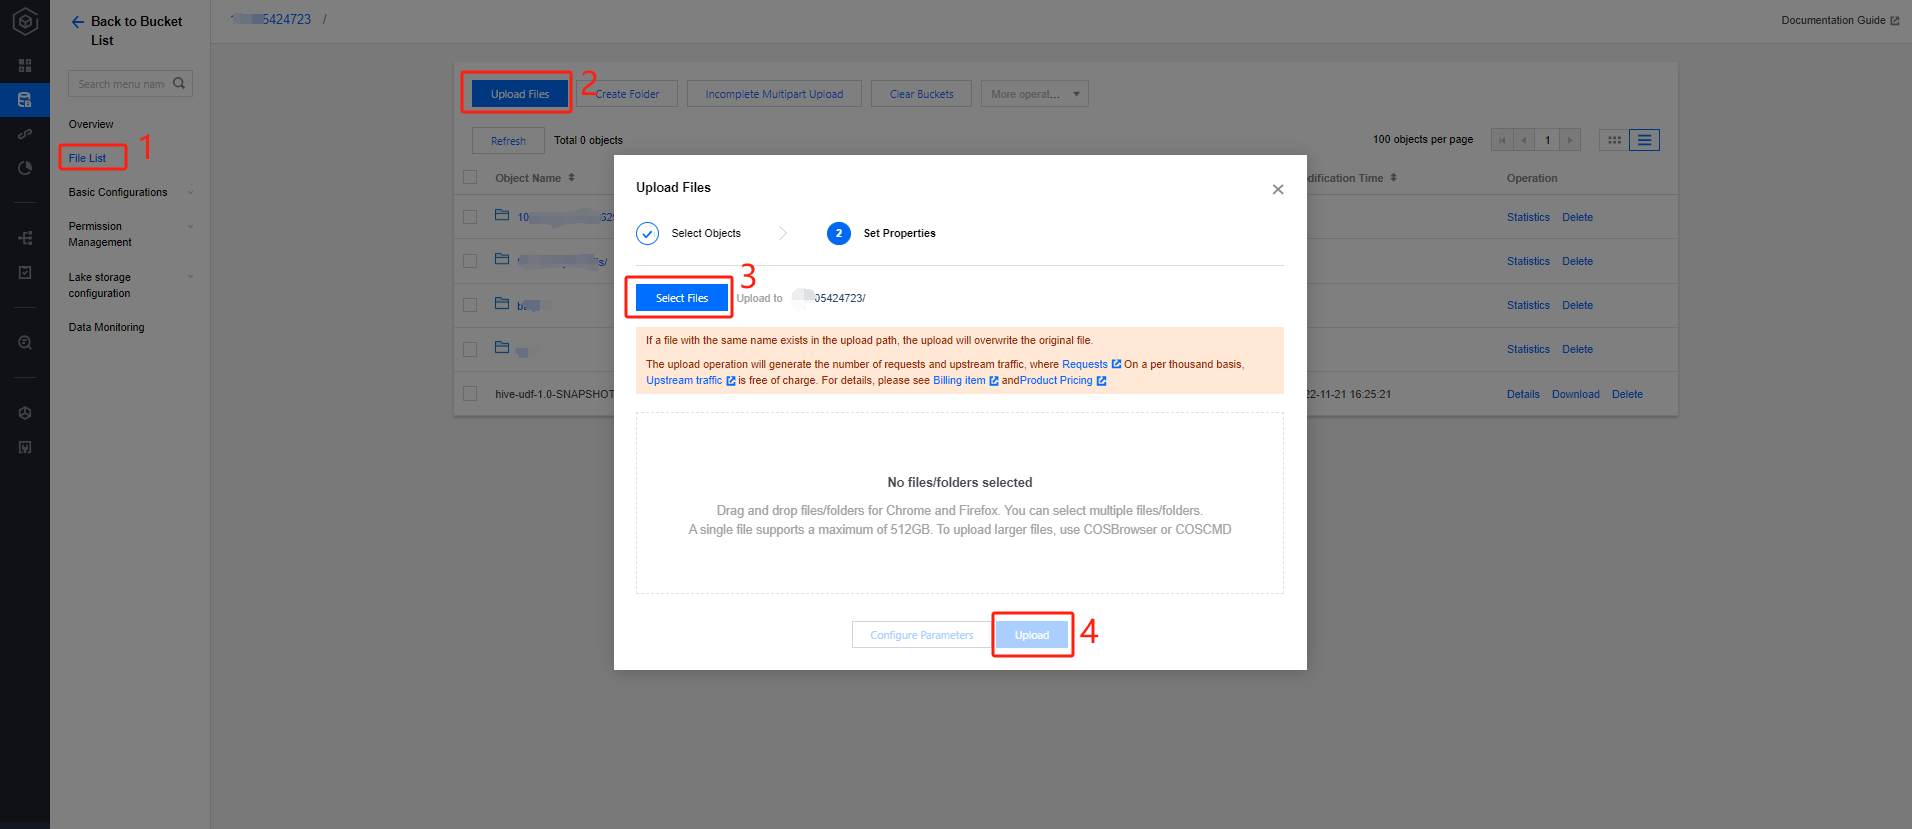
3. Upload File:
Click on File List > Upload File, select the local "people.json" file to upload to the "dlc-demo-1305424723" bucket (-1305424723 is a random string generated by the platform when creating the bucket), click Upload to complete the file upload. For details on creating a new bucket, please refer to Create Bucket.
Creating a Python Project
Create a new project named "demo" using PyCharm.
Writing Code
1. Create a new cos.py file, write code with the functionality to read and write data from COS, create libraries and tables on DLC, query data, and write data.
import sys
from pyspark.sql import SparkSession
from pyspark.sql import Row
if __name__ =="__main__":
spark = SparkSession \\
.builder \\
.appName("Operate data on cos")\\
.getOrCreate()
# 1. Read data from COS, supporting various file types such as JSON, CSV, Parquet, ORC, Text.
2. Create a new db.py file, write code, the functions of which include creating libraries, tables, querying data, and writing data on Data Lake Compute.
from os.path import abspath
from pyspark.sql import SparkSession
if __name__ =="__main__":
spark = SparkSession \\
.builder \\
.appName("Operate DB Example") \\
.getOrCreate()
# 1. Create a Database
spark.sql("CREATE DATABASE IF NOT EXISTS DataLakeCatalog.dlc_db_test_py COMMENT 'demo test' ")
# 2. Create Internal Table
spark.sql("CREATE TABLE IF NOT EXISTS DataLakeCatalog.dlc_db_test_py.test(id int,name string,age int) ")
# 3. Writing Internal Data
spark.sql("INSERT INTO DataLakeCatalog.dlc_db_test_py.test VALUES (1,'Andy',12),(2,'Justin',3) ")
# 4. Inspect Internal Data
spark.sql("SELECT * FROM DataLakeCatalog.dlc_db_test_py.test ").show()
# 5. Create External Table
spark.sql("CREATE EXTERNAL TABLE IF NOT EXISTS DataLakeCatalog.dlc_db_test_py.ext_test(id int, name string, age int) ROW FORMAT SERDE 'org.apache.hive.hcatalog.data.JsonSerDe' STORED AS TEXTFILE LOCATION 'cosn://cry-1305424723/ext_test' ")
# 6. Write external data
spark.sql("INSERT INTO DataLakeCatalog.dlc_db_test_py.ext_test VALUES (1,'Andy',12),(2,'Justin',3) ")
# 7. Inspect External Data
spark.sql("SELECT * FROM DataLakeCatalog.dlc_db_test_py.ext_test ").show()
spark.stop()
When creating an external table, you can follow the steps to upload data to COS and first create a corresponding table name folder in the bucket to save the table files.
Debugging
Ensure PyCharm debugging is free of syntax errors.
Upload PY Files to COS
Log in to the COS console and follow the steps in the previous section Upload data to COS to upload cos.py and db.py to COS.
Create a New Spark Jar Data Job
Before creating a data job, you need to complete the data access policy configuration to ensure that the data job can safely access the data. For details on configuring the data access policy, please refer to Configuring Data Access Policy. If the data policy name has been configured as: qcs::cam::uin/100018379117:roleName/dlc-demo.
1. Log in to the Data Lake Compute DLC Console, select the service region, and click on Data Jobs in the navigation menu.
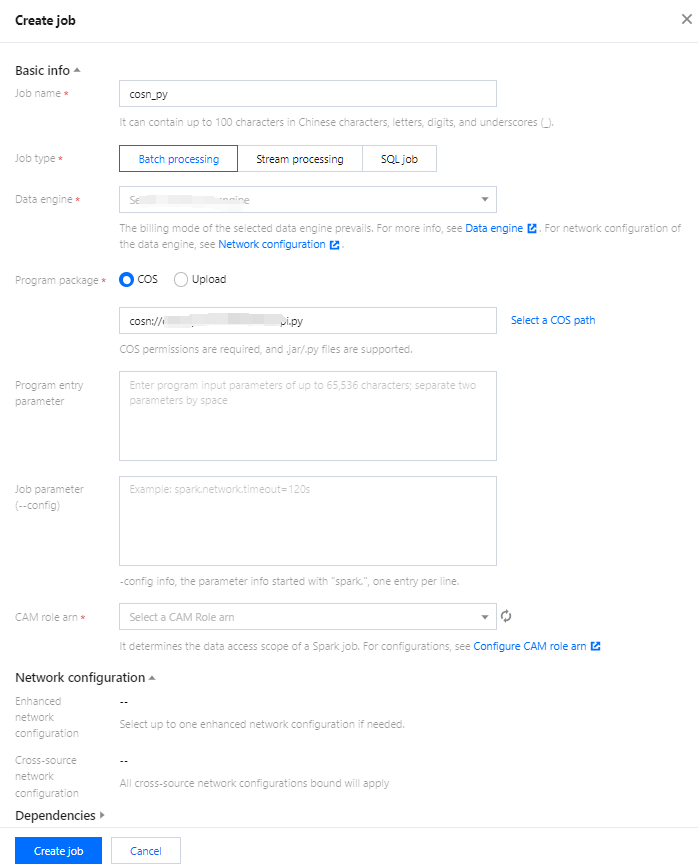
2. Click the Create Job button in the upper left corner to enter the creation page.
3. On the job configuration page, set the job running parameters as detailed below:
Parameter Configuration
Note
Job name
Specify a custom Spark job name, for instance: cosn_py
Job type
Select Batch Processing Type
Data engine
Select the dlc-demo compute engine created in the Create Resource step.
Application Package
Select COS, and in the step of uploading a py file to COS, upload the py file:
To read and write data from COS, select: cosn://dlc-demo-1305424723/cos.py
To create a library, table, etc. on Data Lake Compute, select: cosn://dlc-demo-1305424723/db.py
CAM role arn
Select the policy created in the previous step: qcs::cam::uin/100018379117:roleName/dlc-demo
Retain the default values of other parameters.
4. Click Save to view the created job on the Spark Job page.
Execute and View Job Results
1. Run the job: On the Spark Job page, locate the newly created job and click Run to execute the job.
2. Viewing Job Execution Results: You can view the job execution logs and results.
Viewing Job Execution Logs
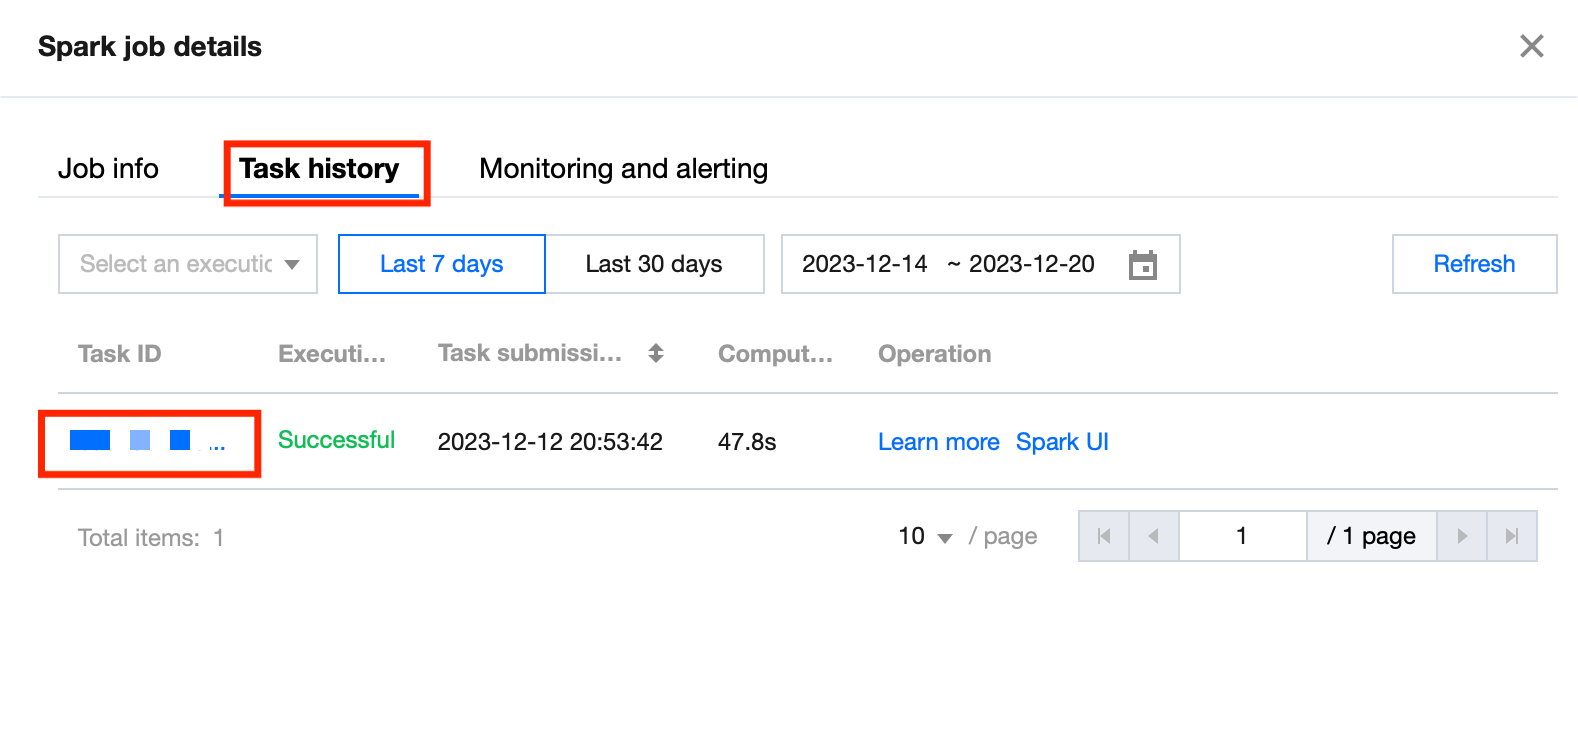
1. Click Job Name >Tasks history to view the task execution status:
2. Click Task ID > Run Log to view the job execution log.
View Job Execution Results
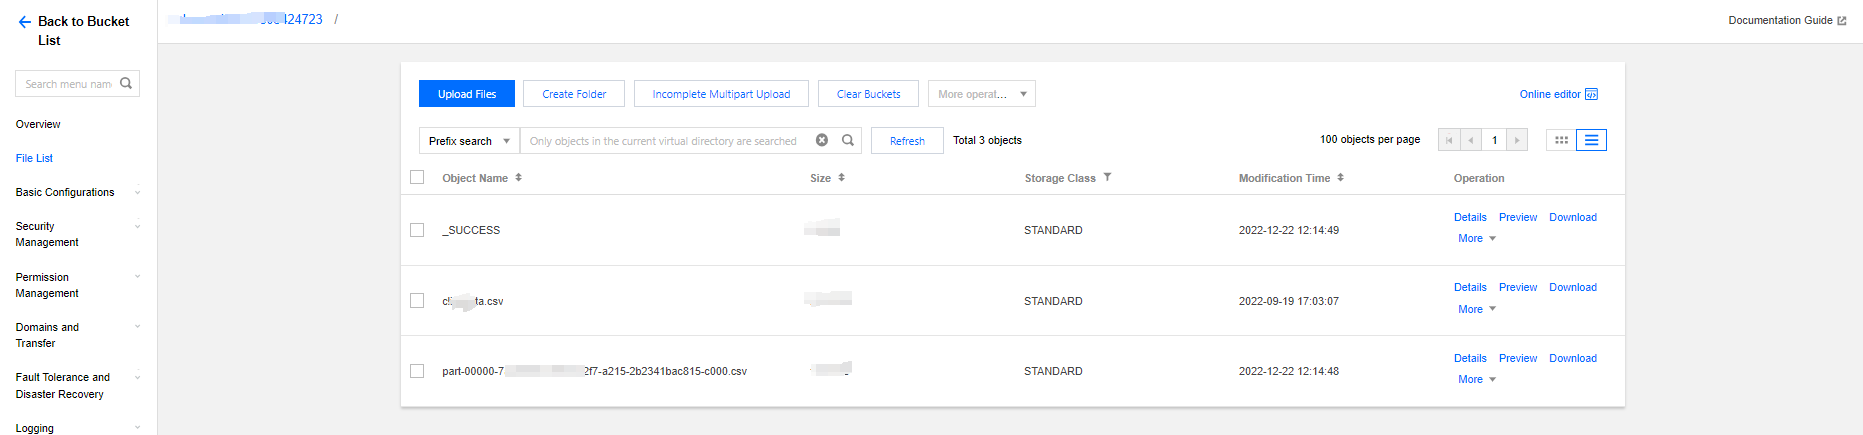
1. To run the example of reading and writing data from COS, go to the COS console to view the data write results.
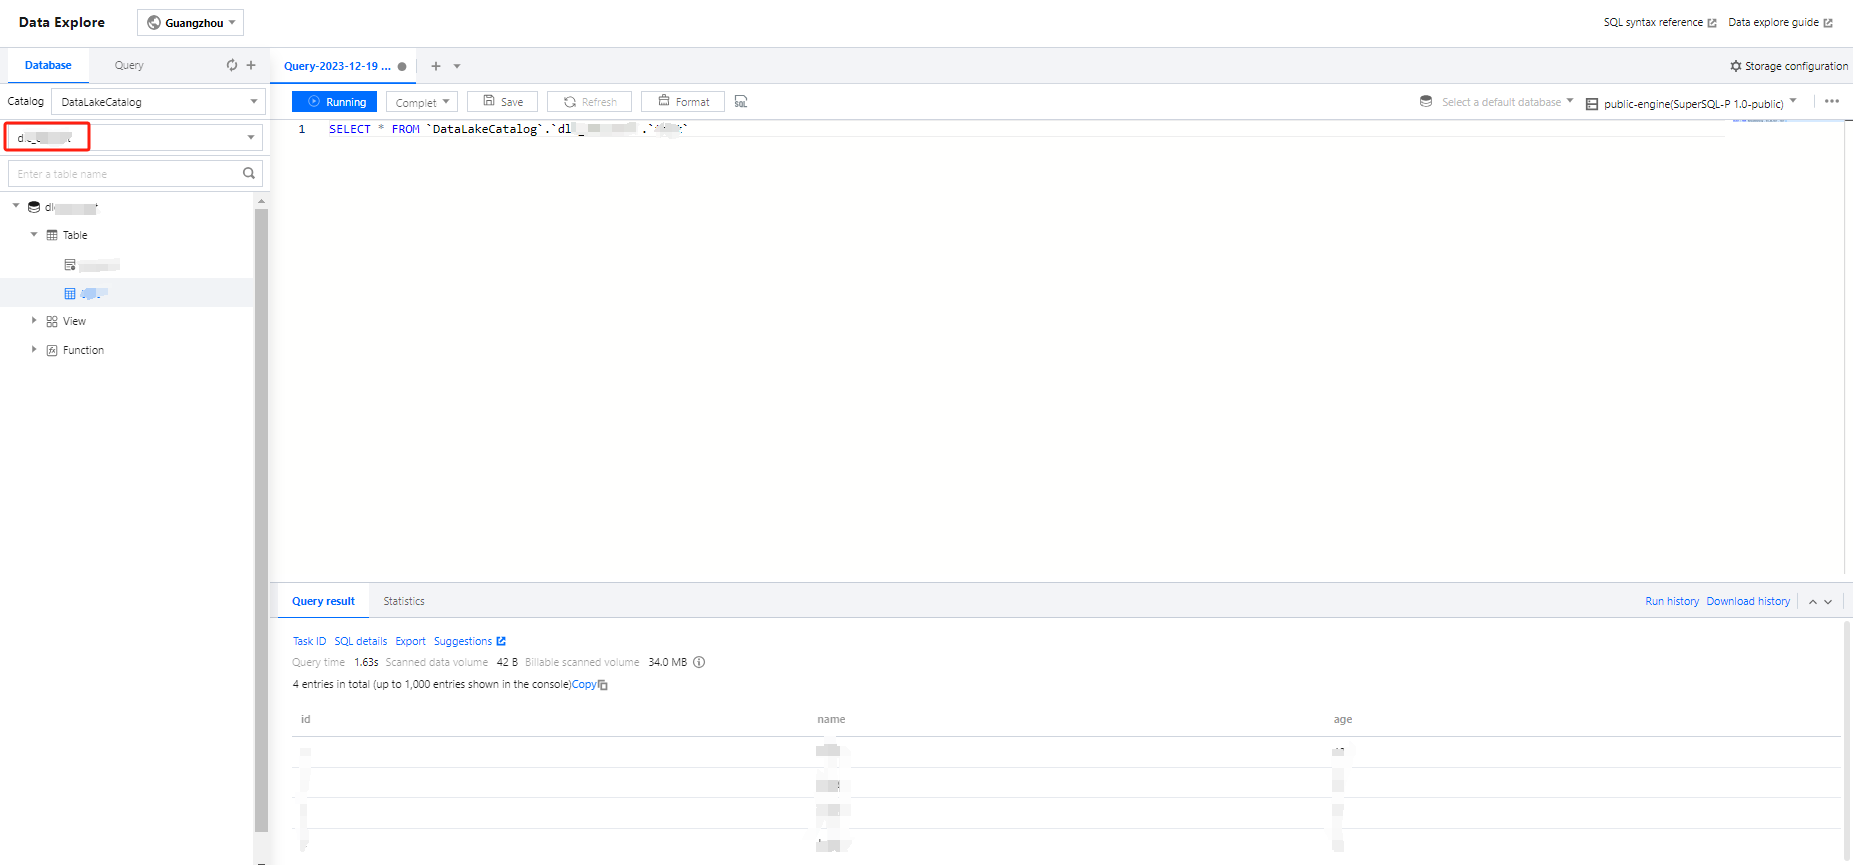
2. To create tables and libraries on Data Lake Compute, navigate to the Data Exploration page on Data Lake Compute to view the creation of libraries and tables.