- 动态与公告
- 产品简介
- 购买指南
- 新手指引
- Demo 体验
- 视频通话(含 UI)
- 组件介绍(TUICallKit)
- 开通服务(TUICallKit)
- 跑通 Demo(TUICallKit)
- 快速接入(TUICallKit)
- Chat 集成通话能力(TUICallKit)
- 界面定制(TUICallKit)
- 离线唤醒(TUICallKit)
- AI 降噪(TUICallKit)
- 虚拟背景(TUICallKit)
- 会话聊天(TUICallKit)
- 云端录制(TUICallKit)
- 更多特性(TUICallKit)
- 解决方案(TUICallKit)
- 服务端 API(TUICallKit)
- 客户端 API(TUICallKit)
- 错误码表(TUICallkit)
- 发布日志(TUICallKit)
- 常见问题(TUICallKit)
- 多人会议(含 UI)
- 组件介绍(TUIRoomKit)
- 开通服务(TUIRoomKit)
- 跑通 Demo(TUIRoomKit)
- 快速接入(TUIRoomKit)
- 预定会议(TUIRoomKit)
- 会中呼叫(TUIRoomKit)
- 界面定制(TUIRoomKit)
- 虚拟背景(TUIRoomKit)
- 会议控制(TUIRoomKit)
- 云端录制(TUIRoomKit)
- AI 降噪(TUIRoomKit)
- 会中聊天(TUIRoomKit)
- 机器人推流(TUIRoomKit)
- 更多特性(TUIRoomKit)
- 客户端 API(TUIRoomKit)
- 服务端 API(TUIRoomKit)
- 常见问题(TUIRoomKit)
- 错误码 (TUIRoomKit)
- SDK更新日志(TUIRoomKit)
- 在线直播(含 UI)
- Live 视频直播计费说明
- 组件介绍(TUILiveKit)
- 开通服务(TUILiveKit)
- 跑通 Demo(TUILiveKit)
- 快速接入(TUILiveKit)
- 界面定制(TUILiveKit)
- 开播和观看(TUILiveKit)
- 房间列表(TUILiveKit)
- 关注主播(TUILiveKit)
- 主播连线(TUILiveKit)
- 主播 PK(TUILiveKit)
- 观众连麦(TUILiveKit)
- 互动弹幕(TUILiveKit)
- 互动礼物(TUILiveKit)
- 礼物特效(TUILiveKit)
- 美颜特效(TUILiveKit)
- 悬浮窗(TUILiveKit)
- 客户端API(TUILiveKit)
- 服务端 API(TUILiveKit)
- 错误码(TUILiveKit)
- 发布日志(TUILiveKit)
- 常见问题(TUILiveKit)
- 语音聊天室(含 UI)
- 无 UI 集成
- 高级功能
- 服务端 API
- 控制台指南
- 解决方案
- 常见问题
- 旧版文档
- 协议与策略
- TRTC 政策
- 词汇表
本文将介绍如何快速完成 Windows RTC Engine 的接入,实现一个基本的音视频通话。
环境准备
操作系统:Windows 7及以上版本。
开发环境:Visual Studio 2019及以上版本,推荐使用 Visual Studio 2022。
接入指引
步骤1. 导入 SDK
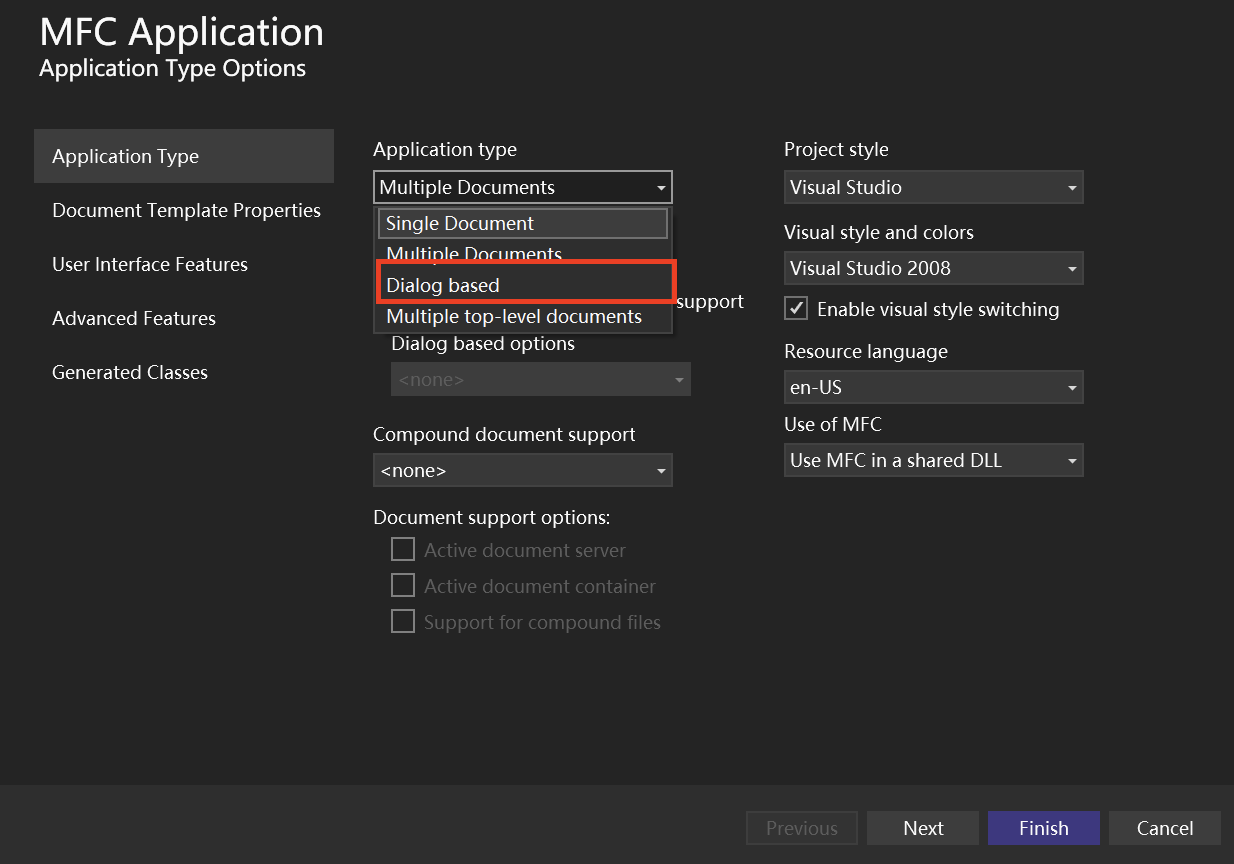
1. 打开 Visual Studio,新建一个您自己的 MFC 应用程序。在向导的 MFC Application 页面,Application type 选择 Dialog based,其他向导配置选择默认即可,单击 Finish。
2. 下载 Windows SDK,将解压后的 SDK 文件拷贝到
.vcxproj 文件所在目录下。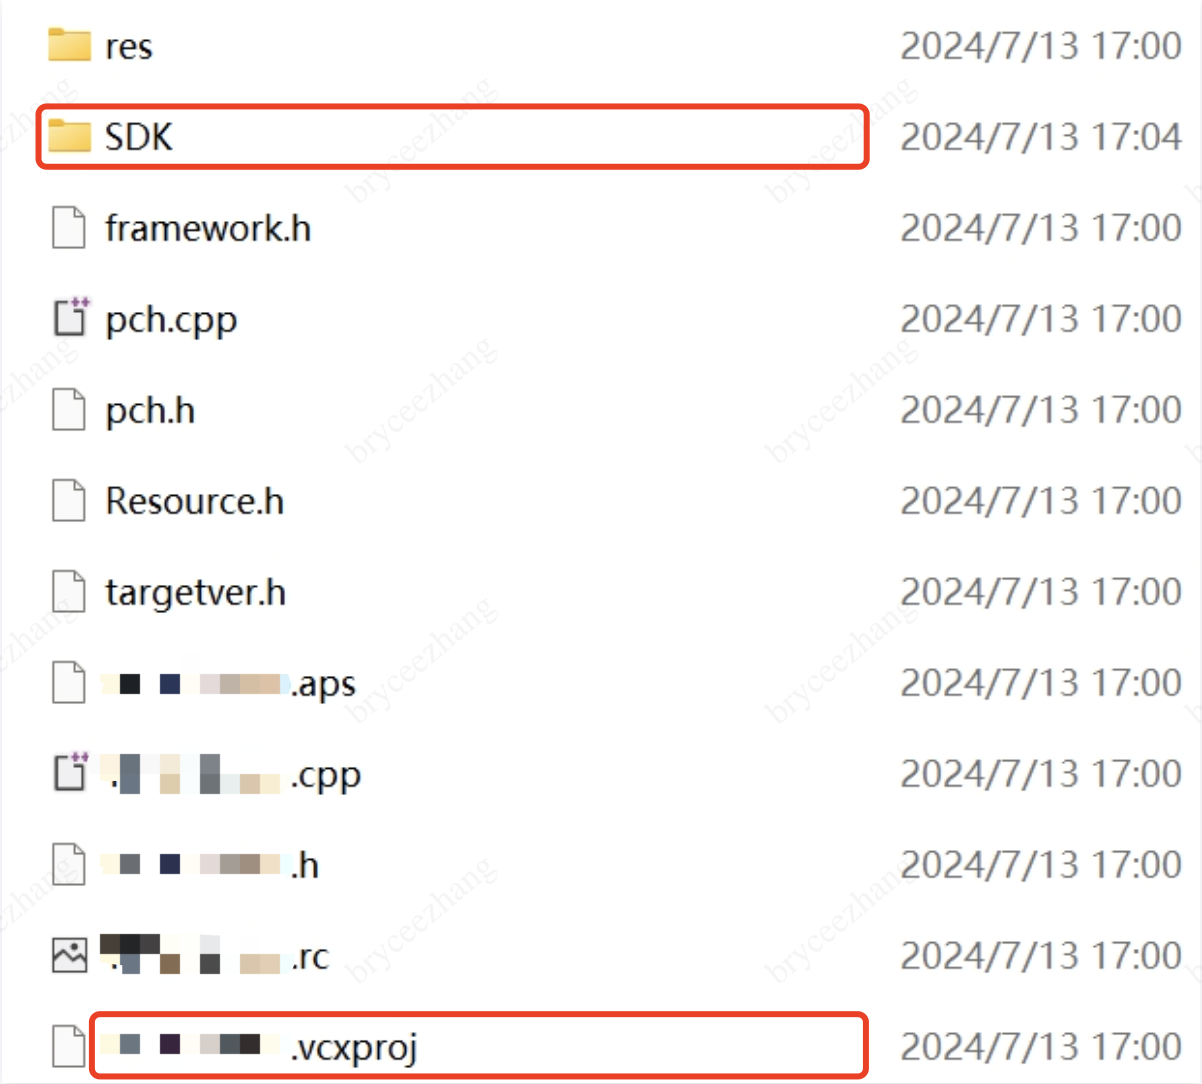
步骤2. 配置项目
双击打开 .sln 工程文件,在右侧工具栏 Solution Explorer > 右键打开项目的选择菜单 > Properties,进行以下配置:
1. 添加 Additional Include Directories:
在 C/C++ > General > Additional Include Directories,添加 SDK 头文件目录:
$(ProjectDir)SDK\\CPlusPlus\\Win64\\include 和 $(ProjectDir)SDK\\CPlusPlus\\Win64\\include\\TRTC。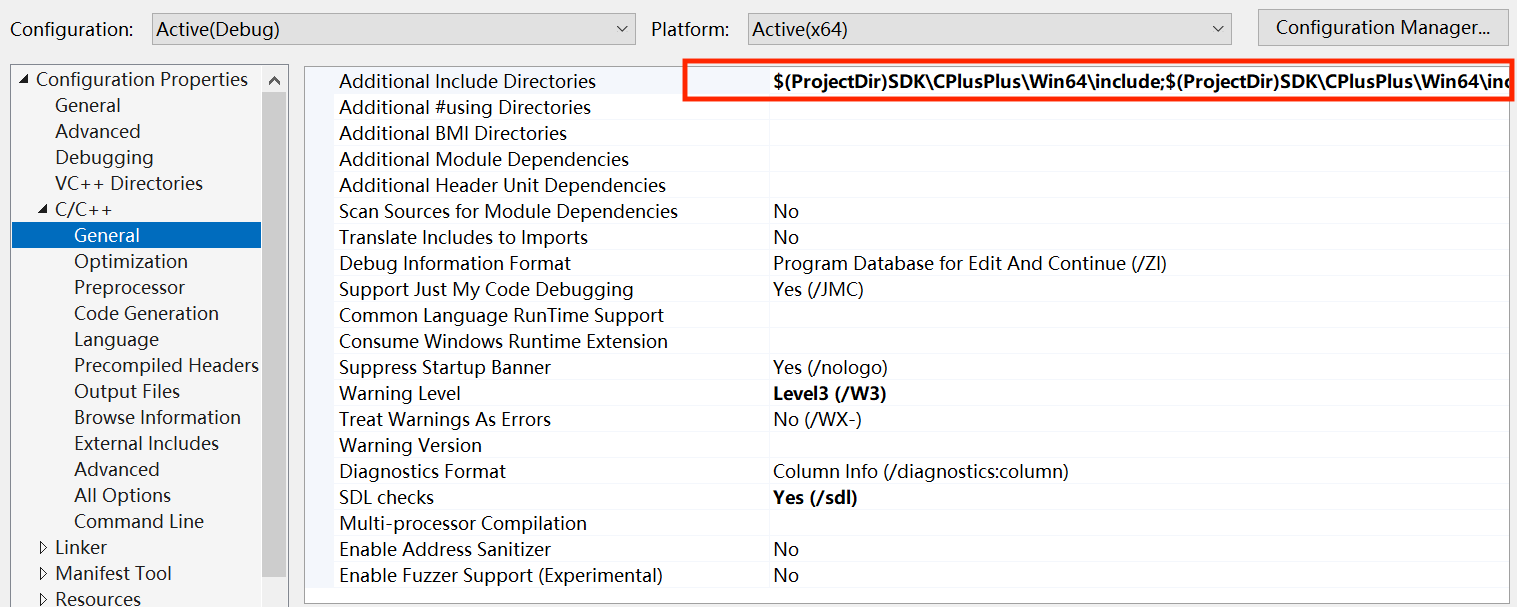
2. 添加 Additional Library Directories:
在 Linker > General > Additional Library Directories,添加 SDK 库目录
$(ProjectDir)SDK\\CPlusPlus\\Win64\\lib。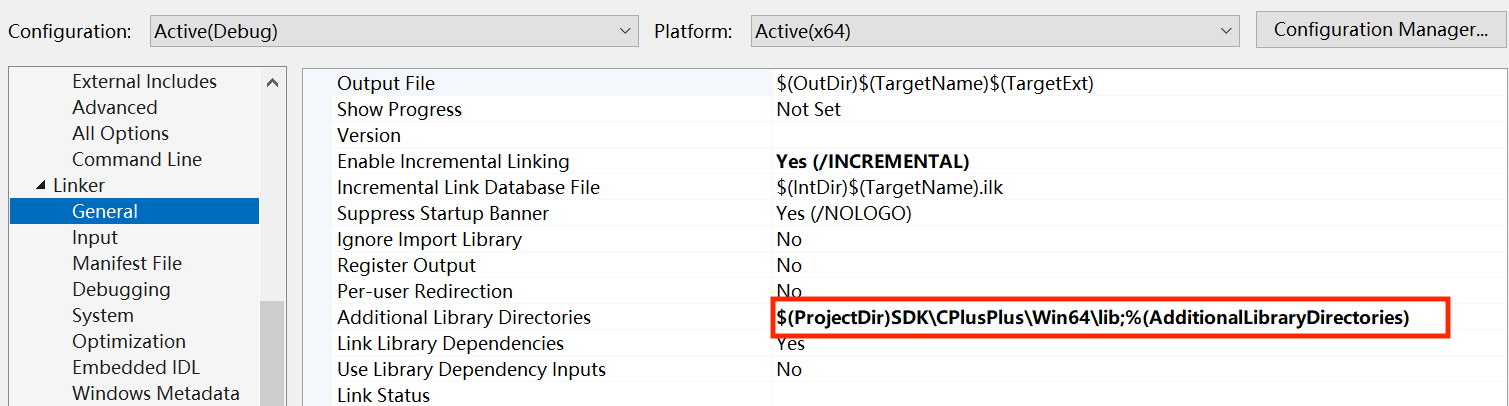
3. 添加 Additional Dependencies:
在 Linker > Input > Additional Dependencies,添加 SDK 库文件
liteav.lib。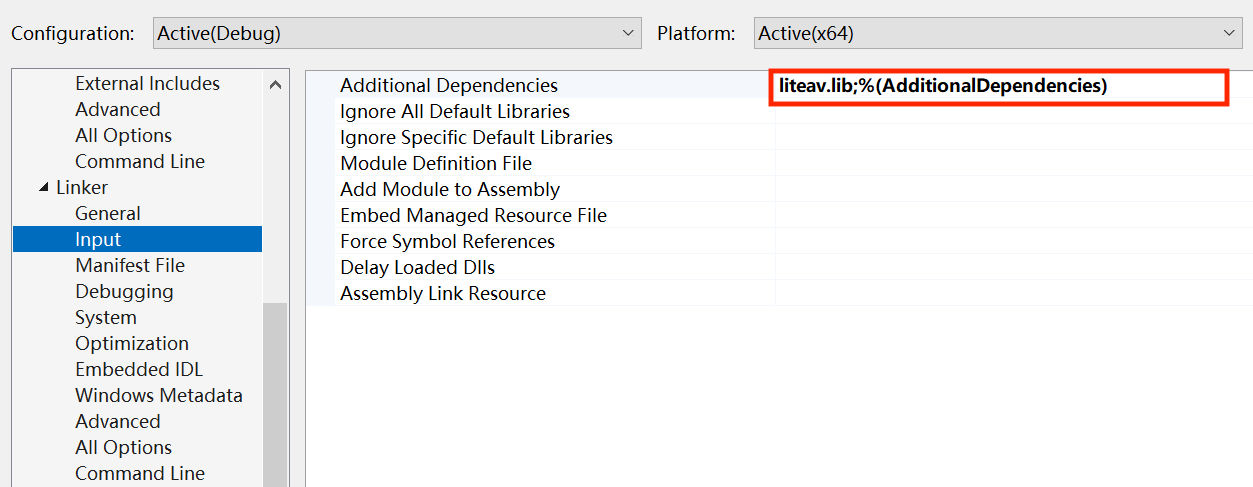
4. 添加 Command line:
在 Build Events > Post-Build Event > Command line,添加
copy /Y $(ProjectDir)SDK\\CPlusPlus\\Win64\\lib\\*.dll $(OutDir)。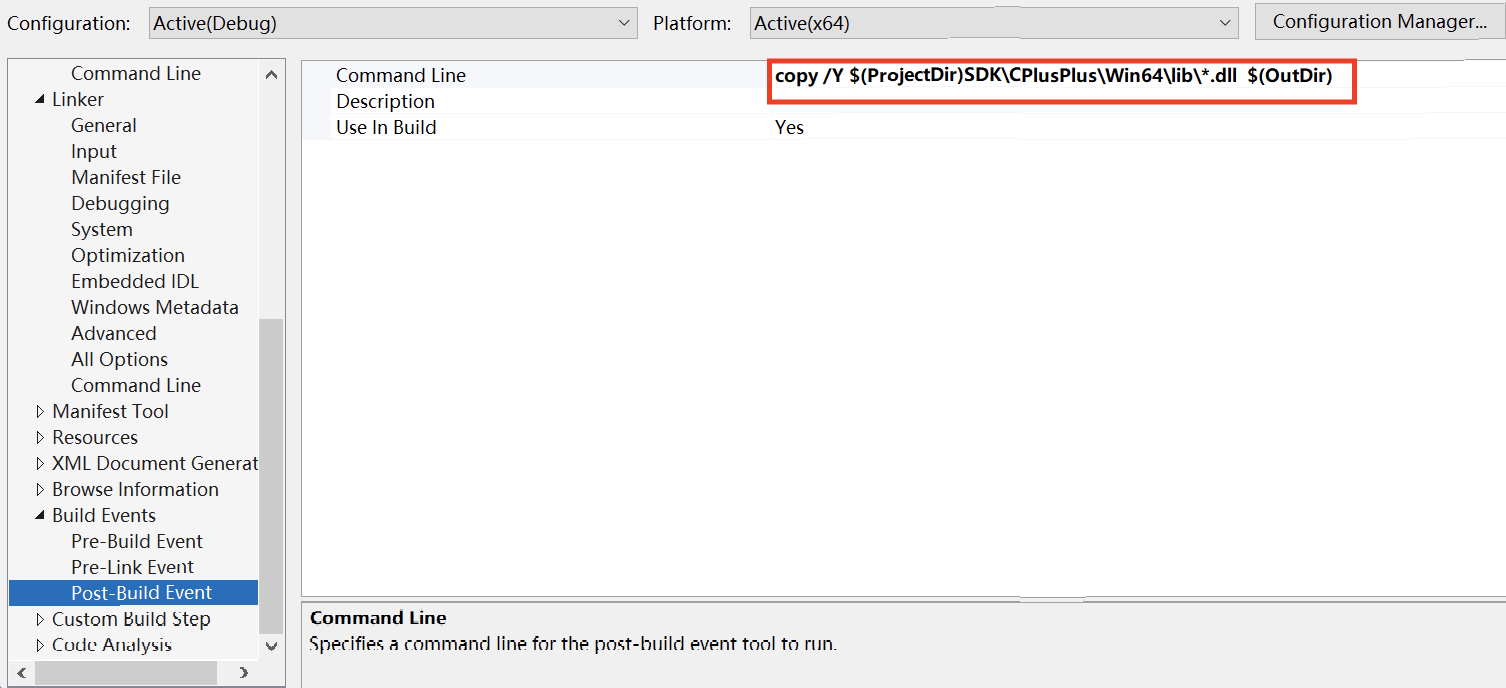
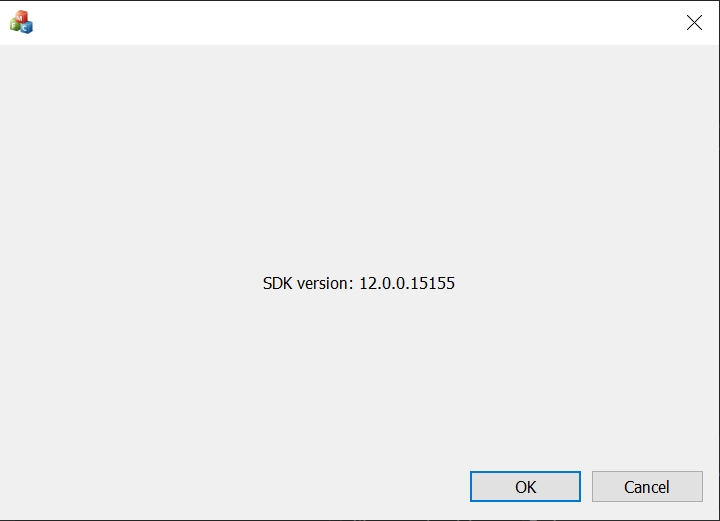
5. 打印 SDK 版本号:
5.1 双击打开 Solution Explorer 中的 .cpp 文件并引入 TRTC 头文件:
#include "ITRTCCloud.h"
注意:
在已有头文件的后面引用
"ITRTCCloud.h",否则将会出现报错: ITRTCCloud:未定义标识符。5.2 在
OnInitDialog 函数中,添加以下代码:ITRTCCloud * pTRTCCloud = getTRTCShareInstance();CString szText;szText.Format(L"SDK version: %hs", pTRTCCloud->getSDKVersion());CWnd *pStatic = GetDlgItem(IDC_STATIC);pStatic->SetWindowTextW(szText);
5.3 完成以上步骤,单击 OK 成功打印 SDK 版本号即可。
说明:
如果出现报错信息:module machine type 'x86' conflicts with target machine type 'x64',在解决方案平台选择 'x64'。
步骤3. 创建 TRTC 实例
1. 在 项目名.h 文件中引用头文件
"ITRTCCloud.h",将该文件中的类公有继承于 CWinApp 和 ITRTCCloudCallback,并声明监听事件和 TRTCCloud 成员变量。#include "ITRTCCloud.h" // 引入 TRTC 头文件class CRTCWindowsApp: public CWinApp, public ITRTCCloudCallback{public:CRTCWindowsApp();// Overridespublic:virtual BOOL InitInstance();virtual void onError(TXLiteAVError errCode, const char* errMsg, void* extraInfo) override; // 监听 'onError' 事件virtual void onWarning(TXLiteAVWarning warningCode, const char* warningMsg, void* extraInfo) override; // 监听 'onWarning' 事件virtual void onEnterRoom(int result) override; // 监听 'onEnterRoom' 事件virtual void onExitRoom(int reason) override; // 监听 'onExitRoom' 事件// 获取 TRTCCloud 实例static CRTCWindowsApp* GetInstance(){return static_cast<CRTCWindowsApp*>(AfxGetApp());}// ImplementationDECLARE_MESSAGE_MAP()public:ITRTCCloud* trtc_cloud_; // 声明 TRTCCloud 成员变量};
注意:
本文所创建的工程项目名为 RTCWindows,在整个接入的过程中,请替换为您自己项目的名称或类名。
2. 在 项目名.cpp 文件的
InitInstance 方法中调用 getTRTCShareInstance 初始化 TRTC 对象实例。// 初始化 TRTCCloud 对象并添加事件监听trtc_cloud_ = getTRTCShareInstance();trtc_cloud_->addCallback(this);
说明:
建议将初始化 TRTC 对象实例的代码添加在
SetRegistryKey(_T("Local AppWizard-Generated Applications")) 方法后。3. 实现声明的监听事件。
// 对监听事件进行处理void CRTCWindowsApp::onError(TXLiteAVError errCode, const char* errMsg, void* extraInfo) {// 监听 "onError" 事件并对相应信息进行打印}void CRTCWindowsApp::onWarning(TXLiteAVWarning warningCode, const char* warningMsg, void* extraInfo) {// 监听 "onWarning" 事件并对相应信息进行打印}void CRTCWindowsApp::onEnterRoom(int result) { // 监听 "onEnterRoom" 事件并对相应信息进行打印if (result > 0) {MessageBox(NULL, TEXT("Enter room successfully"), TEXT("Notice"), MB_OK | MB_ICONINFORMATION);}else {MessageBox(NULL, TEXT("Enter room failed"), TEXT("Notice"), MB_OK | MB_ICONINFORMATION);}}void CRTCWindowsApp::onExitRoom(int reason) { // 监听 "onExitRoom" 事件并对相应信息进行打印if (reason == 0) {MessageBox(NULL, TEXT("Exit current room by calling the 'exitRoom' api of sdk"), TEXT("Notice"), MB_OK | MB_ICONINFORMATION);} else if (reason == 1) {MessageBox(NULL, TEXT("Kicked out of the current room by server through the restful api"), TEXT("Notice"), MB_OK | MB_ICONINFORMATION);} else if (reason == 2) {MessageBox(NULL, TEXT("The current room is dissolved by server through the restful api"), TEXT("Notice"), MB_OK | MB_ICONINFORMATION);}}
步骤4. 进入房间
设置进房参数
TRTCParams 并调用 enterRoom 即可成功进入房间,该方法通常在点击开始通话按钮后调用。void CRTCWindowsApp::OnBnClickedButton() {// 将以下 trtcParams 参数修改为自己的参数liteav::TRTCParams trtcParams;trtcParams.sdkAppId = 1400000123;trtcParams.userId = "denny";trtcParams.roomId = 123321;trtcParams.userSig = "xxx";// 对于多人视频通话场景,推荐使用 TRTC_APP_SCENE_LIVEITRTCCloud* trtcCloud = CRTCWindowsApp::GetInstance()->trtc_cloud_;trtcCloud->enterRoom(trtcParams, liteav::TRTCAppSceneLIVE);}
步骤5. 打开/关闭摄像头
1. 在资源文件 IDD_TRTCDEMO_DIALOG 中,单击左侧边框的 Toolbox,拖动 Picture Control 到对话框中。
2. 在 Picture Control 控件的右键菜单中选择 Properties,ID 选择 AFX_IDC_PICTURE。
3. 在资源文件 IDD_TRTCDEMO_DIALOG 中添加一个 Button 组件,双击新建的 Button 后对
pLocalVideoView进行初始化,设置本地预览的渲染参数 setLocalRenderParams ,并调用startLocalPreview进行本地预览,成功调用enterRoom后开始推流。void CRTCWindowsApp::OnBnClickedButton(){// 设置本地预览渲染参数liteav::TRTCRenderParams render_params;render_params.mirrorType = liteav::TRTCVideoMirrorType_Enable;render_params.fillMode = TRTCVideoFillMode_Fill;ITRTCCloud* trtcCloud = CRTCWindowsApp::GetInstance()->trtc_cloud_;trtcCloud->setLocalRenderParams(render_params);// 初始化 pLocalVideoViewCWnd* pLocalVideoView = GetDlgItem(AFX_IDC_PICTURE);if (pLocalVideoView != nullptr) {auto local_view = (liteav::TXView)(pLocalVideoView->GetSafeHwnd());// 对采集内容进行本地预览trtcCloud->startLocalPreview(local_view);}}
调用
stopLocalPreview关闭摄像头预览并停止推送本地视频信息。void CRTCWindowsApp::OnBnClickedButton(){TRTCCloud* trtcCloud = CRTCWindowsApp::GetInstance()->trtc_cloud_;trtcCloud->stopLocalPreview();}
步骤6. 打开/关闭麦克风
调用
startLocalAudio 开启麦克风采集,请根据您的需求选择以下其中一个声音质量参数Quality。// 开启麦克风采集,设置当前场景为:语音模式// 具有高的噪声抑制能力,有强有弱的网络阻力ITRTCCloud* trtcCloud = CRTCWindowsApp::GetInstance()->trtc_cloud_;trtcCloud->startLocalAudio(TRTCAudioQualitySpeech);
// 开启麦克风采集,设置当前场景为:音乐模式// 为获得高保真度,低音质损失,建议配合专业声卡使用ITRTCCloud* trtcCloud = CRTCWindowsApp::GetInstance()->trtc_cloud_;trtcCloud->startLocalAudio(TRTCAudioQualityMusic);
调用
stopLocalAudio关闭麦克风采集并停止推送本地音频信息。ITRTCCloud* trtcCloud = CRTCWindowsApp::GetInstance()->trtc_cloud_;trtcCloud->stopLocalAudio();
步骤7. 播放/停止视频流
1. 在进入房间之前对 onUserVideoAvailable 进行监听,当您收到
onUserVideoAvailable(userId, YES)通知时,表示该路画面已经有可播放的视频帧到达。2. 调用
startRemoteView/stopRemoteView选择播放或停止远端视频画面。// 播放视频CWnd* pLocalVideoView = GetDlgItem(AFX_IDC_PICTURE);if (pLocalVideoView != nullptr) {auto local_view = (liteav::TXView)(pLocalVideoView->GetSafeHwnd());ITRTCCloud* trtcCloud = CRTCWindowsApp::GetInstance()->trtc_cloud_;trtcCloud->startRemoteView("denny", liteav::TRTCVideoStreamTypeBig, video_view);}
调用
stopRemoteView 停止播放远端画面。// 停止播放ITRTCCloud* trtcCloud = CRTCWindowsApp::GetInstance()->trtc_cloud_;trtcCloud->stopRemoteView("denny", liteav::TRTCVideoStreamTypeBig); // 仅停止播放 denny 的视频trtcCloud->stopAllRemoteView(); // 停止所有视频播放
步骤8. 播放/停止音频流
调用
muteRemoteAudio 选择播放或停止远端声音。// 静音ITRTCCloud* trtcCloud = CRTCWindowsApp::GetInstance()->trtc_cloud_;trtcCloud->muteRemoteAudio("denny", true); // 仅静音 dennytrtcCloud->muteAllRemoteAudio(true); // 静音所有远端用户
// 取消静音ITRTCCloud* trtcCloud = CRTCWindowsApp::GetInstance()->trtc_cloud_;trtcCloud->muteRemoteAudio("denny", false); // 仅取消静音 dennytrtcCloud->muteAllRemoteAudio(false); // 取消静音所有远端用户
步骤9. 退出房间
在资源文件 IDD_TRTCDEMO_DIALOG 中添加一个 Button 组件,双击新建的 Button 后调用
exitRoom 退出当前的房间,TRTC SDK 会在退房结束后通过 onExitRoom 回调事件通知您。void CRTCWindowsApp::OnBnClickedButton(){ITRTCCloud* trtcCloud = CRTCWindowsApp::GetInstance()->trtc_cloud_;trtcCloud->exitRoom();}
常见问题
您可以在 API 参考 查看所有函数列表及其描述。
如果您的接入和使用中遇到问题,请参见 常见问题。
联系我们
如果有任何需要或者反馈,您可以联系:info_rtc@tencent.com。

 是
是
 否
否
本页内容是否解决了您的问题?