LVC lets you direct and edit video layouts, audio, watermarks, and standby videos and images, as well as create program schedules. These features can enrich your live stream content.
Step 1: Setting a Directed Video Frame Size
After you finish adding video input sources for your caster in Live Video Caster, you can set the frame size for each video output.
The size settings will affect the output size of input sources, template layouts, and custom layouts.
LVC comes with built-in landscape and portrait mode output size templates for live streaming on Weixin Channels. It also supports custom output sizes.
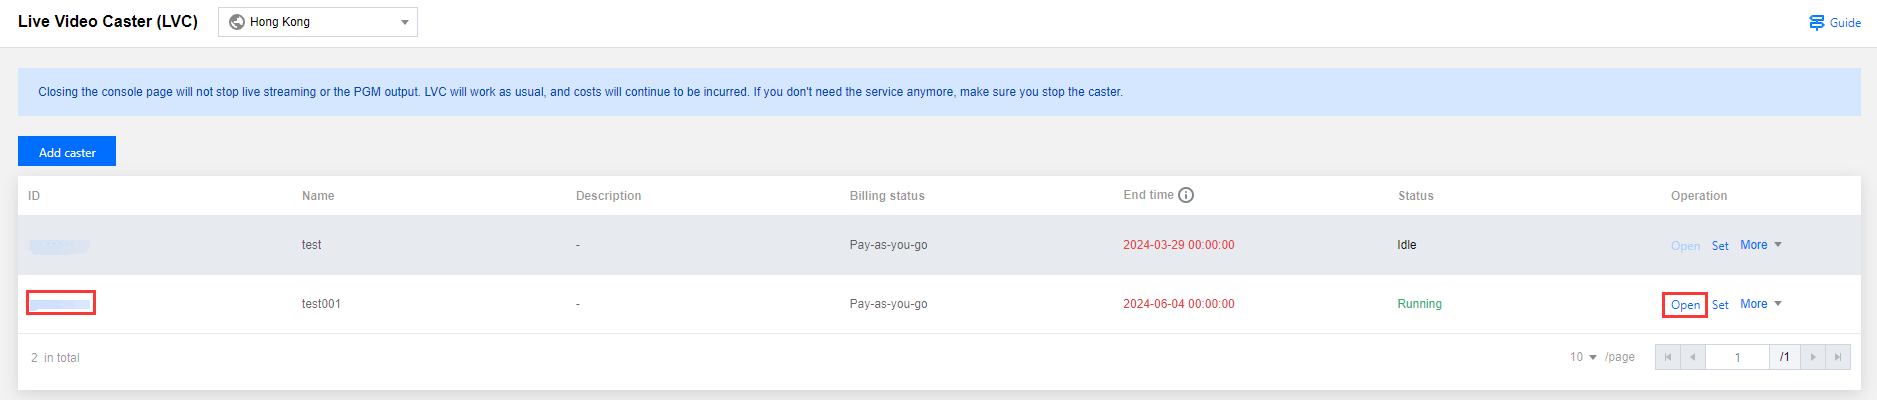
1. In the Live Video Caster list, find the caster you want to edit and click its ID or click Open on the right to enter the caster editing page.
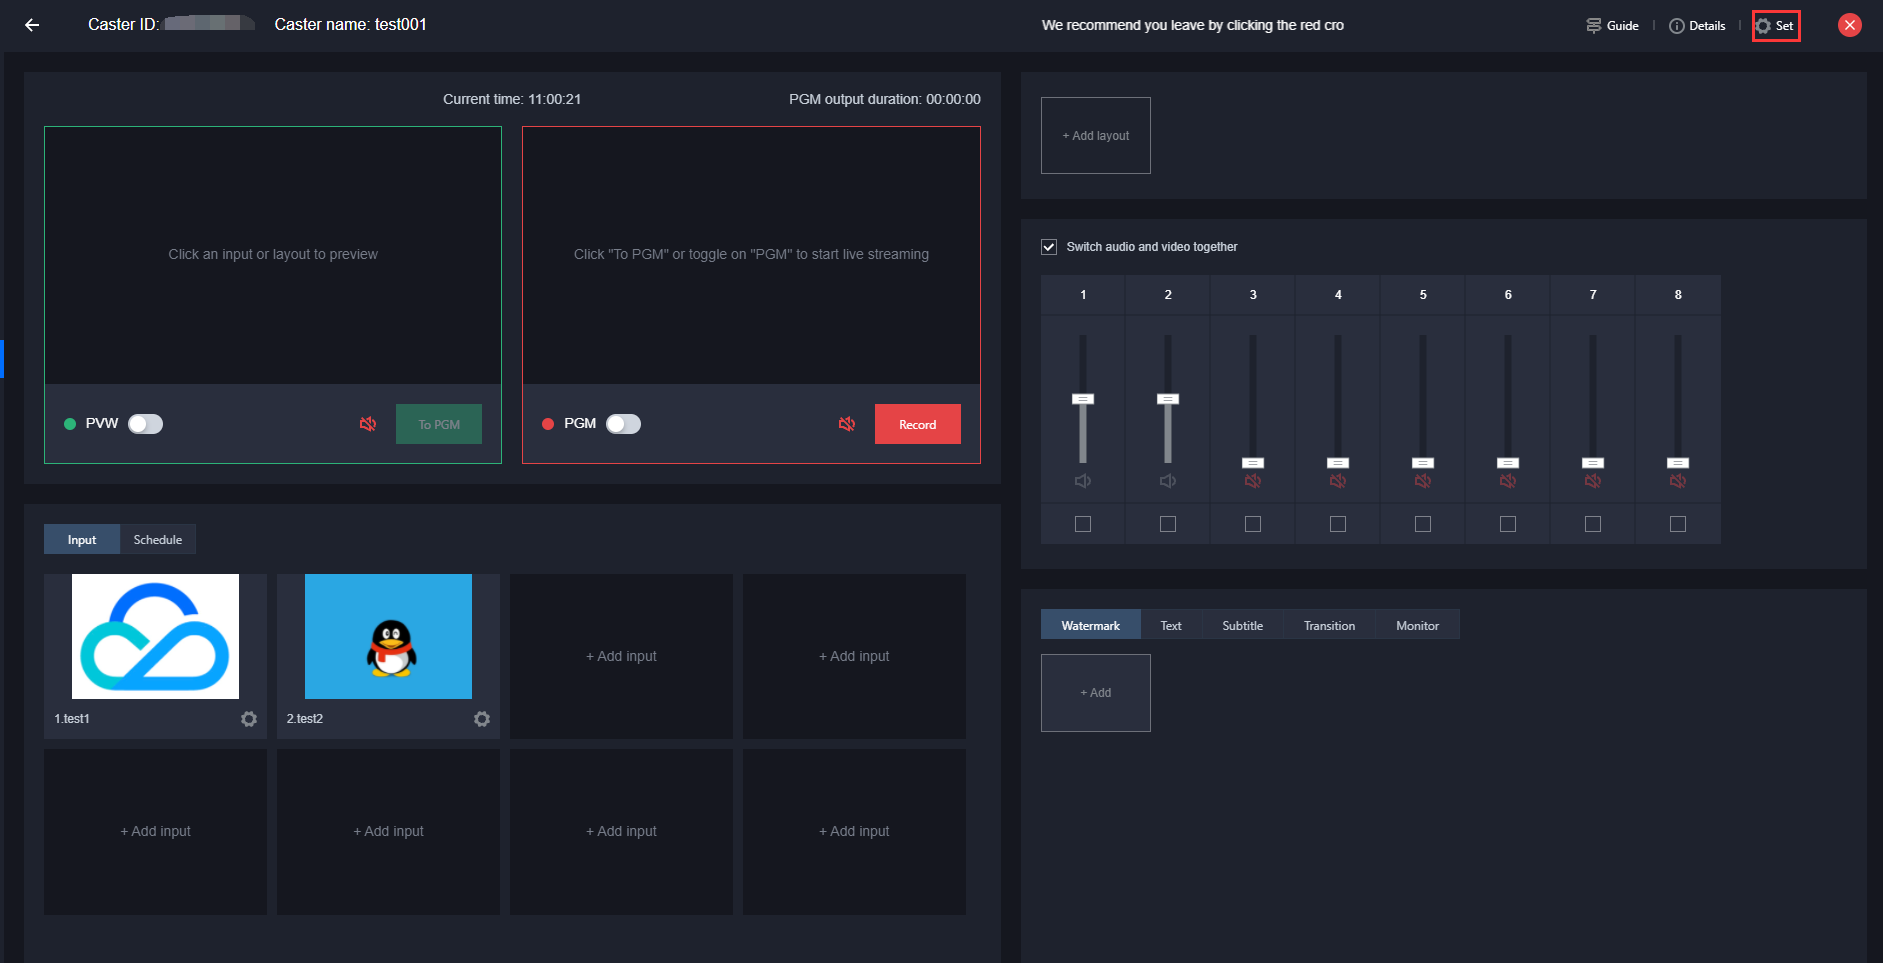
2. On the caster editing page, click
in the upper-right corner.
3. Click Publish to enter the settings page.
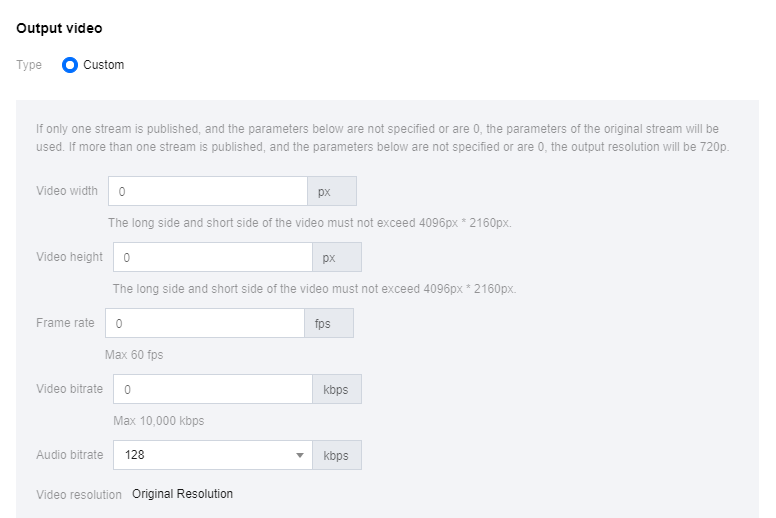
4. Configure the following items in the Output video section:
Configuration Item
Description
Video width
Value range: The long side and short side of the video must not exceed 4096 x 2160 pixels. If you need to customize the width and height, both are required.
Video height
Value range: The long side and short side of the video must not exceed 4096 x 2160 pixels. If you need to customize the width and height, both are required.
Frame rate
Value range: Less than or equal to 60fps.
Video bitrate
Value range: Less than or equal to 10,000kbps.
Audio bitrate
Options: 128kbps, 192kbps, and 256kbps.
Note:
If only one stream is published and the parameters above are not specified or are 0, the parameters of the original stream will be used. If more than one stream is published and the parameters above are not specified or are 0, the output resolution will be 720p.
Step 2: Configuring a Layout
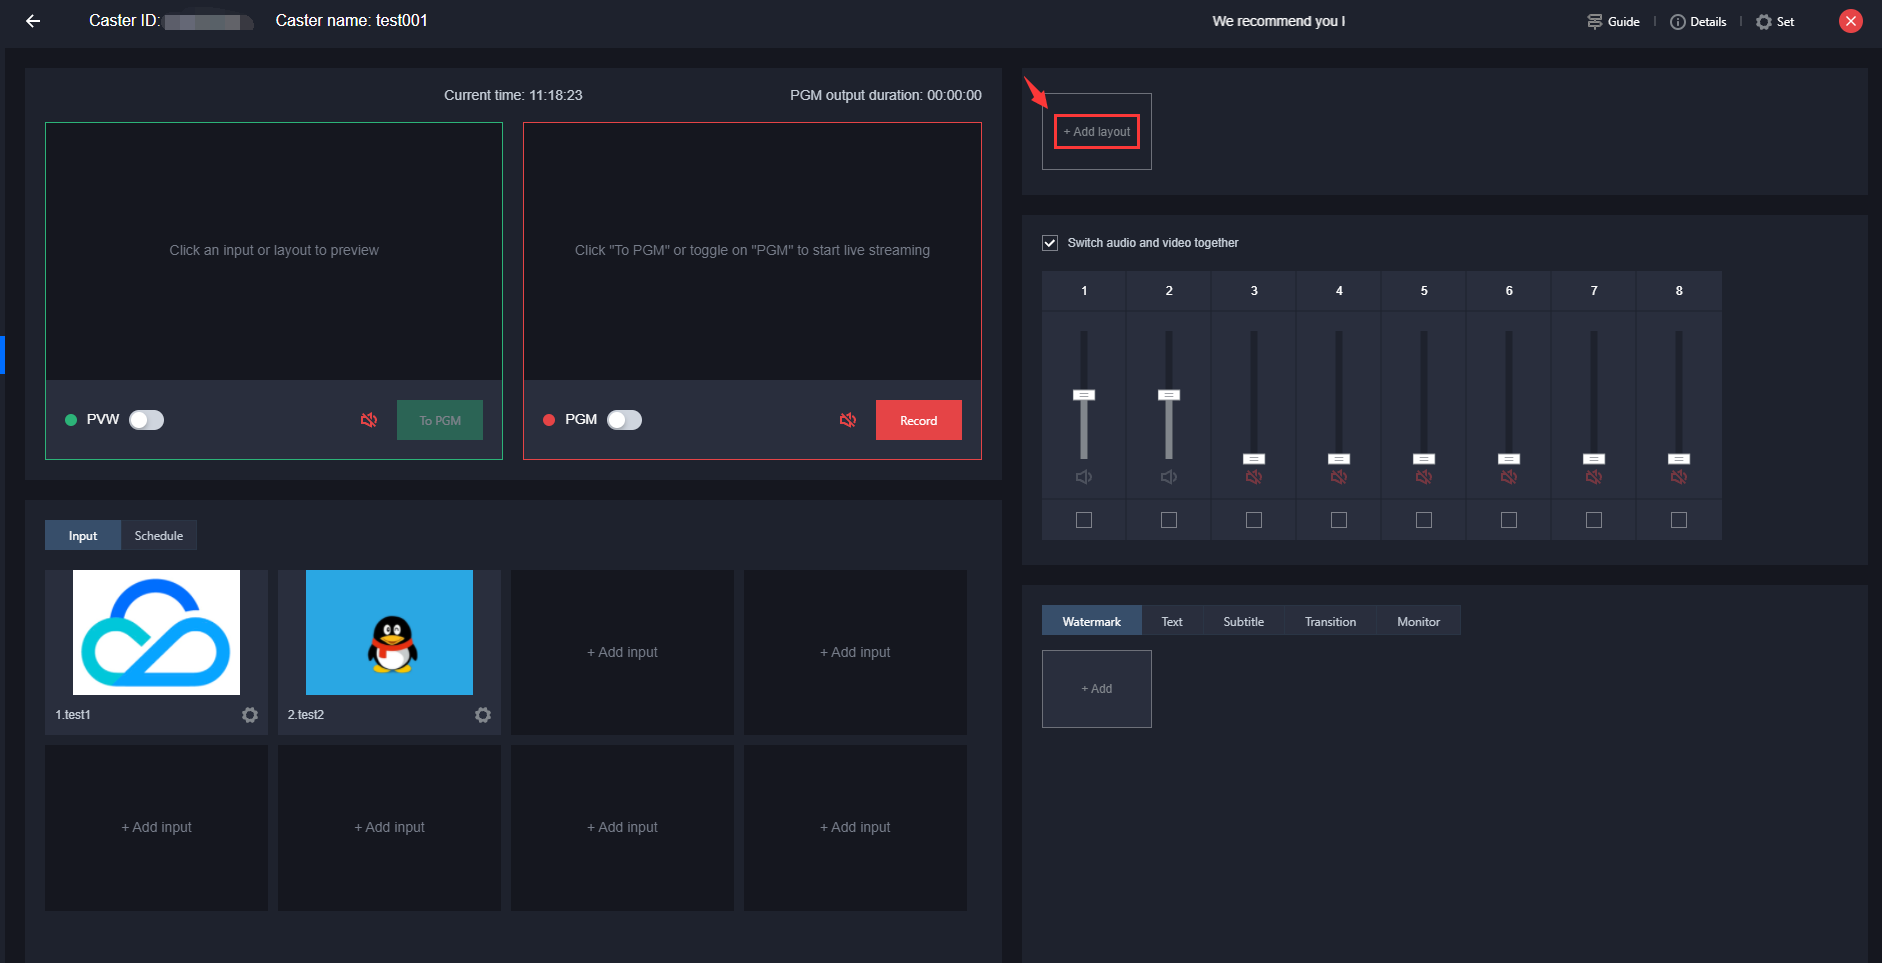
1. Click Add layout in the layout component of the function area to enter the layout creation page.
2. Select a layout style and create the corresponding layout:
3. The layout you created is displayed in the layout component area.
4. Click the successfully added layout to push it to the preview (PVW) window.
Note:
LVC comes with five layout templates. Select an appropriate template based on your needs or customize a layout.
The layout that is currently in use in PVW is marked by a green frame. The layout currently in use in PGM is marked by a red frame. Layouts in use cannot be edited or deleted.
To edit a layout template, click
in the lower-right corner of the layout.
To delete a layout template, click
in the upper-right corner of the layout.
Layout Guide
LVC supports multiple layout modes in different output sizes.
Landscape mode:
Portrait mode: To use the portrait layout for output, click Set in the upper-right corner of the main page to enter the page for changing the output size.
Template Layout
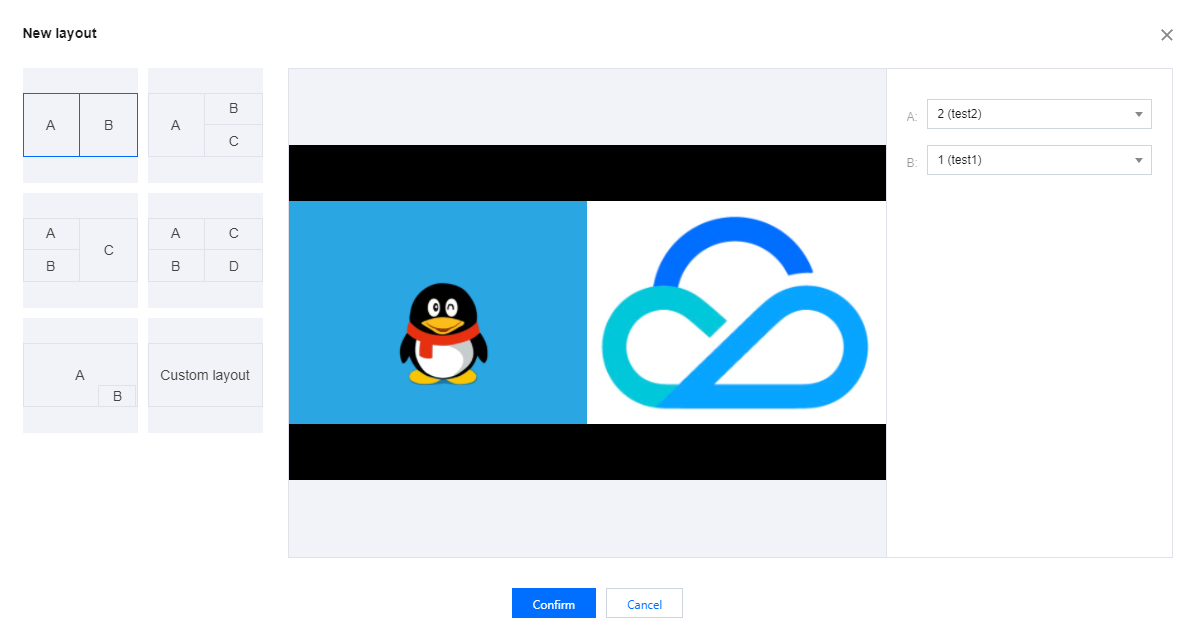
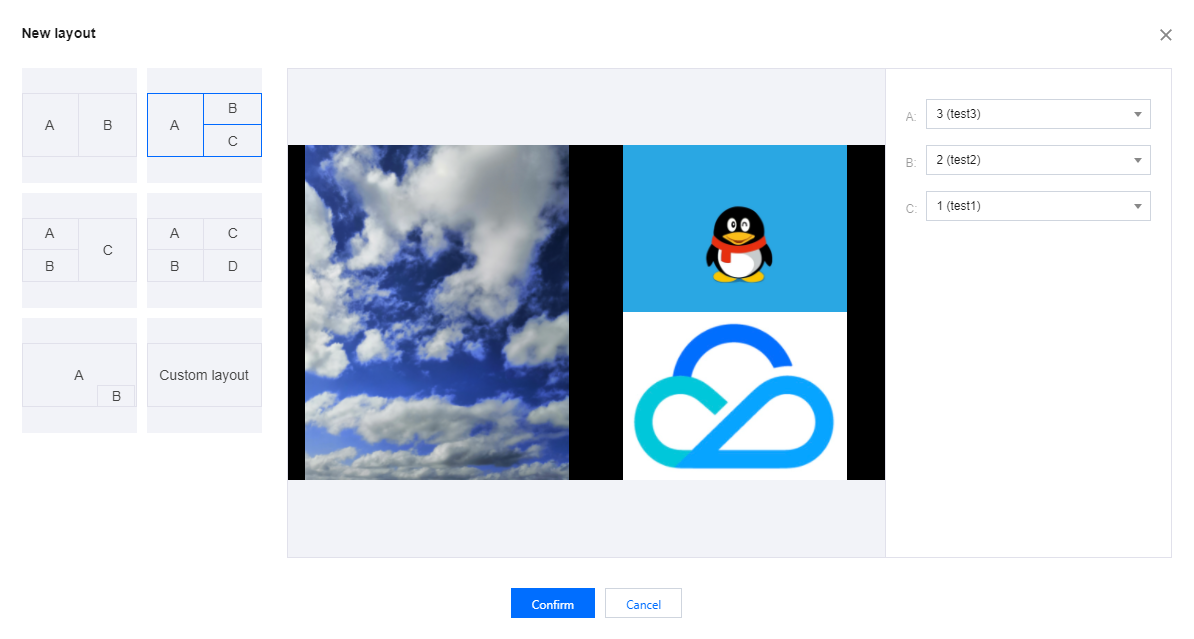
LVC comes with five built-in templates. You may select a template based on your needs, as detailed below:
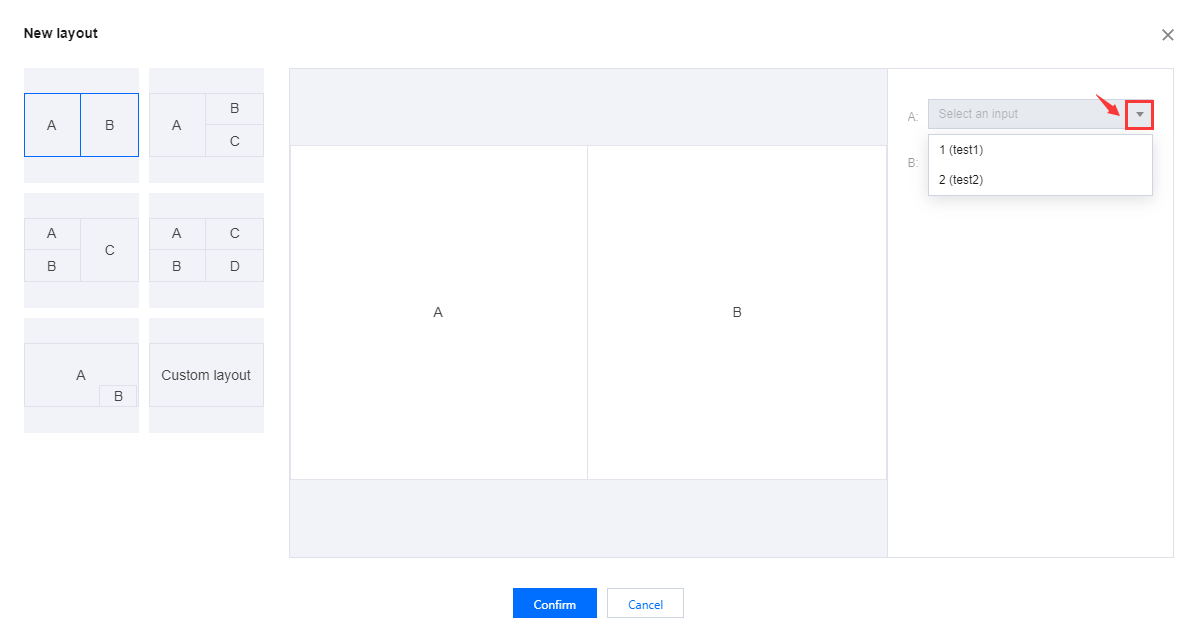
1. Click to select the layout template you want to use.
2. Click the Select an input drop-down list to select input sources.
3. After selecting input sources, you can preview your video in the preview box.
4. Click Confirm to complete the creation of the layout.
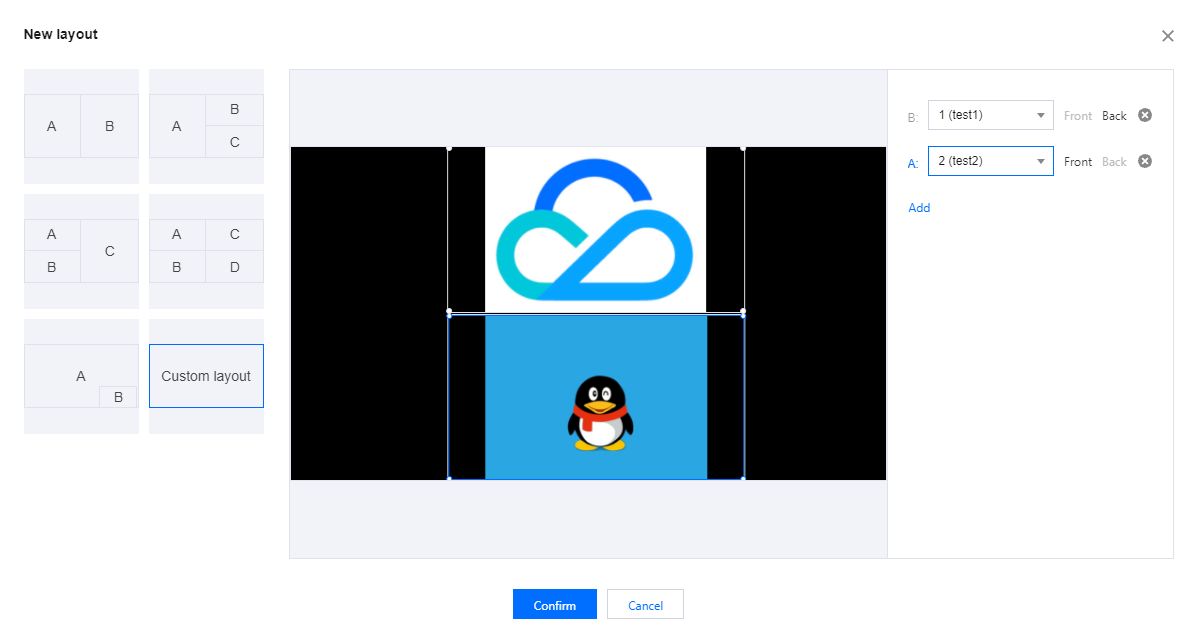
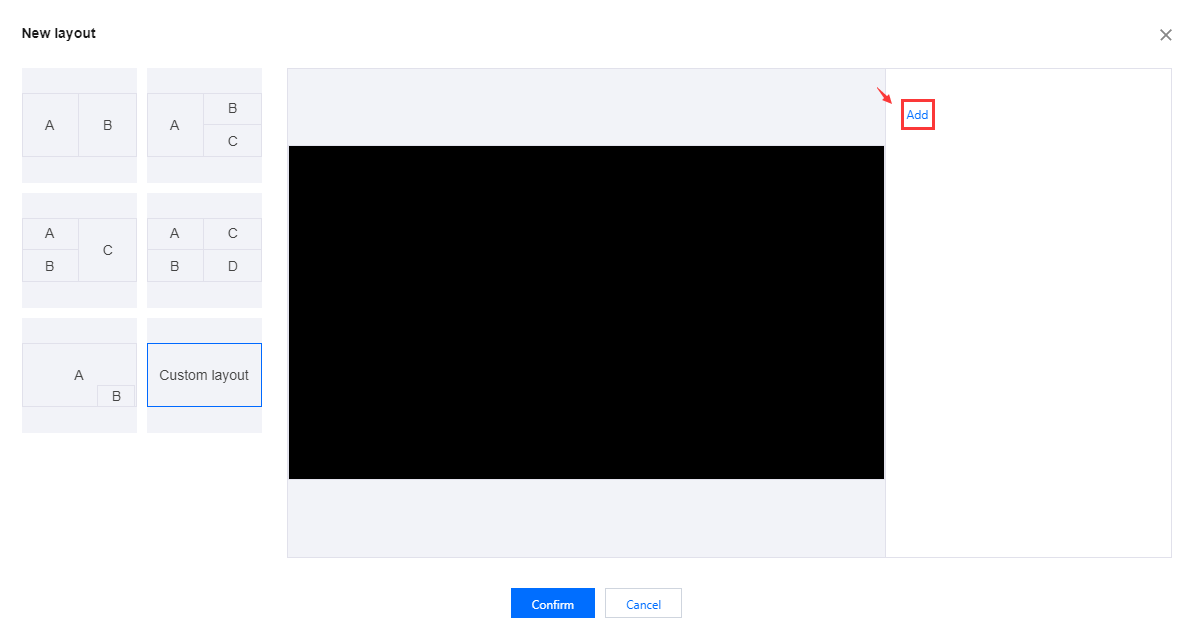
Custom Layout
LVC allows you to customize the arrangement, stacking order, and sizes of input sources and drag and drop them as needed.
1. Click Custom layout and click Add to add input sources.
Note:
You can add a maximum of four input sources; to remove an input source, click
.
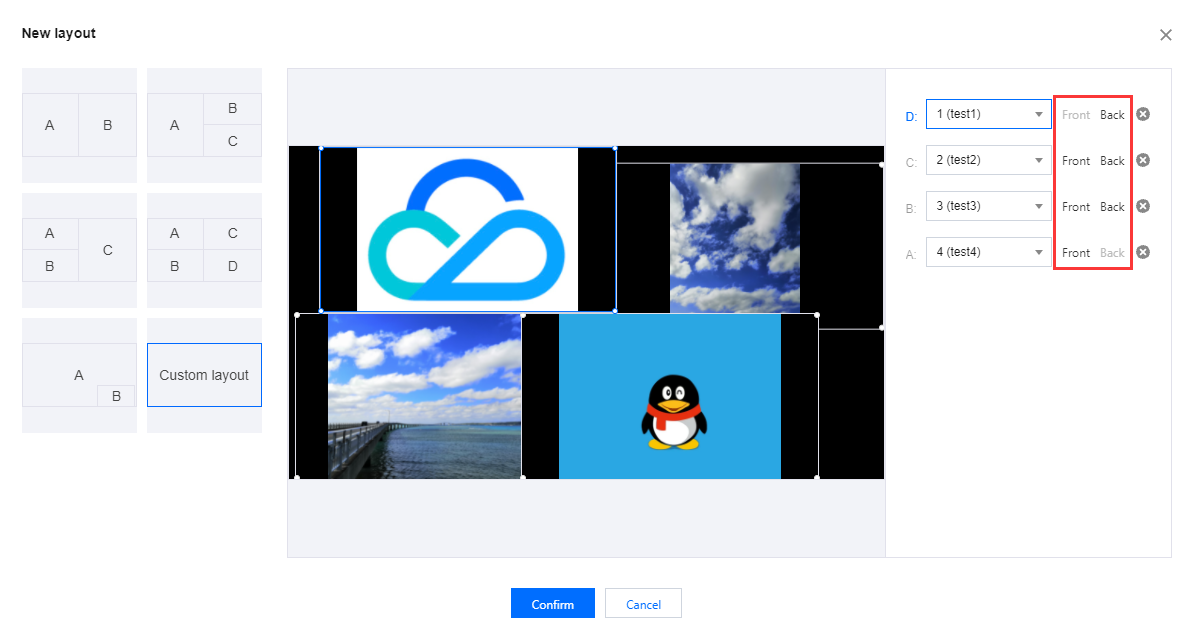
2. Adjust the layout of the input sources:
Click and hold the mouse button while dragging to adjust the sizes and positions of input sources.
Click Front or Back to adjust the stacking order of the input sources.
3. Click the Select an input drop-down list to select input sources. After selecting input sources, you can verify the video effect in the preview window.
4. Click Confirm to complete the creation of the layout.
Step 3: Starting Preview
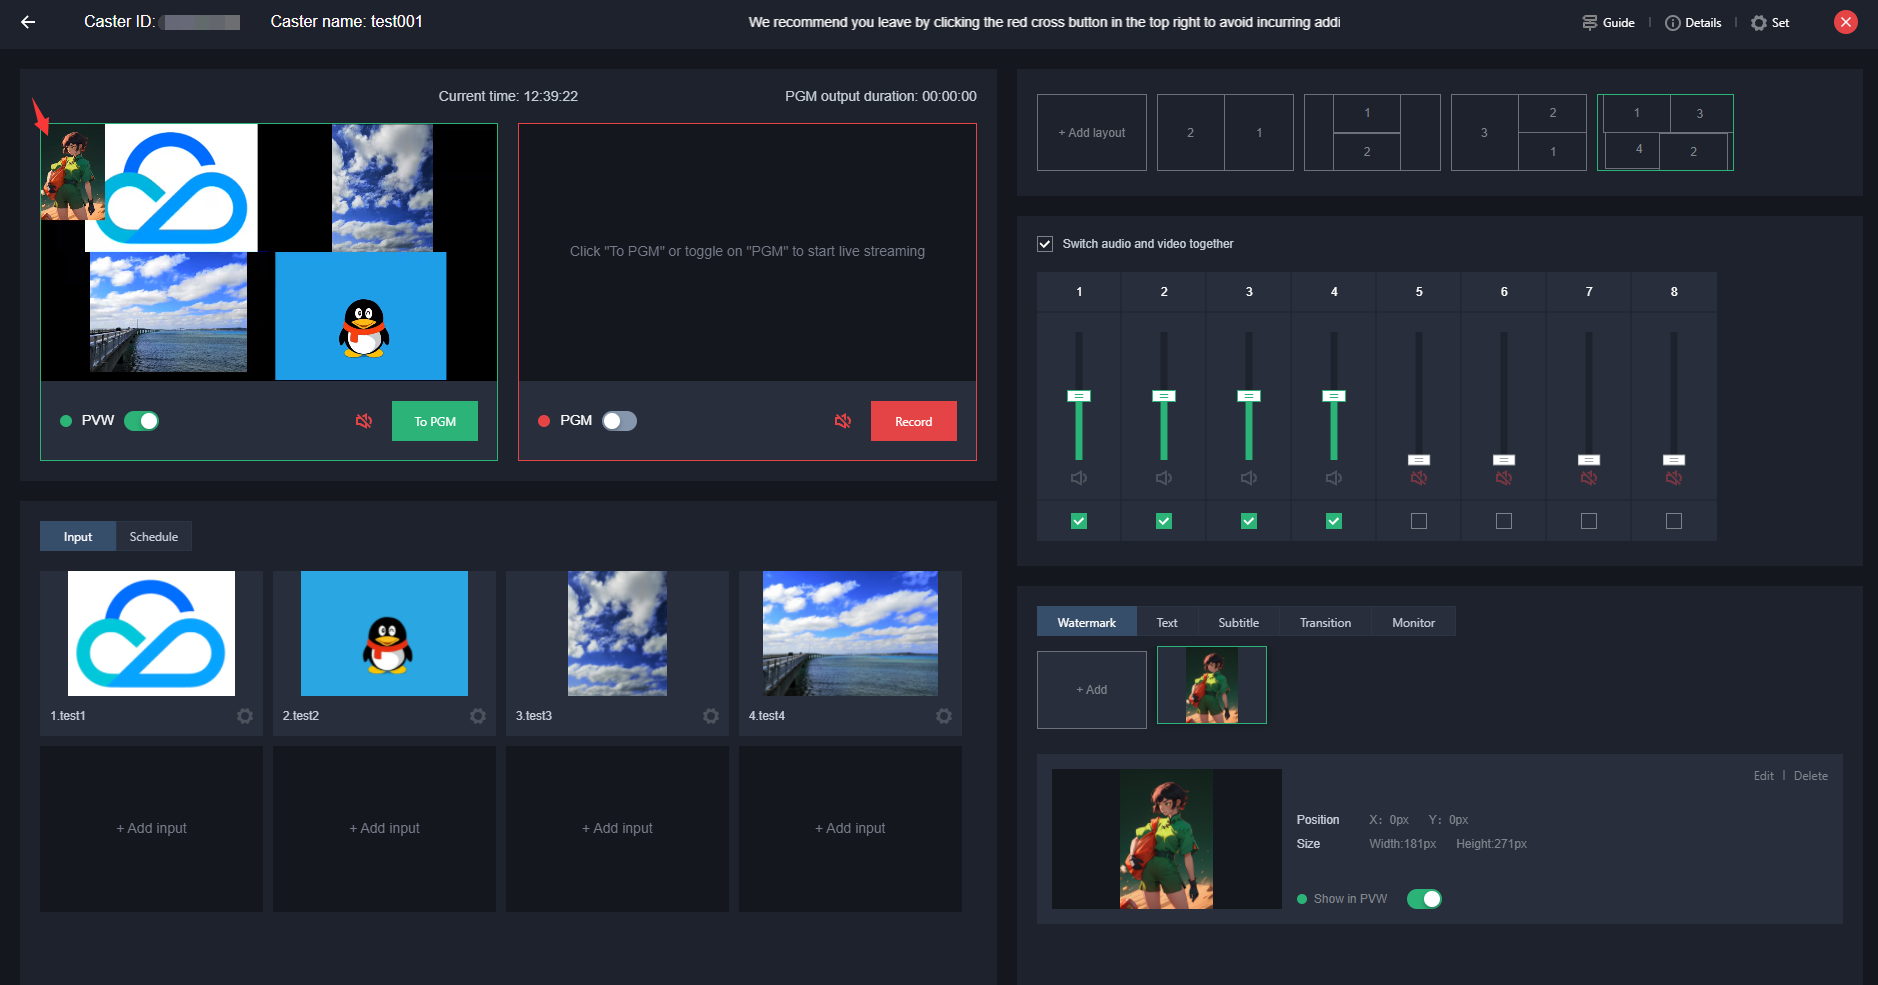
View the video input source area and click an added input source or a created layout template to start preview (PVW).
Note:
The layout currently in use in PVW is marked by a green frame. An input source or layout in use cannot be deleted directly. To delete a layout in use, manually close PVW or PGM or stop the caster first.
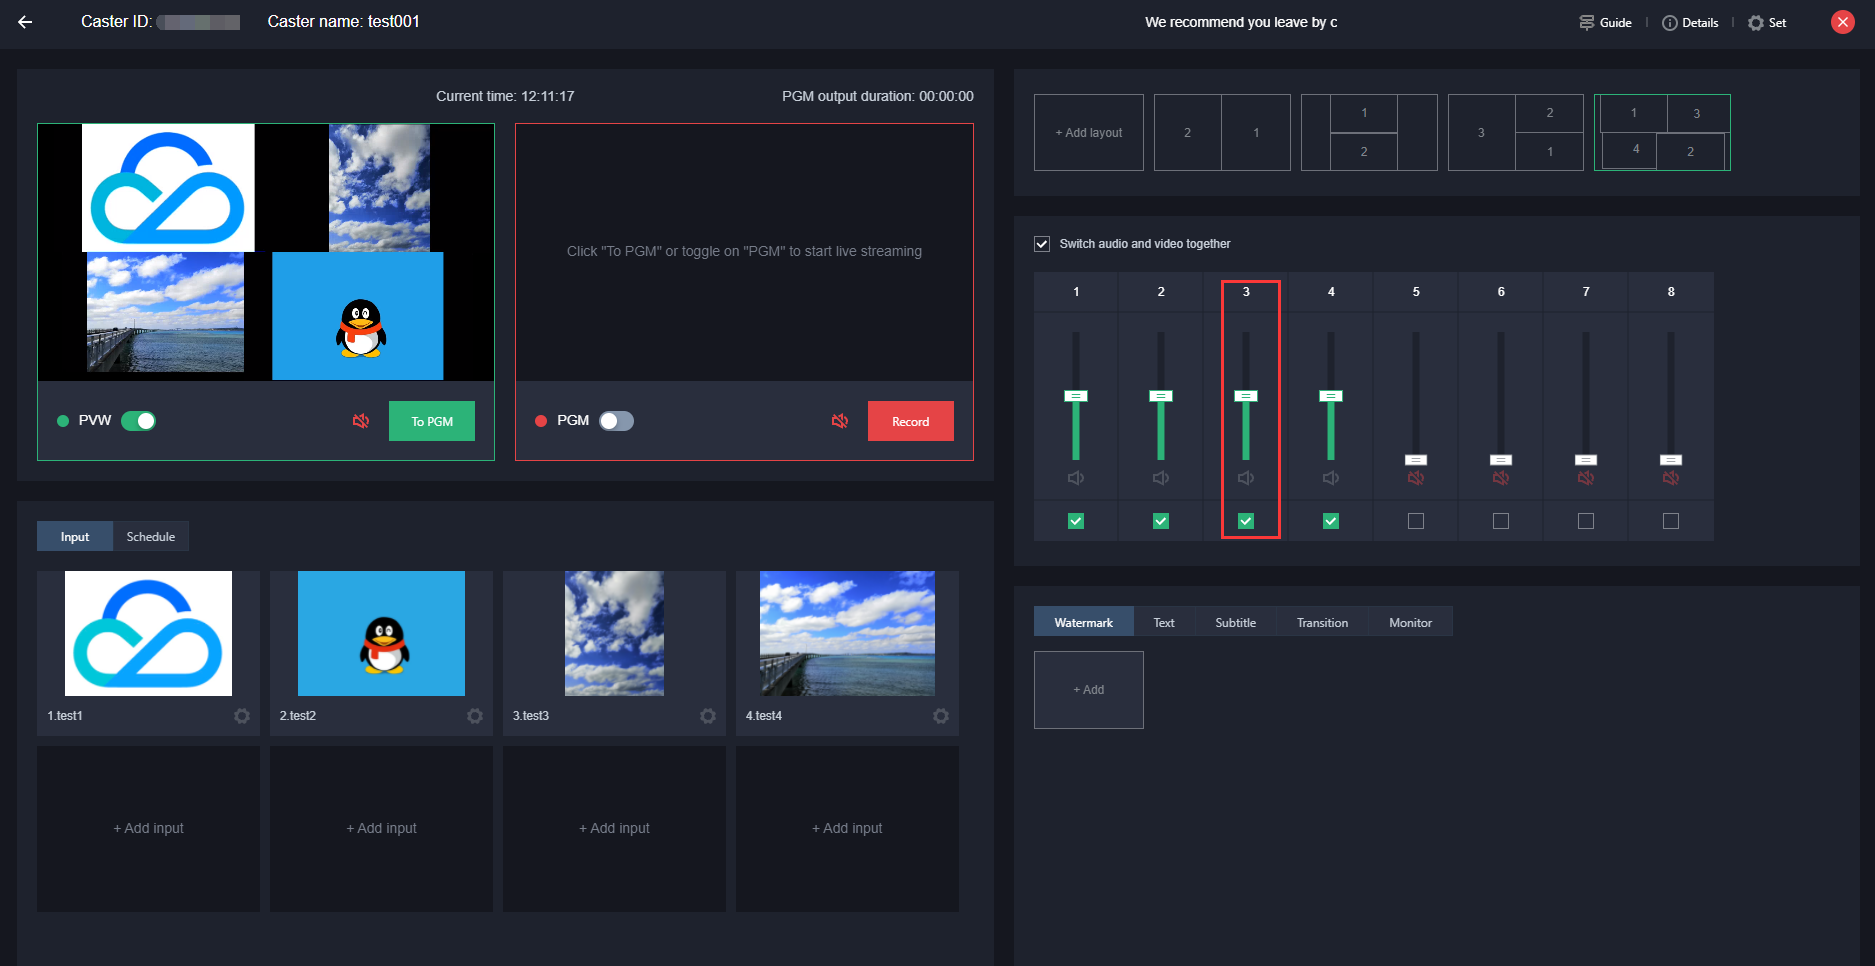
Step 4: Setting Audio
LVC allows you to adjust the volume of each input stream in the output stream. When the Switch audio and video together box is checked, the audio and video in the PVW playback are from the same input source. For example:
If PVW is playing the video from input source 1, the audio being played is also from input source 1. If PVW is playing a mixed stream of video from input sources 1 and 3, the audio being played is also a mix of audio from input sources 1 and 3.
When the Switch audio and video together box is unchecked, audio and video can be selected separately. For example:
If the video from input source 1 is being played, you can choose to play the audio from input source 3. If a mixed stream of video from input sources 1 and 3 is being played, you can choose to play the audio from input source 1 only.
Step 5: Adding a Component
Watermarking
Creating a Watermark Template
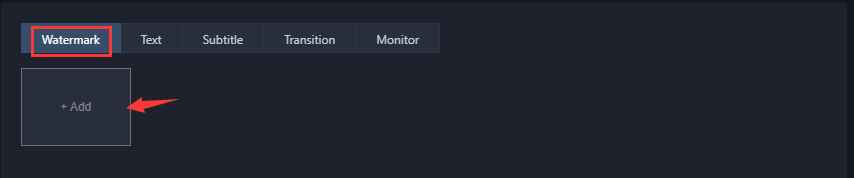
LVC supports multiple watermark overlays. To add a watermark in your directed footage, follow these steps:
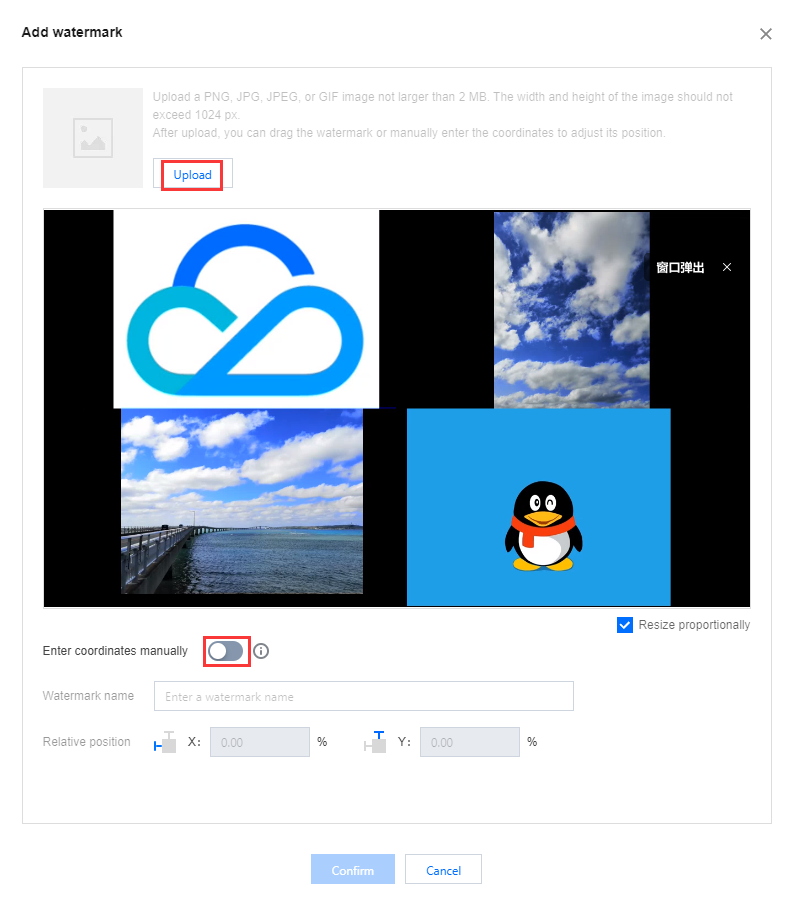
1. Select the Watermark tag and click Add to enter the watermark creation page.
2. Click Upload to upload your watermark image.
Note:
The watermark image can be in PNG, JPG, JPEG or GIF format, with a maximum size of 2M and a width and height not exceeding 1024px. Dynamic watermarks are supported.
After the upload, you can position the watermark by dragging it or specifying its coordinates for a higher positioning precision.
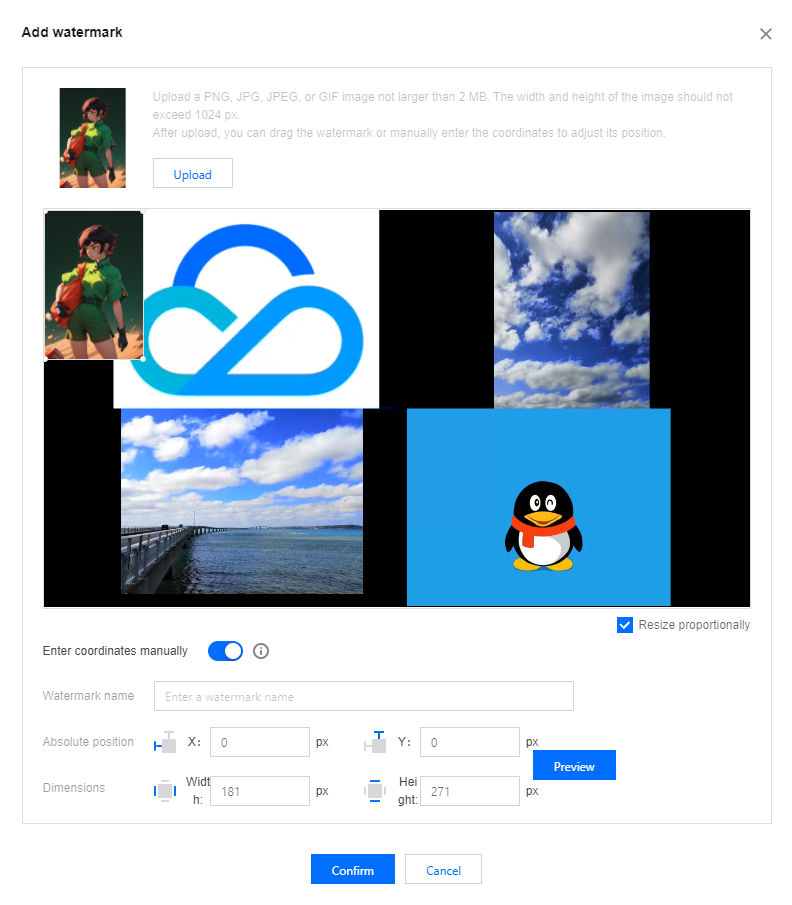
3. Adjust the position and size of the watermark image by dragging the image on the editing screen or clicking
to enter coordinates manually and entering the precise pixel values.
4. Customize a name for the watermark.
Note:
To enter coordinates manually, you must start preview (PVW) first.
5. After the adjustment, you can click Preview to view the watermark effect.
6. When you are finished, click Confirm to save the watermark template.
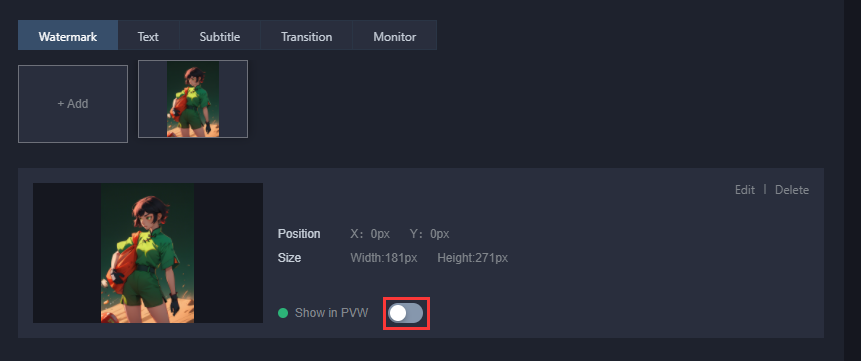
7. Select the watermark template you want to enable, and click
to turn on the PVW window.
8. The watermark is displayed in the PVW window.
Editing a Watermark Template
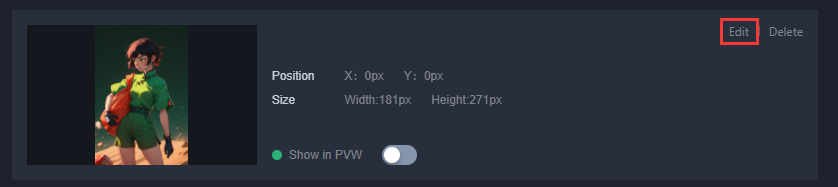
1. Select a watermark template you created and click Edit on the right to modify the template data.
2. Adjust the watermark template based on your business requirements. After the adjustment, click Confirm.
Deleting a Watermark Template
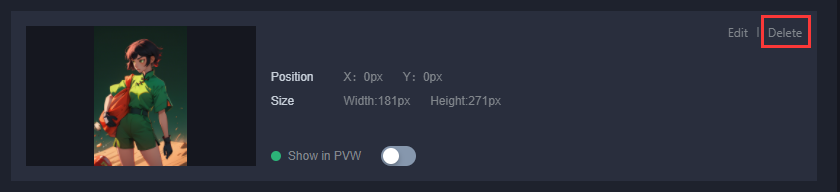
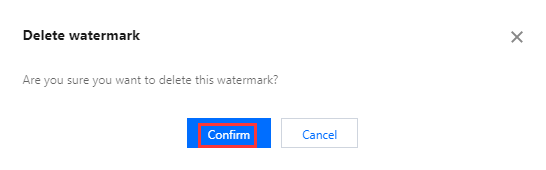
1. Select a watermark template you created and click Delete on the right.
2. Click Confirm to delete the template.
Adding Text
Creating a Text Template
LVC supports multiple text overlays, as well as text and watermark overlays. To add text in your directed footage, follow these steps:
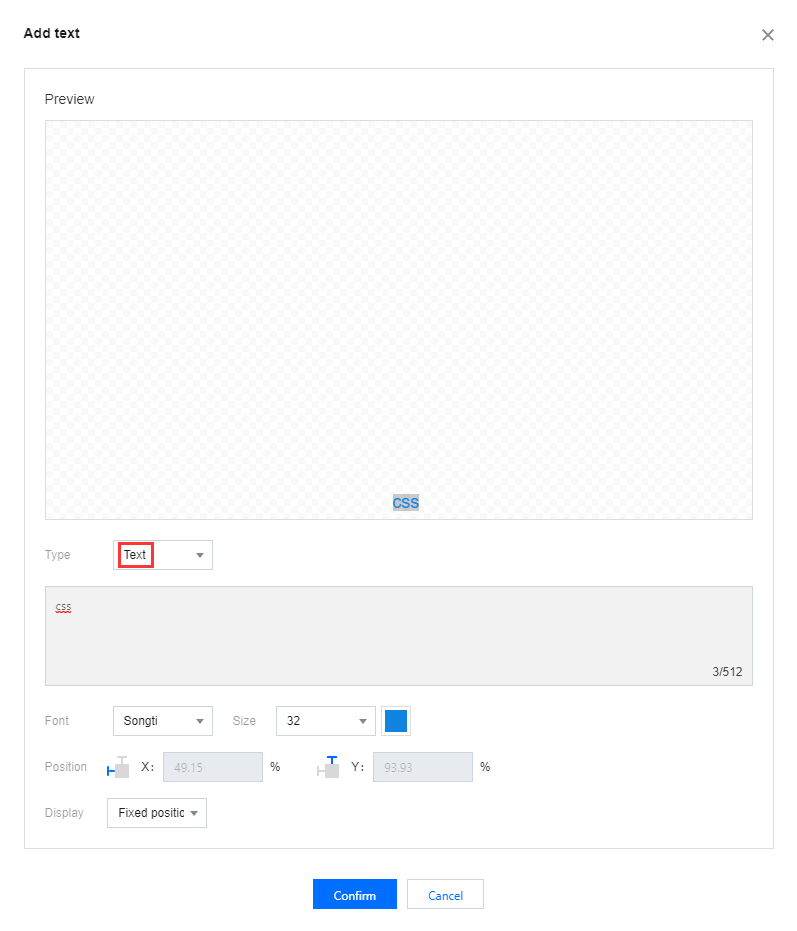
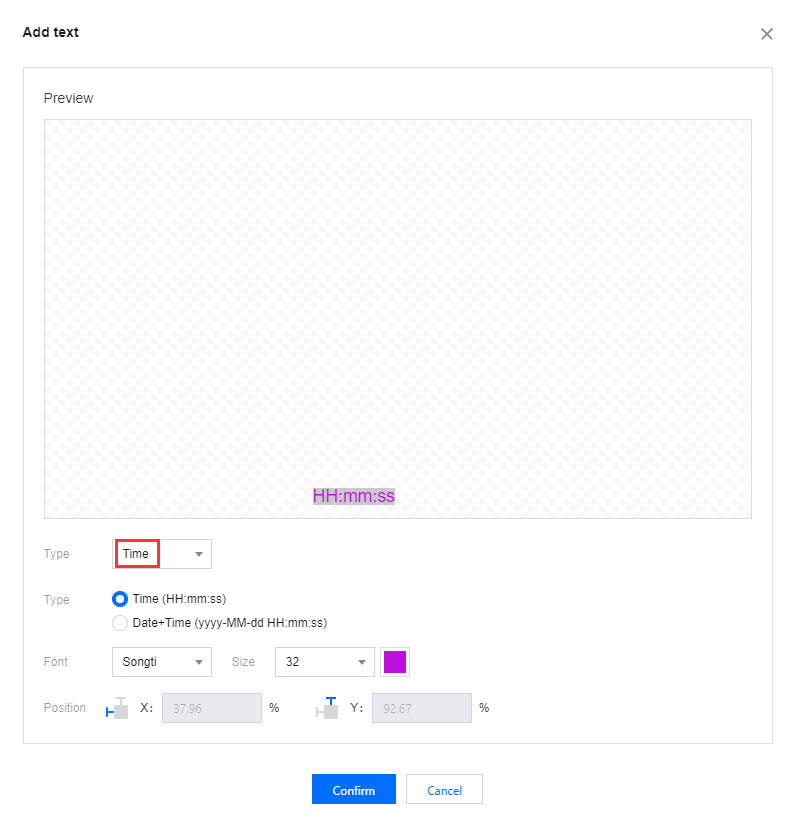
1. Select the Text tab and click Add to enter the text creation page.
2. Configure the following items based on your business requirements:
Text
Time
Configuration Item
Description
Type
The default is Text, and you can also select Time.
Text:
Enter the text to be displayed.
Time:
Set the type to either Time or Date + Time.
Font
Options: Songti and Heiti.
Size
Value range: 16 to 60.
Font color
Customize the font color according to your preference.
Position
Drag and drop the text to adjust its position.
Display
Options: Fixed position, Scroll and Single Scroll.
3. After the editing, click Confirm to save the text template.
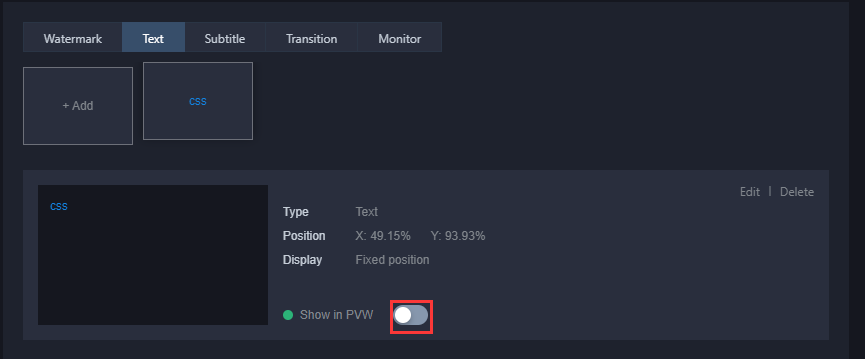
4. Select the text template you want to enable, and click
to turn on the PVW window. The text is displayed in the PVW window.
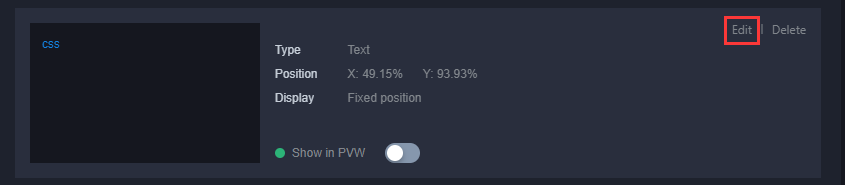
Editing a Text Template
1. Select a text template you created and click Edit on the right to modify the template data.
2. Adjust the text template based on your business requirements. After the adjustment, click Confirm.
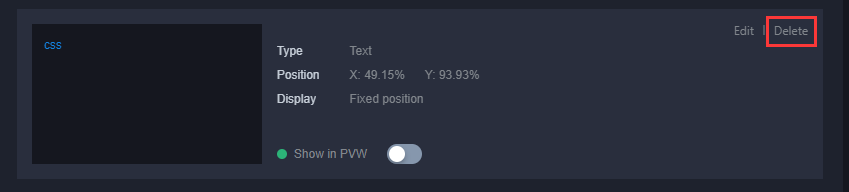
Deleting a Text Template
1. Select a text template you created and click Delete on the right.
2. Confirm whether to delete the text template. Click Confirm to delete it.
Adding Subtitles
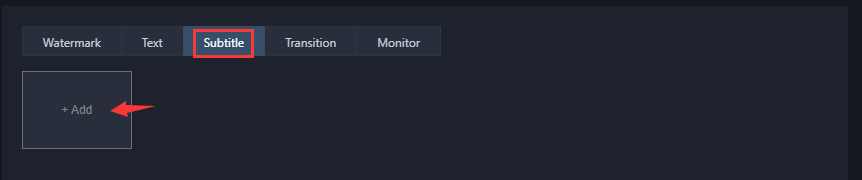
Adding a Subtitle Template
1. Select the subtitle tag, and then click Add to enter the subtitle adding page.
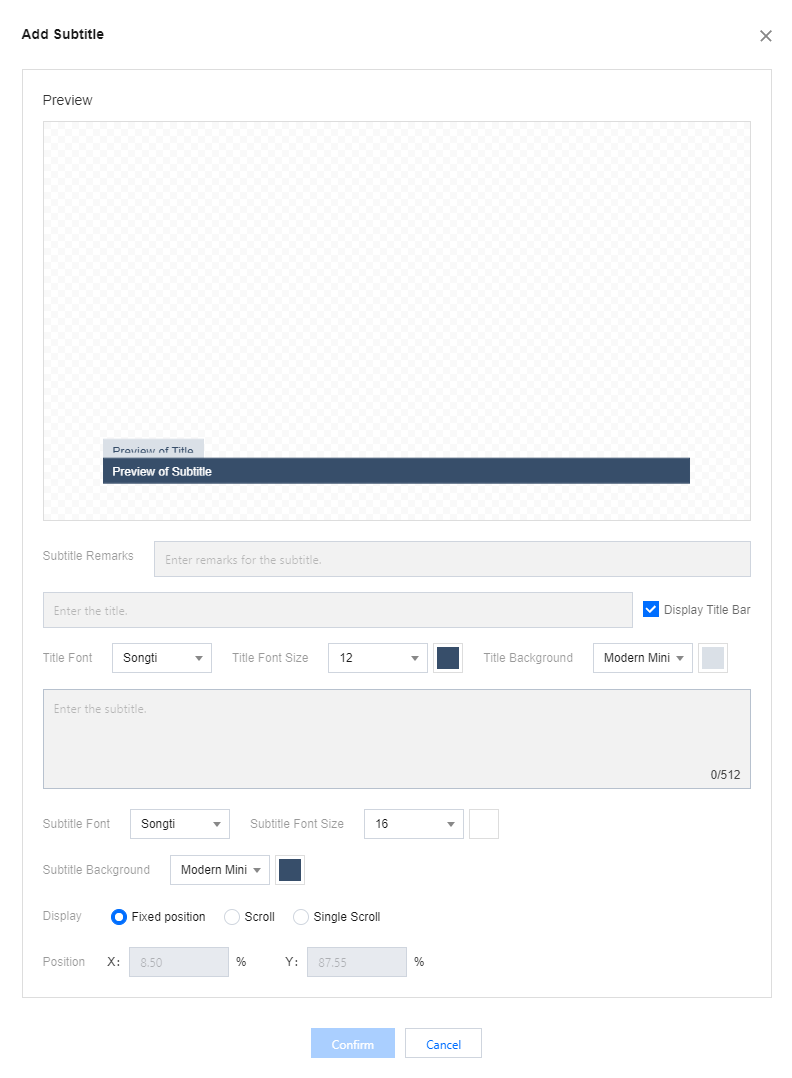
2. Based on your business requirements, proceed with the following configurations:
Configuration Item
Description
Subtitle Remarks
You can customize the subtitle remarks according to your needs.
Title Content
You can customize the title content according to your needs, which contains up to 20 characters.
The title bar is displayed by default. You can manually uncheck it to hide the title bar.
Title Font
The default title font is Songti . You can also select Heiti.
Title Font Size
The font size range is from 12 to 60.
You can select a font color according to your preference.
Title Background
The default style is Modern Minimalist . You can also select the Youthful and Lively style.
You can select a title background color according to your preference.
Subtitle Content
You can customize the subtitle content according to your needs, which contains up to 512 characters.
After the subtitle content is entered, the preview page will show the effect.
Subtitle Font
The default subtitle font is Songti . You can also select Heiti.
Subtitle Font Size
The font size range is from 12 to 60.
You can select a font color according to your preference.
Subtitle Background
The default style is Modern Minimalist . You can also select the Youthful and Lively style.
You can select a subtitle background color according to your preference.
Display
The default is Fixed position. You can also select Scroll or Single Scroll.
The Scroll and Single Scroll modes both support setting the scrolling speed.
The default speed is 5 seconds/line, namely the time for a character to scroll from right to left.
The adjustable speed range is 5-600 seconds/line.
Position
On the preview page, you can drag and drop the text to adjust its position.
3. After editing is completed, click Confirm to save the subtitle template.
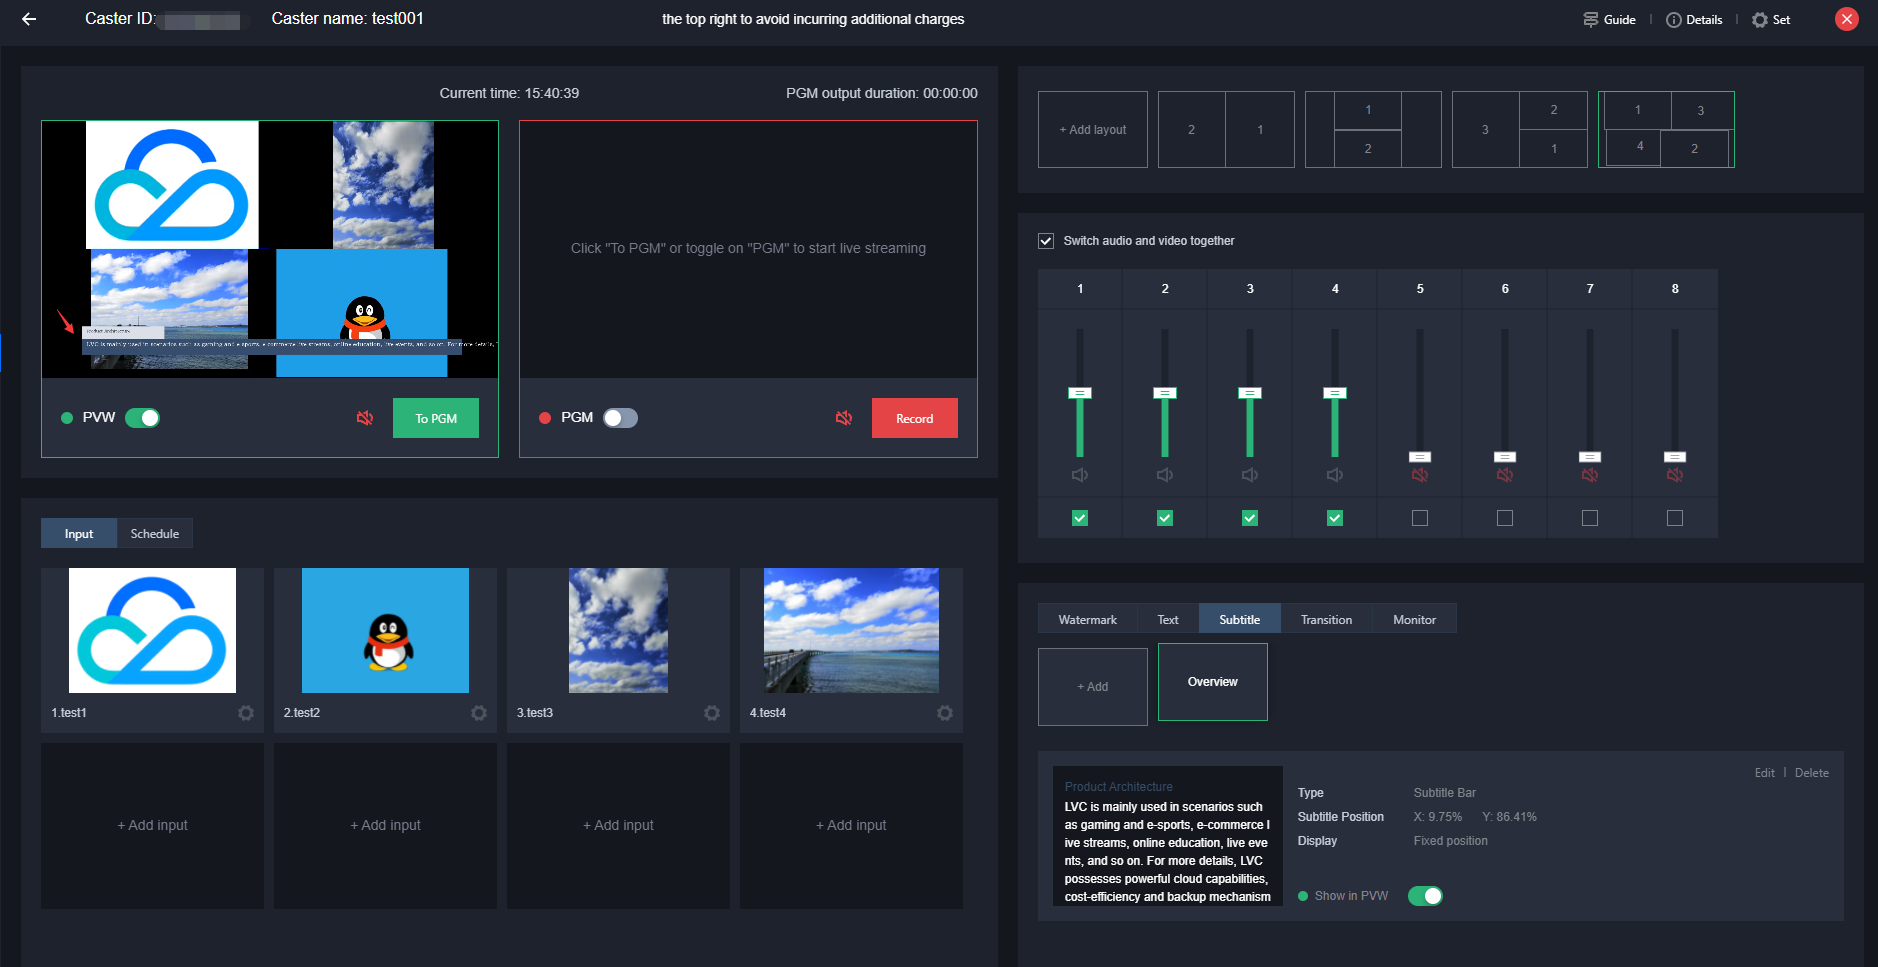
4. Select the subtitle template you want to enable, and click
to turn on the PVW window .
5. After the PVW window is turned on, subtitles will be displayed in the left PVW.
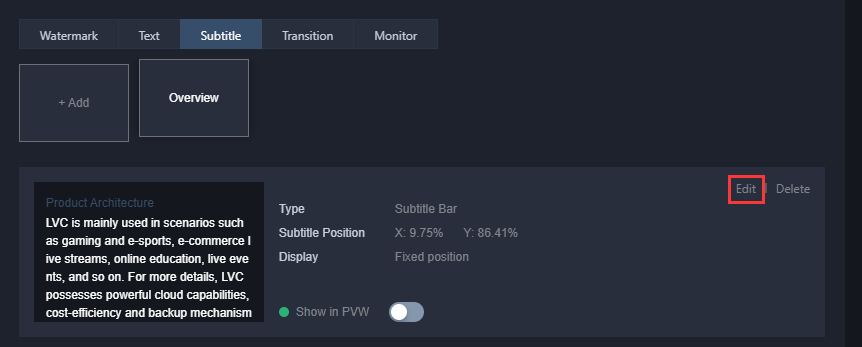
Modifying a Subtitle Template
1. Select the subtitle template you created, and click Edit on the right to modify the template information.
2. Adjust the subtitle template according to your actual business needs. After the adjustment is completed, click Confirm .
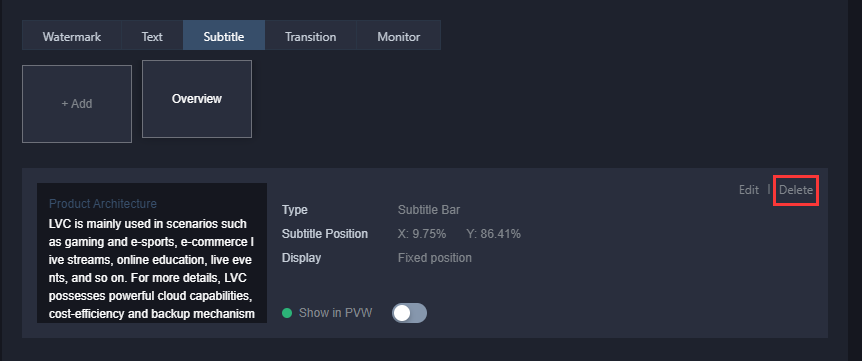
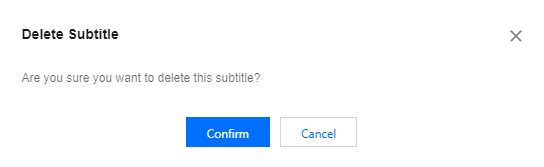
Deleting a Subtitle Template
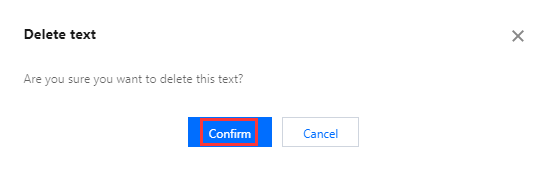
1. Select the subtitle template you created and click Delete on the right.
2. To confirm the deletion of the current subtitle template, click Confirm to delete it.
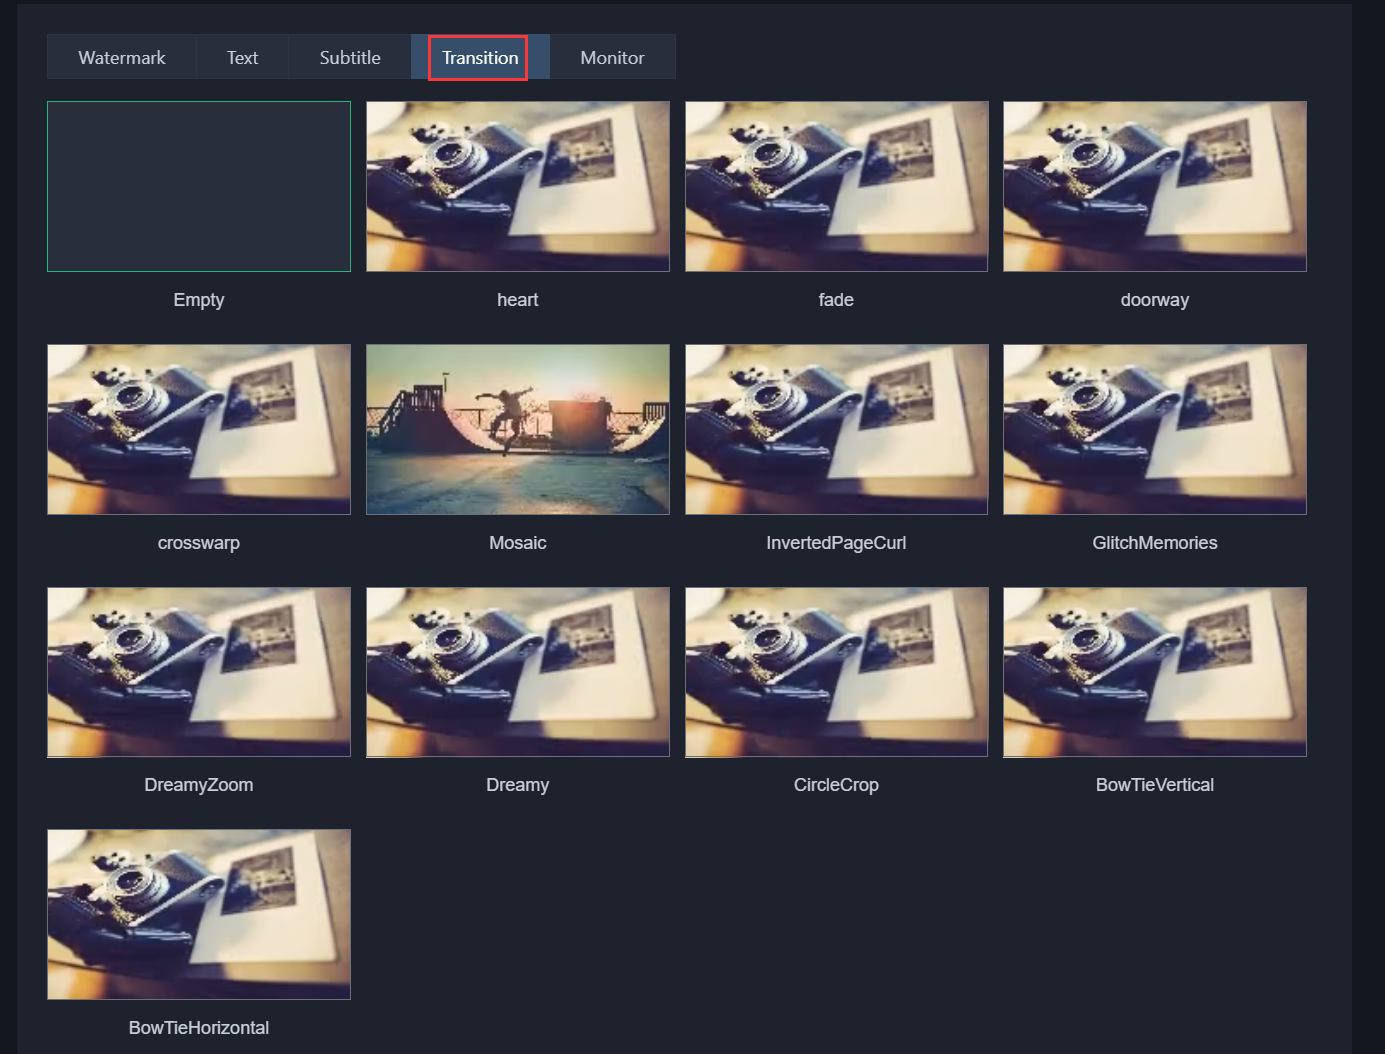
Adding a Transition
LVC offers a variety of transition effects. Click any transition template to use it. Once selected, the transition effect will appear the next time video sources are switched.
Step 6: Adding a Standby Video or Image
Adding a Standby Video
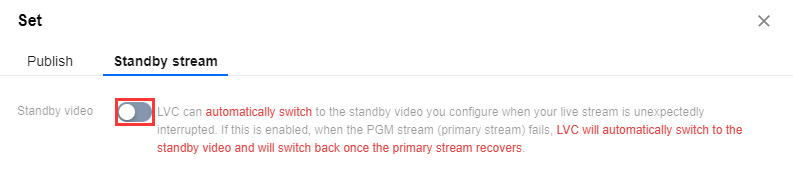
A standby video serves as an auxiliary input source. LVC automatically switches to the auxiliary input source when your live stream is interrupted unexpectedly.
Note:
If the standby video function is enabled, when the input source or pulled stream for the PGM (primary stream) fails or is interrupted, LVC automatically switches to the standby video. Once the primary stream recovers, LVC switches back to the primary stream.
Set this function by following these steps:
1. Click
in the upper-right corner, select Standby stream to enter the configuration page, and click
to enable standby video.
2. Set the input type and fill in the corresponding URL. On demand URL and Live URL are supported.
3. After the configuration, click Confirm to save the settings.
Note:
If added successfully, the video can be previewed in this window.
Adding a Standby Image
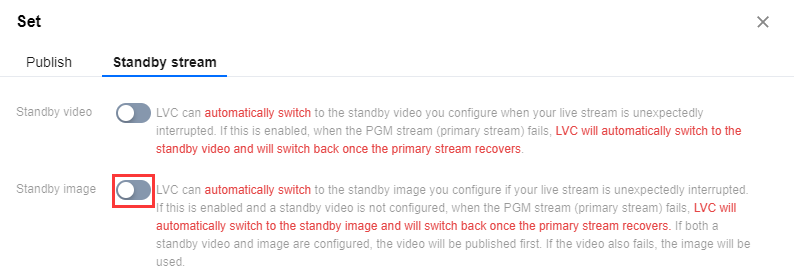
A standby image serves as an auxiliary image input source. LVC automatically switches to the auxiliary input source when your live stream is interrupted unexpectedly.
Note:
If the standby video function is not enabled, when the input source or pulled stream for the PGM (primary stream) fails or is interrupted, LVC automatically switches to the standby image. Once the primary stream recovers, LVC switches back to the primary stream.
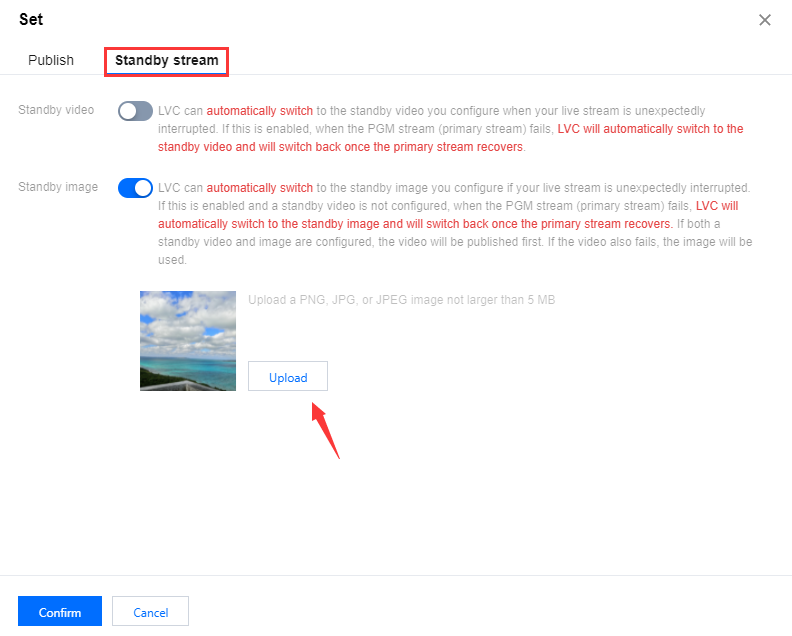
If a standby video and standby image are both enabled, LVC switches to the standby video first. If the standby video also fails, LVS switches to the standby image.
Enable the standby image function by following these steps:
1. Click
in the upper-right corner, select Standby stream to enter the configuration page, and click
to enable standby image.
2. Click Upload and select and upload a local image.
Note:
The maximum image size is 5MB. The PNG, JPG, and JPEG formats are supported.