Cloud Streaming Services
- Release Notes and Announcements
- Announcements
- Product Introduction
- CSS Products
- Purchase Guide
- Basic Service Fee
- Value-Added Service Fee
- Live Video Broadcasting (LVB)
- Live Event Broadcasting (LEB)
- Live Video Caster
- General Cloud Director
- Console Guide
- Domain Management
- Adding Domain Names
- Push Domain Name Management
- Playback Domain Name Management
- HTTPS Configuration
- Feature Configuration
- Time Shifting
- Live Stream Moderation
- Live Subtitling
- Laboratory
- Monitoring
- Log Service
- Feature Guide
- Push and Playback
- WebRTC Protocol Push Stream
- Features
- Live Recording
- Practices in Typical Scenarios
- Live Streaming Security
- Global CSS Service
- Callback Notifications
- User Guides for Common Third-Party Tools
- SDK Guide
- 1. Stream Push
- API Documentation
- Making API Requests
- Monitoring Data Query APIs
- Billing Data Query APIs
- Live Transcoding APIs
- Delayed Playback Management APIs
- Domain Name Management APIs
- Watermark Management APIs
- Certificate Management APIs
- Live Stream Mix APIs
- Stream Pulling APIs
- Recording Management APIs
- Time Shifting APIs
- Live Callback APIs
- Screencapturing and Porn Detection APIs
- Authentication Management APIs
- Live Stream Management APIs
- Ops Guide
- Troubleshooting
- About Pushing
- Generating Push URLs
- PC Push
- Playing Method
- Web Player
- Web Player TcPlayer
- Web CSS Player 1.0
- Web VOD Player 1.0
- FAQs
DocumentationCloud Streaming ServicesConsole GuideFeature ConfigurationLive RecordingRecording Storage to Third Party
Recording Storage to Third Party
Last updated: 2025-03-12 15:58:40
Cloud Streaming Services (CSS) provides a feature to record live streams and store recording files to third-party platforms (Amazon S3 and Google Storage). This document describes how to store recording files to third-party platforms.
Notes
The live recording feature is a paid value-added service. Before using it, you need to activate the third-party object storage service. Using the live recording feature will incur fees for the peak number of recording channels, fees of recording delivery to third-party services, and fees of storage after recording. For billing rules, see the billing documentation.
During the live streaming process, you can obtain a corresponding file about 5 minutes after the recording ends. For example, if the recording of a live stream starts at 12:00 and ends at 12:30, you can obtain a corresponding clip from 12:00 to 12:30 around 12:35.
After a recording template is successfully created, it can be bound to a push domain name. For more information, see Recording Configuration. The template will take effect approximately 5-10 minutes after it is successfully bound.
If you do not specify a recording template when initiating a recording task, the recording file will be stored to Video on Demand (VOD) by default.
Prerequisites
You have activated CSS and added a push domain name.
You have activated the third-party object storage (Amazon S3 and Google Storage) service.
Creating a Recording Template
1. Log in to the CSS console and go to Feature Configuration > Live Recording.
2. In Live Recording, select Recording Storage to Third Party.

3. Click Create Template to set template information and proceed with the following configurations:
Basic Recording Configuration Instructions: including template name, recording content, recording format, and other configuration items.
Recording Format Configuration Instructions: including HLS file segmentation, max recording time per file, resumption timeout, and other configuration items.
4. Upon completion, click Save.
Basic Recording Configuration Instructions
Note:
When the original stream is pushed and recorded via WebRTC, audio can be recorded and played normally for the HLS and MP4 formats, while audio will be lost for the FLV format. It is recommended to choose the HLS or MP4 format.
When an audio-only transcoding template is selected during specified transcoded stream recording, the initial 2 seconds of the recording content in the HLS/FLV/MP4 format will be lost due to format conversion. Please plan your stream pushing and recording time reasonably.
Initiating a transcoding task is required for recording transcoded streams, which will incur additional transcoding costs. However, if the same transcoding template is used for playback, the costs will not be charged again.
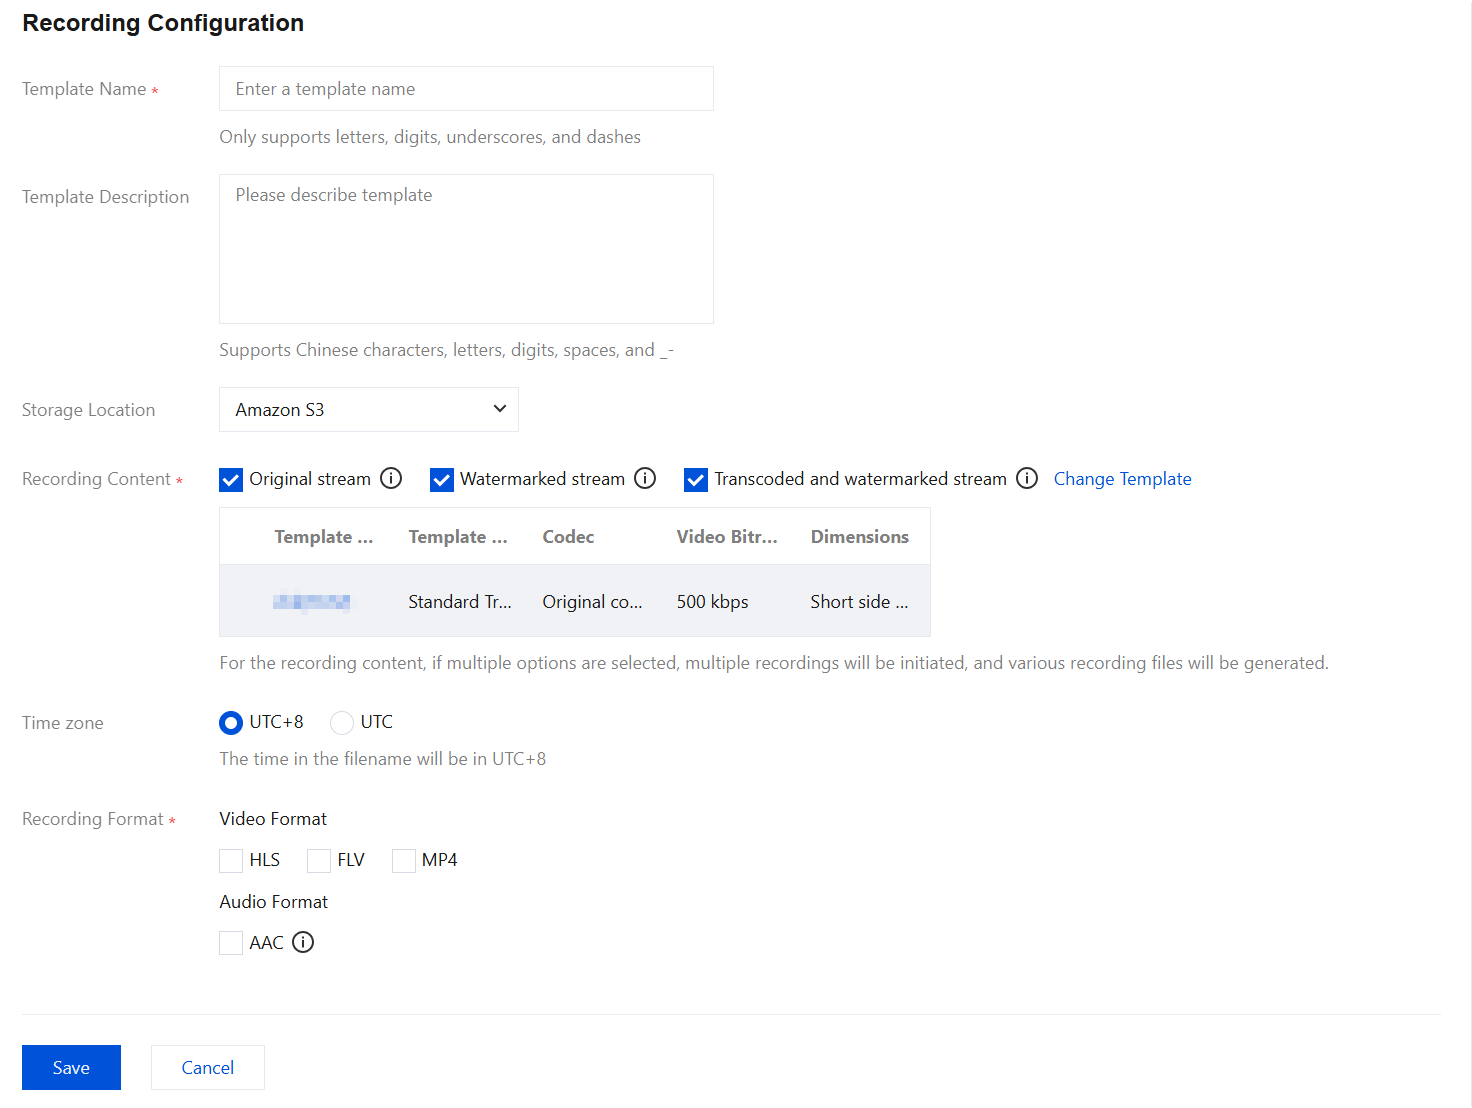
Basic Configuration Item | | Description |
Template Name | | Live recording template name, customizable (only Chinese characters, English letters, digits, underscores (_), and hyphens (-) are supported). |
Template Description | | Live recording template description, customizable (only Chinese characters, English letters, digits, spaces, underscores (_), and hyphens (-) are supported). |
Storage Location | | You can choose to store data in Amazon S3 or Google Storage. |
Recording Content | Original stream | The recording video records the original stream by default and retains its live original bitrate. When this configuration is selected, recording will be performed before live transcoding (including transcoding, watermarking, and stream mixing), and the recording video has no transcoding, watermarking and stream mixing effects. When the original stream is pushed and recorded via WebRTC, audio playback may not be compatible. In this case, it is recommended to select "Watermarked stream" or "Transcoded and watermarked stream". |
| Watermarked stream | When this configuration is selected, recording will be performed after the live stream is watermarked according to the configured watermark template. If no watermark template is configured, the original stream will be recorded. |
| Transcoded and watermarked stream | Click Transcoded and watermarked stream to select a configured transcoding template, or click the name of a template to modify the transcoding template configuration. When this configuration is selected, transcoding will be automatically initiated based on the transcoding template ID after a push, and recording will be performed. If the transcoding template is mistakenly deleted, the effect will be equivalent to that of the recording content "Watermarked stream". |
Time zone | | You can choose UTC+8 or UTC. When this parameter is set to UTC+8, the time in the filename will be in UTC+8. When this parameter is set to UTC, the time in the filename will be in UTC. |
Recording Format | | Videos can be output in the formats of HLS, FLV, MP4, and AAC (for audio-only recording). |
Recording Format Configuration Instructions
Note:
Since the recording file is uploaded as it is recorded, it is impossible to obtain the end time before the upload, so that the end time cannot be added to the filename.
Enabling upload while recording ensures files are uploaded immediately after recording ends. A single recording file supports a duration of up to 12 hours and enhances FLV recording's disaster recovery capability. Playback files may experience stutter when being dragged for online playback, but this does not affect local playback.
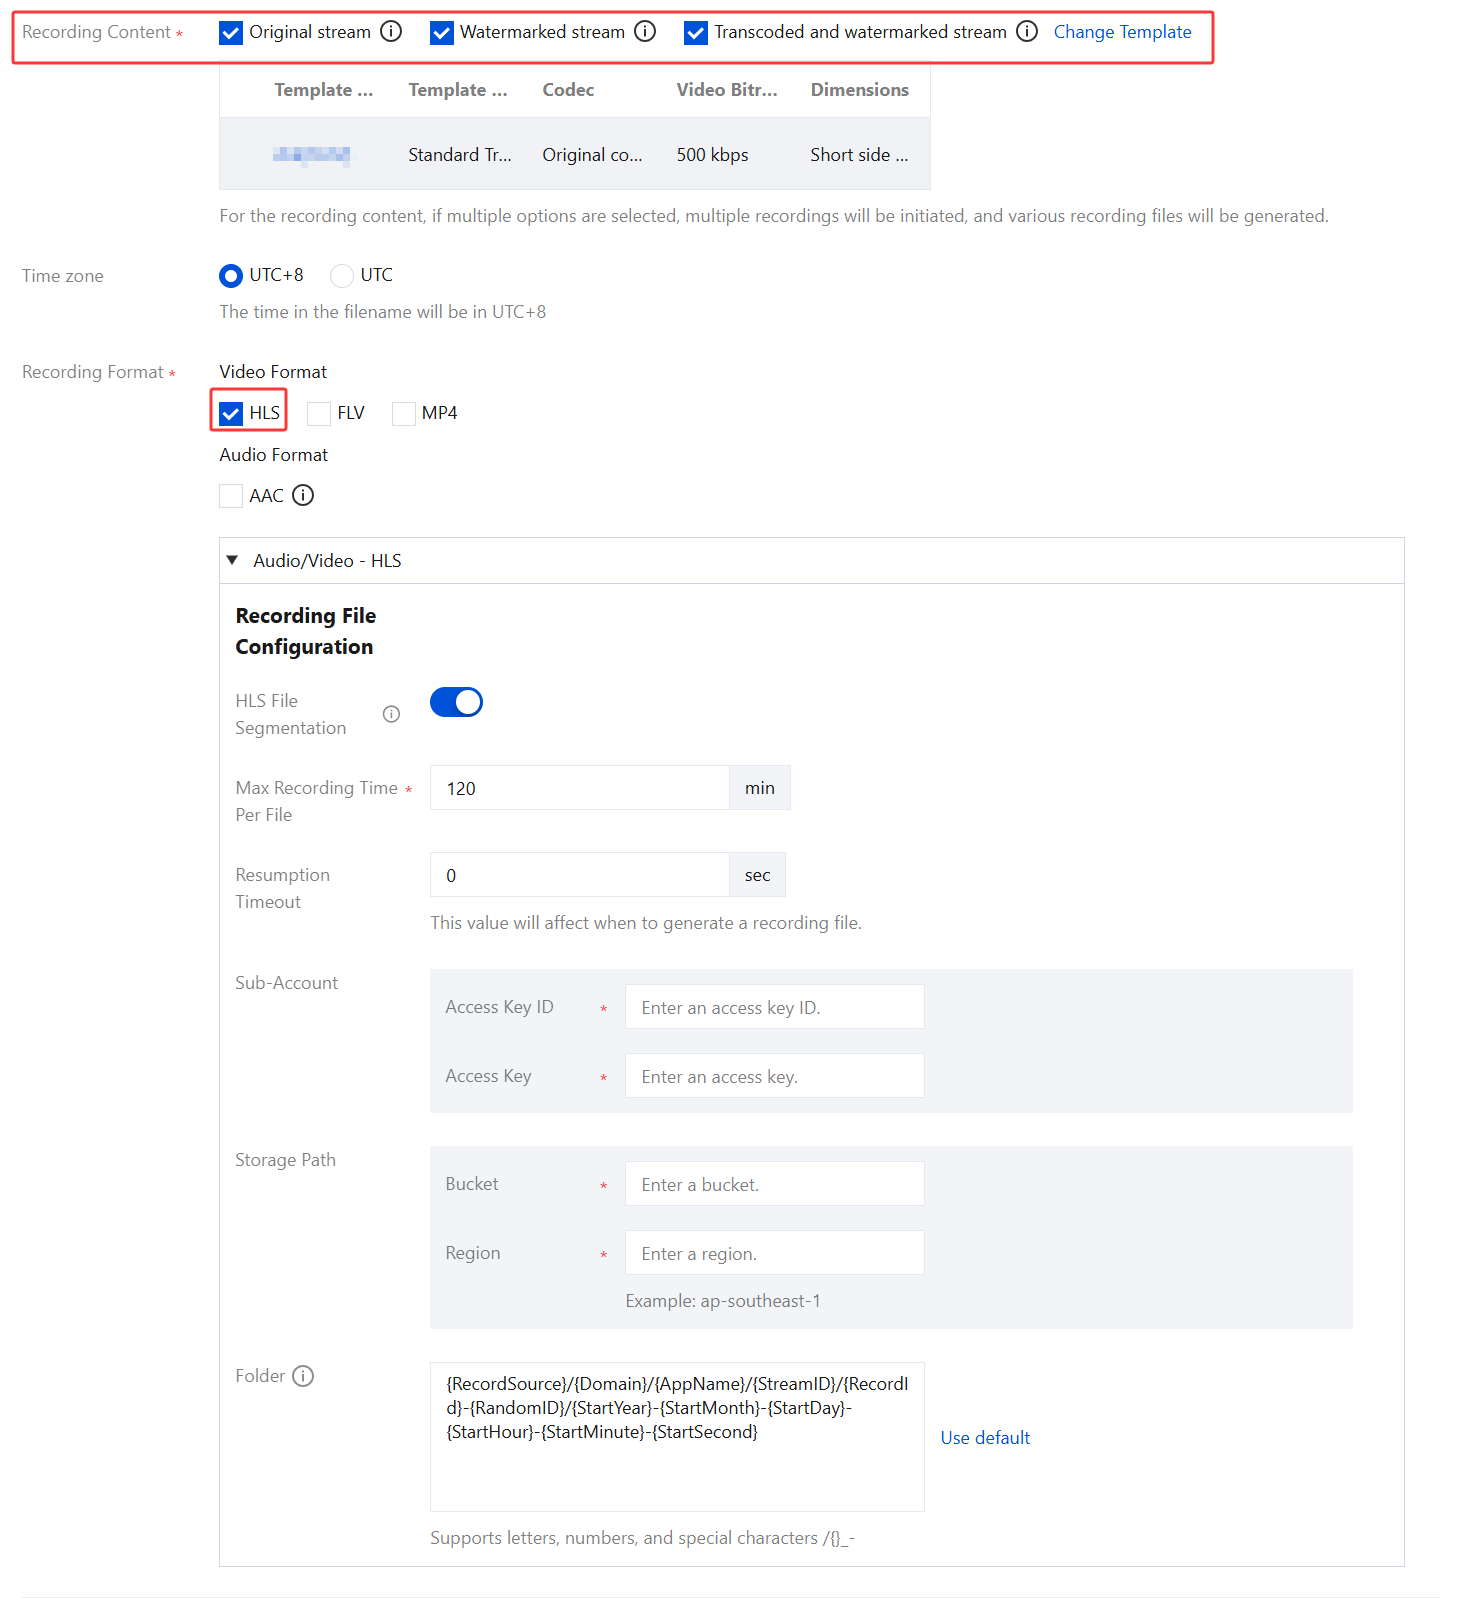
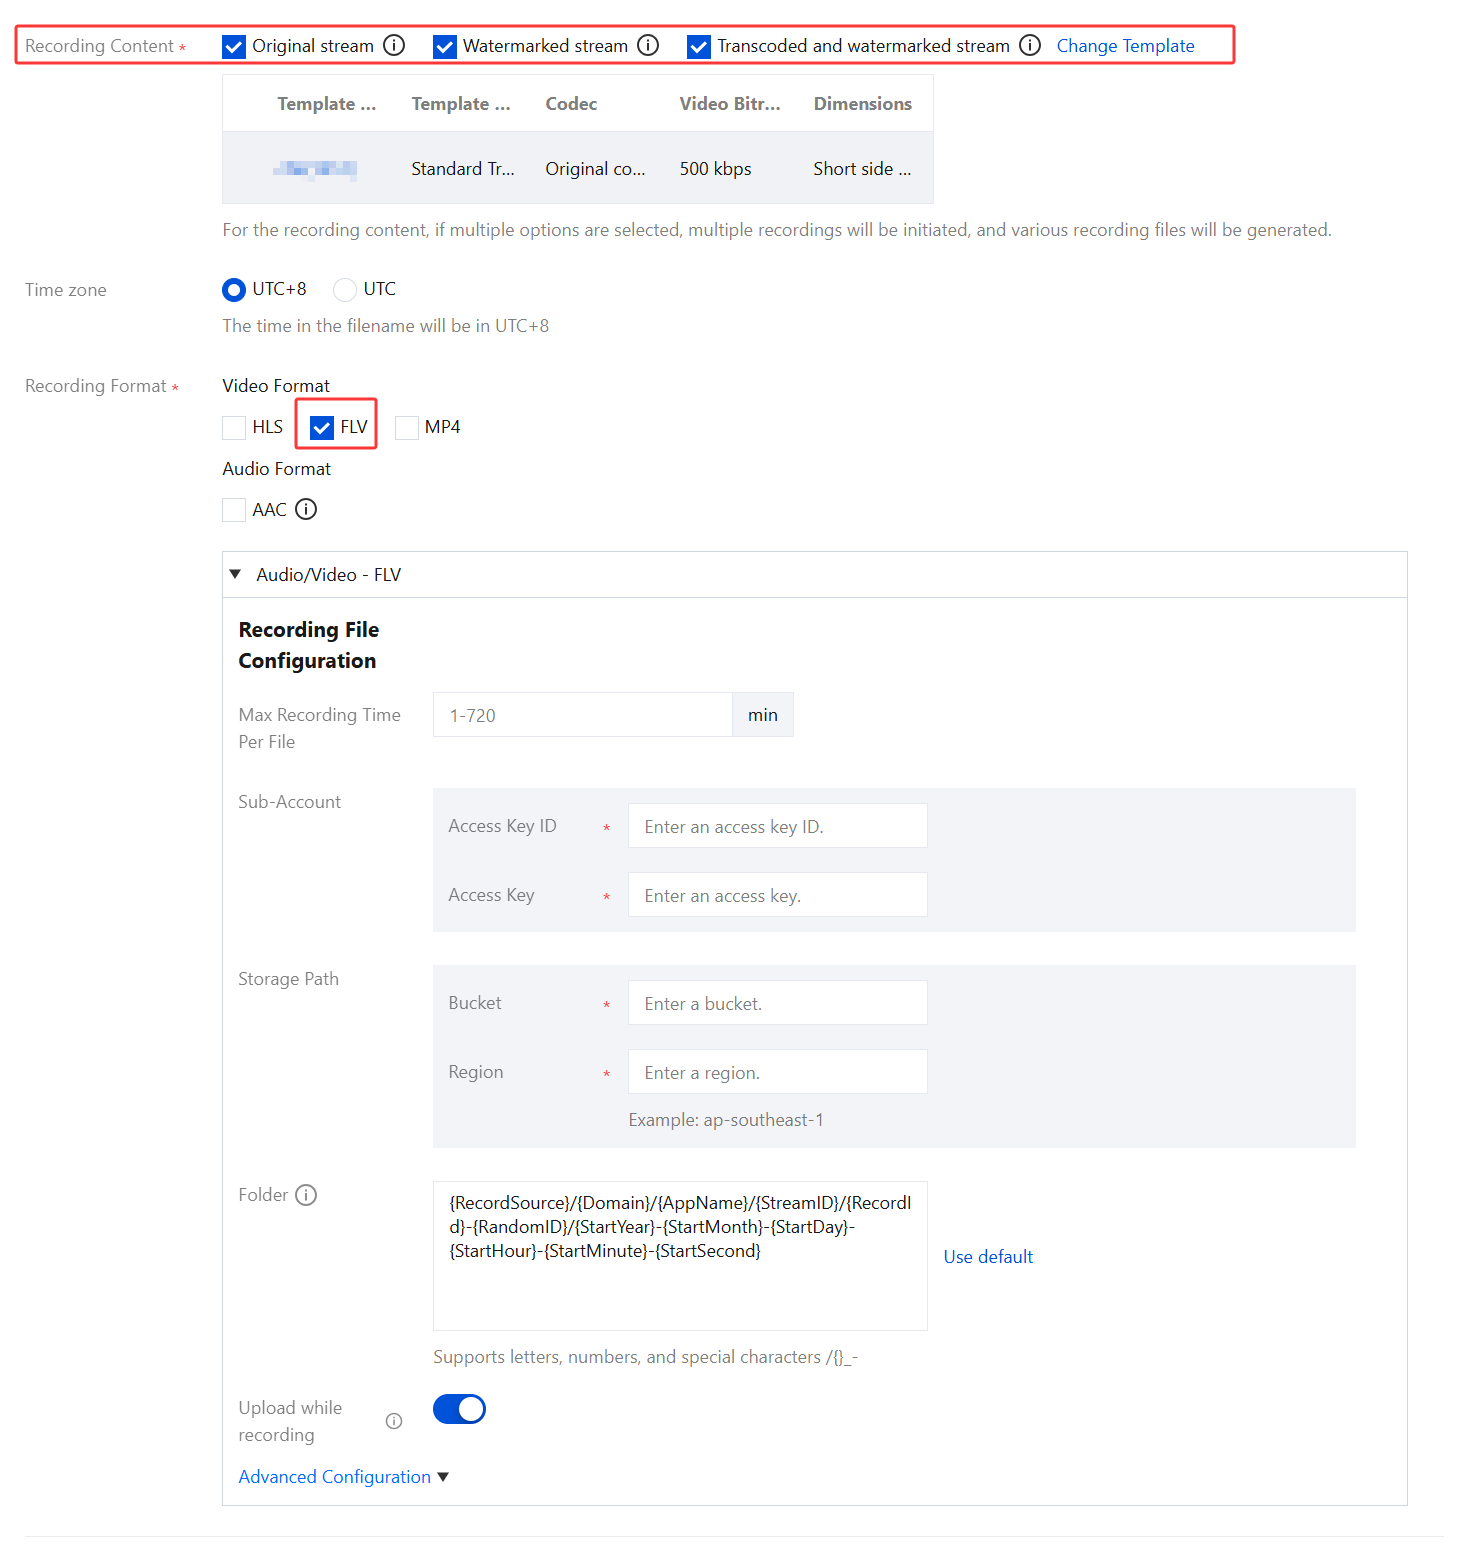
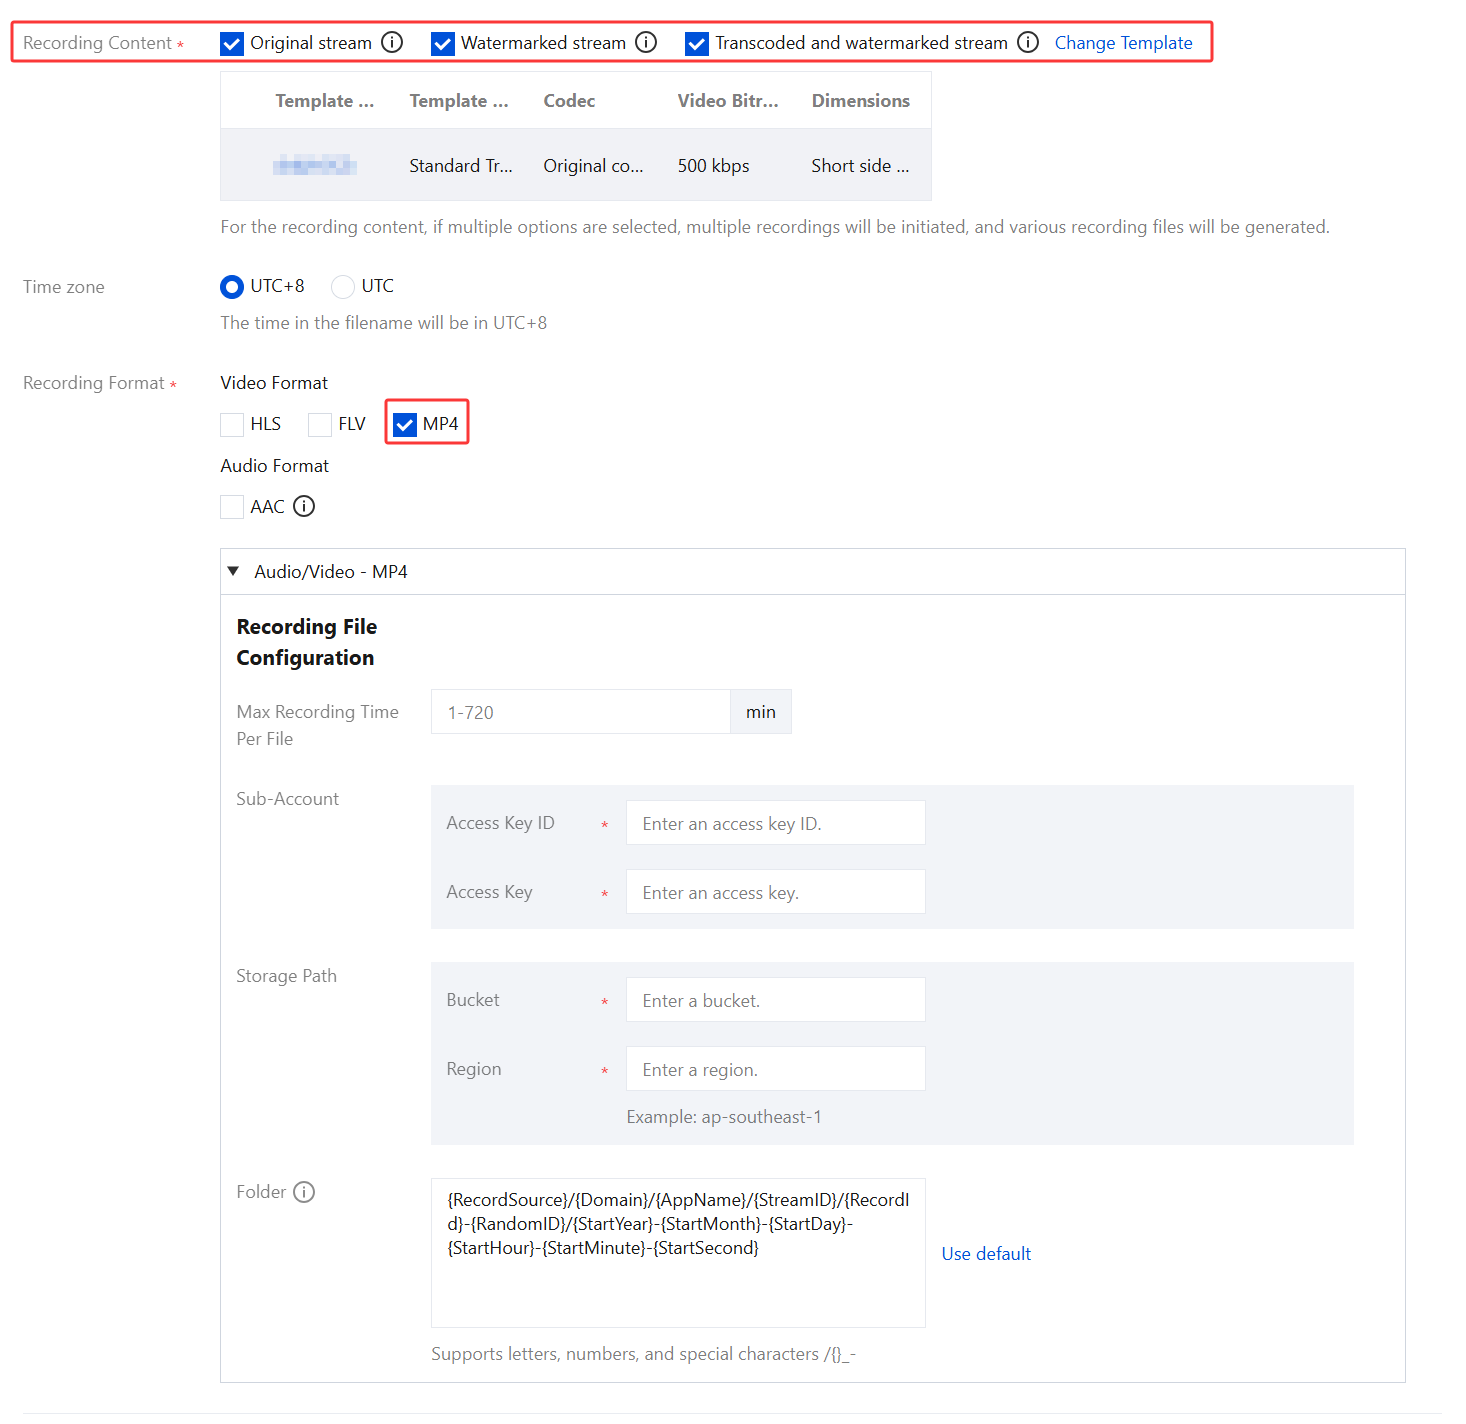
1. After you check a desired recording format in Recording Content, a settings interface for the format will pop up. You can choose one or more recording formats to set up simultaneously. Complete the following settings:
You can switch between different tabs to view the configuration requirements for Audio/Video - HLS, Audio/Video - FLV, Audio/Video - MP4, and Audio-only - AAC.
After you select this format, AAC files will be generated when audio-only or quasi-audio/video live streams are pushed.
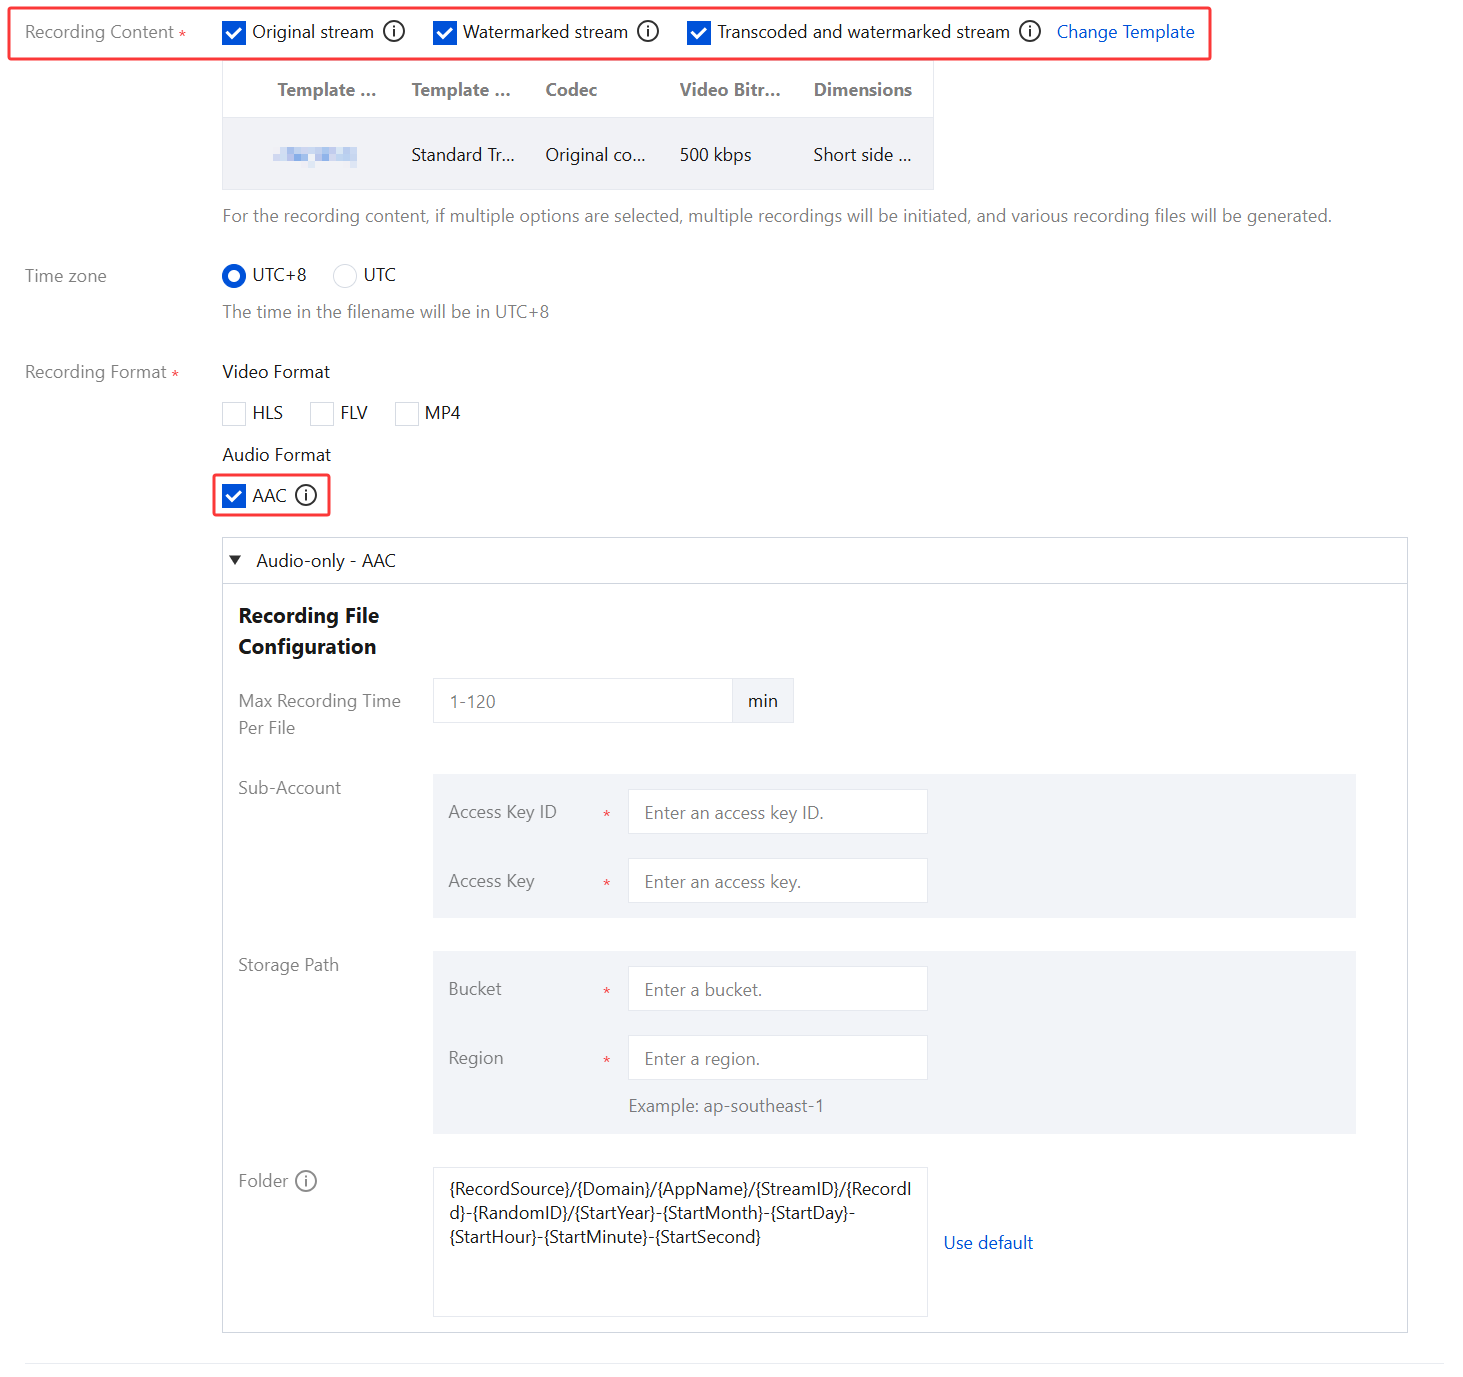
Basic Recording Format Configuration Item | Description |
HLS File Segmentation | The HLS file segmentation feature is disabled by default. If the post-processing service is needed, it is recommended to enable HLS file segmentation and set the duration of individual recording files in the HLS format. If HLS file segmentation is enabled, the duration of individual recording files in the HLS format can be set to define the duration of files generated by post-recording processing. If HLS file segmentation is disabled, recording in the HLS format will continue until the live streaming ends. If post-recording processing is set, it will also be initiated after the recording is complete. |
Max Recording Time Per File (min) | Audio/Video - HLS There is no upper limit on the recording duration of a file in the HLS format. In case of exceeding the resumption timeout, a new recording file will be generated to continue recording. When a recording file in the HLS format is stored to COS, the duration of a single TS file is 10 seconds by default. When HLS file segmentation is enabled, the duration of a single recording file in the HLS format can range from 1 to 720 minutes. Audio/Video - FLV The duration of a single file recorded in FLV format is limited to 1 to 720 minutes.. Audio/Video - MP4 The duration of a single file recorded in MP4 format is limited to 1 to 720 minutes. Audio-only - AAC The duration of a single file recorded in AAC format is limited to 1 to 120 minutes. |
Resumption Timeout (sec) | The resumption timeout directly affects the time it takes to generate a recording file. When the interval of stream interruption does not exceed the set resumption timeout, only one file will be generated from a single live stream. However, the recording file will be received only after the resumption timeout has elapsed, and recording costs will be incurred during the resumption timeout. Set the resumption timeout reasonably. Only HLS format supports resuming recording after stream interruptions, with the resumption timeout period being configurable from 1 to 1,800 seconds. |
Sub-Account | You need to fill in Access Key ID so that the system can identify and verify the user's identity. You need to fill in Access Key to ensure the security of data transmission. Access Key ID and Access Key are crucial credentials for authentication and authorization with cloud service providers (Amazon S3 and Google Storage). They are typically provided by cloud service platforms and are used to securely access and manage cloud resources. If you lose or forget this information, follow cloud service providers' instructions to retrieve or reset it. |
Storage Path | Enter your bucket information in the Bucket field. Note that it should not exceed 100 characters. Region refers to the geographic location of the said Bucket. Enter your Region information, such as: ap-southeast-1, and ensure it does not exceed 100 characters. |
Folder | The default recording storage folder is {RecordSource}/{Domain}/{AppName}/{StreamID}/{RecordId}/{StartYear}-{StartMonth}-{StartDay}-{StartHour}-{StartMinute}-{StartSecond}.Its variables are as follows: {RecordSource}: recording content, which is origin for the original stream and transcoding template ID for the transcoded stream.{StartYear}: start time - year{StartMonth}: start time - month{StartDay}: start time - day{StartMinute}: start time - minute{StartSecond}: start time - second{Domain}: push domain name{AppName}: push path{StreamID}: stream ID{RecordId}: recording ID, which distinguishes recording rules/recording tasks. In case of a recording task, it shows the task ID (that is, the ID is returned by CreateRecord).(/) indicates a hierarchical relationship and (-) is an ordinary character. {RandomID}:random number |
Upload while recording | The upload while recording feature is disabled by default. You can manually enable this feature based on your business needs. Currently, only the FLV format supports the upload while recording feature. Once enabled, it allows immediate upload of files after recording ends, supports a recording file duration of up to 12 hours, and enhances FLV recording's disaster recovery capability. Playback files may experience stutter when being dragged for online playback, but this does not affect local playback. |
2. Just click Save.
Binding a Domain Name
1. Log in to the CSS console and go to Feature Configuration > Live Recording > Recording Storage to Third Party.
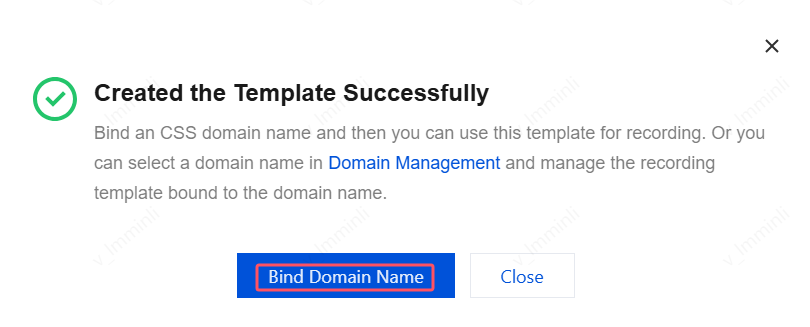
Directly binding a domain name: Click Bind Domain Name on the top left.

Binding a domain name after creating a recording template: After successfully creating a recording template, click Bind Domain Name in the reminder box.
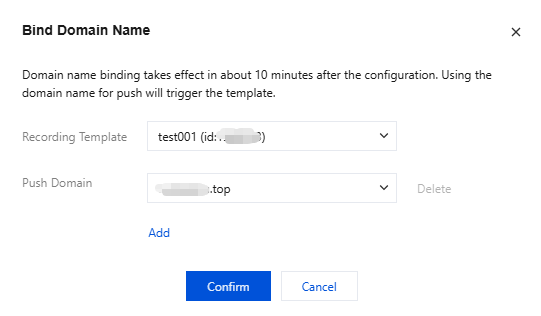
2. In the domain name binding window, select the Recording Template and Push Domain Name you need to bind and click Confirm to complete successful binding.
Note:
You can click Add to bind multiple push domain names to a template.
Unbinding a Domain Name
1. Log in to the CSS console and go to Feature Configuration > Live Recording > Recording Storage to Third Party.
2. Select a recording template bound with domain names, select a domain name to unbind, and click Unbind on the right.
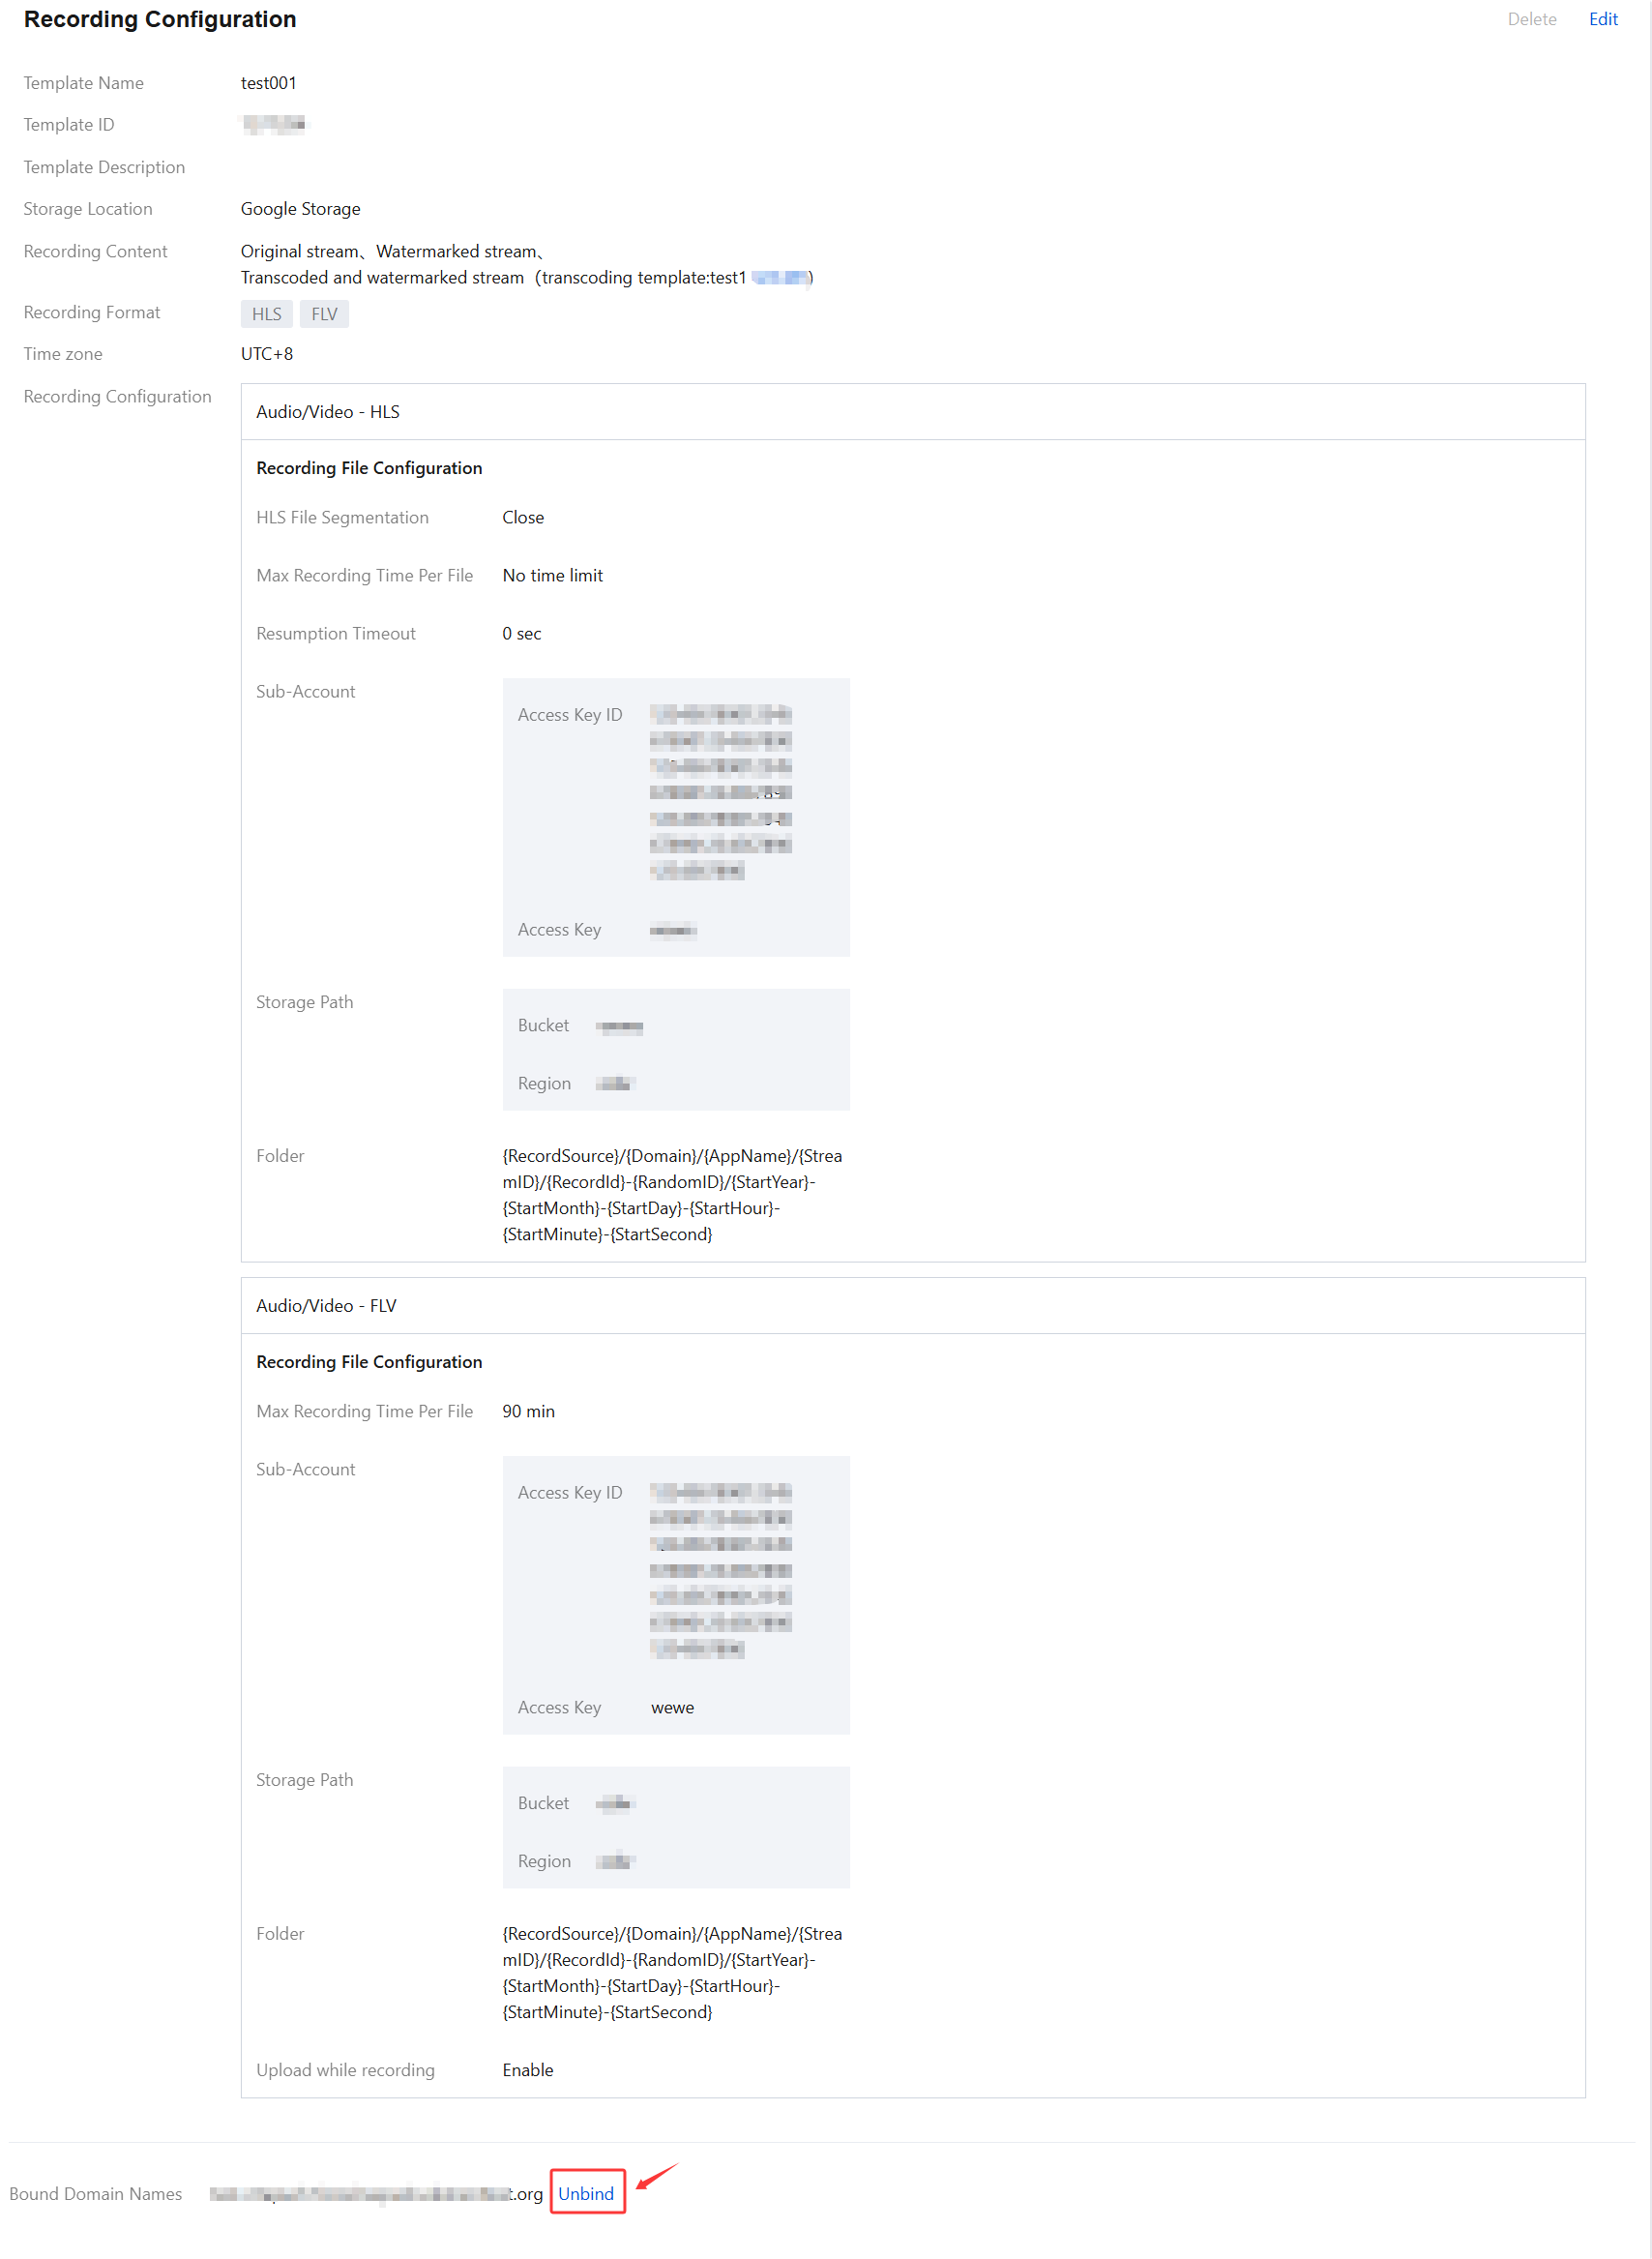
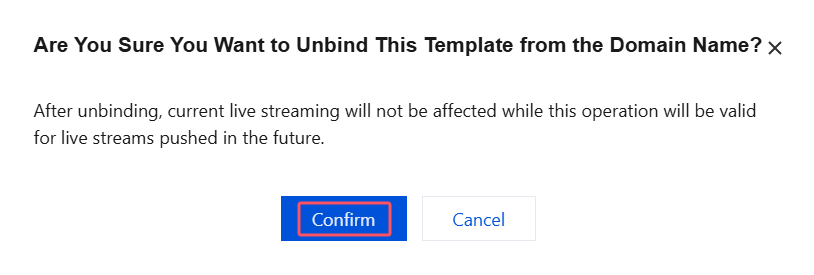
3. Confirm whether you want to unbind the current bound domain name. Click Confirm to unbind it.
Note:
Unbinding the recording template will not affect ongoing live streams.
To make the unbinding take effect, you need to stop live streams and push them again, and no recording file will be generated from new live streams.
Modifying a Template
1. Go to Feature Configuration > Live Recording > Recording Storage to Third Party.
2. Select a recording template you have successfully created and click Edit on the right to modify template information.
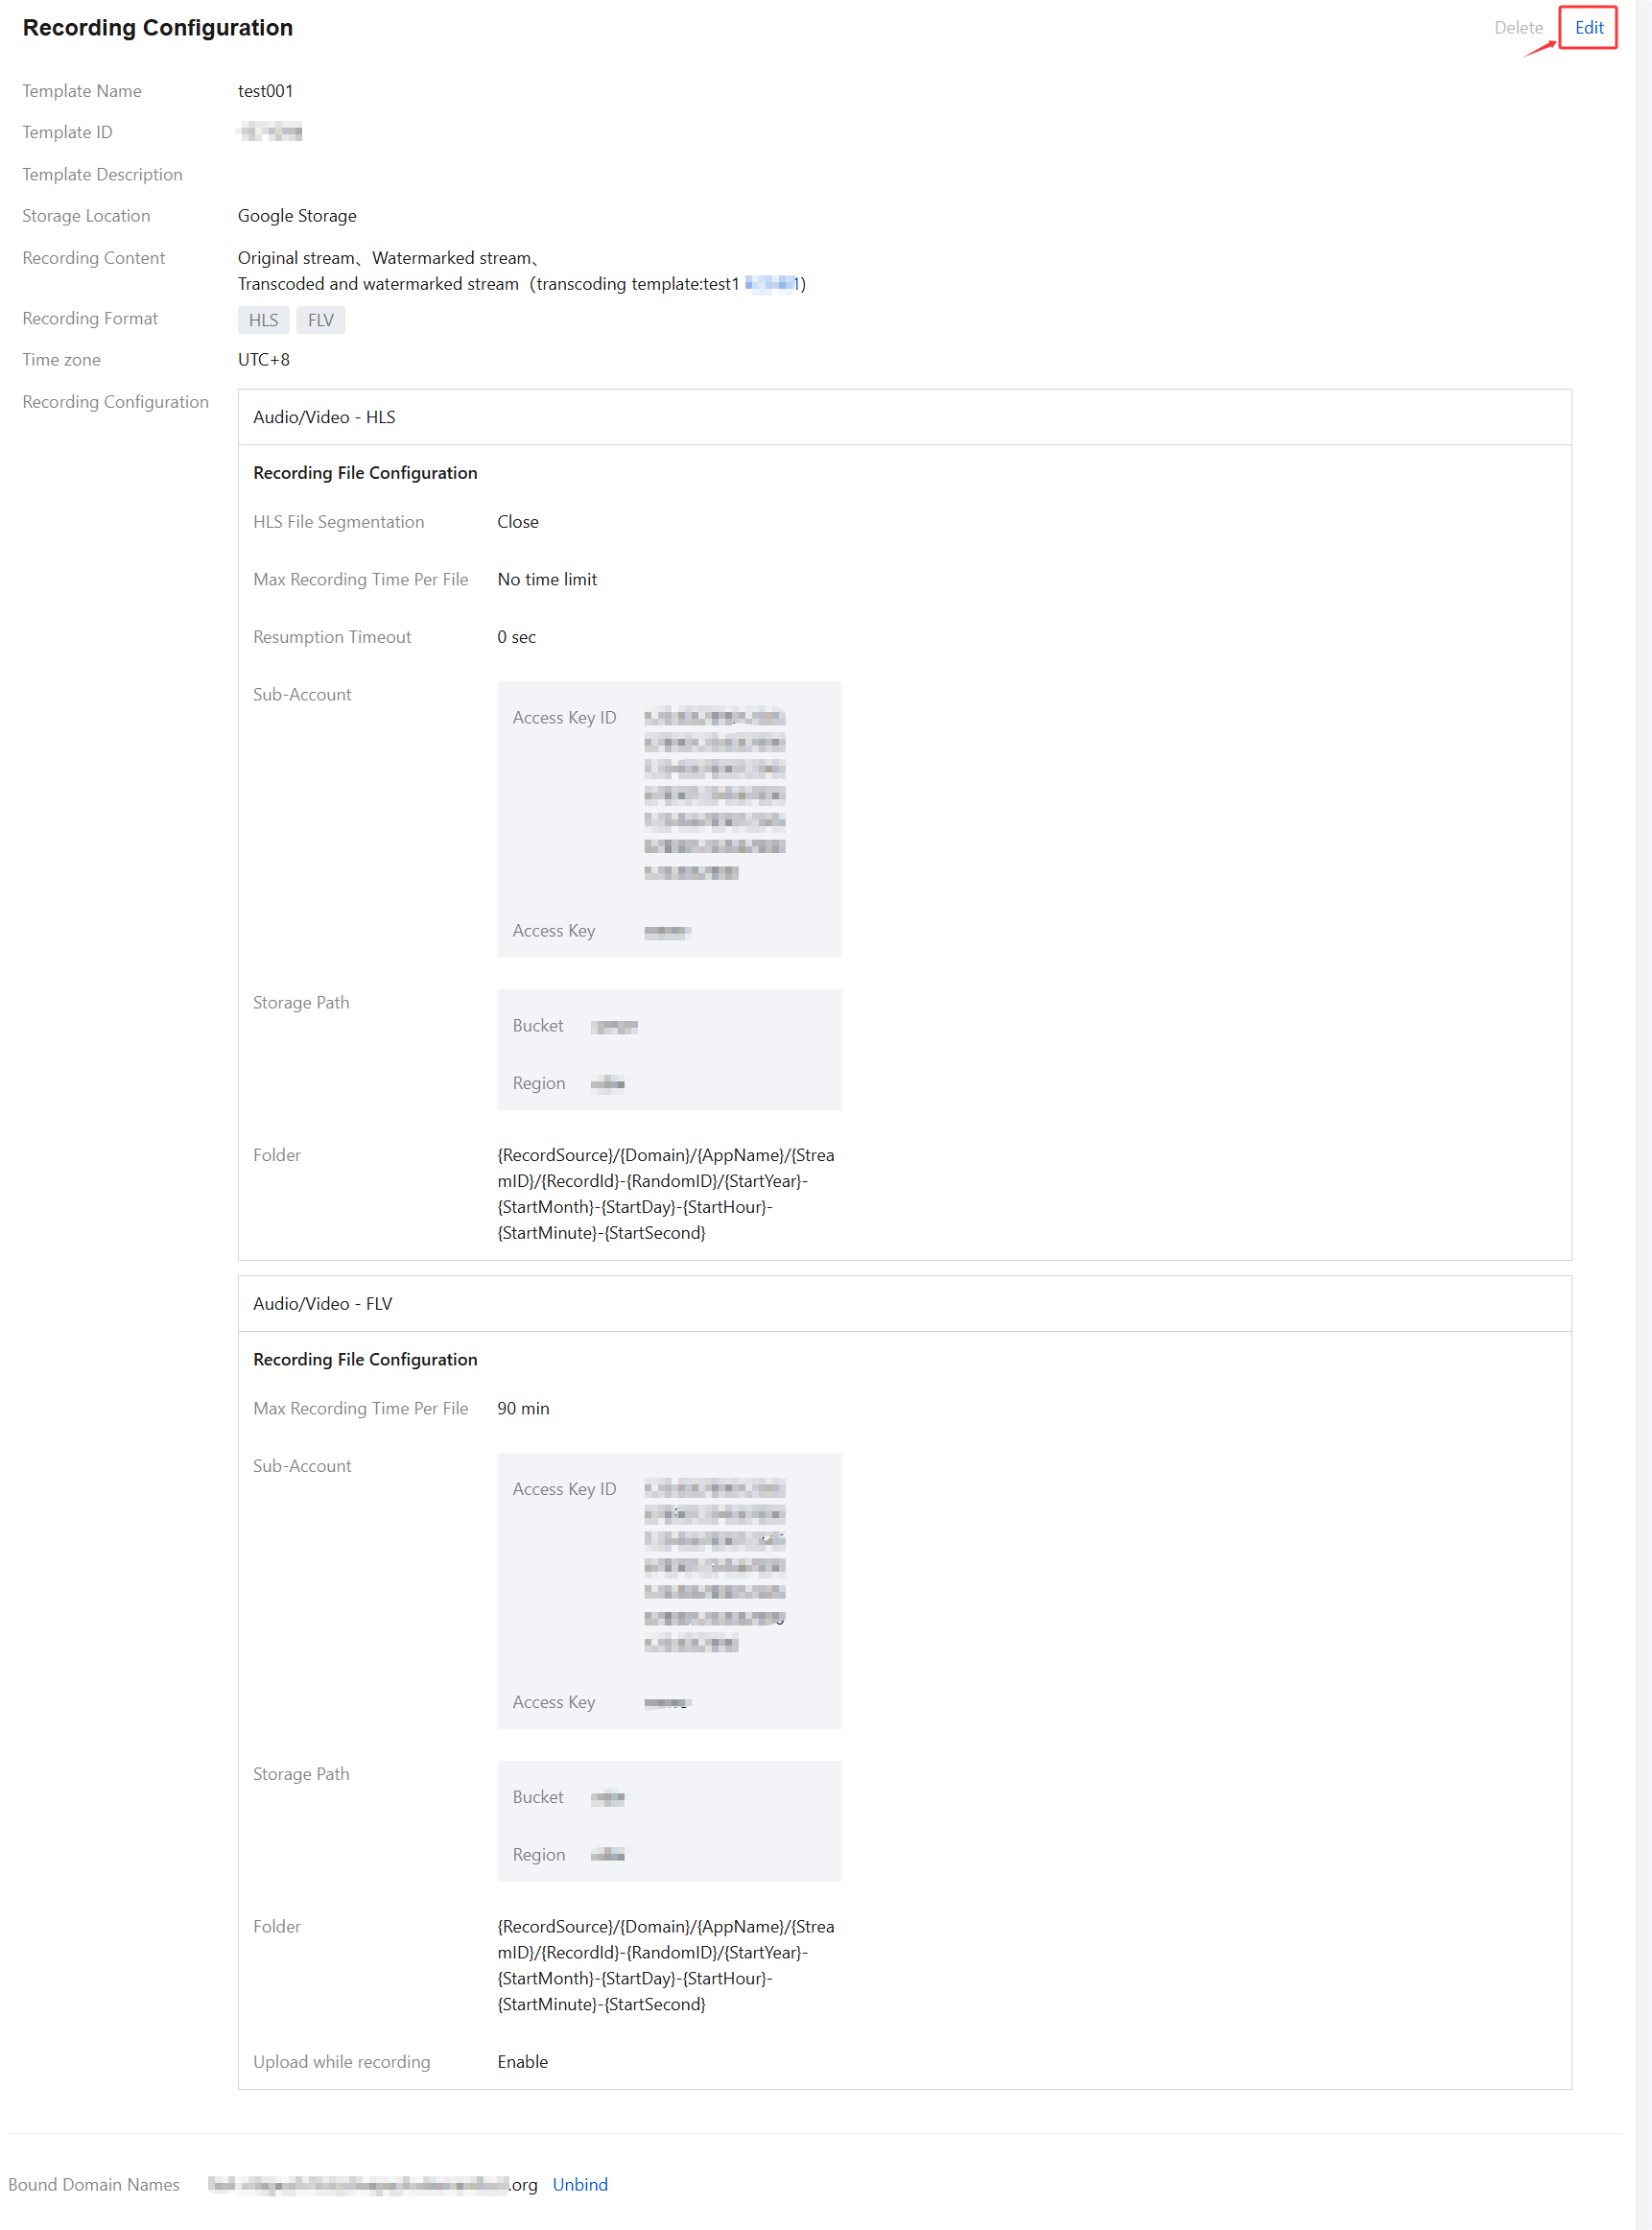
3. Just click Save.
Deleting a Template
Note:
If a template has been bound with a domain name, you need to unbind it before deleting it.
Once a template is deleted, it cannot be restored. Please proceed with caution.
The management of recording templates in the console is at the domain name level. Currently, it is impossible to cancel rules created by bound APIs. If you have bound a specific stream through a recording management API, you need to call DeleteLiveRecordRule to unbind it.
1. Log in to the CSS console and go to Feature Configuration > Live Recording > Recording Storage to Third Party.
2. Select a recording template you have successfully created and click Delete on the top right.
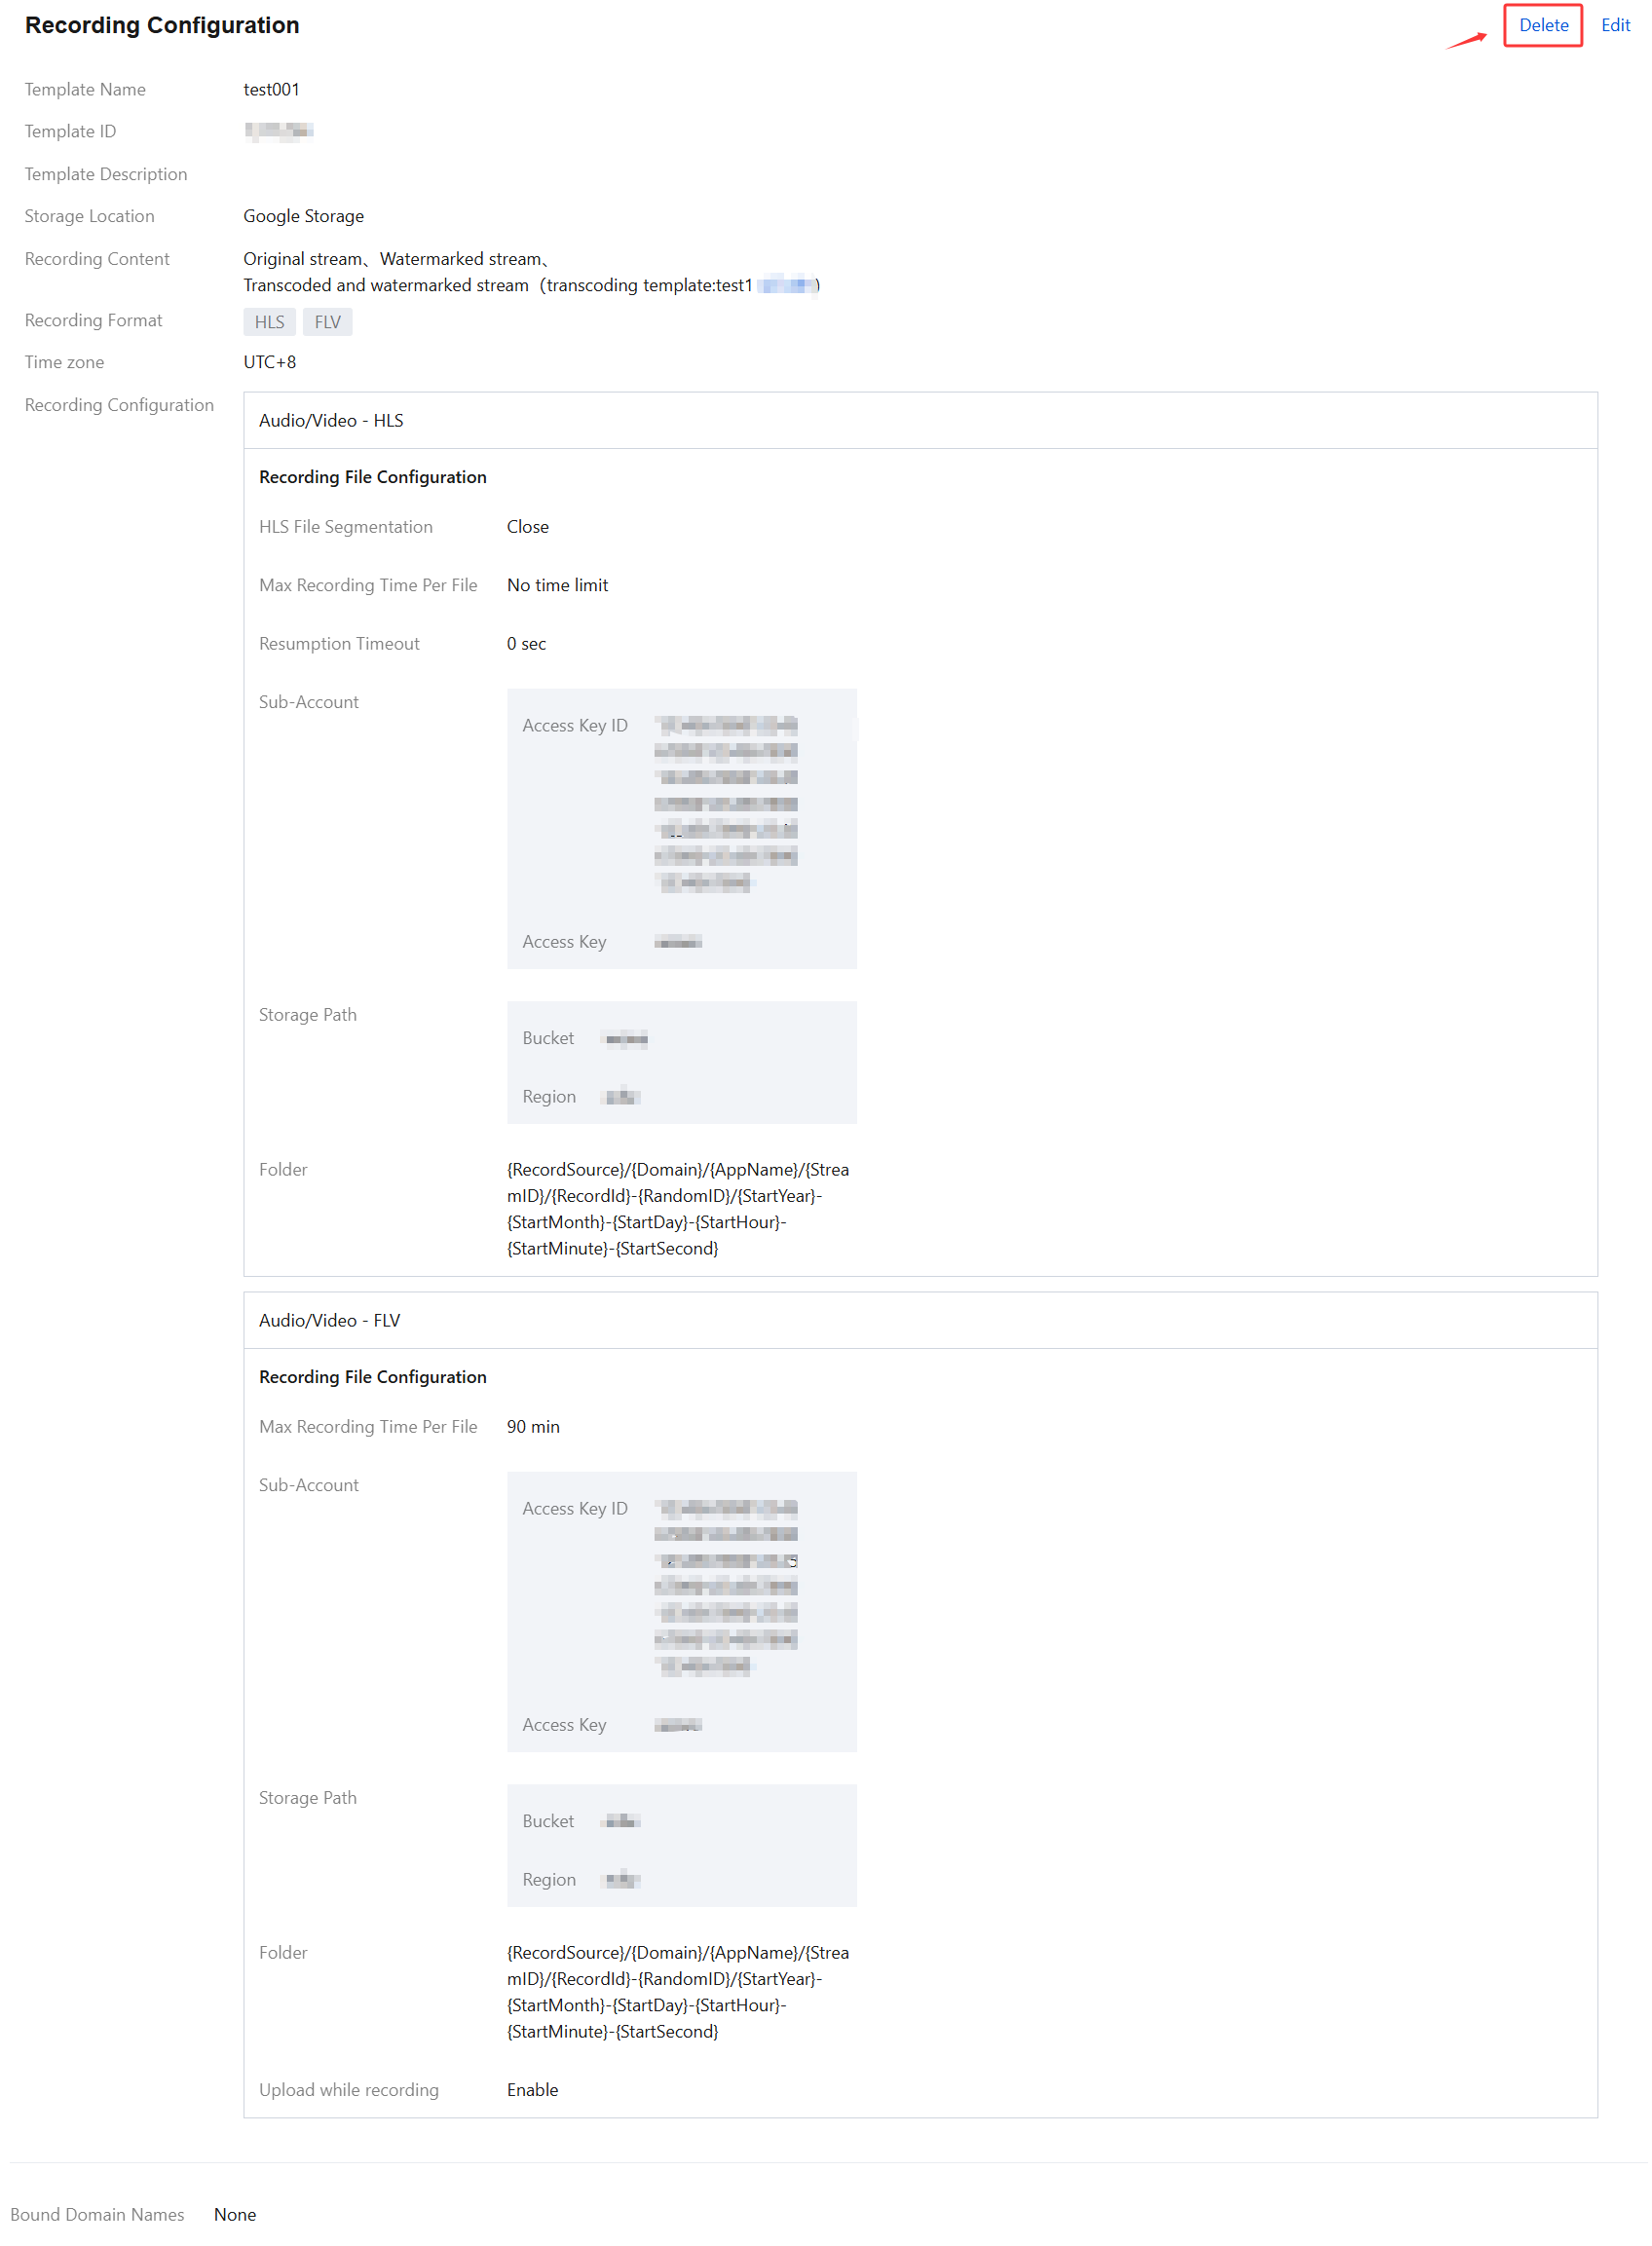
3. Confirm whether you want to delete the current recording template. Click Confirm to delete it.

More
You can also unbind and bind domain names and recording templates. For details, see Recording Configuration.
Was this page helpful?
You can also Contact Sales or Submit a Ticket for help.
Yes
No

