Building All-Scenario High-Availability Architecture
Last updated: 2025-07-02 17:46:05
Based on cross-AZ deployment, TencentDB for MySQL provides remote backups and supporting tools, together with multiple features such as database proxy and elastic CPU, to comprehensively guarantee the secure and stable operation of your business. This document describes how to build an all-scenario high-availability architecture through TencentDB for MySQL.
Background
Database plays a vital role in the core business of an enterprise, and data is the basic resource and lifeline of an enterprise. For this reason, a high-availability database architecture is necessary to ensure the stable production and operation of the enterprise. The enterprise will suffer a great deal in business running and economic loss if there are issues such as database downtime, data loss or unavailability. Therefore, TencentDB for MySQL launched the all-scenario high-availability architecture (AS-HAA) to ensure stable business operation in all aspects and processes.
Prerequisites
You have registered a Tencent Cloud account and completed identity verification.
Advantages
High stability: The capabilities like rapid expansion, load balancing, automatic elastic scaling, and nearby access are provided to ensure an environment with high scalability, smooth operation, and low network latency.
High availability: All components can be deployed across AZs or regions, reducing the risk of single point of failure. Business downtime and data loss rates can be reduced through mechanisms such as backup and data sync.
High data processing capacity and quick response speed: The database proxy distributes the load to multiple database nodes, thereby improving data processing capacity and response speed.
High fault diagnosis and recovery efficiency: DBbrain monitors 7x24 hours to help DBAs quickly locate and solve problems; mechanisms such as backup and data sync are also helpful for failure recovery and data recovery, shortening the time for bug fixes.
Instructions for Building AS-HAA
Step 1. Deploy a high-availability architecture
I. Creating a three-node architecture instance
1. Log in to the TencentDB for MySQL purchase page, complete Basic Configuration and Instance Configuration, and click Next: Set Network and Database.
Basic Configuration
Billing Mode: Monthly subscription and pay-as-you-go billing are supported.
Region: Select the region where you want to deploy your TencentDB for MySQL instance. We recommend that you use the same region as the CVM instance to be connected to. Tencent Cloud services in different regions cannot communicate with each other over the private network. The region cannot be modified after purchase.
Database Version: Currently, TencentDB for MySQL 5.5 (need to add to allowlist), 5.6, 5.7, and 8.0.
Engine: Select InnoDB or RocksDB.
Architecture: Select Three-Node.
Disk Type: TencentDB for MySQL supports local disk and cloud disk.
AZ: Select different AZs for the source AZ and replica AZ.
Instance Configuration
Filter: You can quickly filter the needed CPU and memory specifications for the instance. By default, all CPU and memory specifications are selected.
Type: General or dedicated. For more information, see Resource Isolation Policy.
Instance Specification: Select specifications as needed.
Hard Disk: The disk space is used to store the files required by MySQL execution. Select the size of the hard disk space.
2. Configure Network and Others and Database Settings and click Next: Confirm the configuration info.
Network and Others
Network: VPC is supported. You can select the network and subnet for the instance.
Custom Port: The database access port, which is 3306 by default.
Security Group: For more information on security group creation and management, see TencentDB Security Group Management.
Note:
Port 3306 must be opened for the TencentDB for MySQL instance through the inbound rule of the security group. The instance uses private network port 3306 by default and supports custom port. If the default port is changed, the new port should be opened in the security group.
Project: Select a project to which the database instance belongs. The default project will be used if you don't specify one.
Tag: It makes it easier to categorize and manage resources.
Alarm Policy: You can create alarm policies to trigger alarms and send alarm notifications when the Tencent Cloud service status changes.
Database Settings
Instance Name: Set a name for the instance now or later.
Data Replication Mode: Async, semi-sync, and strong sync replication modes are supported.
Parameter Template: Besides the system parameter template provided by TencentDB, you can create a custom parameter template. For more information, see Managing Parameter Template.
Character Set: LATIN1, GBK, UTF8, and UTF8MB4. The default character set is UTF8.
Collation: The instance character set provides a case- and accent-sensitive collation for system data.
Table Name Case Sensitivity: Whether the table name is case sensitive.
Note:
In MySQL 8.0, the table name case sensitivity can be set only during instance purchase. For other versions, you can modify the
lower_case_table_names parameter to set the case sensitivity for a table name. For detailed directions, see Setting Instance Parameters.Password Complexity: You can set the password complexity to improve the database security, which is disabled by default.
Root Password: Set the password of the root account. The default user name for a new MySQL database is "root". If you select Set After Creation, you can reset the password after creating the instance. For more information, see Resetting Password.
3. Confirm the selected configuration items. If you need to modify them, click Edit to return to the corresponding step and make changes. Read and indicate your consent to the Terms of Service, confirm the Validity Period and Quantity, and click Buy Now.
4. You will be returned to the instance list after you purchase the instance. The instance will be in the Delivering status. You can use the instance after around 3–5 minutes when its status changes to Running.
II. Setting local backup and cross-region backup
Setting local backup
1. Log in to the TencentDB for MySQL console, click an instance ID on the instance list page to enter the management page, and select Backup and Restoration > Auto-Backup Settings.
2. Select backup parameters in the pop-up window and click OK:
Enabling cross-region backup
1. Log in to the TencentDB for MySQL console. In the instance list, click an instance ID or Manage in the Operation column to access the instance management page.
2. On the instance management page, select Backup and Restoration > Cross-Region Backup.
3. In the Cross-Region Backup window, complete the configuration and click OK to enable cross-region backup. Read and select the Cross-Region Backup Space Billing Notes, and click OK.
Cross-Region Backup: It is disabled by default. You need to enable it here.
Back up Binlog: When cross-region backup is enabled, it will be enabled automatically and can be disabled separately.
Backup Region: Select one or two regions other than the source instance region.
Backup Retention Period: 7 days by default. Value range: 3–1830 days. Backup sets will be deleted automatically upon expiration.
4. After cross-region backup is completed, the backup will be synced to the target region and can be queried in the backup list of the source instance.
5. For cross-region backup files, all selected backup regions are displayed in the Backup Region column.
III. Creating a remote disaster recovery instance
1. Log in to the TencentDB for MySQL console. In the instance list, click an instance ID or Manage in the Operation column to access the details page.
2. Make sure that the GTID feature is enabled by viewing the basic information of the instance on the Instance Details page. Click Add Disaster Recovery Instance in the instance architecture diagram to enter the disaster recovery instance purchase page.

3. On the purchase page, set basic information of the disaster recovery instance such as Billing Mode and Region. For the region, select a region different from that of the three-node architecture instance created in step 1.
Note:
The time required to complete the creation depends on the amount of data, and no operations can be performed on the source instance in the console during the creation. It’s recommended to do so at an appropriate time.
If the sync policy is Sync Now, the data will be synced immediately when the disaster recovery instance is created.
Only the data of the entire instance can be synced. Make sure that the disk space is sufficient.
You need to ensure that the source instance is in the running state and none of configuration adjustment tasks, restart tasks, and other modification tasks are executed. Otherwise, the sync task may fail.
4. After confirming that everything is correct, click Buy Now and wait for the delivery of disaster recovery instance.
5. Return to the instance list. After the status of the instance changes to Running, it can be used normally.
Step 2. Enable the database proxy
1. Log in to the TencentDB for MySQL console. In the instance list, select the source instance for which to enable database proxy and click its ID or Manage in the Operation column to enter the instance management page.
2. On the instance management page, select the Database Proxy tab and click Enable Now.
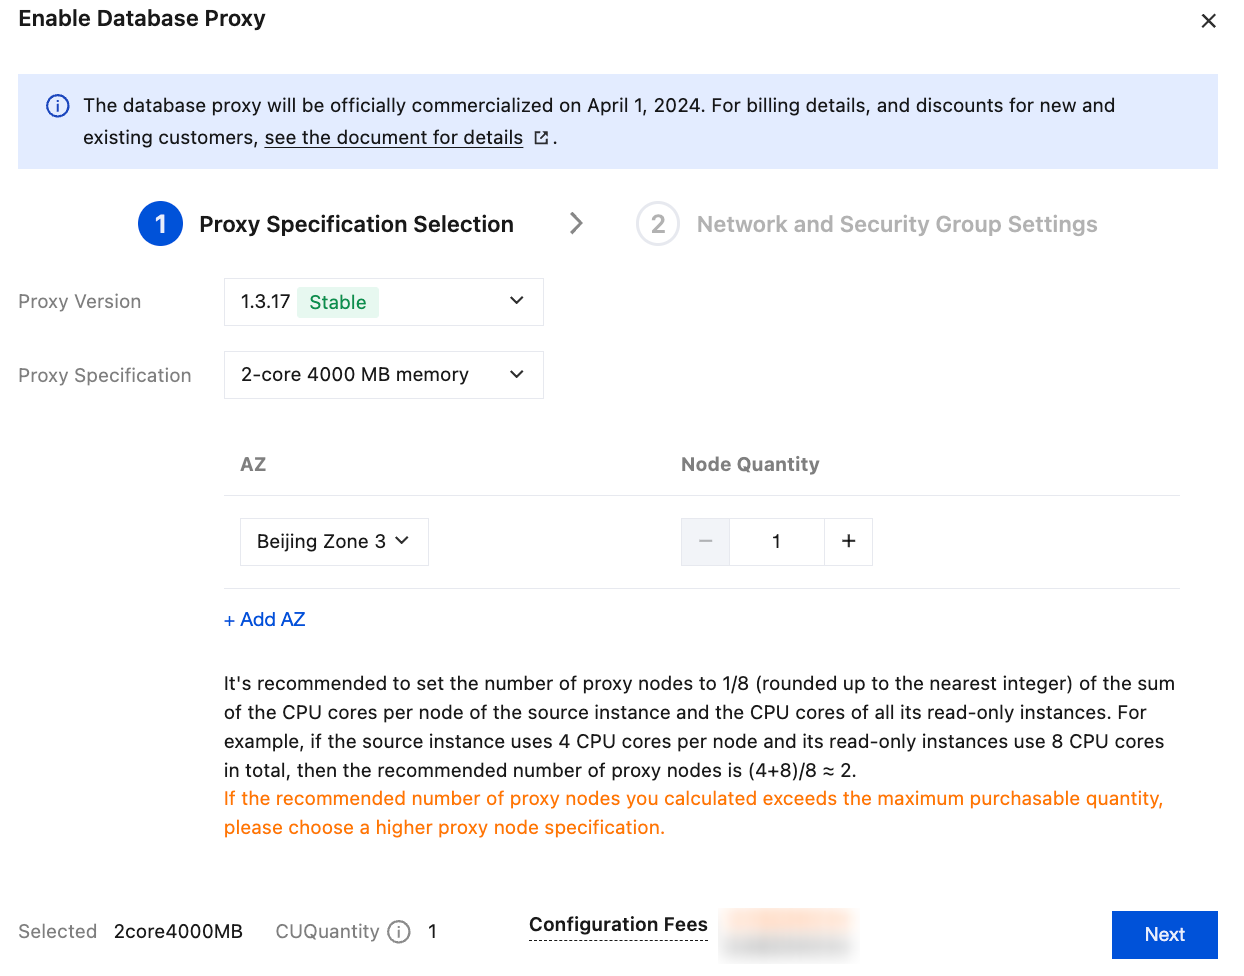
3. In the pop-up window, configure the following items and click Next Step: Network and Security Group Configuration.

Parameter | Description |
Proxy version | Selects the database proxy version. To learn about the update descriptions of each proxy version, see Database Proxy Version Release Notes. |
Proxy Specification | Select 2-core 4000 MB memory, 4-core 8000 MB memory, or 8-core 16000 MB memory. |
AZ and Node Quantity | 1. Select the database proxy AZ. You can click Add AZ to add more AZs. The number of selectable AZs depends on how many AZs are available in the current region. You can select up to three AZs. 2. Select the node quantity. We recommend you set the quantity to 1/8 (rounded up) of the total number of CPU cores on the source and read-only instances; for example, if the source instance has 4 CPU cores, and the read-only instance has 8 CPU cores, then the recommended node quantity will be (4 + 8) / 8 ≈ 2. Note: If the selected database proxy is not in the same AZ as the source instance, the write performance may drop when you connect to the database through the proxy. If the calculated number of proxy nodes required exceeds the purchase limit, we recommend that you choose a higher proxy specification. |
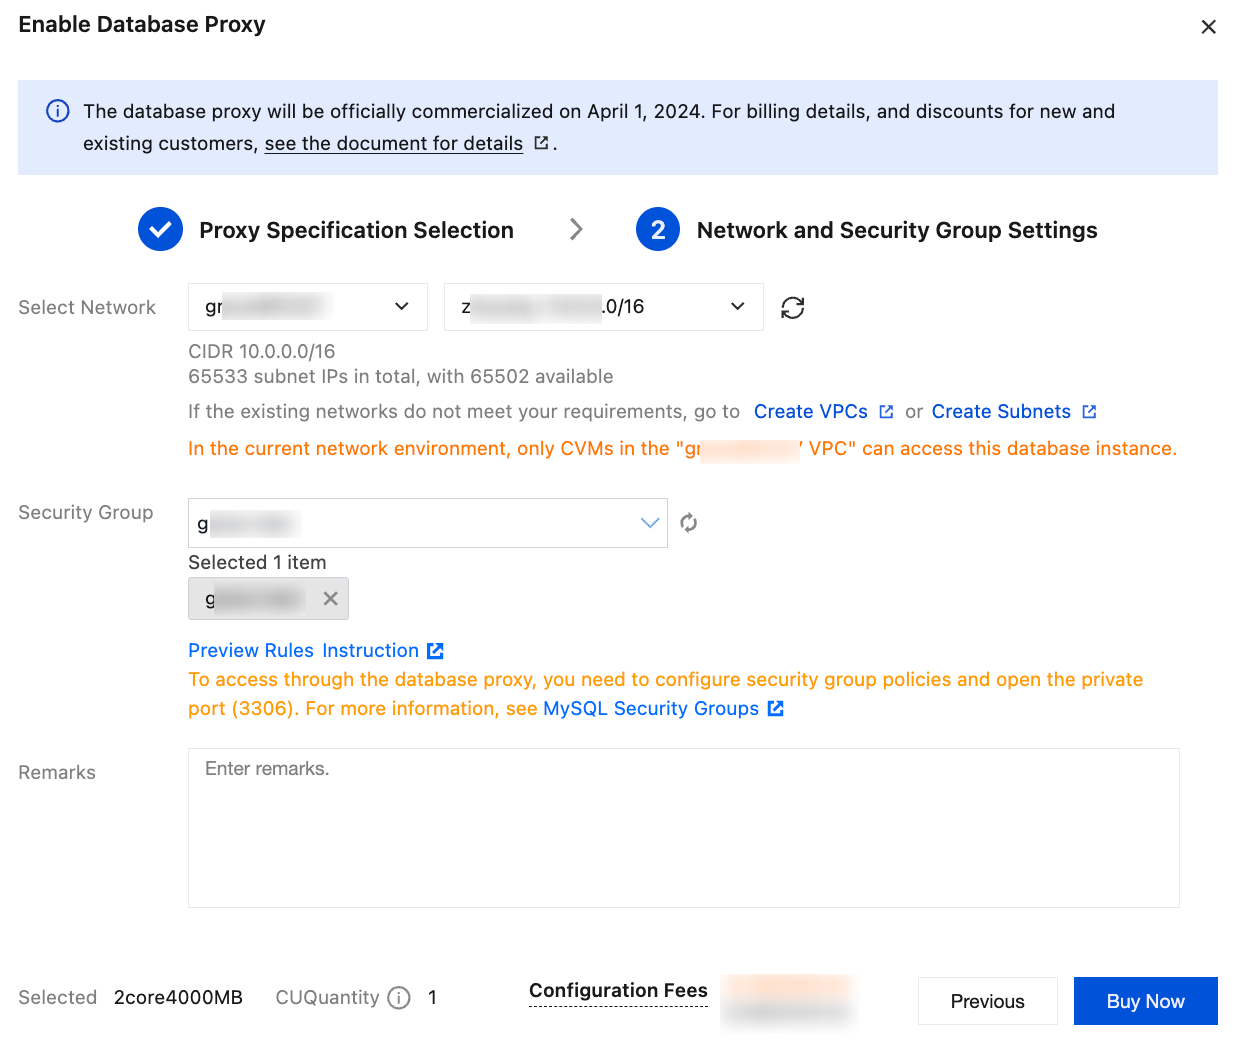
4. Complete the configuration of the network and security group and then click Buy Now.

Parameter | Description |
Select Network | Select the network of the database proxy, which can only be a VPC. |
Security Group | The security group of the source instance is selected by default. You can also select another existing security group or create a new one as needed. Note: To access through the database proxy, you need to configure security group policies and open the private port (3306). For more information, see TencentDB Security Group Management. |
Remarks | (Optional) Enter the remarks of the database proxy service to be enabled. |
5. After the enablement is successful, you can directly access the database proxy through the private access address under Database Proxy page > Overview > Connection Address, and you can configure access policy for the database proxy address. Then, find the target access address under Database Proxy > Overview > Connection Address, and click Adjust Configurations in the Operation column.
6. In the pop-up window, set the policy configuration and click OK.
Parameter | Description |
Read-Write Attribute | Modify the read-write attribute of the proxy access address, which can be **Read/Write Separation** or **Read-Only**. |
Remove Delayed RO Instances | Set the **Remove Delayed RO Instances** policy. After this option is enabled, you can set **Delay Threshold** and **Least RO Instances**. The system will try removing or restoring a failed read-only instance no matter whether this option is enabled. **Delay Threshold**: Enter an integer greater than or equal to 1 (in seconds). **Least RO Instances**: It is subject to the number of read-only instances owned by the source instance. If it is set to `0`, when all read-only nodes are removed, all read requests will be routed to the source instance until at least one of the removed read-only instances rejoins the database proxy to continue processing the read requests. |
Connection Pool Status | The connection pool feature mainly mitigates the instance load caused by frequent new connections in non-persistent connection business scenarios. After this option is enabled, you can select the supported connection pool type, which currently can only be the session-level connection pool by default. |
Transaction Split | You can set whether to enable this feature. After it is enabled, reads and writes in one transaction will be separated to different instances for execution, and read requests will be forwarded to read-only instances to reduce the load of the source instance. |
Assign Read Weight | You can select **Assigned by system** or **Custom**. If multiple AZs are configured when the database proxy is enabled, you can separately assign the weights of proxy nodes in different AZs. |
Failover (with **Read-Write Attribute** being **Read/Write Separation**) | You can set whether to enable this feature. After it is enabled, if database proxy fails, the database proxy address will route requests to the source instance. |
Apply to Newly Added RO Instances | You can set whether to enable this feature. After it is enabled, a newly purchased read-only instance will be automatically added to the database proxy. If **Assign Read Weight** is set to **Assigned by system**, newly purchased read-only instances will be assigned with the default weight based on their specification. If **Assign Read Weight** is set to **Custom**, when newly purchased read-only instances are added, their weights will be 0 by default, which can be modified by clicking **Adjust Configurations** in **Connection Address** on the **Database Proxy** tab. |
Step 3. Enable elastic performance management - automatic expansion and reduction
1. Log in to the TencentDB for MySQL console. In the instance list, click an Instance ID or Manage in the Operation column to access the instance details page.
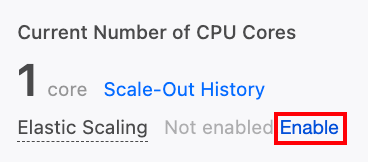
2. Go to instance details > elasticity > scale-out, and click enable.

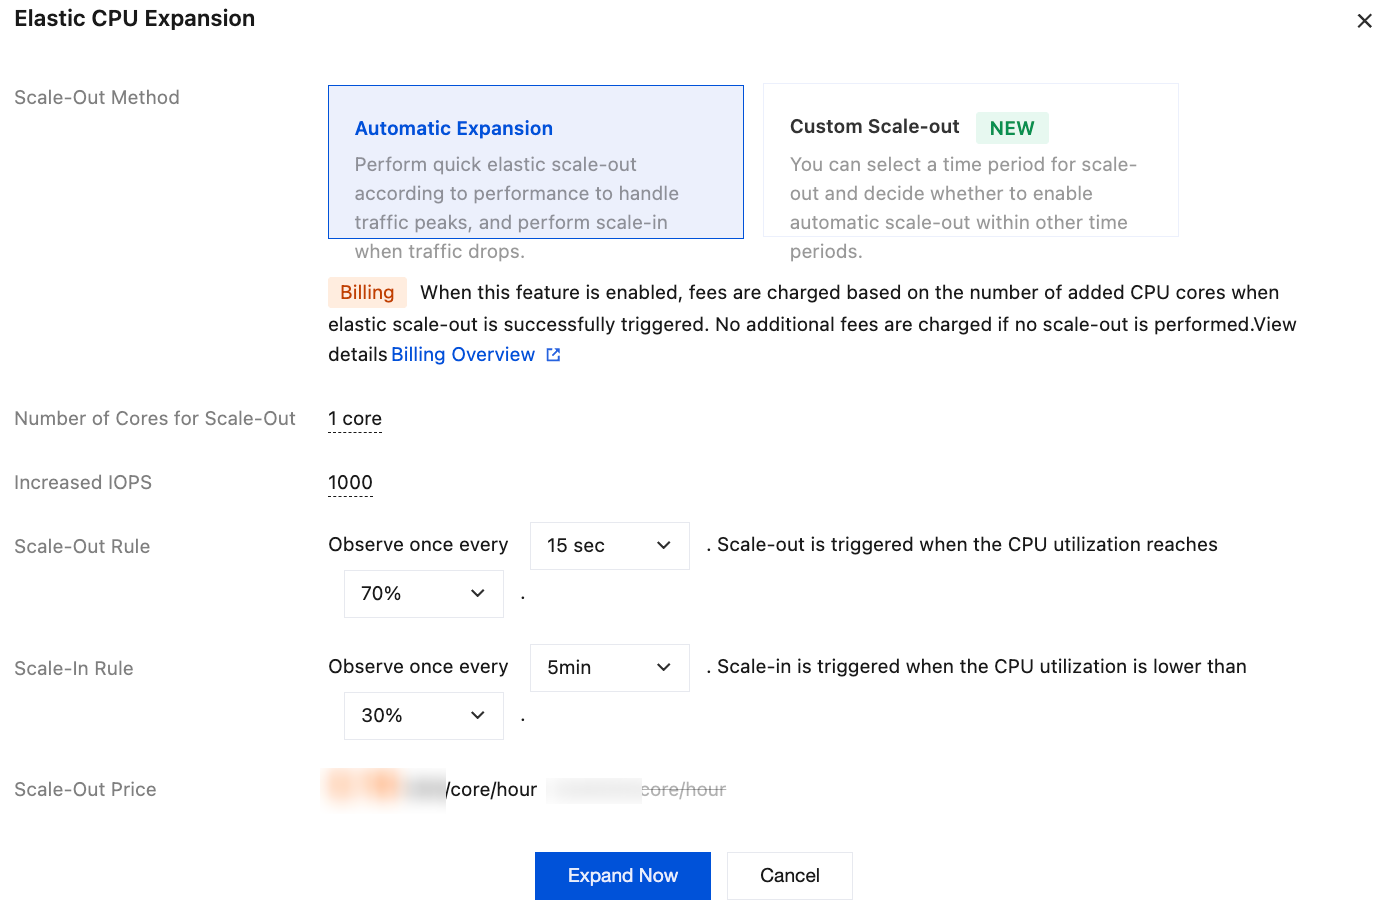
3. In the CPU Elastic Scaling window, complete the following configurations. Confirm the scale-out fees, and click scale out now.

Parameter | Description |
Scale-out method | Automatic scale-out and custom scale-out are supported. Select automatic scale-out here. Automatic scale-out: Perform quick elastic scale-out according to performance to handle traffic peaks, and perform scale-in when traffic drops. Custom scale-out: You can select a period for scale-out and decide whether to enable automatic scale-out within other periods. |
Number of cores for scale-out | The default value is consistent with the number of CPU cores of the current instance specification. For example, if the current instance specification is 6-core and 24,000 MB of memory, the number of cores for scale-out will also be 6 cores. After scale-out is successfully triggered, the CPU of the instance will be 12 cores. |
Increased IOPS | By default, the IOPS increases by 1000 for each core scaled out. |
Scale-out rule | Set the observation period and threshold for triggering scale-out. Observation period: Supported options include 15 seconds, 30 seconds, 45 seconds, 1 minute, 3 minutes, 5 minutes, 10 minutes, 15 minutes, and 30 minutes. Threshold: Supported options include 40%, 50%, 60%, 70%, 80%, and 90%. |
Scale-in rules | Set the observation period and threshold for triggering scale-in. Observation period: Supported options include 5 minutes, 10 minutes, 15 minutes, and 30 minutes. Threshold: Supported options include 10%, 20%, and 30%. |
4. When the instance status/task changes from Configuring elastic expansion policy… to Running, automatic expansion is successfully enabled.
Instructions for Supporting Tools
DBbrain monitors and locates problems
You can use the DBbrain to realize database performance monitoring, security detection and optimization diagnosis. Through intelligent analysis and suggestions, it can help you quickly solve database performance and security problems and improve database efficiency.
Category | Performance Optimization | Description |
Diagnostic analysis | It provides you with real-time performance monitoring, health checks, and failure diagnosis and optimization, so that you can intuitively know the real-time operation status of database instances, locate newly appeared performance exceptions in real time, and optimize the system based on the optimization suggestions. | |
| It offers SQL optimization suggestions after slow SQL analysis. | |
| You can view the instance space utilization, including the sizes of data and logs, the daily increase in space utilization, the estimated number of available days, and the space used by the tables and databases of the instance and their change trends. | |
| It allows you to optimize SQL statements in just a few clicks and provides the corresponding execution plan interpretation and optimization advice. | |
| Audit Log Analysis | After analyzing the SQL performance, it provides optimization suggestions for poorly performing SQL statements by taking into account the index conditions and database/table design. |
Locating and handling database session connection issues | KILL Session | Kill current session and kill sessions during a period. |
| SQL Throttling | You can create SQL throttling tasks to control the database requests and SQL concurrency by setting the ** SQL Type**, **Max Concurrency**, **Throttling Duration**, and ** SQL Keyword**. Multiple tasks do not conflict with each other. |
| Hotspot Update Protection | For businesses with frequent updates or flash sales, this feature greatly optimizes the performance of the UPDATE operation on frequently updated rows. |
Database Autonomy | Autonomy service | It supports automatic SQL throttling and abnormal SQL. When the trigger conditions are met, the autonomous tasks of SQL throttling and abnormal SQL killing are automatically triggered to fix the database exceptions, with no human intervention required. |
Chaotic Fault Generator simulates abnormal scenarios
Chaotic Fault Generator can help you simulate various emergencies and abnormal scenarios, and improve the fault tolerance and reliability of the system. After building a real database structure, the platform will conduct a full range of stress tests on the business, simulate traditional abnormal scenarios and perform automated deployment management, so as to better discover and diagnose potential problems in the system and improve business quality and reliability.
Relevant Documentation
Was this page helpful?
You can also Contact Sales or Submit a Ticket for help.
Yes
No
Feedback

