This document introduces how to use the migration tool go2tencentcloud to migrate the Linux-based CVM online.
Preparations
You already have a Tencent Cloud account and a destination CVM.
Stop applications on the source server to prevent existing applications from being affected by the migration.
Click here to download the compressed migration tool package. Check that both source servers and destination CVM meet the migration requirements. For example, the cloud disks of the destination CVM should have sufficient capacity to save data migrated from source servers.
We recommend you back up your data in the following ways before migrating:
Source server: You can use the source server snapshot feature or other methods to back up data.
Destination CVM: You can create a snapshot as instructed in Creating Snapshots or use other methods to back up data. Files in the compressed package
After go2tencentcloud.zip is decompressed, it contains the following files:
|
go2tencentcloud-linux.zip | The migration zip for Linux system. |
readme.txt | Directory overview file. |
release_notes.txt | Migration tool change log. |
After go2tencentcloud-linux.zip is decompressed, it contains the following files:
|
go2tencentcloud_x64 | Executable program of the migration tool for the 64-bit Linux operating system |
go2tencentcloud_x32 | Executable program of the migration tool for the 32-bit Linux operating system |
user.json | User information in the migration. |
client.json | Configuration file of the migration tool. |
rsync_excludes_linux.txt | rsync configuration file, which excludes files and directories that do not need to be migrated in the Linux system. |
Caution:
The configuration files cannot be deleted. You must store them under the same folder as the go2tencentcloud executable program.
Parameters in the user.json file
The user.json configuration file is described as below:
|
SecretId | String | Yes | SecretId for your account to access APIs. For more information, see Access Key. |
SecretKey | String | Yes | SecretKey for your account to access APIs. For more information, see Access Key. |
Region | String | Yes | Region of the destination CVM. Only the region is required, not the AZ. For more information about the values, see Regions and AZs. |
InstanceId | String | Yes | Instance ID of the destination CVM, which is in the format of ins-xxxxxxxx. |
DataDisks | Array | No | List of data disks to be migrated from the source server. Each element indicates a data disk. A maximum of 20 data disks are supported. |
DataDisks.Index | Integer | No | The serial number of data disk ranges from 1 to 20. If the value is 1, it indicates that the data disk is the first one to be migrated and attached to the destination CVM; if the value is 2, it indicates that the data disk is the second one to be migrated and attached to the destination CVM, and so on. |
DataDisks.Size | Integer | No | Size of the source data disk in GB. The value range is [10,16000]. |
DataDisks.MountPoint | String | No | Mount point of the source data disk, such as "/mnt/disk1". |
You can refer to the following examples to modify the configuration file based on the actual business scenarios.
Example 1: To migrate a Linux source server to a CVM located in Guangzhou, configure the user.json file as follows:
{
"SecretId": "your secretId",
"SecretKey": "your secretKey",
"Region": "ap-guangzhou",
"InstanceId": "your instance id"
}
Example 2: A Linux source server has one data disk, of which the mount point is /mnt/disk1, and the size is 10 GB. To migrate this server to a CVM (with at least one data disk attached) located in the Guangzhou region, configure the user.json file as follows:
{
"SecretId": "your secretId",
"SecretKey": "your secretKey",
"Region": "ap-guangzhou",
"InstanceId": "your instance id",
"DataDisks": [
{
"Index": 1,
"Size": 10,
"MountPoint": "/mnt/disk1"
}
]
}
Example 3: A Linux source server has two data disks. The mount point for disk 1 is /mnt/disk1, and the size is 10 GB. The mount point for disk 2 is /mnt/disk2, and the size is 20 GB. To migrate this server to a CVM (with at least two data disks attached) located in Guangzhou, with disk 1 and disk 2 of the source server to be migrated to the first and second data disks of the destination CVM respectively, configure the user.json file as follows:
{
"SecretId": "your secretId",
"SecretKey": "your secretKey",
"Region": "ap-guangzhou",
"InstanceId": "your instance id",
"DataDisks": [
{
"Index": 1,
"Size": 10,
"MountPoint": "/mnt/disk1"
},
{
"Index": 2,
"Size": 20,
"MountPoint": "/mnt/disk2"
}
]
}
Parameters in the client.json file
The client.json configuration file is described as below:
|
Client.ToolMode | bool | No | Tool migration mode identifier, the value of which defaults to false. If migration via tool is needed, modify the value to true or add the --no-console parameter when running the tool. |
Client.Net.Mode | Integer | Yes | |
Client.Extra.IgnoreCheck | Bool | No | The default value is false. By default, the migration tool automatically checks the source server environment when the tool starts running. To skip the check, set this parameter to true. |
Client.Rsync.BandwidthLimit | String | No | Bandwidth limit in KBytes/s, which is empty by default, i.e., no limit during transfer. |
Client.Rsync.Checksum | Bool | No | Transfer verification. Setting this parameter to true can enhance the transfer consistency verification, but it will increase the CPU load of the source server and slow down the transfer speed. The default value is false, which means no verification by default. |
If neither the source server or destination CVM can access the public network directly, you can establish a connection between them through VPC Peering Connection, VPN Connections, Cloud Connect Network, or Direct Connect and then migrate via the private network mode. Determine the appropriate migration mode according to the network environment of your source server and destination CVM. rsync_excludes_linux.txt file description
This file is used to exclude files on the Linux source server or configuration files under specified directories that do not need to be migrated. By default, the rsync_excludes_linux.txt file already excludes the following directories and files. Do not delete or modify the existing configurations.
/dev/*
/sys/*
/proc/*
/var/cache/yum/*
/lost+found/*
/var/lib/lxcfs/*
/var/lib/docker-storage.btrfs/root/.local/share/gvfs-metadata/*
To exclude other directories or files, append them to the rsync_excludes_linux.txt file. For example, to exclude all content on the data disk attached to /mnt/disk1, configure the rsync_excludes_linux.txt file as follows:
/dev/*
/sys/*
/proc/*
/var/cache/yum/*
/lost+found/*
/var/lib/lxcfs/*
/var/lib/docker-storage.btrfs/root/.local/share/gvfs-metadata/*
/mnt/disk1/*
|
--help | Prints help information. |
--no-console | Only migrates via tool (not migration in console). |
--check | Checks the source server |
--log-file | Configures the log file name, which is log by default. |
--log-level | Configures the logging level. Valid values: 1(ERROR level), 2 (INFO level) and 3(DEBUG level). Default value: 2. |
--clean | Forces the destination CVM to exit the migration mode and cleans up the site. For example, if the console prompts "Please execute '--clean' option manually.", you need to use this parameter to force the destination CVM to exit the migration mode. |
--version | Prints the version number. |
Migration Directions
Data Backup
Source server: You can use the source server snapshot feature or other methods to back up data.
Destination CVM: You can create a snapshot as instructed in Creating Snapshots or use other methods to back up data. Checking Before the Migration
Before migration, you need to check the source server and destination CVM separately as detailed below:
Destination CVM | 1. Storage space: The cloud disks (including the system disk and data disk) of the target CVM must offer sufficient storage space for saving data from the source server. 2. Security group: Port 443 and port 80 cannot be restricted in the security group. 3. Bandwidth setting: It is recommended that you maximize bandwidths at the 2 ends to speed up the migration. During the process, the traffic consumed is approximately the amount of data migrated. Adjust the billing mode before the migration if necessary. 4. OS consistency: If the OSs of the source server and destination CVM are inconsistent, the created image may be inconsistent with the actual OS. We recommend that the OS of the destination CVM be the same as that of the source server. For example, to migrate a CentOS 7 source server, select a CentOS 7 CVM as the destination. |
Linux source server | 2. Run the which rsync command to check whether Rsync is installed, and if not, install it as instructed in How do I install Rsync?. 4. After a migration request is made to the Tencent Cloud API, the API will use the current UNIX time to check the generated token. You need to make sure that the current system time is correct. |
Note:
You can use tool commands such as ./go2tencentcloud_x64 --no-console --check to automatically check the source server.
By default, the go2tencentcloud migration tool automatically performs checks upon launch. To skip checks and perform forced migration, configure Client.Extra.IgnoreCheck to true in the client.json file.
Starting migration
If you use go2tencentcloud supporting checkpoint restart provided by Tencent Cloud for migration, the migration process includes the following three stages. You can intuitively view the migration progress when the tool is running.
Stage 1: The destination CVM enters the migration mode, and is ready for migration.
Stage 2: The destination CVM is in the migration mode, and receives data migrated.
Stage 3: The destination CVM exits the migration mode, and the migration completes.
Each stage will generate some subtasks to perform related operations, and some time-consuming subtasks may have maximum timeout periods by default. The time required for data transfer depends on the size of the data on the source server, network bandwidth, etc. Please wait for the migration process to complete.
Caution:
The destination CVM enters migration mode after the migration starts. Do not reinstall the system, shut down, terminate, or reset passwords of the destination CVM until the migration is completed and the destination CVM exits the migration mode.
Private network (Scenario 1)
Private network (Scenario 2)
Private network (Scenario 3)
1. Download or upload go2tencentcloud.zip to the source server and run the following command to enter the corresponding directory.
1.1 Run the following commands in sequence to decompress go2tencentcloud.zip and enter the directory.
unzip go2tencentcloud.zip
1.2 Run the following commands in sequence to decompress go2tencentcloud-linux.zip and enter the directory.
unzip go2tencentcloud-linux.zip
Note:
The files in the go2tencentcloud directory will not be migrated. Do not place the files to be migrated in this directory.
3. In the client.json file, configure the migration mode and other parameters.
Configure Client.ToolMode in the client.json file to true, that is, select the migration via tool. If necessary, configure other parameters based on the description of Parameters in the client.json file. 4. (Optional) Exclude files and directories on the source server that do not need to be migrated.
Add files or directories that do not need to be migrated from the Linux source server to rsync_excludes_linux.txt file. 5. Run the tool.
For example, on a 64-bit Linux source server, execute the following command as the root user to run the tool.
sudo ./go2tencentcloud_x64
Caution:
If you have not modified Client.ToolMode in the client.json to true, you need to add the parameter --no-console when running the tool, as shown below:
sudo ./go2tencentcloud_x64 --no-console
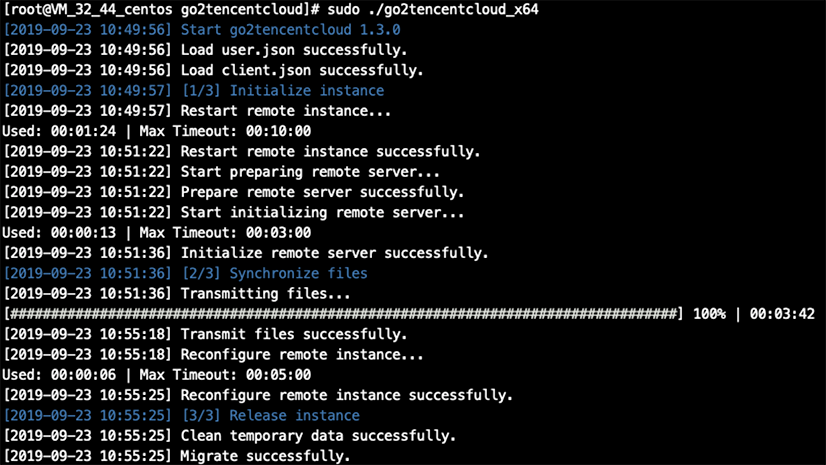
After the tool runs, wait patiently for the migration to end. Generally, the console output of a successful public network migration is shown below:
1. Establish a connection between the source server and the destination CVM.
2. Download or upload go2tencentcloud.zip to the source server and run the following command to enter the corresponding directory.
2.1 Run the following commands in sequence to decompress go2tencentcloud.zip and enter the directory.
unzip go2tencentcloud.zip
2.2 Run the following commands in sequence to decompress go2tencentcloud-linux.zip and enter the directory.
unzip go2tencentcloud-linux.zip
Note:
The files in the go2tencentcloud directory will not be migrated. Do not place the files to be migrated in this directory.
3. In the user.json file, configure the destination CVM for the migration.
Configure the required parameters based on the description of Parameters in the user.json file. 4. In the client.json file, configure the migration mode and other parameters.
Set the Client.ToolMode value in the client.json file to true, that is, select the migration via tool.
5. (Optional) Exclude files and directories on the source server that do not need to be migrated.
Add files or directories that do not need to be migrated from the Linux source server to rsync_excludes_linux.txt file. 6. Run the tool on a server (such as the gateway) that can acce
ss the public network.
For example, on a server that can access the public network, execute the following command to run the tool for migration stage 1. sudo ./go2tencentcloud_x64
Caution:
If you have not modified Client.ToolMode in the client.json to true, you need to add the parameter --no-console when running the tool, as shown below:
sudo ./go2tencentcloud_x64 --no-console
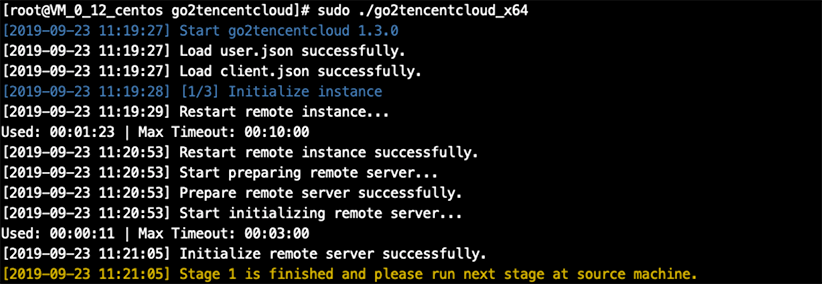
If Stage 1 is finished and please run next stage at source machine. is prompted, stage 1 has been completed, as shown below:
7. Run the tool on the source server to be mi
grated.
After step 6 (stage 1) is completed, copy the entire tool directory in stage 1 to the source server, and then run the tool for migration stage 2.
Execute the following command to run the tool for migration stage 2. sudo ./go2tencentcloud_x64
Caution:
If you have not modified Client.ToolMode in the client.json to true, you need to add the parameter --no-console when running the tool, as shown below:
sudo ./go2tencentcloud_x64 --no-console
If Stage 2 is finished and please run next stage at gateway machine. is prompted, stage 2 has been completed, as shown below:
8. Run the tool on a server (such as the gateway) that can access the public network.
After step 7 (stage 2) is completed, copy the entire tool directory in stage 2 to the source server in stage 1, and then run the tool for migration stage 3.
Execute the following command to run the tool for migration stage 3. sudo ./go2tencentcloud_x64
Caution:
If you have not modified Client.ToolMode in the client.json to true, you need to add the parameter --no-console when running the tool, as shown below:
sudo ./go2tencentcloud_x64 --no-console
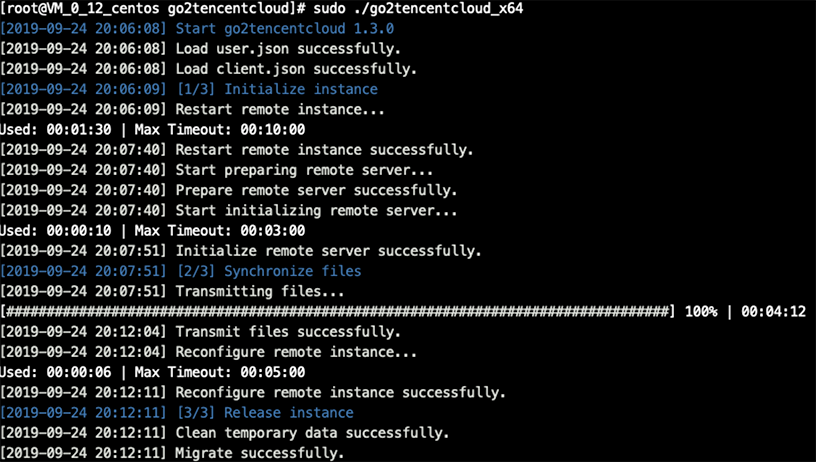
If Migrate successfully is prompted, the entire migration task has been completed, as shown below:
1. Establish a connection between the source server and the destination CVM.
2. Download or upload go2tencentcloud.zip to the source server and run the following command to enter the corresponding directory.
2.1 Run the following commands in sequence to decompress go2tencentcloud.zip and enter the directory.
unzip go2tencentcloud.zip
2.2 Run the following commands in sequence to decompress go2tencentcloud-linux.zip and enter the directory.
unzip go2tencentcloud-linux.zip
Note:
The files in the go2tencentcloud directory will not be migrated. Do not place the files to be migrated in this directory.
4. In the client.json file, configure the migration mode and other parameters.
Set the Client.ToolMode value in the client.json file to true, that is, select the migration via tool.
Set the Client.Net.Mode in the client.json file to 2, that is, select the [Private network migration mode: Scenario 2](https://intl.cloud.tencent.com/ document/product/213/44340#.E6.94.AF.E6.8C.81.E7.9A.84.E8.BF.81.E7.A7.BB.E6.A8.A1.E5.BC.8F ) to migrate. If necessary, configure other parameters based on the description of Parameters in the client.json file. 5. (Optional) Exclude files and directories on the source server that do not need to be migrated.
Add files or directories that do not need to be migrated from the Linux source server to rsync_excludes_linux.txt file. 6. Run the tool.
For example, on a 64-bit Linux source server, execute the following command as the root user to run the tool.
sudo ./go2tencentcloud_x64
Caution:
If you have not modified Client.ToolMode in the client.json to true, you need to add the parameter --no-console when running the tool, as shown below:
sudo ./go2tencentcloud_x64 --no-console
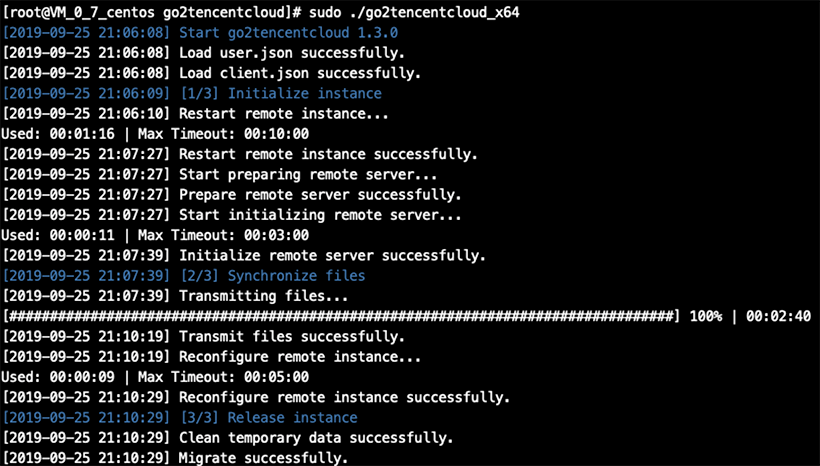
After the tool runs, wait patiently for the migration to end. Generally, the console output of a successful migration is shown below: . 1. Establish a connection between the source server and the destination CVM.
2. Download or upload go2tencentcloud.zip to the source server and run the following command to enter the corresponding directory.
2.1 Run the following commands in sequence to decompress go2tencentcloud.zip and enter the directory.
unzip go2tencentcloud.zip
2.2 Run the following commands in sequence to decompress go2tencentcloud-linux.zip and enter the directory.
unzip go2tencentcloud-linux.zip
Note:
The files in the go2tencentcloud directory will not be migrated. Do not place the files to be migrated in this directory.
3. In the user.json file, configure the destination CVM for the migration.
Configure the required parameters based on the description of Parameters in the user.json file. 4. In the client.json file, configure the migration mode and other parameters.
Set the Client.ToolMode value in the client.json file to true, that is, select the migration via tool.
Set the Client.Net.Proxy.Ip and Client.Net.Proxy.Port in the client.json file to the IP address and port of the network proxy. If your network proxy needs to be verified, enter the username and password of the network proxy in Client.Net.Proxy.User and Client.Net.Proxy.Password. If not necessary, leave the two items empty.
If necessary, configure other parameters based on the description of Parameters in the client.json file. 5. (Optional) Exclude files and directories on the source server that do not need to be migrated.
Add files or directories that do not need to be migrated from the Linux source server to rsync_excludes_linux.txt file. 6. Run the tool.
For example, on a 64-bit Linux source server, execute the following command as the root user to run the tool.
sudo ./go2tencentcloud_x64
Caution:
If you have not modified Client.ToolMode in the client.json to true, you need to add the parameter --no-console when running the tool, as shown below:
sudo ./go2tencentcloud_x64 --no-console
After the tool runs, wait patiently for the migration to end. Generally, the console output of a successful migration is shown below:
Checking after the Migration
If the migration fails, check the error information in log files (under the migration tool directory by default), operation guides, or FAQs about Service Migration for troubleshooting methods. If the migration is successful, check whether the target CVM starts up normally, whether data on the target CVM is consistent with that on the source server, and whether the network and other system services are normal.