This document describes how to migrate the system and applications from a source server in your IDC or a cloud platform to CVM through the online migration in private network mode in the CVM console.
Compared with the public network mode, migration over the private network has a higher migration transfer speed, which can significantly improve the migration efficiency. Plus, it doesn't restrict the public network access capability of the source server, making the migration configuration more flexible.
Prerequisites
You have a Tencent Cloud account.
If you want to use a sub-account to perform migration in the console, you need to log in to the CAM console with the root account and associate the QcloudCSMFullAccess policy with the sub-account.
You can create a key and obtain the SecretId and SecretKey in API Key Management.
Click here to download the compressed migration tool package.
Stop applications on the source server to prevent existing applications from being affected by the migration.
Directions
Backup data
Source server: You can use the source server snapshot feature or other methods to back up data.
Destination CVM: You can create a snapshot or use other methods to back up data.
Download the migration tool
Click here to obtain the compressed migration tool package.
Choose the migration mode
Choose the appropriate migration mode according to the network environments of your source servers and destination CVMs.
You can choose to transfer over the public and private network. The private network mode applies to three scenarios. Each migration mode or scenario has different network requirements for source servers and destination CVMs. If both source servers and destination CVMs can access the public network, you can use the default mode for migration. If source servers or destination CVMs cannot directly access the public network, you need to establish a connection between them through VPC Peering Connection, VPN Connections, Cloud Connect Network, or Direct Connect before using the private network mode for migration.
Check before the migration
Before migration, you need to check the following configuration based on the actual conditions:
To migrate to a CVM instance, you need to check the source server and destination CVM.
To migrate to a CVM image, you need to check only the source server.
2. Run the which rsync command to check whether Rsync is installed, and if not, install it as instructed in How do I install Rsync?
3. Check whether SELinux is enabled, and if yes, disable it as instructed in How do I disable SELinux?
4. After a migration request is made to the Tencent Cloud API, the API will use the current UNIX time to check the generated token. You need to make sure that the current system time is correct.
Destination CVM (optional)
1. Storage space: Both the system disk and data disk of the destination CVM have sufficient storage space for saving data from the source server.
2. Security group: Port 443 and port 80 must be open.
3. Bandwidth: It is recommended that you maximize bandwidths at the two ends to speed up the migration. During the process, the traffic consumed is approximately the amount of data migrated. Adjust the billing mode before the migration if necessary.
4. OS consistency: If the OSs of the source server and destination CVM are inconsistent, the created image may be inconsistent with the actual OS. We recommend that the OS of the destination CVM be the same as that of the source server. For example, to migrate a CentOS 7 source server, select a CentOS 7 CVM as the destination.
Note:
You can use tool commands such as sudo ./go2tencentcloud_x64 --check to automatically check the source server.
By default, the go2tencentcloud migration tool automatically performs checks upon launch. To skip checks and perform forced migration, configure Client.Extra.IgnoreCheck to true in the client.json file.
2. Download or upload go2tencentcloud.zip to the source server and run the following command to enter the corresponding directory.
2.1 Run the following commands in sequence to decompress go2tencentcloud.zip and enter the directory.
unzip go2tencentcloud.zip
cd go2tencentcloud
2.2 Run the following commands in sequence to decompress go2tencentcloud-linux.zip and enter the directory.
unzip go2tencentcloud-linux.zip
cd go2tencentcloud-linux
Note:
The files in the go2tencentcloud directory will not be migrated. Do not place the files to be migrated in this directory.
3. (Optional) Exclude files and directories on the source server that do not need to be migrated.
If there are files or directories on the Linux source server that do not need to be migrated, you can add them to the rsync_excludes_linux.txt file.
Configure Client.Net.Proxy.Ip and Client.Net.Proxy.Port in the client.json file to the IP address and port of the network proxy.
If you need to verify the network proxy, enter the username and password of the network proxy in Client.Net.Proxy.User and Client.Net.Proxy.Password.
5. Import the migration source.
5.1 For example, on a 64-bit Linux source server, execute the following commands in sequence as the root user to run the tool.
chmod +x go2tencentcloud_x64
sudo ./go2tencentcloud_x64
5.2 Enter the SecretId and SecretKey of the account API access key obtained in Prerequisites and press Enter.
If the information in the following figure is displayed in the window of the migration tool, the migration source has been imported to the console successfully, and you can go to the console to view it:
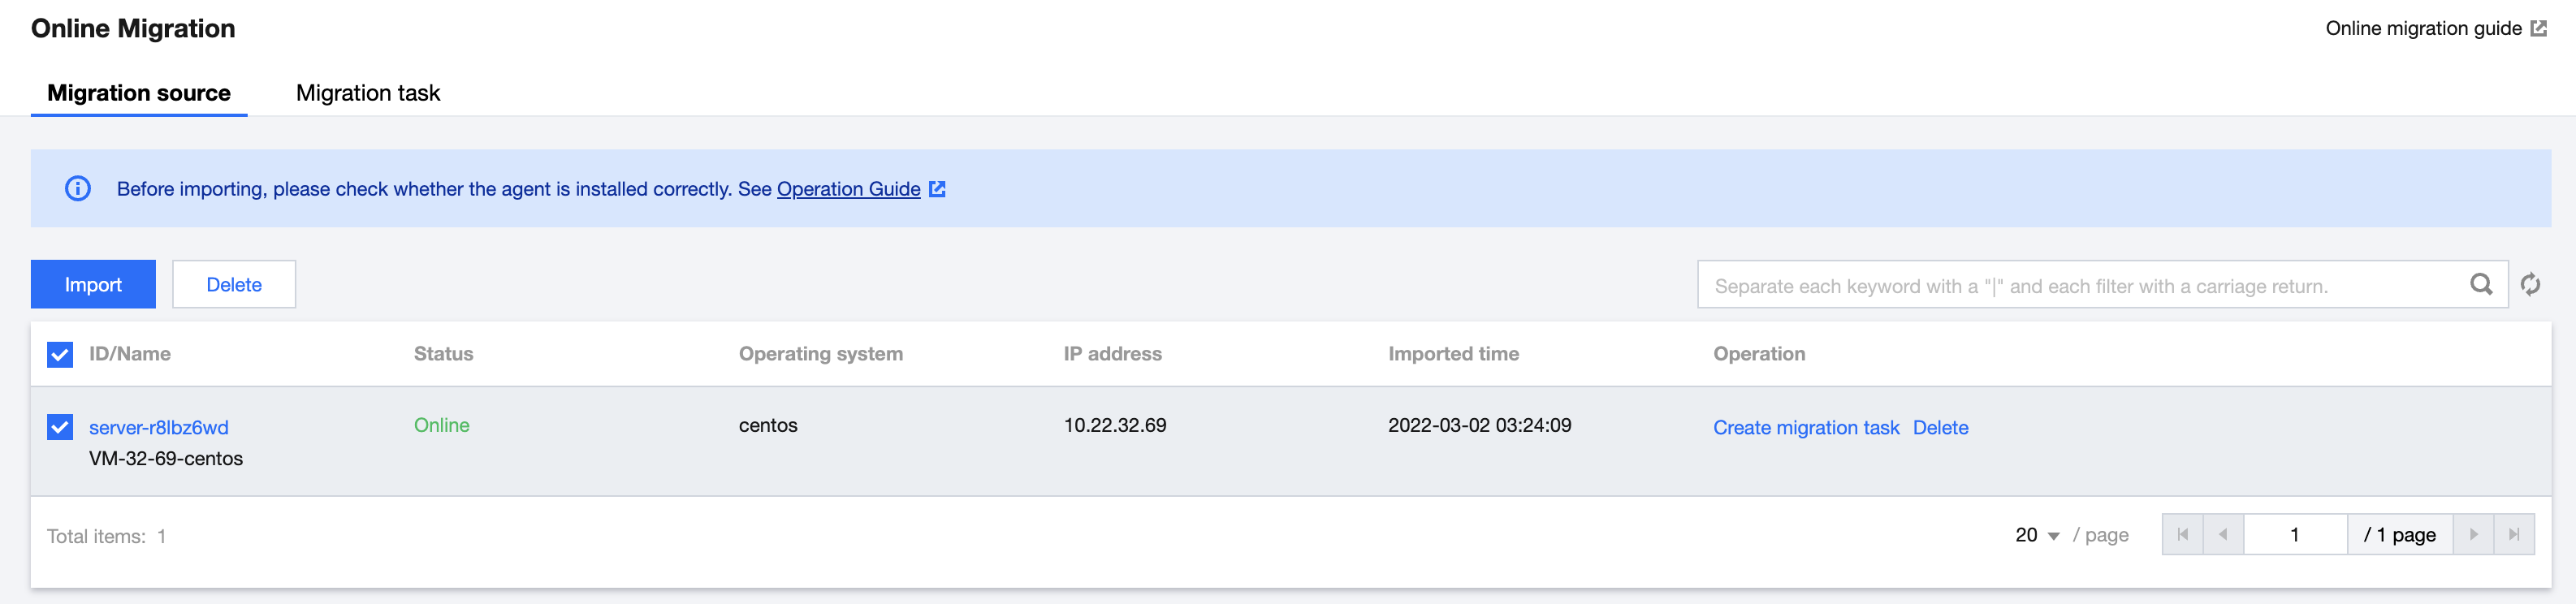
You can log in to the CVM console and enter the online migration page to view the imported migration source, whose status is Online.
If "Import source server successfully" isn't displayed, the migration source failed to be imported, and you can view the log (which is the logs/log file in the migration tool directory by default) for troubleshooting. Then, run the migration tool to import the migration source again.
Caution:
After the migration source is imported successfully, don't close the migration tool in the instance until the migration task is completed; otherwise, the migration task can't be completed after the migration source becomes offline.
6. Go to the online migration page in the CVM console to create a migration task.
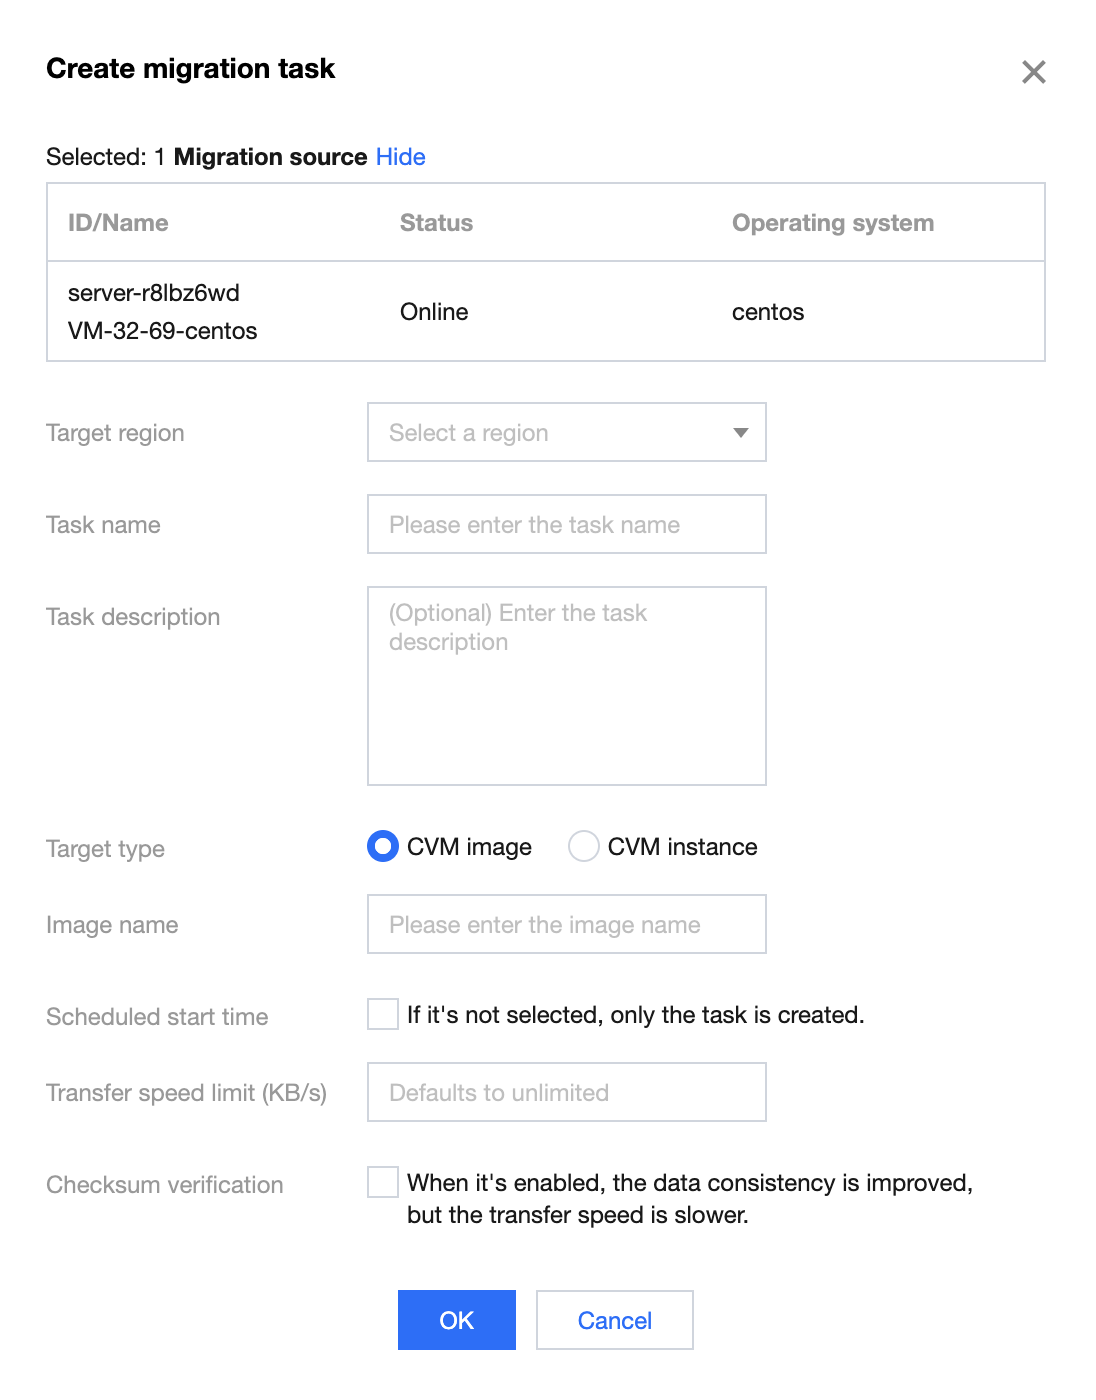
6.1 Log in to the CVM console, go to the online migration page, and click Create Migration Task on the right of the desired migration source.
6.2 In the Create Migration Task pop-up window, configure the task as instructed in Migration Task Configuration Description.
For example, to migrate a Linux source server to the Shanghai region of Tencent Cloud in private network mode and generate the destination CVM image, you can configure the migration task.
7. Start the migration task
Note:
You can skip this step if your task is scheduled, which will automatically start running at the scheduled execution time.
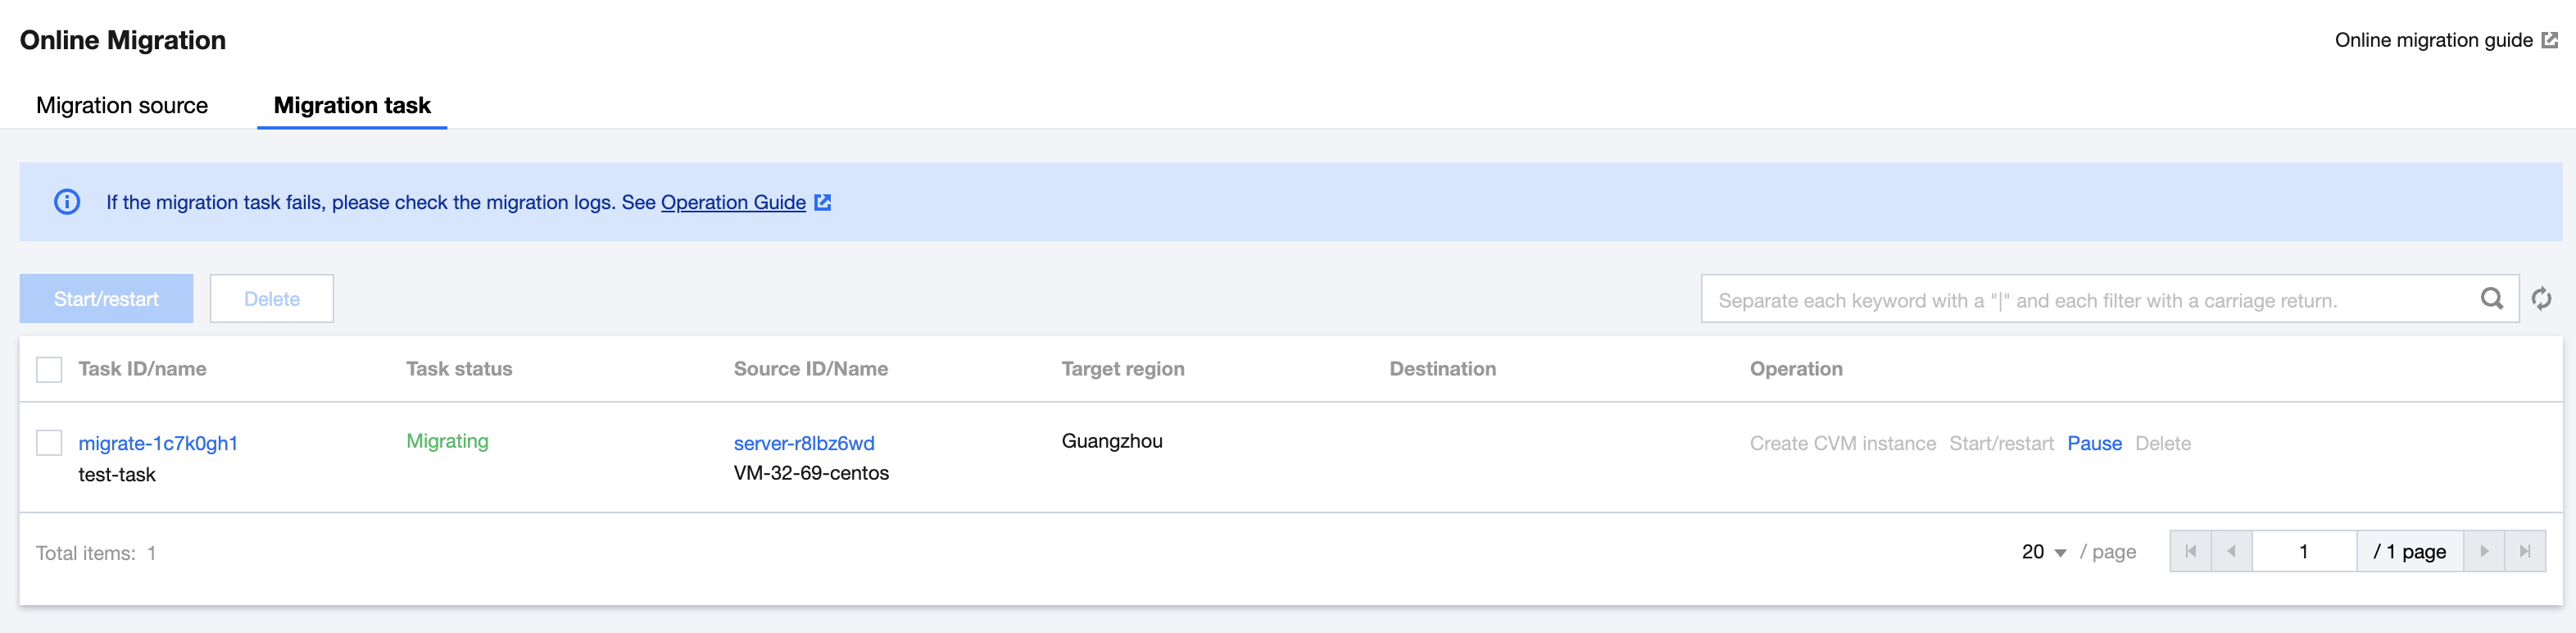
After creating a migration task, you can click the Migration Task tab to view the task.
You can click Start/Retry on the right of the task to start it, click OK in the pop-up window, and the task status will become Migrating.
8. Wait for the migration task to end
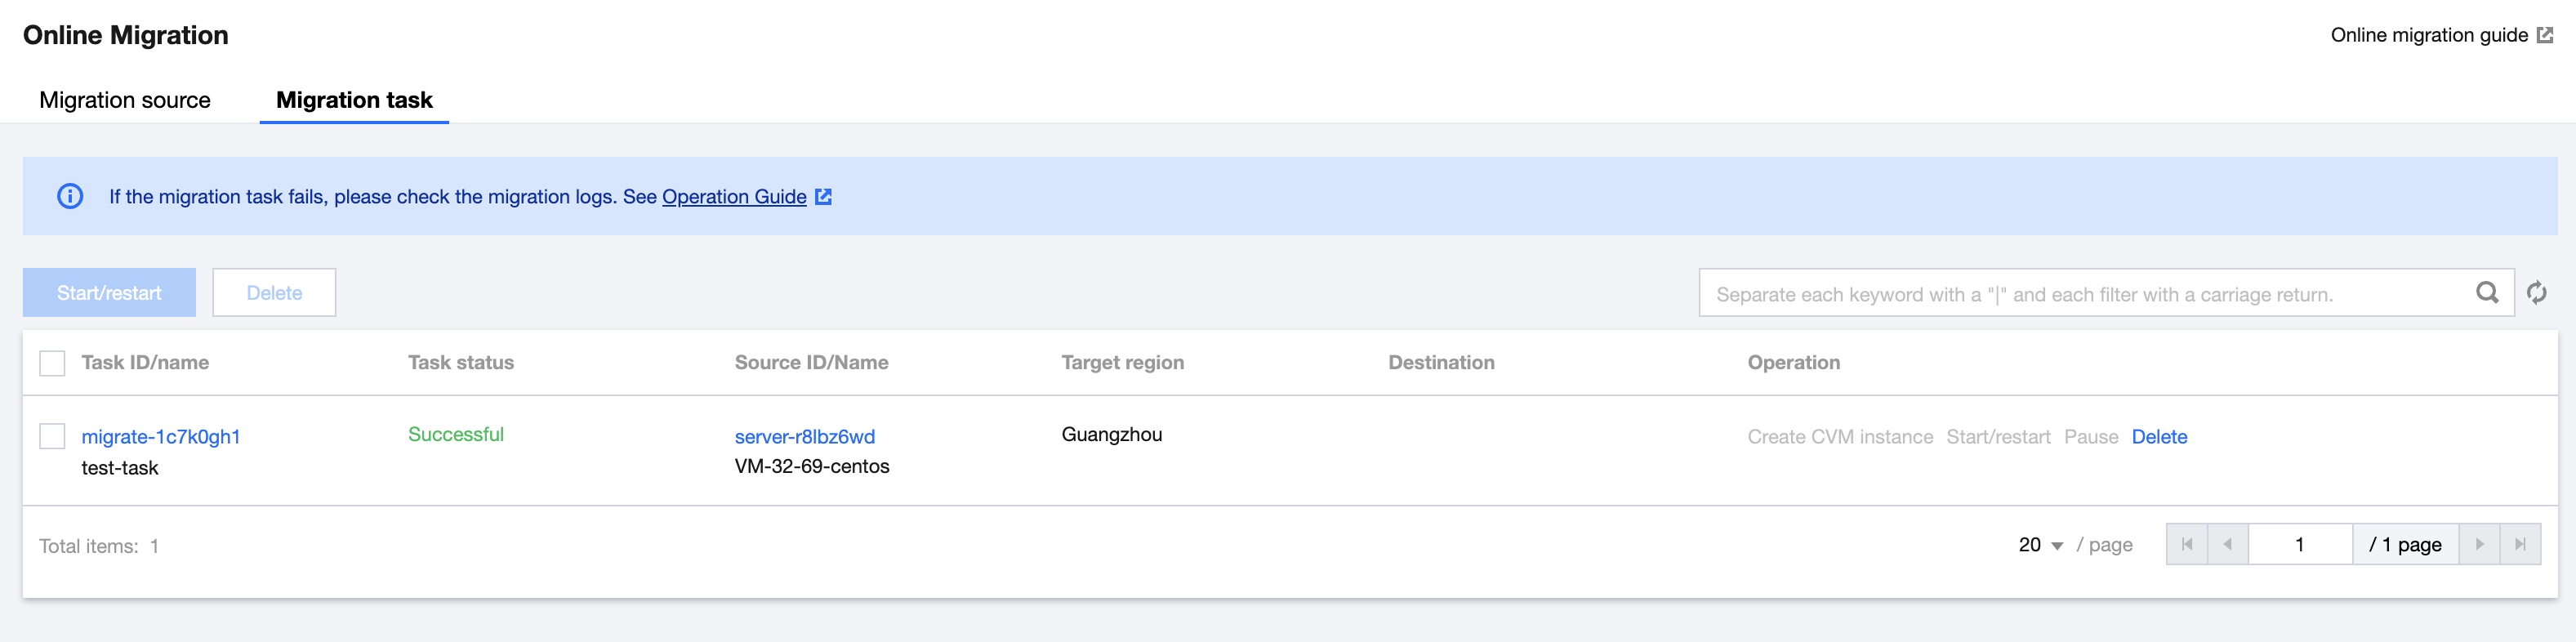
After the migration task status becomes Successful, the migration is completed successfully.
Note:
The time required for data transfer depends on the size of the data on the source server, network bandwidth, etc. Please wait for the migration process to end. The migration tool supports checkpoint restart for data transfer.
Checking after the Migration
Failed migration:
Check the error information in log files (under the migration tool directory by default), operation guides, or FAQs about Service Migration for troubleshooting methods. After troubleshooting, click Start/Retry under the operation column to restart the migration task.
Successful migration:
If the migration destination is a CVM, check whether the destination CVM starts up normally, whether data on the CVM is consistent with that on the source server, and whether the network and other system services are normal.
If the migration destination is a CVM image, you can click the CVM image ID on the row of the migration task to enter the CVM image page and view the image information. You can use it to create CVM instances.
If you have any questions or the migration has an exception, see FAQs about Service Migration or Contact Us.