Cloud Object Storage
- Release Notes and Announcements
- Announcements
- Product Introduction
- Purchase Guide
- Billing Method
- Billable Items
- Metadata Acceleration Fees
- Data Processing Fees
- Getting Started
- Console Guide
- Bucket Management
- Domain Name Management
- Object Management
- Folder Management
- Monitoring Reports
- Data Processing
- Image Processing
- File Processing
- Media Processing
- Function Service
- Content Moderation
- Automatic Moderation
- Historical data moderation
- Data Processing Workflow
- User Tools
- COSBrowser
- COSCLI (Beta)
- Common Commands
- Online Auxiliary Tools
- Practical Tutorial
- Access Control and Permission Management
- Performance Optimization
- Data Migration
- Data Disaster Recovery and Backup
- Domain Name Management Practice
- Image Processing
- Audio/Video Practices
- Direct Data Upload
- Content Moderation
- Data Verification
- Big Data Practice
- Using COS in the Third-party Applications
- Developer Guide
- Creating Request
- Object
- Uploading Object
- Downloading Object
- Copying Objects
- Deleting Objects
- Data Management
- Lifecycle Management
- Data Disaster Recovery
- Versioning
- Using Versioning
- Cross-Bucket Replication
- Data Security
- Cloud Access Management
- Access Permission Configuration Description
- Access Control Overview
- Access Control Methods
- Access Policy Language
- Using CDN to Accelerate Access
- Batch Operation
- Performing Batch Operation
- Global Acceleration
- Data Workflow
- Data Lake Storage
- Cloud Native Datalake Storage
- Metadata Accelerator
- Big Data Security
- GooseFS
- Key Features
- Deployment Guide
- OPS Guide
- Logging Guide
- Data Processing
- Image Processing
- Media Processing
- Troubleshooting
- Resource Access Error
- API Documentation
- Service APIs
- Bucket APIs
- Basic Operations
- Access Control List (acl)
- Cross-Origin Resource Sharing (cors)
- Bucket Policy (policy)
- Hotlink Protection (referer)
- Static Website (website)
- Intelligent Tiering
- Bucket inventory(inventory)
- Cross-Bucket Replication(replication)
- Log Management(logging)
- Global Acceleration (Accelerate)
- Bucket Encryption (encryption)
- Custom Domain Name (Domain)
- Origin-Pull (Origin)
- Object APIs
- Basic Operations
- Access Control List (acl)
- Multipart Upload
- Batch Operation APIs
- Data Processing APIs
- Image Processing
- Basic Image Processing
- AI-Based Content Recognition
- Queue APIs
- Service Configuration
- Media Processing
- Media Screenshot API
- Media Information API
- Private M3U8 API
- File Processing
- File Transcoding
- Async Processing Job APIs
- Async Processing Queue APIs
- File Processing
- Hash Calculation
- File Decompression
- Multi-File Zipping
- Job and Workflow
- Workflow APIs
- Workflow Instance
- Job APIs
- Media Processing
- Canceling Media Processing Job
- Querying Media Processing Job
- Media Processing Job Callback
- Image Processing
- Submit Image Processing Job
- Canceling Image Processing Job
- Querying Image Processing Job
- Multi-Job Processing
- Submitting Multiple Jobs
- AI-Based Content Recognition
- Submitting Content Recognition Job
- Querying Content Recognition Job
- Content Recognition Job Callback
- Sync Media Processing
- Media Screenshot API
- Template APIs
- Media Processing
- Creating Media Processing Template
- Deleting Media Processing Template
- Querying Media Processing Template
- Updating Media Processing Template
- AI-Based Content Recognition
- Creating AI-Based Content Recognition Template
- Querying AI-Based Content Recognition Template
- Updating AI-Based Content Recognition Template
- Batch Job APIs
- Callback Content
- Appendix
- Content Moderation APIs
- Image Moderation
- Video Moderation
- Audio Moderation
- Text Moderation
- Submitting Virus Detection Job
- SDK Documentation
- Android SDK
- Object Operations
- Remote Disaster Recovery
- Cloud Access Management
- Data Verification
- Image Processing
- C SDK
- Object Operations
- Data Management
- Cloud Access Management
- Content Moderation
- Data Verification
- C++ SDK
- Cross-Region Disaster Recovery
- Data Management
- Cloud Access Management
- Data Verification
- Content Moderation
- .NET(C#) SDK
- Bucket Operations
- Object Operations
- Cross-Region Disaster Recovery
- Cloud Access Management
- Image Processing
- SDK for Flutter
- Object Operations
- Go SDK
- Bucket Operations
- Object Operations
- Cross-Region Disaster Recovery
- Cloud Access Management
- Data Verification
- File Processing
- Image Processing
- iOS SDK
- Object Operations
- Cross-region Disaster Recovery
- Cloud Access Management
- Image Processing
- Content Recognition
- Speech Recognition
- Java SDK
- Object Operations
- Cross-Region Disaster Recovery
- Cloud Access Management
- File Processing
- Media Processing
- AI-Based Content Recognition
- JavaScript SDK
- Object Operations
- File Processing
- Remote disaster-tolerant
- Data Management
- Cloud Access Management
- Data Verification
- Image Processing
- Node.js SDK
- Object Operations
- Remote disaster-tolerant
- Cloud Access Management
- Data Verification
- Image Processing
- PHP SDK
- Object Operations
- Bucket Operations
- Remote disaster-tolerant
- Cloud Access Management
- Image Processing
- Media Processing
- Document Processing
- File Processing
- Job APIs
- Template APIs
- Python SDK
- Object Operations
- Server-Side Encryption
- Cross-Region Disaster Recovery
- Cloud Access Management
- Content Recognition
- React Native SDK
- Object Operations
- Mini Program SDK
- Object Operations
- Remote disaster-tolerant
- Cloud Access Management
- Data Verification
- Content Moderation
- Image Processing
- FAQs
- Bucket Configuration
- Domain Names and CDN
- Object Operations
- Data Processing
- Related Agreements
- Appendices
- Historical version
DocumentationCloud Object StorageData Lake StorageGooseFSData SecurityUsing Apache Ranger to Manage GooseFS Access Permissions
Using Apache Ranger to Manage GooseFS Access Permissions
Last updated: 2024-03-25 16:04:01
Using Apache Ranger to Manage GooseFS Access Permissions
Last updated: 2024-03-25 16:04:01
Overview
Apache Ranger is a standardized authentication component that manages access permissions across the big data ecosystem. GooseFS, as an acceleration storage system used for big data and data lakes, can be integrated into the comprehensive Apache Ranger authentication platform. This document describes how to use Apache Ranger to manage access permissions for GooseFS.
Advantages
GooseFS is a cloud-native accelerated storage system that has supported Apache Range access permission management nearly in the same way as it supported HDFS. Therefore, HDFS big data users can easily migrate to GooseFS and reuse HDFS Ranger permission policies.
Compared with HDFS with Ranger, GooseFS with Ranger offers an authentication option of “Ranger + native ACL” that allows you to use the native ACL authentication when Ranger authentication fails, which solves the problem of imperfect Ranger authentication policy configurations.
Framework of GooseFS with Ranger
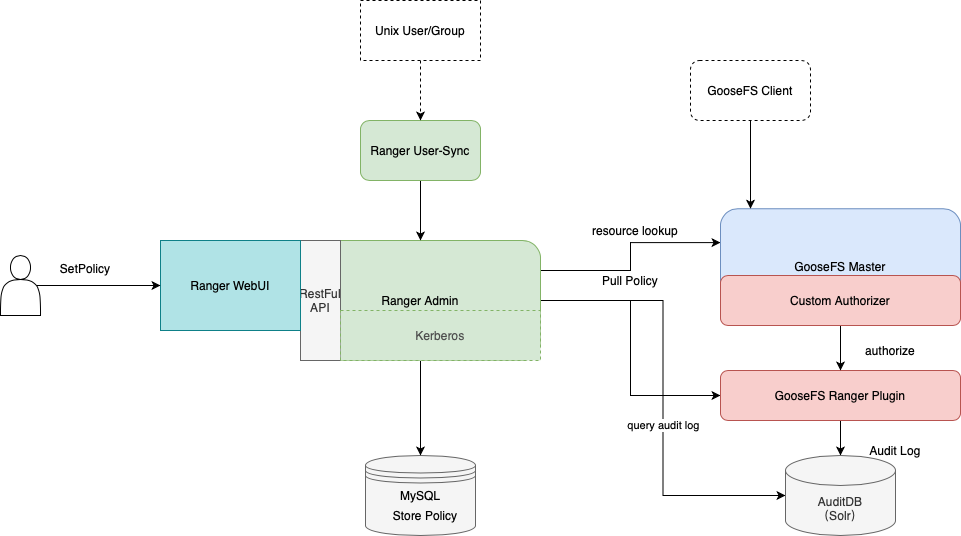
To integrate GooseFS into Ranger, we developed the GooseFS Ranger plugin that should be deployed on the GooseFS master node and Ranger Admin. The plugin does the following operations:
On the GooseFS master node:
Provides the
Authorizer API to authenticate each metadata request on the GooseFS master node.Connects to Ranger Admin to obtain user-configured authentication policies.
On the Ranger Admin:
Supports GooseFS resource lookup for Ranger Admin.
Verifies configurations.
Deployment
Preparations
Before you start, ensure that you have deployed and configured Ranger components (including Ranger Admin and Ranger UserSync) in the environment and can open and use the Ranger web UI normally.
Component Deployment
Deploying GooseFS Ranger plugin to Ranger Admin and registering service
Note:
Deploy as follows:
1. Create a GooseFS directory in the Ranger service definition directory. Note that you should at least have execute and read permissions on the directory.
1. If you use a Tencent Cloud EMR cluster, the Ranger service definition directory is
/usr/local/service/ranger/ews/webapp/WEB-INF/classes/ranger-plugins.2. If you use a self-built Hadoop cluster, you can search for the path of Ranger-integrated components (such as HDFS) in Ranger to locate the path.
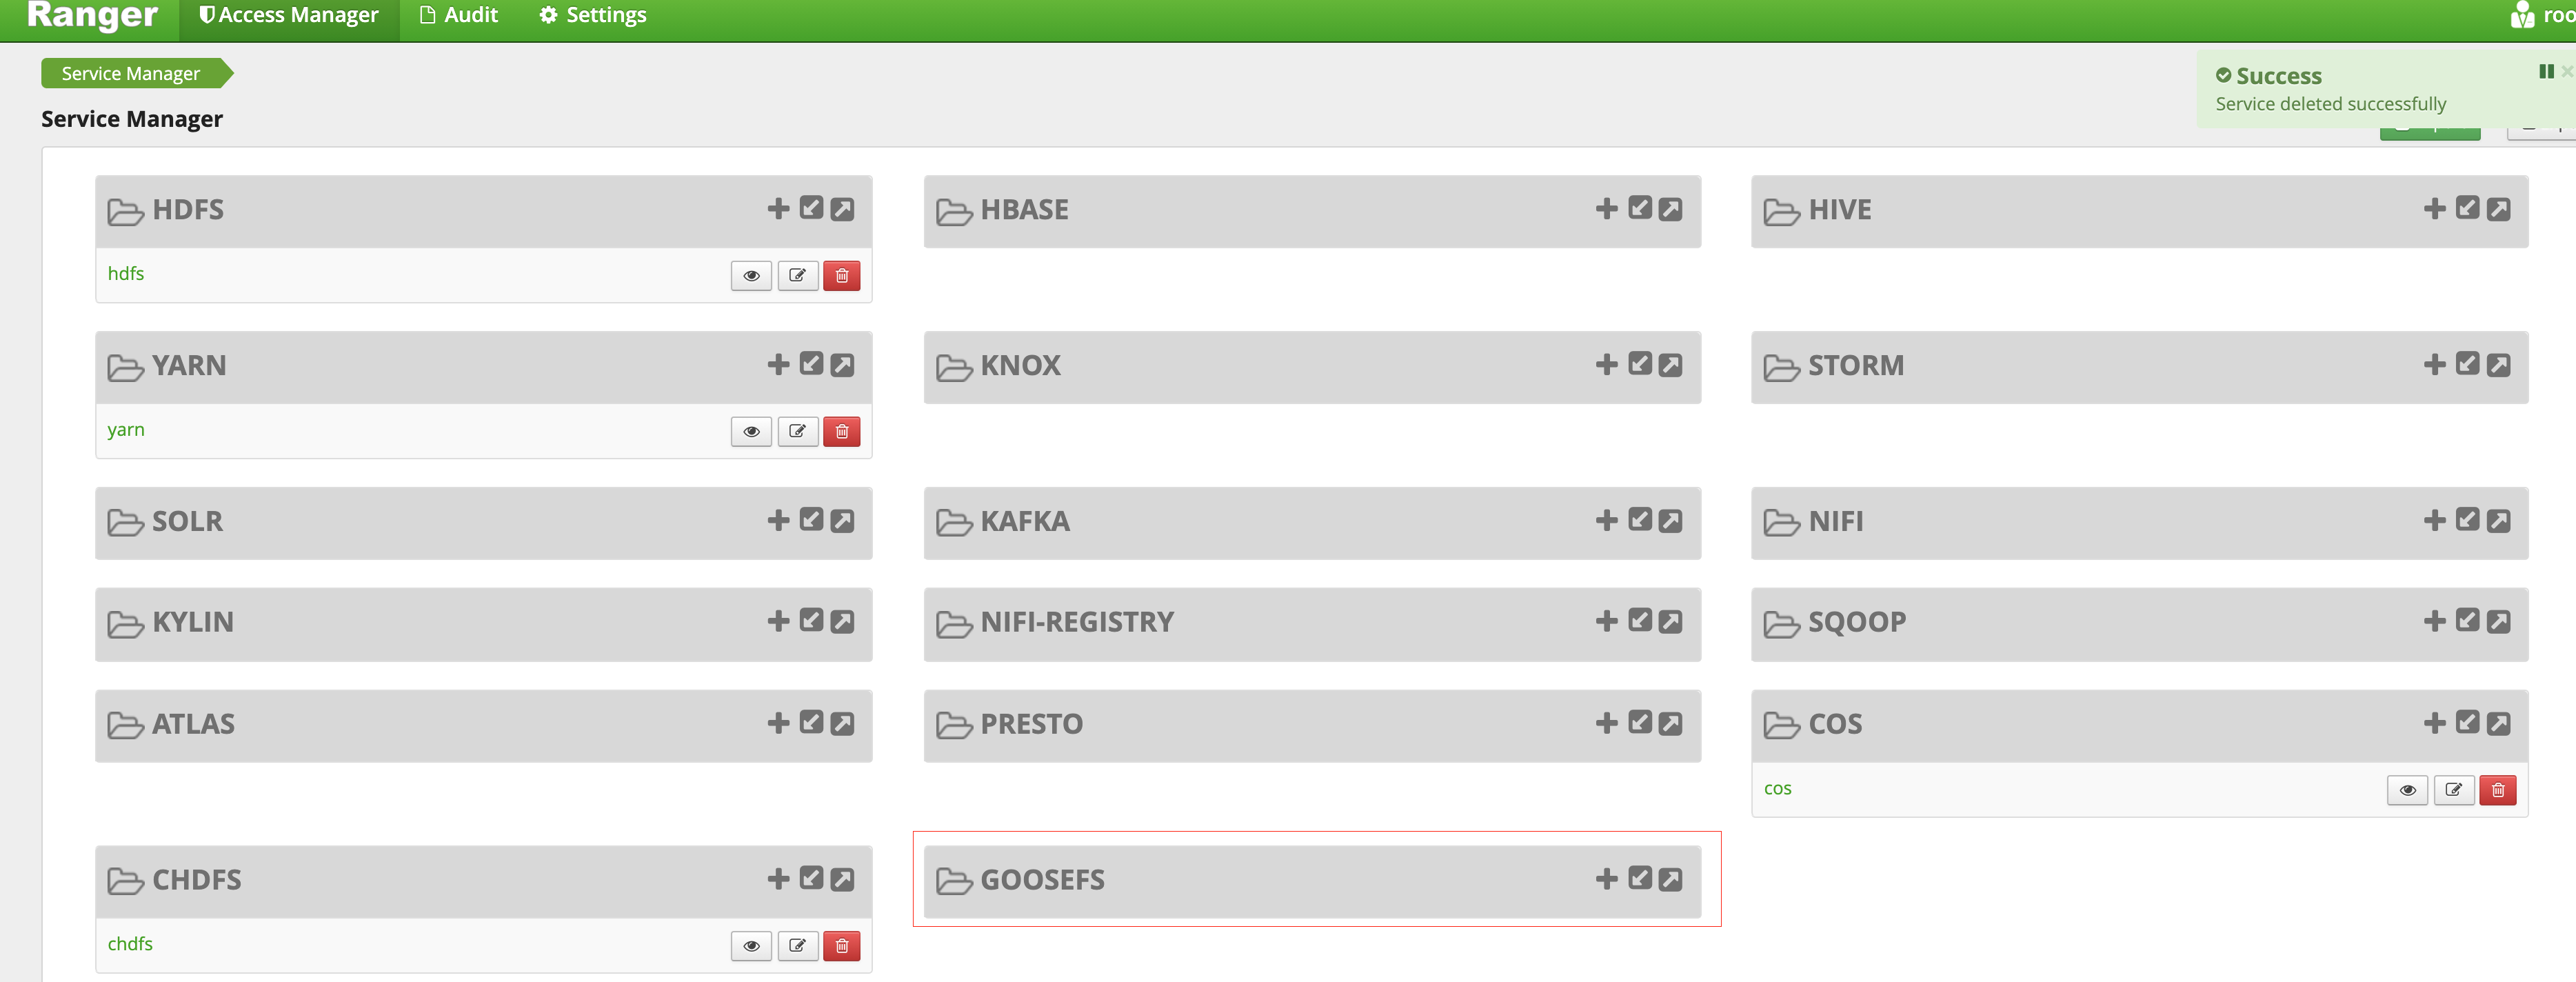

3. Put
goosefs-ranger-plugin-${version}.jar and ranger-servicedef-goosefs.json in the GooseFS directory. Note that you should have read permission.4. Restart Ranger.
5. In Ranger, run the following commands to register the GooseFS service:
# Create the service. The Ranger admin account and password, as well as the Ranger service address should be specified.# For the Tencent Cloud EMR cluster, the admin is the root, and the password is the root account’s password that is set when the EMR cluster is created. The Ranger service IP is the master node IP of the EMR.adminUser=rootadminPasswd=xxxxrangerServerAddr=10.0.0.1:6080curl -v -u${adminUser}:${adminPasswd} -X POST -H "Accept:application/json" -H "Content-Type:application/json" -d @./ranger-servicedef-goosefs.json http://${rangerServerAddr}/service/plugins/definitions# When the service is successfully registered, a service ID will be returned, which should be remembered.# To delete the GooseFS service, pass the service ID returned to run the following command:serviceId=104curl -v -u${adminUser}:${adminPasswd} -X DELETE -H "Accept:application/json" -H "Content-Type:application/json" http://${rangerServerAddr}/service/plugins/definitions/${serviceId}
6. After the GooseFS service is created, you can view it in the Ranger console.
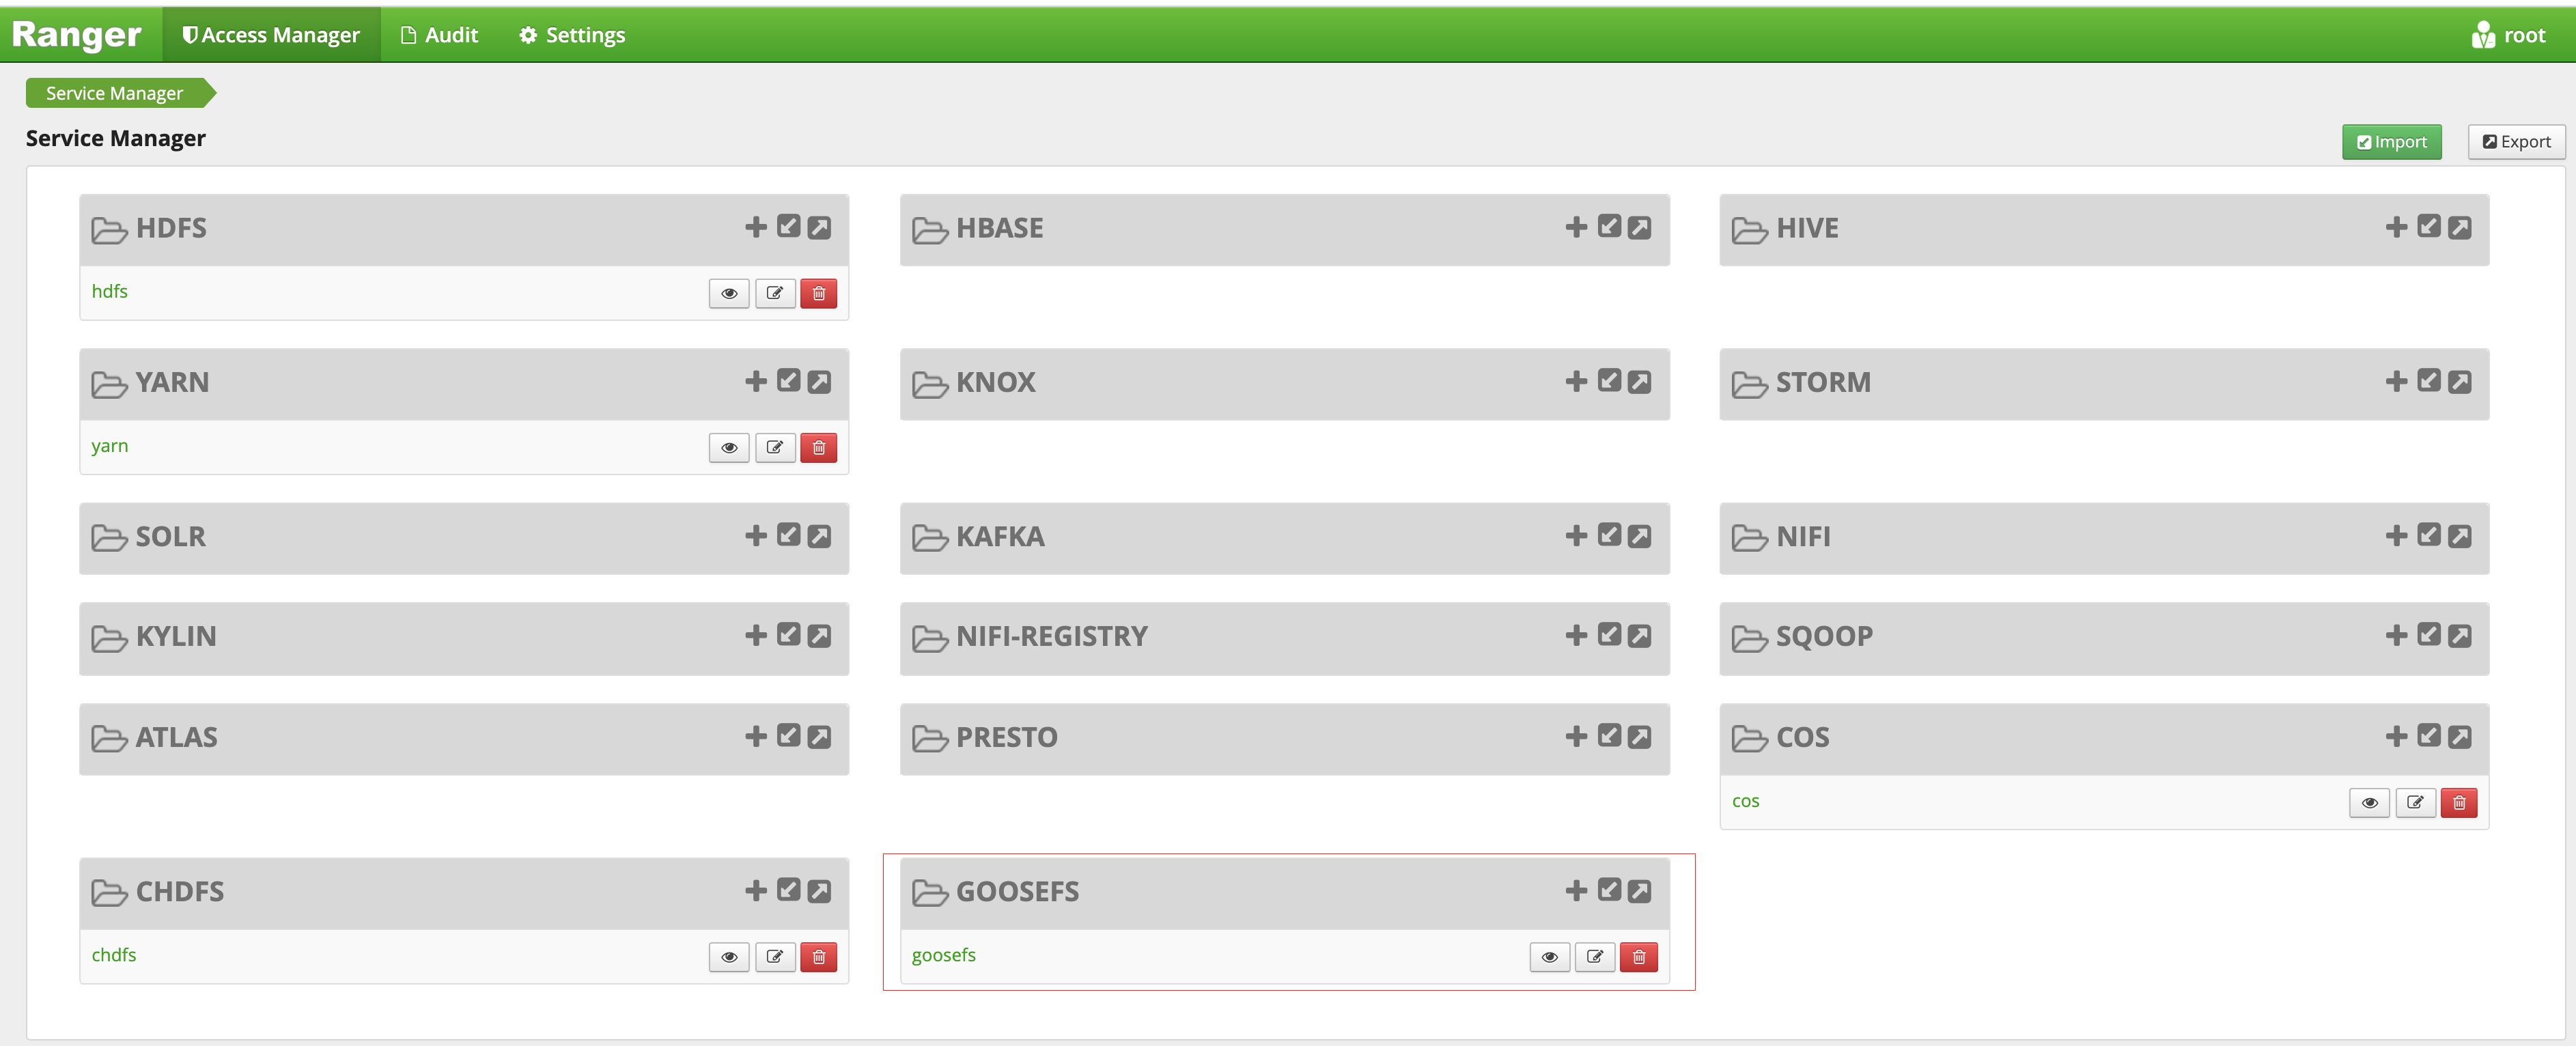

7. Click + to define the GooseFS service instance.
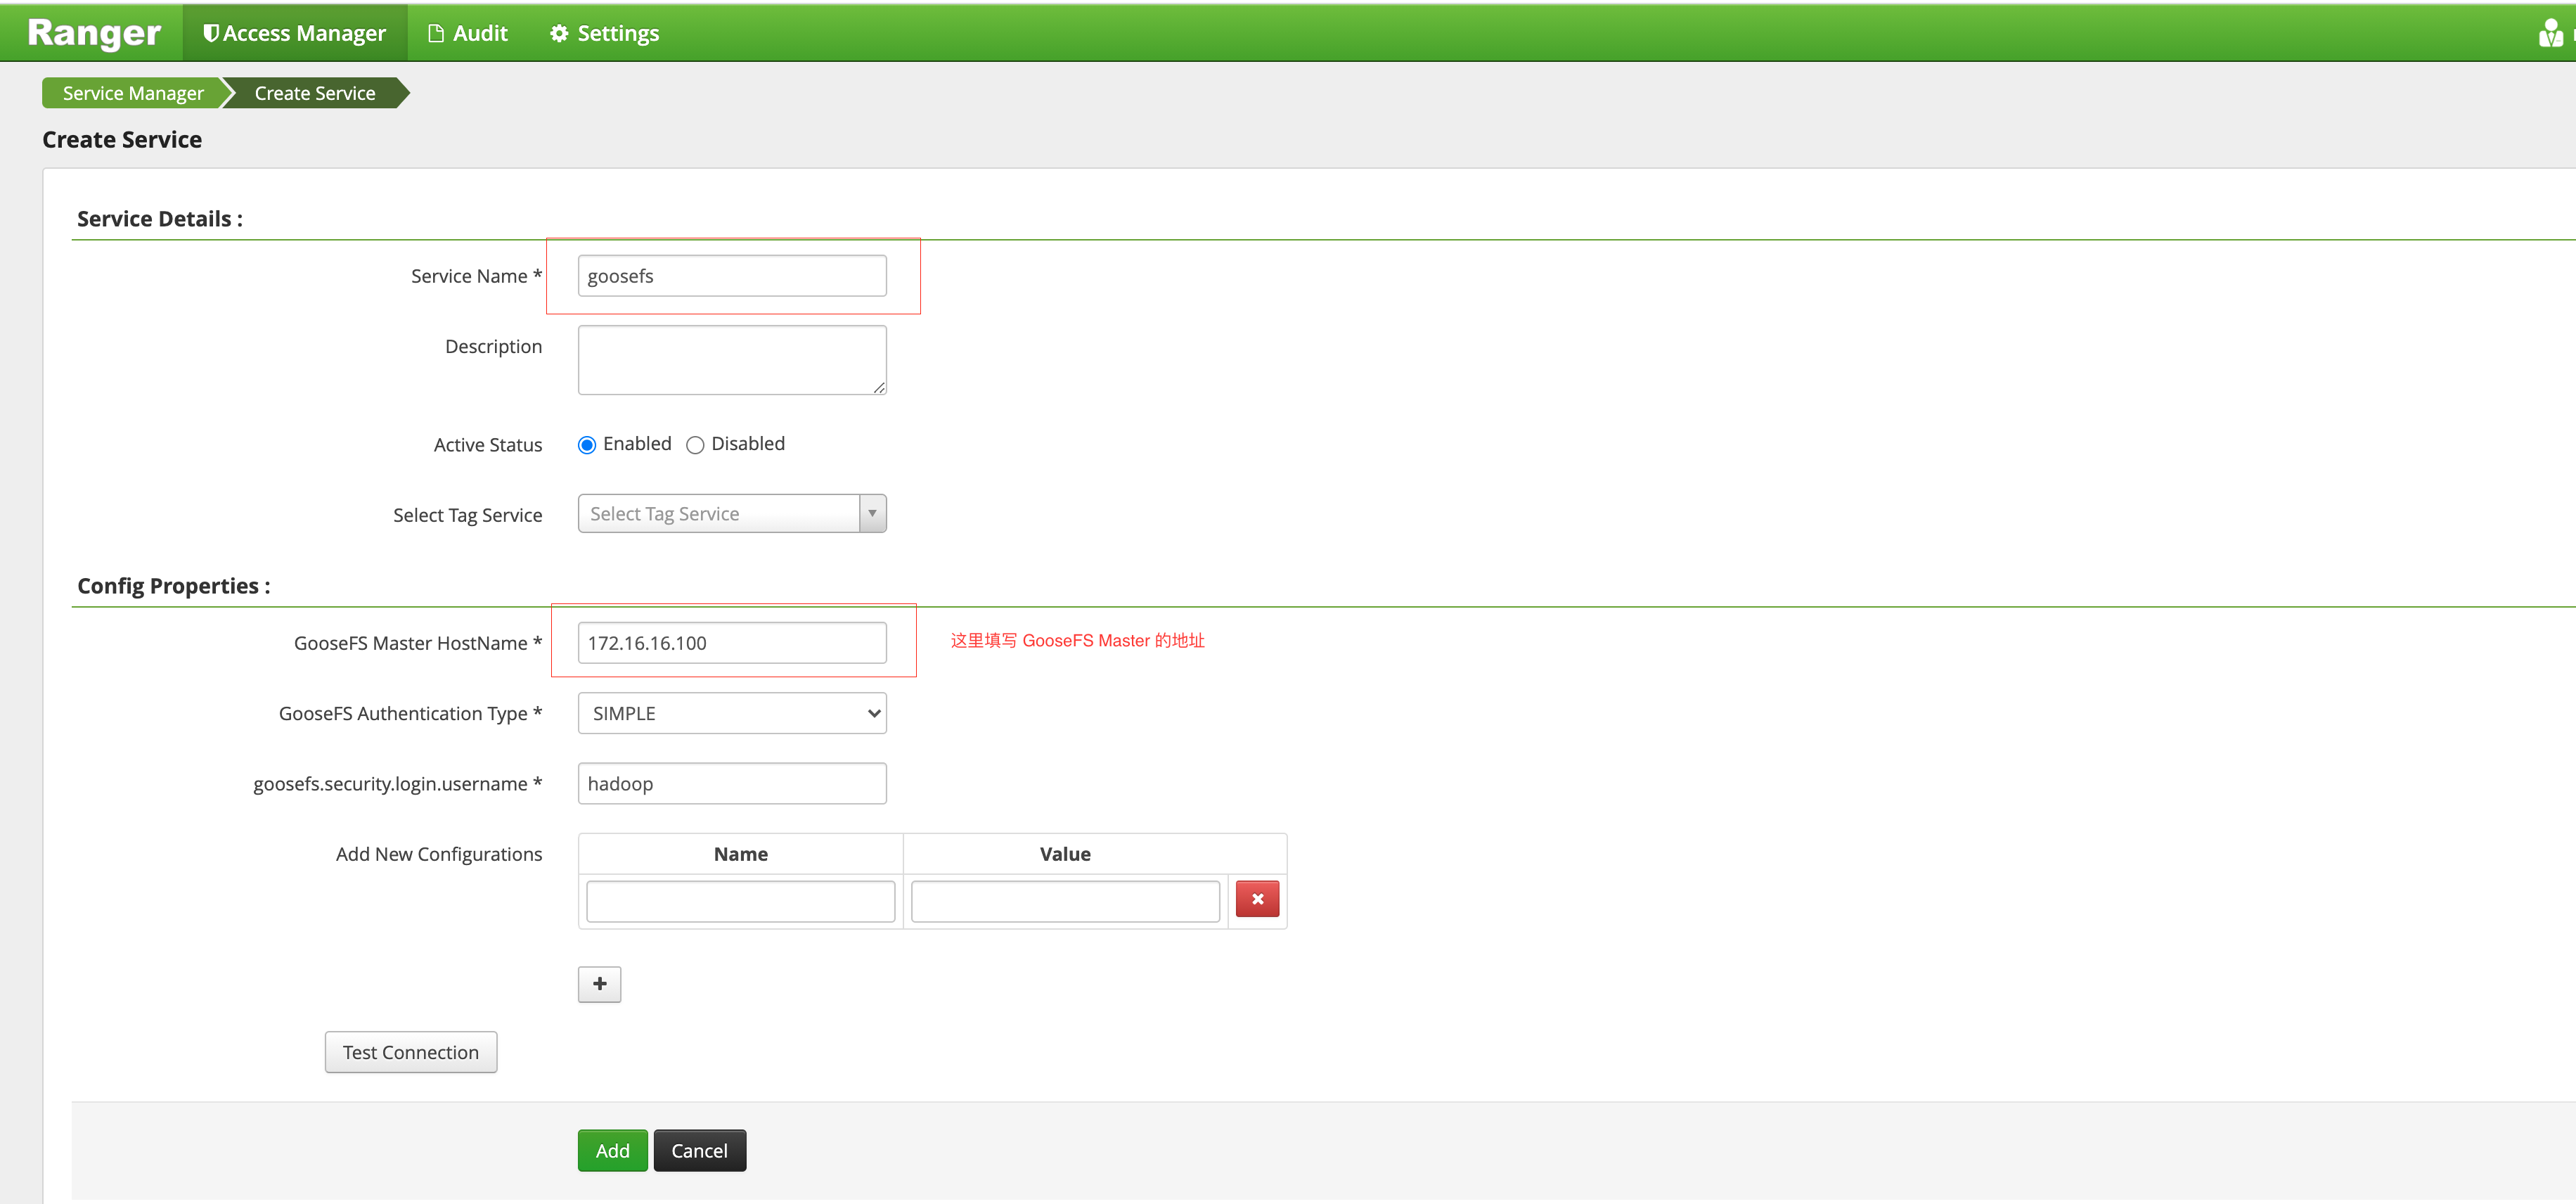

8. Click the created GooseFS instance and add a policy.


Deploying GooseFS Ranger plugin and enabling Ranger authentication
1. Put
goosefs-ranger-plugin-${version}.jar in the \\${GOOSEFS_HOME}/lib directory. You should at least have read permission.2. Put
ranger-goosefs-audit.xml, ranger-goosefs-security.xml, and ranger-policymgr-ssl.xml to the \\${GOOSEFS_HOME}/conf directory and configure the required parameters as follows:ranger-goosefs-security.xml:<configuration xmlns:xi="http://www.w3.org/2001/XInclude"><property><name>ranger.plugin.goosefs.service.name</name><value>goosefs</value></property><property><name>ranger.plugin.goosefs.policy.source.impl</name><value>org.apache.ranger.admin.client.RangerAdminRESTClient</value></property><property><name>ranger.plugin.goosefs.policy.rest.url</name><value>http://10.0.0.1:6080</value></property><property><name>ranger.plugin.goosefs.policy.pollIntervalMs</name><value>30000</value></property><property><name>ranger.plugin.goosefs.policy.rest.client.connection.timeoutMs</name><value>1200</value></property><property><name>ranger.plugin.goosefs.policy.rest.client.read.timeoutMs</name><value>30000</value></property></configuration>
ranger-goosefs-audit.xml (you can skip it if audit is disabled):<configuration><property><name>xasecure.audit.is.enabled</name><value>false</value></property><property><name>xasecure.audit.db.is.async</name><value>true</value></property><property><name>xasecure.audit.db.async.max.queue.size</name><value>10240</value></property><property><name>xasecure.audit.db.async.max.flush.interval.ms</name><value>30000</value></property><property><name>xasecure.audit.db.batch.size</name><value>100</value></property><property><name>xasecure.audit.jpa.javax.persistence.jdbc.url</name><value>jdbc:mysql://localhost:3306/ranger_audit</value></property><property><name>xasecure.audit.jpa.javax.persistence.jdbc.user</name><value>rangerLogger</value></property><property><name>xasecure.audit.jpa.javax.persistence.jdbc.password</name><value>none</value></property><property><name>xasecure.audit.jpa.javax.persistence.jdbc.driver</name><value>com.mysql.jdbc.Driver</value></property><property><name>xasecure.audit.credential.provider.file</name><value>jceks://file/etc/ranger/hadoopdev/auditcred.jceks</value></property><property><name>xasecure.audit.hdfs.is.enabled</name><value>true</value></property><property><name>xasecure.audit.hdfs.is.async</name><value>true</value></property><property><name>xasecure.audit.hdfs.async.max.queue.size</name><value>1048576</value></property><property><name>xasecure.audit.hdfs.async.max.flush.interval.ms</name><value>30000</value></property><property><name>xasecure.audit.hdfs.config.encoding</name><value></value></property><!-- hdfs audit provider config--><property><name>xasecure.audit.hdfs.config.destination.directory</name><value>hdfs://NAMENODE_HOST:8020/ranger/audit/</value></property><property><name>xasecure.audit.hdfs.config.destination.file</name><value>%hostname%-audit.log</value></property><proeprty><name>xasecure.audit.hdfs.config.destination.flush.interval.seconds</name><value>900</value></proeprty><property><name>xasecure.audit.hdfs.config.destination.rollover.interval.seconds</name><value>86400</value></property><property><name>xasecure.audit.hdfs.config.destination.open.retry.interval.seconds</name><value>60</value></property><property><name>xasecure.audit.hdfs.config.local.buffer.directory</name><value>/var/log/hadoop/%app-type%/audit</value></property><property><name>xasecure.audit.hdfs.config.local.buffer.file</name><value>%time:yyyyMMdd-HHmm.ss%.log</value></property><property><name>xasecure.audit.hdfs.config.local.buffer.file.buffer.size.bytes</name><value>8192</value></property><property><name>xasecure.audit.hdfs.config.local.buffer.flush.interval.seconds</name><value>60</value></property><property><name>xasecure.audit.hdfs.config.local.buffer.rollover.interval.seconds</name><value>600</value></property><property><name>xasecure.audit.hdfs.config.local.archive.directory</name><value>/var/log/hadoop/%app-type%/audit/archive</value></property><property><name>xasecure.audit.hdfs.config.local.archive.max.file.count</name><value>10</value></property><!-- log4j audit provider config --><property><name>xasecure.audit.log4j.is.enabled</name><value>false</value></property><property><name>xasecure.audit.log4j.is.async</name><value>false</value></property><property><name>xasecure.audit.log4j.async.max.queue.size</name><value>10240</value></property><property><name>xasecure.audit.log4j.async.max.flush.interval.ms</name><value>30000</value></property><!-- kafka audit provider config --><property><name>xasecure.audit.kafka.is.enabled</name><value>false</value></property><property><name>xasecure.audit.kafka.async.max.queue.size</name><value>1</value></property><property><name>xasecure.audit.kafka.async.max.flush.interval.ms</name><value>1000</value></property><property><name>xasecure.audit.kafka.broker_list</name><value>localhost:9092</value></property><property><name>xasecure.audit.kafka.topic_name</name><value>ranger_audits</value></property><!-- ranger audit solr config --><property><name>xasecure.audit.solr.is.enabled</name><value>false</value></property><property><name>xasecure.audit.solr.async.max.queue.size</name><value>1</value></property><property><name>xasecure.audit.solr.async.max.flush.interval.ms</name><value>1000</value></property><property><name>xasecure.audit.solr.solr_url</name><value>http://localhost:6083/solr/ranger_audits</value></property></configuration>
ranger-policymgr-ssl.xml<configuration><property><name>xasecure.policymgr.clientssl.keystore</name><value>hadoopdev-clientcert.jks</value></property><property><name>xasecure.policymgr.clientssl.truststore</name><value>cacerts-xasecure.jks</value></property><property><name>xasecure.policymgr.clientssl.keystore.credential.file</name><value>jceks://file/tmp/keystore-hadoopdev-ssl.jceks</value></property><property><name>xasecure.policymgr.clientssl.truststore.credential.file</name><value>jceks://file/tmp/truststore-hadoopdev-ssl.jceks</value></property></configuration>
3. Add the following configurations to
goosefs-site.properties:...goosefs.security.authorization.permission.type=CUSTOMgoosefs.security.authorization.custom.provider.class=org.apache.ranger.authorization.goosefs.RangerGooseFSAuthorizer...
4. In
\\${GOOSEFS_HOME}/libexec/goosefs-config.sh, add goosefs-ranger-plugin-${version}.jar to the GooseFS class paths:...GOOSEFS_RANGER_CLASSPATH="${GOOSEFS_HOME}/lib/ranger-goosefs-plugin-${version}.jar"GOOSEFS_SERVER_CLASSPATH=${GOOSEFS_SERVER_CLASSPATH}:${GOOSEFS_RANGER_CLASSPATH}...
After these, the configuration is complete.
Verification
You can add a policy that allows Hadoop users to read and execute but not write to the GooseFS root directory as follows:
1. Add a policy.
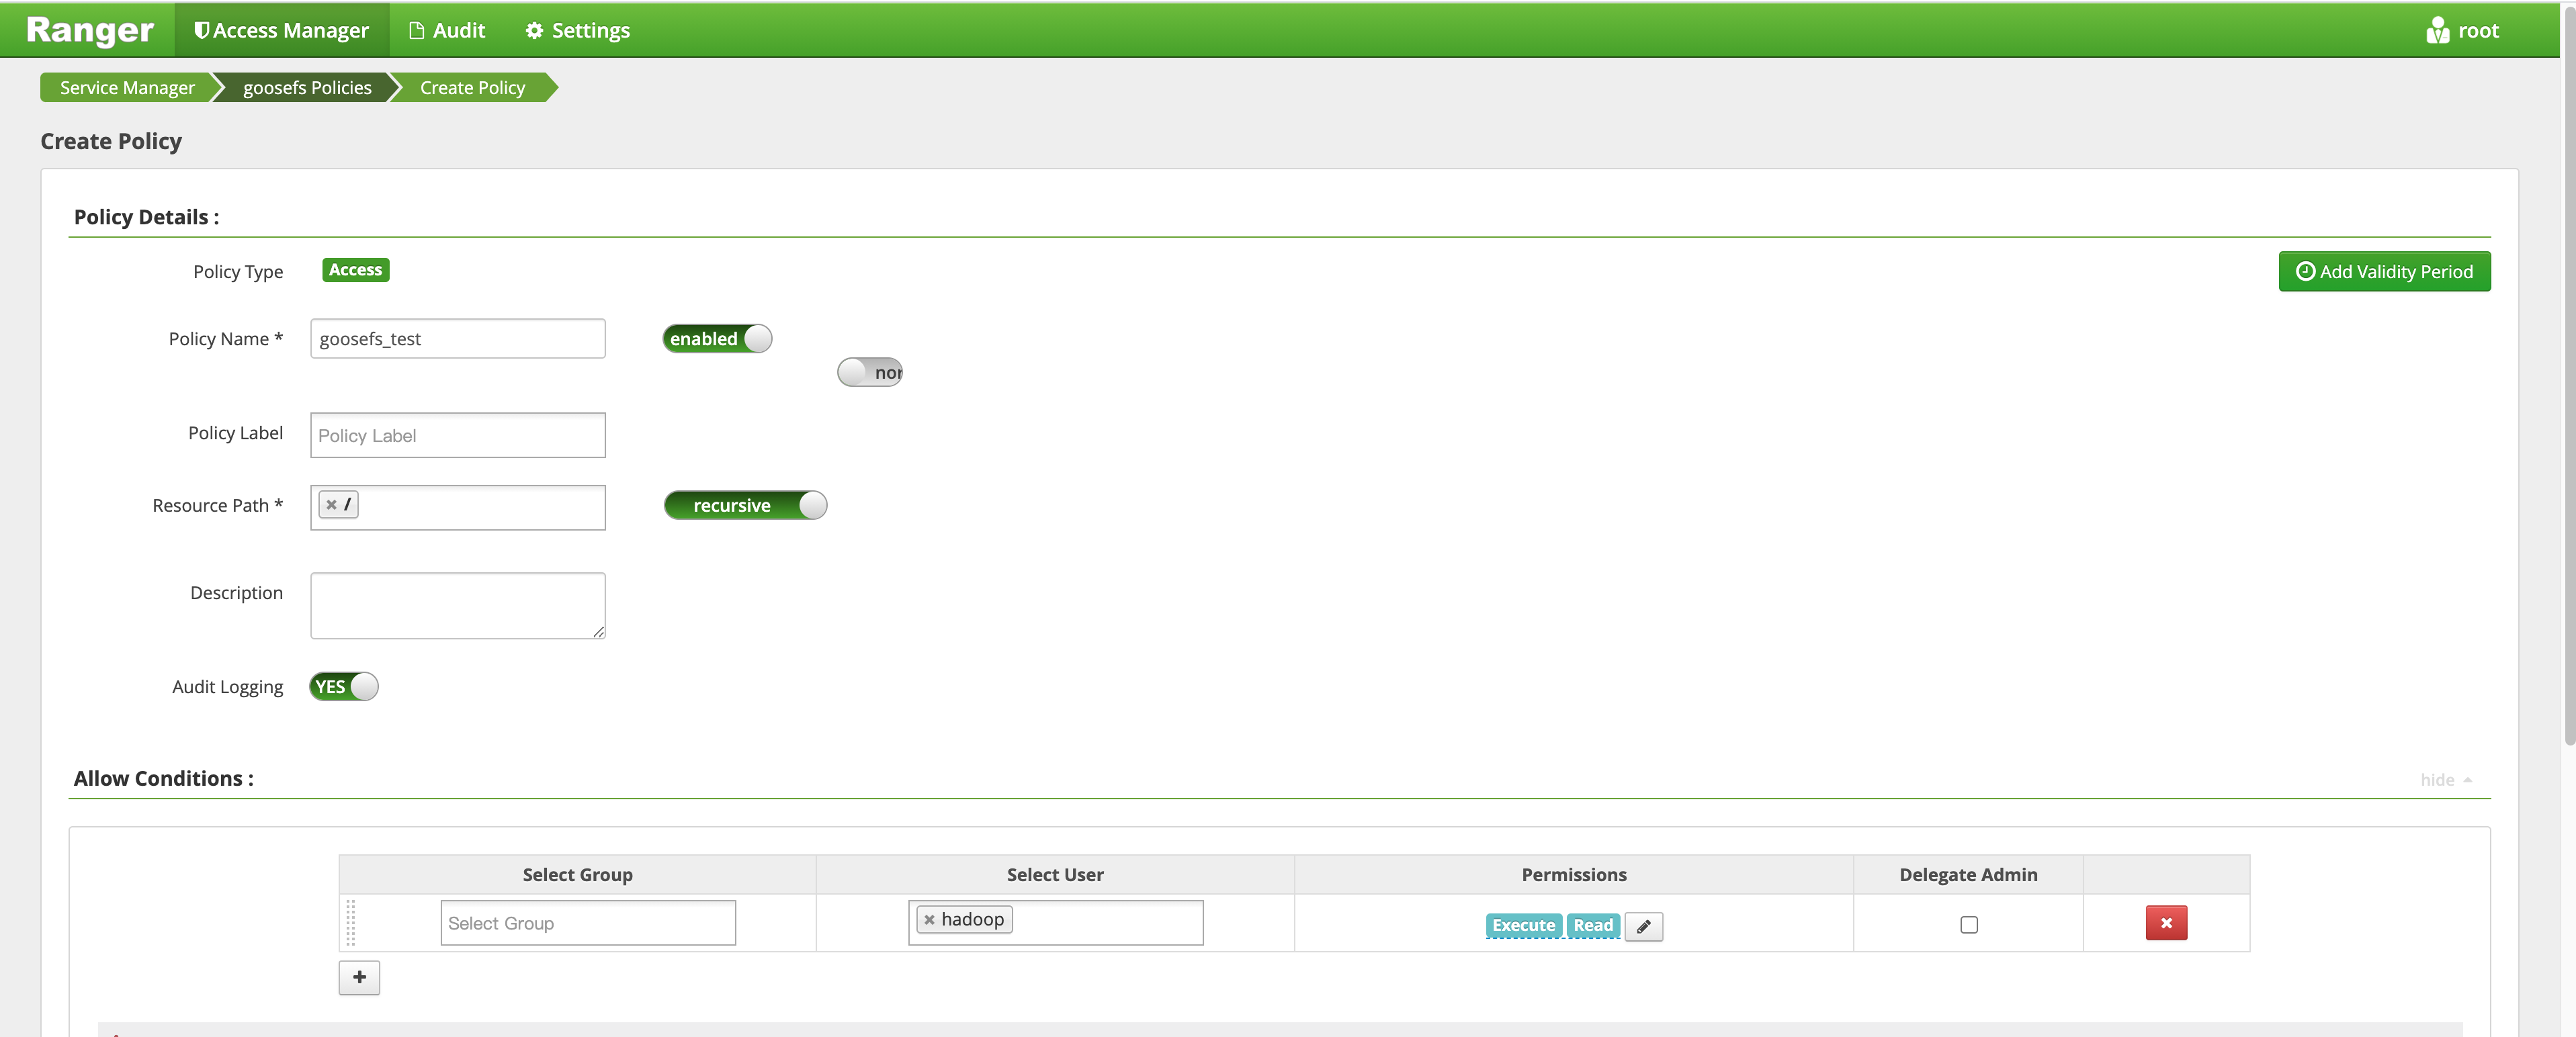

2. Verify the policy to see if the policy takes effect.


Was this page helpful?
You can also Contact Sales or Submit a Ticket for help.
Yes
No

