tencent cloud

Feedback

Windows C++

Last updated: 2024-07-18 15:26:12
    This tutorial mainly introduces how to implement a basic audio and video call.

    Prerequisites

    OS: Windows 7 or later.
    Development environment: Visual Studio 2010 or later (v2015 is recommended).

    Step 1. Import TRTC SDK
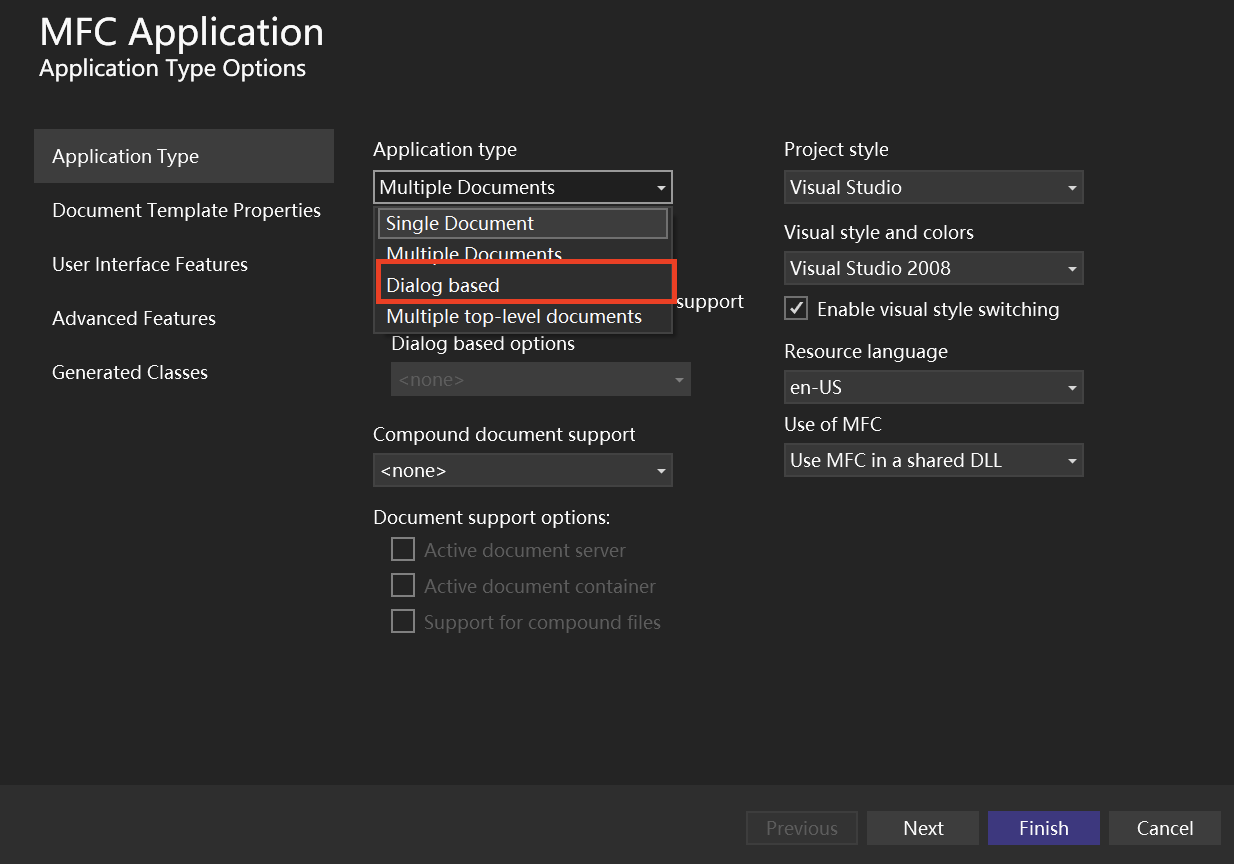
    1. Open Visual Studio and create a new MFC application called TRTCDemo.
    On the MFC Application page of the wizard, select Dialog based for Application type and default for other wizard configurations. Click Finish.
    
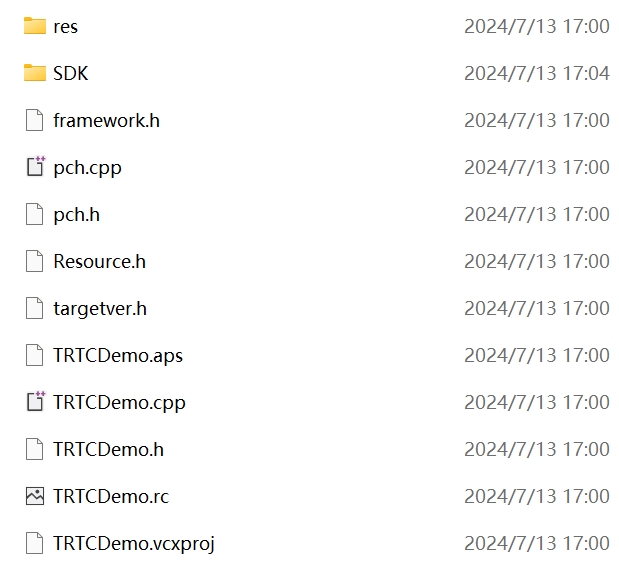
    2. Download the WIndows SDK and copy the decompressed SDK file to the TRTCDemo.vcxproj directory.


    Step 2. Configure project
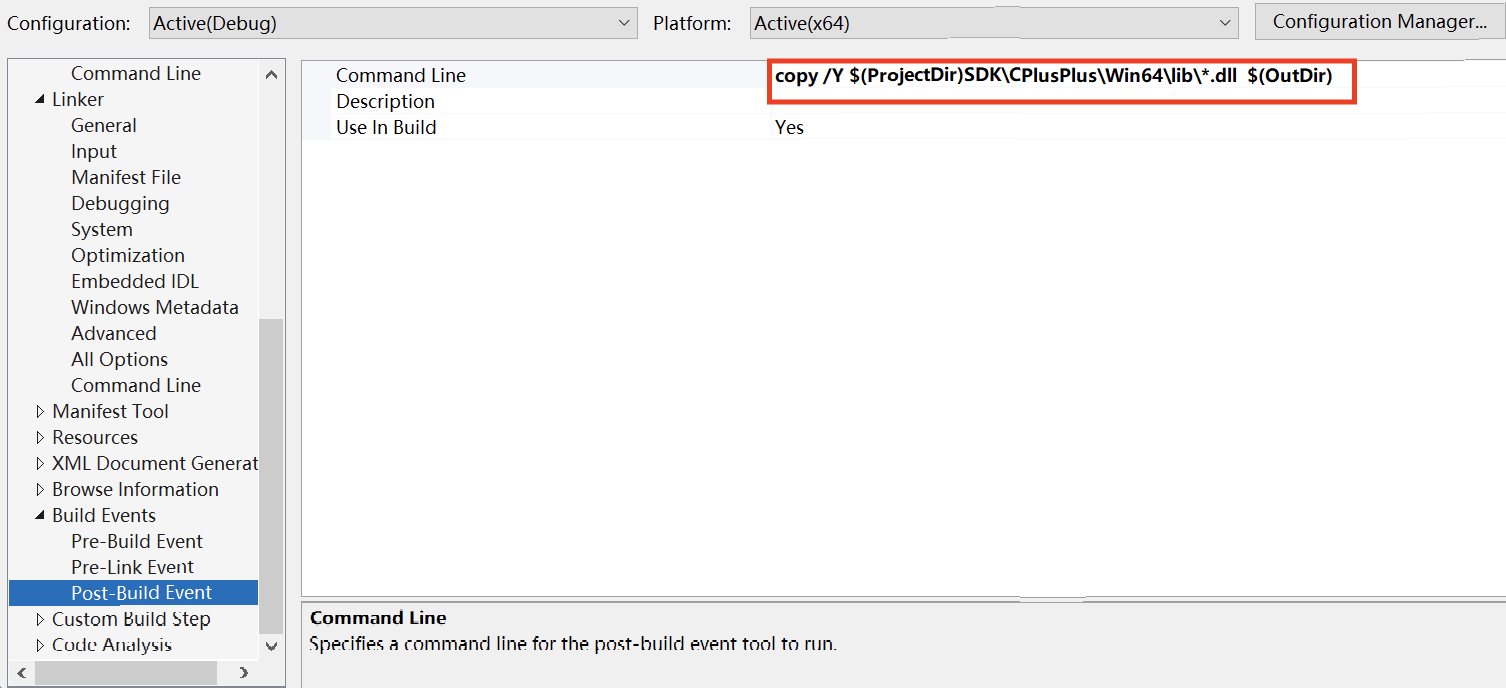
    Open the TRTCDemo.sln property page, following Solution Explorer > Right-click menu for TRTCDemo project > Properties, and perform the following configuration:
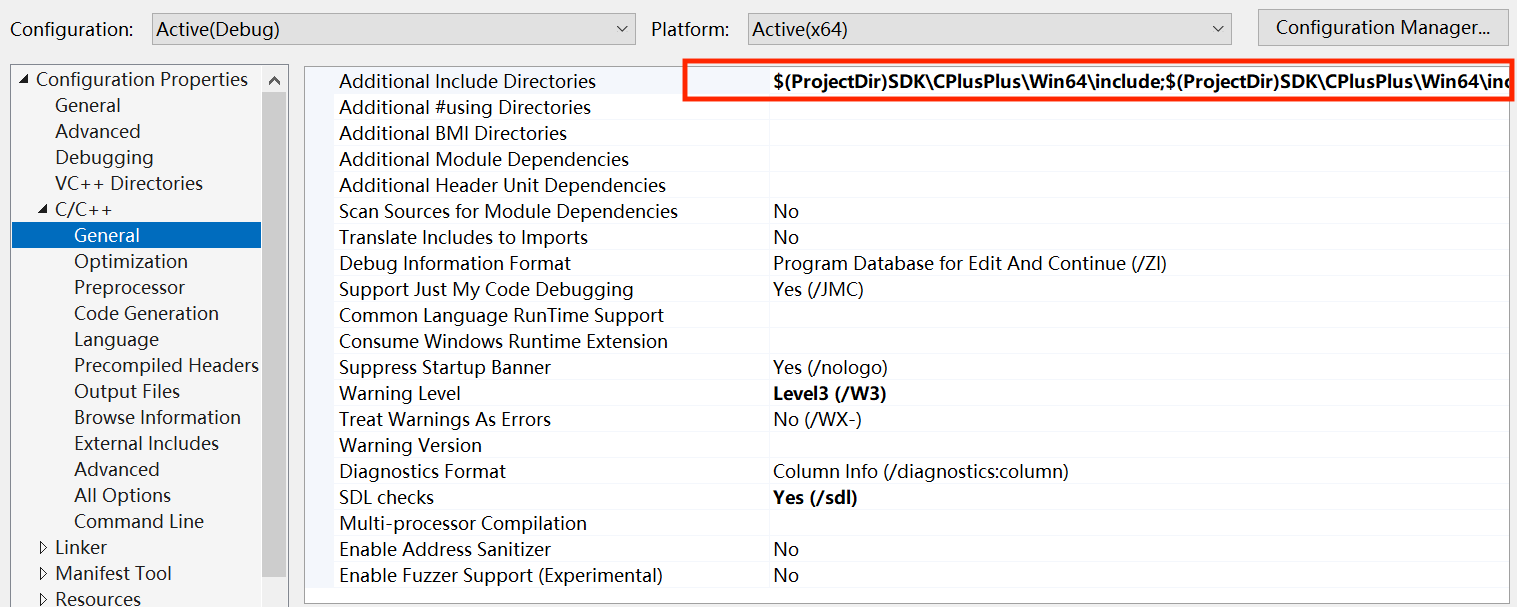
    1. Add Additional Include Directories:
    Following C/C++ > General > Additional Include Directories,add the SDK header directory:$(ProjectDir)SDK\\CPlusPlus\\Win64\\include and $(ProjectDir)SDK\\CPlusPlus\\Win64\\include\\TRTC.


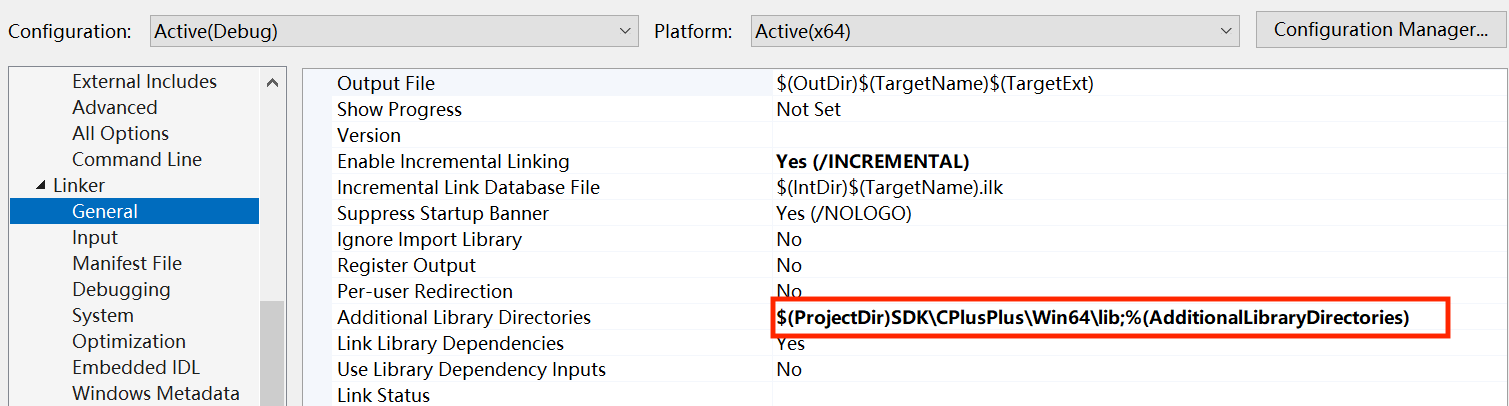
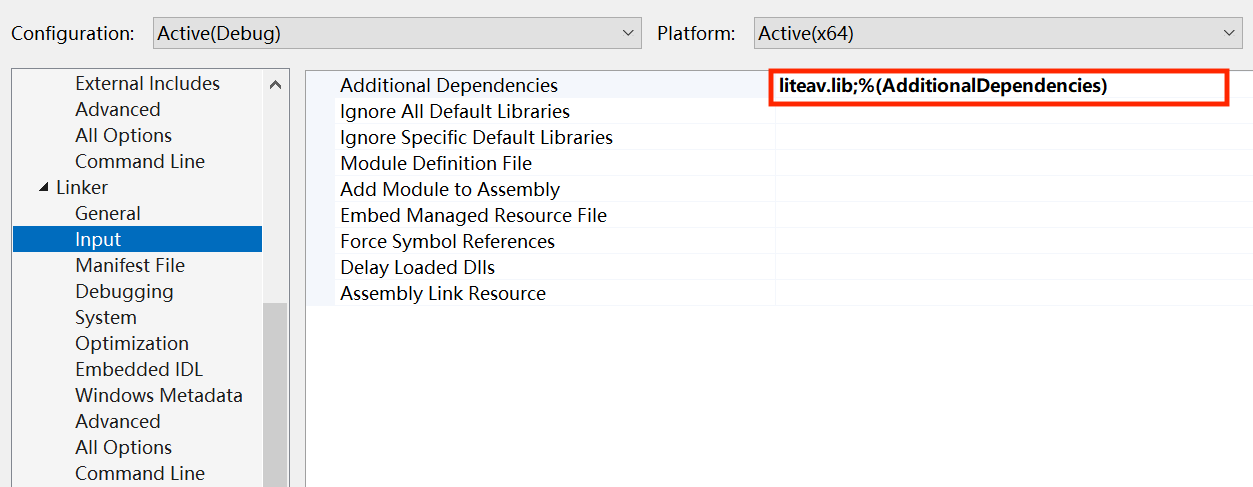
    2. Add Additional Library Directories:
    Following Linker > General > Additional Library Directories,add the SDK library directory: $(ProjectDir)SDK\\CPlusPlus\\Win64\\lib.


    3. Add Additional Dependencies:
    Following Linker > Input > Additional Dependencie,add SDK library files: liteav.lib.


    4. Add Command line:
    Following Build Events > Post-Build Event > Command line,add copy /Y $(ProjectDir)SDK\\CPlusPlus\\Win64\\lib\\*.dll $(OutDir).


    5. Print SDK version:
    Introduce a header file at the top of the TRTCDemoDlg.cpp file:
    #include "ITRTCCloud.h"
    Note:
    Refer to "ITRTCCloud.h" after the existing header file, otherwise you will get an error ITRTCCloud: undefined identifier.
    Add the following codes in CTRTCDemoDlg::OnInitDialog function:
    ITRTCCloud * pTRTCCloud = getTRTCShareInstance();
    CString szText;
    szText.Format(L"SDK version: %hs", pTRTCCloud->getSDKVersion());
    
    CWnd *pStatic = GetDlgItem(IDC_STATIC);
    pStatic->SetWindowTextW(szText);
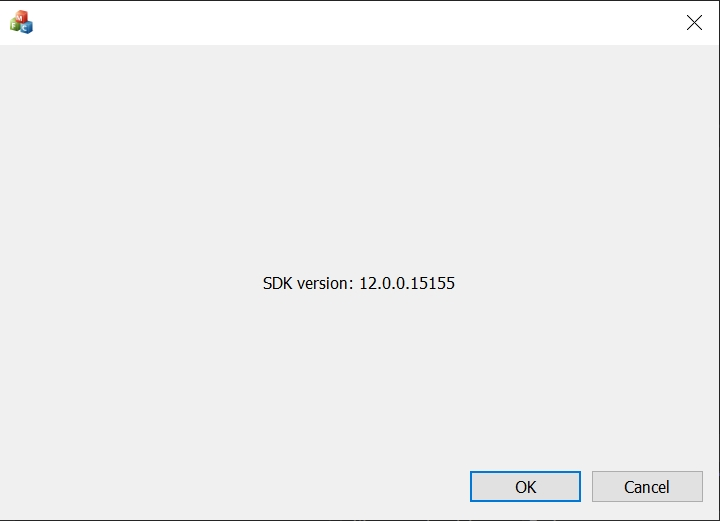
    After completing the preceding steps, click Run to print the SDK version number.


    Note:
    If you get the error message "module machine type 'x86' conflicts with target machine type 'x64', select 'x64' in the solution platform.

    Step 3. Create TRTC instance

    1. Reference header "ITRTCCloud.h" in the TRTCDemo.h file.
    The CTRTCDemo class is publicly inherited from CWinApp and ITRTCCloudCallback and declares callback functions and member variables.
    #include "ITRTCCloud.h"
    class CTRTCDemoApp : public CWinApp, public ITRTCCloudCallback
    {
    public:
    CTRTCDemoApp();
    
    // Overwrite
    public:
    virtual BOOL InitInstance();
    virtual void onError(TXLiteAVError errCode, const char* errMsg, void* extraInfo) override;
    virtual void onWarning(TXLiteAVWarning warningCode, const char* warningMsg, void* extrainfo) override;
    virtual void onEnterRoom(int result) override;
    virtual void onExitRoom(int reason) override;
    // Emplement
    
    DECLARE_MESSAGE_MAP()
    
    private:
    ITRTCCloud* trtc_cloud_; // Declare the member variable trtc cloud
    };
    2. Call the initialization interface to create an object instance of TRTC in CTRTCDemo::InitInstance() method within the TRTCDemo.cpp file.
    // Create trtc instance(singleton) and set up event listeners
    trtc_cloud_ = getTRTCShareInstance();
    trtc_cloud_->addCallback(this);
    Note:
    Add the initialization interface code after the SetRegistryKey(_T("Local AppWizard-Generated Applications")) method.
    3. Implement the declared callback method.
    // Listen for SDK events, and print logs for error messages such as "Current application is not authorized to use the camera"
    // Listen to the "onError" event, and print logs for errors such as "Camera is not authorized"
    void CTRTCDemoApp::onError(TXLiteAVError errCode, const char* errMsg, void* extraInfo) {
    if (errCode == ERR_CAMERA_NOT_AUTHORIZED) {
    printf("Current application is not authorized to use the camera");
    }
    }
    
    // Listen for SDK events, and print logs for warning messages
    // Listen to the "onWarning" event, and print logs for errors such as "WARNING_VIDEO_RENDER_FAIL"
    void CTRTCDemoApp::onWarning(TXLiteAVWarning warningCode, const char* warningMsg, void* extrainfo) {
    if (warningCode == WARNING_VIDEO_RENDER_FAIL) {
    printf("WARNING_VIDEO_RENDER_FAIL");
    }
    
    }
    
    // Listen for the `onEnterRoom` event of the SDK to get the room entry result
    // override to the onEnterRoom event of the SDK and learn whether the room is successfully entered
    void CTRTCDemoApp::onEnterRoom(int result) {
    if (result > 0) {
    printf("Enter room succeed");
    }
    else {
    printf("Enter room failed");
    }
    }
    
    // Listen for the `onExitRoom` event of the SDK to get the room exit result
    // override to the onExitRoom event of the SDK and learn whether the room is successfully exited
    void CTRTCDemoApp::onExitRoom(int reason) {
    if (reason == 0) {
    printf("Exit current room by calling the 'exitRoom' api of sdk ...");
    } else if (reason == 1) {
    printf("Kicked out of the current room by server through the restful api...");
    } else if (reason == 2) {
    printf("Current room is dissolved by server through the restful api...");
    }
    }

    Step 4. Enter the room

    1. Click Create Application in the Tencent RTC console to get the SDKAppID under Application Overview.


    2. Select SDKAppID down in the UserSig Tools, enter your UserID, and click Generate to get your own UserSig.


    3. After setting the incoming parameter TRTCParams in the CTRTCDemo::InitInstance() method, call the enterRoom interface to enter the room.
    As an Anchor:
    BOOL CTRTCDemo::InitInstance()
    {
    // ...other codes
    // Assemble TRTC room entry parameters. Replace the field values in `TRTCParams` with your own parameter values
    // Replace each field in TRTCParams with your own parameters
    liteav::TRTCParams trtcParams;
    trtcParams.sdkAppId = 1400000123; // Replace with your own SDKAppID
    trtcParams.userId = "denny"; // Replace with your own user ID
    trtcParams.roomId = 123321; // Replace with your own room number
    trtcParams.userSig = "xxx"; // Replace with your own userSig
    trtcParams.role = liteav::TRTCRoleAnchor;
    
    // If your scenario is live streaming, set the application scenario to `TRTC_APP_SCENE_LIVE`
    // If your application scenario is a group video call, use "TRTC_APP_SCENE_LIVE"
    trtc_cloud_->enterRoom(trtcParams, liteav::TRTCAppSceneLIVE);
    // ...other codes
    }
    As an audience:
    BOOL CTRTCDemo::InitInstance()
    {
    // ...other codes
    // Assemble TRTC room entry parameters. Replace the field values in `TRTCParams` with your own parameter values
    // Replace each field in TRTCParams with your own parameters
    liteav::TRTCParams trtcParams;
    trtcParams.sdkAppId = 1400000123; // Replace with your own SDKAppID
    trtcParams.userId = "denny"; // Replace with your own user ID
    trtcParams.roomId = 123321; // Replace with your own room number
    trtcParams.userSig = "xxx"; // Replace with your own userSig
    trtcParams.role = liteav::TRTCRoleAudience;
    
    // If your scenario is live streaming, set the application scenario to `TRTC_APP_SCENE_LIVE`
    // If your application scenario is a group video call, use "TRTC_APP_SCENE_LIVE"
    trtc_cloud_->enterRoom(trtcParams, liteav::TRTCAppSceneLIVE)
    // ...other codes
    }
    Note:
    If you enter the room as an audience, sdkAppId and roomId need to be the same as on the anchor side, while userId and userSig need to be replaced with your own values.

    Step 5. Turn on Camera

    1. In the resource file IDD_TRTCDEMO_DIALOG, click Toolbox in the left border and add Picture Control to the dialog box.
    2. Select Properties from the right-click menu and select AFX_IDC_PICTURE for ID.
    3. Call the setLocalRenderParams in CTRTCDemo::onEnterRoom() to set the rendering parameters of the local preview, then call the startLocalPreview to open the camera preview, as shown in the following code:
    void CTRTCDemo::onEnterRoom(int result) {
    if (result > 0) {
    // Set the preview mode of the local video image: Enable horizontal mirroring and set the fill mode for the video image
    liteav::TRTCRenderParams render_params;
    render_params.mirrorType = liteav::TRTCVideoMirrorType_Enable;
    render_params.fillMode = TRTCVideoFillMode_Fill;
    trtc_cloud_->setLocalRenderParams(render_params);
    
    // Start a preview of the local camera
    CWnd* pLocalVideoView = m_pMainWnd->GetDlgItem(AFX_IDC_PICTURE);
    auto local_view = (liteav::TXView)(pLocalVideoView->GetSafeHwnd());
    trtc_cloud_->startLocalPreview(local_view);
    
    printf("Enter room succeed");
    }
    else {
    printf("Enter room failed");
    }
    }

    Step 6. Turn on microphone

    Call startLocalAudio to enable microphone capture. This interface requires you to determine the capture mode by the quality parameter. It is recommended to select one of the following modes that is suitable for your project according to your needs.
    // Enable microphone acquisition and set the current scene to: Voice mode
    // For high noise suppression capability, strong and weak network resistance
    trtc_cloud_->startLocalAudio(TRTCAudioQualitySpeech);
    
    // Enable microphone acquisition, and set the current scene to: Music mode
    // For high fidelity acquisition, low sound quality loss, recommended to use with professional sound cards
    trtc_cloud_->startLocalAudio(TRTCAudioQualityMusic);

    Step 7. Play/stop video streaming

    1. Follow steps 1-4 to create a new project and enter denny's room as an audience.
    2. Add a Picture Control to the resource file IDD_TRTCDEMO_DIALOG and select the ID as AFX_IDC_PICTURE.
    3. Call the startRemoteView in the CTRTCDemo::onEnterRoom() method to play the video of the remote user.
    if (result > 0) {
    // Start a preview of the local camera
    CWnd* pVideoView = m_pMainWnd->GetDlgItem(AFX_IDC_PICTURE);
    auto video_view = (liteav::TXView)(pVideoView->GetSafeHwnd());
    // Play denny's camera footage
    trtc_cloud_->startRemoteView("denny", liteav::TRTCVideoStreamTypeBig, video_view);
    printf("Enter room succeed");
    }
    Then, you can call the stopRemoteView to stop the videos of a remote user. Alternatively, you can also stop the videos of all remote users via the stopAllRemoteView.
    // Stop denny's camera footage
    trtc_cloud_->stopRemoteView("denny", liteav::TRTCVideoStreamTypeBig);
    // Stop all camera footages
    trtc_cloud_->stopAllRemoteView();

    Step 8. Play/stop the audio stream

    Mute the voice of remote user denny by calling the muteRemoteAudio("denny", true).
    // Mute user with id denny
    trtc_cloud_->muteRemoteAudio("denny", true);
    You can also unmute him later by calling the muteRemoteAudio("denny", false).
    // Unmute user with id denny
    trtc_cloud_->muteRemoteAudio("denny", false);

    Step 9. Exit the room

    Call the exitRoom to exit the current room, the SDK will notify you after the check-out through the onExitRoom(int reason) callback event.
    // Exit current room
    trtc_cloud_->exitRoom();

    FAQs

    API Reference at API Reference.
    If you encounter any issues during integration and use, please refer to Frequently Asked Questions.

    Contact us

    If you have any suggestions or feedback, please contact info_rtc@tencent.com.
    Contact Us

    Contact our sales team or business advisors to help your business.

    Technical Support

    Open a ticket if you're looking for further assistance. Our Ticket is 7x24 avaliable.

    7x24 Phone Support