
iOS
Last updated: 2025-06-23 11:17:02
iOS
Last updated: 2025-06-23 11:17:02
This tutorial mainly introduces how to implement a basic audio and video call with Objective-C.
Prerequisites
Xcode 13.0 or later.
iPhone or iPad with iOS 9.0 or later.
A valid developer signature for your project.
Integration guideline
Step 1. Import TRTC SDK
1. Run the following command in a terminal window to install CocoaPods. If you have installed CocoaPods, skip this step.
sudo gem install cocoapods
2. In the terminal window, go to the project root directory and run the following command to create the Podfile for your project.
pod init
3. Edit and save the Podfile as follows.
platform :ios, '8.0'# Modify the 'App' to the name of your projecttarget 'App' dopod 'TXLiteAVSDK_TRTC', :podspec => 'https://liteav.sdk.qcloud.com/pod/liteavsdkspec/TXLiteAVSDK_TRTC.podspec'end
4. In the terminal window, run the following command to update the local library files and download the TRTC SDK.
pod install
Note:
After the
pod install executed, a new .xcworkspace project file is generated. Double-click the .xcworkspace file to open it.Step 2. Configure project
1. Once the .xcworkspace file opened, click on the Project Navigator on the left in the Xcode navigation bar, click on your project name, and make sure you select the correct TARGETS in the edit area.
2. In the
Build Settings TAB, search for User Script Sandboxing and set its value to No, which could allow the user script access to a wider range of system resources and files.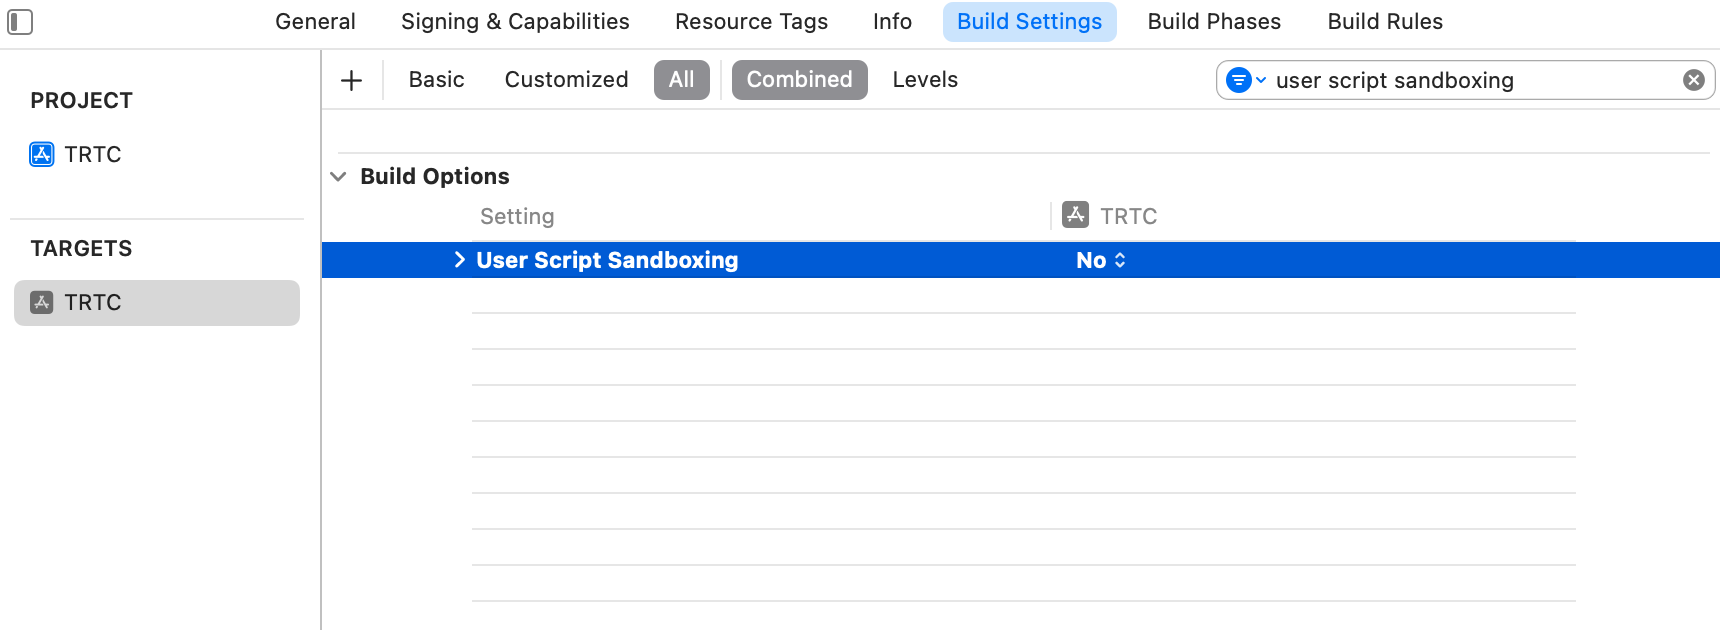
3. In the the
Info.plist TAB, add the Privacy-Microphone Usage Description and Privacy-Microphone Usage Description, and fill in the target prompt words used by the Microphone/Camera to obtain the permission to use the microphone and camera.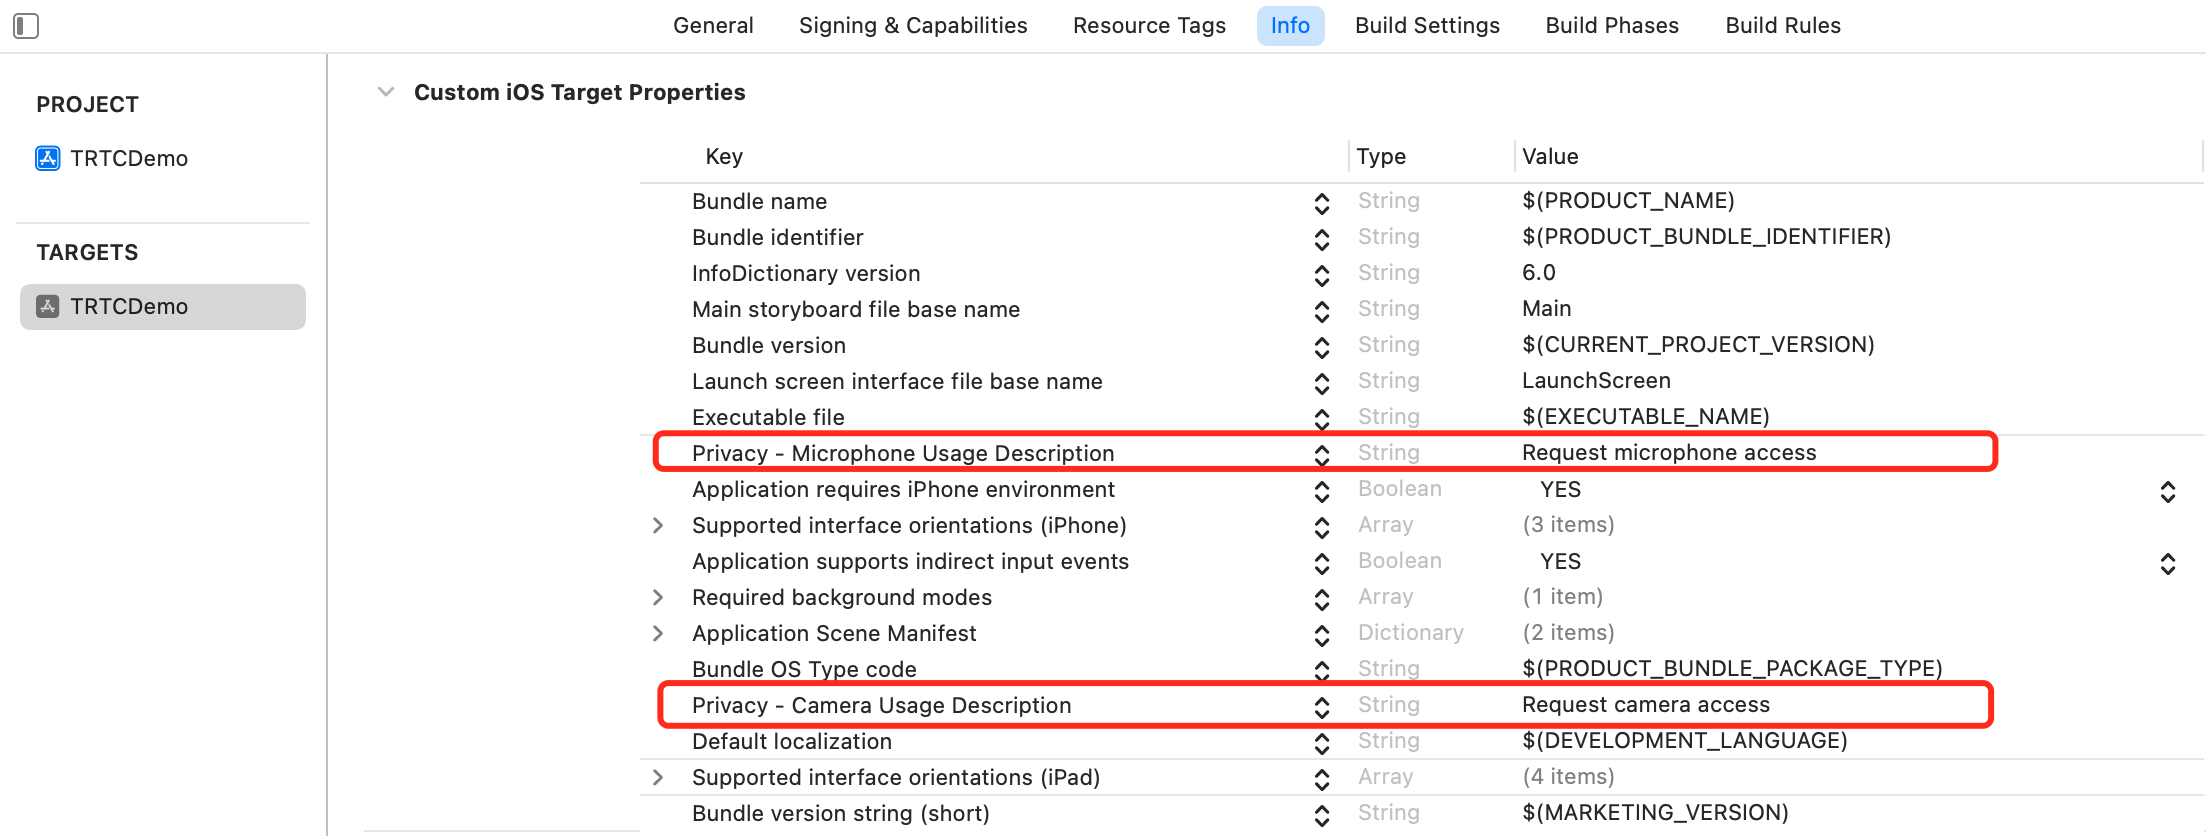
4. In the
Signing & Capabilities TAB, add the Background Modes and check Audio, AirPlay and Picture in Picture to allow the app to run audio, AirPlay and picture-in-picture functions in the background.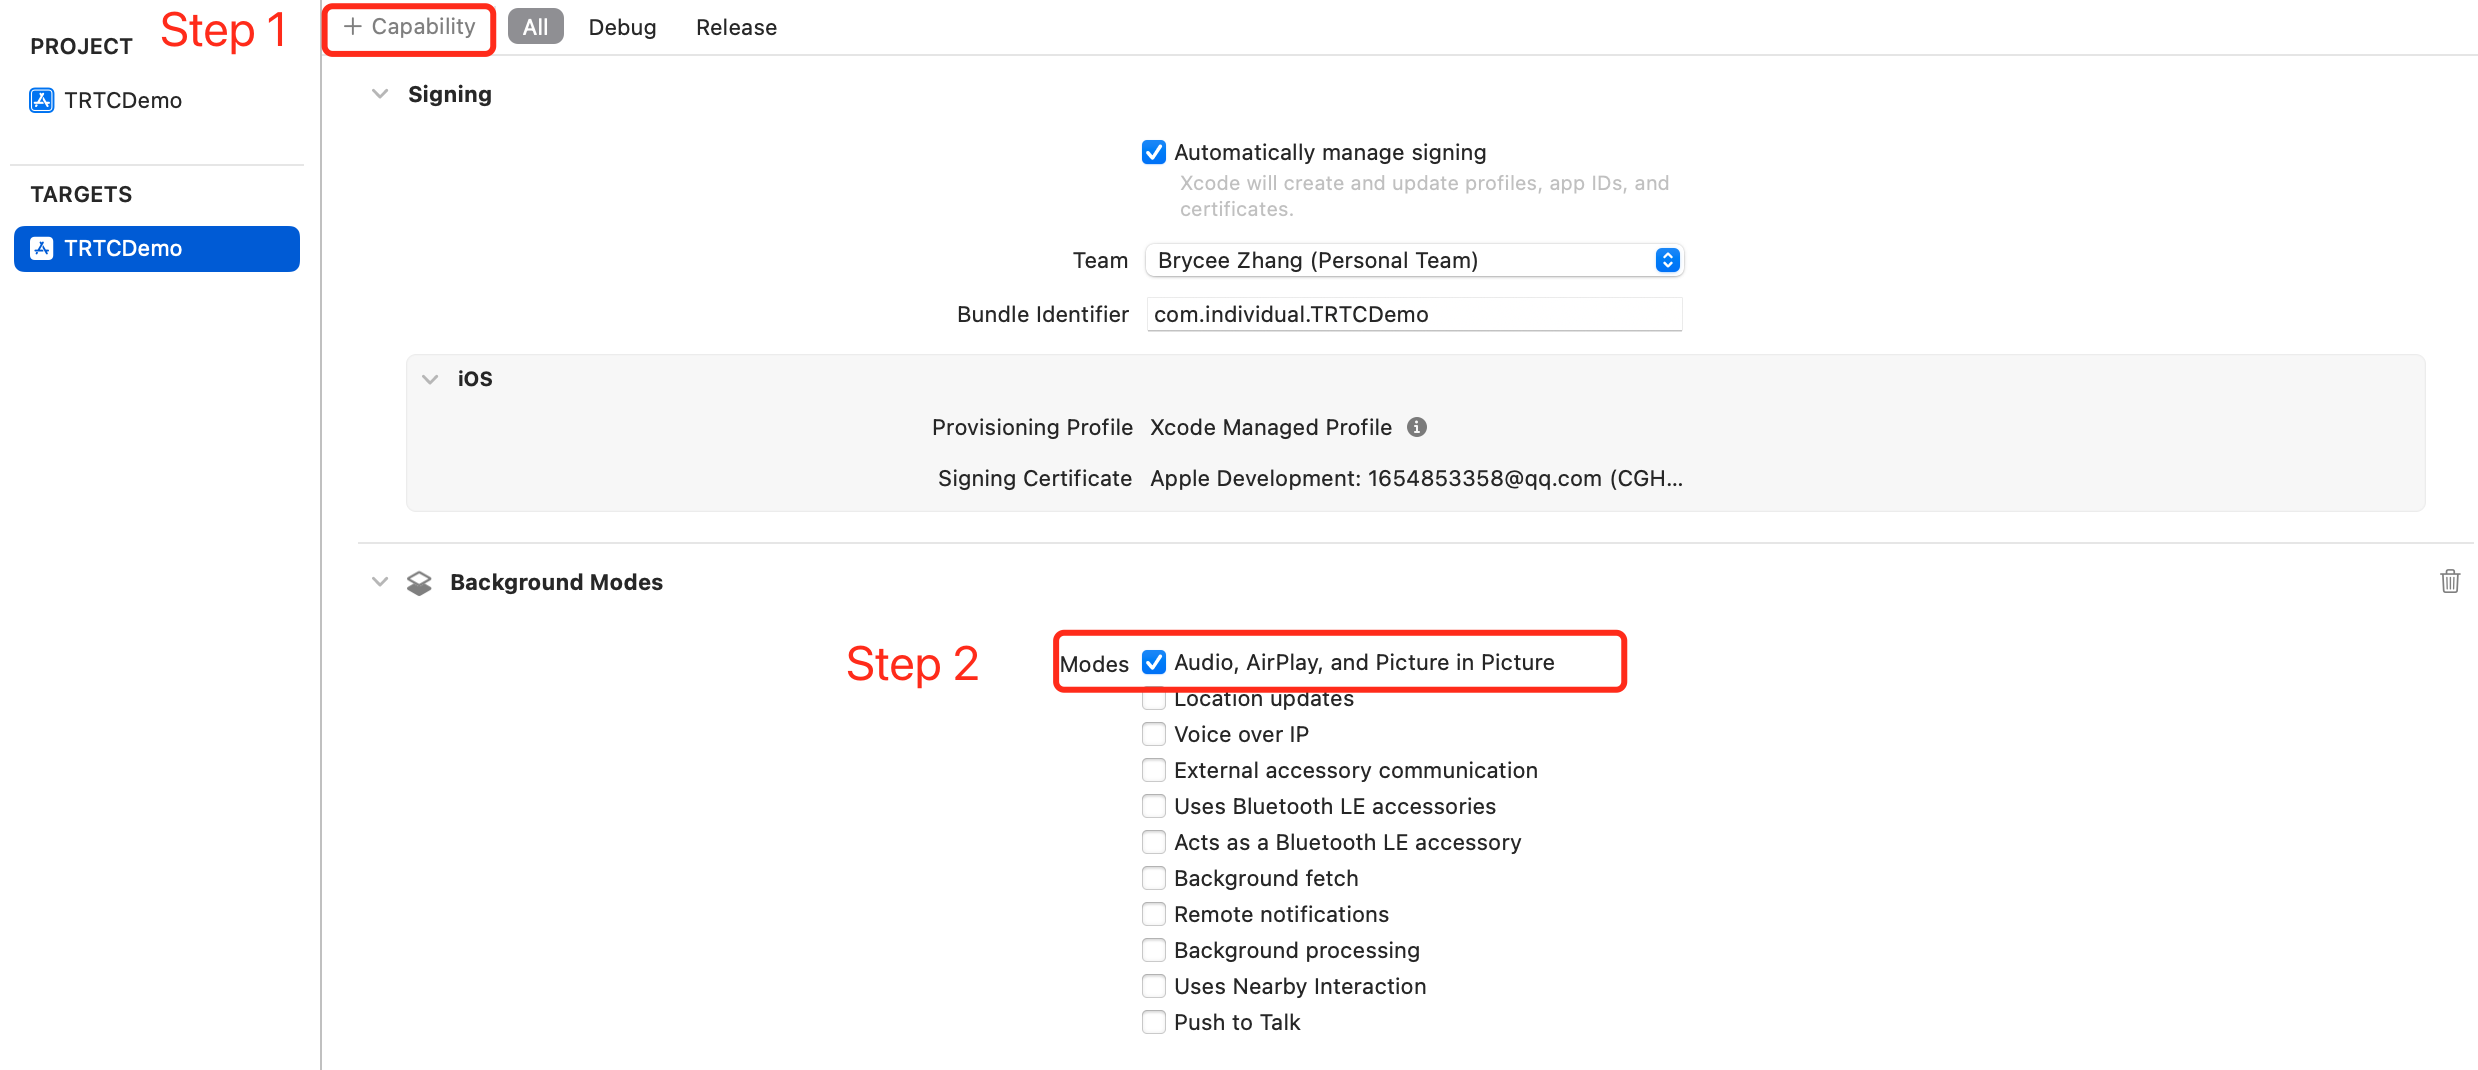
Step 3. Create TRTC instance
1. Import the TRTC SDK in the
AppDelegate.h file.@import TXLiteAVSDK_TRTC; // Import TRTC SDK Module
2. Declare the TRTCCloud property and the TRTCCloudDelegate interface in the
AppDelegate.h file.@interface AppDelegate : UIResponder <UIApplicationDelegate, TRTCCloudDelegate> // Declare the TRTCCloudDelegate interface@property (nonatomic, strong) TRTCCloud *trtcCloud; // Declare the TRTCCloud property
3. After entering the
AppDelegate.m file, call sharedInstance to create the TRTC instance in the didFinishLaunchingWithOptionsmethod and set up the event listener.- (BOOL)application:(UIApplication *)application didFinishLaunchingWithOptions:(NSDictionary *)launchOptions {// Create a TRTC instance and set up a listener_trtcCloud = [TRTCCloud sharedInstance];_trtcCloud.delegate = self;return YES;}// Listen for the 'onError' event- (void)onError:(TXLiteAVError)errCodeerrMsg:(nullable NSString *)errMsgextInfo:(nullable NSDictionary *)extInfo{// Handle the 'onError' event// Recommend to display OnError information via 'toastTip:'NSString *errCodeStr = [NSString stringWithFormat:@"%ld", (long)errCode];NSString *extInfoStr = extInfo ? [extInfo description] : @"";NSString *notification = [NSString stringWithFormat:@"%@, %@, %@", errCodeStr, errMsg, extInfoStr];[self toastTip:notification];}// Implement 'toastTip:'- (void)toastTip:(NSString *)tip {UIAlertController *alert = [UIAlertController alertControllerWithTitle:@"Tip"message:tippreferredStyle:UIAlertControllerStyleAlert];UIAlertAction *okAction = [UIAlertAction actionWithTitle:@"Confirm"style:UIAlertActionStyleDefaulthandler:nil];[alert addAction:okAction];[self.window.rootViewController presentViewController:alert animated:YES completion:nil];dispatch_after(dispatch_time(DISPATCH_TIME_NOW, (int64_t)(2.0 * NSEC_PER_SEC)), dispatch_get_main_queue(), ^{[alert dismissViewControllerAnimated:YES completion:nil];});}
Step 4. Enter the room
Set the entry parameter
TRTCParams and call enterRoom to successfully enter the room, which is usually called after clicking the Start Call button.Parameter | Type | Description |
sdkAppId | number | |
userId | string | User ID specified by you. |
userSig | string | |
roomId | number | Room ID specified by you, usually a unique room ID. |
#import "AppDelegate.h" // Import the "AppDelegate.h" file- (void)enterRoom {// Modify the following parameters to your ownTRTCParams *trtcParams = [[TRTCParams alloc] init];trtcParams.sdkAppId = 1400000123;trtcParams.userId = @"denny";trtcParams.userSig = @"";trtcParams.roomId = 123321;// For multi-party video calls, `TRTC_APP_SCENE_LIVE` is recommendedAppDelegate *appDelegate = (AppDelegate *)[[UIApplication sharedApplication] delegate];[appDelegate.trtcCloud enterRoom:trtcParams appScene:TRTCAppSceneLIVE];}// Listen for the 'onEnterRoom' event- (void)onEnterRoom:(NSInteger)result {// Handle the 'onEnterRoom' event// Recommend to display OnError information via 'toastTip:'}
Step 5. Turn on/off Camera
1. Declare the UIWindow and UIView properties in the
ViewController.h file.@property (strong, nonatomic) UIWindow *window; // Declare the UIWindow property@property (nonatomic, strong) UIView *localCameraVideoView; // Declare the UIView property
2. Set the render parameter
setLocalRenderParams for the local preview, and call startLocalPreview for the local preview, and start the push after successfully calling enterRoom.- (void)startLocalPreview {// Set the local preview rendering parameterTRTCRenderParams *trtcRenderParams = [[TRTCRenderParams alloc] init];trtcRenderParams.fillMode = TRTCVideoFillMode_Fill;trtcRenderParams.mirrorType = TRTCVideoMirrorTypeAuto;AppDelegate *appDelegate = (AppDelegate *)[[UIApplication sharedApplication] delegate];[appDelegate.trtcCloud setLocalRenderParams:trtcRenderParams];// Preview the collected content locally[appDelegate.trtcCloud startLocalPreview:YES view:self.localCameraVideoView];}
Call
stopLocalPreview to turn off the camera preview and stop pushing local video information.AppDelegate *appDelegate = (AppDelegate *)[[UIApplication sharedApplication] delegate];[appDelegate.trtcCloud stopLocalPreview];
3. Perform other extended device functions such as "Switch front and rear cameras", "Set focus Mode", and "Flash".
// By default, the front camera is enabled and switch to the rear cameraAppDelegate *appDelegate = (AppDelegate *)[[UIApplication sharedApplication] delegate];TXDeviceManager * deviceManager = [appDelegate.trtcCloud getDeviceManager];if([deviceManager isFrontCamera]) {[deviceManager switchCamera:false];}// Switch to the front cameraAppDelegate *appDelegate = (AppDelegate *)[[UIApplication sharedApplication] delegate];TXDeviceManager * deviceManager = [appDelegate.trtcCloud getDeviceManager];[deviceManager switchCamera:true];
// If the automatic face recognition supported, enable the auto focus functionAppDelegate *appDelegate = (AppDelegate *)[[UIApplication sharedApplication] delegate];TXDeviceManager * deviceManager = [appDelegate.trtcCloud getDeviceManager];if([deviceManager isAutoFocusEnabled]) {[deviceManager enableCameraAutoFocus:true];}// Disable the autofocus functionAppDelegate *appDelegate = (AppDelegate *)[[UIApplication sharedApplication] delegate];TXDeviceManager * deviceManager = [appDelegate.trtcCloud getDeviceManager];[deviceManager enableCameraAutoFocus:false];
// The flash can be turned on when using the rear cameraAppDelegate *appDelegate = (AppDelegate *)[[UIApplication sharedApplication] delegate];TXDeviceManager * deviceManager = [appDelegate.trtcCloud getDeviceManager];if(![deviceManager isFrontCamera]) {[deviceManager enableCameraTorch:true];}// Turn off the flashAppDelegate *appDelegate = (AppDelegate *)[[UIApplication sharedApplication] delegate];TXDeviceManager * deviceManager = [appDelegate.trtcCloud getDeviceManager];[deviceManager enableCameraTorch:false];
4. Initialize the localCameraVideoView in the
ViewController.m file, and add it to the view hierarchy of the current view.#import "AppDelegate.h" // Import the "AppDelegate.h" file- (void)viewDidLoad {[super viewDidLoad];// Do any additional setup after loading the view.// Initialize localCameraVideoViewself.localCameraVideoView = [[UIView alloc] initWithFrame:self.view.bounds];self.localCameraVideoView.backgroundColor = [UIColor blackColor];[self viewDidAppear];}- (void)viewDidAppear {AppDelegate *appDelegate = (AppDelegate *)[[UIApplication sharedApplication] delegate];// Add the localCameraVideoView to the view hierarchy of the current view[self.view addSubview:self.localCameraVideoView];// Start local preview[appDelegate.trtcCloud startLocalPreview:YES view:self.localCameraVideoView];}@end
Step 6. Turn on/off microphone
Call the
startLocalAudio to turn on microphone capture. Select one of the following sound Quality parameters according to your requirements.// Enable microphone acquisition and set the current scene to: Voice mode// For high noise suppression capability, strong and weak network resistanceAppDelegate *appDelegate = (AppDelegate *)[[UIApplication sharedApplication] delegate];[appDelegate.trtcCloud startLocalAudio:TRTCAudioQualitySpeech];
// Enable microphone acquisition, and set the current scene to: Music mode// For high fidelity acquisition, low sound quality loss, recommended to use with professional sound cardsAppDelegate *appDelegate = (AppDelegate *)[[UIApplication sharedApplication] delegate];[appDelegate.trtcCloud startLocalAudio:TRTCAudioQualityMusic];
Call
stopLocalAudio to turn off microphone collection and stop pushing local audio information.AppDelegate *appDelegate = (AppDelegate *)[[UIApplication sharedApplication] delegate];[appDelegate.trtcCloud stopLocalAudio];
Step 7. Play/stop video streaming
1. Listen to onUserVideoAvailable before entering the room. When you receive the
onUserVideoAvailable(userId, true) notification, it means that there are video frames available to play in the road screen.2. Call
startRemoteView to play the video content collected by the remote side.- (void)startRemoteView{// Play the remote side's videoAppDelegate *appDelegate = (AppDelegate *)[[UIApplication sharedApplication] delegate];[appDelegate.trtcCloud startRemoteView:@"denny" streamType:TRTCVideoStreamTypeBig view:self.localCameraVideoView];}
Call
stopRemoteView to stop the remote video.// Stop the videoAppDelegate *appDelegate = (AppDelegate *)[[UIApplication sharedApplication] delegate];[appDelegate.trtcCloud stopRemoteView:@"denny"]; // Only stop denny's video[appDelegate.trtcCloud stopAllRemoteView]; // Stop all videos
Step 8. Play/stop the audio stream
Call
muteRemoteAudio to mute or unmute the remote side's sound.// MuteAppDelegate *appDelegate = (AppDelegate *)[[UIApplication sharedApplication] delegate];[appDelegate.trtcCloud muteRemoteAudio:@"denny" mute:YES]; // Only mute denny[appDelegate.trtcCloud muteAllRemoteAudio:YES]; // Mute all remote users
// UnmuteAppDelegate *appDelegate = (AppDelegate *)[[UIApplication sharedApplication] delegate];[appDelegate.trtcCloud muteRemoteAudio:@"denny" mute:NO]; // Only unmute denny[appDelegate.trtcCloud muteAllRemoteAudio:NO]; // Unmute all remote users
Step 9. Exit the room
Call
exitRoom to exit the current room, and the TRTC SDK will notify you after check-out via the onExitRoom callback event.// Exit current roomAppDelegate *appDelegate = (AppDelegate *)[[UIApplication sharedApplication] delegate];[appDelegate.trtcCloud exitRoom];// Listen for the onExitRoom callback to find out why you checked out- (void)onExitRoom:(NSInteger)reason {if (reason == 0) {NSLog(@"Exit current room by calling the 'exitRoom' api of sdk ...");} else if (reason == 1) {NSLog(@"Kicked out of the current room by server through the restful api...");} else if (reason == 2) {NSLog(@"Current room is dissolved by server through the restful api...");}}
FAQs
Contact us
If you have any suggestions or feedback, please contact
info_rtc@tencent.com.Was this page helpful?
You can also Contact Sales or Submit a Ticket for help.
Yes
No
Feedback