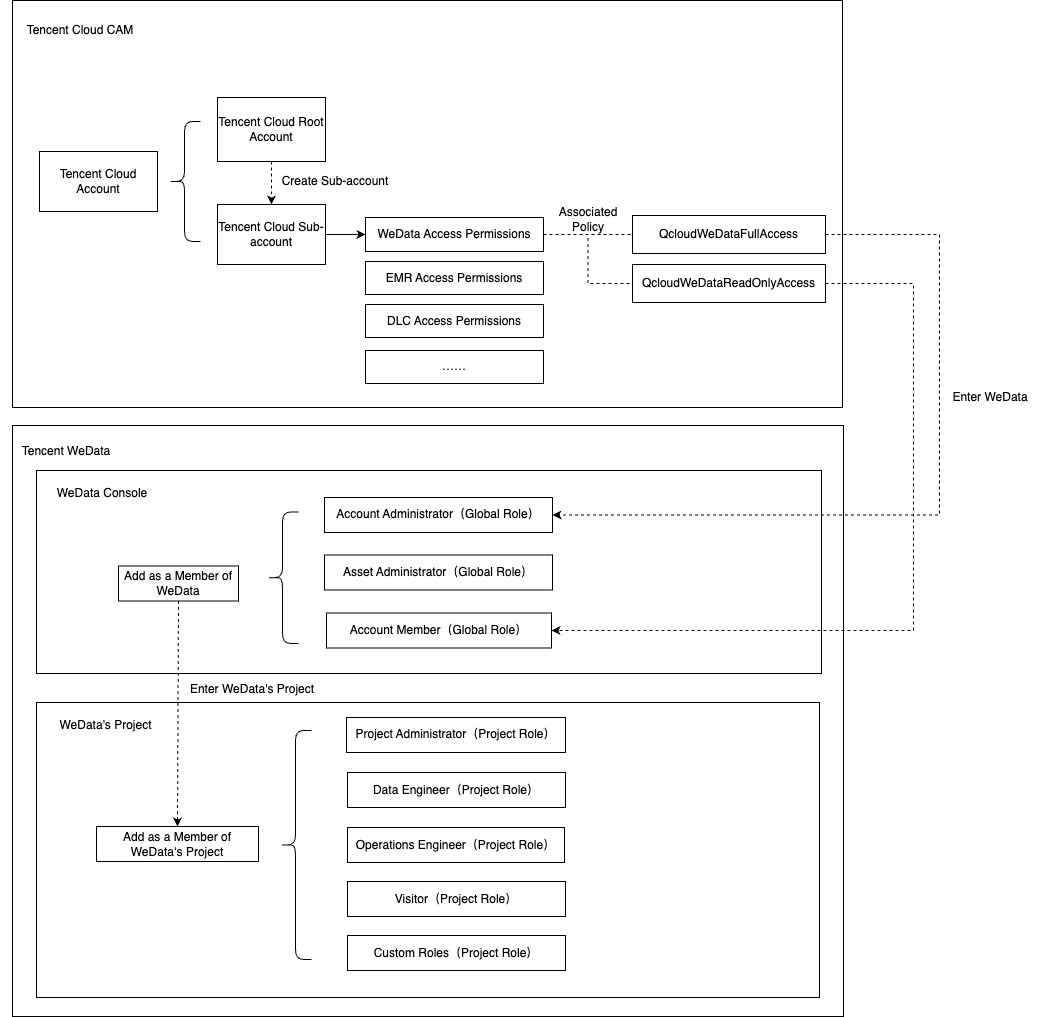
WeData is based on Tencent Cloud Certificate Authority Management user and permission management system, supporting users to log in through Tencent Cloud official console using a root account or sub-account. Meanwhile, within the WeData product, there is an independent RBAC-based user role and permission control system. The Tencent Cloud account needs to be granted both CAM policies and WeData member roles.
WeData user management is divided into three layers: Tencent Cloud Account, WeData global-level members, and WeData project-level members. User access control is implemented through Tencent Cloud Certificate Authority M policies, global-level roles, and project-level roles, as shown in the table below:
Account Type
Permission Management
Permission Control Scope
Policy/Role Name
Permission Description
Remarks
Tencent Cloud Account
Tencent Cloud Certificate Authority M policies
Tencent Cloud platform resources
QcloudWeDataFullAccess
WeData full access
Associated with WeData Root Account Administrator Role
QcloudWeDataReadOnly
WeData read-only access
Associated with WeData Root Account Member Role
WeData global-level members
WeData global-level Role
WeData global menu, including console, data assets, etc.
Root account administrator
Full read and write access to the WeData global menu, responsible for creating projects, purchasing execution resource groups, user management, and other operations
-
Asset Administrator
Has full read and write access to the Data Assets module, as well as read-only access to other Global Menus
-
Root Account Members
Has read-only access to the WeData Global Menu
-
WeData Project-level members
WeData Project-level Role
WeData project-level menu, including DataInLong, data development, etc.
Project Admin
Has full read-write access to the project, responsible for managing project's common configurations and member management
-
Data Engineer
Has data development and operation-related permissions in the project
-
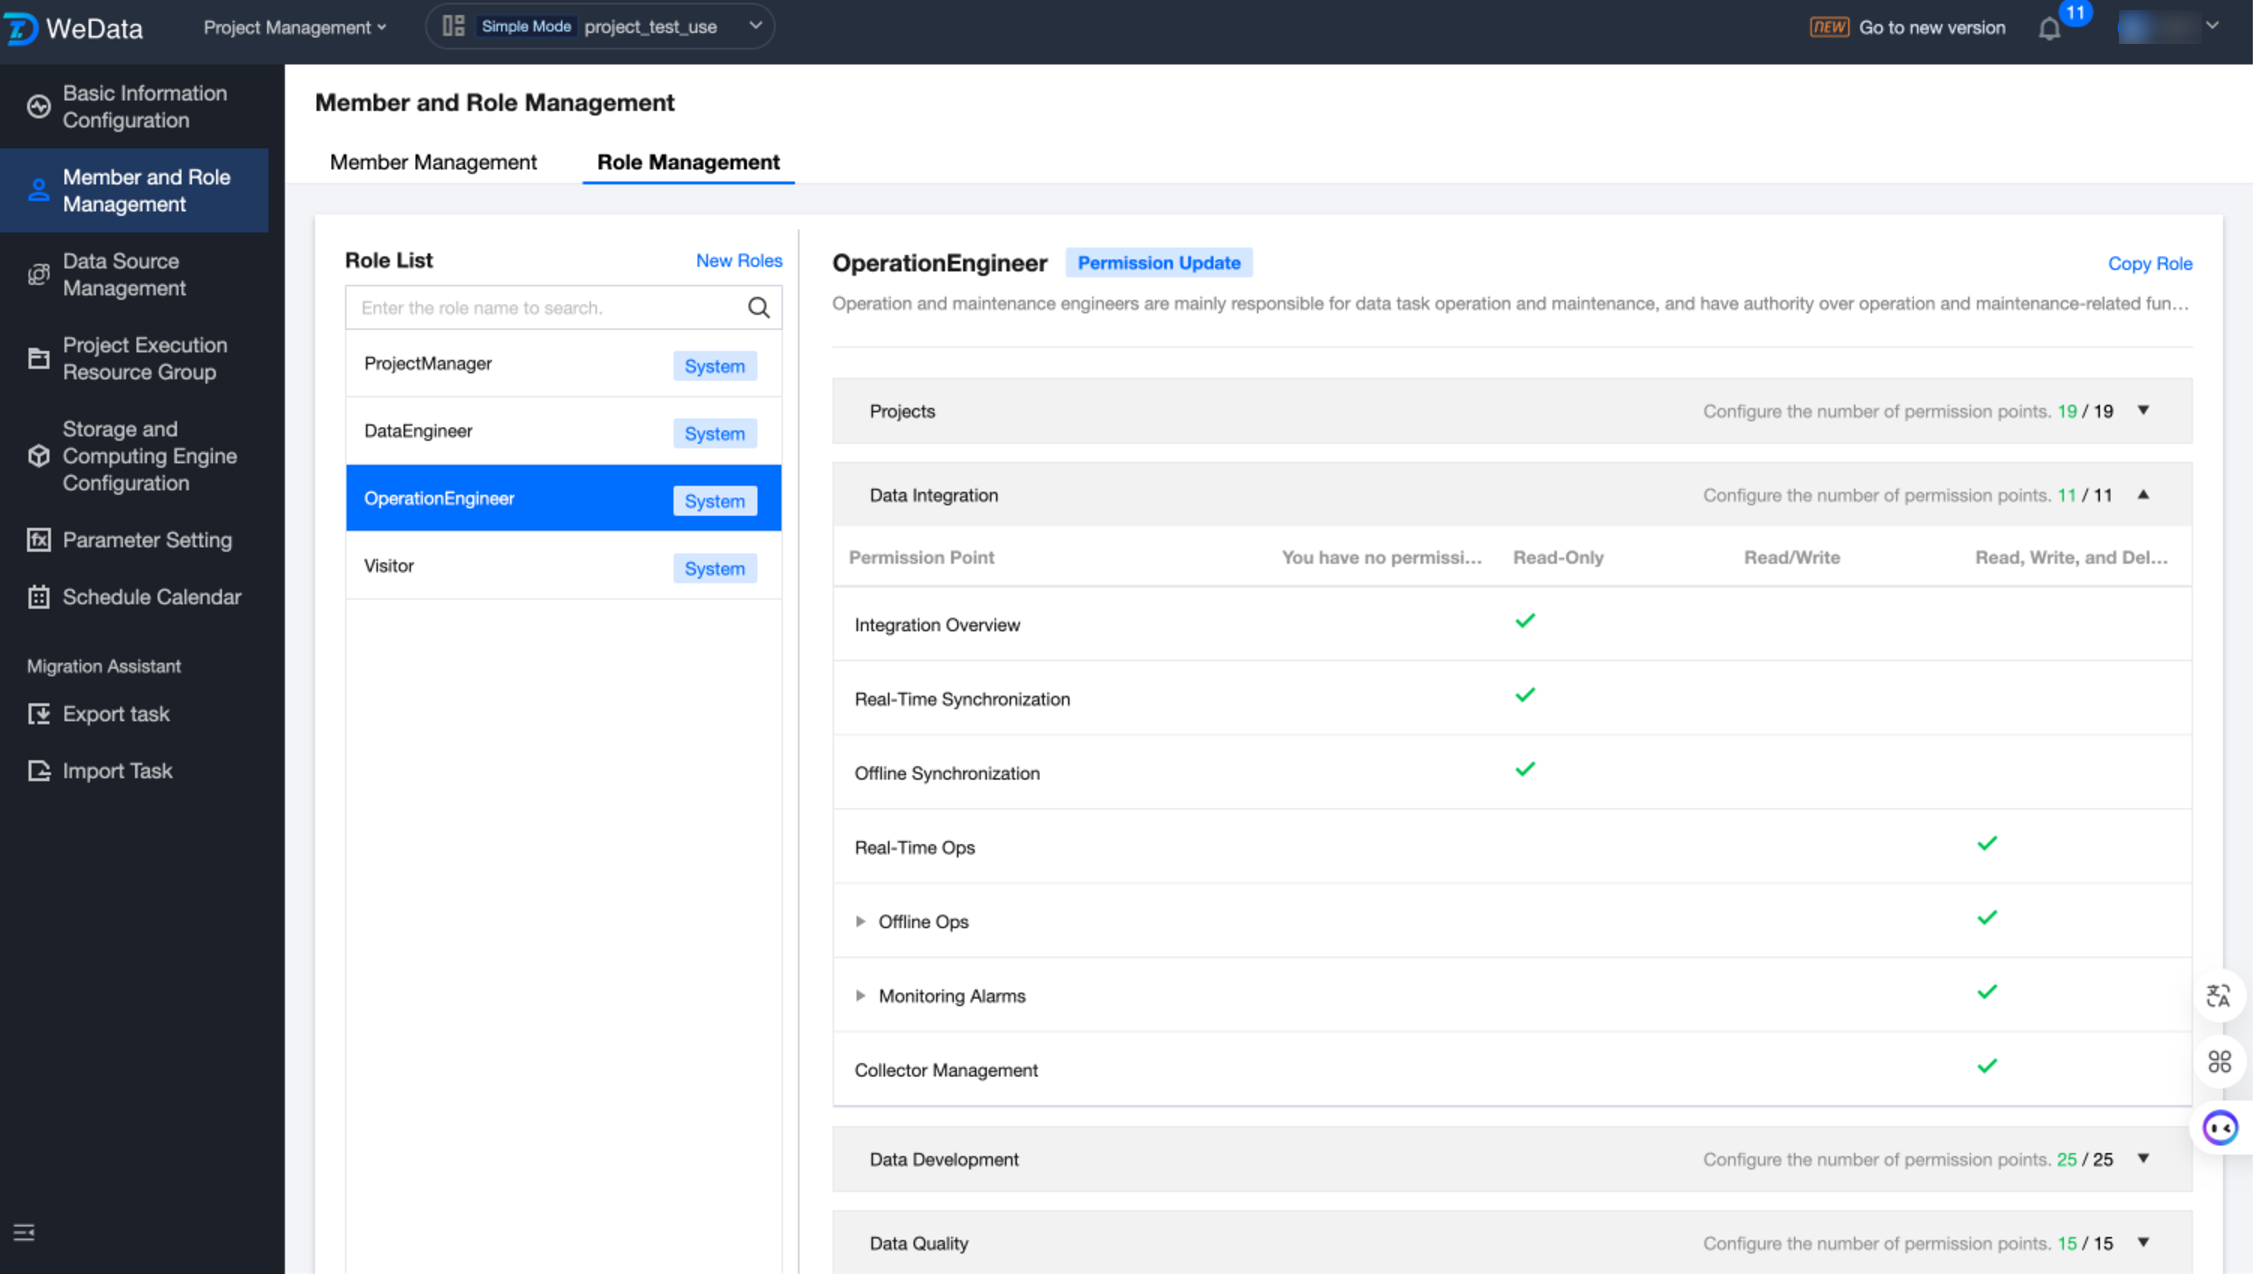
Operations Engineer
Has data operation-related permissions in the project
-
Visitor management
Has read-only access to the project
-
Custom Role
Access control based on a custom permissions list
-
Tencent Cloud Account
Before using WeData, you need to prepare a Tencent Cloud root account and manage sub-accounts through CAM.
Tencent Cloud root account: This is the CAM root account, which by default has all resources under the account. In CAM, the root account is the default owner of all cloud resources and the basic entity for usage-based billing, responsible for the creation, authorization, and management of sub-accounts within the organization.
Tencent Cloud sub-account: Created, managed, and billed through the Tencent Cloud Certificate Authority M console by the root account. In CAM, sub-accounts by default do not own resources and must be authorized by the root account. Once authorized, sub-accounts will manage the root account's resources within the granted permission scope.
When a Tencent Cloud account enters WeData, it is automatically added as a global-level user and associated with a global-level role.
1. Tencent Cloud root account, by default, is the root account administrator for WeData without requiring manual operations from users.
2. Tencent Cloud sub-account:
If associated with the QcloudWeDataFullAccess policy, sub-accounts will automatically become WeData root account administrators.
If associated with the QcloudWeDataReadOnlyAccess policy, sub-accounts will automatically become WeData root account members.
If not associated with any CAM policy, sub-accounts will not have access to WeData.
WeData project members
For a Tencent Cloud account to enter a WeData project, it needs to be added as a project-level user and associated with a project-level role.
Tencent Cloud root account, by default, is the project administrator for all WeData projects without requiring manual operations from users.
Tencent Cloud sub-accounts are not project members of WeData by default and need to be manually added by the project administrator.
User and Permission Management Operations Process
Signing up for a Tencent Cloud account
Create a Tencent Cloud root account
Sign up: If you have not registered a Tencent Cloud account yet, go to the Tencent Cloud homepage, and click Sign Up in the top-right corner. For more details, see the Sign-up Guide.
Identity Verification: The Tencent Cloud root account needs to undergo identity verification to purchase and use Tencent Cloud products. For more details, see the Verification Guide.
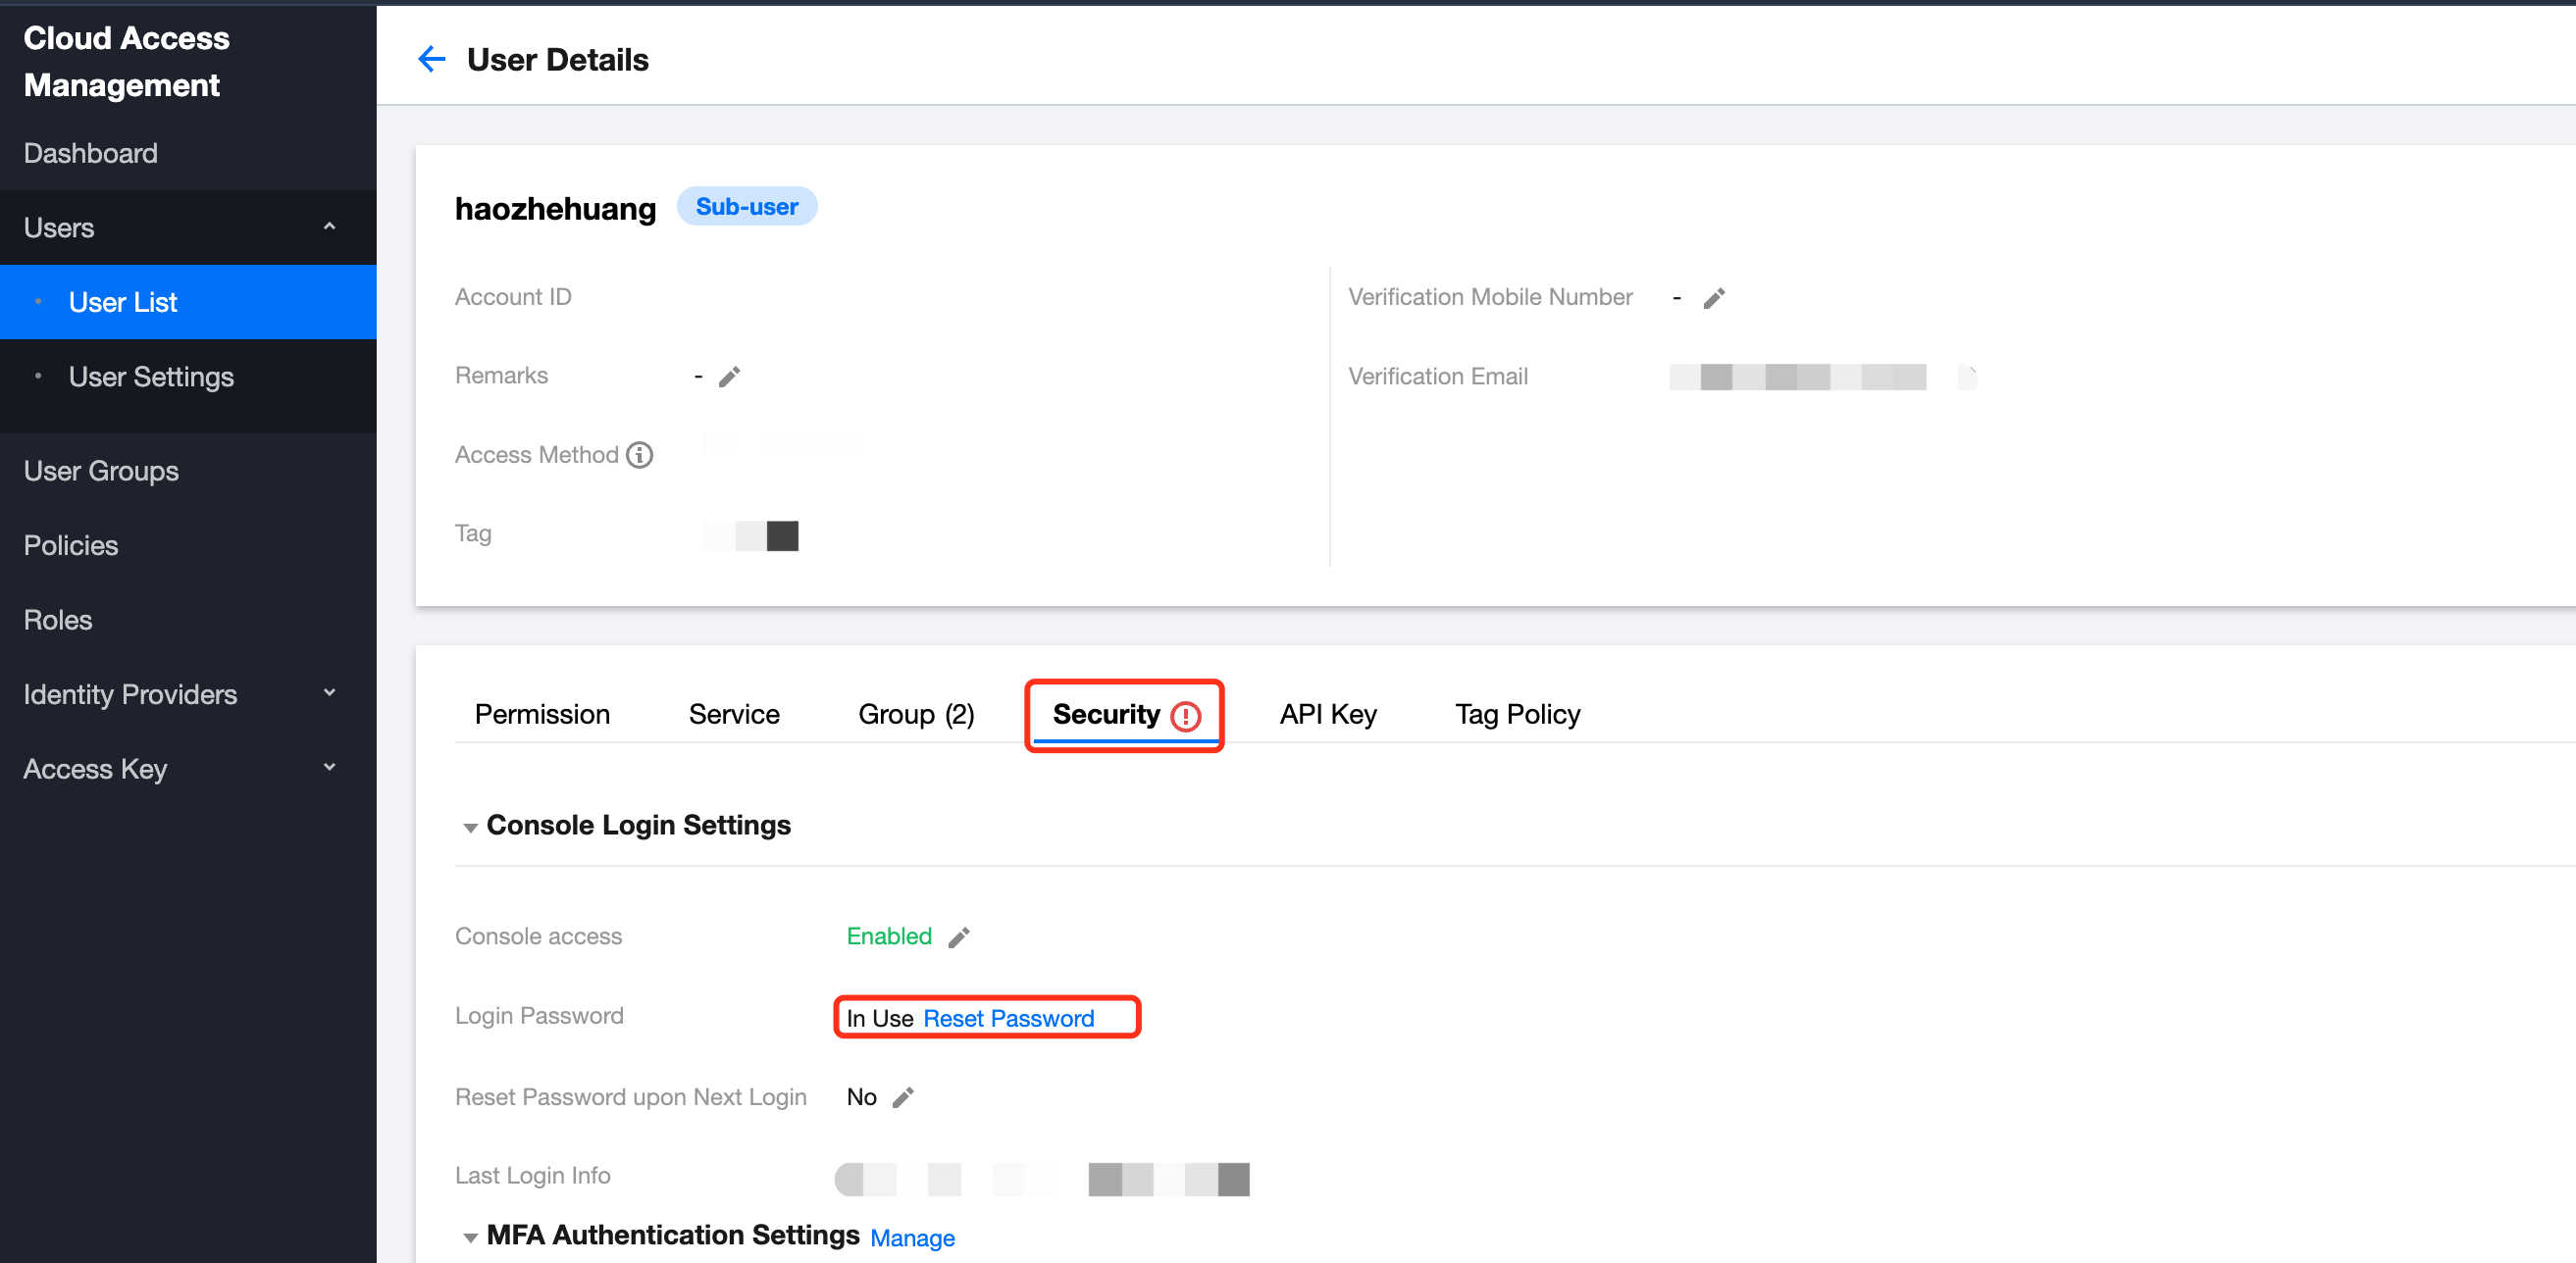
Create a Tencent Cloud sub-account
1. Use the root account or log in to Tencent Cloud CAM Console, then select Users > User List in the left navigation.
2. On the "User List" page, click Create User to create a sub-account, including Sub-user and Collaborator.
3. Once created, CAM will generate login information for the sub-account. You can click View User Details, select Security, and perform a password reset.
Note:
If you need multi-person collaborative development, please create CAM sub-accounts for other collaborators.
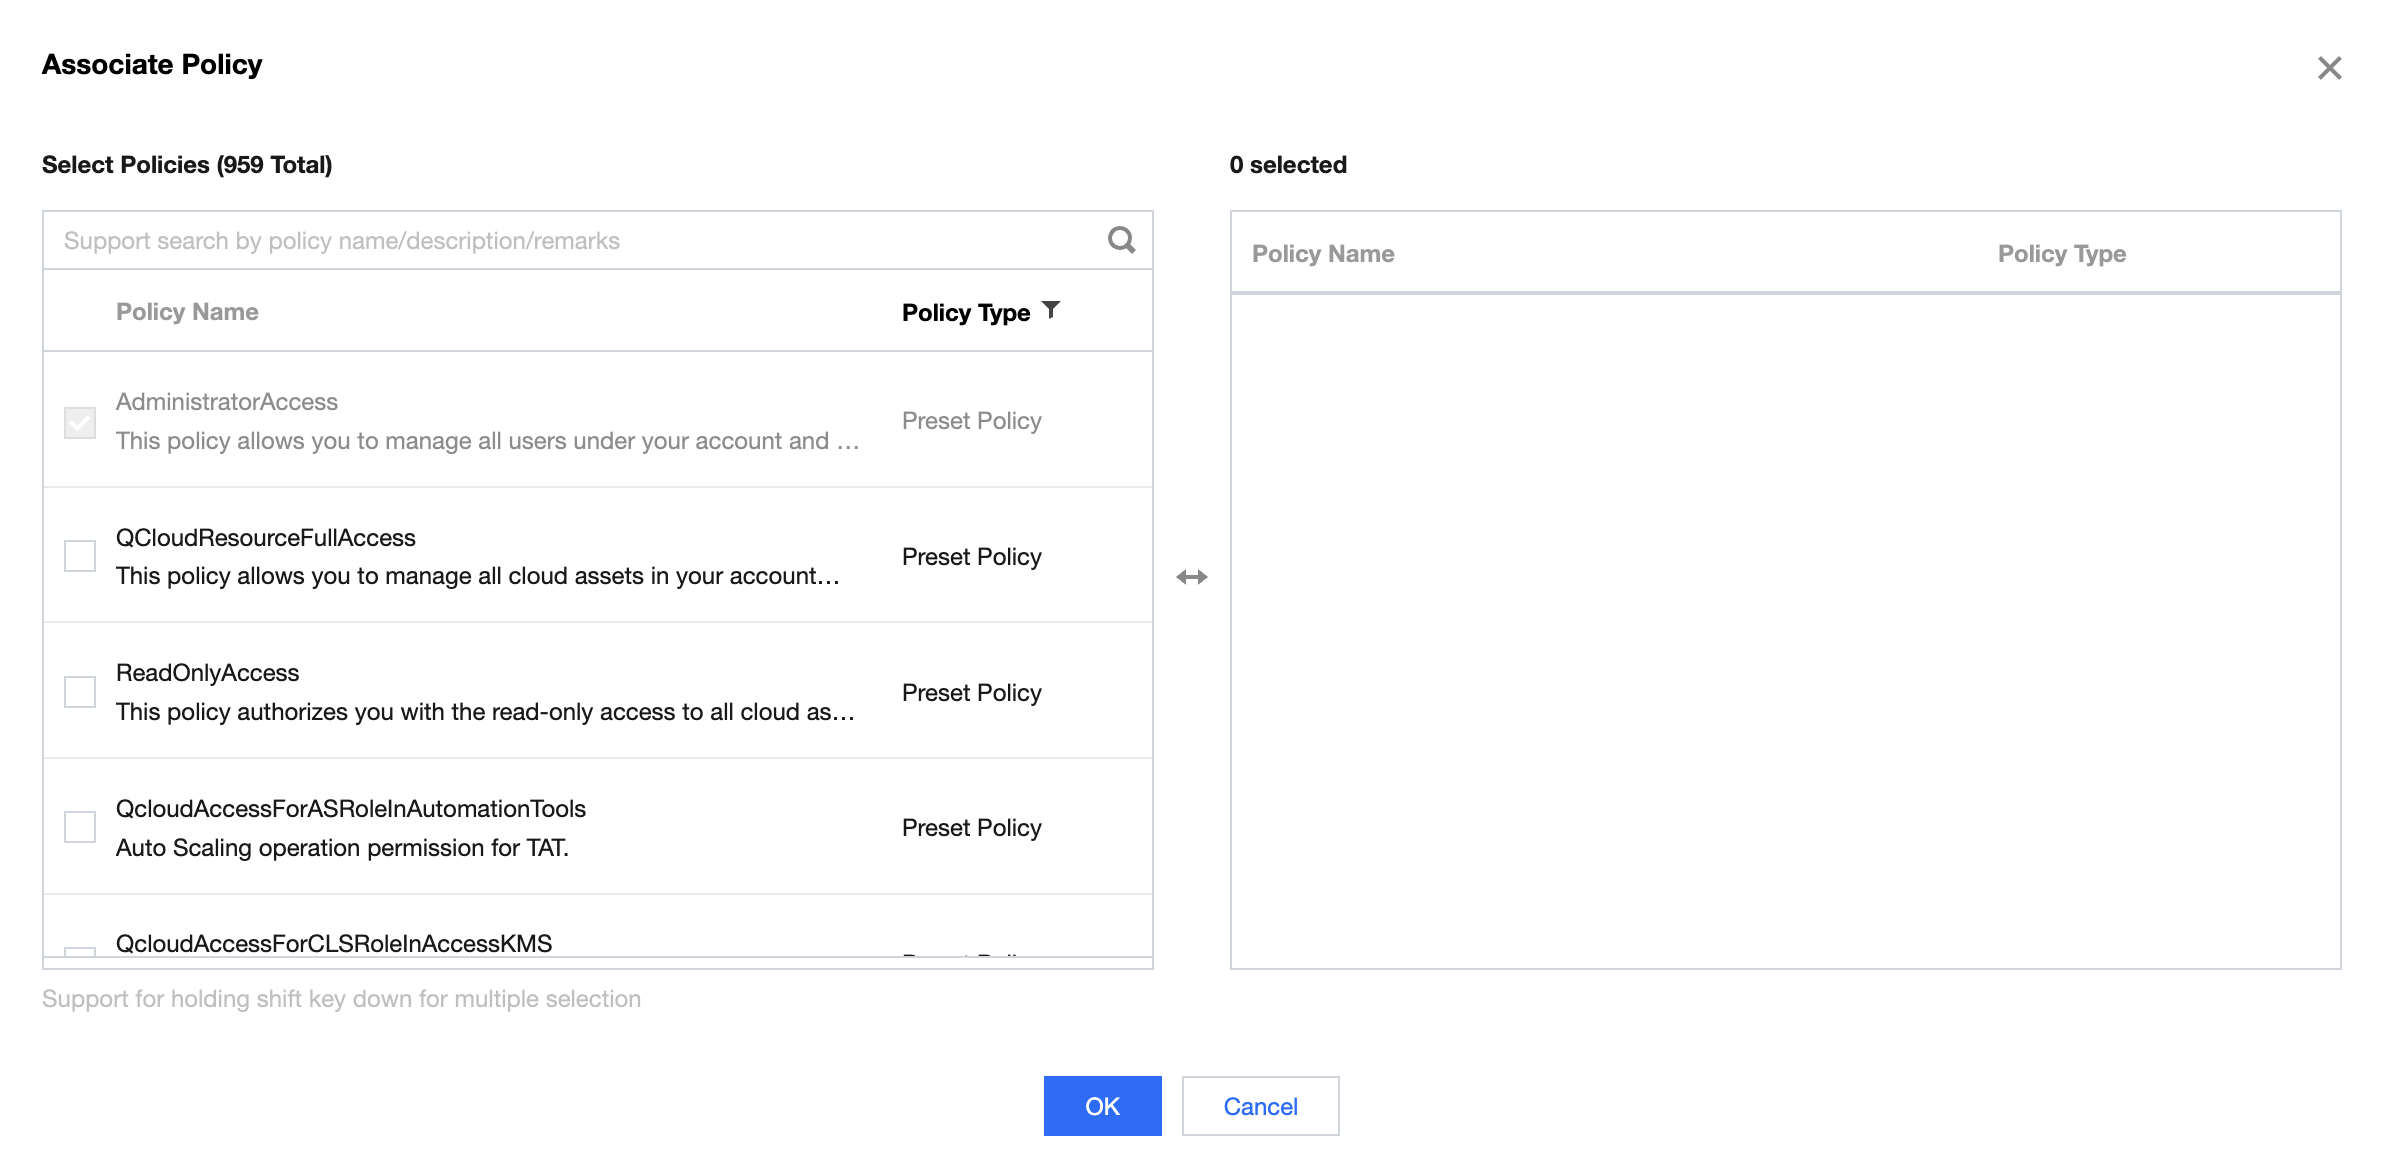
Authorize sub-account access to the WeData product
1. Log in to Tencent Cloud using the root account CAM Console, and in the left navigation, select Users > User List.
2. On the "User List" page, select a sub-account and click Authorize in the action column. Search for and select the QcloudWeDataFullAccess policy or the QcloudWeDataReadOnly policy.
3. Click Confirm to grant the sub-account access permissions to WeData.
4. Inform the collaborators of the information required for the sub-account login: login portal, root account ID, and login username and password.
Become a WeData global-level member
Automatic Addition
1. If the sub-account is associated with the QcloudWeDataFullAccess policy, it will automatically join the global-level user list of WeData and become an administrator of the WeData root account.
2. If the sub-account is associated with the QcloudWeDataReadOnlyAccess policy, it will automatically join the global-level user list of WeData and become a member of the WeData root account.
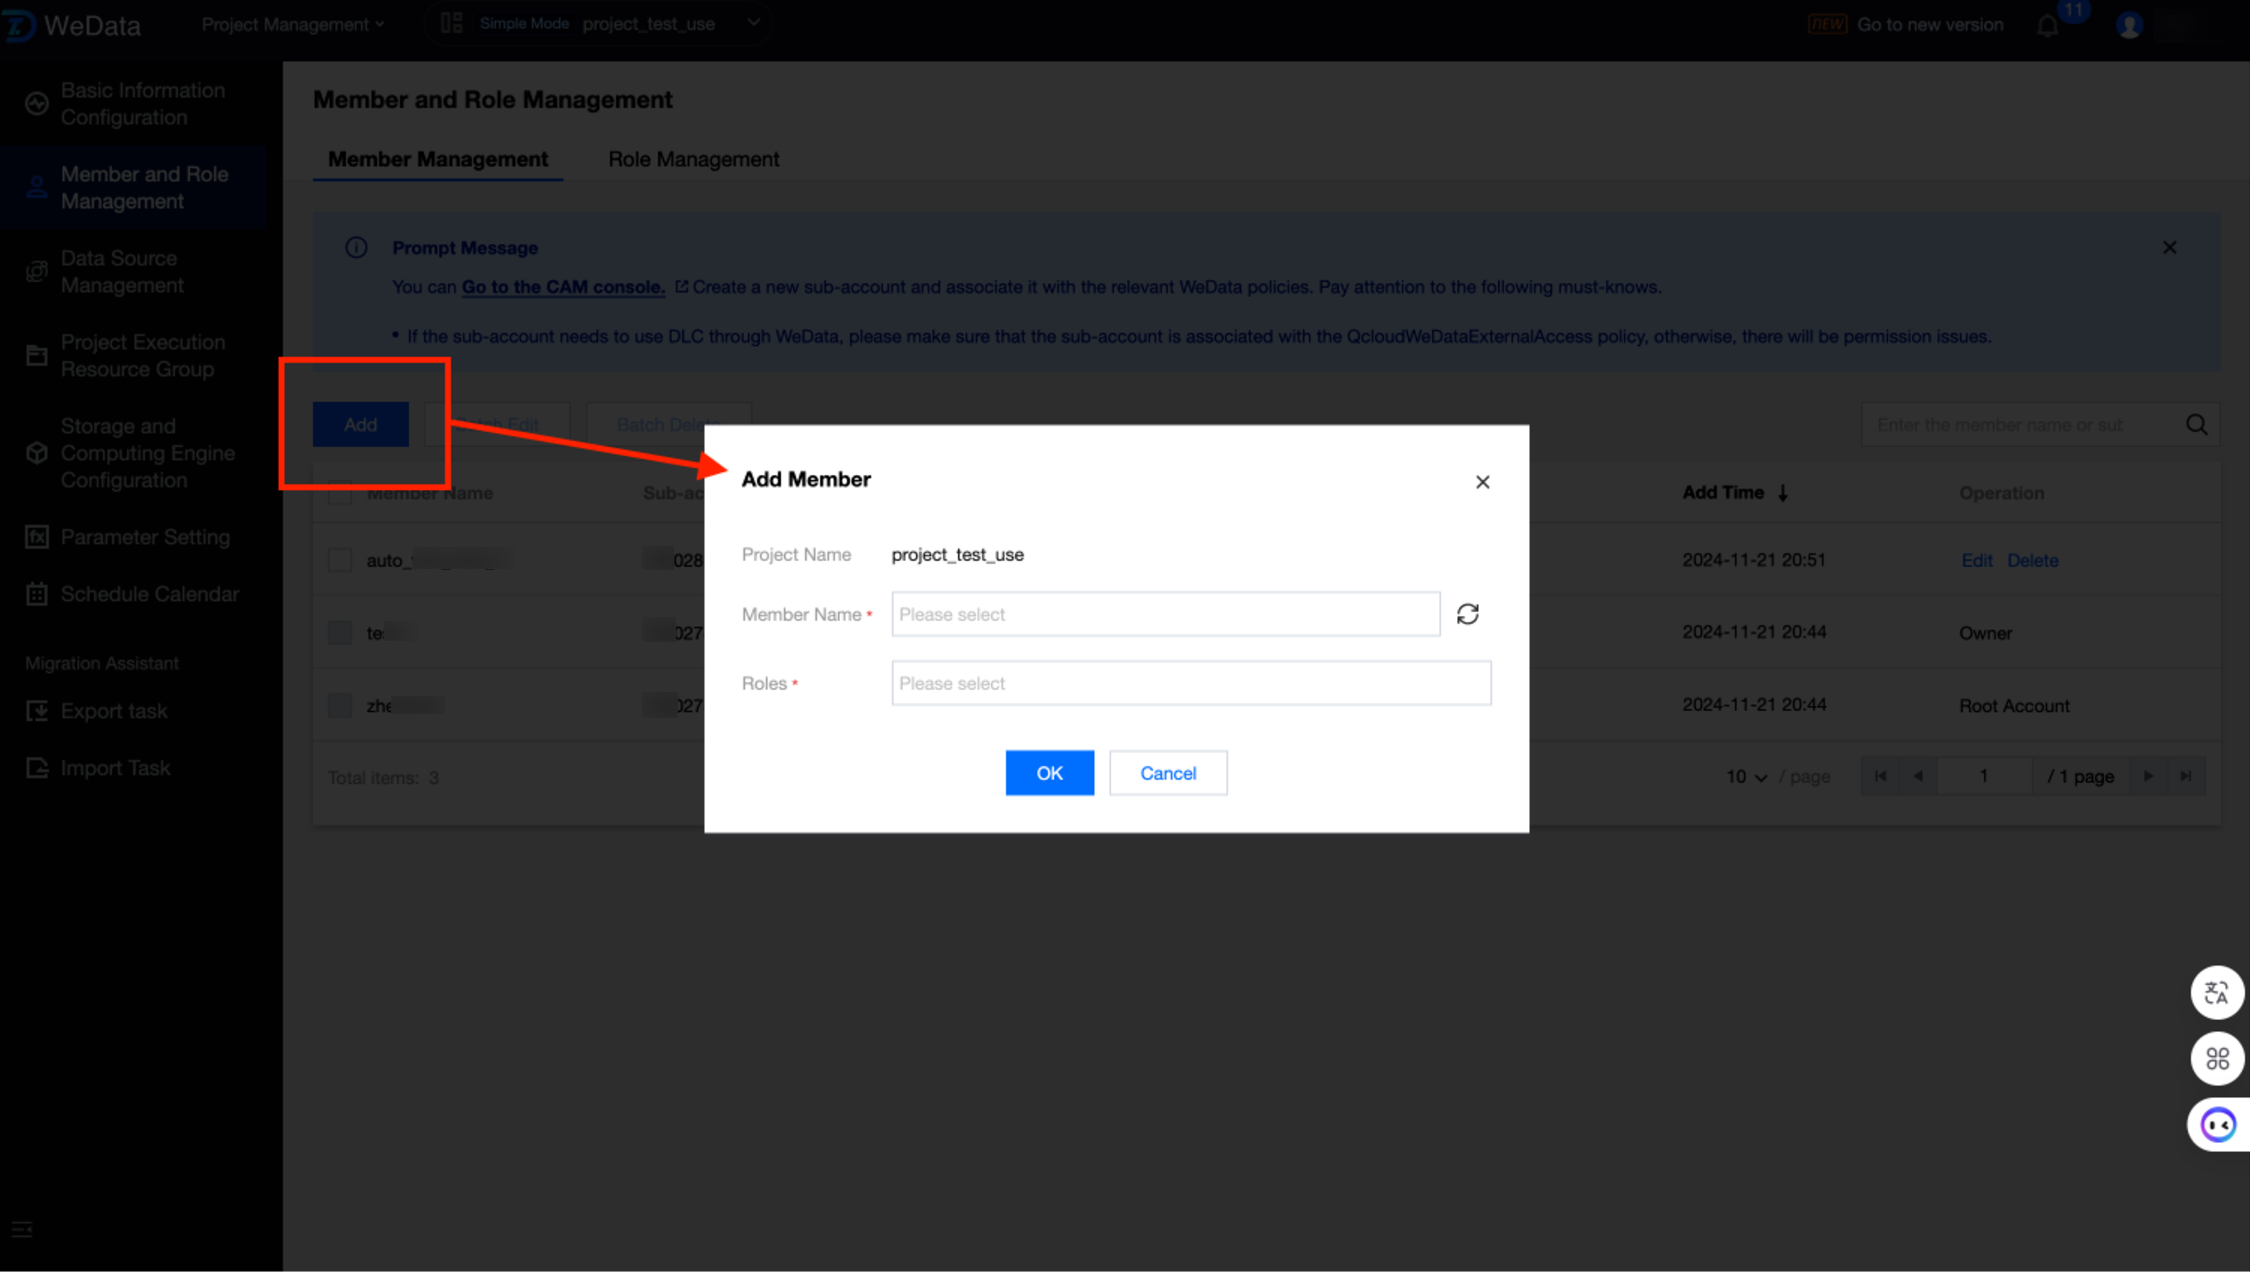
Adding IPs manually
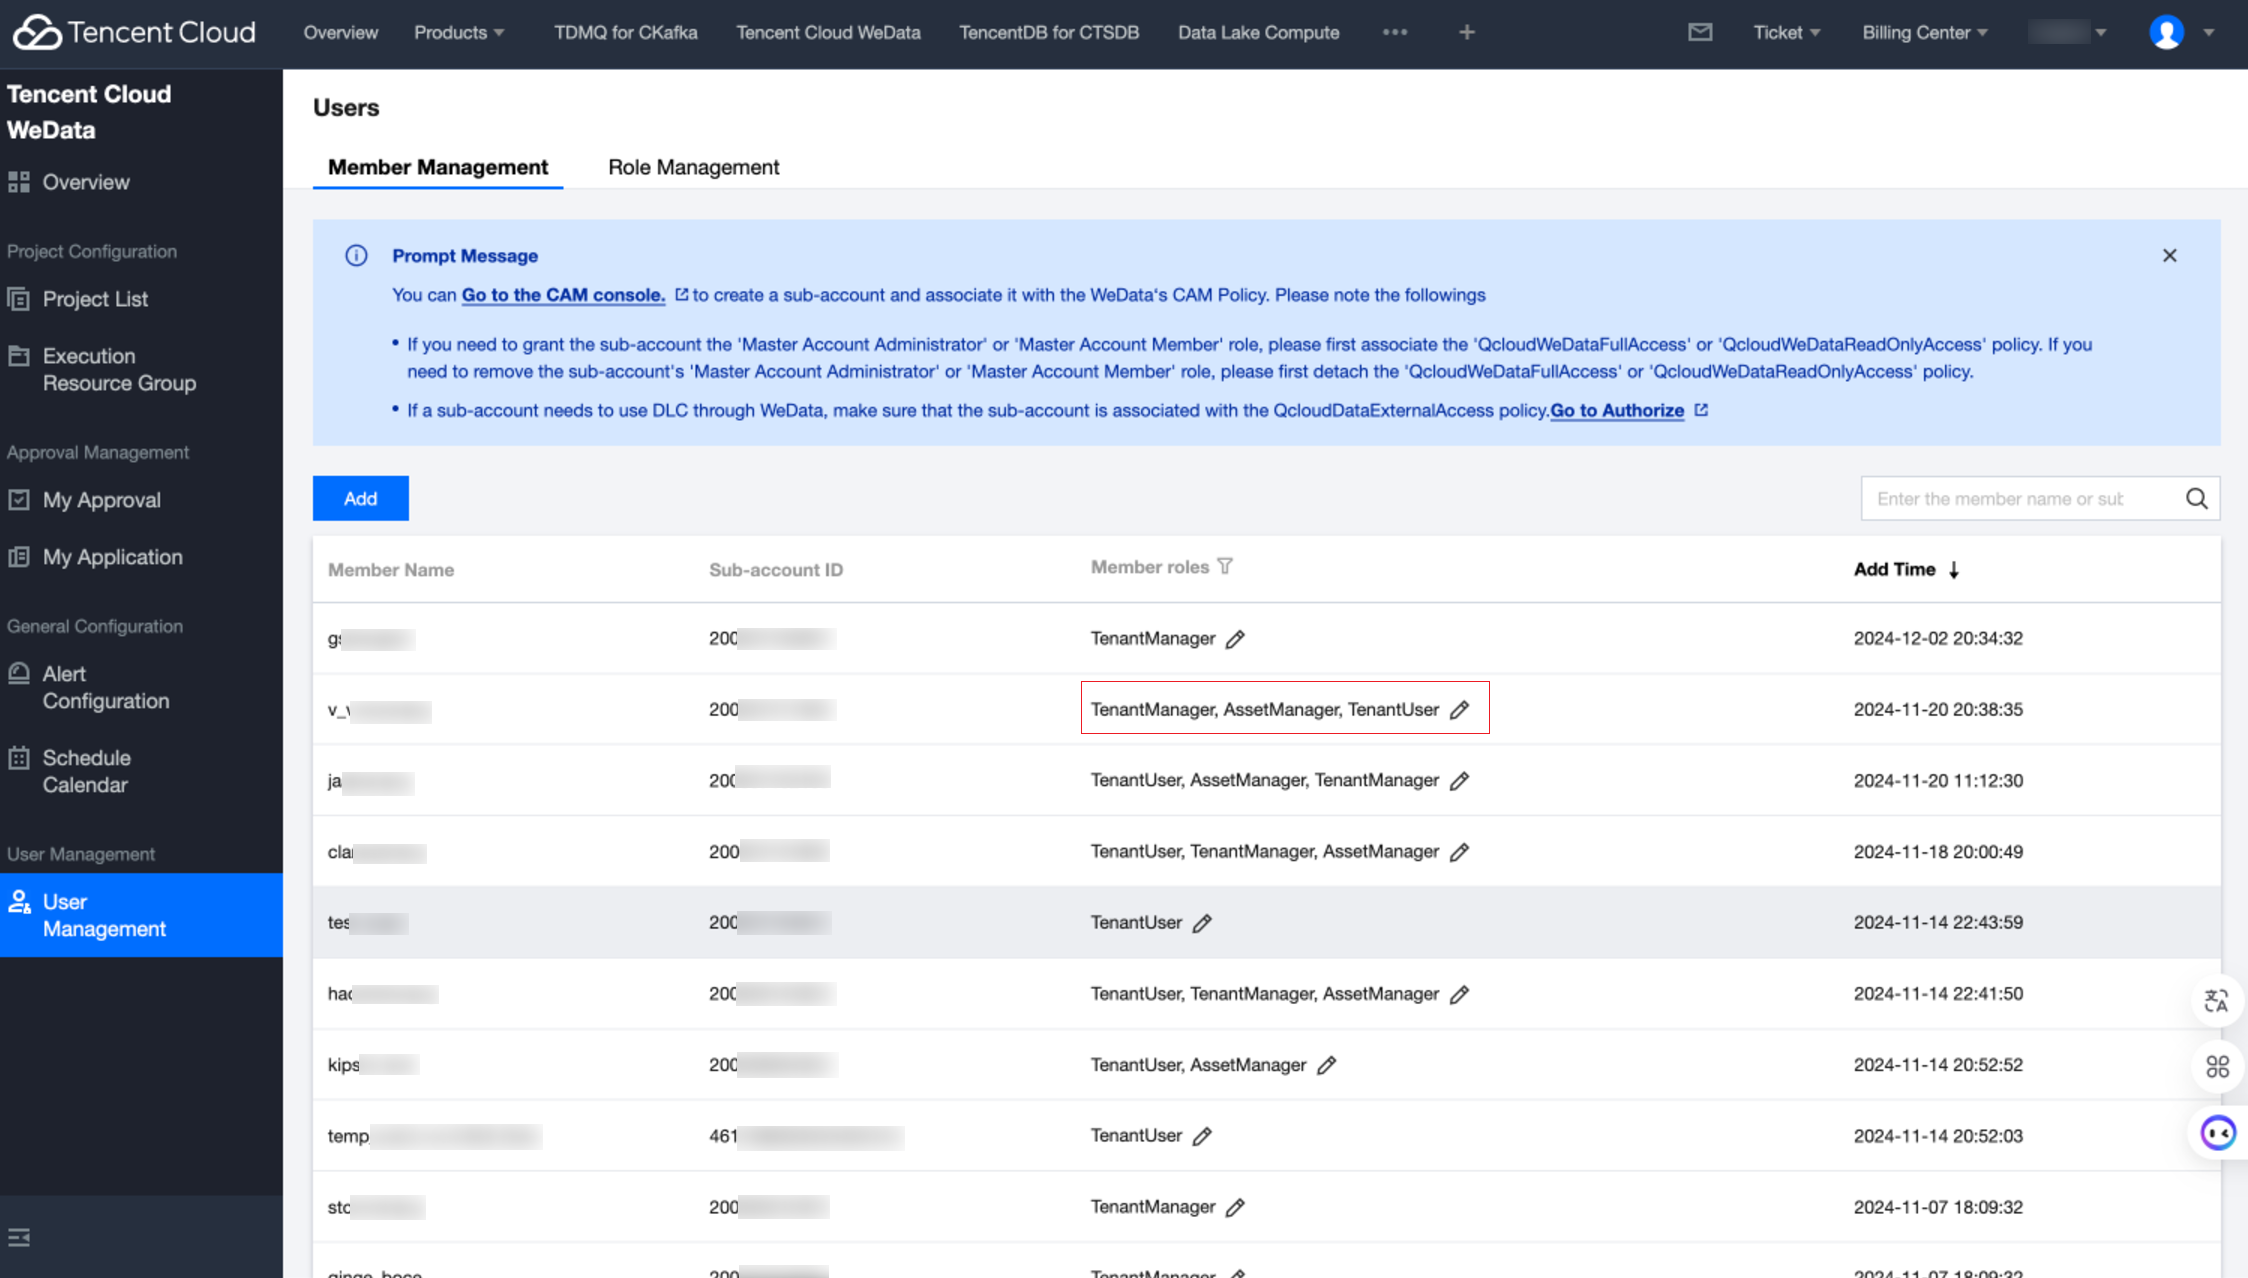
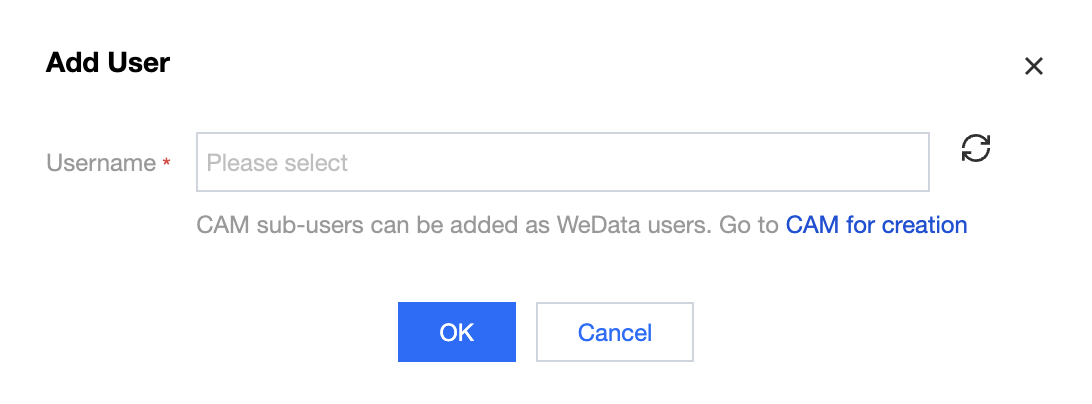
1. Log in with the primary account or the WeData primary account administrator account to the WeData console, and select User Management > Member Management from the left navigation.
2. In the Member Management list, click Add.
3. Enter the Add User page and add the CAM Sub-user as a WeData user. Successfully added users will default to the role of "root account member" in WeData.
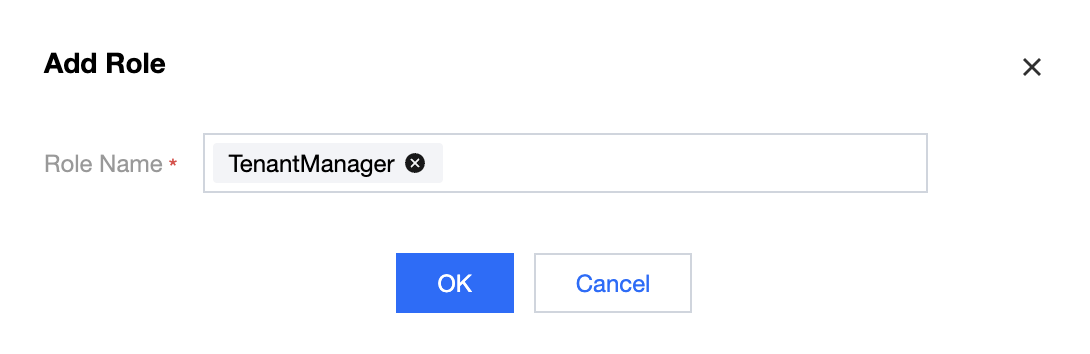
4. If you want to grant the sub-user permissions to create projects, purchase execution resource groups, manage users, and so on, please click the Edit button.
5. Enter the Add Role page and change their member role to "root account admin".
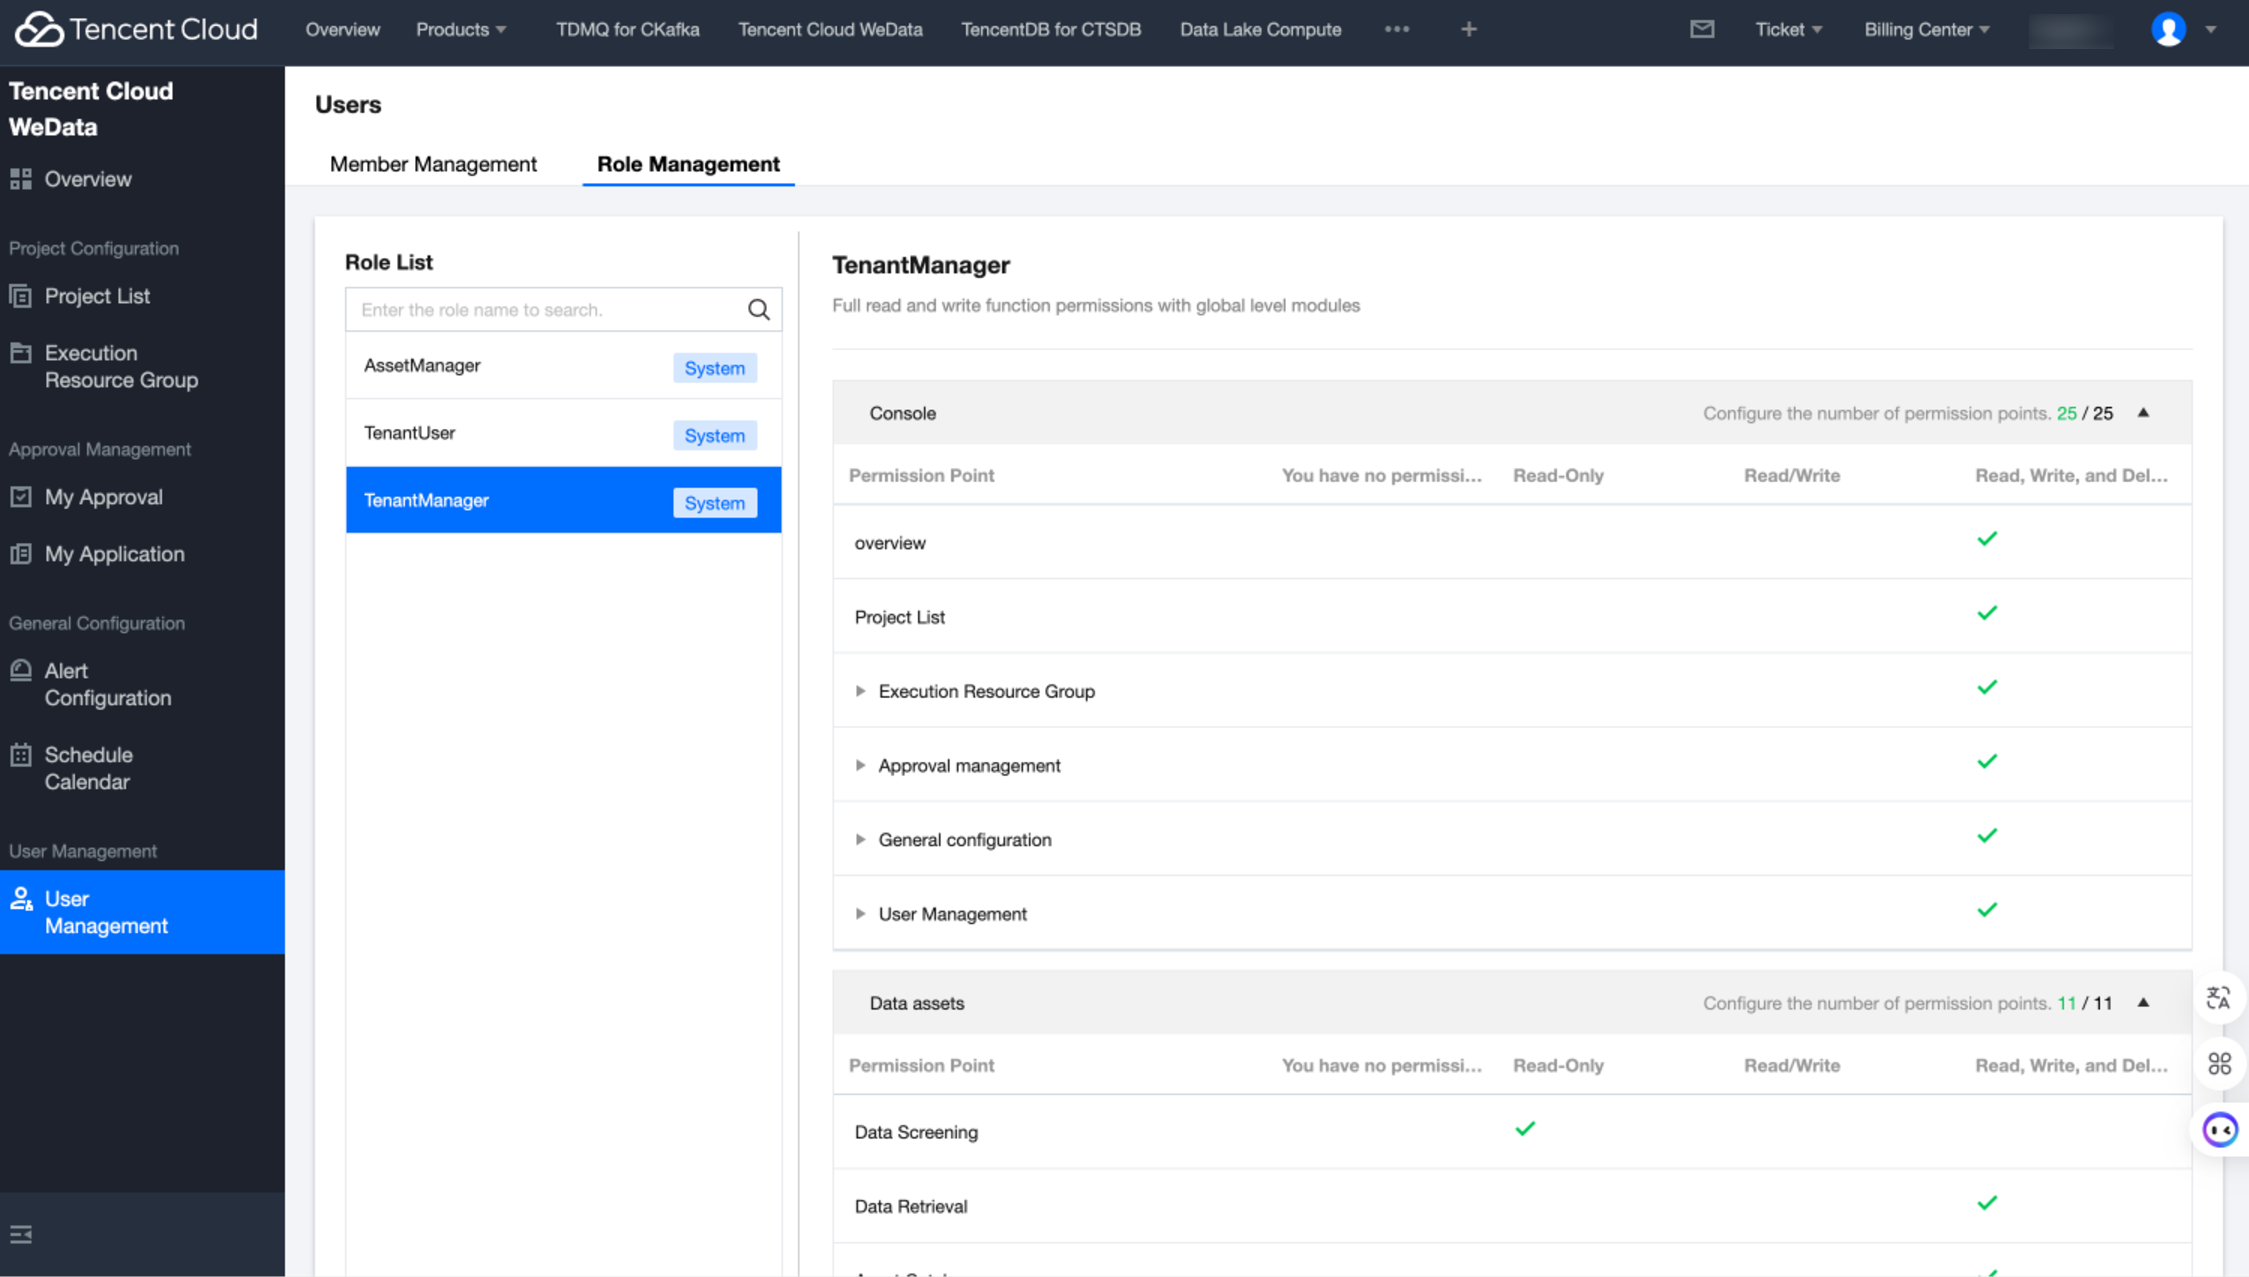
6. Click Role Management to view the permission list for WeData global-level roles.
Become a WeData project-level member
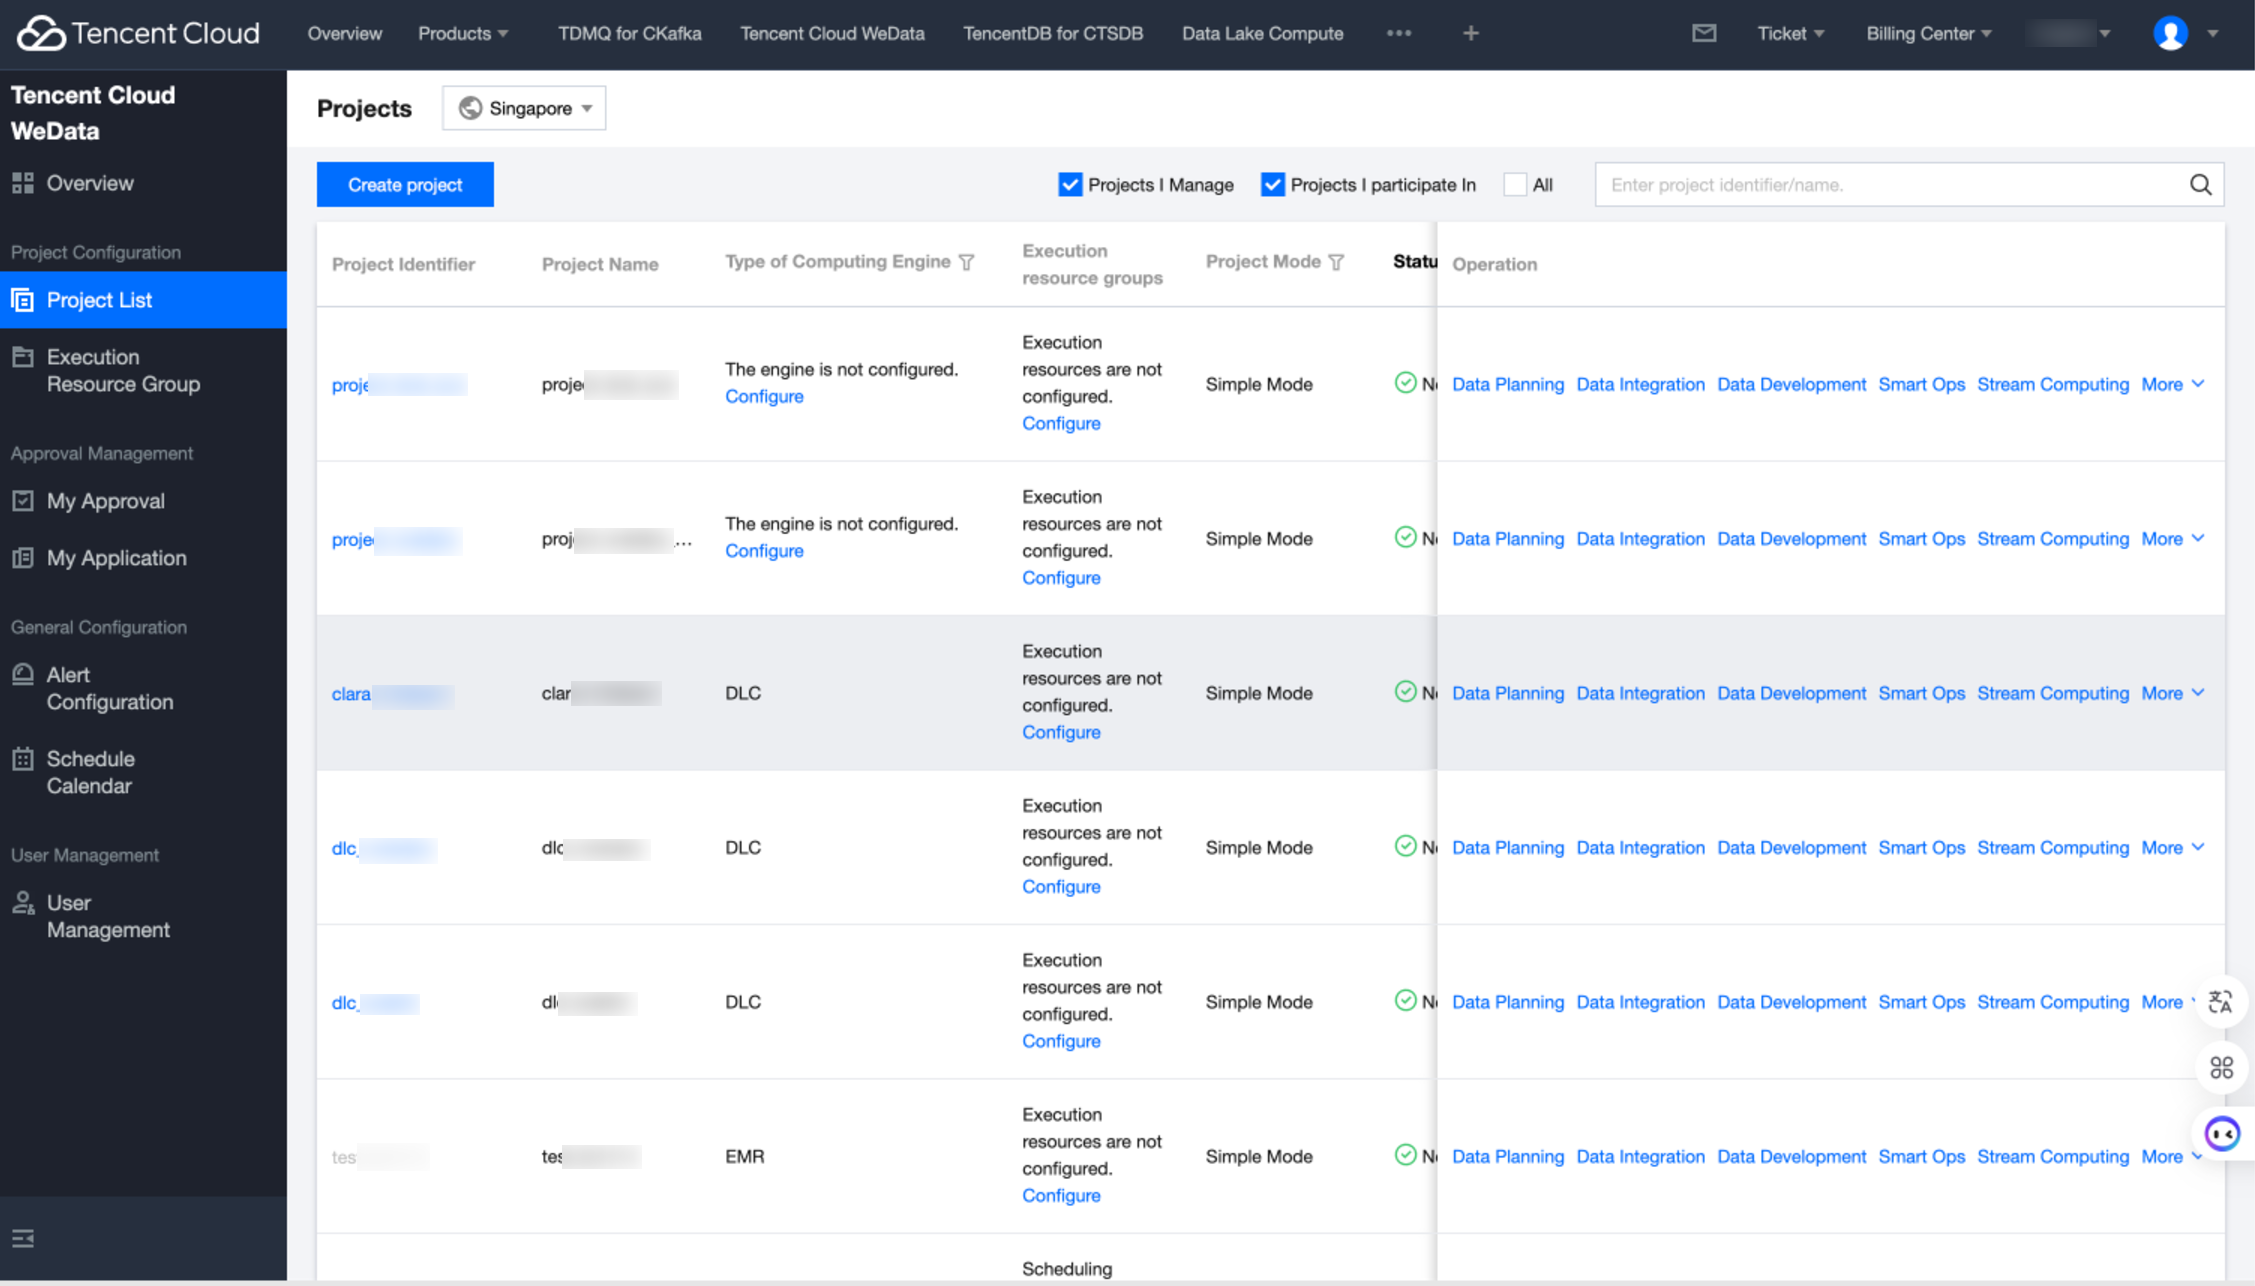
Create a project
Note:
Only the WeData root account admin has the authority to create projects. Upon successful creation, they will automatically become the project admin.
1. Log in to the WeData main account manager account WeData Dashboard, enter the project list page, click Create Project.
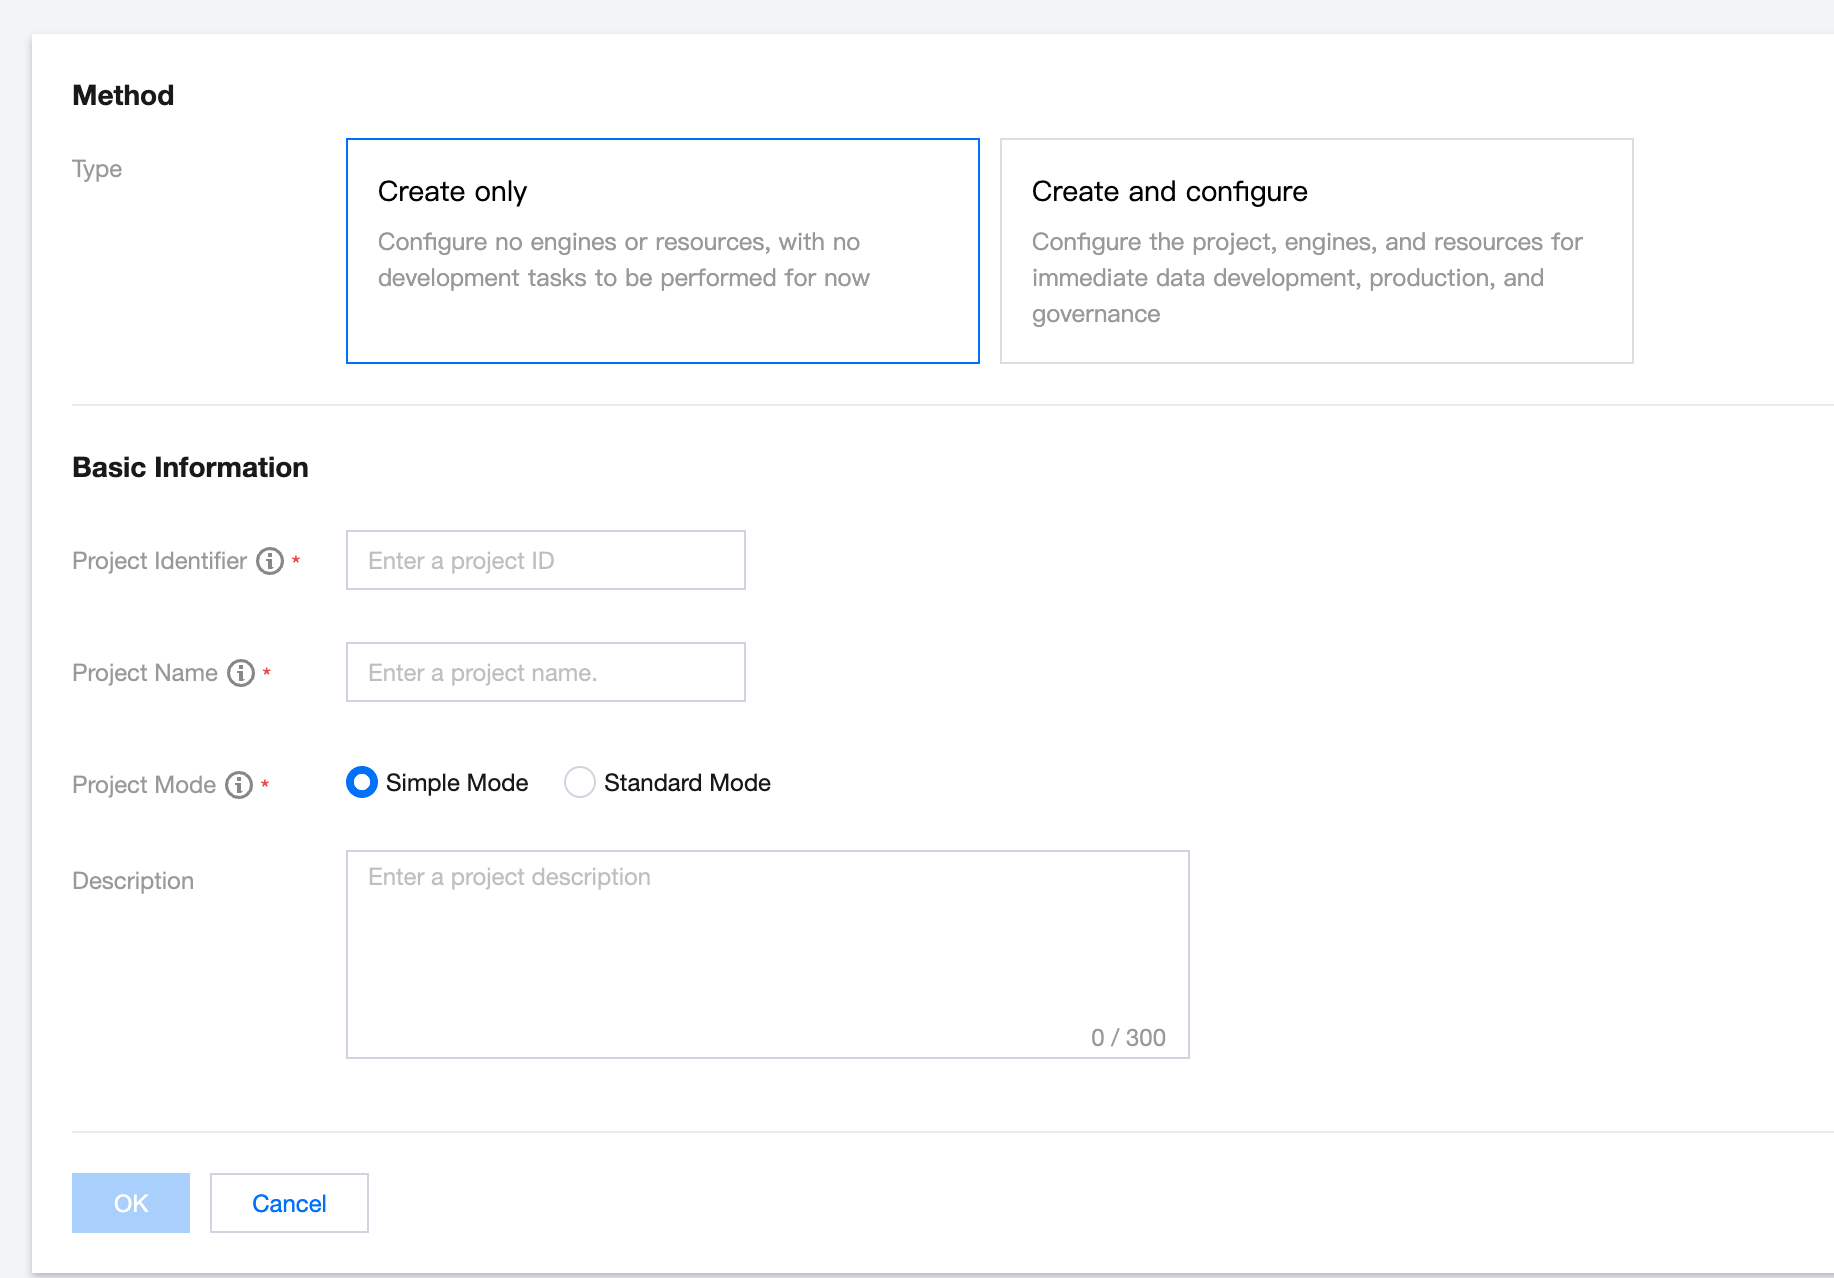
2. Configure project parameters
2.1 You can choose between "Create and configure project" and "Create project only" as the project creation methods.
2.2 Configure various parameters on the creation interface, as described in the table below:
Classify
Parameters
Description
Creation Method
Creation Type
You can choose between "Create and configure project" and "Create project only" as the project creation methods.
Basic Info
Project Identifier
Project English ID, unique within the region. Begins with a letter, may include letters, numbers, and underscores, and does not exceed 20 characters.
Project Name
Project Chinese Display Name, unique within the region. Begins with a letter or Chinese character, may include letters, Chinese characters, numbers, and underscores.
Description(Optional)
Provide a simple description for the created space.
Select Engine Type
Elastic MapReduce
After activation, you can use EMR in WeData for developing big data processing tasks, go to the EMR Dashboard.
Select the region where the Compute Engine Instance is located in WeData. Instances of different types of computing engines must be in the same region.
EMR
Cluster Type
You can choose between EMR on CVM and EMR on TKE as the cluster types.
Cluster Name
Choose one of the available EMR clusters in the selected region under the current main account. If there are no available clusters, you can proceed to purchase an instance.
Component information
After selecting the EMR cluster, the component information contained in the EMR cluster will be retrieved automatically.
YARN Resource Queue
Select one or more from the YARN resource queue of the EMR cluster.
DLC
DLC Data Engine
Select one from the available DLC computing resources in the selected region under the current primary account. Currently, the Standard engine and SuperSQL engine are supported.
Database Name
When no database is specified in the DLC-related task, this database is used for data access by default.
Testing connectivity
Test whether the WeData service can connect to the engine resource.
TCHouse-P
TCHouse-P Version
You can choose the TCHouse-P1.0 or TCHouse-P2.0 version.
Cluster Name
The name of the TCHouse-P Cluster already purchased by the account in the selected region.
Username
The username for connecting to the TCHouse-P Cluster.
Password
The password for connecting to the TCHouse-P Cluster.
Testing connectivity
Test if the username and password can connect to the cluster. Once verified, the project can be created (if the connectivity test fails, it might be due to WeData being blocked by the network firewall of the cluster).
Execute Resource Allocation
Scheduling Resources
Scheduling Resources
Scheduling resources are principally used for the timed scheduling of data development tasks (including SQL tasks, shell tasks, etc.).
Associating the Resource
Scheduling resources must be in the same region as the EMR. After association, the project exclusively uses the associated resources. This list only shows scheduling resources not associated with other projects.
Integration Resources
Integration Resources
Integrated Resource Groups primarily execute DataInLong tasks.
Associating the Resource
After association, the project exclusively uses the associated resources. This list only shows integrated resources not associated with other projects.
3. After creation, the sub-account will automatically become the Project Administrator.
Add to existing project
1. Log in with the Project Administrator account to the WeData Console, go to the project list, select the project and go to the Project Management module.
2. Select the Member and Role Management menu, add the sub-account as a project member and assign it a project-level role.
3. Click Role Management, you can view the permissions list of WeData project-level roles.