If you want to integrate the TIMPush component as simply as possible, you need to use the login/logout interfaces of TUILogin for IM account login/logout operations. The TIMPush component can automatically detect login/logout events. Step 1. Integrate the TIMPush component
1. The TIMPush component supports CocoaPods integration. You need to add the component dependencies in the Podfile.
target 'YourAppName' do
# Uncommment the next line if you're using Swift or would like to use dynamic frameworks
use_frameworks!
use_modular_headers!
# Pods for Example
# The version number "VERSION" can be obtained from the Update Log. pod 'TIMPush', 'VERSION'
end
2. Run the following command to install the TIMPush component.
pod install
# If you cannot install the latest version of TUIKit, run the following command to update your local CocoaPods repository list.
pod repo update
Step 2. Set push parameters
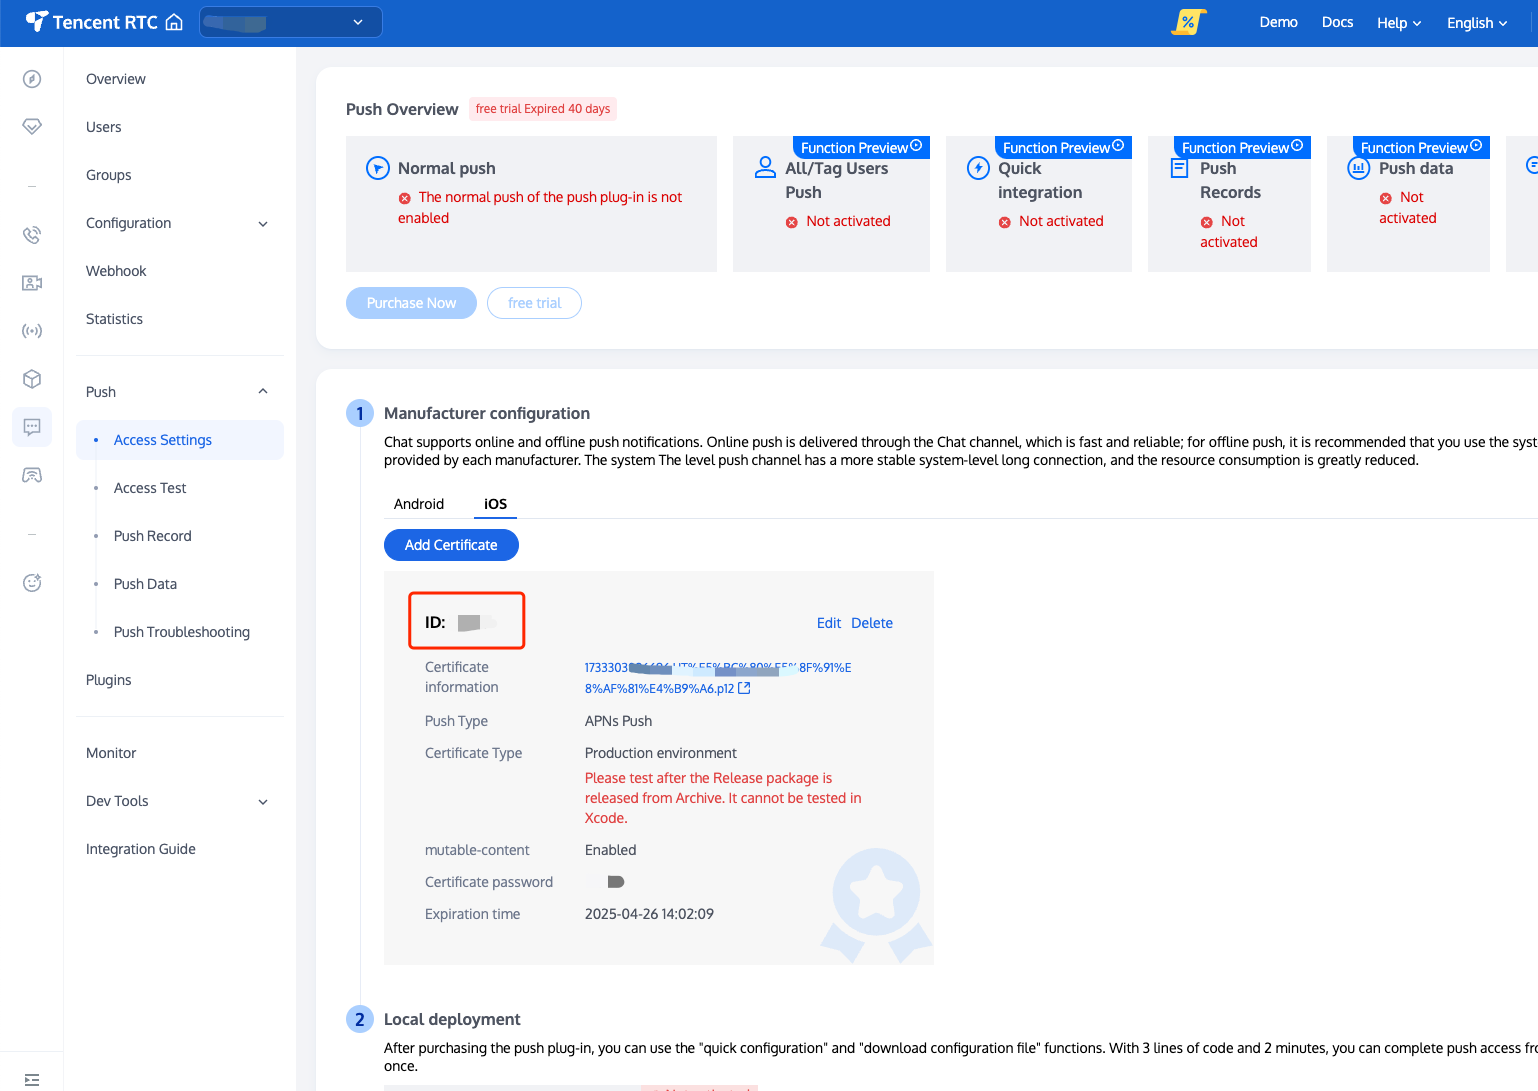
1. After you upload the certificate to the Chat console, the Chat console allocates a certificate ID for you, as shown below:
2. You need to implement the - businessID protocol method in AppDelegate to return the certificate ID.
#pragma mark - TIMPush
- (int)businessID {
int kBusinessID = 0;
return kBusinessID;
}
- (NSString *)applicationGroupID {
return kTIMPushAppGroupKey;
}
- (BOOL)onRemoteNotificationReceived:(NSString *)notice {
return NO;
}
#pragma mark - TIMPush
@objc func businessID() -> Int32 {
return 0
}
@objc func applicationGroupID() -> String {
return "group.com.yourcompony.pushkey"
}
@objc func onRemoteNotificationReceived(_ notice: String?) -> Bool {
return false
}
At this point, you have completed the basic push feature integration.
Note:
1. After you log in, when you see the APNs configuration success log printed on the console, it indicates that the integration is successful.
2. If your app has obtained push permissions, you will receive remote push notifications when it goes to the background or the process is stopped.
3. If you have not integrated the TUICore component and do not need to use TUILogin for login/logout but still want to implement offline push, you only need to:
After your app/Chat login is complete, actively call the registerPush method to register for push notifications.
When logging out, actively call the unRegisterPush method to unregister push notifications.
4. If you only want to support push notifications without login, you can switch the registration interface to: call the registerPush interface of TIMPushManager. For details on sending messages in step 3, see - restApi interface. Step 3. Set offline push parameters when sending messages (TUIChat has already added this by default when integrating with UI, you can skip this step)
When calling sendMessage to send messages, you can set offline push parameters through V2TIMOfflinePushInfo. Use the ext of V2TIMOfflinePushInfo to set custom ext data. When the user receives the offline push and launches the app, they can get the ext field in the callback of clicking the notification and then navigate to the specified UI based on the ext field content. Refer to the sendMessage: method of TUIMessageBaseDataProvider: #import <TUICore/OfflinePushExtInfo.h>
V2TIMOfflinePushInfo *pushInfo = [[V2TIMOfflinePushInfo alloc] init];
pushInfo.title = @"Push title";
pushInfo.desc = @"Push content";
BOOL isGroup = groupID.length > 0;
NSString *senderId = isGroup ? (groupID) : ([TUILogin getUserID]);
NSString *nickName = isGroup ? (conversationData.title) : ([TUILogin getNickName] ?: [TUILogin getUserID]);
OfflinePushExtInfo *extInfo = [[OfflinePushExtInfo alloc] init];
OfflinePushExtBusinessInfo * entity = extInfo.entity;
entity.action = 1;
entity.content = @"Push content";
entity.sender = senderId;
entity.nickname = nickName;
entity.faceUrl = [TUILogin getFaceUrl] ?: @"";
entity.chatType = [isGroup ? @(V2TIM_GROUP) : @(V2TIM_C2C) integerValue];
entity.version = kOfflinePushVersion;
pushInfo.ext = [extInfo toReportExtString];
pushInfo.AndroidOPPOChannelID = @"tuikit";
pushInfo.AndroidSound = TUIConfig.defaultConfig.enableCustomRing ? @"private_ring" : nil;
pushInfo.AndroidHuaWeiCategory = @"IM";
pushInfo.AndroidVIVOCategory = @"IM";
import TIMPush
import TUICore
import ImSDK_Plus
let pushInfo = V2TIMOfflinePushInfo()
pushInfo.title = "Push title"
pushInfo.desc = "Push content"
let isGroup = groupID!.count > 0
let senderId = isGroup ? groupID : TUILogin.getUserID()
let nickName = isGroup ? "conversationData Title" : (TUILogin.getNickName() ?? TUILogin.getUserID())
let extInfo = OfflinePushExtInfo()
let entity = extInfo.entity
entity.action = 1
entity.content = "Push content"
entity.sender = senderId ?? ""
entity.nickname = nickName ?? ""
entity.faceUrl = TUILogin.getFaceUrl() ?? ""
entity.chatType = isGroup ? Int(V2TIMConversationType.GROUP.rawValue) : Int(V2TIMConversationType.C2C.rawValue)
entity.version = 1
pushInfo.ext = extInfo.toReportExtString()
pushInfo.androidOPPOChannelID = "tuikit"
pushInfo.androidSound = TUIConfig.default().enableCustomRing ? "private_ring" : nil
pushInfo.androidHuaWeiCategory = "IM"
pushInfo.androidVIVOCategory = "IM"
Step 4: Customize the tap-to-redirect logic for offline push
If you need to customize the parsing of received remote push notifications, you can implement it as follows:
Custom click redirect implementation
Custom click redirect implementation (old solution)
Note:
It is recommended to place the registration callback timing in the didFinishLaunchingWithOptions function of the AppDelegate.
- (BOOL)application:(UIApplication *)application didFinishLaunchingWithOptions:(NSDictionary *)launchOptions {
[TIMPushManager addPushListener:self];
return YES;
}
#pragma mark - TIMPushListener
- (void)onNotificationClicked:(NSString *)ext {
}
func application(_ application: UIApplication, didFinishLaunchingWithOptions launchOptions: [UIApplication.LaunchOptionsKey: Any]?) -> Bool {
TIMPushManager.addPushListener(listener: self)
return true
}
@objc func onNotificationClicked(_ ext: String) {
}
@objc func onRecvPushMessage(_ message: TIMPushMessage) {
}
@objc func onRevokePushMessage(_ messageID: String) {
}
You need to implement the - onRemoteNotificationReceived method in the AppDelegate.m file.
#pragma mark - TIMPush
- (BOOL)onRemoteNotificationReceived:(NSString *)notice {
return NO;
}
@objc func onRemoteNotificationReceived(_ notice: String) -> Bool {
return false
}
Step 5: Statistics on push arrival rate
2. In the Notification Service Extension's - didReceiveNotificationRequest:withContentHandler: method, call the push arrival rate statistics function:
@implementation NotificationService
- (void)didReceiveNotificationRequest:(UNNotificationRequest *)request withContentHandler:(void (^)(UNNotificationContent * _Nonnull))contentHandler {
NSString * appGroupID = kTIMPushAppGroupKey;
__weak typeof(self) weakSelf = self;
[TIMPushManager handleNotificationServiceRequest:request appGroupID:appGroupID callback:^(UNNotificationContent *content) {
weakSelf.bestAttemptContent = [content mutableCopy];
weakSelf.contentHandler(weakSelf.bestAttemptContent);
}];
}
@end
override func didReceive(_ request: UNNotificationRequest, withContentHandler contentHandler: @escaping (UNNotificationContent) -> Void) {
self.contentHandler = contentHandler
bestAttemptContent = (request.content.mutableCopy() as? UNMutableNotificationContent)
TIMPushManager.handleNotificationServiceRequest(request: request, appGroupID: "appGroupID") {
[weak self] content in
if let bestAttemptContent = self?.bestAttemptContent {
bestAttemptContent.title = "\\(bestAttemptContent.title) [modified]"
contentHandler(bestAttemptContent)
}
}
}
Note:
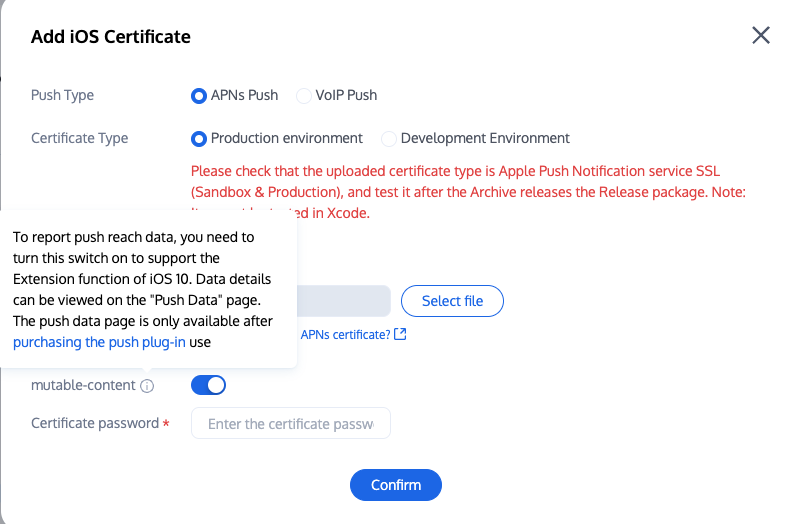
To report push delivery data, enable the mutable-content switch to support iOS 10's extension feature.
About compliance
TIMPush will not perform any other operations before you actively call registerPush, in accordance with relevant regulations.
If you use TUILogin for login and logout, TIMPush will automatically call registerPush or unRegisterPush internally.
Congratulations on completing the integration of the Push Plugin. Please note: After the trial or purchase expiry of the Push Plugin, push services (including regular message offline push, all-staff push, etc.) will be automatically stopped. To avoid affecting the normal use of your business, please purchase/renew in advance. Regarding All-staff/Tag Push
All-staff/Tag Push supports sending specific content, and also allows for the delivery of personalized content to specific user groups based on Tag, attribute, such as Membership Activities, Regional Notifications, etc. It aids in User Acquisition, Conversion, Activation Promotion, and other operational work phases, while also supporting Push Delivery Reports, Self-service Push Troubleshooting Tool. For more details, please see Effect Display. Congratulations on completing the integration of the Push Plugin. Please note: After the trial or purchase expiry of the Push Plugin, push services (including regular message offline push, all-staff push, etc.) will be automatically stopped. To avoid affecting the normal use of your business, please purchase/renew in advance. Note:
To view push indicator data, please use Statistics query. 


