- 动态与公告
- 产品简介
- 购买指南
- 开发指引
- Demo 专区
- 下载中心
- 聊天互动(含 UI)
- 视频通话(含 UI)
- 推送服务(Push)
- 智能客服
- 更多实践
- 无 UI 集成
- 客户端 API
- 服务端 API
- 控制台指南
- 常见问题
- 协议与认证
- IM 政策
- 平滑迁移方案
- 错误码
- 联系我们
- 动态与公告
- 产品简介
- 购买指南
- 开发指引
- Demo 专区
- 下载中心
- 聊天互动(含 UI)
- 视频通话(含 UI)
- 推送服务(Push)
- 智能客服
- 更多实践
- 无 UI 集成
- 客户端 API
- 服务端 API
- 控制台指南
- 常见问题
- 协议与认证
- IM 政策
- 平滑迁移方案
- 错误码
- 联系我们
注意:
步骤1:集成 TIMPush
1. TIMPush 组件支持 cocoapods 集成,您需要在 Podfile 中添加组件依赖。
target 'YourAppName' do# Uncommment the next line if you're using Swift or would like to use dynamic frameworksuse_frameworks!use_modular_headers!# Pods for Examplepod 'TXIMSDK_Plus_iOS_XCFramework'pod 'TIMPush', 'VERSION'end
2. 执行以下命令,安装 TIMPush 组件。
pod install
# 如果无法安装 TUIKit 最新版本,执行以下命令更新本地的 CocoaPods 仓库列表。
pod repo update
步骤2:配置推送参数
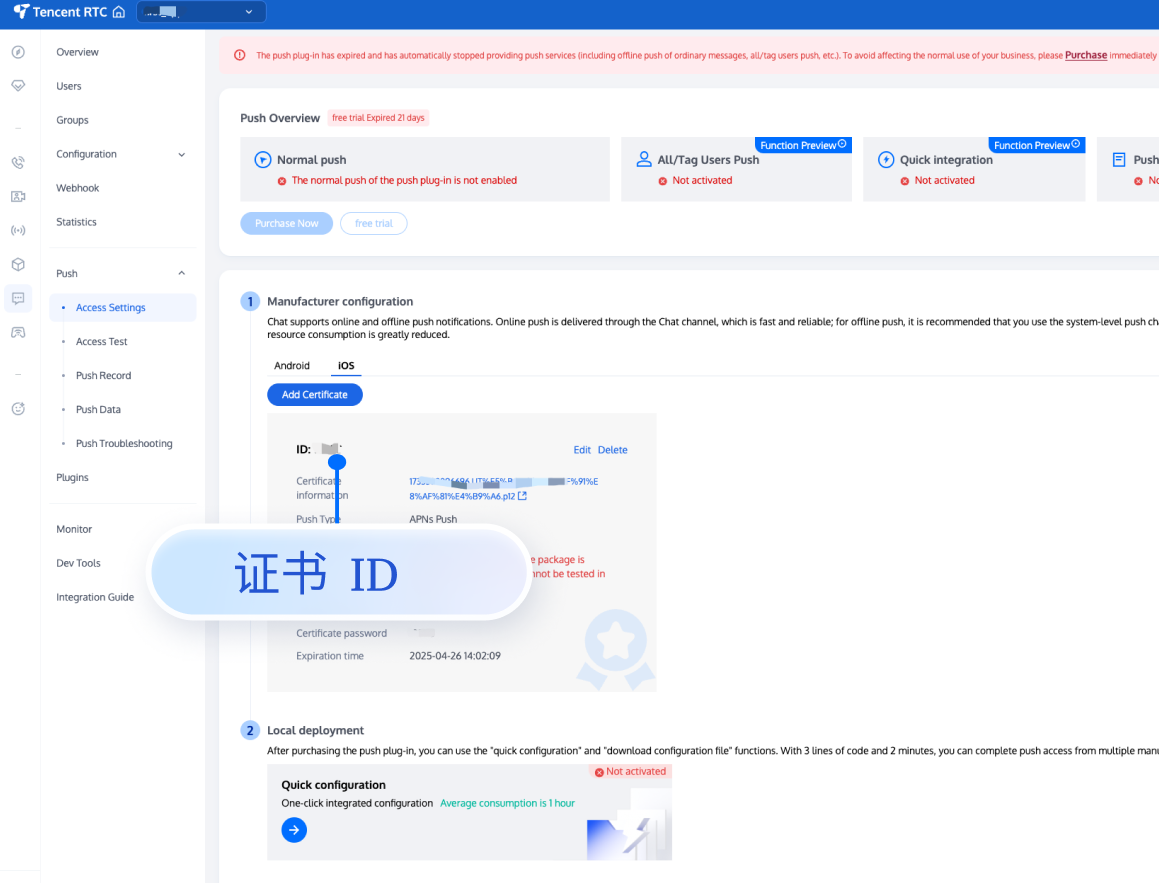
1. 当您上传证书到 IM 控制台后,IM 控制台会为您分配一个证书 ID,见下图:
2. 您需要在 AppDelegate 中,实现
- businessID 协议方法返回证书 ID 即可。#pragma mark - TIMPush- (int)businessID {//上一步控制台给的证书IDint kBusinessID = 0;return kBusinessID;}- (NSString *)applicationGroupID {//AppGroup IDreturn kTIMPushAppGroupKey;}- (BOOL)onRemoteNotificationReceived:(NSString *)notice {// custom navigatereturn NO;}
#pragma mark - TIMPush//Swift 务必携带 @objc 关键字@objc func businessID() -> Int32 {//上一步控制台给的证书IDreturn 0}@objc func applicationGroupID() -> String {//AppGroup IDreturn "group.com.yourcompony.pushkey"}@objc func onRemoteNotificationReceived(_ notice: String?) -> Bool {// custom navigatereturn false}
步骤3:注册推送
调用接口推送注册成功后,就可以收到离线推送通知了。
const int sdkAppId = 您的 sdkAppId;static const NSString *appKey = @"客户端密钥";[TIMPushManager registerPush:sdkAppId appKey:appKey succ:^(NSData * _Nonnull deviceToken) {} fail:^(int code, NSString * _Nonnull desc) {}];
let sdkAppId: Int = 0let appKey: String = "客户端密钥"TIMPushManager.registerPush(Int32(sdkAppId), appKey: appKey, succ: { deviceToken in// 成功回调处理}, fail: { code, desc in// 失败回调处理})
注意:
1. 当您登录后,在控制台上看到 APNs configuration success 日志打印时,即表示已成功接入。
2. 如果您的 App 已经获取到了推送权限,此时退入后台或者杀死进程,即可收到远程推送通知。
步骤4:发送推送消息
步骤5: 单击离线推送后自定义跳转
如果您需要自定义解析收到的远程推送,您可按照如下方法实现:
注意:
注册回调时机建议放在应用 AppDelegate 的 didFinishLaunchingWithOptions 函数中。
- (BOOL)application:(UIApplication *)application didFinishLaunchingWithOptions:(NSDictionary *)launchOptions {[TIMPushManager addPushListener:self];return YES;}#pragma mark - TIMPushListener- (void)onNotificationClicked:(NSString *)ext {// 获取 ext 自定义跳转}
func application(_ application: UIApplication, didFinishLaunchingWithOptions launchOptions: [UIApplication.LaunchOptionsKey: Any]?) -> Bool {// Override point for customization after application launch.TIMPushManager.addPushListener(listener: self)return true}@objc func onNotificationClicked(_ ext: String) {//Clicked}@objc func onRecvPushMessage(_ message: TIMPushMessage) {//onRecvPushMessage}@objc func onRevokePushMessage(_ messageID: String) {//onRevokePushMessage}
您需要在 AppDelegate.m 文件中实现
- onRemoteNotificationReceived 方法。#pragma mark - TIMPush- (BOOL)onRemoteNotificationReceived:(NSString *)notice {//- 如果返回 YES, TIMPush 将不在执行内置的 TUIKit 离线推送解析逻辑,完全交由您自行处理;//NSString *ext = notice;//OfflinePushExtInfo *info = [OfflinePushExtInfo createWithExtString:ext];//return YES;//- 如果返回 NO,TIMPush 将继续执行内置的 TUIKit 离线推送解析逻辑,继续回调 - navigateToBuiltInChatViewController:groupID: 方法。return NO;}
@objc func onRemoteNotificationReceived(_ notice: String) -> Bool {// - 如果返回 true, TIMPush 将不在执行内置的 TUIKit 离线推送解析逻辑,完全交由您自行处理;// let ext = notice// let info = OfflinePushExtInfo.create(withExtString: ext)// return true// - 如果返回 false,TIMPush 将继续执行内置的 TUIKit 离线推送解析逻辑,继续回调 - navigateToBuiltInChatViewController:groupID: 方法。return false}
步骤6: 统计推送抵达率
1. 如果您需要统计推送的抵达和点击数据,您需要在 AppDelegate.m 文件中实现
- applicationGroupID 方法,返回 App Group ID (生成方式可参见 厂商配置-生成 App GroupID)。2. 在 Notification Service Extension 的
-didReceiveNotificationRequest:withContentHandler: 方法中调用推送抵达率统计函数:@implementation NotificationService- (void)didReceiveNotificationRequest:(UNNotificationRequest *)request withContentHandler:(void (^)(UNNotificationContent * _Nonnull))contentHandler {//appGroup 标识当前主 APP 和 Extension 之间共享的 APP Group,需要在主 APP 的 Capability 中配置 App Groups 能力。//格式为 group + [主bundleID]+ key//如 group.com.tencent.im.pushkeyNSString * appGroupID = kTIMPushAppGroupKey;__weak typeof(self) weakSelf = self;[TIMPushManager handleNotificationServiceRequest:request appGroupID:appGroupID callback:^(UNNotificationContent *content) {weakSelf.bestAttemptContent = [content mutableCopy];// Modify the notification content here...// self.bestAttemptContent.title = [NSString stringWithFormat:@"%@ [modified]", self.bestAttemptContent.title];weakSelf.contentHandler(weakSelf.bestAttemptContent);}];}@end
override func didReceive(_ request: UNNotificationRequest, withContentHandler contentHandler: @escaping (UNNotificationContent) -> Void) {self.contentHandler = contentHandlerbestAttemptContent = (request.content.mutableCopy() as? UNMutableNotificationContent)//appGroup 标识当前主 APP 和 Extension 之间共享的 APP Group,需要在主 APP 的 Capability 中配置 App Groups 能力。//推荐格式为 group + [主bundleID]//如 group.com.主bundleID.pushkeyTIMPushManager.handleNotificationServiceRequest(request: request, appGroupID: "appGroupID") {[weak self] content inif let bestAttemptContent = self?.bestAttemptContent {// Modify the notification content here...bestAttemptContent.title = "\\(bestAttemptContent.title) [modified]"contentHandler(bestAttemptContent)}}}
注意:
1. 上报推送触达数据,需要开启 mutable-content 开关来支持 iOS 10 的 Extension 功能。
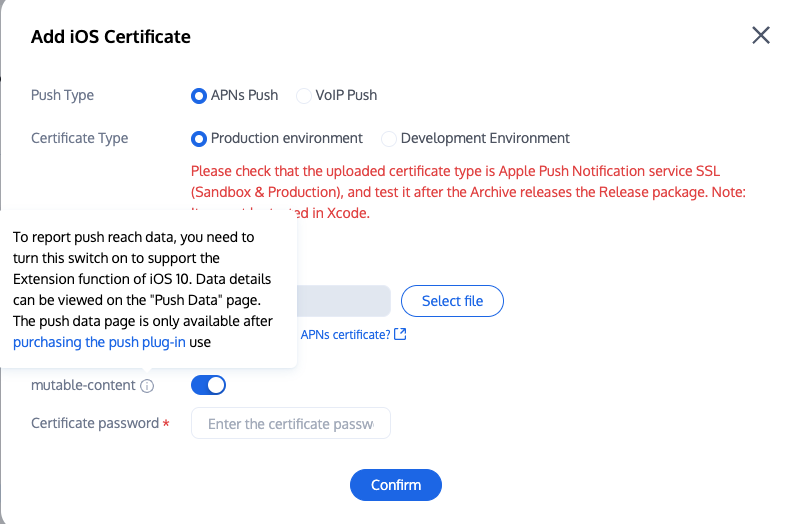
2. 数据详情可在推送数据页面查看,推送数据页面仅限 购买推送插件 后使用。
关于全员/标签推送
全员/标签推送支持发送特定内容,还可根据标签、属性,针对特定用户群体发送个性化内容,例如会员活动、区域通知等,助力拉新、转化、促活等各个阶段运营工作的有效进行,同时支持推送送达报表,自助推送故障排查工具,具体效果请参见 效果展示。

 是
是
 否
否
本页内容是否解决了您的问题?